Recipe: Roasted Potato and Curry Soup

I know it’s early in the week, but I am already trying to work through my CSA bin produce to make room for the following week.  I was pretty darn successful when I stumbled across this recipe on Pinterest yesterday.  Yes…yesterday…which I then proceeded to make for dinner.  Why?  Because I had all the necessary ingredients.

Except celery.  But instead of rushing out to buy that…I substituted sliced carrots.  You know what?  That worked.  It worked amazingly well.

This recipe is actually based off of one by the amazing and inspiring Kris Carr from her CrazySexyWellness page.  Love this lady and find her battle to be one amazing journey of courage, strength, and determination.  If you don’t know about her…look up her page and read a bit about her life with cancer.  She’s super-inspiring.

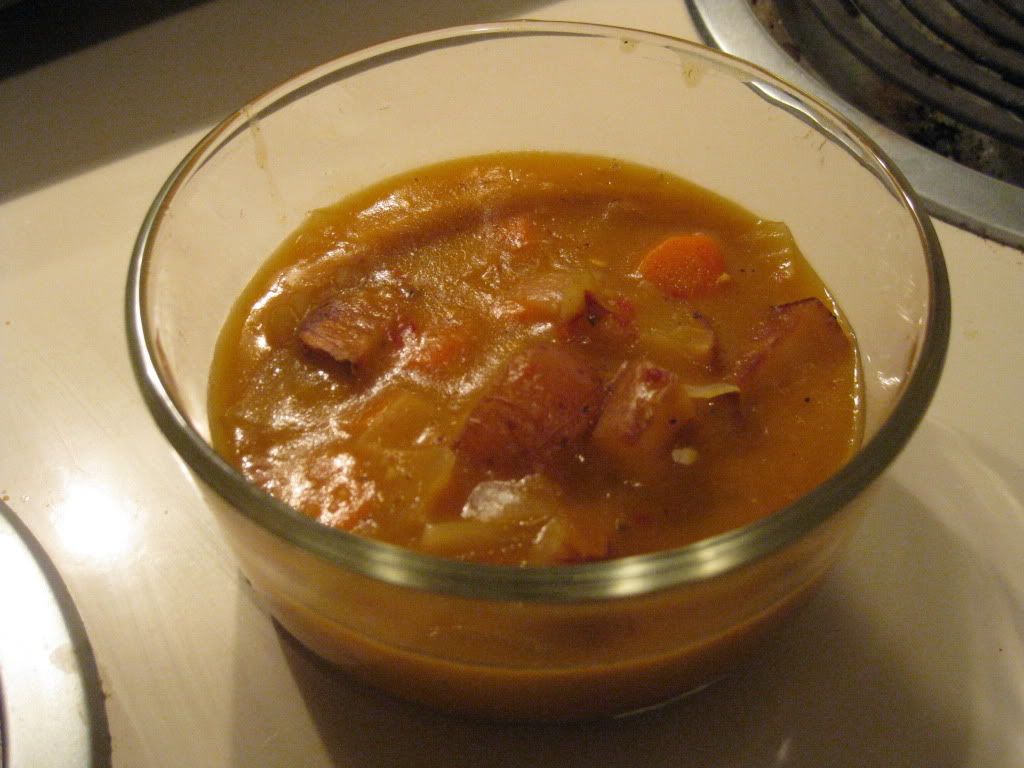
As for the recipe…super delicious and filling.  It was love at first soupy slurp.

Recipe: Roasted Potato and Curry Soup

Roasted Potato and Curry Soup


Servings: 8
Time: Prep 20 minutes; Cook 50 minutes

Ingredients:

  • 2-1/2 tablespoons olive oil
  • 2 pounds potatoes of choice, cubed (I used French fingerling)
  • 1 medium yellow onion, chopped
  • 2 cloves garlic, minced
  • 5 medium carrots, chopped (the original recipe just asks for 2 stalks of celery, chopped, FYI)
  • 32 ounces gluten-free vegetable broth/stock (I used Imagine)
  • 3 tablespoons tapioca flour/starch
  • 1/2 fresh lime, squeezed
  • 1 teaspoon red chili paste
  • 1 tablespoon red curry paste
  • 1/2 cup light coconut milk
  • sea salt and pepper, as desired

Directions:

Preheat oven to 425° F.

Chop all potatoes and place on a baking sheet.  Drizzle potatoes with 1 tablespoon olive oil.  Roast for 30 minutes.

In a medium pot, heat remaining 1-1/2 tablespoons olive oil, then add onions, garlic and celery, sautéing for about 5 minutes.  Slowly add broth. Add tapioca starch and lime juice, stirring thoroughly.  Add chili paste and red curry paste, stirring until combined.  Bring to boil, then reduce to simmer (with lid on pot) for 5-6 minutes.

While soup is simmering, combine coconut milk and 1 cup roasted potatoes in a high speed blender or food processor.  Puree and then add mixture to pot.  Add remaining roasted potatoes and simmer for additional 10 minutes, adding salt and pepper to taste.

~*~*~

It’s simple.  It’s amazing.  It’s chunky.  It’s a little sweet and a little spicy.  It’s soup perfection.  Completely vegan.  Completely packed with flavor.  I was so happy with how this turned out.  The most time consuming part is all the prep of chopping the vegetables, but in the end, the soup is nicely balanced and full of flavor.

And who doesn’t love potato soups?

I’d make this again in a heartbeat!

Glutino’s gluten-free table crackers a necessary addition to any table

Glutino Gluten-Free Table Crackers

Product: Glutino Gluten-Free Table Crackers – $3.99+

You know how much I love my products by Schär…so way back when this gluten-free thing was brand new to me, I busted out a box of their gluten-free table crackers.  And I declared my love of their gluten-free cracker.

But then…last year…Glutino introduced their own variety of table crackers.  And, yes, I bought a box.  And like most things in my pantry…it took me forever to actually bust into them.  But that changed last night.  Because I made a homemade soup.  And it was a chunky soup…so I didn’t want a gluten-free/vegan grilled “cheese.”  Nope…crackers.  That’s what this soup needed.

Into the pantry I went and out came the box of Glutino Gluten-Free Table Crackers.  I had been quite curious about these ever since purchasing them last year while in Denver, Colorado.  So, keep in mind…these have made a plane trip from Colorado to Indiana and they still weren’t massively busted up!  That’s a sign of a good packaging job.

There really is nothing special to the appearance of Glutino’s Table Crackers.  They look like oversized saltines.  Honestly.  Saltines on steroids.  But, I was definitely intrigued.  So, after snapping my mandatory blog photo, I dished up my Gluten-Free Roasted Potato and Curry Soup and dug out a serving of Glutino Table Crackers.  For the record…that’s three of these long sheet crackers.  Awesome.

Settling in to an episode of She-Ra: Princess of Power (I’m a child of the 80s and I’m reliving my favorite parts currently!) while I ate, I broke off a bit of the cracker and took a taste.  I needed to taste it on its own before I could get to the dipping and crumbling into the soup part.

OH. MY. GLUTEN. FREE. CRACKER. BATMAN.

I had ever right to rave about the crackers that came before…but these…these were SO amazing.  A gentle crunch.  A light, airy taste.  No unnecessary salt.  Crisp.  Rich.  AMAZING!  These table crackers were better than the ones I had from Schär…and I’m a Schär pimp.  For real!

On their own…fantastic.  Dipped in my chunky soup…supurb.  These crackers can definitely be eaten on their own…but mixing them with soup, or topping them off with cream cheese, or hummus, or butter, or peanut butter, or jam…that works too.  Me…I love soup and crackers and this definitely worked.  The sweet/spicy flavor of my homemade soup wasn’t hindered by added salt from the crackers.  These crackers are not laden with salt.  And they are still mighty good.

In fact, one serving (as I said before…three crackers) is only 160 calories and 7 grams of fat.  That’s not too bad for table crackers.  The sodium is very low…coming in at 270 mg.  As for fiber and protein…well, you’re not finding those here.  But…I used these in conjunction with a plant-based, vegan soup that made up for the difference.

Unlike Schär, who uses buckwheat, the main ingredient that serves as a base for these crackers is corn starch and soy flour.  So, there is definitely a difference in the taste.  I just preferred this one…just slightly over the other.  Slightly.

Going crackers?  You bet I am!!

I now know that should I ever be in need of any sort of cracker…Glutino is my go-to, with Schär a close second.  Glutino has truly been wowing me with their products…and they continue to come out with more gluten-free goodness for me to try.  And I am a willing guinea pig, that’s for sure!

So if you’re gluten-free and desperately wanting to go crackers…go Glutino!

Recipe: Gluten-Free Lemony Lemon Brownies

When your CSA bin hands you a bunch of lemons…

…make lemon brownies?

Okay…it sounds a bit esoteric…perhaps a little strange.  Maybe even weird.  However, don’t judge a recipe by its cover.  No…these are not chocolate brownies (although when I first mentioned making them to my roommate, she thought they were with lemon in them.  All I can say is…EW!).  These are brownies that are made with an all-purpose flour…and instead of cocoa…you add lemon juice and lemon zest…creating this mellow lemon base which then gets topped off with two layers of lemon glaze…which makes this entire recipe SING!

Trust me.

I discovered this recipe (shock!) on Pinterest and it originally comes from Becky Charms.  So glad I ran across it because I never would have imagined making lemon “brownies” before this.

If you love lemon…make some lemon brownies tonight.

Recipe: Gluten-Free Lemony Lemon Brownies

Gluten-Free Lemony Lemon Brownies

Servings: 16
Time: Prep 20 minutes; Bake 25 minutes

Ingredients for “brownie” batter:

  • 3/4 cup all-purpose flour (I used Better Batter Gluten-Free All Purpose)
  • 3/4 cup granulated sugar
  • 1/4 teaspoon salt
  • 1/2 cup (1 stick) unsalted butter, softened
  • 2 large eggs
  • 2 tablespoons lemon zest
  • 2 tablespoons lemon juice

Ingredients for tart lemon glaze:

  • 1 rounded cup powdered sugar
  • 4 tablespoon lemon juice
  • 8 teaspoons lemon zest

Directions:

Preheat oven to 350°F.

Grease/Spray an 8 x 8-inch baking dish with butter/cooking spray and set aside.

Zest and juice two small/large lemons; set aside.

In the bowl of an electric mixture fitted with the paddle attachment, beat the flour, sugar, salt, and softened butter until combined.

In a separate bowl, whisk together the eggs, lemon zest, and lemon juice until combined.  Pour into the flour mixture and beat at medium speed until smooth and creamy, about 2 minutes.

Pour into baking dish and bake for 23-25 minutes, or until just starting to turn golden around the edges and a toothpick inserted into the center of the brownies comes out clean.  Allow to cool completely before glazing.  Do not overbake, or the bars will be dry (even with the yummy glaze).

When brownies are cooled completely, make the glaze.

Sift the powdered sugar, add lemon zest and juice, and whisk together all three ingredients.

Spread 1/2 the glaze over the brownies with a rubber spatula.  Let glaze set.  Spread the remaining glaze over the bars, and let it set.  This glaze does not harden like most.  Cut into bars, and serve!

~*~*~

Lemony, lemony goodness.  These are definitely not the brownies you’re used to having.  Nothing brown about these.  But what they are are lemony-fresh, delightful on the palate, and just really, really damn tasty.  They are very easy to make and all the effort pays off in the end…because it was love at first bite with these.  I am a lemon fiend and these totally filled my lemon-lover craving.

I made mine gluten-free…but you can certainly use any all-purpose flour instead.  I will totally make these again.  In a heartbeat.

Annie May’s Sweet Café serves up Saturday breakfast with a gluten-free vegan breakfast sandwich to die for

Annie May's Sweet Café, Louisville, Kentucky
Annie May’s Sweet Café, Louisville, Kentucky

Restaurant: Annie May’s Sweet Café, Louisville, Kentucky

One bite.

That was all it took to fall in love with Annie May’s Sweet Café.

And that was just based off a birthday cake my roommate got for me back in September.  Since then…this little bakery/café has become one of my favorite places to stop in for something to eat.  Especially on Saturday’s…because breakfast is being served!  And yes…we all know how much of a breakfast fiend I am.

For a few blogs now, I have mentioned my breakfast adventures there.  From the gluten-free waffles (now discontinued) to the gluten-free French toast to the delicious gluten-free donuts…cookies…cupcakes…you name it…it’s allergen-free/gluten-free…heaven.  Especially for someone like me who developed food allergies as an adult and has to sometimes make do with things that are just not as good as the ‘real’ thing.  Add to that the extra challenge of being a vegetarian first…and it makes up a recipe for culinary problems everywhere.

Not at Annie May’s Sweet Café in Louisville, Kentucky.

Very recently, Annie May’s added a new item to their breakfast menu.  Breakfast sandwiches.  Yep.  You read that right.  These breakfast sandwiches are composed of your choice of a protein on their own vegan/allergen-free bun and served with that day’s fresh fruit.

When I went in today, after a long 8 mile run, I was hungry.  So, along with my usual gluten-free donut ($2.49), I ordered up one of the breakfast sandwiches.  My choice: the Allergen-Free/Vegan “Sausage” and Cheese Breakfast Sandwich ($6.99).  This sandwich is composed of a vegan sausage patty that is also gluten-free, created by a local gourmet burger truck called Grind.  These vegan sausage patties are a housemade blend of spaghetti squash, chickpeas, lentils, onions, sage, and a red pepper spice blend.  It’s perfect for these breakfast sandwiches.  And they are GOOD!

My roommate decided to give the Bacon, Egg and Cheese Breakfast Sandwich ($7.99) a go this morning.  So, we placed our orders, settled in at one of the tables and devoured our donuts while we anticipated the breakfast sandwiches.

Let me preface this by saying that this vegetarian hasn’t had a vegan/veggie sausage in a LONG time.  Not since having to go gluten-free.  Every single one in the freezer section of the grocery store has gluten ingredients in them.  So, the fact that I was just about to enjoy my first vegan sausage patty in a long, long time made me stupidly excited.  The “cheese” portion of this breakfast sandwich was Daiya Vegan cheese…one of my favorite brands.  And the bun…is Annie May’s creation…delicious, golden, and soft on the inside with that crisp golden crust on the outside.

Breakfast heaven.

When this sandwich arrived at the table, I had to restrain myself from diving right in and devouring it.  The donut had helped with the hunger…it just looked so amazing.  I wanted to try it immediately.  But, photos had to be taken first…so I did that as quickly as I could.  Then, after eating the grapes that came with the breakfast sandwich, I reached the point of breakfast I had been looking forward to the most…

Allergen-Free/Vegan Breakfast “Sausage” and Cheese Sandwich time.

I lifted the sandwich up to my mouth and took my first bite.  The vegan sausage is fantastic.  All of those ingredients blend really well and you totally get a sausage-like flavor from it.  I loved it.  Honestly.  The spaghetti squash does sometimes get stringy, but that happens sometimes with real sausage too.  It was the perfect blend of vegetables, spices, and proteins.  I loved it.  The Daiya cheese was melted on top…a simple amount, nothing too overwhelming.  It didn’t take away from the vegan sausage at all.

And that vegan/allergen-free bun…was the icing on the cake.  Metaphorically speaking, of course.  It was a gorgeous golden color, soft on the inside, a little flaky, and crusty on the outside.  It was my favorite part of the breakfast sandwich to be honest.  And coming from the girl who missed vegan sausage patties so much…that’s saying something.  Think of the most perfect biscuit you have ever eaten.  THAT…is what THIS tasted like.  Kudos to you, Annie May’s Sweet Café, for this delicious bread for your Saturday morning breakfast menu.  Let me tell you…I’m totally addicted to those rolls.  I’d eat them with a schmear of Earth Balance, all hot and toasted and…mouth-watering good.

I’m so lucky to have Annie May’s Sweet Café in my backyard.  Louisville, Kentucky is lucky to have them.  As Kentucky’s only allergen-free bakery…they offer a lot of allergen-free/vegan treats for everyone.  And you don’t have to be a vegan or gluten-free to enjoy these products.  My roommate is neither and she loves coming here for breakfast and the occasional treat as much as I do.

I hope Annie May’s remains in business for a very long time.  This place is a real gem and a much needed place for me, the allergic girl, here in Louisville, Kentucky.

Thanks for your delicious Saturday breakfasts, Annie May’s.  Maybe one of these days…I’ll skip breakfast and come in for your Saturday pizza.  Yeah…that’s next on the list.

Annie May's Sweet Café Allergen-Free/Vegan
Annie May’s Sweet Café Allergen-Free/Vegan “Sausage” and Cheese Breakfast Sandwich

Pan-Asian cuisine made easy and delicious with Snapdragon Hunan Sweet & Sour Rice Pasta Stir-Fry

Snapdragon Pan-Asian Cuisine Hunan Sweet & Sour Rice Pasta Stir-Fry

Product: Snapdragon Pan-Asian Cuisine Hunan Sweet & Sour Rice Pasta Stir-Fry – $3.49+

I absolutely LOVE Asian food.  LOVE it.  I can’t emphasize enough how much I love it.  But…I think you get the picture.

The problem with Asian food is…it is one of those that is usually laden in sauce…and whether you’re at a restaurant or at a buffet or what have you…when you are gluten-free…there is basically nothing you can safely eat.  I wish it weren’t true.  Because that craving for good Asian food hits me all the time.

But…all is not lost.  I don’t have to prepare any Asian-style meal from scratch.  Not anymore.  Not since I discovered Snapdragon Pan-Asian Cuisine.

My local World Market has a great selection of food products in their little food market area.  Much of these are ethnic from various countries.  While just browsing the aisles, I ran across a few Snapdragon Pan Asian Cuisine Stir-Fry Rice Pasta meals.  Not having this on my grocery list or worked into the budget…I resisted the urge to purchase every single thing labeled gluten-free…and kept it to one box.

My choice: Snapdragon Hunan Sweet and Sour Rice Pasta Stir-Fry.

I was rather excited about this purchase.  And yet…I had so much other stuff in my pantry that this sat for the longest time.  LONG…EST time.  Until last night…when I needed something light for dinner that wouldn’t take up too much time…as I was also in the midst of making gluten-free bread and gluten-free lemon “brownies” at the same time.

So…I dug this out of the pantry.  I am a vegetarian…so for the protein, I took some tofu out of my fridge to toss into the wok once I got cooking.  First thing was first though…I boiled some water and got the rice noodles soaking.  Once I drained them (it took 5 minutes), I set them aside and got my wok heated up and tossed in my snow peas and tofu to cook up.  Once I got them seared off and cooked, in went the noodles, some water, and the sauce.  I just tossed them all together in the wok, heated it through…and it was ready to serve.

It doesn’t get much easier than that!

The noodles cooked up beautifully.  And when the sauce is incorporated, this easy boxed meal really sings.  The sauce is sweet with a little hint of spice to it.  And the tofu and added snow peas made a fantastic addition to the dish.  I loved diving into this classic Asian meal…made in about 15 minutes.  Simple and delicious.  I devoured mine with the aid of chopsticks.  The noodles didn’t clump together and the sauce didn’t take away from the rest of the ingredients in the actual dish.  It was perfectly balanced.

And yeah…it was amazing.  It totally helped curb my cravings for Asian food.  And I knew that this one was safe for me to eat thanks to the label on the box listing it as gluten-free.

Beyond impressed and totally wowed.  I can’t wait to try another one.

Snapdragon Pan-Asian Cuisine Hunan Sweet & Sour Rice Noodle Stir-Fry

Recipe: Gluten-Free BBQ Mushroom Sliders

I don’t know what I did before Pinterest.  Honestly.

Last week, I was surfing around on my favorite time-suck and came across a delightful recipe for sliders…but instead of meat, these were portobello mushroom sliders.  Oooooh.  They looked absolutely fantastic too.  Seasoned, covered in melted cheese, caramelized onion, avocado…and dripping with barbeque sauce.

*mouth waters*

So, when the crimini mushrooms I received in my CSA bin turned out to be freakishly large…I thought to myself, “Hey…I bet I can make those sliders out of these.”

The only thing I lacked would be gluten-free slider-sized buns, which I solved by baking up my own from a bread mix I had in my pantry.  WINNING!

With that taken care of…I set out to make this recipe up for a light dinner after a very busy day out and about.  And the results…were epic.  Delicious.  And I wish I had made more than just two sliders each for myself and my roommate because these were beyond super yummy.  They were mushroom slider epic wonders of culinary proportions.

The original recipe came from the blog How Sweet It Is.  I just adapted it to fit my dietary needs and the ingredients I had on hand.

Recipe: Gluten-Free BBQ Mushroom Sliders

Gluten-Free BBQ Mushroom Sliders


Servings: 6
Time: Prep 10 minutes; Cook 20 minutes

Ingredients:

  • 6 baby portobello stuffing mushrooms (I used really large crimini mushrooms)
  • 6 slider buns (I made my own, gluten-free, using Chebe Gluten-Free All Purpose Bread Mix)
  • 1 teaspoon smoked paprika
  • 1 teaspoon onion powder
  • 1/2 teaspoon chili powder
  • 1/2 teaspoon black pepper
  • 1 tablespoon olive oil
  • 1 red onion, sliced
  • 2-3 ounces Gouda, sliced into squares (I used Veggie Slices Pepper Jack Flavored)
  • 1 avocado, sliced
  • 1/2 cup BBQ sauce, for drizzling and dipping (I used Stubbs Original BBQ Sauce)

Directions:

Heat a skillet on medium-low heat and add 1/2 tablespoon olive oil.

Add sliced onions with a pinch of salt and let caramelize, stirring occasionally.  Cook for about 8-10 minutes, then turn off heat and set aside.

While onions are caramelizing, brush mushrooms with remaining olive oil and sprinkle both sides with pepper, paprika, onion and chili powder.  Heat a skillet ( or a grill) on medium heat and cook until mushrooms are juicy and tender – about 5 minutes on each side.  With 1-2 minutes remaining, add a slice of cheese on top to melt.

Assemble sliders by placing the mushroom on the bun, then top with onions, avocado, and a hefty drizzle of bbq sauce.

~*~*~

Yeah…it doesn’t get much easier than that.  And the fact of the matter is…these are super-delicious.  Honestly.  I was blown away by how amazing these were.  They were that perfect level of balance in flavor and the mushroom was definitely the star of the dish.  The avocado was a nice addition and when mixed with the caramelized onions, the cheese, and the sauce…it made for one of the best vegetarian sandwiches I have had to date.  And…this was definitely my first vegetarian and gluten-free slider dish.

I’d make this again in a heartbeat.  No questions asked.  Packed with flavor and not heavy like regular sliders can be.  That’s the joy of using mushrooms.  Delicious, light, and just filling enough.

Dinner perfection.

Chebe Gluten-Free All Purpose Bread Mix slides in just short of really good gluten-free bread

Chebe Gluten-Free All Purpose Bread Mix

Product: Chebe Gluten-Free All Purpose Bread Mix – $3.29+

You know…I raved once, almost two years ago, I believe, about Chebe Cheese Bread Mix.  I had made up the little breaded balls of goodness to accompany a pasta dinner I was preparing for a friend who was coming for the weekend.  Much to my delight…Greg (the guest), my roommate, and I all loved the taste, texture, and fluffiness these had.

So, Chebe rose to the top of my gluten-free go-to’s.  Even though I didn’t really purchase anything further of the brand until my local grocery store put their entire gluten-free section on closeout.  Picture me in panic mode as I grabbed a huge shopping cart and began tossing items I had wanted to try, but never got the chance to, into my cart for the reduced price.

One such product was Chebe Gluten-Free All Purpose Bread Mix.

The great thing about Chebe Gluten-Free All Purpose Bread Mix is how allergen friendly it is.  Not only is it gluten-free, but it is also soy free, corn free, rice free, potato free, yeast free, peanut free, tree nut free, egg free (unless you use it in the mix instead of egg substitute), lactose/casein free, iodine free, and sugar free.  This mix is also non-GMO and certified kosher!

Well, my pantry is quite full of numerous mixes and delicious things to try.  So, this just sort of sat.  But with the expiration date fast approaching…it was time to give them a shot.  And, I was thinking something light and savory for dinner.  So, I hit up Pinterest and found a recipe for BBQ Portobello Sliders.  Now, I didn’t have portobello mushrooms, but had rather large crimini ones in my fridge from my CSA bin.  I had the rest of the ingredients too.  What I lacked was the most obvious part of the slider…the slider buns.

Then…it dawned on me that I had this mix in my pantry…and it was getting close to the time it needed to be used up.  So, out it came and I got to work on making up my own little gluten-free slider buns.

Slider buns made from Chebe Gluten-Free All Purpose Bread Mix

This was a simple process.  Following the instructions on the box, I simply poured the bread mix into a bowl, added two eggs and 2 tablespoons of olive oil…mixed that together…then slowly added exactly 1/4 cup of water.  Once that was all incorporated and blended, I kneaded the dough with my hands until it was smooth and all one large lump of bread dough.

And here is where I went off script.  The rest of the recipe created 4 sandwich buns…but I wanted slider buns.  So I made 10 little rolls out of the lump of bread, flattened them down into little round disks like the recipe said, and brushed each one with olive oil.  I then put it in my oven at 375° F for about 25 minutes and allowed them to bake.

When time was up, I removed them from the oven and allowed them to cool on the baking sheet while I prepared the mushrooms, caramelized the onions, and sliced an avocado.

First of all, I was hoping these would crisp into a beautiful golden-brown…but they never quite did.  They looked anemically pale.  It was a bit off-putting, but…that was the last of my problems.  The mix, prior to putting everything together was a very white, very thin powder.  That being said, this Chebe mix is made up simply of tapioca powder, modified tapioca starch, cream of tartar, sea salt, and sodium bicarbonate.  You can add cheese to the mix, but I didn’t…as the sliders were going to have cheese on them.  Still, with the brushing of olive oil…one would think there would still be some golden crust forming.

That was the first disappointment.  The second disappointment was that they really didn’t puff up much.  The flat little disks of dough rose only slightly in the heat of the oven.  So…these made for very flat slider buns.

Finally…the third disappointment was…the taste.  Not that these tasted bad…they just weren’t light and soft like the Cheese Bread that I made from Chebe.  This dough wasn’t too dense, but it was definitely not soft and squishy like a slider bun should be.  It just felt…wrong.  The flavor was fine…but it was the texture that was just all wrong for me this time.  It just didn’t work.

But…I went ahead and sliced the flat rolls in half (as best I could) and filled them up with my mushroom caps, vegan cheese slices, caramelized onions, avocados and a drizzle of barbeque sauce and used them for the purpose I baked them up for.  It wasn’t bad.  I just wish they had been softer and a bit fluffier.

That being said, I have six more rolls in my fridge that I’ll use up tomorrow by making breakfast slider sandwiches.  I am kind of sad about the way this mix turned out, because I have raved about Chebe in the past and was really hoping for that trend to continue.  Sadly…this one failed to win me over.

Maybe, with some convincing, I’ll give another mix a try.  But this one…won’t find it’s way into my pantry again any time soon.

BBQ Mushroom Sliders sandwiched between buns made from Chebe Gluten-Free All Purpose Bread Mix

Recipe: Crispy Baked Parmesan Green Bean Fries

As a vegetarian, I am always looking for new and different ways to eat vegetables.  That’s more than true these days since I began receiving a CSA bin of fresh, organic, local produce from my area.  Finding a new way to prepare a favorite vegetable is always fun and I’ve been enjoying playing with new techniques and recipes.

And…thanks to the magic and wonder of Pinterest…I stumbled across this recipe.  It was originally posted by Dashing Dish…and it truly caught my eye.  Well, I made it tonight and couldn’t have been happier with it.  A little crispy, a little savory, a little salty…and lots of yummy.

Recipe: Crispy Baked Parmesan Green Bean Fries

Crispy Baked Parmesan Green Bean Fries


Servings: 4
Time: Prep 10 minutes; Bake 20 minutes

Ingredients:

  • 4 cups fresh whole green beans (or 1 14 ounce bag of frozen whole green beans)
  • 1/4 cup Parmesan cheese, grated
  • 1/2 teaspoon garlic powder
  • 1/4 teaspoon salt (or to taste)
  • 1/8 teaspoon pepper (or to taste)

Directions:

Preheat oven to 425 degrees.

Line a baking sheet with foil, and spray with non-stick cooking spray.

If using frozen green beans, pop the bag of green beans in the microwave for 3-4 minutes, or until just de-thawed (or you could leave them out at room temperature for a few hours).  If using fresh green beans, wash and snip off the ends.

Place green beans on prepared baking pan, making sure they are evenly spread out, and none are laying on top of each other, (this will ensure even crispiness!)  Sprinkle seasonings and Parmesan cheese evenly over green beans.

Place green beans in the pre-heated oven and bake for 10-15 minutes, or until golden brown and crispy!  (To make them extra crispy, broil them for an extra 1-2 minutes before pulling them out of the oven).

Enjoy immediately with low sugar ketchup or dipping sauce of choice.

~*~*~

Taking that whole enjoy with a dipping sauce of choice, I whipped up a simple vegan Sriracha aoili…and it went with these fries perfectly.  Mine didn’t crisp up as much as I hoped, but I was also baking gluten-free/vegan no chicken nuggets in the oven as well, which took some of the heat source away from the green beans.  Regardless…these were amazing and fantastic…and I intend to make them again tomorrow with the other half of the green beans from my CSA bin.  Yeah…they were that good.

Perfect healthy side dish for any meal, honestly.  What better way to serve your veggies?

Überly Nuts over Lärabar Über Roasted Nut Bar

Lärabar Über Roasted Nut Roll

Product: Lärabar Über Roasted Nut Roll – $1.99+

You know…I’m a  nutty person.  No…for real.

So, it should come as no surprise whatsoever that I fell completely head over feet in love with the Lärabar Über Roasted Nut Roll fruit and nut bar.  I mean…honestly…what’s not to love?

Confession time – today was not the first time I ever ate one of these.  Honestly, I was in the middle of nowhere Pennsylvania at a convenience store/gas station…and in desperate need of a snack.  Aside from a fruit cup, I was finding very little that this gluten-free girl could eat.  And then…I spotted a stash of the Roasted Nut Roll Lärabar Über’s…and I grabbed it.

Like I said…I was a hungry girl in the middle of nowhere, so no pictures were taken.  But…this bar ROCKS!!  I loved it then…and I loved it even more today as I settled in for my 3 p.m. snack time.

Lärabar Über Roasted Nut Roll

It’s sort of nice to come into snack time on a new snack and know, for sure, that it will be delicious.  I have been burned a few times by sub-par gluten-free products.  But Lärabar is a name I trust.  Every flavor I have ever had has been good…some great…quite a few more delicious…but this one…this one is pure awesomeness.

What I think makes this bar so amazing is that perfect balance of sweet and salty.

Even more…I think it’s the fantastic inclusion of so many varieties of nuts that gives it that super nutty flavor.  The Lärabar Über Roasted Nut Roll contains a fantastic mix of roasted almonds, cashews, roasted peanuts, pecans and macadamia nuts.  YUM!!  It’s like a Planters Mixed Nut blend…but healthier…and sweeter.  Why sweeter?  Because in addition to the nuts, the bars also contain brown rice syrup, dates and honey.  Add a dash of sea salt…and what you get is über perfection.  The perfect blend of sweet and salty.  Honestly…it was hard not to just shove the entire bar in my mouth and chew it until it was gone.

I think you can pretty much guess how I feel about these.  And as far as nutrition facts go…these bars contain 220 calories per bar and 16 grams of fat.  So…definitely not the healthiest of options…but still amazing and good.  They have 5 grams of sugar and only 7 grams of sugar, which is awesome.  At least the fat in this bar comes from the nuts…which means it is at least they are healthy fats.

Oh yeah…these are just yumminess personified.  Trust me…buy these.  Buy these now.

Lärabar Über Roasted Nut Roll (unwrapped)

Forget Krispy Kreme – Katz Gluten Free brings glazed donuts to the gluten free masses

Katz Gluten Free Glazed Donuts

Product: Katz Gluten Free Glazed Donuts – $6.99

Were you like me and once upon a time used to be able to eat what everyone else does?

If so, you might recall one of life’s simplest, sweetest, most divine treats – a simple glazed Krispy Kreme donut.

Sure…a donut is a donut, right?  Or…you might think that until you have to give them up.  Trust me…no matter how healthy you are or how good you are trying to be…everyone appreciates a good donut every now and again.

Problem: when you are gluten-free…a good donut isn’t always easy to come by.  Even more difficult…finding one that is reminiscent of the ones you used to be able to savor.

Now…I absolutely love donuts.  And I’ve tried out quite a few different gluten-free ones.  While the ones in stores are all fine and good…the only brand that has really made me sit up and remember what eating at Dunkin’ Donuts after swim class was really like…has been Katz Gluten Free.  Yes, once again I am lifting upon high the fantastic products that Katz Gluten Free puts out on the market.  Why?  Because they truly are worthy of such high praise.  I have yet to find something I have tried that I haven’t liked.

A couple weeks ago, I received an e-mail regarding new products from Katz Gluten Free.  One of the items listed was…glazed donuts.  So, upon returning to my desk at the office, I went ahead and ordered some…because they looked absolutely scrumptious in the announcement.  They arrived two days later and I skipped to the freezer at the office to store them, brought them home and put them in my freezer, then…could hardly wait a week before I was pulling them out to use as breakfast after hitting up the gym.

Yes…hard workout at the gym = gluten-free donut (with some fruit…give me some credit!) for breakfast at the office.

Anyway…I got to the office and went into the kitchen with the donuts.  I pulled out a plate and set one in the microwave, giving it a very quick nuke for 10 seconds.  With it and some freshly chopped pear from my CSA bin, I took the first one to my roommate at her desk.  Then, I returned to the kitchen to repeat the process for me.

As I settled in at my desk, I started on the pear.  My roommate came over to show me something and I asked her how the donut was.  She lifted her eyebrows, looked at my untouched one, and simply said…”Take a bite.”  Who am I to argue when a gluten-free glazed donut is sitting right there waiting for me to devour it.

I lifted it up, drawing in that amazing scent of sugar from the glaze.  It smelled like all those donut shops and bakeries that seem to torture me now.  I savored that aroma for one moment more…then took my first bite.

WOW!  No…honestly…WOW!!  While these are definitely not as light and fluffy as the famous Krispy Kreme donuts…these are just as delicious.  And I don’t mind the extra definition to the donut.  I like that it has a little heft to it.  Honestly…these were melt-in-your-mouth-Krispy-Kremeish-fantasticness.  Yes…that really is an adjective.  Trust me.

I couldn’t believe how much I fell in love with this donut.  It was like, the moment I had a bite…I had to have another one.  Every donut I ever ate before my diagnosis seemed to pale in comparison.  This…was one fantastic glazed donut.  And for the first time ever, I lost myself in the taste and texture of this little treat.  I don’t even care that the office has Krispy Kreme’s and other donuts on occasion now…because I have Katz Gluten-Free Glazed Donuts.  They…are even better, in my opinion.

Dear Katz…if you keep expanding your donut line…I might just love you even more.  Especially if they keep getting better and better…like these.

I love you.

No really.  I do.

Looks like it’s time to order more donuts…

Katz Gluten Free Glazed Donut