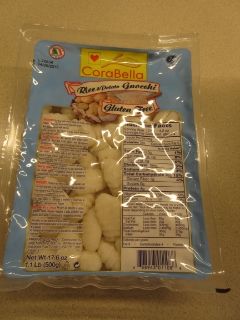
Product: CoraBella Gluten Free Rice and Potato Gnocchi – $5.50+
Before I was diagnosed as a Celiac, one of my favorite cuisines was Italian food. Guess what? It still is. Growing up, my favorite dinner was my mom’s spaghetti. When my friends had me over for dinner…spaghetti was often on the menu. I was in love with everything about pasta.
But it took a trip to Ireland back when I had my first taste of gnocchi. Yep. Ireland. But then, I was obsessed with it. Little puffy pastas made of flour and potato. Heavenly.
But then…with my diagnosis…gnocchi was off the menu. Sure, there were plenty of recipes out on the Internet for gluten-free gnocchi, but it all just seemed so time consuming. I later discovered a couple of brands of frozen gnocchi. One was horrible. One was good. But, those were the only two times I had it…aside from my one time I made gluten-free pumpkin gnocchi. But none of it equaled up to the “real” thing.
So, you can imagine my excitement when my Winter (December) Cuisine Cube arrived in the mail this past month. If you’ve been reading this blog, you know that I am completely in love with my subscription to Cuisine Cube. Cuisine Cube is a monthly delivery system that brings amazing and delicious to your door. This team of enthusiastic eaters, food professionals, and allergy sufferers from New York City created this gluten-free delivery service to bring lesser-known brands, made by small artisan producers that taste better and are better for you than those gluten-free brands available in supermarkets around the country, to your very own front door. Honestly…check them out and give it a try. It’s my favorite part of each month. Hands down.
In this month’s Cuisine Cube, I received six fantastic and new-to-me products! YAY! I have already reviewed one product from the December cube…but tonight I am reviewing another one. Because tonight was my belated New Year’s Eve party with my friend Jenn in Columbus, Ohio. Jenn does not have to eat gluten-free. She’s Italian. And she, much like me, loves food. We normally cook something at least once on my visit…and I tweeted to her earlier this week about what to do for dinner.
Well, I mentioned that I had a package of CoraBella Gluten Free Rice and Potato Gnocchi that I could bring with me. She said that sounded great…and we would make Pão de Queijo (Brazilian Cheese Bread) to accompany it. And why not? Italian main dish, Brazilian side. This…is what we do. We mix things up.
Well, we got the bread (which is naturally gluten-free!) going in the oven and then set out to make the gnocchi. SO easy.
CoraBella Gluten Free Rice and Potato Gnocchi takes less than five minutes to cook. No joke. Bring water to a boil…and add some salt. Then, add the pasta and allow it to cook until the gnocchi rises to the top. Then let it cook for an additional two minutes, drain, and then serve with your favorite sauce. Yep…that easy.
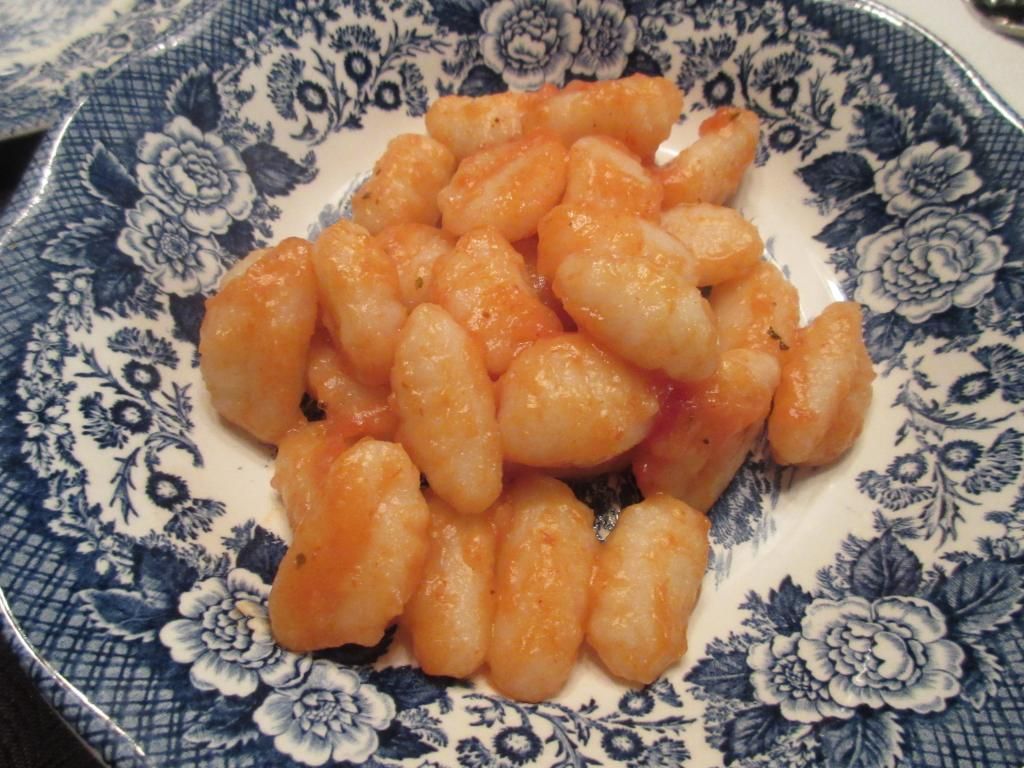
The CoraBella Gluten Free Rice and Potato Gnocchi cooked up perfectly. Honest-to-goodness pillows of potato pasta. They floated to the top and when drained…looked stunning. Jenn mixed them with a little bit of sauce and dinner was served. I couldn’t wait to give it a taste.
Jenn, my roommate Cathy, and I have all taste-tested the other two brands of gluten-free gnocchi together. We are true gnocchi lovers. Especially Jenn! So…this was a big deal. We’ve had one hit and one miss. But the CoraBella…the CoraBella Gluten Free Rice and Potato Gnocchi…was a home run. The gnocchi itself was very light and soft and…amazing. When your Italian friend says, “This tastes like regular gnocchi!”…you know…you just know that it’s good. And it was. It was beyond good. The pasta didn’t stick together when cooking. The pasta was soft and amazing. It paired well with the red sauce, but it would also be amazing crisped up by sauteeing it in a pan with butter. It was this fantastic bowl of light, fluffy, doughy pasta goodness. SO good. I was beyond impressed. I am planning on hitting up the Cuisine Cube Stock Up site for more. This must forever be in my pantry.
There is a reason that the gluten-free gnocchi is one of CoraBella’s best selling pastas. This pasta is made in Italy using the best raw materials from selected mills so that they can put out a genuine pasta that tastes like it was straight out of Italy. They are doing it right. Trust me. I am so happy with this product. My stomach is still happy with this product. If you haven’t tried CoraBella Gluten Free Rice and Potato Gnocchi…you need to. Stat.
Let’s talk about ingredients, shall we? The CoraBella Gluten Free Rice and Potato Gnocchi is made from rice flour, water, potato starch, salt, lactic acid, and potassium sorbate. It is not only gluten-free, but also sugar free, cholesterol free, and virtually fat free.
As for nutrition goes, a package of the CoraBella Gluten Free Rice and Potato Gnocchi serves 4 people. A serving size is about 4 ounces each. In this serving, you will be eating 210 calories and 0.5 grams of fat. A serving also provides 300 mg sodium and 0 grams of sugar. This serving of gnocchi has 1 gram of fiber and 4 grams of protein.
Seriously…the best gluten-free gnocchi you will ever eat. Amazing. It really is. If you haven’t checked out Cuisine Cube yet…what are you waiting for? And if you’ve never heard of CoraBella Gluten Free Rice and Potato Gnocchi yet…what are you waiting for? Find it. Order it. Enjoy it.
Trust me on this one. There is nothing out there that compares. Just simply the best.
CoraBella Gluten Free Rice and Potato Gnocchi (cooked and served with marinara)
I am, literally, a few hours away from entering 2015. It is often a tradition of mine to lay out my mileage goal for the upcoming year. I did this the past couple of years, surpassing my goal the first year…and falling short in 2014. I had hoped to run 2014 miles in 2014. Then, I was injured for about 3 months, and running wasn’t even an option. So, with my final run of the year logged this morning in the bitter cold (my water bottles froze)…my total mileage this year came out to be 1543.86…leaving me exactly 470.14 miles shy of my goal.
I hate it when I don’t meat goals. It’s aggravating and my perfectionist Virgo self doesn’t handle that well. Not one bit. This goal was definitely obtainable…until my foot was injured. So, this year…I’m doing something a little different.
No mileage goals. I can’t handle another year of disappointment should I, once again, fail to meet them. Part of having goals is obtaining them. In 2014…I just couldn’t hit the mark. It was impossible when I was out for as long as I was.
Get used to disappointment, right?
The thing is…I’m not built that way. This girl is a go-getter. This girl is a fighter. This girl likes results. This girl…is literally falling apart these days. Not physically. But mentally.
You know that book PostSecret?
Well…I have my very own RunSecrets to share…
RunSecret #1
RunSecret #2
RunSecret #3
RunSecret #4
RunSecret#5
RunSecret #6
So…there it is. A look into what has been rolling around in my brain as of late. I’ve slowed down. And, I won’t lie…this bothers me. It bothers me a lot. I feel like I lost quite a bit of fitness and endurance when I had to take a hiatus from running. So…this coming year, I don’t want to set myself up for failure and disappointment. So, I have a few simple goals in mind:
Remain injury free
Run the hell out of the Boston Marathon
Try out a new distance
Travel far and run there
Eat better
Train harder, but smarter
Run with different people at different paces – challenge myself!
Remember that can’t run like anyone else but me…so stop comparing my speeds against my peers
Run a race on my birthday with some friends to celebrate going up an age division
Have more confidence
Overall, 2014 wasn’t a bad year for me. But it sort of just brought about new challenges and some very unexpected rough spots with my running. But, there were high points too. And I came out of 2014 with 6 marathons under my belt, bringing me to 8 full marathons total. I became a Marathon Maniac. I learned how to push myself to my limits in the Dopey Challenge at Disney World. I deepened some friendships (you couldn’t even begin to know how much a text or phone call from my friend Kelsey would lift my spirits during my injury) both on the roads and off. I discovered that marathon running slows you down. I spent a few great races with some of my best friends cheering me on from the sidelines. My grandpa finally got to come to a race and see me run. I only wish I had been in better shape at that point (foot injury was not completely healed). I ran a mile with my 8 year old nephew. He’s amazing. I ran a half marathon on a broken toe.
The difficult part leading into 2015 is going to be overcoming my fears and learning how to just focus on me and not compare myself to others. I can only run as well as I can run. I can’t run like anyone else. What I have lost in speed and fitness…I will gain back. It might be a slow process…but I’ll get there. If there is anything I learned about myself in 2014 it’s that I’m tough…and I am determined. I’ve just fallen a bit off track. But with a little focus and a lot of self-control…I’ll get back to where I’m comfortable. I might even overcome some of my fears.
For all of you who have stuck with me…thank you. Here’s to a wonderful 2015.
Back in November, when I ran the TCS New York City Marathon, my friends and I celebrated my finish by going out to eat…at Marcus Samuelsson’s restaurant, Red Rooster, in Harlem. Amazing meal and amazing experience. When my server came to the table, we explained that we were celebrating my completion of my final marathon of the year and then mentioned my food allergies. He said he would go speak to the chef.
The chef was also a marathon runner and asked if he could create a dish for me. I never turn down this opportunity. I love it when chef’s get a bit creative with the ingredients they have on hand to produce a dish off the cuff. I was more than happy to allow him to do so.
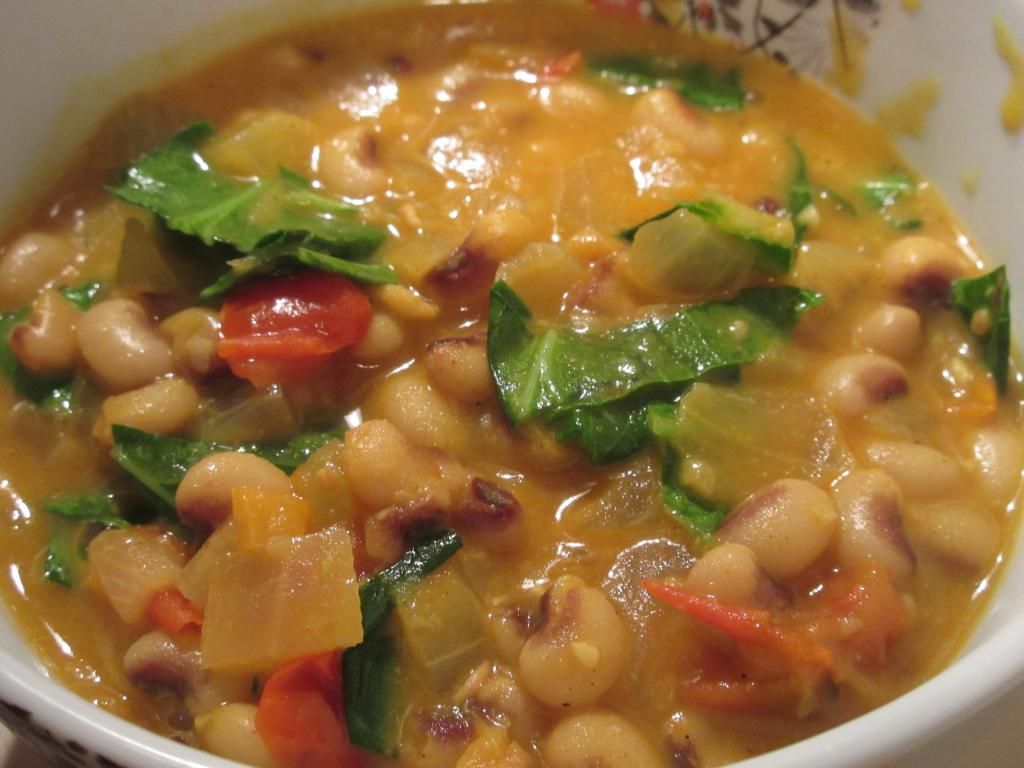
One part of the dish was this amazing curried black-eyed pea dish. I was beyond impressed. So, naturally, I went hunting online for a recipe. And while this is not the exact dish that I had at Marcus Samuelsson’s restaurant, this was one amazing dish. One I was beyond happy to cook up.
I made a few minor tweaks, substituting the cilantro with collard greens. I also used dried ginger instead of fresh. The habanero is important. It adds sweetness and a bit of heat (but it is seeded, so not too much!). Do not leave it out. Also, invest in berbere seasoning. It is my favorite spice on my spice shelf at the moment.
Recipe: Black-Eyed Peas with Coconut Milk and Ethiopian Spices
Black-Eyed Peas with Coconut Milk and Ethiopian Spices
In a large saucepan, cover the peas with water and bring to a boil.
Simmer over moderately low heat until tender, about 40 minutes. Add a generous pinch of salt and let stand for 5 minutes, then drain well.
Meanwhile, in a large saucepan, melt the butter.
Add the onion, ginger, garlic and chile and cook over moderate heat, stirring occasionally, until softened and just starting to brown, about 10 minutes.
Add the berbere and turmeric and cook, stirring, until fragrant, about 2 minutes.
Add the tomatoes and cook, stirring, until softened, about 5 minutes.
Stir in the coconut milk and stock and bring to a boil. Simmer over moderately low heat, stirring occasionally, until the tomatoes break down and the sauce is thickened, about 20 minutes.
Add the peas to the sauce and cook over moderately low heat, stirring, until the peas are lightly coated, about 10 minutes.
Fold in the collards and serve.
~*~*~
This definitely had a bit of bite to it. I almost thought it would be too spicy for my roommate, but she said that she could just handle it. I absolutely loved it. Definitely not the dish I had at Red Rooster, but amazing and delicious all its own. And with the New Year almost here, it is often considered lucky to have black-eyed peas and collard greens on New Year’s Day in the South. So, here is an easy, delicious dish where you can enjoy both in a new and different way.
I have the leftovers in my freezer. Can’t wait to enjoy it again at a later date.
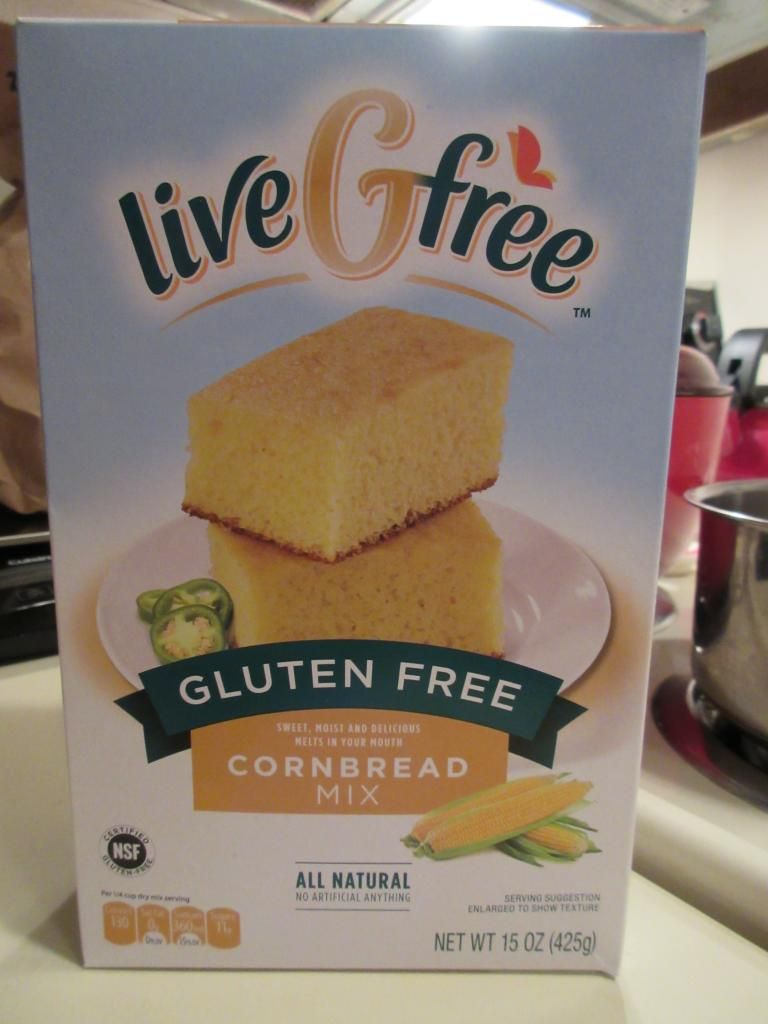
Product: Aldi liveGfree Gluten Free Cornbread Mix – $2.99+
Yep…I still have some items from my original pillaging of Aldi back in May for their new (at the time) gluten-free products. The mixes usually take some time for me to actually use. I just have gotten out of the habit of making things from a simple mix. That’s not a bad thing, mind you, except then my pantry remains very, very full.
Well…the other day I discovered a recipe for a Ethiopain dish that I wanted to try to make for dinner. I didn’t want to serve it with rice. But I knew that I wanted something more than just the black eyed peas and coconut milk mixture (with tons of veggies and spices). When I realized that we still needed a habanero pepper for the dish, I sent my roommate out to the store while I got to work on cooking. It dawned on me that I still had the cornbread mix from Aldi in my pantry.
I figured you can’t go wrong with an African dish served alongside a Southern favorite, right?
Let me start by saying that this is actually a very simple mix to put together. Preheat the oven and then mix together 1 egg, 3/4 cup milk (I used almond milk), and 1/2 cup oil. Add the cornbread mix and beat well for around 2-3 minutes. Place in a greased 8×8 baking pan and allow to stand for 10 minutes. Then, pop it in the oven to bake until golden brown and a toothpick inserted in the middle comes out clean. For me, it was between 20-25 minutes.
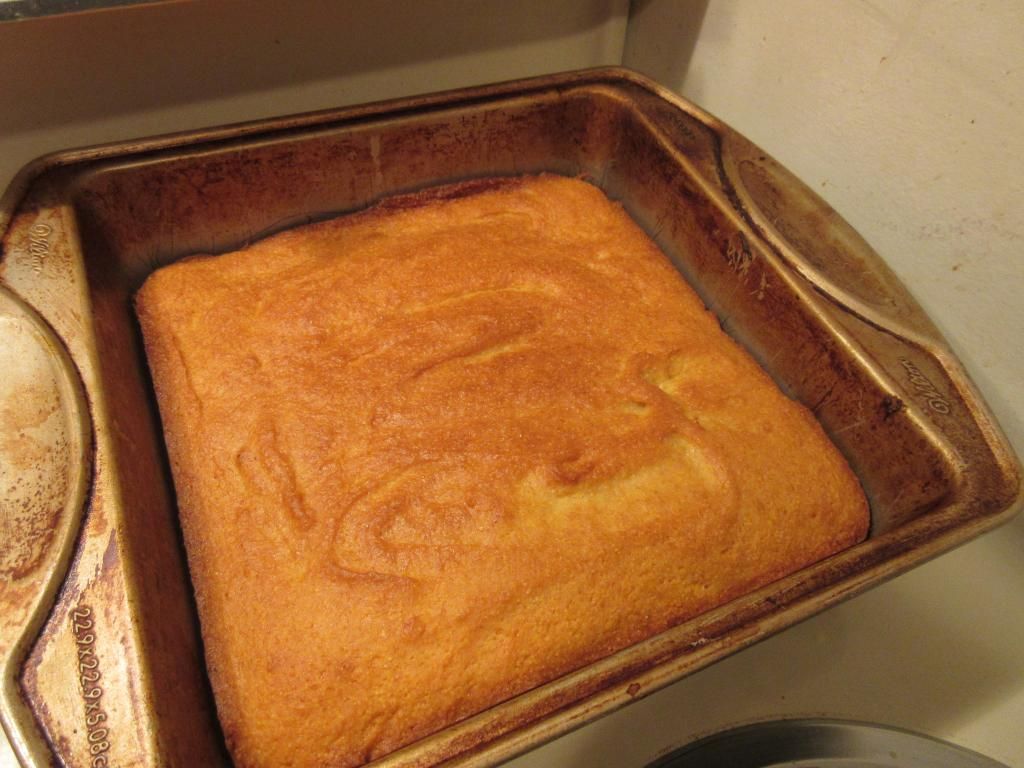
Aldi liveGfree Gluten Free Cornbread
Somehow, my roommate missed the cornbread baking and cooling, although she entered the kitchen a few times. How that happened, I’ll never know. But, when my Black-Eyed Peas with Coconut Milk and Ethiopian Spices was done simmering…dinner was served. And when I handed her a bowl of the curried black-eyed peas, she seemed most excited about the surprise slice of cornbread. She dove right into it.
“It’s really sweet!” she said, as I prepared my own bowl and plate.
She was right. Very right. I settled into my seat and took a bite of my spicy dish Then…the cornbread.
Sweet. Like…cake. Reminds me of the Mark Lowery riff on Southern cornbread. “Do not put sugar in your cornbread. Sugar in the cornbread is cake.” HAHAHA! Ah…funny. *ahem* Sorry. But, yes…this is a sweet cornbread. Not that it is a bad thing…except I grew up in the North…and we don’t do sweet tea or sweet cornbread. That being said, this was the moistest, best tasting gluten-free cornbread from a mix that I have ever made. I’ve even made some from scratch that haven’t baked up this moist and rich. I can overlook that sweetness for the taste and texture that came out of this mix. I am way beyond impressed. Even more impressive…it reheats beautifully, retaining its moistness. Simply amazing. I would definitely purchase this again in a heartbeat. And you certainly can’t beat that price.
Let’s discuss the ingredients that go into the liveGfree Gluten Free Cornbread Mix. This mix is made up of sugar (yep…first ingredient!), yellow corn meal, white rice flour, potato starch, brown rice flour, tapioca starch, baking powder, natural vanilla flavor, salt, and xanthan gum. This mix is gluten-free, lactose free, nut free, soy free, and wheat free. The mix itself is cholesterol free…but that gets negated when you add the egg.
Speaking of which, how about the nutrition information? A serving size is 1/4 cup of the mix. It makes 12 servings. One serving of the mix is 130 calories and is fat free. One serving will provide you with 360 mg sodium and 11 grams of sugar. One serving also provides 1 gram of fiber and 1 gram of protein.
Sometimes love can come in the form of a simple gluten-free cornbread mix. I was really happy with the way this baked up, the way it tasted, and the way it all came together. Amazing. I have been more than impressed by Aldi’s liveGfree line of products. And this one is right on top! Highly recommended.
Finally the gluten-free world gifts me with…gluten-free ramen! I have been waiting a long time for this.
I know what you’re thinking…
“Really? Ramen?”
Trust me…when you are faced with never being able to eat something again…finally is what comes to mind when you suddenly are given that something. I never knew how much I missed ramen…until I was suddenly able to have it again.
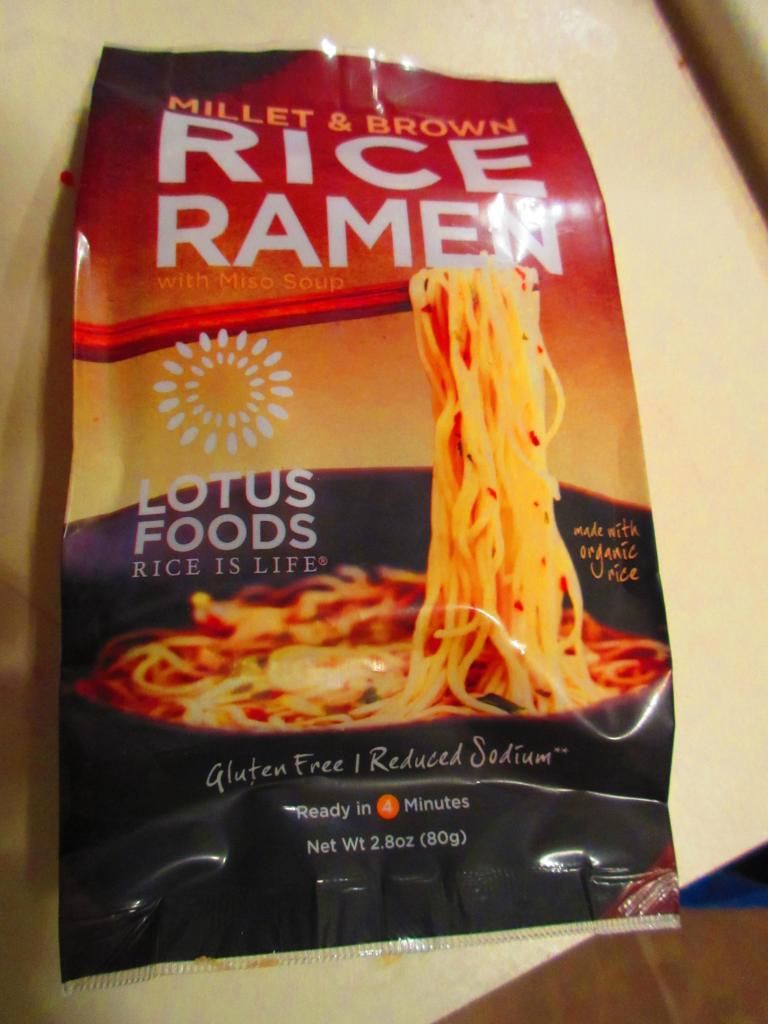
And for this great pleasure, I once again have to credit the amazing Cuisine Cube! Honestly, this is the best money I have ever spent each month. It is always a surprise as to what is inside the cube that arrives in the mail. And I am like a kid at Christmas when I open it up. Back in October’s box…Cuisine Cube included not just one, but two, packages of Lotus Foods Gluten Free and Reduced Sodium Rice Ramen.
Two flavors: Millet & Brown Rice with Miso Soup as well as Forbidden Rice with Miso Soup.
Color me excited. I was so ready to make some ramen. After all, I studied Japanese all through college and ramen is a way of life in Japan. Now…it was back in mine.
Let’s talk about Lotus Foods for a moment, shall we? The products produced by Lotus Foods are recognized for their exceptional cooking quality, taste, texture, and superb nutritional value. The ancient and new rices that compose their products are grown on family farms in limited quantities, on healthy, chemical-free soils. The rice and rice products that are produced by Lotus Foods are found in specialty gourmet, natural food markets, grocery stores, white tablecloth restaurants throughout the United States, becoming a fast favorite of consumers who are seeking healthier options, as well as chefs and foodies across the country.
I decided to do an even mix when it came to the two packages of Lotus Foods Rice Ramen that I received from Cuisine Cube. I’d prepare one package as is stated on the package itself. The other…I would cook up in a recipe.
Lotus Foods Millet & Brown Rice Ramen with Miso Soup
The one that I chose to shine on its very own was the Lotus Foods Millet & Brown Rice Ramen. These traditional Japanese-style noodles are created using their specialty rice instead of wheat. Not only are these gluten-free, but both millet and brown rice are some of the most nutritious and easily digestible grains.
Nothing could be easier to cook. Simply bring 2 cups of water to a boil. Add in the ramen and simmer for about 4 minutes. Stir every now and again, breaking the noodles apart. When the noodles are soft, remove the pot from the heat and mix in the contents of the enclosed soup package. You can then add in any additional veggies and protein as you wish. I added some corn…because I happen to have a lot of fresh corn in my freezer leftover from this summer.
So…what emerged was a hearty, but delicious miso soup. One that is not only gluten-free, but also vegan and non-GMO. All of Lotus Foods rice products are made from organic rice…and that includes the rice ramen.
So…how did it taste? Fantastic. I love that this is also reduced sodium, as a lot of ramen on the market is overflowing with unneeded sodium. I was impressed with that stat on the nutritional information immediately. But as for the taste…the millet and brown rice lend a rich and nutty taste to the noodles themselves. And the soup pack provided a ton of flavor to the hot water. I love the mix of spices that brought a slight bit of heat and sweetness to the entire dish. It was simple to cook and fun to eat. Chopsticks not included.
Lotus Foods Millet & Brown Rice Ramen with Miso Soup (prepared with corn)
Let’s look at the ingredients in Lotus Foods Millet & Brown Rice Ramen. The ramen is made from organic brown rice flour, organic millet flour, water, and organic white rice flour. The soup pack contains red miso powder (cultured soybeans and rice, salt) tamari powder, salt, red onion powder, dried wakame seaweed, sugar, garlic powder, ginger powder, dried parsley, and dried chili peppers. It is gluten-free, cholesterol free, organic, high in fiber and protein, non-GMO, low fat, vegan, and truly delicious!
As for the nutritional information…well…the Lotus Foods Millet & Brown Rice Ramen packs contain 2 servings, so a serving isze is 1/2 ramen with the seasoning. This serving will provide you with 140 calories and 1.5 grams of fat. This portion will also give you 460 mg sodium and 1 gram of sugar. See how amazing that sodium level is?! It has 25% less sodium than regular ramen soup. This serving also provides 2 grams of fiber and 5 grams of protein. It may not seem like much when you look at it…but trust me…you will feel full after eating your bowl of this ramen.
In addition to the Millet & Brown Rice variety, Cuisine Cube threw in the Lotus Foods Forbidden Rice Ramen as well.
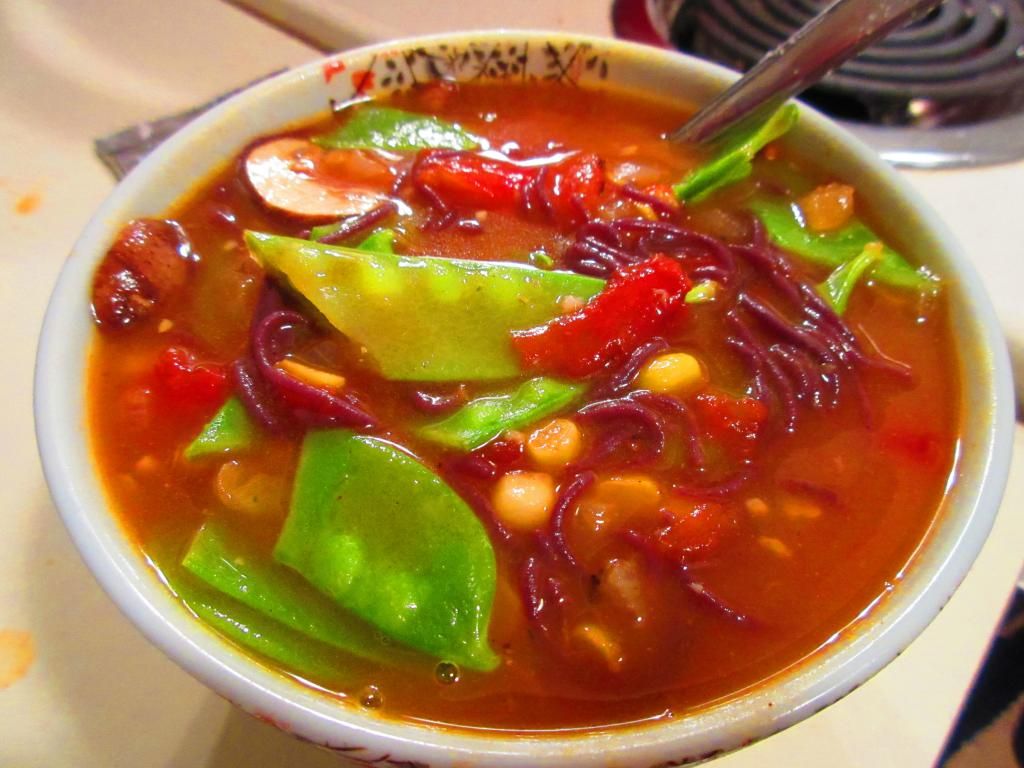
Lotus Foods Forbidden Rice Ramen with Miso Soup
Forbidden Rice is one of the most nutritious ancient grains. It is made from Lotus Foods heirloom black rice instead of wheat. I love the purple color that these noodles take on. It’s really fantastic. Instead of cooking these up according to the package, I incorporated these into a recipe. But…I’m getting ahead of myself. The forbidden rice ramen also has a delicious nutty taste and a great texture to them. In addition, these noodles are a natural source of antioxidants. This package comes with a savory white miso broth to create the noodle soup with. I, instead, incorporated it with the recipe I made. I added a ton of extra vegetables to create a delicious meal. The recipe will follow the ingredients and nutritional information.
Taste was superb. The noodles are amazing and perfect. I wish Cuisine Cube had included more. But, that’s why they have a Stock Up page on their Web site…to stock up. I hope to do just that…because…YUM!
The Lotus Foods Forbidden Rice Ramen noodles are made from organic black rice flour, organic brown rice flour, and organic white rice flour, and water. The soup pack is made from white miso powder (cultured soybeans and rice, salt), salt, white onion powder, tamari powder, soybean powder, mushroom powder, dried parsley, and dried carrots. It is gluten-free, cholesterol free, organic, non-GMO, low fat, and vegan. WOOT!
As far as nutrition goes, Lotus Foods Forbidden Rice Ramen serves 2 people per pack, so a serving size is 1/2 of the package with the seasoning. This serving will provide you with 140 calories and 1.5 grams of fat. In addition, this portion gives you 400 mg sodium and 1 gram of sugar. Yes, the Forbidden Rice Ramen contians 33% less sodium than regular ramen. That’s fantastic. And, finally, you will have less than 1gram of fiber and 3 grams of protein. With less of these final two nutritional factors, load this up with hearty vegeatbles or your protein of choice.
Or…do what I did…
Recipe: Ramen Noodle Soup with Sugar Snap Peas, Mushrooms and Corn
Ramen Noodle Soup with Sugar Snap Peas, Mushrooms, and Corn
1-1/2 cups sugar snap peas, trimmed and halved diagonally
1/2 cup corn
1/2 cup crimini mushrooms, sliced
Salt and freshly ground pepper
Hot sauce, such as Sriracha, for serving
Directions:
In a large, heavy pot, warm the oil over medium-high heat.
Add the shallots and garlic and saute for 3 minutes.
Add the mushrooms and saute for another 3 minutes.
Add the broth and bring to a boil.
Add the ramen noodles and tomatoes and cook, stirring occasionally, for 5 minutes.
Add the sugar snap peas, corn, and the seasoning packet from the Lotus Foods Forbidden Rice Ramen and cook for 2 minutes.
Season with salt and pepper and serve. Add hot sauce, if desired.
~*~*~
Let me tell you, I was amazed with how good this recipe was. And thanks to Lotus Foods Forbidden Rice Ramen Noodles…I was able to create this and cook it up. It had rich depth of flavor. The Forbidden Rice Ramen noodles added a nice hit of bold color. And the soup itself had this great umami flavor. It was rich and loaded with nutrients and fresh vegetables. It was love at first slurp. And there was a ton of slurping going on.
If you haven’t looked into a subscription to Cuisine Cube, I do highly recommend it. In addition, I encourage you to seek out or order Lotus Foods Rice Ramen and give it a try. Especially, if you’re like me, and didn’t even remember what you were missing. It was so delicious. Or, as they say in Japan, “Taihen Oishikattadesu!”
Another product I love, brought to me with great thought and great care from Cuisine Cube. I’m loving this service.
‘Twas the month of December and I was starting to contrive
Brand new recipes for when my Cuisine Cube was due to arrive…
Yes! The December cube is here! It arrived on Monday and I happily dug right in, wondering what sort of goodness lay under the flaps of cardboard and paper. What I was met with was a delightful array of items. It was like Christmas had come early as I sorted through the breakfast, baking, lunch/snack, dessert dinner, and other dessert options. I was ready to dive right in and have a little of everything. But, self-control does still in handy at times.
First of all, let’s discuss Cuisine Cube. I’ve blogged on items I’ve received since signing up in May. Cuisine Cube is a gluten-free delivery service put together by a team of enthusiastic eaters, food professionals, and allergy suffers from New York City. They have scoured the country looking for lesser known brands made by small artisan producers that taste better than the highly processed and subpar items you can find at virtually every grocery store. This was a way to help support small businesses. These products are meticulously selected and then delivered right to your door. So, you get to try a new brand or item you may never have discovered otherwise. It’s a great, efficient, and fantastic service. One that I always look forward to each month.
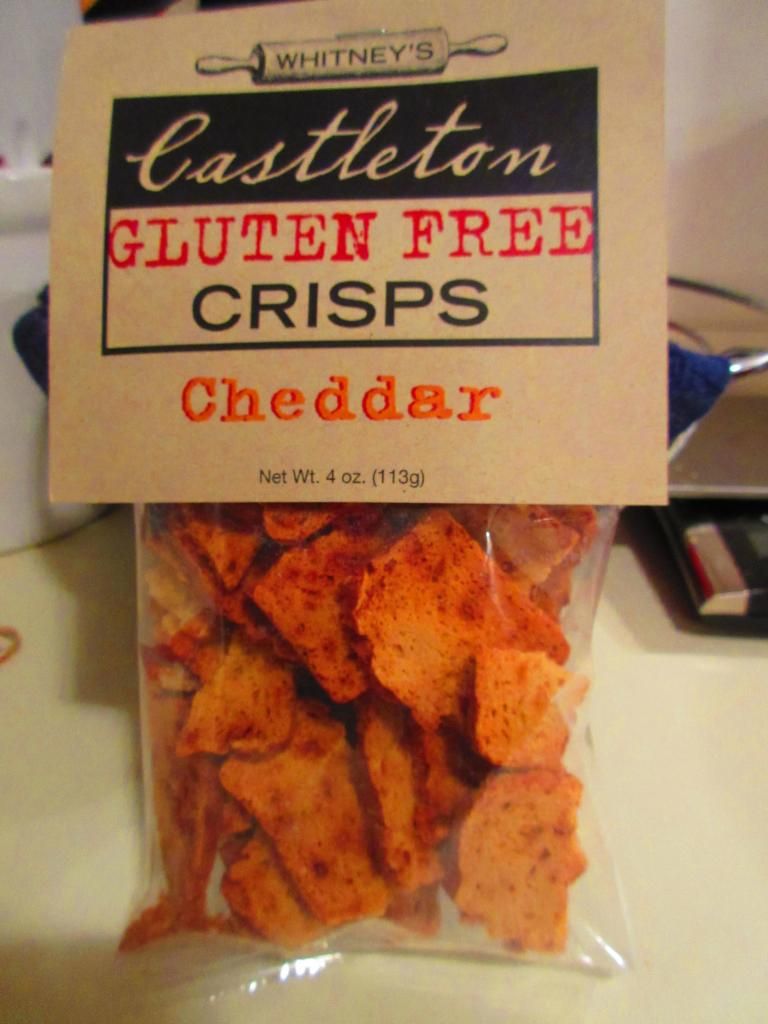
So, this month, I selected Whitney’s Castleton Gluten Free Cheddar Crisps to lead off my month of delicious eating. I thought they looked a lot like the Glutino Bagel Chips that you can find in most grocery stores these days. But, I didn’t just want to eat these straight out of the package…or just throw them on top of a salad. I wanted to do something a little different with them. And I did.
But…not without trying one first. I can’t just re-purpose a product without trying it out as it is first…
There you have it…I opened up the package and popped one of the crisps into my mouth. And I was immediately greeted with the crunchy texture. I love that for these kinds of crisps. They are called crisps for a reason…they should be crispy. But, even more importantly…the flavor! Before I had to go gluten-free…and before I started to really pay attention to what I ate, I was a Cheeze-It connoisseur. And the cheddar flavor in these crisps…reminded me of those. But better. WAY better. I was almost sad to repurpose these for my recipe…because they were amazing on their own.
But my creative chef mind was calling…
So…the rest of these amazing and delicious crisps went into my food processor and got pulverized.
Now, before I share this recipe with you, let’s talk about the Whitney’s Castleton Gluten Free Cheddar Crisps. As far as ingredients go, these are made from sorghum flour, tapioca flour, brown rice flour, white rice flour, xanthan gum, Vermont Farmstead’s Farmstead Cheddar, milk, white vinegar, brown sugar, baking soda, kosher salt, dry mustard and cayenne pepper. These are produced in a designated gluten-free facility.
Nutritionally speaking, a serving is 1 ounce of these crisps…and the package holds 4 servings. One serving will provide you with 120 calories and 3 grams of fat. You will be consuming 10 mg cholesterol, 230 mg sodium, and 2 grams of sugar. In addition, these have 1 gram of fiber and 3 grams of protein.
So, what came of these crisps?
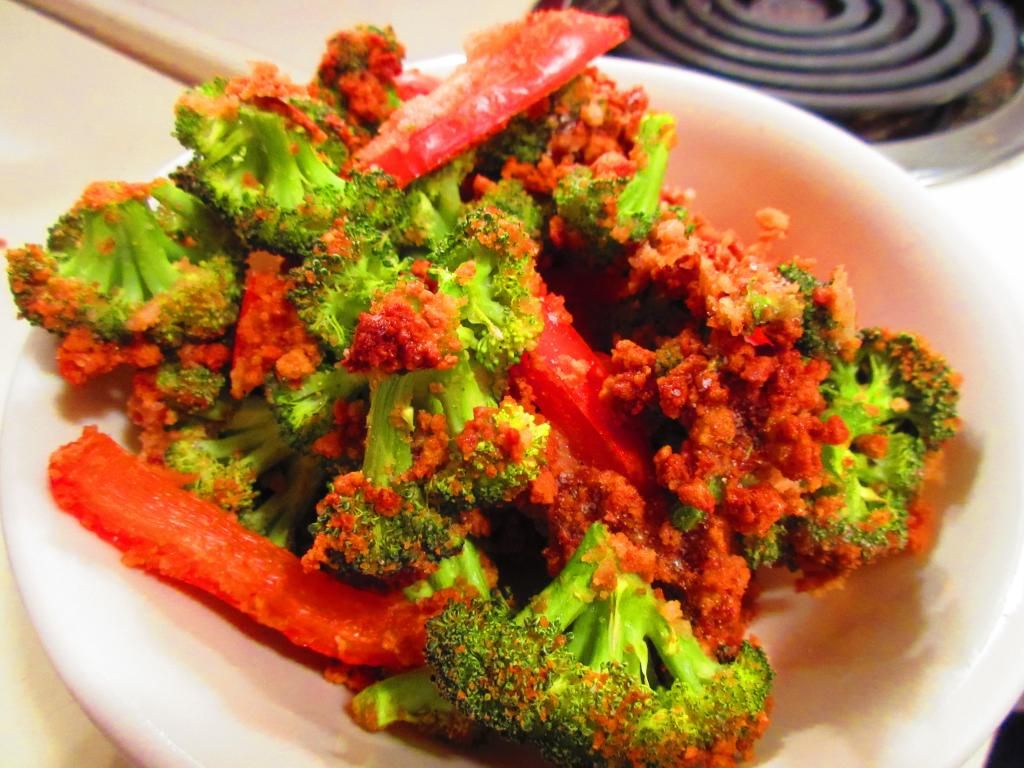
Well, back before I became a vegetarian, and definitely back before I was diagnosed as a Celiac…one of my favorite things to order at Red Lobster was the Fried Calamari appetizer. My roommate would eat the calamari…I wanted the fried broccoli and red peppers that were served with it. Honestly, one of my favorite foods (and definitely not good for you by any means…but it was so good)…which I hadn’t even thought about in years…
But I happened to have a red bell pepper and some broccoli from my CSA bin in my fridge…and now…a breading. I do not fry anything. I just don’t. So, I set out to recreate the infamous Red Lobster vegetables…by baking them. And thanks to Whitney’s Castleton Gluten Free Cheddar Crisps…I now had the perfect gluten-free breading.
Recipe: Crispy Broccoli and Red Peppers
Crispy Broccoli and Red Peppers (made with Whitney’s Castleton Gluten Free Cheddar Crisps)
4 ounces gluten-free breading (I used a package of Whitney’s Castleton Gluten Free Cheddar Crisps)
Directions:
Preheat the oven to 350°F.
In a large plastic bag, place in the broccoli florets and red pepper slices. Add the egg white(s). Close the bag and shake to coat. Add the gluten-free breading. Reseal the bag and shake again. Spread the vegetables onto a baking sheet and bake for 15-20 minutes, until crispy.
~*~*~
Guess what? This was so close to how I remember the original tasting. I love the flavors that baking something in the oven can really coax out of things like vegetables. And the Whitney’s Castleton Gluten Free Cheddar Crisps made the perfect coating for these vegetables. It gave it a nice cheese flavor on top of turning a beautiful golden color in the oven and really making the apartment smell fantastic. I was smelling a great cheddar aroma after these were in the oven for only 5 minutes. Way beyond impressed. I sort of want these in my pantry for always.
So, if you are curious about the Whitney’s Castleton Gluten Free Cheddar Crisps, head over to their site and read more about their products and order some for yourself. Or order from Cuisine Cube’s stock up site!
And if you want to give Cuisine Cube a try, head over to their Web site and check out their subscription options…joining for a monthly, three month, or six month subscription. This Cube (box of goodies) will arrive at your door within the first week of each month and you will have at least 5 full-size gluten-free items inside. I encourage you to give it a try…
…because I never would have heard of these crisps without the aid of Cuisine Cube.
And yeah…they were really fantastic…on their own and in my dish.
It’s my favorite time of year! I love the Christmas holidays. Why? Because I get to make people some of my baked goodies. And I absolutely love doing this and then handing them over. I do this for the people at my bank…the gas station…my neighbors…my adoptive family…and my apartment office. I do it for friends and family. I just love, love, love, love to create something in my kitchen and then bring a little joy and sweetness to the people in my life.
Well, as my roommate and I have made friends with our new downstairs neighbors…we wanted to make some Christmas cookies for them. After asking if their young son had any food allergies (he doesn’t)…I went ahead with my plan to make these adorable Melted Snowman Cookies. I was just crossing my fingers the entire time that they would work out. They did. They require a little work when it comes to the faces…but totally worth it.
Recipe: Gluten Free Melted Snowman Cookies
Gluten Free Melting Snowman Cookies
Servings: 20-28 cookies
Time: Prep 50 minutes; Bake 9-11 minutes
Ingredients:
1/2 cup shortening
1/2 cup peanut butter
1/2 cup granulated sugar
1/2 cup packed brown sugar
1 teaspoon baking powder
1/4 teaspoon salt
1/8 teaspoon baking soda
1 egg
3 tablespoons milk
1/2 teaspoon vanilla
1/4 cup unsweetened cocoa powder
1-1/2 cups gluten-free all-purpose flour (I used Cup 4 Cup)
Mini M&Ms for the face (which I separated ahead of time while the cookies cooled so they were ready to go!)1/4 teaspoon salt1 egg
Directions:
Preheat oven to 350°F.
In a large mixing bowl, beat shortening and peanut butter with an electric mixer on medium to high speed for 30 seconds. Beat in the granulated sugar, brown sugar, baking powder, salt, and baking soda until combined, scraping sides of bowl occasionally. Beat in egg, milk, and vanilla until combined. Beat in the cocoa powder and as much of the flour as you can with the mixer. Stir in any remaining flour.
Shape dough into twenty 1-3/4-inch balls. Place balls 2 inches apart on ungreased cookie sheets.Bake for 9 to 11 minutes or until edges are just firm. Cool on cookie sheet for 2 minutes. Transfer to a wire rack and let cool.
Line a baking sheet with waxed paper. Place cooled cookies on prepared baking sheet. In a medium microwave-safe bowl microwave candy coating on 50% power for 2-1/2 to 3 minutes or until melted and smooth, stirring every 30 seconds. Spoon melted coating over each cookie to cover cookie and resemble melted snow. While coating is still tacky, add a peanut butter cup for a top hat and decorate with mini M&Ms or other candies to resemble snowman faces.
Let stand until set.
~*~*~
These cookies are not only adorable but they are amazing too! Lots of flavor. And they are so easy to make, but it looks like you spent hours in the kitchen making them. The difficult part is letting that candy coating cool so you can package them up. HA! If you are looking for a cute Christmas cookie idea…I highly recommend these!
Many of you are aware that I am over the moon in love with my monthly delivery of gluten-free products from Cuisine Cube. Well, I recently entered into a partnership with them and will be reviewing at least one product from each cube for the next three months. Each review will include a recipe. And…no pun intended…I hope to create some great recipes that are outside of the box. HA!
I encourage all of you to look into signing up for Cuisine Cube. I am so glad I did. I have been introduced to amazing products I never would have known about otherwise.
So, watch this space each month for an exciting post and new recipe!
So, recently, Envirokidz (owned by Nature’s Path) put out two brand new gluten-free cereals in the Envirokidz line of cold cereals. And yes, I have no shame in eating a “kids” cereal. I mean, come on, my parents send me Freedom Foods Tropico’s in the mail so I can get my “Froot Loop” fix. Yeah…kids cereals are often more delicious than the grown up versions anyway. And who puts an age limit on which cereals you eat? My dad could polish off a box of Coco Puffs on his own…and did on numerous times…even though the cereal was bought for the three kids in my family.
Go figure.
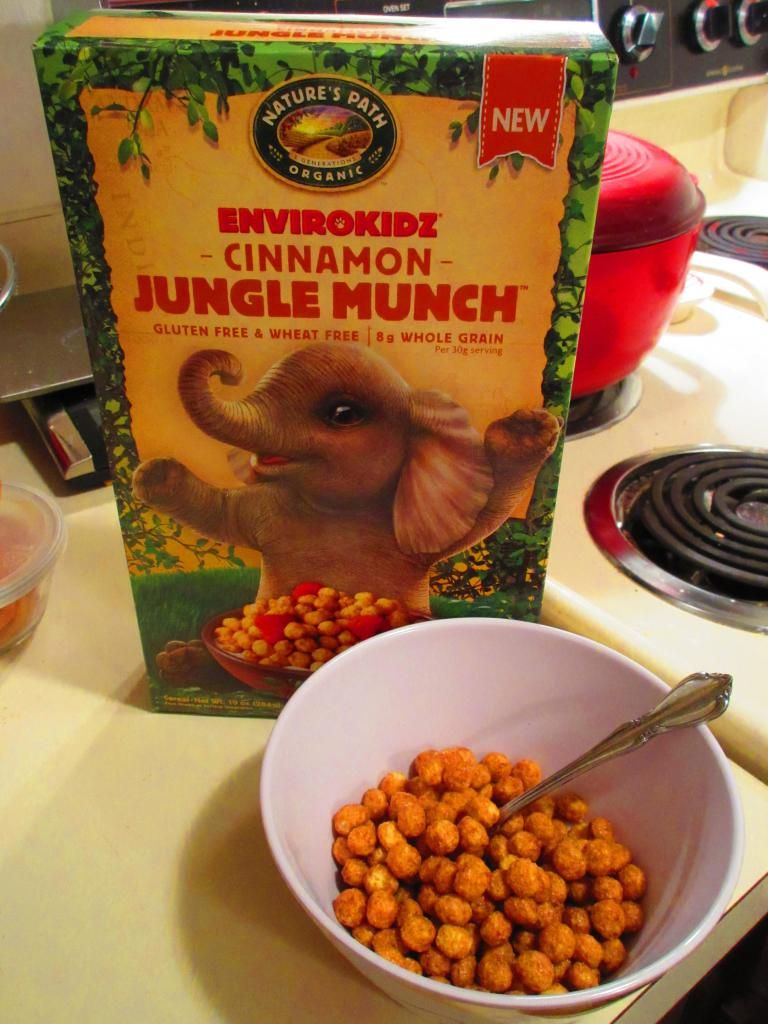
Let it be said that when I saw that one that had the word “cinnamon” attached to it…I immediately knew that I needed to try it. Honestly. I mean, my favorite cookie is a snickerdoodle…cinnamon and I are, like, BFFs…or something. Sure, the other one was chocolate…but my eye was drawn to the box with the happy elephant on the cover. Cinnamon Jungle Munch.
I first spotted this cereal while out of town…and not in a place where I could just bring it home with me. So, when it turned up soon after at one of my local natural food stores, I added some wiggle room to the food budget and picked it up. It’s been a couple of weeks, but I needed to get caught up on blogs before opening a new cereal.
That happened…Monday.
My anticipation was high as I popped open the box and tore into the little plastic bag thingie that keeps everything fresh. I measured out a serving, dumped on some almond milk, and took a bite.
And hated it. I mean, seriously hated it. Not enough to spit it out or not polish off the rest of the box (although it’s really hard to convince myself to eat it now). I don’t know…it’s lacking a bit of sweetness. The cinnamon just sort of overwhelms everything. It’s more spicy than sweet. The little corn puffs are coated in this and it just doesn’t work for me. It just tastes…off. And I am, sadly, not a fan. I love the crunch, but the flavor is just…eh…not right. Too much cinnamon, not enough to balance it out. So…I’m stuck with cereal for at least a week that I dislike. Yay.
The Nature’s Path Web site describes Envirokidz Jungle Munch as a cereal with the “delicate sweetness of cinnamon.” They also claim kids will love it. Maybe kids will. But this adult is giving it a hefty and loud…NO!
Let’s talk about ingredients! Envirokidz Cinnamon Jungle Munch Cereal is made from organic whole grain corn meal, organic corn meal, organic brown sugar, organic molasses, organic cinnamon and sea salt. That’s it. It is gluten-free, cholesterol free, vegan, non-GMO, and made with whole grains.
As far as nutrition goes…a serving of Envirokidz Cinnamon Jungle Munch Cereal is 3/4 cup. In this serving, you are taking in 120 calories and less than 1 gram of fat. A serving also gives you 80 mg sodium and 9 grams of sugar. I admit, that’s good for sugars in a cold cereal. And you will be consuming 2 grams of fiber and 2 grams of protein. So, you won’t feel full, but you won’t feel like you haven’t eaten either.
Cereals are not a one-size-fits-all sort of thing. What I dislike, others may think is the greatest thing. But this cereal really failed to impress me. Which is too bad, because I was practically bouncing off the walls wanting to try it, once I was aware that it existed. So, if you like cinnamon, you may or may not like it. This cinnamon lover…definitely didn’t like it. Maybe next time I’ll stick with the chocolate one.
Me after finishing the Fast Freddie Five Mile Foot Feast – New Albany, Indiana
Race: Fast Freddie Five Mile Foot Feast
Place: New Albany, Indiana
Date: November 27, 2014
Time:38:15
One does not simply Turkey Trot in New Albany, Indiana. Oh no. Not here. In New Albany…we have what is known as a “Foot Feast.” What, pray tell, is the difference? Nothing. But, why trot for turkey or dash for drumsticks when you can simply feast on everything!
I love the Fast Freddie Five Mile Foot Feast. Regardless of the weather being atrociously cold most Thanksgiving mornings around here, when all is said and done…I adore this race. It is, literally, right outside my door. Held at the 4-H Fairgrounds right across the street from my apartment complex. It doesn’t get any more convenient than that. It remains the least stressful race that I run…every year.
So, leave it to me and my Type A, Virgo mind to stress me out.
First of all, the night before Thanksgiving is always…I repeat…always super busy for me. This year, I was preparing desserts to take to dinner. But first, I needed to pick up my packet at the 4-H Fairgrounds (which I did on my lunch break), then, after work, traverse traffic over to Frankfort Avenue in Louisville, Kentucky to pick up my special holiday order from Annie May’s Sweet Café. Gluten-free stuffing and gluten-free croissant rolls awaited. There was no holding me back. And…it was the eve of a race. And while Cathy and I almost went to Jason’s Deli for soup that evening, we instead ended up across the parking lot at Blaze Pizza. Keeping with tradition…gluten-free pizza the night before a race. I think, in the end, it made me feel a little more at ease noshing on a thin-crust gluten-free and vegan pizza.
Afterwards, we were winging back to the apartment so that I could start baking my gluten-free and vegan marbled pumpkin cheesecake and start putting together pink salad…for desserts the following day. It took up the rest of the night and I found myself shifting things in the fridge much later than I would have liked, but getting both the cheesecake and the pink salad inside. Tight fit…but they were in and chilling. That was the important thing.
Tea…then sleep.
I slept really well, waking up around 6 a.m. with the coffee brewing. As I didn’t really need to be in any big rush I just sort of ducked into my closet and started pulling out what I was going to wear. Capri pants, my thermal top with the turtle neck, and compression sleeves. Done. I dressed. I glanced out the window to see if I could see the finish line set-up going on. What greeted me next, however, was SNOW. S-N-O-W.
“Awww…hell!” I said.
I think I kept hoping that it was an illusion or a dream…but each time I checked…the white stuff was still there. I ate breakfast when my roomie staggered out…which consisted of cereal. Then, after puttering around for a little while (which I should have been stretching), my roomie went to go and prepare herself for spectating. She came back out and walked over to the front door, pulling it open.
In rushed this cold, wintery gust of air that literally blew right through me. I sat up from the rug I was just lounging on. “Oh. My. God. Do I need another layer?”
She shrugged and went back into her room. And I was left to ponder the age-old…how to dress for this race problem.
Joy.
After a lot of back and forth, while Cathy suited up in 5 layers to stay warm…I decided to suck it up (gluten-free) cupcake and just wear the top I had on. I could keep my fleece on until go time. And with Cathy bundled up and me really not wanting to step outside…the time had come to make our way down to the 4-H Fairgrounds. Just a short walk across the parking lot of our apartment building. But in the cold air…not as much fun.
Our downstairs neighbor was unloading stuff from her car and she saw us and asked if I was running this morning. I told her I was doing the 5 miler right across the street. She wished me luck. We continued down toward the road and a window of one of the vehicles parked in the drive of the apartment complex rolled down the window. It was Art from my spin class. He and his family were doing the run too. We talked briefly and he introduced me to his wife who was really curious about my marathon running. And then…he went to stay warm for a few more minutes and I went over to the base camp…the fairgrounds.
Runners were huddled together trying to keep warm. I noted who the elite runners were. This is evident by their lack of clothing on seriously cold days…the singlets with the short-shorts. And walking around like it’s really 90 degrees out and we’re just all big babies. These, friends, are people who win races. I am NOT one of these people! Remember, I debated an extra layer. So, I stretched, because I forgot to do it in the warmth of my apartment, and not soon after, Freddie was having everyone fill up the street because this race starts at 9 a.m. SHARP. I joined the masses and moved up toward the front of the line, without being in front. There was still some traffic trying to come through, so we made room. Some brave souls ran sprints through the cars. I just stayed off to the side and tried to stay warm. I had shed my fleece jacket at this point. And with the wind, it was biting cold that morning.
Finally, the cars cleared and we spread out. I moved more toward the other side of the road. Fred let us know that he would give us the on your marks command and a whistle. This year…he blew the whistle.
We were off.
I was not running this year for time. I couldn’t. Not with the foot problem, the broken toe, and the lack of running (except for crazy distance races) since July. Honestly…I took so much time off this year, I felt like a freakin’ tortoise as we started up the first hill to go over the overpass. I usually incorporate this route in some way, shape, or form, in my training in the summer. But as I wasn’t allowed to run all freakin’ summer…the route felt brand new to me. You’d think my legs would remember it. Well…maybe it was the icy cold morning, but…they felt like they had never run it before.
As we crossed over the interstate, there was a patch of ice on the overpass. Everyone near me started yelling “ICE!,” so I did the logical thing and quickly moved away. I sprained my ankle last year and required physical therapy after slipping on ice. I’m done with injuries, okay? Freakin’ done. I’m still working on the recovery. So…yeah…I moved. Down the hill and to the light where we make our first turn. One mile…done.
The rolling ups and downs of Mount Tabor road are what we are greeted with. It feels good, now that my legs have warmed up that first mile. I wish I could say the same for me. I could no longer feel my face. I wasn’t even sure it was still attached. Pressing on, I took the hills as I usually do…with power. I figure, I want to earn the downhill recovery, I’m going to best the hills. And these weren’t bad. Nope. Mile 2…done after turning onto Grant Line Road.
Grant Line Road takes us to Sam Peden Community Park. We duck inside near the fire department. This is where the water stop is located. I think most people decided it was too cold to deal with water as more people than usual just ran right past the group manning the table. We head up an incline and it levels off (no downhill) to take us around the park. At the path where the 2-mile walk cuts across…is Mile 3. Two more to go. And we now get to the most difficult part.
After Mile 3, you get this small, steady incline to take you to another leveled off spot. Here, you round the corner and go through the gate at the other end of the park. A lot of people who live in the apartments there came out to cheer. One guy shouted, “All the kings horses and all the kings men…” I don’t know what that means, but he was clapping and shouting, and it was needed. Exit park on a nice downhill. Then start your first of three hills. Schell Lane is a beast. A freakin’ BEAST!
I actually have always embraced the challenge of Schell Lane. I don’t know why. I hate running hills…and that’s all this road is. Three uphills and two downhills with a nice downhill waiting as you turn the corner and hit Daisy Lane. I ran Schell Lane like I always do – with intention. And, I loved heading up that last hill and seeing these kids out in the yard screaming, “GO RUNNERS!” as we all worked our way up the steepest of the climbs, to earn our reward…a flat segment leading into the turn…then the nice downhill.
Running down Daisy Lane makes you feel so free and alive. It feels so easy because it is one hell of a downhill. It takes you right into that 4th mile. I actually peeked at the clock as I ran past the mile marker. I knew I was going to have a slower time this year. But, I figured that going into it. Time to just make that last mile count.
Down to the traffic light and make the turn onto Green Valley Road. You’ve come full circle almost. Only half a mile away is the finish line, back at the 4-H Fairgrounds. I run this stretch a lot. I know where the rolling hills are. And yet…at this point, my feet wanted to do little in regards to getting me to that finish line. It was the cold weather. My body hates cold weather. My muscles just don’t fire the same. But, I turned it on and gave it my best push and soon, I was rounding the corner to the drive of the 4-H Fairgrounds and pushing hard to the finish line, with Cathy screaming at me from the sidelines. There were very few spectators out this year. I think the cold weather kept them inside.
But…finish I did. I dropped the bottom tag of my bib into the raffle box and went to grab some water. Cathy met me on the other side of the main hall and we debated whether to stick around for awards or not. Traditionally, we do. And if you do place in your age division, Freddie says you have to be there to claim your award. That’s just how he does it. So…after debating on whether to go shower and get ready for the drive to Corydon for Thanksgiving or to stick around, I finally decided to stick around…at least for a little while.
This turned out to be…of little use this year. There was a timing mat issue…which they were working on resolving. So, they went ahead and gave out some of the raffle drawing awards. And then they did the top three male and female finishers. No new faces there. Not this year. The first male finisher, Ben Hubers, finished in 25:05. The first female, Sarah Peace, finished in 28:14. The times were slower this year and a lot of that was on account of the cold weather.
Me with Santa after the Fast Freddie Five Mile Foot Feast – New Albany, Indiana
Anyway…they finished up the raffle and then Fred announced that they were still sorting out age division awards, so they would have that posted on the Web site and if you won an age division award, you could pick up your award at Pacers & Racers on Grant Line Road for a week. After that…they were gone.
So…as it turns out, I ran this years Fast Freddie Festive Five Mile Foot Feast almost 2 minutes slower than last year, finishing with a time of 38:15. I was 152/928 finishers this year. I was the 26th female to cross the finish line. And lo and behold…I was 3rd in my age division. Go figure. So, the one year they aren’t able to do the awards at the race is the year I actually place. And I did it running slower. How does that even happen?! Needless to say, I went over to Pacers & Racers that Sunday to pick up my award. It was a mug. AWESOME!
Anyway, I am already looking forward to next year’s Fast Freddie Five Mile Foot Feast and can’t wait to see what I can accomplish. Maybe I can at least beat this year’s time. HA! Hope everyone had a great Thanksgiving!!