It’s the night before a race. You know what that means?
PIZZA NIGHT!
Granted, this is a very, very, very short race in the morning, but…why mess with tradition, right?
In addition to it being pizza night, I just happened to have some gluten-free pizza crusts in the freezer, compliments of Katz Gluten-Free. I could have made my own dough…I actually do have recipes for that…but I was hungry and really just wanted to eat. So, when I got home, I set my roomie to the task of chopping the rainbow chard that came in my CSA bin this past week, while I worked on getting the pizza stone heated and the rest of the ingredients prepped and ready for some pizza.
I got the idea for this recipe from Cate’s World Kitchen, but altered it to fit my dietary needs as well as what I had on hand.
2 individual size gluten-free pizza crusts (though feel free to make your own and do this in larger scale)
1/4 cup olive oil
1/2 tsp smoked paprika
1/4 tsp chili powder
1 bunch rainbow chard, chopped
zest of half a lemon (I didn’t have lemon on hand, but I had plenty of orange zest…so I used that)
Mozzarella cheese (I used Rice Shreds Mozzarella flavor)
Directions:
Preheat the oven to 500 degrees F with a pizza stone inside (if you have one).
Heat the oil in a small saucepan with the paprika and chili powder. Simmer on low heat for about two minutes, stirring constantly so the spices don’t burn. Remove from heat.
Heat about 1 tbsp of the paprika oil in a wide skillet. Saute the chard until wilted. Stir in a pinch of salt and the lemon zest.
Brush each individual pizza crust with paprika oil. Sprinkle evenly with chard, then top with mozzarella.
Bake the pizzas on the pizza stone for about 10 minutes, or until the crust is golden and the cheese is melted and bubbly.
~*~*~
I am thrilled that we have more rainbow chard left and 2 more pizza shells because this was really good. I loved tasting the earthiness of the chard, mixing with the zing of orange zest and the heat from the oil. It was a fantastic mix. And the cheese just added that little bit of saltiness to round it all out. I really enjoyed every bite of this pizza. And trust me…it was going, going, gone!
Give pizza night a colorful veggie flare. And feel free to add your own spin on things. If you prefer to make your own dough, even better. Simply shape the dough and then brush with the paprika oil. It’s that easy. And it truly is a delicious slice of vegetarian pizza.
You know what that means? For me, it means I get to do all my holiday baking. And I absolutely love to bake goodies for the holidays. Even better, I love to surprise people with homemade goodies for the holidays.
You see, the other day while my roomie and I were in the gas station getting our daily dose of caffeine, the cashier behind the counter (who literally sees us every work day) said that she was leaving. On Monday she was starting a new job…in an office. So she would definitely miss us.
And we all know that I love any occasion to bake. I happened to be in the gas station one morning when she was talking to a co-worker about chocolate. She hates chocolate…except for white chocolate. So…I knew her going away gift needed to be something white chocolate. And keeping with the spirit of the holidays…I was guided by the wonder of Pinterest to this recipe, featured on the Crazy For Crust blog. I took it, and gave it a gluten-free spin.
Recipe: Gluten-Free Triple White Chocolate Peppermint Blossoms
1/2 cup butter, softened (I used I Can’t Believe It’s Not Butter All-Purpose Sticks)
3/4 cup sugar
3 ounces white chocolate, melted and cooled slightly (I used Ghirardelli White Chocolate)
1 box white chocolate instant pudding (3.5 ounces)
2 eggs
1 teaspoon vanilla extract
1 teaspoon baking soda
2 1/2 cups flour (I used 2 cups Arrowhead Mills Gluten-Free All-Purpose Flour and ran out, so the last 1/2 cup was Hodgson Mill Gluten-Free Multi-Purpose Flour)
1 package Candy Cane Hershey’s Kisses, unwrapped
Additional sugar for rolling, if desired
Directions:
Cream butter and sugar in the bowl of an electric mixer fitted with the paddle attachment.
Add pudding mix and blend until combined.
Add white chocolate and mix until mixture is smooth.
Add eggs and vanilla and beat until combined.
Mix in baking soda and flour.
Chill dough for at least 30 minutes.
When ready to bake, preheat oven to 350 degrees.
Line cookie sheets with parchment paper. Place about 1/2 cup sugar in a small bowl for rolling, if desired. (Cookies will be a little crunchy on the outside with the sugar, if you use it.)
Scoop one tablespoon balls of dough and roll in sugar, or just place on cookie sheet. Bake 7-9 minutes until bottoms just begin to get golden. Remove from oven and immediately press an unwrapped Peppermint Hershey’s Kiss on top. Do not move pan until Kiss is cooled, or it will collapse.
Cookies can be frozen for later consumption, if desired. Place in a Ziploc bag between layers of paper towel for best results when freezing.
~*~*~
Here’s the best part…they truly are amazing. Honestly. I had my doubts. Me and sugar cookie bases don’t get a long…at all. Seriously…I’ve tried for about 5 years now to make sugar cookies at Christmas time and it just never works. This time…it did. And to think…it was with a blend of flours too.
Of course my roommate and I each had to sample one. I even took one in for my teammate to try. She loves to bake and I love to have her sample things, especially since I’ve had to go gluten-free. She doesn’t hold back. We all loved how the cookies were soft in texture and that after you swallow, the white chocolate really hits. But the magic happens when you take a bite with that Peppermint Hershey’s Kiss in it. Oh…yeah.
I am going to do a few different variations on these cookies now and I’m really looking forward to the end results.
Anyway, I gave the cashier at the gas station her gift and told her that I overheard that she loved white chocolate so I made these for her. She looked so happy and said that she wasn’t going to share. She thanked me and we left. I hope she enjoyed them as much as three three of us who also got to eat one did.
It’s winter time…and you know what that means? It means my CSA bin is throwing Brussels sprouts at me again. As you will recall, the first time Brussels sprouts turned up in my bin…I was at a loss. Not only had I never eaten them…but I had no idea how to cook them. I finally cooked them up in a Creamy Brussels Sprouts Bake which my roommate and I did enjoy.
But we weren’t blown away by it.
This time, when I pulled out the Brussels sprouts, I was determined to find a different way to cook them. So, in the end I went with the most basic, rustic, perfect way…simply roasting them in the oven. And it only takes 4 ingredients to make this happen.
Cut off the brown ends of the Brussels sprouts and pull off any yellow outer leaves.
Mix them in a bowl with the olive oil, salt and pepper.
Pour them on a sheet pan and roast for 35 to 40 minutes, until crisp on the outside and tender on the inside. Shake the pan from time to time to brown the sprouts evenly. Serve immediately.
~*~*~
It doesn’t get much easier than that. Honestly. And they smelled so good while they were cooking. When I dished them up to eat with dinner, my roommate took the first bite and said that they reminded her of when I made kale chips.
NICE!
You know what? She was right. This is definitely my favorite way to eat Brussels sprouts. Nothing fancy. Just letting the vegetable shine. Who would have thought something this basic, this simplistic could win my taste buds over.
Now I know exactly what to do next time Brussels sprouts turn up in my bin.
Awhile back, I did a gluten-free version of a recipe that came from The Brokeass Gourmet that intrigued me. It was a Brown Butter Pumpkin Mac and Cheese. And it was delicious.
It is definitely the time of year for pumpkin flavored things, so when the office potluck luncheon rolled around this week, I decided I would make the Brown Butter Pumpkin Mac & Cheese. And then, after pondering for a bit, I decided to do things a little differently. For one thing, it was going to be vegan, as we do have a vegan in the office and I wanted him to be able to eat it too. Secondly…I was going to do a different recipe that put a little more emphasis on the pumpkin portion of the entree.
So, after some searching I found a recipe that originally came from The Inventive Vegetarian and modified it to fit the ingredients I have (vegan & gluten-free). The end result…was better than I dreamed.
Recipe: Gluten-Free and Vegan Pumpkin Mac and “Cheese”
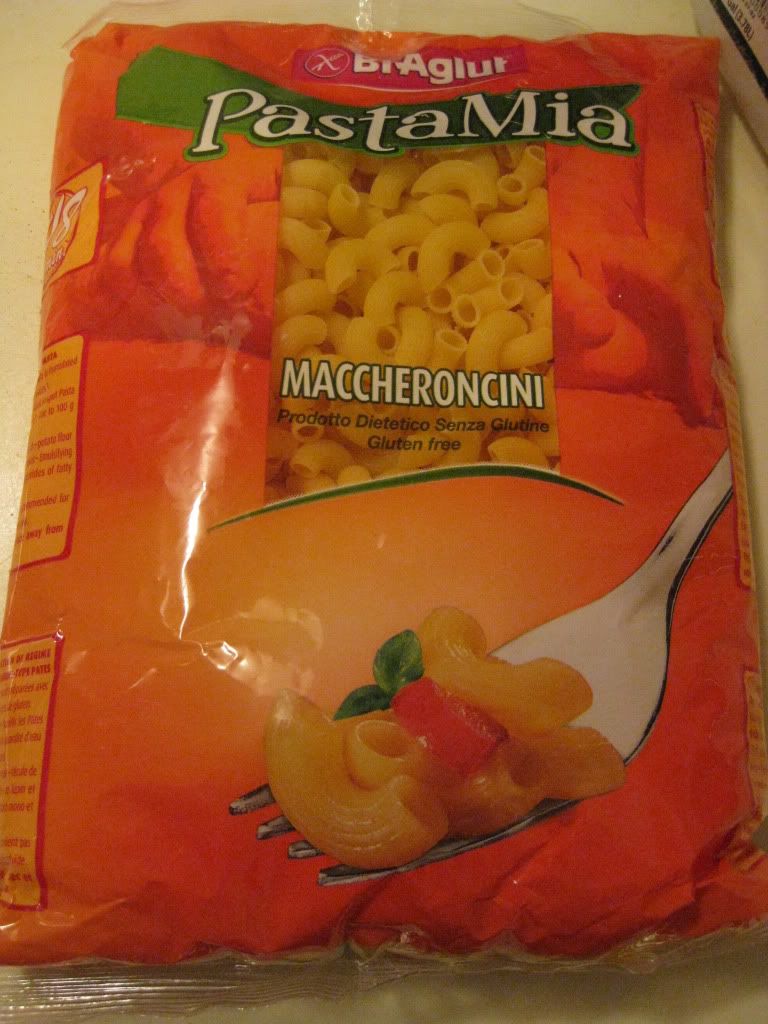
1 box elbow macaroni (I used BiAglut Gluten-Free Maccheroncini)
2 cups almond milk (I used unsweetened)
2 tablespoons olive oil
2 tablespoons all-purpose flour (I used Arrowhead Mills Gluten-Free All-Purpose Flour)
2 cups Daiya Cheddar Style Shreds (I prefer the Daiya wedges, so I just shredded an entire Daiya Cheddar Wedge)
1 can pumpkin puree
1 teaspoon soy sauce*
1/2 teaspoon cinnamon
1/4 teaspoon cloves
1/4 teaspoon allspice
1/8 – 1/4 teaspoon cayenne pepper (or more if you like heat)
Salt and pepper to taste
Directions:
Preheat oven to 375 degrees F.
Heat the almond milk in a small saucepan, but don’t boil it.
In a medium pot, heat the oil over medium heat and sprinkle in the flour. Whisk for about 2 minutes to create a smooth roux. The mixture should darken slightly during this time.
Still whisking, add the hot almond milk slowly and cook for a minute or two more, until the mixture has thickened. A good way to check is to dip a spoon into the mixture, then run your finger over the back of the spoon. If the mixture does not run into the streak made by your finger, it’s thick and good to go.
Add in the pumpkin puree and stir until smooth. Keep it on the heat for just a minute or two, until the puree is warmed through.
Take the almond milk mixture off the heat and stir in the vegan cheese, soy sauce, and spices. Partially cover and let the mixture sit as the cheese melts.
While waiting for the cheese to melt, bring a pot of water to a boil and cook your macaroni. Cook it just shy of al dente (subtract a minute or two from the al dente cooking time on the box). Drain the noodles when they’re done.
Once the cheese has fully melted (it will take a little longer with this stuff than with real cheese), taste and adjust any of the spices, as well as salt and pepper, to your liking. The whole mixture should now have a nice, velvety texture to it. Add the cooked macaroni (and the onions if you’re adding them) and stir well. Pour the whole mixture into a 9×13 baking dish, or a deeper casserole dish.
Bake for 40 to 50 minutes, or until the sauce is bubbly.
Enjoy!
~*~*~
The difference between this pumpkin mac and cheese and the previous one is the pumpkin flavor is definitely more pronounced in this one. I think that has to do with the seasonings used more than anything. It was creamy and delicious and those who ventured to try it at the office luncheon all said it was really good.
*Now, I do want to note that if you are using real cheese and not making this a vegan recipe…do not add the soy sauce. The soy sauce is basically used as a seasoning for the extra umami that soy cheese needs. Real cheese…you’re good to go without it.
Very impressed with this recipe. If you love pumpkin and mac & cheese…give this one a try.
I’m declaring it now. Right there in my subject line for this post. After all years of searching for the best pre-packaged gluten-free pasta, I think I may have finally found the crème de la crème. I didn’t think many things can live up to the standard that RP’s fresh gluten-free pasta set…and then I find it…just waiting to be discovered in my pantry.
Fresh pasta is always best, but it’s not always the most practical.
When it isn’t practical, BiAglut should be. Trust me, I have tried mostly every gluten-free pasta out there. Rice noodles, corn noodles, tofu noodles, quinoa noodles…I’ve had them all. Some do better than others. Some brands I prefer over others. Some are just easier and more cost efficient in the end. That being said, I think I would pay a pretty penny to have more noodles from BiAglut.
BiAglut is an Italian brand of gluten-free products that have been produced in Italy for more than 45 years by the Italian affiliate of H. J. Heinz Company. The company’s main focus is on individuals with Celiac disease, gluten intolerance, or those who follow a gluten-free diet. By keeping to this focus group, the brand offers a variety of gluten-free products to the market, including pasta, breads, bread substitutes, flours, cookies, crackers, snacks, and desserts.
But the main item that BiAglut is known for is…their pasta.
I was at a gluten-free expo awhile back and BiAglut was one of the companies there. It was a very small expo with very few vendors. But the people who were at the BiAglut table had me try some of their pasta and I loved it. Great texture. Great flavor. It was cold…but…well…you can’t have everything. After a little discussion, my roommate and I decided to go ahead and buy a bag of their noodles. They had very few options left (yes…it was going fast), so I snagged the very last bag of BiAglut Maccheroncini (elbows).
And then…it joined the plethora of other noodles in my pantry. And it sat…as I worked my way through the rest of them.
But, then we had another dreaded office potluck. I say that because, with the exception of one or two other people in the office, nothing brought in is something I can eat. Granted, being a gluten-free vegetarian does limit my diet, but it is nice when someone puts for the effort to make something that I can also eat so I’m not stuck with just two things on my plate (the two items I bring, mind you).
With that in mind, I signed up to bring two dishes…some crock pot caramelized apples and a vegan pumpkin macaroni and cheese.
I checked my pantry list and the next pasta noodle to have it’s day in the spotlight was the BiAglut Maccheroncini. I was kind of sad to be using this pasta on my office because I knew full well that since I was the person bringing it in…hardly anyone would touch it. It’s…weird. It’s…*GASP*…GLUTEN-FREE! I swear to God, no one in that office quite understands what that means and just won’t even try the food I bring in…which is why I hate to bring things in. I can cook for myself at home and it will save me money, time, and food that won’t go to waste because only 2-5 people are eating it.
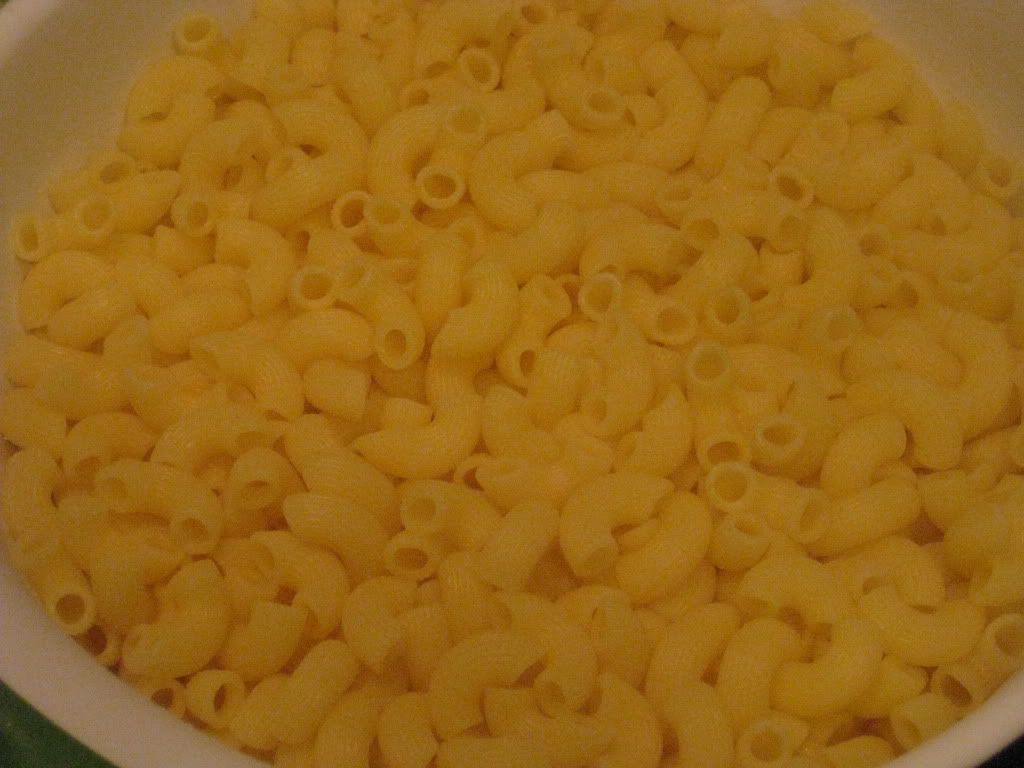
BiAglut Maccheroncini (cooked and drained)
That being said, I sucked it up and went ahead and made the items I signed up for. Early that morning, I stood in the kitchen boiling a pot of water to pour the BiAglut Maccheroncini in and allow it to cook most of the way. It only took about 6 minutes to get to where I needed them to be. I mean…it was fast. Most gluten-free pasta noodles have to be boiled for around 12-16 minutes, if not longer, to get that perfect consistency. Not these. They were done so fast I had time to spare.
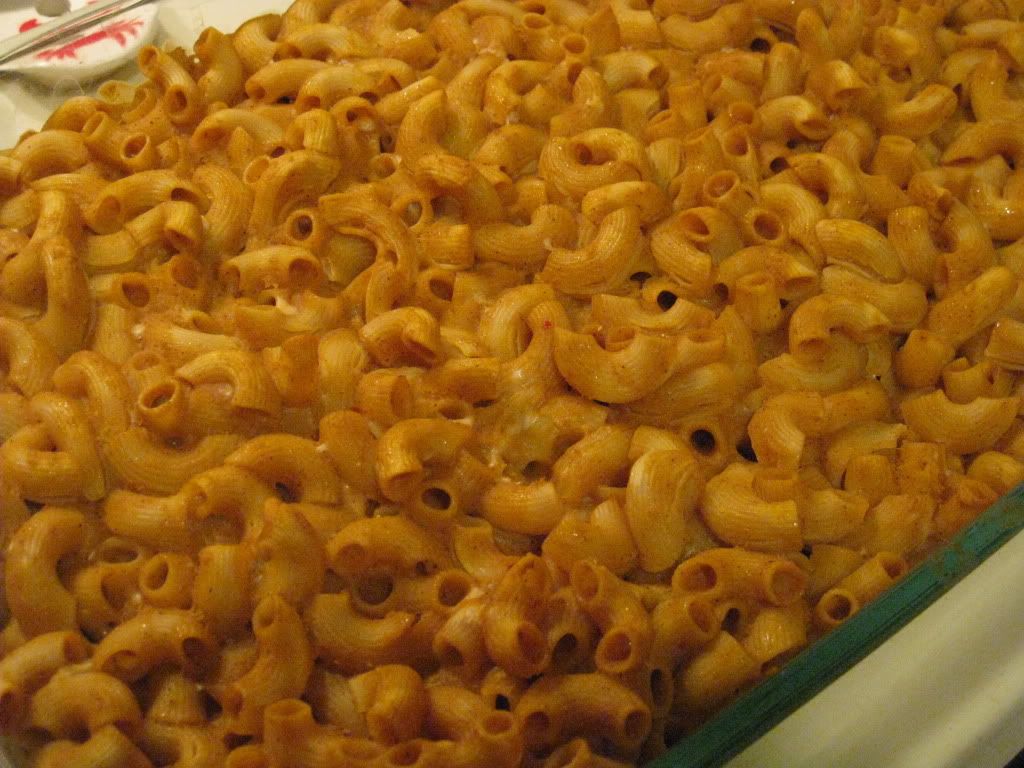
After I drained the noodles, I put them back into the big pot and poured my vegan pumpkin cheese sauce over the top of it. With a spatula, I stirred it all together, delighted in the fact that the noodles were holding together. They weren’t turning to mush. They weren’t falling apart in the sauce or with the movement of the spatula. I was already impressed. Then, the mixture was poured into the baking pan and into the oven it went for about 45 minutes.
When it emerged…the noodles were still perfect. They already survived boiling and baking. I was very surprised. I’m just not used to my gluten-free pastas being so sturdy. Well, before I could serve this to myself and the brave few who just might have a little taste at the office, I had to make sure it was good. I plucked a noodle from the casserole dish and…oh yeah…it was good. The noodle was a perfect al dente. Perfect. It cooked up beautifully in the sauce and didn’t fall apart in the baking process.
The true test was going to be lunch. So, about 10 minutes before lunch was to be served, I got to the kitchen and pulled my mac and cheese out of the fridge. I brought a splash of almond milk to add to the pasta for when I reheated it, and poured it over the top. Then, into the microwave it went. As I reheated it a few minutes at a time, I would stir it around to make sure it heated evenly. And the noodles held together. They didn’t crumble as I stirred them. They didn’t shred. They held. And I was so elated.
The moment of truth came – the office luncheon began. My roommate, myself, and the office vegan I knew would be eating the macaroni and cheese. Others seemed a bit hesitant. Some took just a smidge. Most didn’t even give it another look because…I made it…therefore it’s gluten-free and must be disgusting. Ignorant fools!
As I sat down to dig in…I was hoping I’d be as impressed with the BiAglut Maccheroncini as I had been this entire time leading up to the first actual bite. One bite and it was all the confirmation I needed. Through boiling, baking, and nuking, the BiAglut Maccheroncini not only held its shape, but it still tasted great. It didn’t mush up or disintegrate under pressure. It is pure, honest, gluten-free pasta perfection.
BiAglut Maccheroncini is made from cornstarch, potato flour, lupin flour and lupin proteins. No eggs. No dairy. And what comes of this is the best packaged pasta I have had to date. Gluten-free pasta is so tricky, but BiAglut held up to everything I could put it through and still tasted great in the end. And, on a personal note, it worked very well in my vegan and gluten-free pumpkin mac and cheese. Tasted great.
Best texture. Best quality. Best all-around when it comes to dry pasta. BiAglut is amazing. Now I wish I had purchased more of their products at the time. Guess I’m going to have to get online and place an order.
If you can find BiAglut…I encourage you to try it. It is heads and tails above the competition. It’s happiness in pasta form.
Gluten-Free Vegan Pumpkin Mac & Cheese made with BiAglut Maccheroncini
When you name your company So Delicious, you are definitely setting a high standard for not only your branding, but also the products that you put out. So far, I have yet to have a flop with the So Delicious items that I have tried. I know…most of said products have been in a non-dairy ice cream form.
That trend continues here…
My local grocery store had a great sale going on for the So Delicious quarts of ice cream awhile back. After sending my roommate out for an item I needed for something I was cooking, she returned with a huge surprise for me. Three quarts of So Delicious non-dairy ice creams to try. And since then, I have dug into the Chocolate Velvet and the Neapolitan flavors and fallen in love with each of them.
All that remained in my freezer was the Creamy Vanilla one. I really wanted to dress this ice cream up. I mean, we all love vanilla ice cream…but it is so versatile. I was thinking of melting chocolate over it…or getting some chocolate syrup from the store…or topping it with fruit and nuts…or sandwiching it between two gluten-free cookies. The possibilities were endless. I mean, vanilla ice cream is like being handed a blank piece of paper and a pencil. You can get as creative with it as you want.
Little did I know that in the end…I’d basically be enjoying it as it was made. Undressed. But…perfectly matched.
So Delicious Creamy Vanilla is a soy milk based ice cream that is vegan, kosher, and gluten-free. It is also non-GMO certified. YAY! That being said, this ice cream had been hanging in my freezer since the summer…so there was no way of telling what state I might find it in when I cracked it open last night. I almost expected freezer burn and ice crystals.
But…I was wrong. When I pulled the lid off the quart, a beautiful white surface looked back at me. Perfect vanilla. And it smelled of vanilla too. So amazing.
When I said perfectly paired just above I wasn’t kidding. You see, I have been watching Hotel Hell (Gordon Ramsay’s new show) and one of the hotels he went to help turn around was one that invented Apple Pie À La Mode. No joke. And I just happened to have a gluten-free apple pie in my freezer as well. Hmmm…what to do…
LIGHT BULB!
So, last night after hurrying through dinner in an attempt to make it out to a concert (The Dave Matthews Band was in town) on time, my roommate and I actually allowed ourselves a moment for a palate cleansing dessert. Never miss dessert. It is very important. I had thawed out the pie earlier that day so all I needed to do was toss it in the microwave (Gordon Ramsay would FLIP OUT!). While a tiny slice of pie was heating, I opened up the So Delicious Creamy Vanilla ice cream and got out a spoon.
Apple pie à la mode is a slice of apple pie topped with vanilla ice cream. The warm pie melts the ice cream that is layered on top and what emerges is this amazing dessert that is both hot and cold and melty and yummy and…*DROOL*. Ahem. Sorry. Bit of a food nerd here. At least I’m a foodie who loves to eat (within my dietary restrictions that is!).
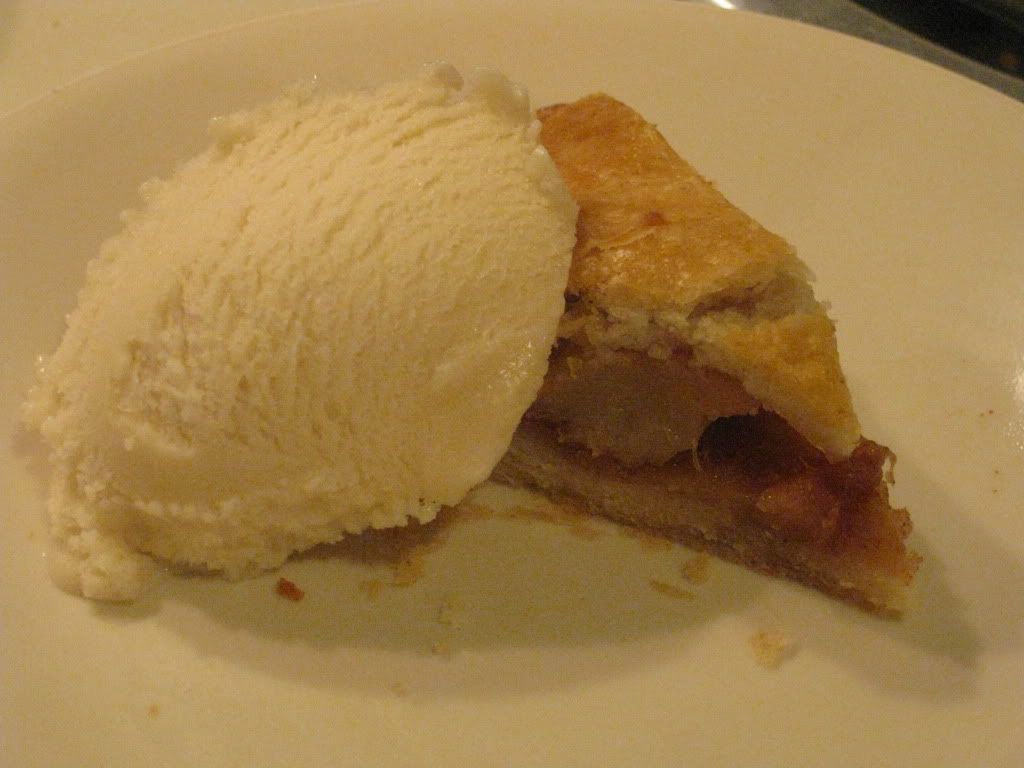
So, when the microwave tolled it’s completion of the heating process, I removed the plate with the slice of pie resting on it and eased my spoon into the ice cream.
Smooth. I expected something rock-hard, or flaky (some non-dairy ice creams can be crystallized and a bit hard to get a good, creamy scoop out of). But So Delicious really delivered here. The ice cream folded up in the spoon to create a perfect scoop. I set it alongside the pie (trust me, for calorie purposes, the serving size was halved and setting any ice cream on top of this itty-bitty slice was not an option). I repeated it with the other half of the slice and served one to my roommate and myself.
Oh. My. Foodie. God.
First of all, having a delicious gluten-free pie is one thing. But the ice cream. Oh, the ice cream just totally made this dessert. I loved how it mixed perfectly with the buttery, flaky goodness of the pie crust, and the hot apples in the center just aided in creating this hot/cold, flaky/melty mess of a dessert. And it was everything I dreamed it would be.
The So Delicious Creamy Vanilla won’t slap you in the face with its vanilla flavor. It is very subtle. That being said it is also very delicious. Trust me. I was highly impressed. I loved how it had just the right hit of vanilla flavor so that it wasn’t underwhelming or overwhelming. It was just perfect. I would buy this again in a heartbeat…and eat it straight. I might even still turn it into a sundae, or just put it in a gluten-free ice cream cone (I still have some of those in my pantry!).
Being lactose intolerant and gluten free doesn’t have to mean ice cream is off limits. It just means you find an ice cream that suits you. Preferably one that is So Delicious.
A scoop of So Delicious Dairy Free Creamy Vanilla Soy Milk Ice Cream over a small slice of Katz Gluten Free Apple Pie
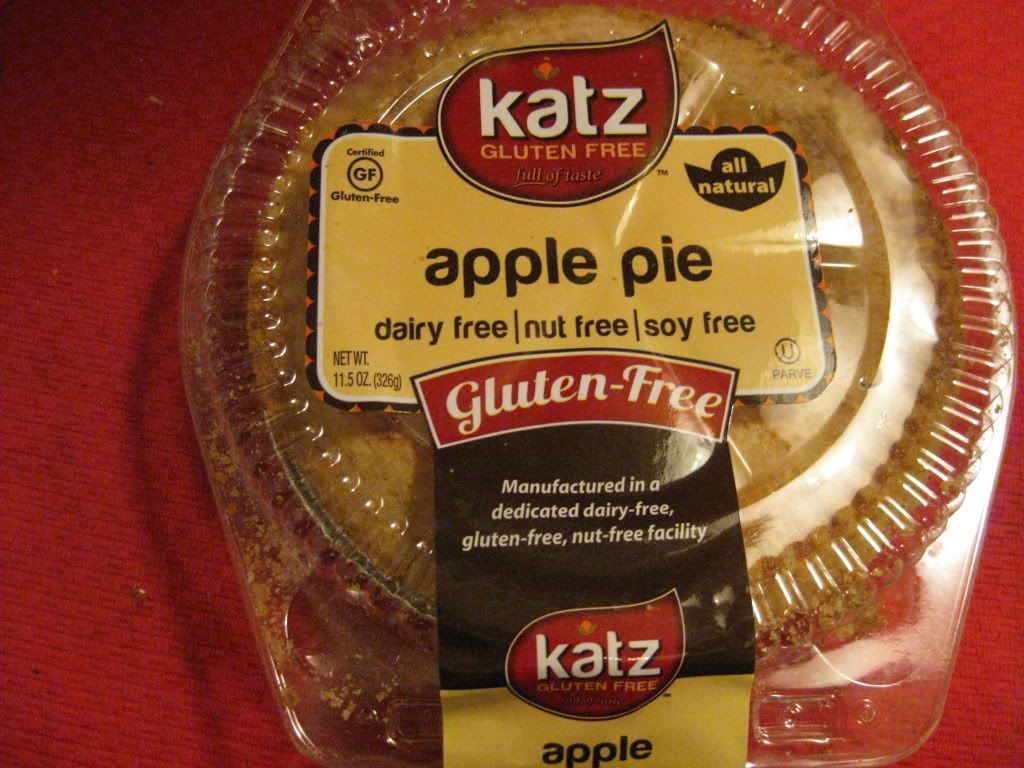
Product: Katz Gluten-Free Apple Pie (Personal Size – 6 inches) – $7.49
Do you know how long it has been since I’ve had apple pie? Seriously?!
Actually, up until this past summer when I was visiting my family in Minneapolis, Minnesota, it had been…years since I last had an actual slice of pie. I’ve never been big on pie. It’s like my cake…I prefer it sans frosting. Weird, I know. But that’s just me. So, pie had sort of slipped off my radar up until…my cousin’s husband did a gluten-free version of his family’s famous strawberry pie. I never ate so much pie in my life. It was amazing. And he was kind enough to share the recipe with me, so I made it once as well. And so…my long absent admiration of pie finally returned.
But, after I made the strawberry pie for an office luncheon (made it vegan in addition to gluten-free), I just didn’t have the drive to attempt another pie. A different pie. A classic pie, perhaps. Like cherry or apple or something. A lot of it is…making pie crust can be tricky. Especially that top layer. And using a gluten-free flour can be…well…it can be an absolute mess if you don’t use it appropriately. Even the pre-mixed gluten-free all-purpose blends work well in some things better than others. And a pie is a huge time commitment…so I never could quite commit to trying to bake one up for myself.
But, one day my roomie went ahead and placed an order with Katz Gluten-Free. I wasn’t allowed to look at the receipt that came through my e-mail. I was to wait and see what turned up in the box. Let me tell you, it was like Christmas when the order arrived at the office that day. One of the products inside:
Katz Gluten-Free Apple Pie.
Katz Gluten-Free Apple Pie (thawed)
A PIE!!
Well, as usual, I have more than enough desserts/sweets in my pantry and freezer to go around, and other items had to be used up first. So, it wasn’t until yesterday that I finally got around to pulling the pie out of the freezer. I allowed it to thaw on the counter for a bit, before putting it into the refrigerator while I was at work.
That evening was a busy, busy, busy one. Not only, after working all day, did I have leftovers to reheat, gluten-free bread to toast, and a salad to throw together, but we were trying to hustle out the door to drive into Louisville to see the Dave Matthews Band in concert as well. At least the main part of the dinner (Scalloped Russet Potato and Yam Gratin with Fresh Herbs, in case you were wondering) was just a simple reheat and salads don’t take too long to throw together when all is said and done. With the bread toasted in the oven, I got dinner together and we chowed down.
And I knew…despite being in a hurry, that dessert was necessary.
After we polished off our plates, I got up and gave my usual question: “Dessert?”
“Yes ma’am!” came her response.
And so, into the fridge I went and pulled out the Katz Gluten-Free Apple Pie that was just sort of chilling in there. I turned it over before tearing it open to check serving size and nutrition information. And with that in mind, and some So Delicious Creamy Vanilla Soy Milk Ice Cream lingering in my freezer door, I made a decision to make up some Gluten-Free Apple Pie À La Mode. And the star of the show was going to be a slice of Katz Gluten-Free Apple Pie.
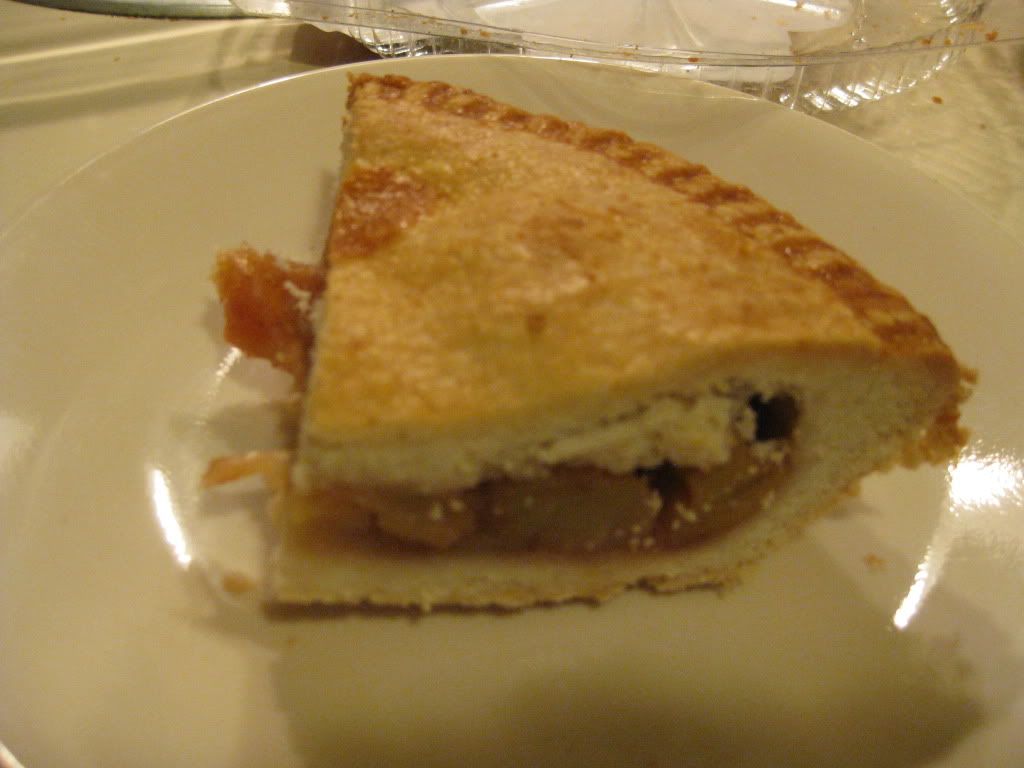
Since normally 1/4 of the 6 inch pie is the serving size, totaling up to 230 calories and 12 grams of fat, I decided to make each already tiny slice into two even tinier slices of pie. That way I would half the calories and fat…and the pie would last longer. But…I am not kidding when I say these slices are teeny-tiny. They were already small when cut into fourths, imagine in eighths. The things we do accommodate the addition of ice cream.
Three-bite slice of pie…why not?
A slice of Katz Gluten-Free Apple Pie (1/4 of pie serving size)
Aside from the tiny serving size…this pie is actually quite good. As I stated before, I’ve never been someone who would actively order pie. But if my mom made it for the holidays, you bet I was having a slice (except if it was pumpkin pie…never been a fan!). So, after slicing the pie into quarters, I halved each one and removed the tiny sliver of pie, placing it on a plate and giving it a quick zap in the microwave to warm it. Then, once it was removed, I scooped up a small bit of ice cream (small pie = small ice cream scoop) to have with it. Viola. Gluten-free (and dairy free) Apple Pie À La Mode.
So, how did it taste?
Well…it warmed up to perfection. The inside was soft and hot, the apples sizzling with the heat as though it was fresh from the oven. And the crust was flaky and toasty and just amazing. And, take my word for it…this pie pairs very well with ice cream (or dairy-free ice cream like what I used). Honestly. While the dessert was a simple couple of bites and then gone, it is still very satisfying. The pie honestly reheats without falling into a mushy mess. The crust is the true star of the show. Sure, it’s not crispy like it would be fresh out of the oven, but it has that buttery, flaky texture to it that I remember from my mom’s homemade pies.
I have attempted to get some local grocery stores to carry some of Katz Gluten-Free Products. One said that they carry a couple of things by the company, but can’t carry the pies because they contain high fructose corn syrup. Now, I have been over the label and ingredients countless times and I haven’t found mention of high fructose corn syrup anywhere. I refuse to buy anything with high fructose corn syrup in it and do my best not to consume anything that might contain it. Whether this is old information or I’m missing a code word on the label, I don’t know. Perhaps it is something I should talk to the company about to make sure.
In the end, however, my seemingly high fructose corn syrup -free gluten-free apple pie from Katz was a total win with both myself and my roommate. Even though the slices are itty-bitty (if you are working within certain calories for the day), they really end up being just enough to satisfy the need for something sweet at the end of a meal. If calories and fat aren’t something you care to watch…dig on in and have a quarter slice or even half the pie. Trust me…these are small pieces.
If you feel like you’ve been missing out on pie…go ahead and place an order with Katz Gluten-Free. I am absolutely in love with this apple pie and a friend of mine has raved about the blueberry pie…so I think I might have to look into trying that one in the near future.
Oh…and trust me…dish out some ice cream with this. It’s a divine treat all around.
Nailed it again, Katz. Nailed it again!
A slice of Katz Gluten-Free Apple Pie (1/8 of pie served with a scoop of So Delicious Creamy Vanilla Non-Dairy Ice Cream)
Product: Vino de Milo Portobello Shiraz Pasta Sauce – $5.99+
As is evident by this blog, I am a sucker for new products that are not only gluten-free, but also vegetarian. And one of my favorite things to test is pasta sauces. Why? Well, growing up my favorite thing to eat was pasta. It didn’t matter what kind of pasta dish it was…I just loved pasta. Even more, I loved to cover it in sauce. Yum yum!
When the gluten-free thing had to happen, I thought pasta would never be the same. In fact, it was months before I even attempted to make any sort of gluten-free pasta dish. And…sadly…it didn’t quite live up to the stuff I used to have and consume by the plateful.
But, as time went on, I discovered different types of gluten-free pastas, different brands…and the same held true for sauces as well. I’ve tried a lot of really good sauces and I’ve tried others that were decent enough…but…I’d probably never purchase again.
While out at Whole Foods one day, an end-cap full of pasta sauces I had never seen before caught my attention. All of them were clearly marked gluten-free…and I knew that I had to take one home with me and try it. So, my roommate and I looked over the various selections being offered and finally decided that the best one would be to go with the Portobello Shiraz, a pasta sauce made from diced tomatoes, tomato sauce, fresh onions, fire-roasted portobello mushrooms, fresh garlic, fresh herbs, extra-virgin olive oil, crushed red pepper…and Shiraz wine.
No ingredient on there sounded unappetizing and there were no chemicals or added preservatives. Even better.
So, it came home with us and we began working our way through some of the other sauces in the pantry. Last night, however, was Vino de Milo’s night to top off some fresh (yes…you read that right, FRESH) gluten-free pasta. I sauteed up some mushrooms and some yellow onion, added the fresh pasta noodles and poured two servings of the sauce over the noodles in the pan to warm it. And then…when it was ready, I dished it up. A small shake of freshly grated Parmigiano-Reggiano topped it off and I served a bowl to my roommate and kept the other for myself.
I was already in a happy place due to the fresh gluten-free pasta (which was superb!) The addition of a new pasta sauce had me eager to dig in and have a taste. Before I even settled in though, my roommate had taken a taste and declared the pasta to be fantastic…the sauce…not so much.
My heart sank. But I went and settled in with my own bowl to make that call for myself.
Sadly…she was absolutely right. It wasn’t that this sauce is bad. It’s not. It’s just that I have tasted others that have been so much better than this one. The wine, while a common and usually delicious addition to any tomato-based sauce…just didn’t seem to fit in this one. Trust me, my own homemade marinara uses wine…and I love that one. Perhaps it was the type of wine used. The Shiraz is normally a slightly spicy wine, but here it just sort of made everything taste like…it had a touch of vinegar on it. It just wasn’t a good fit. It wasn’t bad…it just tasted all wrong. But…we are going to finish off the jar regardless.
I don’t know if I would be willing to try other options for sauces by Vino de Milo after this one. While I love a good spicy kick to any sauce, this just didn’t deliver for me. Thankfully, the pasta and the vegetables were there to lend a hand to the dish. And I also didn’t drown the pasta in sauce (I kept to the serving size!).
Nutritionally speaking, Vino de Milo’s Portobello Shiraz is a healthy choice when it comes to sauces for pasta. A serving (1/2 cup) is only 40 calories. Love that. It is also completely fat free and low in sodium (330 mg) and sugars. So, it is a rather healthy choice when it comes to sauces. I mean, it is a marinara, it shouldn’t be loaded with a lot of unnecessary calorie-loaded and fat-laden things. So, there is the good. I just wished it tasted better.
If I find myself looking for another sauce to give a try, I might try a different variety of Vino de Milo pasta sauces. But the Portobello Shiraz was definitely not the way to get started on this brand.
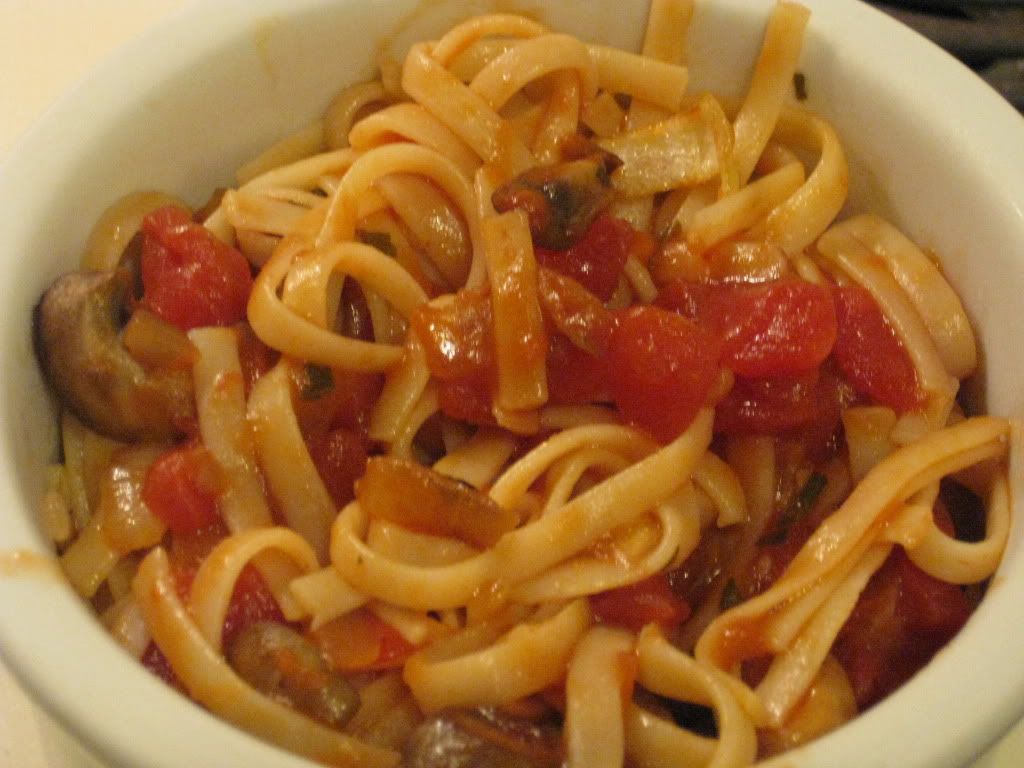
Vino de Milo Portobello Shiraz Pasta Sauce over RP’s Fresh Gluten-Free Linguini and sauteed mushrooms and onions
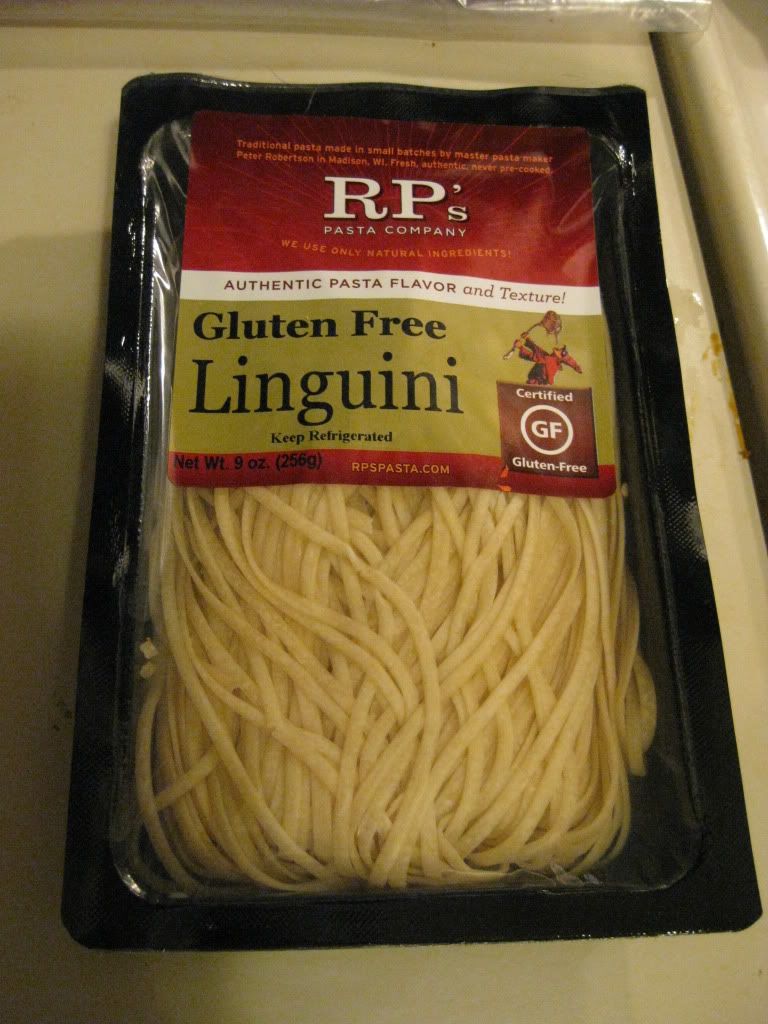
Product: RP’s Pasta Company Gluten-Free Linguini – $5.99+
I had a “Pinch me, I must be dreaming!” moment a couple weeks back while I was out grocery shopping at my favorite local grocery store…Earth Fare. If you have an Earth Fare in your town…run…do not walk…to that location and grocery shop. This little grocery store brings me so much gluten-free goodness that I have taken to calling it Earth Joy. I never walk out of there without seeing or purchasing something new or something that has made me happy.
And, let me tell you, living where I do, sometimes gluten-free goodies are beyond hard to come by.
Well, this moment happened when I was scoping out the cheese section and looked up to spot…gluten-free pasta in the refrigerator section. Like…that awesome homemade fresh pasta that just takes minutes to boil. Not that boxed rice or corn or quinoa pasta. No, my friends. This was like fresh noodles all vacuum sealed and just ready for some boiling water and a touch of sauce. I was elated.
And while out and about on Saturday afternoon doing my grocery shopping, my roommate treated me to a package of this pasta.
The brand is RP’s Pasta Company. Now, I am not familiar with this company at all. And given that I have been doing the gluten-free thing for almost two years now, you would think I’d know of every brand out there. But, this was not the case. It’s a good thing I like surprises.
RP’s Pasta founder and owner Peter Robertson, was approached by a long time customer and friend who was upset because she had to stop eating wheat. Robertson felt that everyone should be able to eat fresh pasta set out to develop a recipe of equal or greater quality of the regular RP’s fresh pasta. It happened in 2008 and from then on out, RP’s began producing fresh gluten-free and wheat-free pasta that matched the quality of their traditional semolina pasta.
The main ingredients of the RP’s Gluten-Free Pasta are brown rice flour, potato starch and egg. From there, they managed to work the ingredients to match the quality and texture of any high quality fresh pasta. Along with making a good product, RP’s gluten-free pastas are produced in a dedicated wheat-free area to insure proper safety and no cross-contamination.
If that wasn’t enough to convince you…the following night, Sunday, I was ready for some pasta.
The product that I chose (because they had a few in the refrigerated section) was RP’s Gluten-Free Linguini. It was so easy to prepare that I was able to get some vegetables sauteing, ready some gluten-free bread for toasting, prepare two salads, and get water boiling without needing an extra hand. And, there was no real reason to have to time things around pasta that might or might not be done within the time stated on the package. That’s the thing about fresh pasta…it literally only takes two to three minutes and you have pasta perfection.
RP’s Gluten-Free Linguini was awesome. It was so easy to prepare too. I just started some water boiling, pulled out the pasta and seaparted it as much as I could. Then into the water it went for about 3 minutes. Afte I drained it, I tossed it into the pan with my sauteing vegetables and a hit of the sauce I was using. I stirred it around until all was mixed and coated. Then it went into the bowls for serving.
One bite was all I needed to discover that this pasta was all I wanted from here on out (once I use up the stuff in my pantry, that is). Nothing beats a good quality fresh pasta. And that was what I was lacking after having to go gluten-free. But not anymore. I thought this pasta was beyond the quality of any of the hard shells and noodles that I’ve been having to purchase for any sort of pasta dish I want to create. Never again. The linguini was perfect al dente in 3 minutes. It paired well with my vegetables and sauce. I was beyond happy with the texture and the taste. Honestly…the absolute best gluten-free pasta I have had in the two years I have been gluten-free. I’m astounded and amazed and only wish I had known about this before now.
One serving of this pasta is 220 calories, which is pretty much standard for any pasta. It has only 2 grams of fat and provides 47 carbohydrates. The long distance runner inside me cheers for joy with that. The sodium content is relatively low (539 mg) each serving. And the taste and texture are unmatchable. Trust me. I have never been so happy eating a bowl of linguini than I was last night. Even if the new sauce I used wasn’t good. The noodles were the star and these really stood out and impressed.
RP’s Pasta Company Gluten-Free Linguini (cooked and sauced)
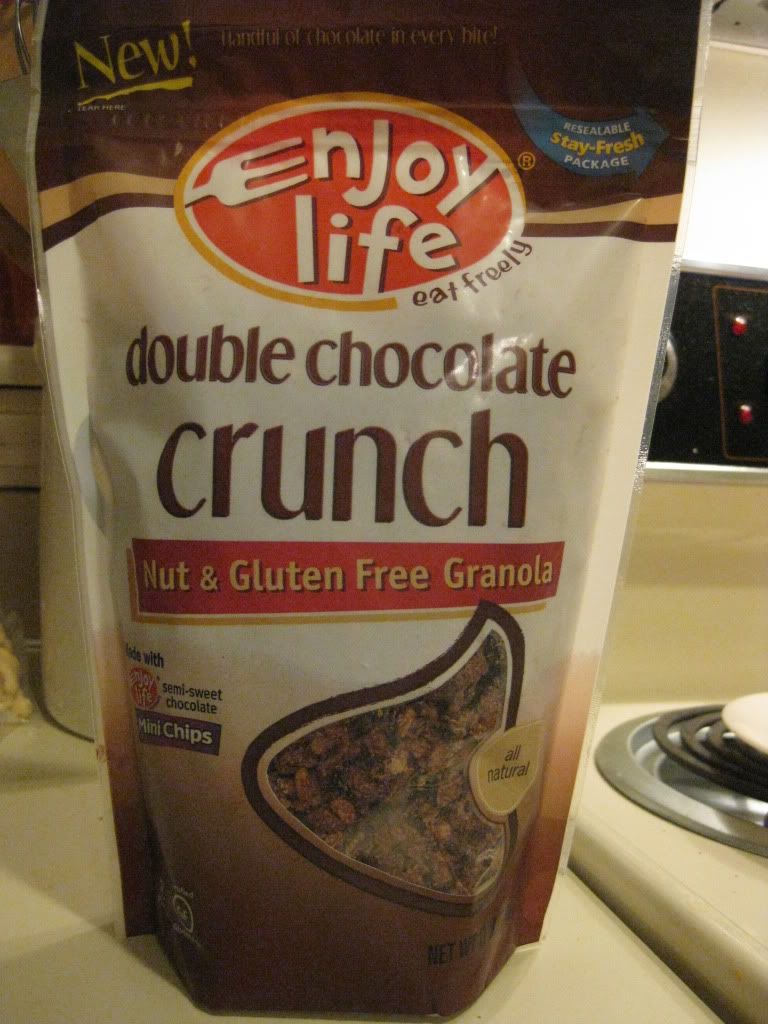
Product: Enjoy Life Double Chocolate Crunch Granola – $5.99+
Say it with me…
Chocolate. For. Breakfast.
Sounds sweet, yes? Sounds, perhaps, a little decadent? Perhaps more than a little sinful?
In most cases, you would be right to think so. But there is nothing sinful about Enjoy Life’s Double Chocolate Crunch Granola. It’s sweet. It’s chocolate. And yes…it can be even made into something decadent. But you will be amazed at how good this actually is as far as, not just gluten-free granola (and granola in general) goes, but chocolate granola at that.
My problem with most granola is that it is laden with sugar. I try to eat healthy…and at times I am as guilty about splurging on some sweet treat than every other human being out there. We like to treat ourselves to something at times. This chocolate granola from Enjoy Life foods is all treat without the guilt. I promise…even I was shocked by the nutritional information on this.
But I’ll get to that momentarily.
I actually picked up a bag of Enjoy Life Double Chocolate Crunch granola at Big Lots one afternoon while out shopping. It was a random stop, but I couldn’t turn down the price. Most of the time it is far more expensive than what I found it for at Big Lots. Score. I’d been wanting to try chocolate granola for ages and had seen this at other stores, but had been more than a little reluctant to pay the price for it. Now…I had reason to welcome it into my pantry.
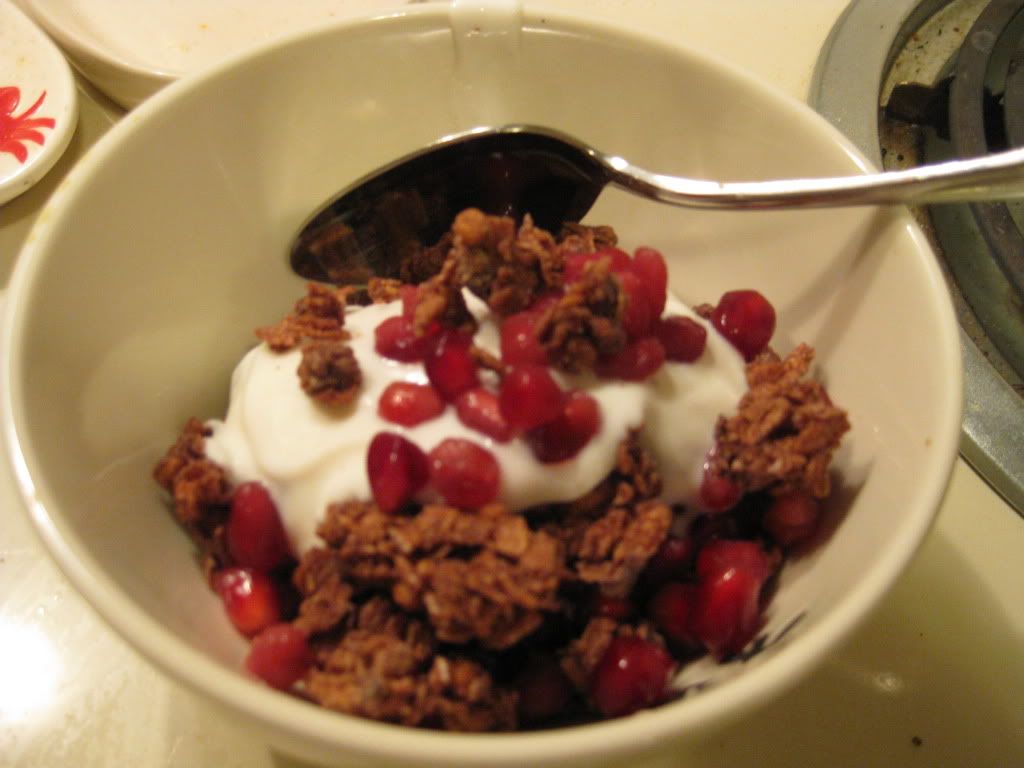
This morning, I had some Chobani vanilla chocolate chunk Greek yogurt to finish off, some pomegranate seeds to use, and a pantry that held the key crunch component of my infamous breakfast parfaits. I reached into my pantry and eagerly pulled out the bag of Enjoy Life Double Chocolate Crunch and eagerly began assembling my gluten-free and mighty tasty breakfast parfaits.
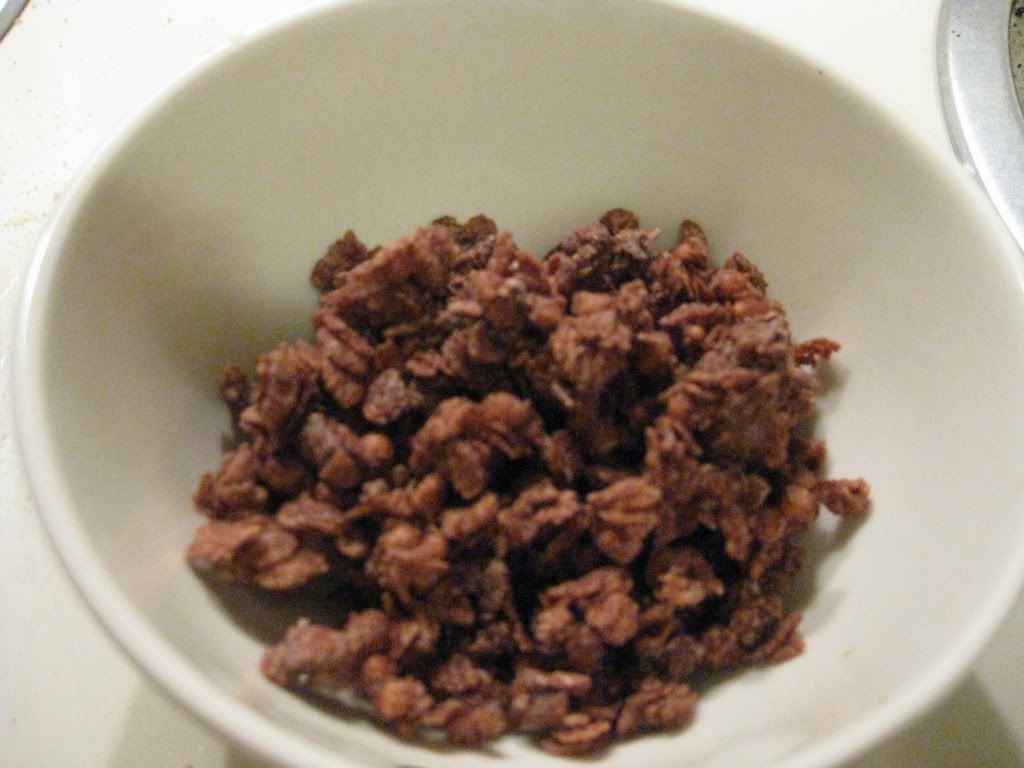
A serving of Enjoy Life Double Chocolate Crunch Granola
In the bowl, a small layer of granola. Over that, some Greek yogurt. Then the pomegranate seeds. Then more granola, more yogurt, more pomegranate seeds, then one last dusting of granola. It’s super simple and super delicious. And it makes for a delicious breakfast treat to start off the morning with. I just knew that the chocolate and pomegranate would be a match made in heaven. In fact, I couldn’t wait to try it so I dug right in.
Super chocolate YUM! No joke. I loved how crisp this granola is. And scattered throughout it are chunks of allergen-free chocolate. Love that. In fact, this granola is free of the top eight food allergens (wheat, dairy, peanuts, tree nuts, eggs, soy, fish and shellfish). I love that. It is composed of brown rice flakes, evaporated cane juice, chocolate chips, brown rice syrup, rice crisps, cocoa powder, ground flaxseed, vegetable oil, vanilla, salt, and rosemary extract. When combined, what develops is this amazing chocolate granola that is a delight to nibble on, plain, with a splash of milk (I use unsweetened almond milk), or in some sort of a breakfast parfait, dessert topping, etc.
Nutritionally speaking, for a chocolate granola (or just as granola) this is one of the better options. A serving size is 1/2 cup and that will only set you back 180 calories and 4 grams of fat. That’s not bad at all comparatively speaking. But what surprised me and pleased me even more was that the sugar content in a serving was only…only…11 grams. A lot of regular granola pack twice that. Color me impressed.
What also impressed me was the taste and texture of this granola. It was sweet without being overly sweet. The chocolate was a delicious sweet touch and it really popped when I mixed it into my breakfast parfait. On its own, however, it was just as tasty. I love the chocolate chips that are scattered throughout, making a nice pop of chocolate with every bite. I was in love with this granola upon first bite. And I’m already coming up with other ideas of how to use it and use it well.
If you are in the market for a granola and are craving a hit of chocolate…you can’t go wrong with Enjoy Life’s Double Chocolate Crunch Granola. I’m so happy I finally got to try this. And now…I don’t think I can survive without it.
Enjoy Life Double Chocolate Crunch Granola layered with Chobani Vanilla Chocolate Greek Yogurt and Pomegranate Seeds