Product Review: Ian’s All Natural Allergy Friendly Cinnamon French Toast Sticks

Ian's All Natural Allergy Friendly Cinnamon Friend Toast Sticks
Ian’s All Natural Allergy Friendly Cinnamon Friend Toast Sticks

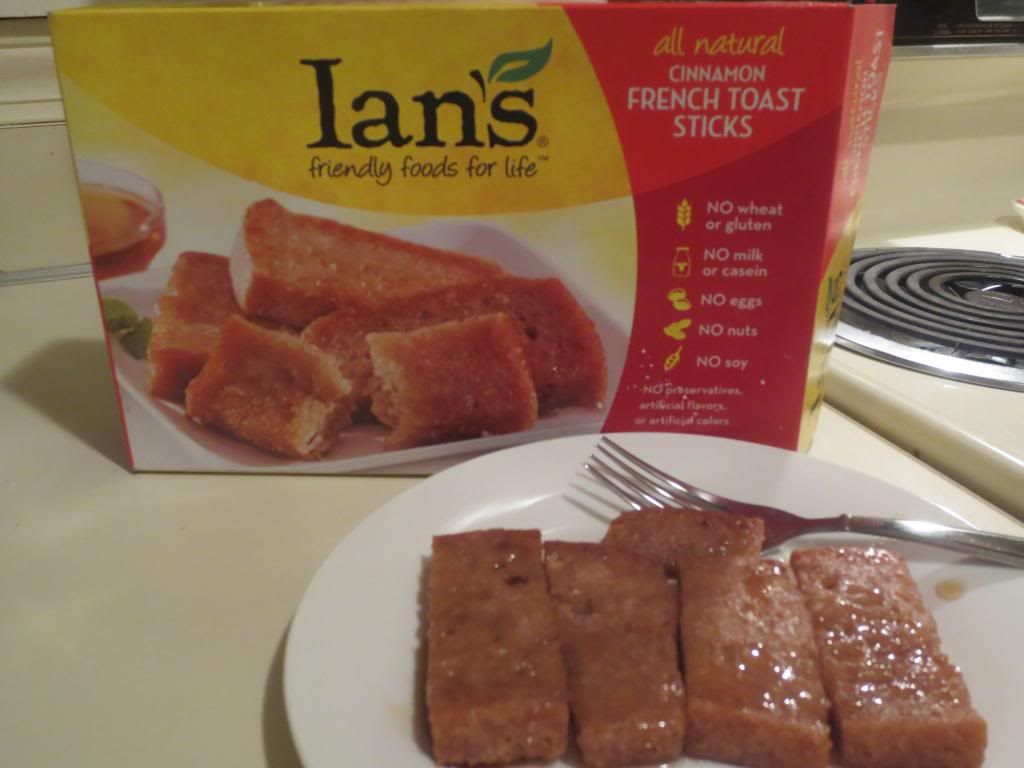
Product: Ian’s All Natural Allergy Friendly Cinnamon French Toast Sticks – $4.99+

It was the morning before the biggest race of my life.  My first marathon.  THE CHICAGO MARATHON.

I had just run an easy 3 miles before showering, getting dressed, and trying to find something a little substantial for breakfast for me, Cathy, and our friend Jenn before the three of us hit the road to Chicago.  Lunch was not going to happen…so our food was going to be the snacks I made/packed and then a nice dinner at a restaurant that does gluten-free options out the wazoo for dinner.  So, along with a bowl of Chocolate Chex…I reached into the freezer and pulled out the box I had of Ian’s All Natural Allergy Friendly Cinnamon French Toast Sticks.

I love French toast, and being gluten-free…I don’t get it unless I make it.  BUT…that normally means that it’s French toast made with sandwich bread.  Not delicious brioche or some other fancy-schmancy bread like all the “regular” people get to eat.  Prior to these…I had been spoiled by the gluten-free delicious awesomesauce that is Van’s Gluten-Free Cinnamon French Toast Sticks.  I mean…those blew me away.  So, when I spotted Ian’s own version at my local natural foods, I picked them up for the occasion where I couldn’t cook an elaborate breakfast (which I am known to do…even on weekdays).  The morning before a long-ish road trip seemed like the perfect time to break these out and give them a try.  I was excited…because the pizza I had from Ian’s was SO amazing and good.  I only expect good things now from them.

I noticed that the box indicated these were best cooked in the oven…which is what I intended to do regardless.  So, I preheated the oven as directed by the box and then opened up the package to get a look at the contents.

Here is where my first issues with this product fall.  Obviously, this product is geared more toward kids, however, I still think that the French toast sticks could be normal bread size.  Van’s French Toast Sticks are the size of regular bread.  The version by Ian’s…about the length of my thumb…maybe a little longer, but not by much.  Strike One.  The box also says that there are 5 servings inside.  A serving is 4 sticks.  I had enough for my friends and I to have 1 serving each and then split one lone stick into thirds to make it even-Stevens.  Five servings my marathon-running behind!!  So aggravating.  So…Strike Two.

What did intrigue me about these miniature French toast sticks is that they had this white crust of sugar on them.  Okay…this was new.  I figured that would cook up and melt down in the oven and be a delicious part of this, so far disappointing, product.  My faith went all to Ian’s here…I trusted them.  So…into the oven they went…cooked as directed, and removed when done.

I dished up a serving and 1/3 for each of us, warmed up some maple syrup, and breakfast was served.

I really, really, really wanted these to be good.  Two strikes so far…they needed to taste epic.  But…they didn’t.  That white sugar-like coating did nothing to enhance the flavor of this bland product.  In fact, when it cooked, it didn’t melt and give that warm cinnamon-sugar feel I was hoping for.  Instead it created this hard crust around each little piece of French toast.  Not impressed.  The maple syrup, I hoped, would soften it up.  I always warm my maple syrup…but that didn’t even help.  And the flavor, overall, very, very bland.  I hated the fake sugary flavor that these had.  I hated the texture…so tough on the outside thanks to that coating of sugar. Yep…Strike Three.

You better believe these will never find their way into my freezer again.  So disappointing coming from Ian’s.

Regardless…I still feel I need to discuss the ingredients and the nutritional worth of this product.  Ian’s All Natural Allergy Friendly Cinnamon French Toast Sticks are made from cinnamon brown rice bread, tapioca starch, cinnamon, yeast, cane sugar, and a batter consisting of water, white rice flour, cane sugar, tapioca flour, potato starch, cinnamon, sea salt, and xantham gum,  While I admire and approve of the fact that I recognize every single ingredient on that list (no preservatives, no chemicals, nothing fake), I just wish this product tasted good.  Because…it was a rather epic fail on the food scale.  This product also contains no wheat or gluten, no milk or casein, no eggs, no nuts, and no soy.  It is vegan safe…but not vegan tasty.

As for the nutrition information…as I mentioned earlier, a serving of Ian’s All Natural Allergy Friendly Allergy Friendly Cinnamon French Toast Sticks is 4 of the little mini pieces.  These four bites (seriously…bites) will serve you up 170 calories (NOT WORTH IT!) and 6 grams of fat (NOT WORTH IT!).  You will also be supplied with 95 mg sodium and 2 grams of sugar.  You only receive 2 grams of protein and absolutely no fiber from these.  So, these will not leave you feeling full or satisfied for hours.  Nope.  In fact, we were all reaching for the homemade gluten-free madeleine cookies I baked up about halfway to Chicago.  So annoying.

There is absolutely nothing redeeming about this product.  It was a total and complete disappointment from the moment I opened the box.  I was hoping it would only get better from there…but it was a false hope.  And the three of us who ended up eating them despite not really caring for them…were not impressed nor happy with our breakfast that morning.  It was a good thing dinner was fantastic.  And it’s a good thing I bake a mean gluten-free madeleine!!

Never…ever…again.  Sticking with Van’s Gluten-Free Cinnamon French Toast Sticks forever and always!

Sorry, Ian’s…but you lost me on these.  At least your pizza is still good…

Product Review: Love Grown Foods Apple Walnut Delight Oat Clusters

Love Grown Foods Apple Walnut Delight Oat Clusters

Product: Love Grown Foods Apple Walnut Delight Oat Clusters – $4.99+

Granola is something that I buy…every week…when I’m at the grocery store.  I have to be selective.  I have to.  The requirement is it must be gluten-free and have a low amount of sugar.  I don’t want my granola to be packet with sugar.  I already take in way more sugar every day than I should.  So…two requirements.  You’d be surprised how many granola brands on the market do not fit that bill.

A lot.

That being said, there are a few select brands that do…and they are brands that I am quite familiar with and return to in my constant rotation of granola through my pantry.

This week…I let my roommate choose.  She and I both adore, love, and cherish the granola we get from Love Grown Foods.  So, she opted with that brand.  YAY!  Her flavor choice, however, was a new one for us to try.  It is their Apple Walnut Delight.  Since I am putting this granola over Greek yogurt and caramelized apple…I figured this was actually a very good choice.  Therefore…it was the granola gamble of the week.

I have fallen in love with every flavor of the Love Grown Foods Oat Clusters that I have brought home.  They strike that perfect balance, whether eaten on their own, with milk, or in one of my infamous breakfast parfaits.  The seasoning is spot on, the sweetness is at the right level.  The flavors are subtle…yet…just there, so your taste buds catch every part of the cluster…the granola mix…but it doesn’t overwhelm the palate.  Love Grown Foods distributes love with each sack of granola.  For real.

The Apple Walnut Delight Oat Clusters are truly…delightful.  The granola is a blend of gluten-free oats, honey, walnuts, coconut, agave syrup, expeller pressed canola oil, dried apples, sunflower seeds, pure vanilla, milled flaxseed, cinnamon, and sea salt.  There is truly a touch of sweet and savory in this one…but it means you keep on going back for a little more…then…a little more.  It’s a fantastic balance.

The dried apples are really good, and the walnuts add a bit of rustic flavor to the mix.  But the star is the sweetened gluten-free oats.  The way the agave and cinnamon play against each oat flake is amazing.  The touch of vanilla livens everything up.  And each bite will leave you quickly spooning your bowl for another one.  Or, at least that’s what happened in my case.  I was loving the clusters in this one…the pockets of cinnamon and vanilla, mingling with the nuts and the fruit.  It’s one flavor party in a bag…in my breakfast…and in my belly.

Let’s talk nutrition for a moment.  A serving of Love Grown Oats Apple Walnut Delight Oat Clusters is 1/4 cup.  This serving provides you with 130 calories and 6 grams of fat.  A serving is low in sodium (only 35 mg) and only contains 7 grams of sugar.  That is fantastic for a granola.  Trust me.  Each serving provides 3 grams of fiber and 3 grams of protein as well.  This granola is cholesterol free, gluten-free, and non-GMO!

Loving it.

And loving Love Grown Foods once again.  If you love the taste of apples and cinnamon…with a hint of nuttiness with the addition of the walnuts…then you should definitely try this granola.  These oat clusters are fantastic.  Love Grown Foods really does put a lot of love into their products.  That is beyond evident.  Every time I try a new product from their lineup.

Still impressed.  Still loving it!

Caramelized Apple and Greek Yogurt Breakfast Parfait with Love Grown Oats Apple Walnut Delight Oat Clusters

Recipe: Gluten-Free Smokey Purple Sweet Potato and Chickpea Veggie Burgers

While out grocery shopping this weekend…my roommate and I both made it abundantly clear that we were craving burgers.  Now, she’s a carnivore…and I’m a vegetarian…but she loves veggie burgers…especially when I make them out of real ingredients…fresh…not frozen…not a patty of artificial preservatives and more chemicals than a science lab holds.

Which…makes me incredibly happy!

I’m heading to Chicago this weekend…nothing major…just RUNNING IN THE CHICAGO MARATHON…that’s all.  So, I’m trying to use up as much of my produce that will inevitably go bad while I’m out of town.  So…I had a brilliant moment of brilliance while out running 4 fast miles this morning.  Because…when I run…I think about food.  And I thought…purple sweet potato…and some sort of bean from the pantry.  I have cans and varieties, folks.  When you’re a vegetarian…this happens.  So…after returning home and taking a shower…I got to work in the kitchen creating my base for my veggie patties that I would form upon returning home from work.  A sit in the fridge might actually help the mixture, yes?

I seasoned it up with paprika, cumin, salt, onion powder, and a little hit of black pepper.  That’s where the smokiness comes from.  The rest…well…see for yourself…

Recipe: Gluten-Free Smokey Purple Sweet Potato and Chickpea Veggie Burgers

Gluten-Free Smokey Purple Sweet Potato and Chickpea Veggie Burger (with a side of homemade beet chips)

Servings: 8
Time: Prep 20 minutes; Cook 10 minutes

Ingredients:

  • 2 cups coarsely mashed sweet potatoes (or yams), about 2 large potatoes (I used purple sweet potatoes, but you can use any variety)
  • 1 cup chickpeas (garbanzo beans), drained and rinsed
  • 2 garlic cloves, minced
  • 1/3 cup gluten-free bread crumbs (I used Southern Homestyle Gluten-Free Corn Flake Crumbs)
  • 1/3 cup flour (I used Better Batter Gluten-Free All Purpose)
  • 1 large egg, lightly beaten
  • 1-1/2 teaspoons smoked paprika
  • 1 teaspoon onion powder
  • 1/2 teaspoon pepper
  • 1/8 teaspoon cumin
  • 1 teaspoon salt

Directions:

Pierce the potatoes (I used 2 large) all over with a fork and place on in the microwave on a paper towel.  Microwave for 5 minutes, then flip and cook for 5 minutes more. Remove the potatoes and slice them in half, allowing them to cool enough so that you can scoop out the flesh.

In a large bowl, coarsely mash beans with a fork.  Add the sweet potatoes and mash together.  Add in the cumin, paprika, onion powder, spices, salt, pepper, minced garlic, egg, breadcrumbs,  and flour.  Mix together until combined.

Refrigerate the mixture for 15-20 minutes or all day while you’re at work (like me).  This will help make it easier to form them into patties…but they still can be quite messy.  Trust me.  then place bowl in the fridge for 15-20 minutes. This helps form them into patties, but as a warning they are still somewhat messy.

Heat a large skillet over medium heat and add 2 tablespoons coconut oil (or olive oil).

Remove the mixture from fridge and form into 8 equal patties.  Once the skillet is hot, place the patties in the pan and allow to cook on one side for about 5-6 minutes.  Make sure it has a nice crust on that first side before carefully flipping it over and allowing to cook for another 5-6 minutes.

Toast buns if desired.  I toasted the gluten-free hamburger buns I picked up from my local allergen-free bakery, Annie May’s Sweet Café.

Assemble the burger with your favorite toppings and enjoy!

I served mine with homemade beet chips.

Yum!

~*~*~

These burgers can be a bit crumbly…but they are so packed with flavor.  I loved the smokiness brought on by the paprika.  And the sweet potatoes and chickpeas definitely made a nice base for this patty.  All it took was a little binder and my favorite toppings (kale, caramelized onion, and avocado slices)…and dinner was an epic burger of vegetarian awesomesauce.  I also made a vegan roasted garlic sriracha aioli to top off the burgers.  DELICIOUS!

I am so glad I have 6 more of these patties in my freezer.  They were truly fantastic.  A lot of flavor in each bite.  That’s how veggie burgers should be done.  They were a bit crumbly…but on the whole…a total win.

Try them out…and see for yourself!

Recipe: Baked Delicata Squash with Pomegranate and Goat Cheese

I know what you’re thinking.  You’re thinking…”Squash…again?”  Heck yeah.  It’s the time of the year where my CSA bin is inundated with squash.  It’s unstoppable.  You can’t stop it.  You just have to embrace it, find new ways to eat it, and then enjoy the fruits of your labor.

In this case…that’s exactly what I did.

This is the second time my CSA bin has thrown delicata squash my direction.  I copped out last time and chopped it, steamed it, then threw it on a broccoli crust pizza.  But this time…I really wanted to experience the delicata squash.  So, I went hunting on Pinterest (because…hello!) and happened across a recipe originally posted on the blog Peanut Butter & Peppers, which focuses on health, fitness, and good food.  As delicata squash was not something that came up a lot on Pinterest…and I had the squash and goat cheese…I figured I could at least wrangle up a pomegranate (or 2…because I love pomegranate) and give this recipe a try.

Tonight…was that night.  And below…is said recipe.

Recipe: Baked Delicata Squash with Pomegranate and Goat Cheese

Baked Delicata Squash with Pomegranate and Goat Cheese

Servings: 2
Time: Prep 10 minutes; Cook 20 minutes

Ingredients:

  • 1 Delicata Squash (536 grams)
  • 2 tsp. olive oil
  • 1/4 tsp cinnamon
  • 1/4 tsp. salt
  • 1/8 tsp cayenne pepper (optional, but highly recommended)
  • 2 tbsp. pomegranate arils
  • 1/2 oz goat cheese


Directions:

Preheat oven to 375 degrees

Line a baking sheet with aluminum foil, spray with cooking spray.

Wash delicata squash, cut off the ends.

Slice squash in 1/2″ pieces.  With a spoon take the seeds out.

Place the squash in a bowl and toss with olive oil, cinnamon, salt, and cayenne pepper.

Place squash on the prepared baking sheet.

Bake for 10 minutes, flip the squash and bake for another 10 – 12 minutes or until fork tender and skin slightly blistering.

Place squash on a plate and top with pomegranate arils and goat cheese.

~*~*~

This dish is a flavor explosion.  You have the sweet creaminess of the roasted winter squash.  Then you have the sweet tang of the pomegranate arils.  And then that savory, rich flavor of the goat cheese.  The cinnamon and cayenne pepper give it this nice warmth (not heat, but warmth)…with just the right amount of sweetness.  It all balances out and comes together right on the plate.

As I was eating, the only fault I could find was that there wasn’t more of it.  This is a fantastic dish…and very nutritious too.  Clean eating, once again, for the win!!

I’m sure any winter squash would be a good stand in, but the delicata squash made for a beautiful, and more importantly, delicious plate.

Recipe: Gluten-Free and Vegan Pumpkin Spice Ice Cream

I love pumpkin.

I’ve said it countless times before…because, after all, this is pumpkin season.  So…I’ll say it again.

I.  LOVE.  PUMPKIN.

Get it?  Got it?  Good!

Well, this past weekend I met up with some great friends at the local ice cream shop.  There, I indulged in a great ice cream called “Pumpkin Spice and Everything Nice.”  Why?  Because it’s pumpkin time and it’s one of the seasonal rotating flavors.  It only comes around in the fall, my friends…so I take advantage…believe me!  Of course, as I am sitting there eating it, I’m wondering if I could make something like this…but using the coconut milk and the cans of pumpkin I had in my pantry.

After a little researching, it turned out I could.  And with a little guidance from PBS and Kitchen Explorers, I was able to make my own pumpkin spice ice cream…completely vegan…gluten-free…packed with flavor.  I was one happy girl when I took this out of the ice cream maker.

Recipe: Gluten-Free and Vegan Pumpkin Spice Ice Cream

Gluten-Free and Vegan Pumpkin Spice Ice Cream

 Servings: 8
Time: Prep 10 minutes; Freeze 30 minutes

Ingredients:

  • One 13.5 ounces can coconut milk (do not use skim or low-fat) (I used the 11 ounce carton of So Delicious Culinary Coconut Milk)
  • 1-1/2 cups unsweetened canned pumpkin puree (I used Libby’s)
  • 1 cup sugar
  • 1/2 cup packed dark brown sugar
  • 2 teaspoons vanilla extract
  • 1-1/2 teaspoon pumpkin pie spice
  • 1/4 teaspoon cinnamon
  • 1/4 teaspoon ginger powder
  • 1/4 teaspoon cloves
  • 1/4 teaspoon salt

Directions:

Whisk all the ingredients in a large bowl until well mixed and smooth.

Transfer the mixture to an ice cream maker and freeze according to the manufacturer’s directions.

Transfer the ice cream to a freezer-safe container, cover the ice cream with plastic wrap, cover with the lid, then freeze until firm.

~*~*~

Yes…it truly is that easy.  And the flavor.  OMG…the flavor.  This is now going to be incorporated into my Thanksgiving Day menu.  I’m hosting this year…and I got inspired with this ice cream to do a dessert for the occasion.  No pumpkin pie at my house.  I hate pumpkin pie with a passion.  But this…this will blow away the pie competition anyway.  The flavor of this ice cream is like eating a chilled pumpkin pie…except that it tastes good.  It’s hard to stick to just the one serving, but if you do…you’ll have 8 delicious 1/2 cup servings of this amazing ice cream.

It’s my favorite one I have made so far.  And now I just want to keep making it to keep it stocked in my freezer.  You will too.  Trust me.

Product Review: Tasty Bite Spinach Dal

Tasty Bite Spinach Dal

Product: Tasty Bite Spinach Dal – $3.29+

It’s Monday again.  And you know what that means, right?

It means I use the rice I cooked up last week for Monday…until the world got loopy…and enjoy another quick Indian meal from Tasty Bite.  That’s what it means.  Why?  Because it’s the night I come straight home from work, feed myself quickly, change into my running clothes and then head out to get at least 3 miles in with my friends at my local running store.

I’m currently tapering…3 miles would have been ideal.  Except we did something different tonight, and Patrick (he’s tricksy), somehow got me to climb Dog Hill in Cherokee Park twice.  TWICE!  I hate dog hill…but he said, as we entered Cherokee Park…let’s make this the start of one loop, so we’ll  go all the way around and then when we come back around we’ll head back to the store.  Um…okay?  I guess.  Regardless…I was one of three people who did it.

During taper.

Bad.  Bad me.

But…one thing that wasn’t bad was my dinner.  In fact, I was once again blown away by the authentic flavor and taste that Tasty Bite puts into each of their entrees.  Since I love Indian food with a passion, then I want my Indian food to be good.  I want it to taste like Indian food.  And Tasty Bite accomplishes just that.  It’s incredible how good these little microwavable pouches actually are.  I continue to be impressed, surprised, and happy with my meal.

Today was a new flavor for me.  Today’s pouch introduced me to Spinach Dal.  Dal is lentils.  So, if you like lentils and spinach…well…this is a great opportunity for you to combine the two into one.  The Tasty Bite Spinach Dal entree is spinach that has been cooked down and combined with yellow lentils.  This forms an amazing sauce that is packed with nutrients and protein.  These two components are accented with a variety of spices (including ginger, garlic, sugar, chilies, turmeric, cinnamon, cumin, and pepper) as well as water, tomatoes and onions.  What emerges is this great green spinach-y sauce with tons of flavor, seasoned to perfection, with yellow lentils swimming throughout.  The texture is great.  The taste is superb.  You’ll be blown away by it.  I hoovered mine down, which isn’t always a good thing to do before going for a run, but I was hungry…and loving every bite.

Nutritionally speaking, the Tasty Bite Spinach Dal is a powerhouse of nutrients.  One serving is half of the pouch, which dishes up only 100 calories and 5 grams of fat.  One serving also provides 480 mg sodium and 2 grams of sugar.  Not too shabby for a shelf-stable item, right?  And one serving will give you 3 grams of fiber and 3 grams of protein as well.

Once again, Tasty Bite exceeds all expectations and wows me once again with their bold flavors, their ability to replicate Indian food to perfection, and just how easy they are to prepare.  Just a 90 second zap in the microwave and serve.  Add it over rice, eat it on its own or add it to a meal to change it up or turn it up a notch.  I saw a recipe on their Web site where someone placed Spinach Dal on a pizza crust.  Sounds delicious, yes?

The possibilities are endless…and taste oh, so good!

Tasty Bite Spinach Dal over jasmine rice

Product Review: Katz Gluten Free Vanilla Rugelech

Katz Gluten Free Vanilla Rugelech

Product: Katz Gluten Free Vanilla Rugelech – $5.49

It is because of Katz Gluten Free that I have been introduced to the awesomeness of rugelech.  I had never heard of rugelech before, let alone ever tried it…until I was received some from Katz Gluten Free.  My life…my foodie world…changed.

For those of you who may be like me and have been in the dark as to what rugelech is…well…read on.

Rugelech is a traditional Jewish pastry that is eaten year-round, but particularly on holidays.  It is made of rolled up dough and a sweet, fruity filling.

These little rolled cookies are life changing.  Honestly.  I had the chocolate ones first as part of the sample pack I ordered from Katz when I first went gluten-free.  The cinnamon flavor I ordered on my own…and they were like eating miniature cinnamon rolls.  My personal favorite.  During a special, I ordered enough product to get a free pack of rugelech from Katz Gluten Free.  I requested the vanilla because it was the only one I had yet to try.

Wise choice.

Katz Gluten Free has yet to really let me down on a product.  I trust them and their food.  And the Gluten-Free Vanilla Rugelech is just as amazing as I thought it would be.  These moutwatering treats are perfect as a palate cleanser after dinner.  But…they are really good anytime.  In fact, I like to give mine a little 15 second warm in the microwave so they taste like they are fresh out of the oven.  The Vanilla Rugelech taste like a cinnamon roll…if it were made with vanilla instead.  Amazing flavor.  The sweetness tingles across the tongue with each bite.  It’s just…so delicious.  I savor mine, nu-spiriling them in little pieces and nipping them so that the time I am enjoying them lasts a little longer.  You can’t blame me.  Once you try them, you’ll want the moment to last as well.  These are fantastic.  And I am going to be sure to stock up on more of them…very soon!

When it comes to ingredients, I know what everything is that Katz Gluten Free uses in their products.  For the Vanilla Rugelech…it’s a mix of their gluten-free flour (potato, tapioca, white rice, brown rice, sorghum, corn), sugar, canola oil, eggs, orange juice, water, dry yeast, baking powder, xanthan gum, salt, and pure vanilla.

Looking at it nutritionally speaking…these are cookies…little pastries of delicious gluten-free joy.  Treat them as a treat.  But do enjoy them.  Do try them.  A serving of the Gluten Free Vanilla Rugelech is 1 cookie.  This one cookie provides you with 90 calories and 3.5 grams of fat.  One cookie also serves up 30 mg sodium and 6 grams of sugar.  The Vanilla Rugelech also will provide you with 1 gram of fiber and 1 gram of protein.  It’s not awful…not at all.  I usually eat two of them though…so whoops!

Ah well…the goodness and the great flavor makes the splurge worth it.  These are delicious and amazing and I would buy them again in a heartbeat.  Any of the three flavors that Katz offers, actually.  I’m a huge fan. now, of rugelech.  And you will understand why when you give these a try to.  You can order them from Katz off their Web site, or check with your local natural foods stores.  Many carry a few of Katz products, and I most often see their rugelech.

Enjoy!!

Product Review: Udi’s Gluten-Free Pumpkin Muffins

Udi's Gluten-Free Pumpkin Muffins
Udi’s Gluten-Free Pumpkin Muffins

Product: Udi’s Gluten-Free Pumpkin Muffins – $6.99+

I feel as though I may have stumbled into an anomaly…or perhaps some alternate universe.  Why?

Because I managed to find a new product before many other places had it.  And in this area, that is a rare and unnatural thing.

You see, I was in my Whole Foods just browsing.  I had to just browse because the food budget purse strings had been tightened.  There were so many things I wanted to try, but the roomie said, “Not this week…next week.”  Which is code for…NEVER.  Or so it seems.  Because whenever I am told that…it seems like forever until I actually get to have said product that caught my attention.  But…the budget was tight coming back from my epic vacation…so I guess never it will be.

That was…until I spotted something I had never seen before on the top shelf of the gluten-free bread area in my store.  I pointed to them…”What is that?” I asked.  My roommate looked up…looked at me and sighed.  “Want them?”  As if she had to ask.  The product I am speaking about is the Udi’s Gluten-Free Pumpkin Muffins.  And you better believe those were put in the cart and immediately shuttled to the register for ringing up before she changed her mind.

Then the week from hell happened and these delicious muffins remained untouched in my fridge for the whole of the week.  Until Friday morning.

Friday morning I was going to be working from home.  So, I allowed myself to get up later, go for a 5 mile walk, go into work to drop off a few items and pick a few more up, then head home.  The roommate was up after a rough week of being in the hospital…and she was ready for breakfast.  She didn’t even bother to pour herself any cereal…so that’s what she got started off with.  Next time, she can manage that on her own.  But I needed a main course for our brekkies that morning and these muffins were quick and easy and would allow me to get myself logged into work and getting my job done a lot sooner.  So…out came the muffins.  I warmed one up for her and one up for me…and breakfast was done.

These scream fall flavor.  Pumpkin flavored everything is everywhere and I eat it up.  I love pumpkin.  I love the taste and flavor of pumpkin.  The only time I do not like pumpkin is pumpkin pie.  I’ve never liked pumpkin pie.  Pumpkin anything else and…DING DING DING…we have a winner.  I’m weird…I know.

So, how were the Udi’s Gluten-Free Pumpkin Muffins?

Let me put it this way…the first day of fall is coming…and this was like the flavor of fall in one amazing and delicious bite.  Honestly.  The Gluten-Free Pumpkin Muffins actually do taste like pumpkin.  It’s not just a name for the product.  It doesn’t overpower, but strikes that right balance.  The muffin itself is light and fluffy.  I always heat mine up in the microwave for about 15-20 seconds and it’s like taking them fresh from the oven.  Soft, springy, and warm all the way through.  I loved the addition of pumpkin seeds throughout the muffins themselves.  It really added to the pumpkin experience.  The hints of cinnamon and nutmeg were so warming…just what you want in anything that includes pumpkin.  After all, the weather is getting cooler…the food should definitely make you feel warm and cozy.  These muffins are, probably, my second favorite thing in the Udi’s line-up.  My favorite being the Harvest Crunch Muffins…these probably are tied with Blueberry Muffins for second.  Yeah…they’re that good.

I think my only comlaint would be how uneven the muffins were.  My batch looked like they were set on their side when they baked.  But, you know…at least they tasted amazing.

So, let’s take a look at what Udi’s puts into these muffins, shall we?  Ingredients include dried cane syrup, eggs, pumpkin, brown rice flour, tapioca starch, water, palm oil, canola oil, dry molasses, pumpkin seeds, salt, cinnamon, orange zest, caramel color, xanthan gum, ground ginger, nutmeg, and baking soda.  So…yes…the first ingredient is basically sugar…but…it is a muffin.  And, let’s face it, muffins are sweet.

Nutritionally speaking, these aren’t a complete waistline buster.  One muffin is the serving size.  And with that one muffin, you will be consuming 260 calories (which isn’t the best for a muffin, but not bad either!) and 10 grams of fat.  While there are 200 mg of sodium in these muffins, the high 19 grams of sugar is a bit of a shock.  Yikes.  That’s over half the sugar I am actually allotted each day.  Well, as long as it’s not an every day thing…right?  In addition, one muffin also provides 1 gram of fiber and 3 grams of protein.  So with that sugar level and the lower levels of fiber and protein, don’t expect this muffin to keep you full through lunch.  It’s not happening.

Be that as it may…they are super-duper delicious.  If you love the flavor of fall…the flavor of pumpkin…you’ll definitely want to pick up these if you can find them in your area.  I haven’t seen these since, so I’m glad I splurged that week and picked them up.  And now, naturally, I just want more of them.

Guess that’s how it works.

Keep an eye out this holiday season for Udi’s Gluten-Free Pumpkin Muffins.  You’ll fall in love at first bite.

Recipe: Baked Parmesan Risotto with Peas and Portobello Mushrooms

I am addicted to the Food Network.

Really.

If I am out of town or at the gym, that is my preferred station.  I might be a gluten-free vegetarian, but I love food.  And I love to learn about food.  And, even more, I love to learn new ways to cook food.  Lucky for me HULU airs a few Food Network shows, and one evening my roommate and I tuned into an episode of The Barefoot Contessa.  I know, a lot of people don’t like Ina that much, but sometimes the things she does with food is awesome.  And on this particular episode…she was making risotto.  The difference was, she was not going to stand over a pan on a stove, stirring and stirring and stirring as the rice worked its way to the perfect texture.

Nope.  She was going to bake it.

BAKED RISOTTO!!  Who would have thought that would work?

I changed up the original recipe to be vegetarian and make use of what I had in the kitchen, which meant I even (God forbid) took out the use of the white wine.  I didn’t have any on hand.  I include some sauteed fresh portobello mushrooms as well.

Recipe: Baked Parmesan Risotto with Peas and Portobello Mushrooms

Baked Parmesan Risotto with Peas and Portobello Mushrooms

Servings: 6
Time: Prep 10 minutes; Cook 50 minutes

Ingredients:

  • 1-1/2 cups Arborio rice
  • 5 cups simmering vegetable stock, divided
  • 1 cup freshly grated Parmesan cheese
  • 3 tablespoons unsalted butter, diced
  • 2 teaspoons kosher salt
  • 1 teaspoon freshly ground black pepper
  • 1 cup frozen peas
  • 1 cup portobello mushrooms, chopped

Directions:

Preheat the oven to 350°F.

Place the rice and 4 cups of the vegetable broth in a Dutch oven.

Cover and bake for 45 minutes, until most of the liquid is absorbed and the rice is al dente.

While it bakes, clean and chop your portobello mushrooms (if using).  Place a pan over medium heat and add olive oil.  When the olive oil is heated, add the portobello mushrooms and a dash of salt and saute until the mushrooms are lightly browned on each side.  Remove from the heat and set aside.

Remove the risotto from the oven, add the remaining cup of vegetable broth, the Parmesan, butter, salt, and pepper.

Stir vigorously for 2 to 3 minutes, until the rice is thick and creamy.  Add the peas and mushrooms and stir until heated through.

Serve hot.

~*~*~

I couldn’t believe how beautifully this actually worked out.  Honestly.  It was amazing.  The rice was fluffy and soft.  The risotto itself had that thick risotto feel to it.  The cheese melted beautifully and really helped give it that added bit of creaminess.  I didn’t even miss the wine.  And by sauteing up the mushrooms, I gave the risotto a little meatiness.  The seasoning was good, but if you are using a good Parmesan cheese, I recommend maybe cutting back slightly on the salt that is added.

My roomie loved this dish and was so happy we had leftovers.  I even took a serving in to a co-worker because I had mentioned I was making it for dinner, and he had been having a rough week.  When I saw him later that day, he said it was SO good.  It made me happy.

So, if you love risotto but don’t want to slave over a hot stove to make it…give this recipe for baked risotto a try.  I think you’ll be more than pleased with the results.  As for me…I think I will forever bake my risotto in the future.  So much easier and much better results.

Recipe: Gluten-Free Spaghetti Squash Alfredo

A couple of years ago, you never would have caught me buying a spaghetti squash or even cooking with squash.  For as much as I could remember, growing up, I disliked squash.  Wouldn’t touch it.  Hated the taste.  Hated the texture.  Hated everything about it.  Did. Not. Want.

But when I signed up for my CSA bin, before I knew I could swap out items…squash season came around and my bin was being inundated with different varieties of the vegetable.  And there I was…not wanting to let anything go to waste.

Now…whenever I get a squash I do a happy dance of joy.  I have learned that tastes can change over time and now squash is one of my favorite things to prepare.  There are so many different varieties of squash and so much that can be done with them because of that.  This is one rockstar of a vegetable, that’s for sure.

One of my favorite varieties of squash is the spaghetti squash.  I love it.  I have made so many different meals with the inner strands of the spaghetti squash, even substituting it for pasta noodles.  But when my CSA bin recently delivered a small spaghetti squash to my door…I wanted to do something outside of the box.  With a little Google-foo and a recipe from a blog called Chocolate & Carrots…I was able to do just that.  I baked my spaghetti squash…shredded it with a fork…then topped it off with a lightened up, gluten-free alfredo sauce.

Recipe: Spaghetti Squash Alfredo

Gluten-Free Spaghetti Squash Alfredo

Servings: 2
Time: Prep 10 minutes; Cook 1 hour

Ingredients:

  • 1 spaghetti squash
  • 1 tablespoon unsalted butter
  • 3 cloves garlic, finely minced
  • 2 tablespoons flour (I used Better Batter Gluten-Free All-Purpose Flour)
  • 1 cup of milk (I used unsweetened almond milk)
  • 1 tablespoon reduced fat cream cheese (I used Daiya Deliciously Dairy Free Cream Cheese Style Spread)
  • 1 cup grated melty cheese like Parmesan (I used Dill Havarti Cheese…because that’s what I had)
  • 1/4 cup grated mozzarella or Parmesan, for topping


Directions:

Bake your spaghetti squash as usual.  There are so many ways to bake a spaghetti squash…in the oven or the microwave.  But I cooked mine by slicing the squash in half and removing the seeds and pulp.  On a baking sheet, I placed the squash rind-side up and slid it into a 375°F oven for about 40 minutes.  After 40 minutes, I removed the squash from the oven and used a fork to break up the spaghetti squash strands inside of the spaghetti squash casing.

While the squash is baking…make the sauce.

In a small sauce pan over medium heat, melt the butter.

Whisk in the garlic and cook for 1 minute, until fragrant.

Whisk in  the flour until combined.

Slowly whisk in the milk until it is combined and there are no lumps.

Keeping the pan on the heat, whisk in the cream cheese.

Remove the pan from the heat and whisk in the cheese until it has melted.

Evenly distribute the sauce to both halves of the spaghetti squash and stir.

Top with the remaining cheese and place the halves under a broiler for a minute or two, until the top becomes a light brown.

Serve immediately with pepper, red pepper flakes, or hot sauce.

~*~*~

I discovered that the next time I choose to make this dish, I definitely want to use a stronger cheese.  While I love Dill Havarti for a cheese, it really wasn’t made for an alfredo sauce.  It melted just fine, but the flavor profile needed a bit more of a boost.  I recommend a Gouda cheese or an extra sharp cheddar.  Something with a little bite behind it.

All that being said, regardless of the use of mild cheese, I found that I absolutely LOVED this dish.  It was nutritious and filling all at the same time.  The spaghetti squash paired well with the lightened up alfredo sauce.  And I found topping it with a little heat from red pepper flakes and a dash of my favorite hot sauce just gave it that little extra kick.  It’s optional…but amazing.  My roommate preferred hers with just some grated Parmesan cheese on top.

If you are looking for a new way to enjoy a spaghetti squash…or are just now being introduced to the vegetable…give this recipe a try.  It takes a little time to prep the squash…but the end result is always worth it.