Yep. Friday. Which many of you know means…BIN DAY!! I love my CSA bin. The problem was…I had a lot to use up still from the previous week. Like…potatoes. Both red potatoes and fingerling potatoes. The fingerling potatoes were actually from two bins ago…so I knew I needed to do that first.
Thankfully, I have a board for that on Pinterest…so I hit that up and found a recipe that sounded absolutely delicious. My version is a slight variance on a recipe from Bon Appétit. Really…it was delicious.
Better yet…it was easy to make.
Even better…healthy…and delicious!!
Recipe: Garlic and Herb Roasted Fingerling Potatoes
6 sprigs of fresh herbs, chopped (I used rosemary and thyme)
4 garlic cloves, peeled, grated
1 pound fingerling potatoes, unpeeled
2 tablespoons extra virgin olive oil
Kosher salt
Freshly ground pepper
Directions:
Preheat oven to 375°F.
Place herbs, garlic, potatoes, and oil in a large bowl. Season with salt and pepper and toss to coat.
Place in a large baking dish or rimmed cookie sheet and toss.
Bake for 45-55 minutes.
Serve hot.
~*~*~
See how easy that is. The difficult part is smelling the potatoes as they cook because it really smelled amazing and delicious. I was ready to dive in when I pulled them out of the oven. Total win with the potatoes. It was nice to cook them up differently this time around. I am going to search for more fun and different potato recipes for the very near future.
Until then…give this one a try. I promise…you’ll fall in love with it. Especially if you like potatoes.
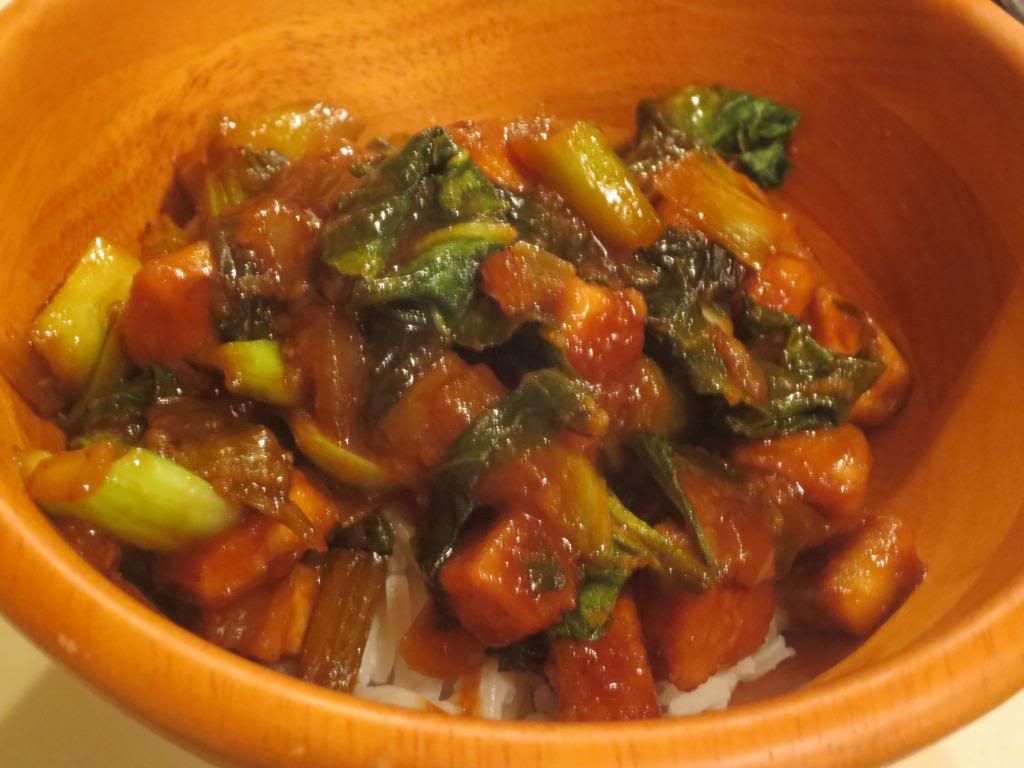
It seems to be a seasonal favorite of my CSA bin as of late. For two weeks in a row, it has been one of the components of my bin. Now, normally I would simply make a stir-fry out of it…but I’ve been attempting to expand on my culinary skills a little. Step a little outside the comfort zone. Do something…different.
I think I accomplished that last night when I cooked up a meal inspired by the blog Big Girls Small Kitchen. I had all the components on hand in my pantry and fridge…including the bok choy and tofu.
What emerged was a fantastic meal that really worked together. I served mine over basmati rice…which I cooked up while I was working on the rest of the dish as well. It was a fantastic meal and not too difficult to create either.
Recipe: Gluten-Free Sweet-and-Sour Tofu with Bok Choy
2 tablespoons flour (I used Better Batter Gluten-Free All Purpose Flour)
Pinch salt
2 tablespoons safflower, grapeseed, or other neutral oil
1/4 cup lemon juice
1/4 cup honey
1/4 cup soy sauce
1 tablespoon grated ginger (I used 1 teaspoon ground ginger)
1 tablespoon grated garlic (3 cloves)
Sriracha
2 bunches baby bok choy, rinsed, trimmed and cut into bite-sized pieces
3 scallions, white and green parts chopped and separated (I substituted 1/2 a white onion)
Directions:
Cut the tofu into slices about 1 inch thick. Press the water out of the slices, then cut them into 1-inch square cubes. In a baggie or on a wide plate, toss the tofu with the flour and salt until all the pieces have a thin coating.
Mix the lemon juice, honey, soy sauce, sriracha, garlic and ginger in a small bowl. Add 1 tablespoon water.
In a frying pan, warm the oil. In one layer, brown the tofu (in two batches if your pan is small), about 4 minutes per side.
Return all the tofu to the pan if you browned it in two batches.
Put in the onions and the crunchy part of the bok choy and cook for 2-3 minutes, stirring constantly. Add the green leaves and cook 1 more minute.
Add the sauce.
Bring the tofu to a boil, then lower the heat and let is simmer until the sauce has reduced and coats the tofu thickly, about 10 minutes.
~*~*~
I was so happy with the way this meal turned out. The tofu was perfectly cooked, the flour giving it this slight texture to it, even after cooking in the sauce. The bok choy and onion, along with the sauce brought this amazing flavor to every component. I loved this sauce. It smelled amazing and it had the perfect balance of sweet and sour…nothing overpowering the other.
This meal is a great source of protein. As I said, I served mine over a serving of basmati rice…and it was delicious. This meal was so easy to put together and cook…perfect for those nights where you don’t want to spend all night in the kitchen cooking up dinner.
So…I know I have the ability to change out the items I receive in my CSA bin. The truth is…sometimes I don’t want to. Sometimes I like to be challenged by an ingredient…sit there for a couple days and ponder exactly how to best use this piece of produce that I don’t commonly have on hand, nor would I normally buy. Why do I do this? To keep my culinary skills up, of course.
Well, this week’s big challenge was this gorgeous head of cabbage. While I could easily make a coleslaw with it…my roomie despises coleslaw and I’m not a big fan of it myself. So…I was hoping to figure out a unique way to utilize it in a breakfast. With a little guidance form a blog called Ditch The Wheat, I got inspired to make my own little cabbage breakfast, adding a bit of texture with some homemade potato chips. That would give them some crunch. I also added a hint of flavor by adding some sliced shallots and some minced garlic to my sautéed cabbage.
And…to make it all breakfast-like…I topped each bowl off with a fried, over-easy egg. Surprisingly…very delicious and really packed with flavor.
Slice the fingerling potatoes thin like a chip. I recommend using a mandolin.
Pour enough olive oil into the pan to lightly fry the potato slices. Turn the pan to medium. Place the potato slices into the pan, sprinkle salt on them and flip when one side is crispy and sprinkle salt on them again. These are done when both sides are crispy. (NOTE: I used the Mastrad Topchips Chip Maker instead of pan frying them…or you could even bake them in the oven. I’m not big on frying…but not everyone has a chip maker like I do).
Take out all of the sweet potato chips and place on paper towel.
Place the shallot in the oil and stir, allowing to soften slightly. Add the cabbage and saute until desired crispiness. I prefer it to be well done. When you have about a minute left, add the garlic and stir.
While the cabbage finishes up, in a small pan, crack an egg and allow to fry on one side. Carefully flip the egg to cook the white through, but keep the center a little runny (unless you hate runny yolks, in which case…cook the hell out of that egg).
When the cabbage is done take out of the pan and mix with the chips. Place in two bowls and add a fried egg on top of each one. Serve immediately.
~*~*~
I admit…I was surprised with how good this recipe turned out to be. I found elevating the flavor with shallot and garlic was a great call. The cabbage cooked perfectly, just slightly browned by the heat of the pan, giving it this nice caramelization. And the egg on top just made all the difference. One very healthy, nutritious, and different breakfast for sure. But one that I would repeat…in a heartbeat!
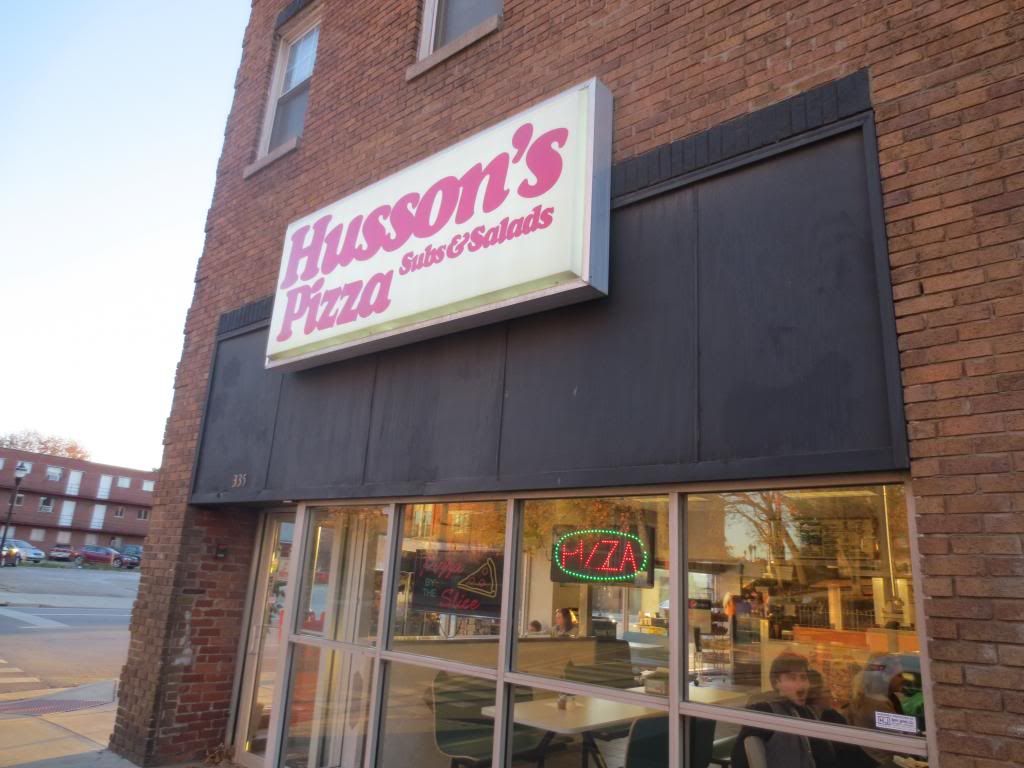
Restaurant: Husson’s Pizza, Huntington, West Virginia
It was the night before a marathon and I was in Huntington, West Virginia. Trust me…when it comes to dining gluten-free, Huntington, West Virginia is not where you’d want to find yourself. Why? There just aren’t a lot of options out there.
But…it’s tradition.
Race = fuel = gluten-free pizza.
Thankfully, before he left the running group and the state to move to Dayton, Ohio, my good friend Keith mentioned this place called Husson’s…not far from Marshall University. As this was the Marshall University Marathon…I was going to be in that area anyway. So Husson’s Pizza was kept in the back of my mind. And I recalled it as the date of the race grew closer and I traveled from Louisville to Huntington.
After a very busy day of traveling and race related stuff…I was ready to tuck into my gluten-free pizza around 5 p.m. My roomie and I had planned on splitting one of the 10 inch gluten-free pizzas. So when we drove down to Husson’s Pizza on Hal Greer Boulevard, we parked the car, and headed toward the establishment. Huntington, West Virginia is a mix of really beautiful buildings and some that are run down. Husson’s was definitely one of the ones that looked down. And if I had been traveling through, without the recommendation from my friend Keith, I probably never would have stopped there to eat. At all.
But, looks can be deceiving.
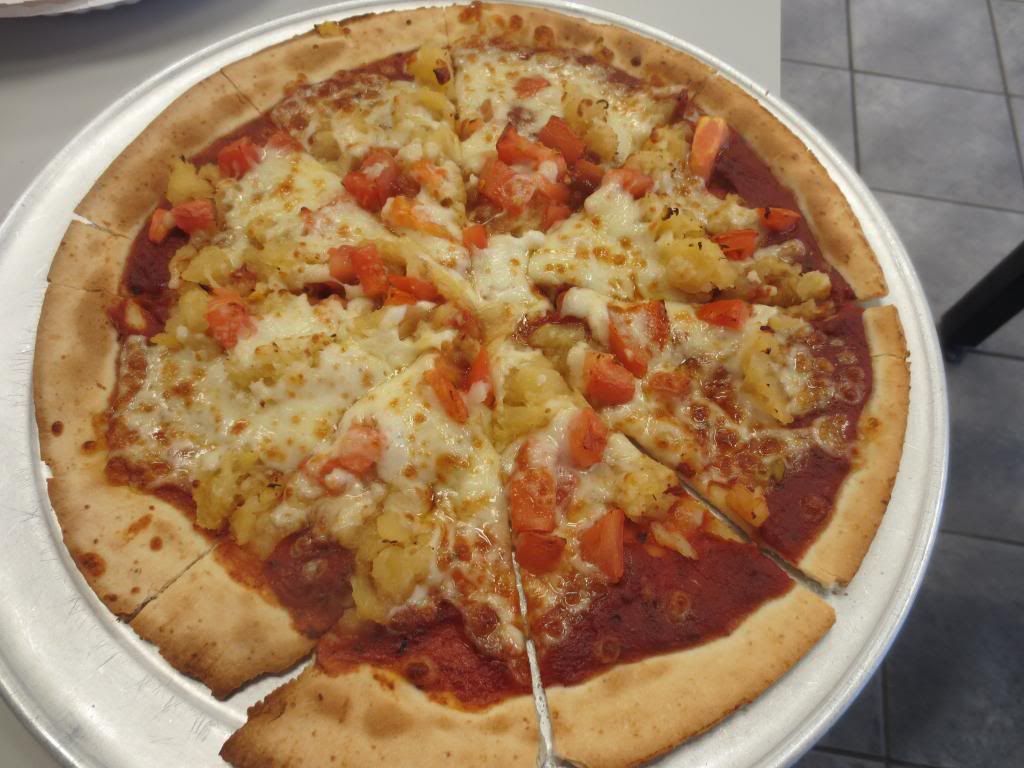
We stepped inside, and while the place definitely looks dated, you can’t argue with the affordability of their food. We already had an idea of what we wanted to eat…so we stepped up to the counter. We were greeted by a very friendly guy working the register who was ready to take our order. Cathy inquired about the gluten-free crust and they confirmed they did have it. So, as it was the day before a marathon…we kept the flavors simple.
A gluten-free pizza with tomatoes and pineapple ($10.99). YUM! It’s great because you can actually choose up to 5 toppings for the pizza without being charged extra for it. And a $10.99 gluten-free pizza is awesome. What a great price. With our order in, Cathy and I settled in at one of the tables and awaited our food.
A short while later, our pizza arrived.
It smelled absolutely fantastic. It looked a mess…but…if it was as good as it smelled we were certainly in for a treat. I snapped a picture for the blog…and we each took our first slices.
So, the pizza is really nothing to right home about. Which was more than disappointing. The gluten-free crust was a simple cracker crust. Not much flavor. And it crumbled. It crumbled under the sauce, cheese, and our two toppings. I had no silverware to eat my pizza with (and I normally eat pizza with a fork and knife), so as the pizza would fall apart, I would have to scoop it up with my fingers. The sauce, however, was awesome. It was definitely the star of the entire pizza. I loved the smokey, rich flavor that came with this simple red sauce. It was fantastic. I could have eaten an entire jar of the sauce. I loved how the pineapple and tomatoes were chopped up small…but they were just casually thrown onto the top…so it was a bit…uneven with the toppings on the 8 slices. Like I said…decent enough pizza…but nothing that really made me want to go back for more.
While I appreciate a decent, affordable, gluten-free meal as much as the next person, I was truly hoping for an epic pizza experience. As it was, with the exception of the sauce, this was a complete let down. Not bad. And if I were back in town, I would probably head here for food again…because I know they have gluten-free food I can eat. I just…wish it had been more spectacular than it was.
When you eat a lot of gluten-free pizza…and I do…you just need a bit more than a cracker crust and a splash of sauce and a dusting of toppings. I want my taste buds to be wowed and my stomach to be full. This pizza didn’t accomplish that at all. Again, it wasn’t horrible or bad…it just wasn’t what I had anticipated. I’ve been spoiled by too many really damn good gluten-free pizzas that when I get something like this…it’s a complete let-down.
At least tradition remained thanks to Husson’s Pizza.
Husson’s Pizza’s Gluten-Free Pizza with Tomatoes and Pineapple
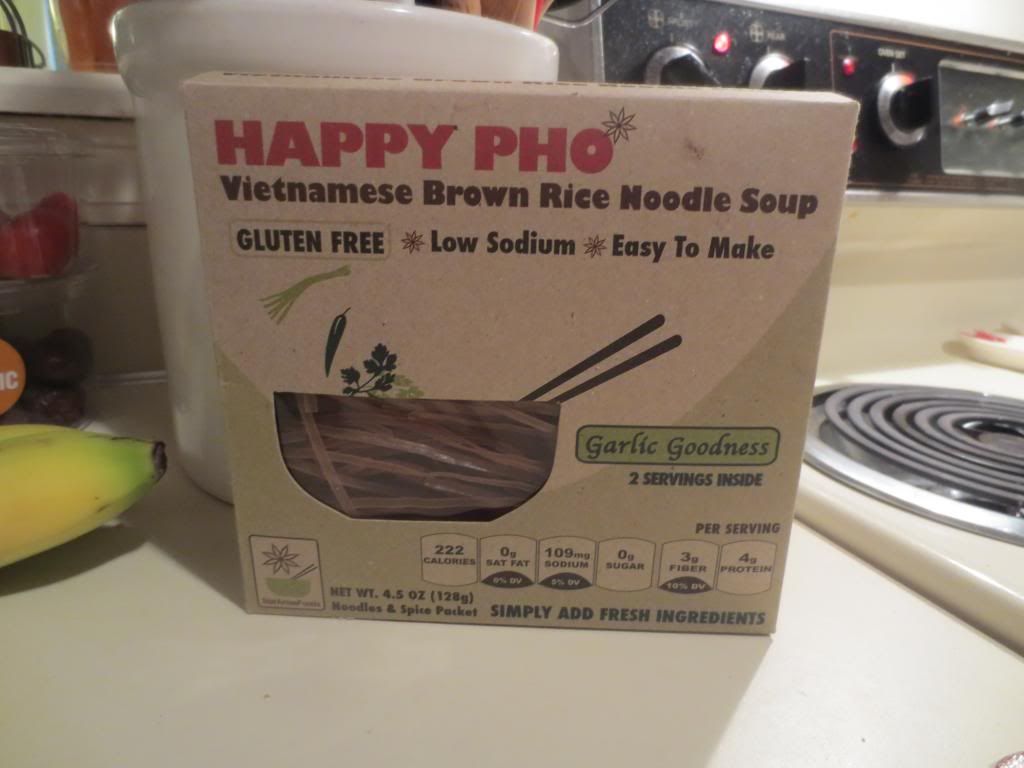
Star Anise Foods Happy Pho Garlic Goodness – Vietnamese Brown Rice Noodle Soup
Product: Star Anise Foods Happy Pho – Garlic Goodness Vietnamese Brown Rice Pho Noodle Soup – $3.49+
Splurges happen.
For real.
And for me…splurges tend to happen when food is involved. Mainly…grocery shopping. Something catches my eye, peeks my interest, and before you know it, the plan to stick to the already tight budget is out the window and I’m scraping by the rest of the week. But it’s okay…because I have food. Right?
Sure.
Well, a splurge happened this past weekend. I was wandering the aisles of Whole Foods, which already is a dangerous thing, when my roomie spotted these little brown boxes. The words “PHO” caught her attention first. Followed by “GLUTEN-FREE.” Now we’re talking. She’s been wanting to have pho for a long, long while…but…I just don’t know of where to go in Louisville to make that happen for her. Instead…we figured this might be a good way to use up some of the produce and make our own version of a pho. And why not? If you can’t get creative in the kitchen…there’s no point to having one.
The product we spotted was by Star Anise Foods. It’s called Happy Pho, and it comes in three different flavors. We chose the Garlic Goodness Vietnamese Brown Rice Pho Noodle Soup. We figured we’d eventually try them all…if the one we tried was any good. Cathy loves garlic…so I had a feeling that would be the one to start us off.
Instead…with a little refrigerator magic…and a Organic Vegetarian Pho Base by Pacific Natural Foods (which was in my pantry, swear to the culinary gods!), this splurge of a purchase became tonight’s dinner. And tomorrows lunch for that matter.
Let’s talk a little bit about this product though. First of all, Star Anise Foods Happy Pho – Garlic Goodness Vietnamese Brown Rice Pho Noodle Soup is not only gluten-free, but also non-GMO, low in sodium, contains no MSG, made from 100% brown rice with organic green tea, vegan, all natural, made with organic ingredients, fat-free, wheat-free, egg-free, dairy-free, free from artificial colors and preservatives. It’s ALL NATURAL, my little pho babies!!
One serving is 1/2 the packet, which my roommate and I stretched out into 4 meals, so we’re only eating 1/4 of the packet each. Regardless, a regular serving will provide you with 222 calories. A serving only has 190 mg of sodium, which is amazing for a shelf-stable, packaged product. The Garlic Goodness variety of Happy Pho also will has 1 gram sugar, 3 grams of fiber, and 4 grams of protein. That’s really good!!
To make my pho…I pan fried up some thinly sliced tofu. While the pho starter came to a boil, I added the packet of seasoning that comes with the noodles and allowed it to blend with the pho starter. I then sliced up some bok choy (compliments of my CSA bin) and put it into the broth. Once the tofu was nearing completion, in went the brown rice noodles to soften up in the hot soup base. As the noodles finished up, I poured the tofu in to warm and…dinner was easily served.
And…OMG…was it ever good!! I mean super good. As in I make a mean vegetarian pho thanks to Star Anise Foods and their Happy Pho starter kits. Honestly. I was so happy with the flavor of this noodle soup. The brown rice noodles were a bit gummy, but that tends to be the trend with brown rice noodles. Sadly enough. But…the flavor was there, and the noodles, broth, tofu, and bok choy all married together to make this incredible, flavor-filled meal. The seasoning packet combined with the pho soup base made a perfect base for the vegetables, tofu, and…the noodles. My roommate and I devoured this with chopsticks. Happy girls, we were! Food Yoda, I speak like.
Go to your local Whole Foods…check out their aisle with the Asian foods. If you spot Star Anise Foods Happy Pho kits…buy one. Buy them all. Trust me, they are totally amazing and I intend to pick up more of them, other flavors, and give them a taste as well. This made for a quick, easy, and very delicious (and nutritious) dinner tonight. I was beyond impressed.
Star Anise Foods Happy Pho – Garlic Goodness Vietnamese Brown Rice Noodle Soup
Restaurant: Shalimar Indian Restaurant, Louisville, Kentucky
I need to send out a big, huge, whopping THANK YOU to my darling little sister. Because if it weren’t for her…it probably would have taken me forever…and ever…and even then I possibly would have put it off…to haul myself out to the Indian restaurant that is consistently voted THE BEST in Louisville, Kentucky. Normally, I would rave and go on and sing praises for the Indian restaurant I have been going to since co-workers suggested it. That being Dakshin, also in Louisville.
Oh. My. God.
I love Dakshin…but after the experience I had at Shalimar…it is out and Shalimar rightfully is where I want to go for my Indian food cravings. Forever. And ever.
Goodbye, Dakshin.
It was fun while it lasted.
Welcome to my Indian cuisine loving world, Shalimar.
I have mentioned quite a few times how my family grew up eating Indian food. Authentic Indian food. Our neighbors, who had children the same age as my little sister and my older brother, often invited us over to dinner when they were having curry. And I loved it. All the different spices and flavors…it was exciting and exotic. It was…beyond delicious. I was hooked at a young age.
So, as my sister’s husband isn’t as outgoing with food choices, when she told me she wanted to come visit me this past weekend, I wanted to get her to an Indian restaurant. Normally, I’d haul out to the far end of Louisville to Dakshin…but not this time. No way. I wanted to take her to the place that Louisville always seems to deem the best. This was a gamble…since I had never eaten there before. But…with those kinds of reviews and awards…how could it be a bad choice? I sent her the menu, although I knew that she’d be ordering the Chicken Curry…and comparing it to the stuff we grew up eating.
The big day, Saturday, came. And after a fun day of walking around sight-seeing, shopping, and just having a good time, we decided we were starting to get a little hungry. So…we headed over to Hurstbourne Lane to the strip mall where Shalimar is located. Two snags. First…traffic was ridiculous…so we ended up turning around and coming at the restaurant from another angle. By the time we got there and parked, we realized that the hours posted said dinner on the weekend was 5:30 p.m. We had about 40 minutes to kill. We hopped across the way to Half Price Books and just kept making circuits and looking at different books until we couldn’t take it anymore. Five minutes left…so we slowly meandered out of the store, got in the car, and headed back to the restaurant.
They were now open and people were being seated. We were given a nice booth at the side of the dimly lit restaurant and allowed to peruse the menu. I had looked over the menu before, but was going go give it a little more of a look while we had the time. Our water glasses were filled and we were asked if we’d like anything else to drink. We all decided to stick with water. I had spotted something that sounded AMAZING on the menu…so I was now set. Cathy was still deciding…but finally settled. When our server returned…we placed our orders.
Cathy went with the Lamb Biryani ($11.95), which is a classic Muglai dish of curried meats cooked with basmati rice. She made sure to specify that she wanted the spice on it as low as it could go. The less spice the better. Wimp. She also ordered a side of the Naan Bread ($1.95) to go with her meal. As predicted, my sister did order the Chicken Curry ($10.95), which is chicken that is cooked in a thick curry sauce. She opted for medium heat. She hoped it was as good as the Duggal’s. As for me…I went with the Broccoli Masala ($9.95), which might just be my new favorite thing in life. For real. This is simply broccoli cooked in spices. Except I ordered mine spicy! I always love some heat with my food…especially when it’s ethnic. And they promised they would do it up good for me.
Orders in, we talked a lot about growing up with Indian food in our lives…and just having some fun. We took some selfies in the restaurant. And…soon…our food arrived.
It all looked and smelled fantastic. I mean…really, really, really fantastic. I hated that I had pause to take pictures of my food for the blog because I was ready to dive in. My broccoli masala came with basmati rice, so after the photos were taken, I scooped up some rice onto my plate, then put some of the broccoli over it. Time to dig in.
FLAVOR EXPLOSION OF AWESOME-SPICY-SAUCE!!
No joke. If I were to pick something to eat as my last meal…this is definitely one of the front runners. Honestly, there seem to be no words to properly describe how amazing this dish was. I know…some of you are thinking that it’s just broccoli and spices…but it was more than that. It was the perfect blend of spices…with the perfect heat level. In fact…I probably could have taken it a little spicier. The broccoli was tender and cooked to perfection. The sauce…the sauce made it. The rice gave me some oomph to the meal. And I was even happier when I added a tomato chutney to it. It was the perfect meal with the perfect people.
For the record, the Chicken Curry brought back happy memories for my sister. Honestly. She was thrilled and said it totally reminded her of the stuff we grew up eating. And Cathy…loved her Lamb dish. She’s big on rice…and this was a big heaping pile of rice. For real.
We were so happy with the food and service that we got at Shalimar. I don’t think I can bring myself to stray from this restaurant. This is where you go to get authentic, delicious Indian food. This is where you go to get the flavors, the tastes, and the experience of Indian cuisine. This…is why Louisville consistently names this restaurant THE BEST Indian cuisine in the city.
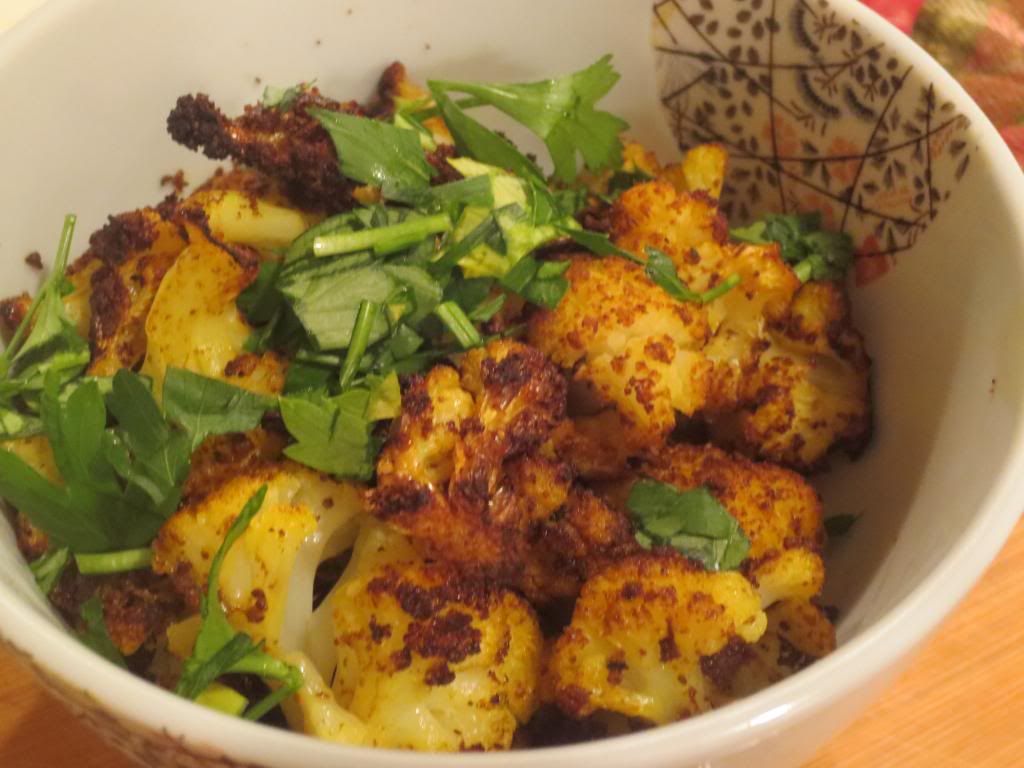
Cauliflower is so versatile. I have made “bread sticks” from a head of this vegetable. I have made buffalo cauliflower florets as well. Pizza crust. I’ve put it in stir-fries. I’ve made a tempura batter and fried them up. But…when my CSA bin delivered me another gorgeous head of cauliflower…well…I wanted to do something different. I have my go-to recipes…but I just wanted something different.
With the magic of Pinterest and a recipe that I built around from Nom Nom Paleo…I took this beautiful head of cauliflower, mixed it up with some healthy fats and a dose of curry, cumin, and seasoning. Roasted it up in the oven…then topped it off with some fresh herbs. And the result…pure magic. Enough that I want to make it again…soon. I need more cauliflower.
Preheat the oven to 450°F and move the rack to the lower middle of the oven.
Place the florets in a large bowl and toss them with a generous amount of the oil of your choice (about 2 tablespoons).
Add the curry powder, cumin, salt and pepper and toss until the florets are coated.
Pour the seasoned florets on a foil-lined baking sheet and cover it tightly with another sheet of foil.
Roast in the oven for 15 minutes, then remove the top layer of foil and continue to roast the cauliflower for 20 more minutes, flipping the florets every 8 or so minutes, until they are softened and browned in parts.
Plate the cauliflower and give each serving a squirt of lemon juice and top off with the minced fresh parsley.
~*~*~
Serious flavor. Even Cathy was talking about the next time I made this dish. I was so happy with the way it turned out. It wasn’t too spicy, which worked in Cathy’s favor. Just the right hint of seasoning. Total perfection. Tender…delicious…and amazing.
Just a couple minor changes to a recipe can make or break it. Honestly. But…a couple years ago, Cathy bought me the cookbook for Bouchon, Thomas Keller’s restaurant in Las Vegas. In fact, we dined there when we were in Vegas and had one of the best food experiences of our life up to that point. It was, in a word, heavenly.
And then…I just sort of let this gem of a cookbook sit on my shelf…never really pulling it out to explore. But when my CSA bin gave me leeks, I remembered one of the dishes we had in Vegas was…Potato Leek Soup. So, I pulled out my cookbook and got settled in to see if it was something I could, indeed, set out to make…and make properly.
There were a couple of minor tweaks necessary, for my food allergies and the like…like making it vegan. It actually worked out perfectly. Honestly. I was so happy with the way this soup turned out that I am eager to make it again…and again…and again. The best part was…save for a few minor ingredients (chives)…this recipe was made from items that were already in my pantry.
I will make not of my changes in parentheses. But huge props to Thomas Keller for this amazing recipe. And if I hadn’t eaten at Bouchon…well…I might never have experienced this or been inspired to make it for myself.
Recipe: Vegan Potato Leek Soup (inspired by Thomas Keller’s Bouchon recipe)
4 tablespoons (2 oz.) unsalted butter (I used Earth Balance)
Heaping 1/2 cup sliced (about 1/4 in. thick) shallots
1/3 cup sliced (1/4 inches thick) onions
Kosher salt and freshly ground black pepper
1/2 pound (about 1 large) russet potato, peeled
1 tablespoon minced garlic
Bouquet garni or sachet of 8 thyme sprigs, 2 Italian parsley sprigs, 2 bay leaves, 1/2 tsp. black peppercorn, wrapped in cheesecloth
6 cups chicken or vegetable stock (I used a low-sodium organic vegetable broth)
3/4 cup heavy cream (I used So Delicious Culinary Coconut Milk)
1/2 cup minced chives
Extra virgin olive oil
Freshly ground black pepper
Directions:
Cut away and discard dark green leaves and roots from leeks, leaving only white and palest green sections. Cut in half lengthwise, rinse in cold water to remove dirt between layers. Place leeks cut side down and cut in 1/4 inch thick slices (yields about 3 cups).
Melt butter in large saucepan over med-low heat. Add leeks, shallots, and onions. Season generously with salt and pepper. Increase heat to medium and sweat the veggies, stirring often, for 3 to 5 minutes – veggies should wilt but not brown.
Meanwhile, cut potato lengthwise into quarters, then cut crosswise into 1/4 in thick slices, yielding about 1-1/4 cups.
Add garlic to the sauteing veggies and cook for another minute, then add sachet and potatoes. Cook for 2 to 4 min longer.
Add 6 cups stock, adjust seasonings. Bring to simmer, then reduce and simmer for 30 min, or until potatoes are tender. Remove from heat and let soup cool for about 15 min. Remove the sachet. Transfer soup in batches to blender and puree, starting at low speed (to release heat remaining in soup), and then slowly increase speed until soup is smooth. Don’t overfill the blender, since hot liquid can spurt out. It is helpful to place your hand over the lid while holding a towel. Strain through a fine sieve or the like if you want the soup to be extra smooth. (That part is optional…I chose not to, and my soup was still smooth!)
To finish, return soup to a rinsed out pan and bring to simmer. Add cream and simmer on low for 5 min – stir frequently and careful not to burn! Remove from heat. Stir in chives if serving hot. If refrigerating, pour into container and place in ice bath to cool (it keeps about 2 days). Serve sprinkled with chives and olive oil and fresh ground black pepper.
~*~*~
You would be hard-pressed to tell that this soup was vegan. Honestly, the changes I made didn’t affect the creaminess or the taste of the soup. It was so good, and Cathy and I feasted on it for three delightful evenings. It was super packed with flavor and still super creamy. Substituting culinary coconut milk for the heavy cream didn’t change the texture at all. It worked brilliantly.
So…with soup season coming on strong…give this recipe a try. Thomas Keller is a brilliant chef and this recipe is one of the best soups I have made so far. Truly a delight.
Quick Indian meals are usually my Monday thing. I mean…I have to get home from work, scarf something down, and get changed and out the door to head to my running group’s Monday meet-up at 6 p.m. Not easy when construction is going on and often traffic is at a stand-still going across the river. It can be frustrating. And when trying to take a little bit of stress out of the day…the best thing to do is have a simple meal prepared.
But this time…this was a Wednesday thing. I had eaten a big lunch on the way back from Chicago the Monday before I had this…so no food was necessary that evening. Not a bite. But…Wednesday marked a big heaping deal of a run. My good friend, Natalie, was completing her pledged 180th straight day of running to raise money for the victims of the Boston Marathon bombing. And she invited the group at the store to run those last miles with her. She chose 4.15 miles, in honor of the date of the bombings, April 15.
So, that evening sort of ran (heh…no pun intended. See what I did there?) like a Monday night. That morning, I cooked up two servings of jasmine rice, let it cool, and tucked it away in the fridge for later. Upon returning home from work…I heated up the rice, pulled out my next packet of Tasty Bite goodness…and got ready to dive in.
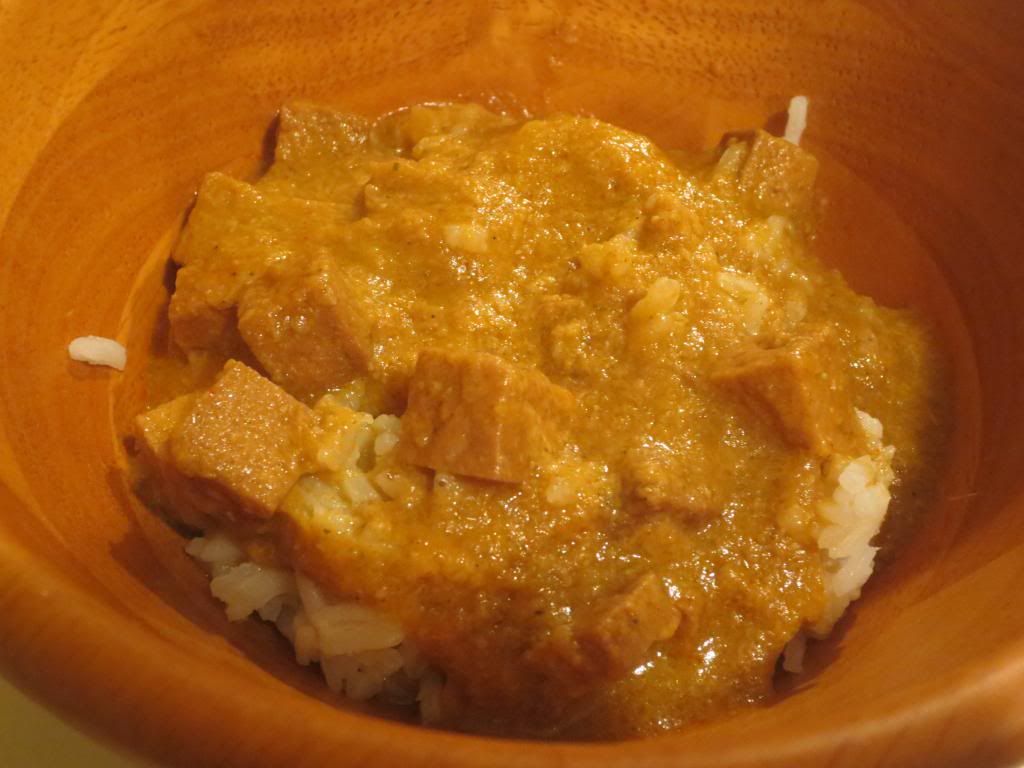
This week…Tasty Bite Paneer Makhani. Paneer, for those of you not familiar with Indian cuisine, is a soft, vegetarian-friendly cheese. It can be firm or soft…depending on how it is made. But it is…delicious. Makhani is a Hindustani word meaning “with butter.” So…this is basically Butter Paneer. Don’t freak out…really it’s these cubes of paneer that are cooked in this fantastic, creamy tomato sauce…spiced just right to give it that Indian flavor. I love the taste of Indian food. So yummy.
So…what happens when said entree comes in a microwavable pouch? What happens when it only takes 90 seconds to heat and eat? Magic. Because Tasty Bite knows what it is doing when it comes to these fun little meals. Honestly. I wasn’t too sold on the thought of a buttery cheese dish…but…they proved me wrong.
The Tasty Bite Paneer Makhani is just what I described above…home-style paneer cheese in a creamy, spiced sauce. This pouch is a delicate balance of natural ingredients that are non-GMO, vegetarian, and gluten-free. Happy dance. In fact, the ingredients in this particular Indian meal include tomatoes, paneer cheese, water, onion, cream, cashew nuts, sunflower oil, ginger, garlic, salt, coriander, chiles, and spices. Sounds delicious, yes? Of course it does. So, after giving my jasmine rice a quick steaming in the microwave to reheat it…this little pouch of goodness was put in and given it’s 90 seconds to warm through.
I poured the contents over two bowls of rice…and dinner was done in 5 minutes total.
So, we all know that this Tasty Bite Paneer Makhani was easy to prepare…but how did it stack up in flavor and taste?
It was good. It was really good. I loved the bit of mild heat from the variety of spices in the sauce itself. The sauce was the perfect thickness…not too runny, but not too thick either. Perfect consistency. I wished I had more of the sauce, honestly. The cheese was…pretty good. I love paneer cheese, but this just seemed a bit rubbery. Probably because it is, after all, in a microwavable pouch. It wasn’t bad…it was still soft…but it wasn’t the star of this dish like it should have been. Major props to the sauce. It saved this one. I’d probably invest in this variety again…but only if nothing else caught my eye. The Paneer Makhani wasn’t about the paneer at all. It was all about that Makhani sauce.
So, let’s talk nutrition. A serving of the Tasty Bite Paneer Makhani is 1/2 of the pouch. This serving dishes up 220 calories and 17 grams of fat. YIKES!! Some of that, however, does come from the cashews…but most of it comes from the paneer. That’s…a hefty dosage of fat, I think. I mean, 150 of those 220 calories come from fat. That’s…not that great. A serving of the Paneer Makhani also will provide you with 440 mg of sodium and 3 grams of sugar. Not bad for a shelf-stable, processed meal, right? Also, you will be getting 1 gram of fiber and a whopping 10 grams of protein. Low fiber, high protein…good for running.
So, while the flavor was there in the Paneer Makhani, the paneer cheese definitely fell flat, but the sauce saved it. I would recommend trying this one, if you are a fan of Indian flavors. And if you love paneer cheese. Just know…fresh cheese that isn’t sealed in a pack and kept on the shelf definitely stands up better when used in Indian cuisine. But when you are an on-the-go kind of person…this definitely works in a pinch. So…not one of my favorites, but not bad either. Tasty Bite hasn’t put out a bad product…this one just didn’t wow me like the others have so far.
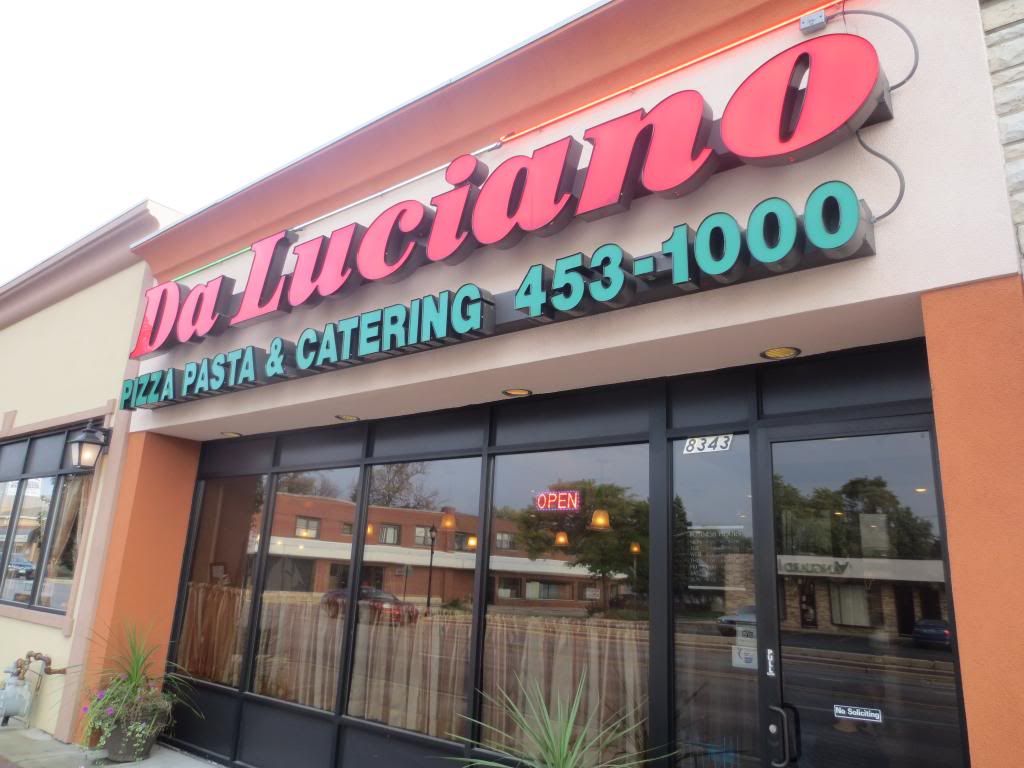
Da Luciano – Pizza, Pasta & Catering, River Grove, Illinois
Restaurant: Da Luciano – Pasta, Pizza& Catering, River Grove, Illinois
This…was an important dining choice to make when I was coming to Chicago, Illinois. I mean…for real. This was a big…heap…deal.
Why?
Because I was in town for the Chicago Marathon. I needed a safe meal…one that would guarantee that I would have no stomach issues…and…being that I was running on Sunday morning…this needed to include gluten-free pizza. It HADto be gluten-free pizza. That is my stipulation when it comes to the night before a big run. If it’s a half marathon or marathon…it has to be gluten-free, vegetarian pizza. It just works for me. Some down pasta…not this girl. This girl indulges in a few epic slices of (hopefully) amazing pizza. Gluten-free pizza isn’t tasteless cardboard, you know. When done right…it is a culinary work of art.
And I’ve eaten good and bad gluten-free pizzas…as they are well documented in this blog.
But there was something special about Da Luciano, which is one of the reasons, despite meaning a car ride outside of downtown Chicago, that I felt I needed to eat there the night before the Chicago Marathon.
What was so special about this place?
They understand Celiac Disease. They totally get me. They totally know how to handle and prepare my food so that I won’t get sick from eating there. And how do I know this? Well, as stated on their Web site, the owners, Luciano and Rosalia, were first introduced to the gluten-free world when four of of their seven children were diagnosed with Celiac Disease. Being an Italian family, bread and pasta were daily staples in their diets. Rosalia set out on a mission to find quality gluten-free bread and pasta for her children, but found that her options were limited. So, she began to experiment with her own recipes, succeeding in making gluten-free bread, pasta, pizza, and desserts that satisfied all of her children. When Da Luciano Pizza, Pasta & Catering opened the following year, they decided to offer their customers a gluten-free menu featuring Rosalia’s amazing recipes. The response from the gluten-free community was huge.
So…as you can see…this place won me over right from the start. And, upon arriving at the restaurant, we were immediately asked if anyone needed a gluten-free menu. I didn’t have to request one. I didn’t have to ask if one even existed. The hostess just flat-out asked. And so, when we were seated, I was given their rather extensive (no one sheet of paper here…but a true menu, my friends!) gluten-free menu to peruse.
So many of the dishes sounded awesome. And part of me wanted to do the gluten-free bruschetta for an appetizer…but we had all decided that dessert was happening…so the appetizer went to the wayside…this time. The gluten-free menu at Da Luciano is about as big as the regular menu. So many of the dishes are offered as a gluten-free option. From the dishes with meat (as I’m a vegetarian, I didn’t look at the extensive seafood, chicken, and veal offerings), but there were many amazing sounding pasta dishes. BUT…I never change up the night before a race…and it was one of their individual gluten-free pizzas for me.
When our waitress returned to the table to take our orders…we were all settled on what we wanted. Heather is not big on carbs, so she went with one of the chicken entrees. Her choice – Chicken Scaloppine ($14.95), which was thinly sliced chicken served in what looked like a tomato and mushroom sauce. Cathy opted for the Rigatoni Porcini ($11.95), which was rigatoni pasta cooked with porcini mushrooms in a light cream sauce. Jenn went with the Gnocchi al Pesto ($11.95), which was delicious looking gnocchi served in a creamy (probably) basil pesto sauce. It looked fantastic.
Da Luciano’s Gluten-Free Pizza with Mushrooms, Onions, and Roasted Red Peppers
But for me…I went with the Gluten-Free Pizza ($8.50) topped off with mushrooms, onion, and roasted red pepper ($0.75 each). I couldn’t wait to get a taste of this pizza. And…I wanted to make sure that Heather got a bite as well, because she suffered through the disaster of Pizza Ranch in Minnesota with me…and I wanted her to know good gluten-free pizza was out there. If we had been in Louisville…I’d take her to Annie May’s Sweet Café and split one of those amazing pizzas with her…but when in Chicago…you find a place that works.
We had a little wait, but soon our food was arriving at the table. And it all looked and smelled amazing! I photographed every dish…especially my pizza. And it was time to dig in.
So…
WINNING!! Granted, I still like my local bakery’s crust better…but this definitely is one of the best crusts I’ve had on a gluten-free pizza. Cooked to golden perfection, so it was crispy, without being burnt or overdone. And it still had that nice doughy texture with it as well. The sauce was amazing. The cheese…was more than I would have liked…but…it starts off as a cheese pizza. The other toppings get added. The star of the toppings, however, were the roasted red peppers. OMG…YES! Packed with flavor. Mild…but with that right amount of kick to keep the palate interested. The onions didn’t overpower anything. And the mushrooms were done to perfection. Nothing watery. Nothing disappointing. And, as I cut off pieces for my friends to try, the rest of it was mine. All mine. And yes…I devoured it all. Every slice. I might have licked the plate clean. It was delicious…and I needed to top off the tanks for the marathon the next morning. This was the key.
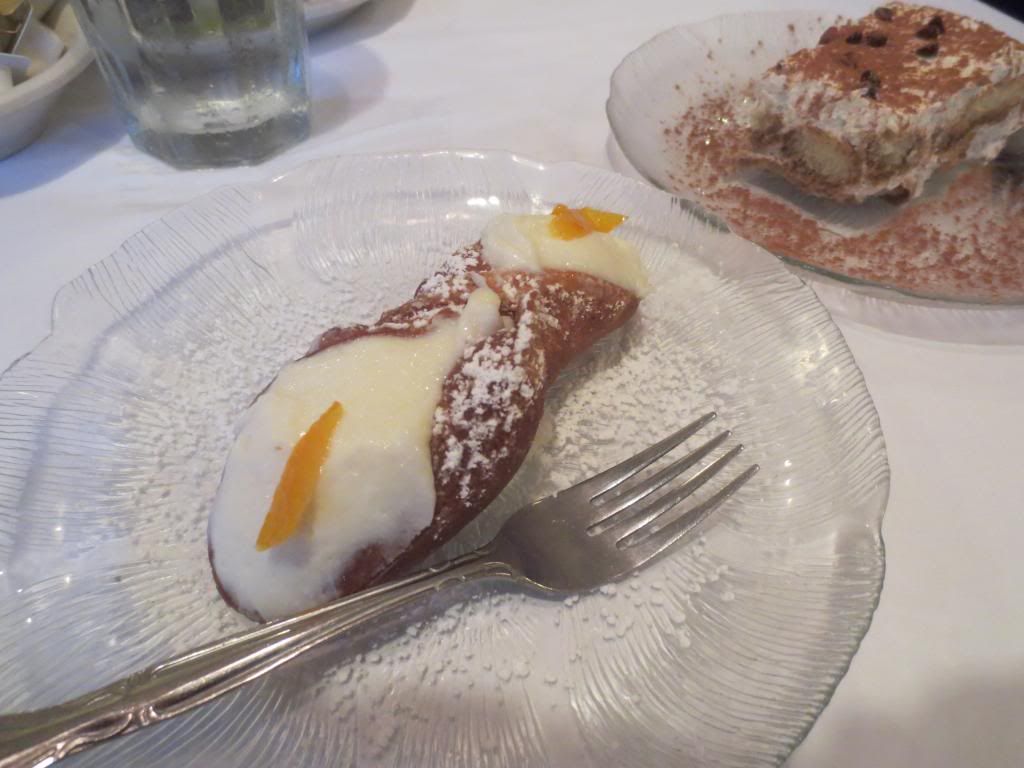
And, as I mentioned earlier…dessert was going to happen. I had 6 options to choose from on the gluten-free dessert menu. And while they all sounded fantastic, I was down to three choices…the cream puffs, the tiramisu, and the cannoli. It took a lot of pondering, internal debate, and deliberation with myself to pick between them. I rarely have so many options for a dessert…so choosing one was not easy. The cream puffs almost won, but I wasn’t sure how big they were and it came with two on the plate. The tiramisu was SO tempting. I haven’t had tiramisu in a long, long time. I wanted it. But…ultimately…I settled on the Gluten-Free Cannoli ($4.95). Both Jenn and Cathy opted for the regular Cannoli ($3.95) and Heather went with the regular Tiramisu ($3.95).
I was so excited when our desserts emerged from the kitchen and at our table. My cannoli definitely looked different from Cathy & Jenn’s…but it was the color and thickness of the shell. That was the only difference. Heather’s tiramisu looked absolutely amazing. Next time…(and there will be a next time!)…I’ll get the gluten-free tiramisu. It looked fluffy and amazing.
So…how was the gluten-free cannoli? SO SO SO good. SO GOOD!! MMMMMMMM….GOOD! OMG…GOOOOOOOOOD! The cannoli cream was amazing. Sweet, but not overly sweet. Creamy. Amazing. Delicious. It had bits of chocolate chips and fruit. There was a candied orange peel on each end. And the shell…sugary-sweet goodness. The crunch that it had with each bite was satisfying. And it all just blended together. It worked. And I devoured my dessert happily.
With that…I went and purchased a few bags of their gluten-free pasta, available at the register, and we paid our bill. As we were leaving, I overheard the restaurant manager explaining to a customer that the way the manage no cross-contamination is that all the gluten-free dishes are prepared in the kitchen upstairs at the restaurant…and the regular menu items are all done in the kitchen downstairs. Brilliant. And so safe for Celiacs. I loved learning that about Da Luciano’s. It’s nice to know I had nothing to worry about when eating there…which is good because the last thing you want before running 26.2 miles is tummy troubles.
We had to head back downtown…after dropping Heather off at a train station to head back to her hotel. We had plans for when she would arrive at The Hilton Chicago to meet up with us before the the marathon the following morning. We were all satisfied and happy with the meal we ate at Da Luciano. I will be back the next time I find myself in Chicago…which I hope is soon.
Speaking of which…the gluten-free pizza worked its magic as always…I had a fantastic marathon. Thank you, Da Luciano…for giving me my pre-race carbs in my favorite form. I can’t wait to come back and try more of your amazing menu.
So, if you find yourself in the Chicago area, make a point to head to River Grove and eat at the fantastic Da Luciano – Pasta, Pizza & Catering. It’s worth the short drive because the food is simply that amazing.