Product Review: Nana’s No Gluten Lemon Cookie

Nana's No Gluten Lemon Cookie
Nana’s No Gluten Lemon Cookie

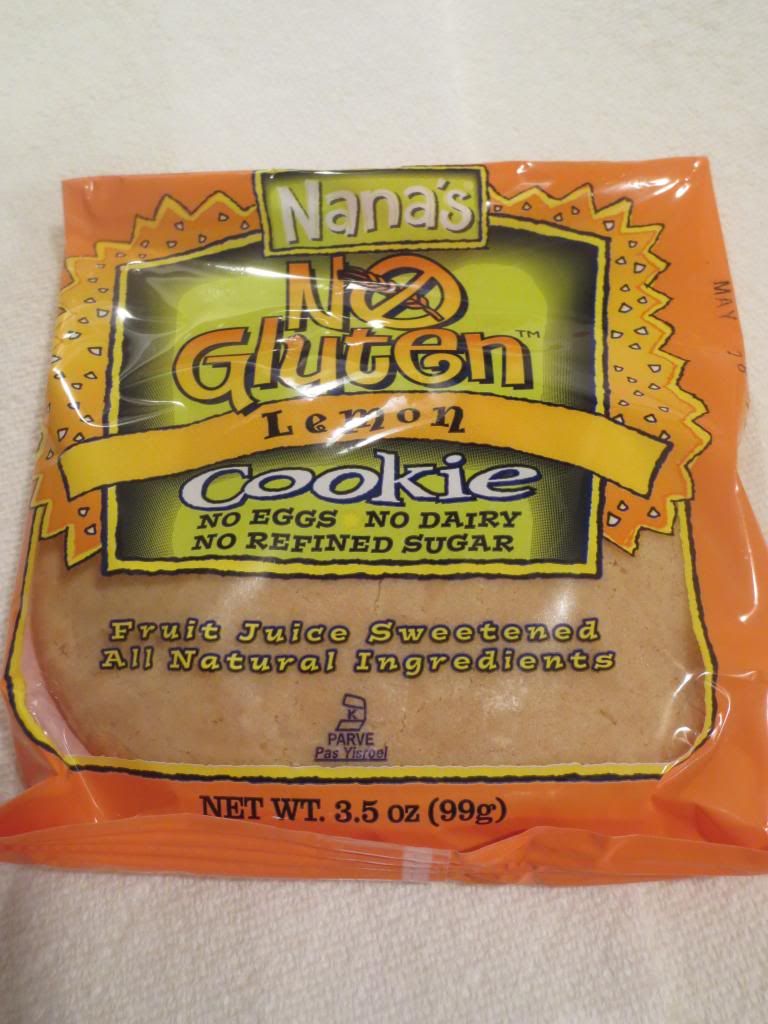
Product Review: Nana’s No Gluten Lemon Cookie – $2.99+

The cookie monster has struck again.

I need to stop finding all these different brands of gluten-free cookies.  Wait…no.  No, I don’t.  Because I forever will love cookies.  Especially a good cookie.

I have actually spotted Nana’s No Gluten cookies at a local natural food store.  However, I never really thought to stop and purchase one and give it a try.  Why?  I don’t know.  I must not have been thinking clearly.  Or, perhaps I was actually obeying my budget.  Or…was overwhelmed by the amount of sheer awesome gluten-free goodies at that store.  Whatever the case may be…that changed.  But while I was visiting my family in Birmingham, Alabama.

My roomie and I stopped by the organic store my mom took us to the last time we were in town.  It’s called Organic Harvest and their gluten-free selection is mesmerizing.  For real.  On the very bottom shelf, my roommate spotted the Nana’s No Gluten Lemon Cookie.  Because if lemon is involved, she’s going to find it.  Trust me.  So, it didn’t take much pleading to make that one of the purchases we made while there.  Good thing too, because when we drove home, we had nothing really left for dessert.  So…guess what was dessert last night?

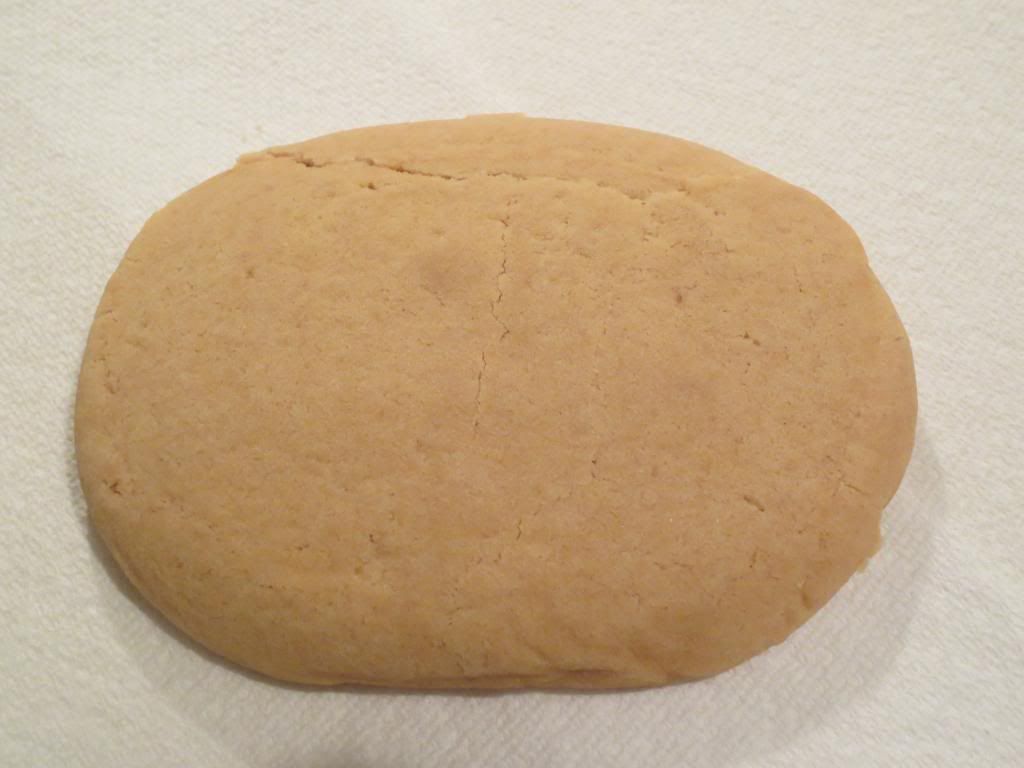
Now, I love a soft, chewy cookie.  I really do.  And Nana’s No Gluten Lemon Cookie looked very soft and very chewy.  I opened up the package and was greeted with the best smell of lemon citrus flavor.  YUMMY!  I only hoped that the lemon flavor wouldn’t overpower.  I split the cookie in half and gave half to my roomie and kept the other half for me.  She dug in immediately, as lemon is her favorite flavor, and I asked her how it was.  She liked it.  I asked if it was too lemony and she said that it was right on the edge.  It was perfect.  I hoped she was right.  I settled in to my own half, took a bite and…WOW!!  Super soft, for one thing.  Love that.  Moist.  You’d never believe that these were vegan (no dairy, no eggs, and an added bonus of no refined sugar).  The lemon flavor was at the right level for sure.  Any more and it would have been too tart.  But the sweetness of the cookie actually perfectly balanced out the tartness of the lemon.  I was beyond impressed.  I devoured the half of a cookie in record time.  The texture was a hybrid of a shortbread cookie and a moist, dense molasses cookie.  Right in between.  No joke.  It was melt-in-your-mouth nom-a-licous.  Honestly.  And I love that the cookie is sweetened by fruit juice.  Amazing.

So, let’s talk ingredients, shall we?  Nana’s No Gluten Lemon Cookie is made from brown rice flour, white rice flour, fruit juice (a combo of pear, apple and grape), rice dextrins (a natural and unmodified starch), non-GMO expeller pressed canola oil, white rice crisp, tapioca flour, lemon, baking soda, non-aluminum baking powder, natural flavoring, natural vanilla extract, xanthan gum, salt.  As far as ingredients go, not too bad.  Not great…but not too bad either.  Better than some I have eaten (and loved).

Nutritionally speaking, a serving is half the cookie.  Yes…half.  Not the whole cookie.  Just half.  In this half of a cookie, you will be consuming 180 calories and 7 grams of fat.  This half of a cookie also contains 85 mg sodium and 10 grams of sugar.  For a cookie, 10 grams of sugar isn’t bad, specially when it all comes from fruit juice.  You also get 1 gram of fiber and 2 grams of protein.  So, don’t expect this cookie to fill you up.

The light, fresh, moist, delicious taste of this cookie is so amazing and enticing.  I was sad that we only bought one.  Honestly, one of the best gluten-free cookies on the market.  I’m already hoping to try more of Nana’s No Gluten Cookies…even if I have to order them online.  Delicious!  If you love cookies and you are a fan of lemon…you won’t want to miss out on this treat.  Trust me.

I’m already craving another one.

Nana's No Gluten Lemon Cookie (unwrapped)
Nana’s No Gluten Lemon Cookie (unwrapped)

Product Review: Amy’s Organic Kitchen Andy’s Dandy Candy Chewy Candy Bar

Amy's Organic Kitchen Andy's Dandy Candy Chewy Candy Bar
Amy’s Organic Kitchen Andy’s Dandy Candy Chewy Candy Bar

Product Review: Amy’s Organic Kitchen Andy’s Dandy Candy Chewy Candy Bar – $2.49+

Yep.

Amy’s Kitchen does more than just organic cakes now for dessert options.  In fact, as I am typing this from a hotel in Birmingham, Alabama, I have since discovered that Amy’s Organic Kitchen also does ice cream now…dairy free ice cream.  No joke.  I saw it at the a little natural foods store and the Earth Fare and Whole Foods down here.  No joke.  Where have I been living?

What I did know is that Amy’s Kitchen put out candy bars not too long ago.  Yep.  Organic candy bars.

Trust me, I know…slapping the word organic on the label of something that is chocolate coated, packed with gooey caramel and nuts and…honestly…candy…does not make it healthy or any better than a Snickers.  Save that it is made from organic ingredients and not…well…hydrogenated soybean oil (Snickers, I’m looking at you!), it’s still candy.  I understand this.  I get this.  It doesn’t mean I didn’t pick it up off the shelf at the grocery store when I spotted it and keep it for dessert.

Because…I did.

HA!

Let’s first talk about why Amy’s Kitchen began producing candy in the first place.  According to the Web site, Amy’s father, Andy, loves candy.  He was the son of a candy maker and spent his childhood sampling chocolate morsels and chewy caramels from his father’s kitchen.  To honor Amy’s Organic Kitchen’s commitment to provide great flavor and pure organic ingredients, Andy’s Dandy Candy was created.  Andy was the tester for the flavors and when he was satisfied with the outcome…the candy bars were put on the market.

Currently, there are four different varieties: Crispy, Crunchy, Chewy, and Creamy.

I picked up Chewy.

Why Amy’s Organic Kitchen Chewy Candy Bar?  Well, it was described, on the package, as soft, chewy caramel with pecans that were coated in chocolate.  That sounds like heaven to me.  Pecans are one of my favorite nuts.  WIN!

Amy's Organic Kitchen Andy's Dandy Candy Chewy Candy Bar (unwrapped)
Amy’s Organic Kitchen Andy’s Dandy Candy Chewy Candy Bar (unwrapped)

As I was out of dessert options this past week before heading out of town, the roomie and I each had one of the two mini bars that are inside the package of the Amy’s Organic Kitchen Chewy Candy Bar.  Yes…one for you and one to either keep for later or share.  I highly encourage sharing.  Because the more you share, the more these will sell…and they are SO worth it.

One bite…and it was like eating a hybrid of a Snickers (with less nuts) and a Rolo.  There it is.  It was amazing.  The caramel was soft and chewy.  The chocolate was a nice sweetness.  And nothing pairs better with caramel than chocolate.  Yum.  The pecans were actually quite sizable and prevalent throughout the candy bar itself.  It added a nice salty element…so each bite was perfection.  I was one happy girl.  And this girl doesn’t eat candy, let alone candy bars, all that often.  Even Cathy was a fan.

So, let’s talk ingredients.  Amy’s Organic Kitchen Andy’s Dandy Candy Chewy Candy Bar is made from organic milk chocolate, organic tapioca syrup, organic cane sugar, organic pecans, organic nonfat dry milk, organic grade AA butter, filtered water, organic palm oil, organic vanilla extract, sea salt, organic soy lecithin.  It is deliciously organic, made from Rainforest Alliance Certified cocoa, gluten-free, and contains no high fructose corn syrup, preservatives or GMOs.

Nothing too off-putting, right?  Right.

As for the nutrition facts…a serving size is 1 of the 2 mini bars that are included in the pack.  One bar will provide you with 100 calories and 6 grams of fat, which is actually good for a candy bar, I think.  This little bar has 5 mg of cholesterol, 45 mg sodium, and 9 grams of sugar.  9 grams of sugar for a candy bar is actually not bad at all.  A snickers of comparable size has 24 grams of sugar, twice the calories and way more fat and sodium.  One serving of the Chewy bar also gives you no filling fiber and only 1 gram of protein.  But…it’s candy.

Yes…candy.  Indulgent treats that I actually do treat myself to every now and again.  But, when choosing a candy…choose something a little bit better for you.  Less sugar.  Less fat.  Organic ingredients.  No high fructose corn syrup of hydrogenated oils.  For me…Amy’s Organic Kitchen Andy’s Dandy Candy Chewy Candy Bar is a fantastic option for when the sweet tooth hits.

Try it for yourself.  And as soon as I can find the other varieties…I’ll give those a try too.

Happy indulging.

Amy's Organic Kitchen Andy's Dandy Candy Chewy Candy Bar (halved)
Amy’s Organic Kitchen Andy’s Dandy Candy Chewy Candy Bar (halved)

Product Review: Mi-Del Gluten-Free Gingerbread Men Cookies

Mi-Del Gluten-Free Gingerbread Men Cookies

Product: Mi-Del Gluten-Free Gingerbread Men Cookies – $4.59+

I was in Birmingham, Alabama just before Christmas…visiting my family.  My mom had found a new organic and natural food store in the area…and often goes there to shop…because the owner of the store is a Celiac.  So much of their offerings are gluten-free…and now also paleo.  It was actually a very cool store…and I picked up quite a few items while visiting there…which I hadn’t seen yet around here.

One of these items was the Mi-Del Gluten-Free Gingerbread Men Cookies.

It had been forever since I last had anything gingerbread…minus the amazing gluten-free gingerbread French toast and allergen-free gingerbread donuts my local allergen-free bakery (Annie May’s Sweet Café) makes during the holiday season.  But cookies?  I haven’t enjoyed a gluten-free gingerbread cookie…ever.

So, when I spotted these…nevermind the fact that I don’t really care for gingerbread…during the holidays…I don’t mind it.  I guess it’s part of that holiday feeling…those familiar flavors and tastes.

Well, it’s now almost February…and these cookies have been waiting patiently in my pantry for a little while now (and since my return to the Louisville area, I have found them at Target…go figure!).  I was completely out of dessert options for after dinner tonight.  Until I remembered I had these lurking in the pantry.  Time to pull them out and give them a try.

The cookies actually look exactly like they do on the box.  I was impressed.  They are this great tan color, with this sugary coating.  They looked fantastic and I was actually looking forward into biting into them.  I doled out two servings…for myself and my roommate…and we sat down for our little treats.

OH…these are really good.  First of all, that gingerbread flavor doesn’t overwhelm or overpower the palate.  In fact, they are sweet with just a hint of that ginger spice.  Perfect, really.  These cookies are crunchy and amazing.  In fact, we had to turn the volume up a bit on the cooking show we were watching while we noshed.  Every bite was a treat.  Sweet…crunchy…it was the perfect way to cap off a meal.  Mi-Del does a fantastic job with their gluten-free gingerbread cookies.  I was SO happy eating these.  With it being so bitterly cold outside…it was like the warmth of the holidays all over again.  One bite…and you’ll be hooked too.

Mi-Del Gluten-Free Gingerbread Men Cookies are made from a gluten-free flour mix of corn flour, soy flour, potato flour, rice flour, corn starch, potato starch, and xantahn gum.  They also are made up of sugar, modified tapioca starch, canola oil, unsulphured molasses, ginger, baking soda, organic caramel color, sea salt, soybean lecithin, xanthan gum.  Every ingredient recognizable.  Every ingredient real.

As for nutrition…you’ll love this!  Mi-Del Gluten-Free Gingerbread Men Cookies are rather guilt-free.  A serving is 4 cookies, which will provide you with 100 calories and 2.5 grans of fat.  These are cholesterol free, contain 100 mg of sodium, and only 7 grams of sugar (awesome for a cookie!).  You also get 1 gram of fiber and 2 grams of protein.

So…these are relatively healthy as far as cookies go.  I didn’t feel guilty at all as I crunched my way through my serving.  They are the perfect blend of ginger and sweetness.  The crispness of each bite makes you feel like you’re biting into a real treat.  And the flavor…amazing.  These all natural cookies are fantastic.  And if you missed out on them this holiday season…seek them out next year.  They are SO good!

Product Review: Liz Lovely Gluten-Free Cowboy Cookies

Liz Lovely Gluten-Free Cowboy Cookies

Product: Liz Lovely Gluten-Free Cowboy Cookies – $3.99+

Remember awhile back when I worked my way through every Liz Lovely gluten-free cookie available?

Times are changing.

And so is Liz Lovely.  In fact, they recently just got their certification.  Certified.  Certified for goodness, of course.  But this is HUGE.  Liz Lovely is now CERTIFIED 100% FREE OF WHEAT, DAIRY, AND EGGS!  Yep.

You know what this means?

It means this cookie monster has more cookies from this amazing company at my disposal.  My taste buds are ready!

While out at my local natural food store, I spotted the Liz Lovely shelf that I usually walk to and stare longingly at for a little while.  Most of the time I can talk myself out of purchasing a pack of 2 cookies…but this had varieties I had yet to try.  I got the roomie to consent to one item off the grocery list/budget this week and we brought home Liz Lovely’s Gluten-Free Cowboy Cookies.  Previously, you could only get this version done vegan…now it’s both.

And I am one very happy cookie monster.

So, what is a cowboy cookie?  Well, it’s a hearty cookie for one thing.  Usually they contain oats, chocolate chips and some sort of nut.  Sometimes…coconut is included.  In the case of Liz Lovely’s variety of Cowboy Cookies, you get a magical combination of oats, chocolate chips and walnuts.  YUMMY!!  The base of her cookie is dipped in delicious dark chocolate and the top has some nice dark chocolate stripes.  It looked amazing.  Sounded delicious.  And after dinner last night, I split one in half with my roommate and we enjoyed a gluten-free Cowboy Cookie dessert.

On Liz Lovely’s Web site, she gives a little background as to how the Cowboy Cookies reinvented the idea of the original business concept.  Liz Lovely was originally going to do vegan truffles, but it turns out, one night before hosting a tasting party, Liz had extra chocolate but no more centers…so she quickly baked up some oatmeal chocolate-chip cookies and drizzled the extra chocolate all over them.  The truffles were all but forgotten at the party.  The cookies were the hit.  So, the next day, it was decided…Liz Lovely would be a cookie company.  Cowboy Cookies…that’s what made it happen.

I can see why too!  These cookies are fantastic.  Way better than I could even imagine a vegan truffle to be (although I love vegan truffles too).  My first dessert love is a cookie…always and forever…so this was a very nice treat.  The oats in the dough give it this fantastic texture and a bit of sustenance.  The chocolate chips bring the sweetness.  And those walnuts…not only add a bit of a crunch, but that saltiness that pairs well with the chocolate.  I love how the extra chocolate on the bottom and top of the cookie meshes with the rest of the flavors.  It is one sweet, hearty, delicious bite.  That’s for sure!  Consider me one happy cookie monster.

So…now we’ll talk ingredients and nutrition.

One thing I love about Liz Lovely cookies is that they are real.  No ingredient is processed or fake or made up of chemicals.  You’ll recognize (and enjoy) everything that goes into her cookies.  In the case of the Gluten-Free Cowboy Cookies, you’ll find: unrefined cane sugar, gluten-free rolled oats, rice flour, dark chocolate, palm fruit oil, walnuts, water, tapioca starch, xanthan gum, molasses, vanilla extract, sea salt, potato starch and baking soda.  The ingredients aren’t a mile long…and, as I said…everything is recognizable and able to be purchased in your grocery store.  LOVE IT!

Now, let’s talk about nutrition.  Do remember…this is a COOKIE and any way you slice it (in my case…in half) it is a treat.  A serving size of a Liz Lovely Gluten-Free Cowboy Cookie is 1/2 of the cookie.  This half will dish you up 180 calories and 8 grams of fat.  This half of a cookie also contains 14 grams of sugar (I know…it’s a lot…but it’s a COOKIE!) and a mere 75 mg sodium.  Not too shabby.  And you’ll also be devouring 2 grams of fiber and 3 grams of protein.

Nice!

And these cookies are naughty and nice.  Honestly.  If you are going to splurge, I encourage you to find a store that sells Liz Lovely’s cookies and give them a try.  I have yet to find any better on the market.  They are soft, chewy, and just…amazing.

And…if you can’t find them where you live, you can always order online.

Do it.  You’ll fall in love too.

Liz Lovely Gluten-Free Cowboy Cookie

Recipe: Smashed Herbed Potatoes

I am a runner.  Carbs are my friend.  And I just happen to be a huge, huge fan of potatoes.  I love potatoes.  Any way you can serve them up, I will devour them.

Recently in my CSA bin, I received a huge bag full of fingerling potatoes.  Instead of roasting them up as I normally would, I wanted to do something different.  I wanted to think outside of the normal box I hem myself in when potatoes are in my kitchen.

So…that’s exactly what I set out to do.  I decided to finally get to smashing potatoes.  I’m not talking mashed potatoes.  I really mean…smashed potatoes.  I served mine with a dipping sauce of Spinach & Artichoke Hummus.

For real.  And yeah…it was super delicious.

Recipe: Smashed Herbed Potatoes

Smashed Herbed Potatoes (with Spinach and Artichoke Hummus)

Servings: 4-6
Time: Prep 30 minutes; Cook 25 minutes

Ingredients:

12 fingerling potatoes (or other small potatoes, like new potatoes, etc.)
3 tablespoons extra virgin olive oil
kosher salt, to taste
black pepper, to taste
Rosemary (or other herbs of choice), to taste


Directions:

Bring a pot of salted water to a boil.  Add the potatoes to the water and cook them until they are fork-tender.

On a sheet pan, generally drizzle olive oil.  Place the tender potatoes on the cookie sheet, leaving plenty of room between each potato.

With a potato masher, gently press down each potato until it slightly mashes, rotate the potato masher 90 degrees and mash again.  Do this to all the potatoes.  Then, brush the tops of each crushed potato generously with more olive oil.

Sprinkle the potatoes with kosher salt, fresh ground black pepper, and freshly chopped rosemary (or chives or thyme or whatever herb you have available).

Bake in a 450°F oven for 20-25 minutes until they are golden brown.

Serve.

~*~*~

OH. MY. GOD.

This is my new favorite way to eat potatoes.  For real.  I mean…packed with flavor.  The fresh herbs really draw out amazing flavors.  And dipping it into hummus was sheer genius.  Trust me.  This is one dish that is totally worth making.  It takes some time, but…you will be as addicted to these as I am.

I’m already wanting to make it again.  And thankfully, this week’s CSA bin is coming with fingerling potatoes.  Hmmm…

Get smashing and enjoy!

Product Review: Tastefully Simple Gluten-Free Beer Bread Mix

Tastefully Simple Gluten-Free Beer Bread Mix

Product Review: Tastefully Simple Gluten-Free Beer Bread – $8.99

Let me give a big shout-out to Tastefully Simple consultant and a friend of mine from high school, Rebecca Fifield!  It is because of her that I have these products in the first place.  You see…back when I was in high school, I wasn’t gluten-free.  In fact…I don’t think anyone in my hometown even knew what a Celiac was.

It turns out that there is magic in the Interwebs…and thanks to the magic of social media…you reconnect with people.  That’s how Rebecca and I got back into touch.  And she, knowing I am Celiac and having to eat gluten-free now, sent me packets of Tastefully Simple’s new gluten-free line-up of mixes.

Well…it’s the New Year.  January 1st.  And my roommate and I have set a few goals for this coming year.  And we are wasting no time getting settled into the new routine.  That being said, tonight I was simply cooking up some black eyed peas with some kale for dinner.  I know that doesn’t sound gourmet, but some believe that eating black eyed peas on New Years Day will bring prosperity.  I’m all for that.  The recipe mentioned something about serving the meal with cornbread.  I don’t have cornbread and I didn’t have enough cornmeal in my pantry to rock out a batch of it from scratch.

That being said…I remembered I had these mixes ready for me to try.  So, I climbed up to the top shelf of my pantry and began to pull each one up until I found the one I was seeking.

Gluten-Free Beer Bread.

Yes.  Gluten-Free Beer Bread.  And…I just so happen to have gluten-free beer on hand.  I’m not a beer drinker, mind you, but I make a killer queso with it…so I tend to have it in the house in case.  So glad I did…because I was more than excited to get this bread cooking.

And guess what?  Tastfully Simple really is simple!!  This mix is super easy to put together.  I got down one 9 x 5 bread pan and buttered the inside.  Then, all I had to do was add to a large bowl…the mix, the gluten-free beer (or you can use soda), and 1 egg.  There is an option to add 3 tablespoons of melted butter…which I decided to do.

That’s it.  Whisk it together.  Pour it in the pan.  Drizzle the melted butter over the top (if you’re using it…but I highly recommend it).  Set it in a 350°F oven for about 50 minutes…and you have yourself a beautiful loaf of gluten-free beer bread.

YES!  It really is that easy!

Tastefully Simple Gluten-Free Beer Bread

What’s more…I was drooling as this was baking in my oven.  My apartment smelled (and still does) so amazing.  Fresh-baked bread is one of my favorite smells…but this aroma was beyond fantastic.  I resisted the urge to open the oven and sneak a peak the instant I started to smell it.  That being said…I allowed it to cook for a full 50 minutes, preparing the rest of dinner as it was finishing up.  And when my timer went off, I pulled a gorgeous, golden-crusted loaf of gluten-free bread out of my oven.  I turned it out of the pan…and it was perfect.

I let it cool slightly as I finished up the last of the black eyed peas and kale we were having for dinner.  I knew the bread needed to cool a bit more…but I was ready to dive in.  So, I sliced off two slices…one for me and on for my roommate.  It sliced beautifully, still steaming in the middle.  Fresh.  Hot.  Gluten-Free.  Bread.

Well, we settled in for our New Years Day feast and I immediately had to sink my teeth into the beer bread.

OH MY BREAD GODS!  No…this is, by far, one of the best gluten-free breads I have ever made in my kitchen.  The mix forms into this light, not dense, loaf of bread.  I think the carbonation from the beer helps with this.  The flavor is buttery, and light, and totally amazing.  The texture is perfect.  Not dense.  Not heavy.  And it’s soft…and the right amount of chewy.  It is gluten-free bread perfection.  I am going to have to order more of this from Rebecca…and stat!

Let’s talk ingredients now, shall we?  The Tastefully Simple Gluten-Free Beer Bread is a mix of rice flour, whey, sugar, potato starch, tapioca flour, baking powder, whey protein concentrate, cassava flour, brown sugar, salt, yeast extract, natural flavors, maltodextrin, and xanthan gum.  Not a bad mix of ingredients there.

As for nutrition…the way I prepared the bread…the stats would look like this:

This mix contains enough for 13 servings.  One serving of this bread would provide you with 138 calories and 3 grams of fat.  You would also have get only 6 grams of sugar, no fiber, and 3 grams of protein.  Amazing stats for bread, yes?  YES!

And…trust me when I say that this bread is really, really, really good.  Tastefully simple.  Tastefully gluten-free.  Tastefully devoured.

So, if you want to give it a try, hop on over to Rebecca’s Tastefully Simple Page (www.tastefullysimple.com/web/bfifield) and place an order now.  You won’t regret it.  I am so happy to have this in my life.  Thank you, Rebecca!  And thank you, Tastefully Simple!

Tastefully Simple Gluten-Free Beer Bread

Recipe: Gluten-Free Thin Mint Cookies

The cookie monster strikes again!

But this time…for a good reason!

You see, one of the people I run with…a lot…had a birthday.  And he also recently ran yet another marathon, making 11 for this year, I believe.  Well, birthdays and marathons are things to be celebrated.

Originally, I was going to make a Boston Cream Pie to bring to the run group…but I just couldn’t figure out a way to make it dairy-free with the custard inside.  Well, I could…but it wasn’t going to be easy and time was a little tight.  So, I changed my mind at the very last minute, while standing in my kitchen, and instead threw together a version of the Girl Scout favorite (which I haven’t been able to indulge in since my diagnosis three years ago!).  Guess what?  They were a hit.

The recipe came together with a little help from Gluten-Free On A Shoestring.  So, check out the recipe and give it a go.  They brought back so many happy memories and made a lot of people happy that night.

Recipe: Gluten-Free Thin Mint Cookies

Gluten-Free Thin Mint Cookies

Servings: 30 larger cookies (I made 65 small cookies)
Time: Prep 15 minutes; Bake 7 minutes

Ingredients:

COOKIES

  • 5 tablespoons unsalted butter (I used Earth Balance)
  • 4 ounces semi-sweet chocolate, chopped (I used Enjoy Life morsels)
  • ¼ teaspoon pure vanilla extract
  • ½ teaspoon pure peppermint extract
  • ¾ cup high-quality all-purpose gluten-free flour (I used Better Batter)
  • ¼ teaspoon xanthan gum (omit if your blend already contains it)
  • ½ cup unsweetened natural cocoa powder
  • ¼ teaspoon baking soda
  • ½ teaspoon kosher salt

GLAZE

  • ½ pound dark chocolate, chopped
  • pure peppermint extract, to taste

Directions:

Preheat your oven to 300° F.  Line rimmed baking sheets with unbleached parchment paper, and set them aside.

In a medium-size microwave-safe bowl, place the butter and all of the semi-sweet chocolate except for 3 to 4 1-1/2-inch-size chunks.

Microwave at 70% power for 45 seconds at a time, stirring in between, until melted and smooth.  Add the reserved chunks of chocolate, and stir until the chocolate has begun to thicken a bit and the chunks have melted.

Add the vanilla extract and peppermint extract, and stir to combine.  Set the chocolate aside.

In a large bowl, place the flour, xanthan gum (if using), cocoa powder, baking soda, salt and sugar, and whisk to combine well.  Add the chocolate mixture, and mix until the dough comes together and is well-integrated.  Press the cookie dough into a disk.

Place the dough between two sheets of unbleached parchment paper, and roll it out until it is about 1/4 inch thick (any thinner and the cookies are more likely to burn in the oven, and they will crack when you try to coat them in chocolate).  Cut out rounds that are about 1-1/2 inches in diameter, and place them, 1 inch apart, on the prepared baking sheets.

Place the baking sheet in the center of the preheated oven and bake, rotating once, for 7 minutes.

Remove from the oven, and allow the cookies to cool completely on the baking sheet.

Once the cookies are cool, make the glaze.

Place all of the dark chocolate except for 3 to 4 1-1/2 inch-size chunks in a medium-size, microwave-safe bowl.

Microwave at 70% power for 45 seconds at a time, stirring in between, until melted and smooth.  Add the reserved chunks of chocolate and the peppermint extract, and stir until the chocolate has begun to thicken a bit and the chunks have melted.

Place the cookies, one at a time, in the glaze.  Press down on the cookie with the tines of a fork, then flip it gently in the chocolate.  Pull the cookie out of the chocolate by slipping the fork under it and bobbing the cookie on the surface of the chocolate a few times before pulling it along the edge of the bowl and carefully placing it on a clean sheet of parchment paper.  Allow the chocolate to set at room temperature.

Serve and enjoy!

~*~*~

While it has been ages since I have last been able to eat a Thin Mint Cookie (or 12 in one sitting)…these reminded me SO much of the cookies I grew up devouring.  I loved them enough to have as much trouble stopping myself from eating them as I did the real things.  So, from this one-time Girl Scout to all of you Celiacs and gluten-intolerant people out there…don’t give up hope.  You can now make your own Girl Scout favorite in the comfort of your own kitchen.

They’re probably less expensive too.  *WINK*

Recipe: Paleo Snickerdoodle Cookies

I love Snickerdoodles.  Seriously.  I loved it in the winter time when my mom would bake all the holiday cookies, bars, fudge, etc…and we’d have a literal smorgasbord to choose from each night for dessert.  One treat.  So…make your decision wisely.

Never failed.  I wanted the Snickerdoodles.

It has been years since I have had my mom’s homemade Snickerdoodles.  And she will probably never make them again, sadly, since she has since had to go gluten-free as well and has switched over to eating paleo.

Lo and behold…I came up with a solution.  You see, one of my running buddies is also on the paleo diet.  And I love, love, love to bake goodies for my run group.  I’ve been craving Snickerdoodles for awhile now, so today I decided that’s what I would make for my fellow runners.  But, I wanted everyone to be able to enjoy them, so I did a little searching on the Internet.

And with a little guidance from various blogs, especially The Urban Poser, I was able to make Snickerdoodles tonight that are paleo, vegan, egg/grain/dairy-free.  Gluten-Free Snickerdoodles.

They aren’t my mom’s specialty…but they are good.  So, go ahead and give this recipe a spin.

Recipe: Paleo Snickerdoodle Cookies

Paleo Snickerdoodle Cookies

Servings: 15-16
Time: Prep 10 minutes; bake 10 minutes

Ingredients:

  • 2 cups blanched, fine ground almond flour
  • 1/4 teaspoon salt
  • 1/4 teaspoon baking soda
  • 4 tablespoons coconut oil, softened or liquid (5 for a softer cookie)1/4 cup mild honey (like clover) or vegan alternative (such as agave)
  • 1 tablespoon gluten-free vanilla extract

Cinnamon coating:

  • 1 tablespoon raw coconut crystals (I used Coconut Secret)
  • 1 tablespoon ground cinnamon
Directions:
 
Preheat the over to 350 degrees F and line and grease or line a baking sheet with parchment paper.In a medium sized bowl, combine the dry ingredients; mix together well.  (When measuring almond flour, use the dip & sweep method for best results.  Dip the measuring cup into the loose almond flour and drag the flat edge of a knife over the top.  Pouring the flour directly into the measuring cup can result in too much or even too little almond flour in the recipe).In a separate bowl, mix together the oil, honey and vanilla.  Add the wet ingredients to the almond flour mixture and stir until combined.

In another small bowl, combine the coconut sugar crystals and the ground cinnamon in a small bowl.

Using a rounded tablespoon, scoop out the dough, then gently form into a ball.  Roll the dough in the cinnamon mixture.

Place the balls of cookie dough on a parchment lined baking sheet, about 3 inches apart.

Using a mason jar or your hands, slightly flatten each cookie.

Bake the cookies for 8-9 minutes.  Leave the cookies on the cookie sheet while cooling.  They may seem under-baked at first, but they will firm up to just the right texture as they cool.

Dig in and enjoy!

~*~*~

So, they aren’t my mom’s Snickerdoodle cookies…but these do come out sweet, thin, crackled and chewy.  Not cake-y, which so many Snickerdoodles tend to be when sold in stores.  These remind me of how my mom’s used to cook up.  They don’t taste the same…but they are totally Snickerdoodles in their own right.

And yeah…they are amazingly good!

Product Review: Mom’s Best Safari Cocoa Crunch

Mom's Best Gluten-Free Safari Cocoa Crunch
Mom’s Best Gluten-Free Safari Cocoa Crunch

Product: Mom’s Best Gluten-Free Safari Cocoa Crunch – $2.49+

Remember those adds with Sonny the Cuckoo Bird declaring, “I’m cuckoo for Cocoa Puffs!”

I ate it up as a child.  As did I devour said chocolatey puffy cereal.  Actually, I think my dad enjoyed them way more than we kids did, because he’d eat the entire box if we weren’t watching him.  Says something about that chocolate, sugary rush in the morning, yes?

Well, aside from a couple varieties of chocolate rice puffs…anything remotely close to Cocoa Puffs was nonexistent in the gluten-free cereal world.

Or…so I thought.

Enter…The Roomie.

You see, every now and again, I get into my kitchen to start on a meal…and discover that I am missing an ingredient.  So, the roomie is normally kind enough to allow me to do more prep work while she runs down to the grocery store to get what I need.  And every now and again, she returns with a wonderful new gluten-free product for me to try.  This was the scenario the day she came home from the grocery store with…basically gluten-free Cocoa Puffs.

The brand is Mom’s Best…and I’ve had their Crispy Cocoa Rice cereal (basically…chocolate Rice Krispies) before…and loved then.  Loved everything about them but the sugar content.  But…let’s face it.  I’m having chocolate for breakfast.

That’s basically how it works with the Mom’s Best Gluten-Free Safari Cocoa Crunch as well.  At first…the amount of sugar was a concern…but I let it go.  I tend to obsess over some things…and while watching my sugar intake is important, it isn’t life-threatening if I go over a certain amount.  I just try to keep it in check…and I never seem to be able to.  But…setting all that aside, this morning I opened up the box of the Safari Cocoa Crunch, and poured myself a serving.  These little chocolate puffy balls of cereal looked so much like Cocoa Puffs, I might have squeed a little in delight.  Maybe.

Okay…I did.

But even more so after tasting them.  I popped a couple pieces of them dry…to get just the flavor on their own.  Oh…my chocolate gods of cereal bliss…they were fantastic.  Light…crispy…chocolatey…everything this chocoholic could have asked for and more.  Chocolate in the morning…yes please!  Sign me up.  I then ate the rest of the bowl with a small pool of unsweetened almond milk.  Fantastic.  I might…might…have slurped up the extra milk, now rich with chocolate, at the bottom of the bowl.  There is a good possibility it happened.

These were better than I even remember Cocoa Puffs tasting.  However…it’s been a very long time since I’ve had cocoa puffs…so…keep that in mind.

But…OMG…YUMMY!!!

So, let’s get down to the ingredients and nutrition portion of this blog, shall we?

Ingredient wise…Mom’s Best Gluten-Free Safari Cocoa Crunch is made up from sugar (ugh…yes…that is the first ingredient!), corn meal, corn flour, corn syrup, coconut oil, corn bran, cocoa, caramel color, salt, calcium carbonate, canola oil, natural flavor and trisodium phosphate.  So…not really the best option…and there are a few chemical sounding ingredients, despite the fact that the box declares that there are no flavors or preservatives that you can’t pronounce.  Okay…I can pronounce them…doesn’t mean I know what they are.  This cereal, however, does not contain high fructose corn syrup or hydrogenated oils.  It is gluten-free as well.

A serving of Mom’s Best Gluten-Free Safari Cocoa Crunch is 3/4 cup.  In this serving, you will be consuming 120 calories and 2 grams of fat.  That really isn’t too bad for a chocolate cereal.  You will be provided with 110 mg sodium and a whopping 14 grams of sugar.  Again…it’s a chocolate cereal.  I’m going to try not to obsess over that.  Unfortunately, this cereal will not leave you feeling full, as I found out this morning.  It has only 2 grams of fiber and 1 gram of protein.  I ate my bowl before heading to the gym and I was already starving 30 minutes into my workout.  So, it won’t stick with you.  Then again, it’s mostly sugar…so there is a reason.

Overall though…really, really tasty.  I love chocolate and it’s nice to treat myself every now and again to a sinfully sugary cereal.  I don’t make a habit of it…but this one was totally worth it.  Really good.  Mom’s Best has once again bested the sugar-addict in me…and made me fall in love with yet another chocolate breakfast treat.

Well played!

Product Review: EatPastry Gluten-Free Sugar Momma Cookie Dough

EatPastry Gluten-Free Sugar Momma Cookie Dough

Product: EatPastry Gluten-Free Sugar Momma Cookie Dough – $6.49+

COOKIE!

We all know…I am one big cookie monster.  I mean…give me a chance to try a gluten-free cookie and I’m on it like Cookie Monster.  OM NOM NOM!!  Seriously…cookies are one of my biggest weaknesses when it comes to treats.  I love them.  I always have.  I grew up with my mom constantly baking cookies, from scratch, on snow days, for special occasions, and especially during the holidays.

While my favorite will always be her Snickerdoodles (which I intend to attempt to make gluten-free this year…so wish me luck), I also love it when she would make sugar cookies.  Not only did we get to help cut them into the fun shapes, but we got to help decorate them too.  Sugar cookies are so simple…yet have always been one of my favorite cookies to reach for and devour…er…I mean eat.

Why?

Simple flavors.  Simple ingredients.  Pure awesomeness.

They are basically sugar, butter, and flour, but damn…they are awesome.  I’d be hard-pressed to find someone who didn’t enjoy a sugar cookie.  And if they said anything of the sort, I’d deem them a liar…just like everyone I know who says they hate chocolate.

LIES!  ALL LIES!!

*cough*

Anyway…here I was…before the release of Pillsbury Gluten-Free Cookie Dough (which is refrigerated)…walking around my local natural foods store during one of their fun gluten-free events…when…the roommate says I can pick out some new products to try.  WOOHOO!  I love it when she expands my grocery budget as a treat…sometimes for no good reason.  She says she benefits from it too…so it’s win/win!  I never go overboard…and generally pick a few items that I’ve not seen anywhere else.  And one of those items this last time was a gluten-free sugar cookie dough in the refrigerator section.  It’s EatPastry Gluten-Free Sugar Momma Cookie Dough.

EatPastry is a line of vegan and some vegan and gluten-free cookie doughs.  The company was founded, according to the website, by confusion, curiosity, and dedication.  The company experimented until they came up with what they thought to be the best tasting, best “feeling” cookie dough.  They use only high quality, all natural ingredients.  And it has been a priority from the inception of EatPastry to maintain 100% vegan ingredients, meaning none have come into contact with any animal ingredients.  Their cookie dough also uses only organic and fair trade sugar (evaporated cane juice) and select organic ingredients.  They even make their own peanut butter for their (not gluten-free) vegan Peanut Butter Chocolate Chip Cookie Dough.  EatPastry’s doughs contain no eggs, no dairy, no preservatives, no processing, no fillers, no GMOs and no funny business.  None.  Good cookie dough is serious business, folks!  They even state that all flavors were created with various moods in mind.

Mood food.  Love it.

Well…I am just now getting around to using this dough because…well…I ran out of desserts in my freezer and pantry.  HA!  I wanted to try this before but I was working against a deadline on expiration dates.  So…this little container was just hanging out in my fridge…waiting patiently.

It’s time to shine came yesterday!  I just polished off a delicious, fresh dinner and knew I needed something sweet.  I always have dessert.  Always.  So…I pulled this out of the fridge, preheated my oven to 350 degrees and laid out a strip of parchment paper across a baking sheet.  I scooped up two tablespoons of dough, flattened each spoonful out, and then threw the pan in the oven.

How easy is that?  About 12 minutes later…out they came.  Delicious, individual cookies that were fresh from the oven.  That is a total dessert win.

And…oh…my goodness.  The EatPastry Gluten-Free Sugar Momma Cookie Dough is sassy, sweet and seductive.  No…really…that’s what the Web site says.  But I couldn’t agree more.  First of all, with the scoopable refrigerator dough, you can make one cookie at a time if that’s what you wanted.  You don’t have to make an entire batch right away…which you may or may not polish off before they start to get hard.  This is easy and convenient.  Seriously.  They have this great texture to them.  They are soft on the middle, but golden on the edges.  And fresh from the oven…that is unbeatable.  The flavors are subtle…but fantastic.  There is that rich, delicate undertone of vanilla in each bite.  And these cookies aren’t gritty with sugar.  Not one bit.  They are so amazing that it’s probably a good thing I can cook them up personally.  Or I might eat the entire container.

Let’s talk ingredients and nutrition now…because I like to know what I’m getting myself into.

The EatPastry Gluten-Free Sugar Momma Cookie Dough is made of from a gluten-free flour blend (garbanzo, brown rice), Earth Balance, filtered water, pure salt, natural flavor (derived from corn with no MSG, no alcohol, no gluten) sunflower lecithin, lactic acid (derived from sugar beets), organic evaporated cane juice, pure apple sauce, pure vanilla extract, nutmeg, baking soda, and sea salt.  Not too bad for a cookie right?

You’ll fee the same way about the nutrition.  One serving is 1 tablespoon, which spoons you up only 60 calories and 2.5 grams of fat.  This serving also has only 25 mg sodium and 5 grams of sugar.  Yes…5 grams of sugar in a SUGAR COOKIE!!!  You don’t get any fiber of protein from these cookies, but they are free of trans fats as well as cholesterol.

And they are fantastic.  Really sexy, smooth, sinful gluten-free cookies of awesomeness.  Without the guilt.  Because, let’s face it…you don’t find 60 calorie cookies just anywhere, right?

I hope to try the other two vegan and gluten-free varieties offered by EatPastry…the Chocolate Chip and the Snickerdoodle (SQUEE!).

If you can find EatPastry refrigerated vegan and gluten-free cookie dough in your grocery store or natural food store…get it…and try it.  You can scoop what you like and keep the rest for later.  I’m loving it.

Cookie made from EatPastry's Gluten-Free Sugar Momma Cookie Dough
Cookie made from EatPastry’s Gluten-Free Sugar Momma Cookie Dough