Product Review: Domata Gluten Free Pizza Crust Mix

Gluten Free Foccacia Bread made with Domata Gluten Free Pizza Crust Mix

Product: Domata Gluten Free Pizza Crust Mix – $7.99+

It’s no secret…I love pizza.  Pizza, to me, is the perfect food.  Honestly.  Some people would probably disagree…but, I ignore them.  Because every thing that is right and good in this world…can happen on a pizza.  Pizza is a basic staple in my diet, especially the night before a big race.  I just have found that if I eat pizza before a half marathon or marathon (or, hell, even the shorter distances), I seem to run better.  I don’t know if it’s all just in my head, or if I have found that magic food that offers that perfect balance of protein, carbs, and fats that fuel my body on the long run.

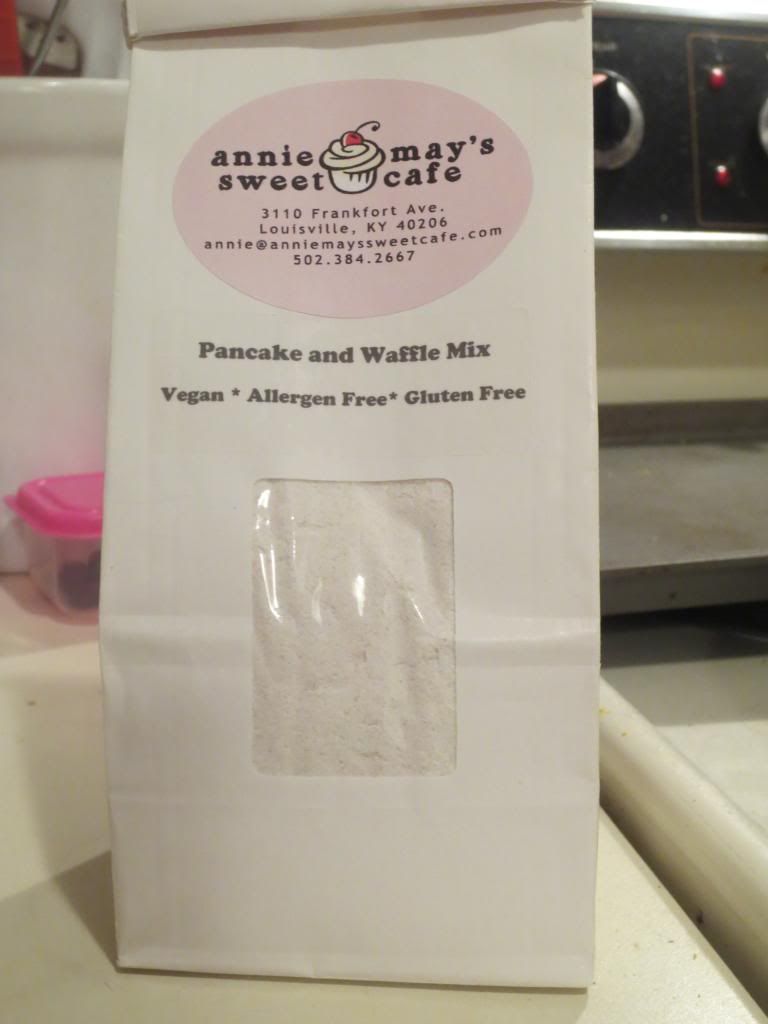
Regardless…I love my pizza.  I love to make pizza and order pizza.  Around here, there are quite a few places in Louisville, Kentucky that offer gluten-free pizza.  And I love them for that.  On this side of the river, options are definitely more limited.  Therefore, I usually end up making my own (on the best gluten-free pizza crust ever…from Annie May’s Sweet Cafe – here in Louisville, Kentucky) or purchasing a frozen one (usually Udi’s, Ian’s, Glutino, or even Daiya).  That’s if I’m not planning on pizza that day.  Otherwise, I normally will head to Annie May’s Sweet Café on Friday or Saturday (pizza day’s) or hit up one of the restaurants around the area that offer gluten-free pizza…but I have to feel safe eating there, and that narrows down the possibilities.

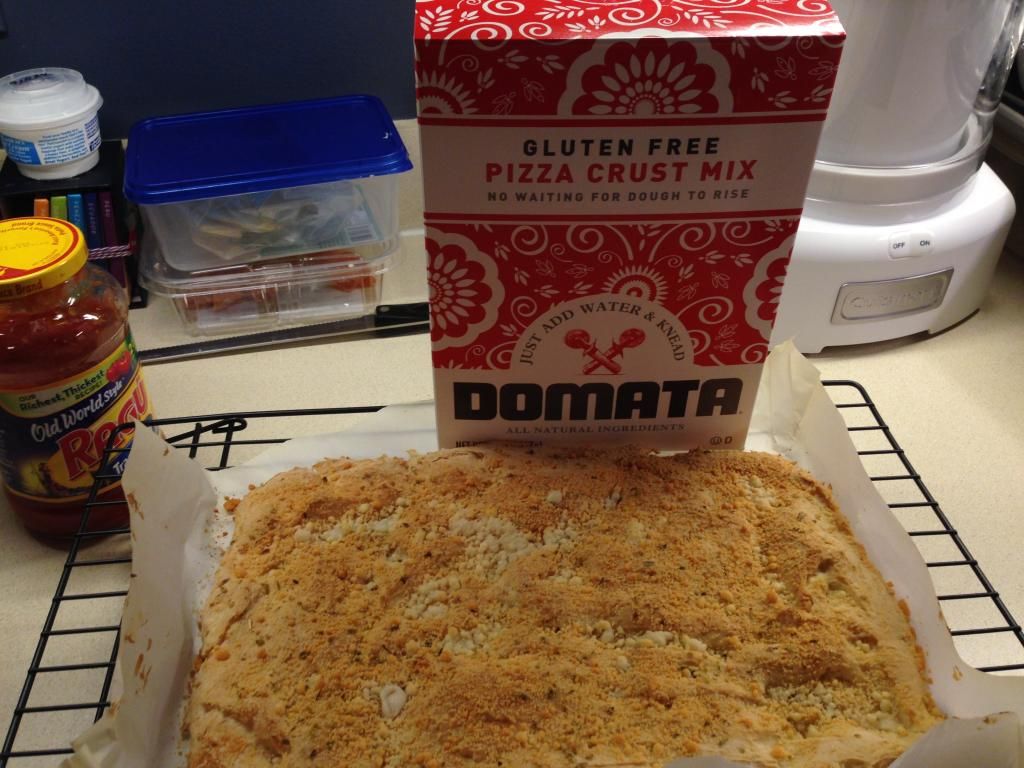
That being said, on a recent trip to Columbus, Ohio, I made a stop by the infamous natural food store I have come to love…Raisin Rack.  In the aisle with various baking flours, I spotted this red and white box with bold black lettering.  It really stuck out and, therefore, it drew my attention.  It turned out to be the Pizza Crust Mix from Domata, a company owned by David and Julie Madison, who understand how difficult a gluten-free diet can be, and also believe in the importance of affordable gluten-free foods.  They kept this in mind when they created their gluten-free flour mixes: Recipe Ready Flour, Pizza Crust Mix, and their Seasoned Flour.  These flours are easy to work with too.  The recipe ready is a cup-for-cup exchange on all recipes and the pizza crust mix…well…I’ll get into that.  These products are made in a dedicated gluten-free and nut-free manufacturing facility, so there is no worries about cross contamination.  And Domata does pride itself on using all natural ingredients with nothing artificial.  I appreciate that too.

Ironically, I didn’t use this mix to make pizza crust.  Not this time, anyway.  This time, I used it to make the recipe for Gluten Free Foccacia Bread that is listed on the box.  Because, I was in Columbus, Ohio, visiting my friend Jenn…and we were making pasta for dinner.  Foccacia bread is a great side to have with gluten-free pasta…so that evening, after a busy day of shopping around town (and hitting up Raisin Rack for more goodies), she and I got busy in her kitchen, prepping this super-easy recipe for gluten-free foccacia.

The great thing about the Domata Gluten Free Pizza Drust Mix is that all you need to do is add water.  It’s that simple.  Put it in a mixer and blend the dough.  It will be sticky.  That’s why you turn it out onto a floured surface.  Jenn and I skipped this step because…eh…we didn’t want to mess with it.  So, using our oiled fingers, we spread the dough out in the baking pan and gave it a little brush of olive oil and seasoned it with the garlic powder and dried oregano that the recipe on the box suggests.  Super simple.  Into the oven it went to bake for 20 minutes.  We started to prep the water to cook the gluten-free noodles in and got out the marinara sauce for the noodles and, of course, to mop up with the bread.  When the noodles were in, the bread came out to get a dusting of Parmesan cheese…then it was back in the oven for another 5 minutes.  The noodles finished up.  They were drained and properly sauced (the Italian way), and dished up.  The bread was set on the table to rip into (instead of slicing it into strips) as we wanted to get as much as we wanted.  Dinner was served.

I have to say…I was very impressed with the quality and flavor of the Foccacia bread that we baked with the Domata Gluten Free Pizza Crust Mix.  It wasn’t too heavy or dense and it browned up beautifully.  The herbs that we scattered throughout the dough and on top brought a nice pop of flavor.  And the bread itself was airy and light, rather than the kind that feels heavy and sits like a lump in your stomach.  The crispy outside gave way to a soft middle, which was bread perfection, if you ask me.  I have enough of the mix left to do a pizza crust with and I think I might do that sometime this week or next…just to see how well it works in pizza crust form.  But as a flour to make Gluten Free Foccacia bread…Domata totally wins.  It was delicious!

When Domata exclaims that “life is hard enough, baking gluten free shouldn’t be”…they hit the nail on the head.  This flour requires no time to rise.  It’s straight from the mixer to the pan to the oven to the table to the plate to the stomach.  It is fantastic and so easy!!  We all (me…the Celiac, and my two non-gluten-free compatriots, Cathy (the roomie) and Jenn (the hostess with the mostest!)) agreed that it made a very tasty and highly acceptable loaf of gluten-free foccacia bread.  Definitely impressed with the flavor, the lightness, and the texture.  I’d purchase this again in a heartbeat.  I mean, come on…you just add water!!!!  It doesn’t get easier than that!

So, let’s talk ingredients for a moment.  The Domata Gluten Free Pizza Dough Mix is a blend of rice flour, corn starch, tapioca dextrim, nonfat dry milk, whole egg, sugar, salt, xanthan gum, baking powder, soybean oil, and rice extract.  It is gluten-free, nut-free, and kosher.

Nutritionally speaking, a serving of Domata Gluten Free Pizza Dough Mix is 1/4 cup.  In this serving you will be taking in 150 calories and 1.5 grams of fat.  This serving will also be giving you 30 mg cholesterol, 460 mg sodium, and 2 grams of sugar.  In addition, you will be taking in 1 gram of fiber and 3 grams of protein.  Not bad for a pizza crust or pan of foccacia bread, right?  Especially when it’s gluten-free.  Because so often the calories and fat go way, way, way up in gluten-free items such as this.

Impressive!

I am definitely more than willing to try the other two flours and purchase the Domata Gluten Free Pizza Crust Mix again.  Honestly.  I was impressed with how easy it was to make the bread with and how delicious each bite turned out to be.  If this holds true for their Seasoned Flour and their Recipe Ready Flour…you might just have me sold on it for life…simply for simplicity.  HA!!  But let’s not forget, it also bakes up into something amazing and totally delicious.  I want to make more foccacia bread.  I want to make pizza crust.  I just want to bake it all and see how this flour fares against others I have used…including my current favorite.

Only time will tell…but this was a winning flour mix in my book!

Product Review: Tastefully Simple Gluten Free Fudgy Brownie Mix

Tastefully Simple Gluten-Free Fudgy Brownie Mix

Product: Tastefully Simple Gluten Free Fudgy Brownie Mix – $11.99

I want to give a quick shout out to my friend, Rebecca Fifield, a Tastefully Simple consultant and friend of mine since middle school.  When Tastefully Simple first put out their new gluten-free products, she sent me a box containing said products and asked me to try them out.  Sometimes, I get distracted, but I always get around to it.  And while I have already reviewed the Tastefully Simple Gluten-Free Gluten-Free Beer Bread Mix and the Tastefully Simple Gluten-Free Vanilla Bean Pound Cake Mix, I had yet to get around to the (honestly) most important one…the Tastefully Simple Gluten-Free Fudgy Brownie Mix.

Why is this one the most important product?  It’s not…I just made that up.  Why?  Because it involves chocolate.  And brownies.  And second only to cookies…brownies are my next favorite treat in life.  Seriously.  And while there are plenty of gluten-free options out there for brownie mixes…let’s face it…they aren’t all great.

Well…I don’t know what convinced me that today was a good day to make brownies.  It was 97°F outside…I had just returned from Detroit (I was seeing Queen in concert!) and the World Cup Final was about to begin.  Of course, brownies seem logical, yes?

Well, the best part about Tastefully Simple is…how simple their products are to make.  So, this took me, literally 5 minutes to get ready to go into the oven.  Anything that doesn’t require me dragging out my Kitchenaid Mixer and a bunch of different bowls and ingredients is a good thing in my book.  And this…required only two additional items to the mix itself – 2 eggs and butter.

That’s it.

Simple.

Tastefully simple.

So, here I was, moments away from kickoff and I’m preheating my oven to 350°F and getting out a large bowl.  I empty the Tastefully Simple Gluten-Free Fudgy Brownie Mix into a large mixing bowl and crack open 2 eggs.  I add the melted 1-1/2 sticks of butter to the bowl, grab a spoon, and simply stir it all together.  The thick, chocolate batter then is poured into a greased 8×8 baking pan…and into the oven it went.  No World Cup missed.  And dessert well on its way to being done in 40 undisturbed minutes.

Tastefully Simple Gluten-Free Fudgy Brownies (baked and fresh from the oven)

Near the end of the first half, my timer beeps and I get up and pull the brownies out of the oven.  I had been smelling them all during the match and my mouth was already watering.  They looked amazing…a little crisp on the edges, but crumbly and flaky all throughout the center.  I inserted a toothpick to see if it came out clean…and it did.  The Tastefully Simple Gluten-Free Fudgy Brownie Mix was done baking.  I placed the pan on cooling rack and got to work on dinner while they cooled.

After dinner, it was time to give my dessert a try.  I got out a knife and sliced the Tastefully Simple Gluten Free Fudgy Brownies into 16 squres, as the serving is 1/16th of the package.  Math is my strong subject.  I eased out two squares, one for my roommate and one for myself.  As we are coming off of a mega concert high and World Cup excitement, it was time to doctor these up.  I got out my gluten-free So Delicious Coconut Milk Cookie Dough Ice Cream and placed a scoop on top of the brownies.  Then, topped it off with a drizzle of hot fudge.  Gluten-Free Brownie Sundaes done in time for the second half of the final match.

So…here’s the thing…

The Tastefully Simple Gluten-Free Fudgy Brownie Mix bakes up really rich and fudgy brownies.  Oh…my…GOD!  These were chocolate heaven.  I ended up pushing my scoop of ice cream off the top of the brownie so I could simply enjoy it and all it’s moist, chocolate goodness.  Seriously.  I wasn’t expecting to fall this in love with this dessert, but Tastefully Simple truly nailed it with these.  They have a nice, crisp, outer edge…but the rest of the brownie is ooey, gooey, soft, fudgy goodness.  From one bite to the next, I was already anticipating the next rich burst of chocolate.  I was just…loving each and every bite and had to stop myself from going back to steal another square.  I did, however, pick up all the crumbs from the two pieces I dished up and ate those.  Hey…nothing this good should go to waste.

I know, you’re thinking that $11.99 is a lot of money to spend on a brownie mix…but when Tastefully Simple does something…they do it right.  And with it being so easy to prepare and bake, you’ll never want to go back to any other brownie mix.  Phenomenal flavor…sweet, rich, moist and simply tasty.

Let’s look at ingredients, shall we?  The Tastefully Simple Gluten-Free Fudgy Brownie Mix is made up of sugar, rice flour, cocoa, potato starch, tapioca flour, and less than 2% of natural flavors, salt, xanthan gum, and silicon dioxide (anticaking).  It is gluten-free and can be made vegan by using vegan butter (like Earth Balance) and using an egg substitute.

As for nutrition?  Well…they are brownies.  So…remember that.  A serving of the Tastefully Simple Gluten-Free Fudgy Brownies is 1/16th of the package.  So that’s about a 2-inch square, I think.  This serving will give you 130 calories and 0.5 grams of fat.  It is cholesterol-free.  You will be taking in 60 mg sodium and 20 grams of sugar.  Yep…it is high in sugar, but it’s also the first ingredient on the pouch and…it is BROWNIES!  Dessert.  Hello!  This mix also provides 1 gram of fiber and 1 gram of protein.

Thank you Rebecca for introducing me to Tastefully Simple and their gluten-free line.  I have a few more products to review, but so far, everything I have been able to try has gone above and beyond all expectations.  I think the Fudgy Brownie Mix will never leave my pantry.  Ever.  Simple and delicious.  That’s Tastefully Simple.  And they make some of the best gluten-free products I have ever been able to easily make and try.

Make sure you head over to Rebecca Fifield‘s Tastefully Simple page and order some for yourself!  You will not be disappointed.

Tastefully Simple Gluten-Free Fudgy Brownie (serving size)

Product Review: Lundberg Family Farms Organic Roasted Red Pepper Brown Rice Pasta and Sauce Mix

Lundberg Family Farms Organic Roasted Red Pepper Brown Rice Pasta and Sauce Mix

Product: Lundberg Family Farms Organic Roasted Red Pepper Brown Rice Pasta and Sauce Mix – $5.99+

Lundberg Family Farms…is, quite honestly, one of my most trusted brands for gluten-free goodness.  I love the brown rice cakes.  I love the gluten-free risottos, the gluten-free rice blends…even their brown rice pasta.  So, a little while ago, I heard about their latest addition to their gluten-free food line-up.  Brown rice pasta and sauce mixes.

I saw an ad in one of the gluten-free magazines I subscribe to and immediately went on the hunt.  Sadly, at the time (and maybe still), nowhere in my area carried these delightful little boxes of pasta and sauce goodness.   I was beyond disappointed.

Leave it to Columbus, Ohio.  My friend Jenn took me to a natural food store there, called The Raisin Rack.  It was there that I found, on one of the numerous shelves of gluten-free products, these boxes of brown rice with their own cooking sauce from Lundberg Farms.  See this happy face?  Yeah, I made sure I grabbed one of them.  Not to get ahead of myself, but I should have grabbed one of each flavor.

As it was, I selected the Lundberg Family Farms Organic Roasted Red Pepper Brown Rice Pasta and Sauce Mix.  Why?  Because roasted red pepper is awesome!  I’m on a roasted red pepper kick as it is…so…yeah…it was the winner.  I took this home and waited for the right opportunity to cook it up.  It came the night before a big trip to Colorado.  With all the produce used up, I needed something fast and efficient for dinner.  I went to the pantry and perused for a moment before snatching this box from the shelf and giving it a chance to wow me with an easy meal.

Lundberg Family Farms made this meal from organic rotini pasta and a flavorful sauce that is cooked up with water and the mix included in the box.  When it cooks up, the spiralized brown rice pasta cooks in the water and as it sits, each noodle is blanketed in a rich and creamy sauce, all blended with amazing herbs, spices and vegetables.  And yes…it actually does work out like that.

Settling in for dinner was as easy as making it.  I handed a bowl of the pasta to my roomie and then settled in with mine.  She dug in and actually seemed quite happy with it.  I wasn’t sure how she’d like it.  The sauce wasn’t a thick sauce, but it wasn’t watered down either.  I just know that she likes…sauce.  And she actually did like this sauce, because it does coat every noodle quite beautifully.

And the flavor is really good.  I was concerned that the noodles might be bland, but they weren’t.  They cooked up to a perfect al dente and then soaked in that sauce as it sat off the heat for a few minutes.  All of that brought this fantastic flavor…of roasted red pepper and  garlic and onion…with the right amount of seasoning from herbs and spices.  It was creamy without the unhealthy cream.  It was full of flavor with simple, basic ingredients.  In other words…it was amazing and fantastic and delicious.

Lundberg Family Farms Organic Roasted Red Pepper Pasta and Sauce Mix is made up from organic brown rice pasta, organic dried garlic, organic dried red bell peppers, organic corn starch, organic dried onion, sea salt, organic dried cane syrup, organic brown rice flour, organic mushroom extract, organic spices (parsley and pepper), organic rice concentrate, organic olive oil, and organic sesame oil.  It is gluten-free and cholesterol-free.  It is also kosher and vegan.  Love that.

Nutritionally speaking, the Lundberg Family Farms Organic Roasted Red Pepper Pasta and Sauce Mix serves up 2 servings per box.  One serving of this pasta will dish up 220 calories and 3.5 grams of fat.  You will also be consuming 440 mg sodium and 3 grams of sugar.  Not too bad for something in a box, right?  In addition, you’ll be taking in 4 grams of fiber and 5 grams of protein.  So, this will definitely make you feel full.

If you need a quick meal that can be made in one pot, making clean-up a synch, and also providing big flavor and great taste…I highly recommend Lundberg Family Farms Organic Roasted Red Pepper Pasta and Sauce Mix.  It is so easy to make, cooks to perfection, and tastes great.  If you can find these boxes of pasta goodness…do give them a try.

Enjoy!!

Lundberg Family Farms Organic Roasted Red Pepper Brown Rice Pasta and Sauce Mix (cooked)

Product Review: Tastefully Simple Gluten-Free Vanilla Bean Pound Cake Mix

Tastefully Simple Gluten-Free Vanilla Bean Pound Cake Mix

Product: Tastefully Simple Gluten-Free Vanilla Bean Pound Cake Mix – $10.99

It’s no secret by now…I have a sweet tooth.  I also, fortunately, love to bake!  But sometimes, the art of gluten-free baking is more trouble than it’s worth.  Like…a simple pound cake can mean, in order to get the right texture and density…a whole lot of different flours being mixed together with the hope that it just…tastes…good.

Well, thanks to Tastefully Simple…a pound cake no longer has to be a daunting task.  In fact…it isn’t daunting at all.  The mixing part is done for you.  All you need to do is add one stick of melted butter and 2/3 cup water.  Mix it together until it is smooth…put it in a loaf pan and put it in an oven at 350°F for around 50 minutes.

Word to the wise…pay attention to your oven heat and the time it’s in there.  I’m just sayin’…

More on that later.

Now, baking should always be this simple.  That’s one of the biggest draws of Tastefully Simple.  Two ingredients get added to the mix.  You whip it together and you bake it.  Simple.  Basic.  And…perfection.

I could smell this amazing pound cake baking.  The vanilla bean made my apartment smell so warm and inviting.  I kept breathing in the aroma as I was busying myself with other tasks…such as updating Facebook, doing some of my stretches for my recovering sprained ankle, cleaning up around the living room…

The time was ticking down…and when the microwave beeped…I was ready to see what awaited me in the oven.

Except…my oven is really old…and even though it was set for 350°F…it cooked at 375-380°F.  When I opened the oven, the amazing aroma of a vanilla bean pound cake flooded the walls of my apartment.  But the outside was quite dark.  Not burnt.  Not to that point, but I silently cussed out my old oven for getting so hot.  This is my lesson I learn…either set it lower when baking and check constantly on that temperature to make sure it isn’t rising above what it should be baking at…or…check on the baked goods throughout the baking process.  Don’t get so wrapped up in other things.

That being said…while the outside crust got slightly darker than I would have liked…it wasn’t burnt and it wasn’t ruined.  I let the Gluten-Free Vanilla Bean Pound Cake sit in the pan for about 15 minutes before running a knife along the edge of the loaf pan and turning it out.  I put it on a wire rack to cool the rest of the way before wrapping it up in foil to have for dessert the following night.  I was actually really excited about this.  It has been three years since I’ve been able to have pound cake.  And if the Gluten-Free Beer Bread from Tastefully Simple was any indication of the quality of their products…I was really excited to be trying this out.  I LOVE POUND CAKE!!  And I love anything vanilla.  So this was the best of both worlds.

After a long day at the office and a quick dinner…my roommate and I decided it was time to slice into the Tastefully Simple Gluten-Free Vanilla Bean Pound Cake.  The pouch the mix comes in says that it serves 8, but I am totally getting about 12 slices out of this cake.  Honestly.  I had picked up some fresh organic blueberries at the store and had some TruWhip in the freezer, which I put in the fridge while I was at work to thaw.  Pound cake for dessert was a go.  I sliced into the loaf, laying each slice down on the plate.  I topped it off with a healthy dollop on TruWhip, then tossed a handful of the organic blueberries on top.  Dessert was as simple to put together as the pound cake was to bake.  I settled in with my slice and cut into it with my fork.

It was moist and and soft, yet didn’t have that graininess and that potential to crumble like so many gluten-free baked goods.  Even with a darker crust on the cake, it was still packed with amazing vanilla flavor and it was still moist and soft and amazing.  It was everything that a pound cake should be…but it’s gluten-free and no one would even know it.  I loved the specks of vanilla bean that you find throughout the slices of pound cake.  It was so good that it brought tears to my eyes, since it had been forever since I had actually been able to eat one.  This…was so easy to make…and was so full of flavor and amazing texture.

Ingredient-wise, the mix that is sent to you contains: sugar, rice flour, non-fat milk, egg. potato starch, maltodextrin, tapioca flour, less than 2% of emusifier, baking powder, salt, vanilla bean seeds, xanthan gum, artificial flavors.

Nutritionally speaking, a serving, which is 1/8 of the cake, provides you with 220 calories and 2.5 grams of fat.  You will also be taking in 90 mg cholesterol, 230 mg sodium, and 28 grams of sugar.  It is a cake.  So don’t freak out, okay?  In addition, you will be provided with less than 1 gram of fiber and 5 grams of protein.  So…you will feel full, but it won’t keep you full.  Of course, those stats are simply for the dry mix.  You still have to figure in the stick of butter that you add.  Another reason I managed to portion this cake out to 12 smaller servings.  Trust me…you won’t even notice.

Tastefully Simple…you totally win once again.  The Gluten-Free Vanilla Bean Pound Cake Mix bakes up the most perfect, delicious, so-good-you-won’t-guess-it’s-gluten-free, pound cake that I’ve ever tasted.  Ever.  It’s fantastic.  And I’m totally in love with Tastefully Simple.  I have my friend, Rebecca Fifield, to thank for sending me this product.  If you are interested in trying it, please check out her page… https://www.tastefullysimple.com/web/bfifield.  She will be more than happy to get you the products you want to try!  And, trust me, this is worth it.

A slice of Tastefully Simple Gluten-Free Vanilla Bean Pound Cake (topped with TruWhip and organic blueberries)...my oven was too hot so it got a little dark...but it still rocked my gluten-free dessert life!
A slice of Tastefully Simple Gluten-Free Vanilla Bean Pound Cake (topped with TruWhip and organic blueberries)…my oven was too hot so it got a little dark…but it still rocked my gluten-free dessert life!

Product Review: Urbāne Grain Three Cheese and Mushroom Whole Grain Quinoa Blend

Urbāne Grain Three Cheese and Mushroom Whole Grain Quinoa Blend

Product: Urbāne Grain Three Cheese and Mushroom Whole Grain Quinoa Blend – $4.99

Quinoa.  I love quinoa.  I cook with it often.  And I have used it as a hot cereal in the morning as well as a side…and even baked it in casseroles.  I’ve also supplemented it for rice-based meals, as quinoa has a much better nutrition profile than rice.

Even better…it tastes great.

One day, while hitting up the (seriously) nine grocery stores I shop at every week, my roommate decided to splurge a little and had me pick out one of the new products we hadn’t seen elsewhere before.  I noticed some black pouches on a shelf with clearly labeled “gluten-free” markings on them.  They were quinoa dishes, that were also touted to be all natural and restaurant quality.  Since I am a quinoa whore…I desperately wanted to try one of the variety of flavors.  So, I pointed to them and my roommate told me to pick a flavor.  As I am less picky than her I told her to pick the one that sounded best to her.

Her choice?

Urbāne Grain Three Cheese and Mushroom Whole Grain Quinoa Blend.

Sounds good, yes?

I thought so.  So…we brought it home with us.  And promptly let it sit in the pantry for a few months.  D’oh!  But…even though a bin was received today, I already had it in my mind that this quinoa meal was going to be our dinner tonight.  And so…it was.

Now, I had physical therapy on my ankle right after work, so this put us home much later than normal.  I didn’t take that into account this morning when I noticed the 20-25 minute cooking time on the stove and in the microwave.  Ah well.  I figured I could pair it with a nutritious kale salad with some fresh veggies and that would help get us through the cooking time.

So, as instructed by the package, I immediately filled a pan with 1-1/2 cups of water, 1 tablespoon of olive oil, then added the contents of the pouch.  I gave it a stir and set it on medium-high heat, letting it come up to a boil.  Once there, I covered it, took the heat down to low and let it simmer for about 25 minutes.  The entire time it was cooking, and the couple of times I lifted the lid to give it a stir, the dish itself smelled fantastic.

Like…macaroni and cheese.

I’m okay with that.

Anyway, after it cooked and the liquid was mostly gone, I removed it from the heat and let it sit, still covered, for five minutes.  After that, I gave it a quick fork fluffing and dished it up.  Dinner…was finally served.

And my, oh, my…this was one crazy indulgent dinner.  First of all…hello quinoa.  I love you.  Pair that with a blend of organic millet and brown rice and you’re talking a filling little bowl of goodness.  The cheeses..Romano, Cheddar, and a 12 month anged Parmesan.  Amazing.  It smelled as good as it tasted.  And that texture was rich and creamy, with a little bit of that rice-chewy texture that is just what you need so everything isn’t just one strange texture.  It was awesome.  The dehydrated mushrooms softened up beautiful.  And my cheese-loving roommate devoured it as quickly as I did.  Really amazing.  I thought it was one of the better packaged items that involved quinoa that we have picked up to date.  YUM-A-LICIOUS!

Ingredient-wise…it doesn’t get much simpler than this.  The Urbāne Grain Three Cheese and Mushroom Whole Grain Quinoa Blend contains parboiled brown rice, quinoa, millet, Cheddar cheese, Parmesan cheese, and Romano cheese, dehydrated mushrooms, sea salt, and dried herbs.  Simple ingredients make the best meals.  Even when they come in a package.

Nutritionally speaking, a serving of Urbāne Grain Three Cheese and Mushroom Whole Grain Quinoa Blend is 1/3 cup of the dry mix.  There are 2.5 servings per package, which makes about 2 cups when completely cooked.  A serving will provide you with 180 calories and 2.5 grams of fat.  You will also be consuming 550 mg sodium, and only 1 gram of sugar.  Nice!  A serving also will dish you up 3 grams of fiber and 6 grams of protein, so you will feel full when you eat this.  Trust me.  This mix is gluten-free and cholesterol free.

I fell in love with this package of awesome quinoa goodness.  The flavors were amazing.  It cooked up beautifully. It was indulgent and rich and…just really amazing. I can’t say enough good things about it.  They aren’t kidding when they say it is restaurant quality.  I can’t wait to try the other 8 flavors out there.

Urbāne Grain Three Cheese and Mushroom Whole Grain Quinoa Blend (cooked)

Product Review: Simply Shari’s Gluten Free and Fabulous Quinoa Mac & Cheese

Simply Shari's Gluten Free and Fabulous Quinoa Mac and Cheese
Simply Shari’s Gluten Free and Fabulous Quinoa Mac and Cheese

Product: Simply Shari’s Gluten Free and Fabulous Quinoa Mac and Cheese – $3.49+

I haven’t had too much experience with products from Simply Shari’s Gluten Free and Fabulous.  However, I have tried one frozen pizza…and loved it…and a couple of cookies…and enjoyed those.  So, that’s a good track record, yes?

I think so.

Which is why when I was shopping at TJ Maxx of all places…when I spotted this macaroni and cheese I figured…why not try it?  I mean…it’s a brand I am familiar with and have liked in the past.  It’s made from quinoa.  HELLO!  And..it’s mac and cheese.  One of my favorite comfort foods of all time.

With this being a no produce bin week, meals have been cobbled together from things in the pantry, fridge and freezer.  While it’s not getting bare…sometimes choices are slim.  With that being said, I’m hitting the pantry the hardest this week and digging out some items I purchased and just haven’t cooked up yet.  Simply Shari’s Gluten Free and Fabulous Quinoa Mac and Cheese…it’s now your turn to shine.

Now, as I have stated before, I prefer to make my gluten-free mac and cheese from scratch.  But it’s a crazy-busy week.  I just got back into town on Monday night and I’m heading back out of town tomorrow after work for a weekend with my friend Jenn (who is always willing to try new gluten-free things because she rocks like that).  No CSA bin…not a lot of grocery shopping went on.  Just the bare necessities.  So, very little time to linger in the kitchen, for sure.  And for that reason, this little meal was popped out of the pantry.  So, if I can’t go homemade, I’ll settle on a box or bag variety.  I just prefer real ingredients as often as possible.

Cooking this was a snap.  I brought a pot of water to a boil and added a bit of salt and oil, per the directions on the package.  Then, in went the gluten-free noodles, which are quinoa, not brown rice.  YAY!  They cooked up in the boiling water for about 10-12 minutes.  It didn’t take long.  After that, you drain them, put them back in the pan on low heat, add a teaspoon of butter, 3/4 cup of milk (I used unsweetened almond milk) and then add the package of cheese powder.  Stir it…let it thicken on the heat, and then…serve.

Simple.

Now, remember those days of long ago when you’d have that orange powder you’d pour into the Kraft Cheese and Macaroni?  (Not macaroni and cheese, always reversed…I remember!).  Anyway…this powder had those clumps, so I broke them up as best I could, and continued to stir until it was blended as best as I could manage.  Into the bowls they went and dinner…was served.

One bite…that’s all it took.  So creamy and tangy and delicious.  The cheese actually gets to this rich velvety texture that coats each noodle.  The noodles cook up perfectly.  And, because they aren’t made completely of brown rice, they aren’t mushy and falling apart either.  They held that elbow macaroni shape, even with all the intense stirring that occurred.  The small clumpy bits of cheese powder reminded me of my childhood days with the Kraft stuff.  I broke up most of them, but a couple lingered.  Nothing that took away from the awesomeness of this dish.  For real.  The cheese was quite tasty.  And the meal itself…quite filling.

I was beyond impressed.

Simply Shari’s Gluten Free and Fabulous Quinoa Mac and Cheese is made up of quinoa pasta (made from quinoa, rice and water), powdered cheese (which contains milk, salt, enzymes, whey, beta carotene for color, corn starch and salt).  That’s it.  Simple…easy ingredients.  All of which I recognize.  Let’s hear it for simple and basic ingredients!  This product is also GMO free as well as gluten-free.

Nutritionally speaking, Simply Shari’s Gluten Free and Fabulous Quinoa Mac and Cheese is on the light side for mac and cheese.  A serving is 4 ounces and the package holds 1.5 servings.  For two people, it’s more than enough, trust me.  This serving will give you 280 calories and 6 grams of fat.  You will also be receiving 15 mg cholesterol, 330 mg sodium, and 1 gram of sugar.  Not bad.  And since I used unsweetened almond milk…no sugar there either.  A serving gives you 2 grams of fiber and (the best part!) 18 grams of protein.  That is NOT a typo!  18 grams of protein.  Thank you quinoa.

So, healthy, creamy, cheesy and wonderful.  Simply Shari’s Gluten Free and Fabulous Quinoa Mac and Cheese lives up to its name.  Yes.  It is…simply awesome!

Simply Shari's Gluten Free and Fabulous Quinoa Mac and Cheese (cooked)
Simply Shari’s Gluten Free and Fabulous Quinoa Mac and Cheese (cooked)

Product Review: A Taste of Thai Peanut Noodles Quick Meal

A Taste of Thai Peanut Noodles Quick Meal

Product: A Taste of Thai Peanut Noodles Quick Meal – $5.49+

Love Thai food?

Me too.  We have a great authentic Thai place not too far from where I live.  It isn’t even in Louisville.  It’s in Jeffersonville, Indiana.  I love that place.  I haven’t been there in ages, but I contacted them awhile back and they said they could make anything gluten-free for me.  That’s the joy of Thai food…it is easy to accommodate.

That being said, when a sale is happening…my roomie and I tend to go a little crazy at the grocery store.  No lie.

A long time ago in a far away (or perhaps local) grocery store, we encountered a sale on A Taste of Thai products.  We picked up two of the Peanut Noodle Quick Meals (they serve 2 in each box) and a Pad Thai for Two…which we have yet to make as well.

Tonight, after a long day of travel from Birmingham, Alabama back home…and with no CSA bin this week, I needed a quick and simple meal.  Trust me, I haven’t been in the mood to get creative with the food.  And, honestly, after sitting all day in the car and being the sad sot that I am right now (injured runner…stand back!), I didn’t really want to whip up something from scratch that might take…ages.

Thank goodness for these meals in the pantry.

So easy to make too.  Remove all of the envelopes that contain coconut milk powder, the peanut sauce, peanuts and noodles.  Place a cup of water into the box and then add the sauce, the coconut milk, then the noodles.  Microwave on high for 3 minutes.  Stir.  Microwave again for another minute.  Then, let stand for 1 minute.  Afterwards, add the peanuts.  Stir and then serve.

Simple.  Easy.  And ready in 5 minutes.  Gotta love it.

Packets inside A Taste of Thai Peanut Noodles Quick Meal

So, how was it?  Better than I expected.  For one thing, the “sauce” packet was a powder, which threw me off for a moment.  So was the coconut milk portion as well.  But those both go in the water first and they mix in all proper like.  The noodles actually do soften up in the 4 minutes of heating and 1 minute of resting.  I promise.  No hard noodles were found in the consuming of this product.  And the flavor was awesome.  Not as awesome as real Thai food, but as close to awesome real Thai food as one can get without being at an authentic Thai restaurant…or in Thailand.  I swear.  There was a little bit of heat…just enough to keep the flavor interesting.  The peanuts gave a nice texture to the overall dish.  The noodles were perfect.  Not crunchy.  Not mushy or sticky.  Perfect.  And the sauce…it was delicious.  I might have licked my bowl.  Maybe.  A little.

So, how does this stand up nutritionally?

Let’s look at ingredients first.  The sauce contains: sugar peanuts, chili powder, kaffir lime leaf powder, lemongrass powder, modified tapioca starch, salt, hydrolyzed vegetable protein, dextrose, tricalcium phosphate (to prevent caking), yeast extract, malic adid.  The coconut milk powder is made up of coconut maltodextrin, mono and diglyceride (an emulsifier), dipotassium phosphate (a stablizer) silicon dioxide (to prevent caking).  And the peanuts contained peanuts and silicon dioxide (to prevent caking).  The rice noodles were simply made from rice flower, water, and modified food starch.  Do I like all those modified ingredients.  Not one bit.  I bought these back before I was paying attention to that.  Kind of shocking when I look at it and type it up.

As for nutrition…this box contains 2 servings.  In one of these servings, you will consume 340 calories and 10 grams of fat.  Not bad for a saucy noodle dish, I think.  You will be taking in 320 mg of sodium and 13 grams of sugar.  The sugar is a bit high, but I believe that is from the sauce.  You get 2 grams of fiber and 5 grams of protein.  It is cholesterol free, gluten-free, and preservative free.

So, while it is not the cleanest of eats, it was quick and easy.  I do dislike the modified ingredients.  Not a fan.  But I am a fan of the taste, flavor, spice, and texture.  For an every-now-and-again dinner, not a bad choice at all.

Product Review: The Pfunky Griddle Gluten-Free Pancake Mix

The Pfunky Griddle Gluten-Free Pancake Mix

Product: The Pfunky Griddle Gluten-Free Pancake Mix – $7.99

Awhile back, on a return trip from visiting my family in Birmingham, Alabama, my roommate and I were hungry.  Very hungry.  And I got onto my Find Me Gluten-Free app to find somewhere in Nashville, TN, where we might be able to safely grab a bite to eat.  My app never steers me wrong…and it threw a few options at me.  But…we were very intrigued by The Pfunky Griddle.  And after a quick read of the reviews, I felt confident I could eat there and not get sick.

Breakfast food!  YES!!  They serve salads and sandwiches as well, but if you’re going to The Pfunky Griddle…you’re probably seeking out something to put on the griddle.  And that was what we did, splitting an order of the gluten-free pancake mix and topping them off with our toppings of choice.

While we were waiting on a table, however, I spotted my danger zone.  They sell their pancake mixes.  Seriously.  And one of the options they offered was their gluten-free pancake mix.  After eating the pancakes at the store, I wanted some to take home.  And after working through the plethora of gluten-free pancake mixes (I seriously LOVE pancakes)…I finally got to this one today.

And…you know I can’t do anything simple.  The actual making of the batter is easy.  Add to mix 2 eggs and 8 ounces of milk.  I used my unsweetened almond milk.  That was actually the easy part.  I made 4 pancakes (1/4 cup of batter each) just plain…just the batter…so I could get an unadulterated taste of it.  Then, I made 4 pancakes with blueberries added to them.  And then, finally, I made 4 pancakes with white chocolate chips added to them.  One batter…3 servings of different pancakes.  I was excited, because from what I recall, I loved this batter when I ate at the restaurant.

However…today…I was way less enthusiastic about it.  Not that it was bad; it wasn’t.  It just…it isn’t able to compare to some of the other mixes I have used in between eating at the restaurant and making them myself at home.  The pancakes actually cook up beautifully.  Thin little cakes, toasted evenly on each side to a gorgeous golden brown color.  The issue, I found, was that they actually tasted…gritty.  Now, sometimes gritty is good, but not with pancakes.  I was feasting on the plain pancakes this morning…my roommate said hers were pretty good.  Which, sometimes means she likes them…and sometimes means that she is just being polite.  I should learn not to ask her sometimes…

But, yeah…gritty.  Gritty is not a good thing when it comes to pancakes.  The batter was well mixed together…so it wasn’t an error on my behalf.  And it didn’t have a horrible flavor either.  Don’t get me wrong there.  They taste like delicious pancakes, but that gritty texture is a little…off putting.  In fact, I was happy to down these quickly and then finish off breakfast with my coffee instead of my usual vice-versa finish.  My biggest hope is that the pancakes with the added fruit or sweet white chocolate chips offset a bit of that odd, gritty texture.  Perhaps that’s why I didn’t notice it at the restaurant…because I was adding blueberries and bananas to my batter on the separate griddle pan.

The Pfunky Griddle Gluten-Free Pancake Mix is a blend of brown rice flour, corn starch, potato starch, salt, sugar and baking powder.  Not bad on the ingredients.  I managed to get 12 pancakes out of the mix.  And they were all of a very decent size too.

So, they weren’t bad…but I just wasn’t as impressed with them at home.  The gritty texture was a little…off for me.  But, the flavor was good.  I’ll give them that.  However, I probably wouldn’t buy this again, even if I do stop in at the restaurant for breakfast/brunch again.

Pancakes made from The Pfunky Griddle Gluten-Free Pancake Mix

Product Review: Annie May’s Sweet Café Allergen Free Pancake and Waffle Mix

Annie May's Sweet Café Allergen Free Pancake and Waffle Mix
Annie May’s Sweet Café Allergen Free Pancake and Waffle Mix

Product: Annie May’s Sweet Café Allergen-Free Pancake and Waffle Mix – $5.00

I am a lucky one!

I am.  I am one lucky lady.

And I’m about to tell you why.

I live just outside of Louisville, Kentucky.  One short drive over a bridge and I am in the city.  I can see Louisville from my apartment.  I’m that close.  But it’s not the city itself that makes me feel lucky.  It’s the gem that sits at the heart of it.

Recently, Louisville has really come onto the foodie scene.  With chefs showing up on television shows, the restaurant scene exploding (especially over in NULU), and features in food magazines like Food & Wine, Louisville really has something to offer for everyone.

Yes.  Everyone.

Including me – a gluten-free vegetarian.

The place – Annie May’s Sweet Café, located at 3110 Frankfort Avenue.  It’s a short little journey there…and one that I make weekly…if I’m in town.  I don’t miss any opportunity to support this business and the people who make this genuinely good food.  And trust me…you don’t need to have a food allergy to enjoy the products that they put in their case and offer Tuesday – Saturday.

Really, trust me.  My roomie eats there every week with me.  I’ve taken my running friends Natalie and Harry there.  I’ve taken my sister there.  I’ve taken my friend Greg there…and he is hooked on her Allergen-Free Double Chocolate Brownies.  Trust me…he always buys at least two when he’s in town.  In fact, you’d be hard pressed to tell her food was gluten-free or dairy-free it wasn’t advertised.  Seriously.  Good eats.  All around.

But today, I am not just going to talk to you about the business.  Today…I want to talk to you about one of the mixes that is available for purchase from Annie May’s.

I’m talking about Annie May’s Sweet Café Allergen-Free Pancake and Waffle Mix.

Yes.  More pancakes.  The world would be a better place if more pancakes were consumed.  But…they must be good pancakes.  I’ve eaten a lot of different pancakes since going gluten-free.  Frozen, from mixes, from restaurants.  And this mix really does cook up some fantastic pancakes.  I actually utilized the mix two ways to be honest.  I did my first four pancakes just plain…made as the bag instructed me to make them.  But for the second batch…I added Enjoy Life Mini Chocolate Chips…and made chocolate chip pancakes for the following day.  The mix is so easy to make and it has a great texture.  I just had a good feeling when I put it all together in my mixing bowl and then scooped up the 1/4 cup to set on the skillet.

The pancakes cooked to perfection.  No joke.  Golden and crusty on the outside.  They were a thing of beauty.  In fact, I might have let out a little squee of glee and did a little hop-dance of joy in the kitchen after I flipped the first one.  Because it was gorgeous.  A stunning and perfect pancakes.  I only had to be sure not to burn them.  And…I didn’t.  I totally rocked these out and they fluffed up and got all soft and hot in the middle.  I am drooling just writing about them.  Then, after serving them up with real maple syrup…I devoured.  And as I was savoring and scarfing all at the same time…I got the chocolate chip version cooking.

Once again…perfection.  I tucked these into a container and put them in the fridge.  I had a spinning class to take on Friday morning, so I figured when I got back from that, I could pop these bad boys in the microwave, nuke them to reheated perfection, and serve them up with that maple syrupy goodness.  I was so pleased with how well these reheated.  Honestly.  So many times you just get a soggy, mushy mess.  While these don’t get that golden crust they have fresh off the skillet, they don’t wilt and fall apart after a day in the fridge either.  They reheated really well and maintained the integrity of the previously consumed pancakes…still so delicious…down to the last bite.

I have two pancakes left.  Can you guess what I’m eating Sunday morning?  HA!  I can’t eat them tomorrow…I’m going to Annie May’s Sweet Café for their amazing breakfast menu.  Might even splurge and get a few extras.  Because…I can.  And I want to.  And so…I will.

Don’t be disheartened if you don’t live in or near Louisville, Kentucky.  Annie May’s Sweet Café ships!  Yes…they ship.  Just go to this page and place an order.  Trust me…you will not be disappointed.  And, yes…the Allergen-Free Pancake and Waffle Mix is available for order.  So…don’t think.  Just do.  DO IT!

And…I still count myself as one very lucky lady to live near a place that has a restaurant that I feel totally and completely at ease in.  I know I can get good food there…and I will continue to bring my friends and family there.  So far, no one has been disappointed.

And to Annie May, Kenna, and the staff…keep up the good work.  See you tomorrow morning!

Perfect pancakes made from Annie May's Sweet Café Allergen Free Pancake and Waffle Mix
Perfect pancakes made from Annie May’s Sweet Café Allergen Free Pancake and Waffle Mix

Product Review: Tastefully Simple Gluten-Free Beer Bread Mix

Tastefully Simple Gluten-Free Beer Bread Mix

Product Review: Tastefully Simple Gluten-Free Beer Bread – $8.99

Let me give a big shout-out to Tastefully Simple consultant and a friend of mine from high school, Rebecca Fifield!  It is because of her that I have these products in the first place.  You see…back when I was in high school, I wasn’t gluten-free.  In fact…I don’t think anyone in my hometown even knew what a Celiac was.

It turns out that there is magic in the Interwebs…and thanks to the magic of social media…you reconnect with people.  That’s how Rebecca and I got back into touch.  And she, knowing I am Celiac and having to eat gluten-free now, sent me packets of Tastefully Simple’s new gluten-free line-up of mixes.

Well…it’s the New Year.  January 1st.  And my roommate and I have set a few goals for this coming year.  And we are wasting no time getting settled into the new routine.  That being said, tonight I was simply cooking up some black eyed peas with some kale for dinner.  I know that doesn’t sound gourmet, but some believe that eating black eyed peas on New Years Day will bring prosperity.  I’m all for that.  The recipe mentioned something about serving the meal with cornbread.  I don’t have cornbread and I didn’t have enough cornmeal in my pantry to rock out a batch of it from scratch.

That being said…I remembered I had these mixes ready for me to try.  So, I climbed up to the top shelf of my pantry and began to pull each one up until I found the one I was seeking.

Gluten-Free Beer Bread.

Yes.  Gluten-Free Beer Bread.  And…I just so happen to have gluten-free beer on hand.  I’m not a beer drinker, mind you, but I make a killer queso with it…so I tend to have it in the house in case.  So glad I did…because I was more than excited to get this bread cooking.

And guess what?  Tastfully Simple really is simple!!  This mix is super easy to put together.  I got down one 9 x 5 bread pan and buttered the inside.  Then, all I had to do was add to a large bowl…the mix, the gluten-free beer (or you can use soda), and 1 egg.  There is an option to add 3 tablespoons of melted butter…which I decided to do.

That’s it.  Whisk it together.  Pour it in the pan.  Drizzle the melted butter over the top (if you’re using it…but I highly recommend it).  Set it in a 350°F oven for about 50 minutes…and you have yourself a beautiful loaf of gluten-free beer bread.

YES!  It really is that easy!

Tastefully Simple Gluten-Free Beer Bread

What’s more…I was drooling as this was baking in my oven.  My apartment smelled (and still does) so amazing.  Fresh-baked bread is one of my favorite smells…but this aroma was beyond fantastic.  I resisted the urge to open the oven and sneak a peak the instant I started to smell it.  That being said…I allowed it to cook for a full 50 minutes, preparing the rest of dinner as it was finishing up.  And when my timer went off, I pulled a gorgeous, golden-crusted loaf of gluten-free bread out of my oven.  I turned it out of the pan…and it was perfect.

I let it cool slightly as I finished up the last of the black eyed peas and kale we were having for dinner.  I knew the bread needed to cool a bit more…but I was ready to dive in.  So, I sliced off two slices…one for me and on for my roommate.  It sliced beautifully, still steaming in the middle.  Fresh.  Hot.  Gluten-Free.  Bread.

Well, we settled in for our New Years Day feast and I immediately had to sink my teeth into the beer bread.

OH MY BREAD GODS!  No…this is, by far, one of the best gluten-free breads I have ever made in my kitchen.  The mix forms into this light, not dense, loaf of bread.  I think the carbonation from the beer helps with this.  The flavor is buttery, and light, and totally amazing.  The texture is perfect.  Not dense.  Not heavy.  And it’s soft…and the right amount of chewy.  It is gluten-free bread perfection.  I am going to have to order more of this from Rebecca…and stat!

Let’s talk ingredients now, shall we?  The Tastefully Simple Gluten-Free Beer Bread is a mix of rice flour, whey, sugar, potato starch, tapioca flour, baking powder, whey protein concentrate, cassava flour, brown sugar, salt, yeast extract, natural flavors, maltodextrin, and xanthan gum.  Not a bad mix of ingredients there.

As for nutrition…the way I prepared the bread…the stats would look like this:

This mix contains enough for 13 servings.  One serving of this bread would provide you with 138 calories and 3 grams of fat.  You would also have get only 6 grams of sugar, no fiber, and 3 grams of protein.  Amazing stats for bread, yes?  YES!

And…trust me when I say that this bread is really, really, really good.  Tastefully simple.  Tastefully gluten-free.  Tastefully devoured.

So, if you want to give it a try, hop on over to Rebecca’s Tastefully Simple Page (www.tastefullysimple.com/web/bfifield) and place an order now.  You won’t regret it.  I am so happy to have this in my life.  Thank you, Rebecca!  And thank you, Tastefully Simple!

Tastefully Simple Gluten-Free Beer Bread