Product Review: Udi’s Gluten Free Crunchy Original Granola

Udi's Gluten Free Crunchy Original Granola
Udi’s Gluten Free Crunchy Original Granola

Product: Udi’s Gluten Free Crunchy Original Granola – $6.50+

Granola.

I love it.  I use it every other morning (as in…mornings I don’t go to the gym) in breakfast fruit parfaits or over hot cereal.  I love it.  And, thankfully, I have found some better choices when it comes to the sugars that are included.  And I love finding granola I haven’t tried yet.  And Udi’s Gluten Free released quite a few new options recently.

Now Udi’s Gluten Free has had granola out on the market for awhile…but the new varieties bring some extra oomph to the mix.  For real.

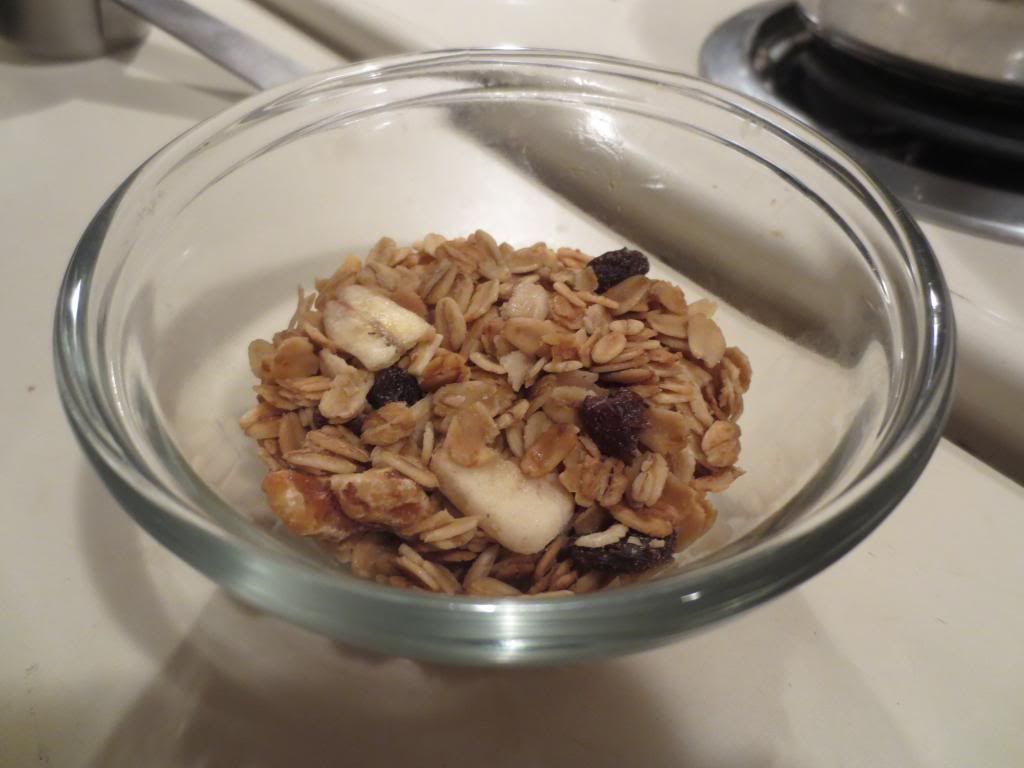
The variety that I purchased was the Udi’s Gluten Free Crunchy Original Granola.

So…what is it?  Simple.  It’s a blend of oats that have been toasted and mixed with sweet and salty toppings.  What might these be?  Raisins, banana chips, walnuts, cashews, almonds, and pistachios.  Mmmm…delicious!  I love that blend.  The raisins and the banana chips bring nice variety in texture, soft and crunchy…and also the sweetness that meshes with the honey toasted oats.  The blend of nuts also adds variety as each has a distinct flavor and texture.  And it just works!  It works well.

The oats are that right level of granola perfect.  Kind of soft, but still crunchy.  The raisins are plump and sweet.  The nuts are amazing…because I love nuts.  And the banana chips are a nice addition of sweetness that is a little unexpected but very welcome.  The variety of ingredients and flavors really works well over the palate.  It’s a fantastic play on the tongue.  And I put this over some gluten-free hot cereal and it was really delicious.  I mean…YUM!

Ingredients are basically already listed above…with a few additions.  Udi’s Gluten Free Crunchy Original Oats are made from certified gluten-free oats, wildflower honey, canola oil, raisins, banana chips, walnuts, cashews, almonds, pistachio nuts.  I love, love, love it.  Clean eating…right here!

As for nutrition…this isn’t bad either.  A serving size is 1/4 cup of granola.  This is actually a rather large amount believe it or not.  This serving will provide you with 140 calories and 6 grams of fat (of which, much is the healthy variety from the nuts).  This granola is cholesterol free and sodium free.  A serving also provides 7 grams of sugar, which is amazing in a granola.  This serving will also give you 2 grams of fiber and 3 grams of protein.

I am wowed!

No, for real.  This is one of my favorite granola I have had to date.  And trust me…I have eaten a lot of granola.  Why I never purchased this before, I don’t know.  But I’m sold.  The different textures, tastes…it works.  It works magic, whether you top something off with it or eat it straight from the bag.  You won’t be disappointed either.

Now…excuse me…there is an open package of this in my pantry calling my name…

A serving of Udi's Gluten Free Crunchy Original Granola
A serving of Udi’s Gluten Free Crunchy Original Granola

Product Review: Food Should Taste Good Harvest Pumpkin Tortilla Chips

Food Should Taste Good Harvest Pumpkin Tortilla Chips

Product: Food Should Taste Good Harvest Pumpkin Tortilla Chips – $2.50+

Pumpkin.

I am obsessed with it.  Not just in the fall, either.

ALL. THE. TIME.

No joke!  I look forward to all those delicious pumpkin flavored coffee drinks in the fall.  I love to cook with pumpkin and bake with pumpkin and eat pumpkin seeds…

Pumpkin is like my BFF for life.

And now…it’s a tortilla chip.

Yes.  A tortilla chip.

Now, some of you may not think this sounds appetizing at all.  But trust me…it works.  It actually works.

The brand is Food Should Taste Good, which has never made chip I haven’t liked.  And while I don’t consume chips often, my roomie spotted this at the grocery store and brought them home for me as a surprise.  She knows my obsession with pumpkin well…and…I thanked her for them.  I had other treats to devour first, but with my lack of a CSA bin this week and a tight food budget…it was bare necessities time.  And with that came…dig through the pantry to find your snacks this week.

Enter Food Should Taste Good Pumpkin Harvest Tortilla Chips.  Confused?  Don’t be.  The basic premise is that this chip is pumpkin flavored, kissed with a hint of nutmeg and cinnamon.  The pumpkin flavor actually sweetens the chip, which still has that corn tortilla texture and underlying flavor.  But the sweetness isn’t too much, as the spices sort of tame it and make it…an interesting but delicious bite.  They would be really awesome with a guacamole or hummus.  But I like to eat them on their own.  I love the soft crunch, the sweet notes in each bite, and that little hint of fall spice.  It’s like eating a crunchy pumpkin pie…without the overwhelming pumpkin flavor and that nasty texture that pumpkin pie has (yes…I am a pumpkin freak but SO dislike pumpkin pie).

I. AM. IN. LOVE.

Let’s look at ingredients, shall we?  What I love about Food Should Taste Good is that they use real ingredients.  Nothing unidentifiable; nothing unpronounceable.  No chemicals or preservatives.  Just sheer awesome and real ingredients.  The Harvest Pumpkin Tortilla Chips are made from stone ground corn, high oleic sunflower oil and/or safflower oil and/or canola oil, cane sugar, dried pumpkin, pumpkin, cinnamon, allspice, nutmeg, sea salt and clove.

Nutritionally speaking, a serving of the Food Should Taste Good Harvest Pumpkin Tortilla Chips is 28 grams (I always dish up servings by weight)…or about 12 chips.  This serving will provide you with 130 calories and 6 grams of fat.  This serving will dish up 80 mg sodium and only 2 grams of sugar.  LOVE that.  Low sodium…low sugar.  YES!  You will be consuming 2 grams of fiber and 2 grams of protein.  These chips are cholesterol free and gluten-free.

And they are made of pumpkin-y love.  And I am hooked on them.  It’s a good thing I’m insistent about dishing out proper serving sizes and NOT eating out of the bag.  It is only for that reason that I still have some chips in my bag in the pantry.  Might have to try these with some hummus or guac.  Hmmm…

Anyway…don’t be afraid.  They are actually rather amazing to bite into and enjoy.  If you are a fan of pumpkin…you’ll be a fan of these.  If you aren’t a fan of pumpkin, don’t count these out.  They won’t overwhelm you with their pumpkin flavor.  Just a hint of sweetness before that salty corn tortilla undertone kicks in.

I am in love with these chips.  For life.

Product Review: Nana’s No Gluten Lemon Cookie

Nana's No Gluten Lemon Cookie
Nana’s No Gluten Lemon Cookie

Product Review: Nana’s No Gluten Lemon Cookie – $2.99+

The cookie monster has struck again.

I need to stop finding all these different brands of gluten-free cookies.  Wait…no.  No, I don’t.  Because I forever will love cookies.  Especially a good cookie.

I have actually spotted Nana’s No Gluten cookies at a local natural food store.  However, I never really thought to stop and purchase one and give it a try.  Why?  I don’t know.  I must not have been thinking clearly.  Or, perhaps I was actually obeying my budget.  Or…was overwhelmed by the amount of sheer awesome gluten-free goodies at that store.  Whatever the case may be…that changed.  But while I was visiting my family in Birmingham, Alabama.

My roomie and I stopped by the organic store my mom took us to the last time we were in town.  It’s called Organic Harvest and their gluten-free selection is mesmerizing.  For real.  On the very bottom shelf, my roommate spotted the Nana’s No Gluten Lemon Cookie.  Because if lemon is involved, she’s going to find it.  Trust me.  So, it didn’t take much pleading to make that one of the purchases we made while there.  Good thing too, because when we drove home, we had nothing really left for dessert.  So…guess what was dessert last night?

Now, I love a soft, chewy cookie.  I really do.  And Nana’s No Gluten Lemon Cookie looked very soft and very chewy.  I opened up the package and was greeted with the best smell of lemon citrus flavor.  YUMMY!  I only hoped that the lemon flavor wouldn’t overpower.  I split the cookie in half and gave half to my roomie and kept the other half for me.  She dug in immediately, as lemon is her favorite flavor, and I asked her how it was.  She liked it.  I asked if it was too lemony and she said that it was right on the edge.  It was perfect.  I hoped she was right.  I settled in to my own half, took a bite and…WOW!!  Super soft, for one thing.  Love that.  Moist.  You’d never believe that these were vegan (no dairy, no eggs, and an added bonus of no refined sugar).  The lemon flavor was at the right level for sure.  Any more and it would have been too tart.  But the sweetness of the cookie actually perfectly balanced out the tartness of the lemon.  I was beyond impressed.  I devoured the half of a cookie in record time.  The texture was a hybrid of a shortbread cookie and a moist, dense molasses cookie.  Right in between.  No joke.  It was melt-in-your-mouth nom-a-licous.  Honestly.  And I love that the cookie is sweetened by fruit juice.  Amazing.

So, let’s talk ingredients, shall we?  Nana’s No Gluten Lemon Cookie is made from brown rice flour, white rice flour, fruit juice (a combo of pear, apple and grape), rice dextrins (a natural and unmodified starch), non-GMO expeller pressed canola oil, white rice crisp, tapioca flour, lemon, baking soda, non-aluminum baking powder, natural flavoring, natural vanilla extract, xanthan gum, salt.  As far as ingredients go, not too bad.  Not great…but not too bad either.  Better than some I have eaten (and loved).

Nutritionally speaking, a serving is half the cookie.  Yes…half.  Not the whole cookie.  Just half.  In this half of a cookie, you will be consuming 180 calories and 7 grams of fat.  This half of a cookie also contains 85 mg sodium and 10 grams of sugar.  For a cookie, 10 grams of sugar isn’t bad, specially when it all comes from fruit juice.  You also get 1 gram of fiber and 2 grams of protein.  So, don’t expect this cookie to fill you up.

The light, fresh, moist, delicious taste of this cookie is so amazing and enticing.  I was sad that we only bought one.  Honestly, one of the best gluten-free cookies on the market.  I’m already hoping to try more of Nana’s No Gluten Cookies…even if I have to order them online.  Delicious!  If you love cookies and you are a fan of lemon…you won’t want to miss out on this treat.  Trust me.

I’m already craving another one.

Nana's No Gluten Lemon Cookie (unwrapped)
Nana’s No Gluten Lemon Cookie (unwrapped)

Product Review: A Taste of Thai Peanut Noodles Quick Meal

A Taste of Thai Peanut Noodles Quick Meal

Product: A Taste of Thai Peanut Noodles Quick Meal – $5.49+

Love Thai food?

Me too.  We have a great authentic Thai place not too far from where I live.  It isn’t even in Louisville.  It’s in Jeffersonville, Indiana.  I love that place.  I haven’t been there in ages, but I contacted them awhile back and they said they could make anything gluten-free for me.  That’s the joy of Thai food…it is easy to accommodate.

That being said, when a sale is happening…my roomie and I tend to go a little crazy at the grocery store.  No lie.

A long time ago in a far away (or perhaps local) grocery store, we encountered a sale on A Taste of Thai products.  We picked up two of the Peanut Noodle Quick Meals (they serve 2 in each box) and a Pad Thai for Two…which we have yet to make as well.

Tonight, after a long day of travel from Birmingham, Alabama back home…and with no CSA bin this week, I needed a quick and simple meal.  Trust me, I haven’t been in the mood to get creative with the food.  And, honestly, after sitting all day in the car and being the sad sot that I am right now (injured runner…stand back!), I didn’t really want to whip up something from scratch that might take…ages.

Thank goodness for these meals in the pantry.

So easy to make too.  Remove all of the envelopes that contain coconut milk powder, the peanut sauce, peanuts and noodles.  Place a cup of water into the box and then add the sauce, the coconut milk, then the noodles.  Microwave on high for 3 minutes.  Stir.  Microwave again for another minute.  Then, let stand for 1 minute.  Afterwards, add the peanuts.  Stir and then serve.

Simple.  Easy.  And ready in 5 minutes.  Gotta love it.

Packets inside A Taste of Thai Peanut Noodles Quick Meal

So, how was it?  Better than I expected.  For one thing, the “sauce” packet was a powder, which threw me off for a moment.  So was the coconut milk portion as well.  But those both go in the water first and they mix in all proper like.  The noodles actually do soften up in the 4 minutes of heating and 1 minute of resting.  I promise.  No hard noodles were found in the consuming of this product.  And the flavor was awesome.  Not as awesome as real Thai food, but as close to awesome real Thai food as one can get without being at an authentic Thai restaurant…or in Thailand.  I swear.  There was a little bit of heat…just enough to keep the flavor interesting.  The peanuts gave a nice texture to the overall dish.  The noodles were perfect.  Not crunchy.  Not mushy or sticky.  Perfect.  And the sauce…it was delicious.  I might have licked my bowl.  Maybe.  A little.

So, how does this stand up nutritionally?

Let’s look at ingredients first.  The sauce contains: sugar peanuts, chili powder, kaffir lime leaf powder, lemongrass powder, modified tapioca starch, salt, hydrolyzed vegetable protein, dextrose, tricalcium phosphate (to prevent caking), yeast extract, malic adid.  The coconut milk powder is made up of coconut maltodextrin, mono and diglyceride (an emulsifier), dipotassium phosphate (a stablizer) silicon dioxide (to prevent caking).  And the peanuts contained peanuts and silicon dioxide (to prevent caking).  The rice noodles were simply made from rice flower, water, and modified food starch.  Do I like all those modified ingredients.  Not one bit.  I bought these back before I was paying attention to that.  Kind of shocking when I look at it and type it up.

As for nutrition…this box contains 2 servings.  In one of these servings, you will consume 340 calories and 10 grams of fat.  Not bad for a saucy noodle dish, I think.  You will be taking in 320 mg of sodium and 13 grams of sugar.  The sugar is a bit high, but I believe that is from the sauce.  You get 2 grams of fiber and 5 grams of protein.  It is cholesterol free, gluten-free, and preservative free.

So, while it is not the cleanest of eats, it was quick and easy.  I do dislike the modified ingredients.  Not a fan.  But I am a fan of the taste, flavor, spice, and texture.  For an every-now-and-again dinner, not a bad choice at all.

Product Review: Amy’s Organic Kitchen Andy’s Dandy Candy Chewy Candy Bar

Amy's Organic Kitchen Andy's Dandy Candy Chewy Candy Bar
Amy’s Organic Kitchen Andy’s Dandy Candy Chewy Candy Bar

Product Review: Amy’s Organic Kitchen Andy’s Dandy Candy Chewy Candy Bar – $2.49+

Yep.

Amy’s Kitchen does more than just organic cakes now for dessert options.  In fact, as I am typing this from a hotel in Birmingham, Alabama, I have since discovered that Amy’s Organic Kitchen also does ice cream now…dairy free ice cream.  No joke.  I saw it at the a little natural foods store and the Earth Fare and Whole Foods down here.  No joke.  Where have I been living?

What I did know is that Amy’s Kitchen put out candy bars not too long ago.  Yep.  Organic candy bars.

Trust me, I know…slapping the word organic on the label of something that is chocolate coated, packed with gooey caramel and nuts and…honestly…candy…does not make it healthy or any better than a Snickers.  Save that it is made from organic ingredients and not…well…hydrogenated soybean oil (Snickers, I’m looking at you!), it’s still candy.  I understand this.  I get this.  It doesn’t mean I didn’t pick it up off the shelf at the grocery store when I spotted it and keep it for dessert.

Because…I did.

HA!

Let’s first talk about why Amy’s Kitchen began producing candy in the first place.  According to the Web site, Amy’s father, Andy, loves candy.  He was the son of a candy maker and spent his childhood sampling chocolate morsels and chewy caramels from his father’s kitchen.  To honor Amy’s Organic Kitchen’s commitment to provide great flavor and pure organic ingredients, Andy’s Dandy Candy was created.  Andy was the tester for the flavors and when he was satisfied with the outcome…the candy bars were put on the market.

Currently, there are four different varieties: Crispy, Crunchy, Chewy, and Creamy.

I picked up Chewy.

Why Amy’s Organic Kitchen Chewy Candy Bar?  Well, it was described, on the package, as soft, chewy caramel with pecans that were coated in chocolate.  That sounds like heaven to me.  Pecans are one of my favorite nuts.  WIN!

Amy's Organic Kitchen Andy's Dandy Candy Chewy Candy Bar (unwrapped)
Amy’s Organic Kitchen Andy’s Dandy Candy Chewy Candy Bar (unwrapped)

As I was out of dessert options this past week before heading out of town, the roomie and I each had one of the two mini bars that are inside the package of the Amy’s Organic Kitchen Chewy Candy Bar.  Yes…one for you and one to either keep for later or share.  I highly encourage sharing.  Because the more you share, the more these will sell…and they are SO worth it.

One bite…and it was like eating a hybrid of a Snickers (with less nuts) and a Rolo.  There it is.  It was amazing.  The caramel was soft and chewy.  The chocolate was a nice sweetness.  And nothing pairs better with caramel than chocolate.  Yum.  The pecans were actually quite sizable and prevalent throughout the candy bar itself.  It added a nice salty element…so each bite was perfection.  I was one happy girl.  And this girl doesn’t eat candy, let alone candy bars, all that often.  Even Cathy was a fan.

So, let’s talk ingredients.  Amy’s Organic Kitchen Andy’s Dandy Candy Chewy Candy Bar is made from organic milk chocolate, organic tapioca syrup, organic cane sugar, organic pecans, organic nonfat dry milk, organic grade AA butter, filtered water, organic palm oil, organic vanilla extract, sea salt, organic soy lecithin.  It is deliciously organic, made from Rainforest Alliance Certified cocoa, gluten-free, and contains no high fructose corn syrup, preservatives or GMOs.

Nothing too off-putting, right?  Right.

As for the nutrition facts…a serving size is 1 of the 2 mini bars that are included in the pack.  One bar will provide you with 100 calories and 6 grams of fat, which is actually good for a candy bar, I think.  This little bar has 5 mg of cholesterol, 45 mg sodium, and 9 grams of sugar.  9 grams of sugar for a candy bar is actually not bad at all.  A snickers of comparable size has 24 grams of sugar, twice the calories and way more fat and sodium.  One serving of the Chewy bar also gives you no filling fiber and only 1 gram of protein.  But…it’s candy.

Yes…candy.  Indulgent treats that I actually do treat myself to every now and again.  But, when choosing a candy…choose something a little bit better for you.  Less sugar.  Less fat.  Organic ingredients.  No high fructose corn syrup of hydrogenated oils.  For me…Amy’s Organic Kitchen Andy’s Dandy Candy Chewy Candy Bar is a fantastic option for when the sweet tooth hits.

Try it for yourself.  And as soon as I can find the other varieties…I’ll give those a try too.

Happy indulging.

Amy's Organic Kitchen Andy's Dandy Candy Chewy Candy Bar (halved)
Amy’s Organic Kitchen Andy’s Dandy Candy Chewy Candy Bar (halved)

Restaurant Review: Village Tavern, Birmingham, Alabama

Village Tavern, Birmingham, Alabama

Restaurant: Village Tavern, Birmingham, Alabama

I’m so disappointed.

I know…any blog that starts with those three words can’t be good, right?  Right.

And, sadly enough, that’s the way of it when it comes to Village Tavern in Birmingham, Alabama.

First of all, finding a restaurant in the South for gluten-free food is not always easy.  There are some, but when you are craving gluten-free pizza…when you require it…well…things can get a bit tricky.

But, after a little research, Cathy and I found Village Tavern in Birmingham, Alabama for the recent journey down there.  I was going to have a great dinner out with my sister, her youngest son, and a great friend of mine…Michelle!

The company at dinner was great.  I hadn’t seen Michelle since I left Alabama eight years ago.  She hasn’t changed a bit.  She’s still bubbly with the best laugh ever.  And my sister…well…she really made it a fantastic night tonight.  I always enjoy my time with my sister.  There isn’t enough of it in my life.  But…tonight…I got her and her youngest son and that was awesome.

So, the five of us total were seated and given our drinks.  We all had water.  Hydration, friends.  Always water.  Then…after a little back and forth, we were ready to order.  My sister opted for the Chicken Quesadilla ($7.95), which came with a salsa and a dipping sauce as well.  She got my four year old nephew the kids Cheese Pizza ($4.95)…which is HUGE for a child, honestly.  He loved it.  Even said it was the best pizza he ever had.  Adorable.

Michelle got the Spring Rolls ($8.95), which she seemed to like.  They weren’t what I was expecting honestly.  But they sure did look good.  With that she got a side Mixed Greens Salad ($4.95).

Cathy and I chose to split a Gluten-Free Margherita Pizza ($8.75), which is a 10-inch pizza.  Usually that’s the standard for a restaurant.  And she got the Tavern Salad ($8.50) to go with it as she hadn’t had any vegetables all day.  I opted for a side of the Broccoli ($4.00).  And that was that…orders in.  We had the chance to sit, talk, catch up and all of that while we awaited the arrival of the food.  And when it came…it smelled fantastic.

Problem:

The waiter knew Cathy and I were splitting the gluten-free pizza…and yet…no extra plate was brought out.  Secondly…the waiter forgot about Cathy’s salad.  In fact, he didn’t even put it on the ticket.  So…yeah…that had to be corrected.

But the greatest problem…the biggest offense…

My gluten-free pizza dough was RAW!  Like…gooey…uncooked rawness.  I was beyond disappointed.

While I was waiting on a plate, Cathy went ahead and started on her half of the pizza.  When my plate finally was brought to the table, well…it took two tries.  First one was a small plate…which was fine.  But soon after that was left for me…a larger, must better suited plate arrived at the table.  Fantastic.  Thank you.  Cathy dished up my half of the pizza and I picked up my fork and knife to slice through what I was expecting to be a crispy crust.  This was that infamous gluten-free cracker crust that all gluten-free pizzas have.  But there was no crunch.  No crispness.  Mushy…soggy…still stretchy doughiness.  Yes, doughiness is a word…because I used it in a sentence.  The disappointment on my face must have been evident because my sister and Michelle both were like…”Is it not good?”  I held up a piece of the dough and said…”It’s not cooked!”

The best part of the pizza was the crust on the edge…because that actually WAS crispy and cooked through.  I know with cracker crusts there is a fine line between crispy and burnt…but this was on a fine line of being fresh from the package and undercooked.  The toppings weren’t even that impressive.  The pizza was just REALLY disappointing overall.  I was not impressed.  Not happy.  And just MEH about the whole thing.

At least I had good company and good conversation.

I had it in my head to return to Village Tavern with my parents the following night, but I was so unhappy with that pizza, that I’m judging the rest of their gluten-free options based on that…and will find somewhere else to eat.  I don’t think I’ll ever be back.

Village Anchor's Gluten-Free Margherita Pizza (doughy disaster)
Village Anchor’s Gluten-Free Margherita Pizza (doughy disaster)

Recipe: Homemade Gluten-Free and Vegan Bacon

It was almost five years ago that I made a decision to become a vegetarian.  And as of this month…three years ago that I had to go gluten-free.  My…time sure does fly!  That being said, when I first became a vegetarian, my life was filled with Morningstar Veggie Bacon Strips and faux meat products…which…looking at now makes me cringe due to the number of chemicals and processed crap that are in them.  Besides that…most all processed-to-death faux meat products contain vital wheat gluten…which means…I can’t consume it anyway.

Honestly, after three years I’ve worked around this.  But, you see, my roommate has a love of BLT sandwiches.  As you know, Cathy eats what I eat at home, so she’s 80% gluten-free and vegetarian.  But when we go out…meat is her treat (think those Beggin’ Strips commercials…).  Anyway…she’s acquired this taste for BLT sammies…and with a plethora of lettuce from my CSA bin, she put in that request.

So…I needed bacon.  And no one makes a gluten-free and vegetarian version of this.  So, I had to make it myself.  And it’s mainly made up with…beans.  So…beancon?  I guess?  The recipe was adapted from the No Meat Athlete…and now…will forever be made and kept in my kitchen.  What’s even better…after you cook the batter up and slice it, the slices can be kept in the freezer and go immediately from the freezer to the pan.  Oh yeah…beancon time!

Recipe: Homemade Gluten-Free and Vegan Bacon

Homemade Gluten-Free and Vegan Bacon

Servings: 24-32
Time: Prep 20 minutes; Bake 10 minutes

Ingredients:

  • 1/2 cup dried adzuki beans, or other small red beans
  • 1/3 cup whole grain buckwheat groats (not buckwheat flour)
  • 1 tsp onion powder
  • 1/3 tsp garlic powder
  • 1/3 tsp rubbed sage
  • 1/2 tsp thyme
  • 1-1/2 tsp smoked paprika
  • 1 tsp liquid smoke (not all brands are gluten-free, but Colgin is…and that’s what I use)
  • 3 tbsp pure maple syrup
  • 1-1/2 tbsp coconut aminos (I subbed San-J Gluten-Free Tamari)
  • 1 tbsp tomato paste
  • 1-1/2 tbsp nutritional yeast (optional)
  • 1 tsp coconut oil (may sub any oil you prefer)
  • 1/2 tsp salt

Directions:

Rinse the beans and buckwheat, place in large bowl covered with several inches of cold filtered water; let soak overnight.

Preheat the oven to 400°F.

Drain and rinse the soaked beans and buckwheat.  Place in the bowl of a food processor fitted with an s-blade, along with all of the other ingredients. Pulse several times to combine, scrape down the sides and bottom of bowl and continue pulsing until uniform, but not completely pureed.

Line a 9 x 13 casserole dish or rimmed baking sheet with parchment paper and spray with baking spray. Place bacon batter in pan and spread evenly with a spatula.  You may choose to spray another piece of parchment paper lightly with baking spray and press the paper on top of the mixture and flatten with your hands.  Remove and discard the top piece of parchment paper, then use a spatula to spread over and fill in any bare spots.

Bake for 10 minutes.  Remove from oven and let cool for 10 minutes.  Slice into 24-32 strips, whatever size you prefer, I cut mine into 1 inch by 4 inches slices (Do this by making one lengthwise cut down the center, and then 12-16 cuts across the shorter side).

At this point freeze any strips your don’t plan on eating immediately. Frozen strips can go straight into the skillet at a later date, no need to thaw first. To fry, heat a skillet with a small amount of oil and fry both sides to desired level of crispiness. You may also choose to fry slices in cooking spray, for a less crispy, but still very delicious result.

~*~*~

The liquid smoke gives it that smokey feeling of bacon and they taste great.  Honestly.  I made this once before and used them on breakfast sandwiches, to pair with pancakes, and now…on BLTs.  Brilliant recipe.  Bacon really can be for everyone…even gluten-free vegetarians and vegans.  Because this no meat treat is a delicious, homemade, and easy recipe.  And no chemicals.  Real food.  Real good!

Gluten-Free and Vegan BLT Sandwich

Recipe: Broccoli and Goat Cheese Soufflé

Tonight…I made my first soufflé.  I’m not going to lie…it made me feel chef-y.  Really, really chef-y.

Because soufflé’s can be tricky.  They are picky.  They are very, very, very difficult to master.  And this recipe seemed easy enough…so I decided to give it a try.

The result?  A light, airy, fluffy treat that made for a delicious dinner.  It wasn’t perfect, but for my first soufflé, I’m quite happy with the results.  It tasted phenomenal.

The recipe comes from Eating Well magazine, one of my favorites.  And yeah…I’ll make this again in a heartbeat.

Recipe: Broccoli and Goat Cheese Souffle


Broccoli and Goat Cheese Soufflé

Servings: 4-8
Time: Prep 25 minutes; Cook 20 minutes

Ingredients:


  • 1-1/2 cups finely chopped broccoli florets
  • 1 tablespoon butter
  • 1 tablespoon extra-virgin olive oil
  • 2 tablespoons all-purpose flour (I used Better Batter Gluten-Free All Purpose)
  • 1-1/4 cups low-fat milk (I used unsweetened almond milk)
  • 1 teaspoon Dijon mustard
  • 1/4 teaspoon dried rosemary
  • 1/4 teaspoon salt
  • 1/2 cup crumbled goat cheese
  • 3 large eggs, separated
  • 2 large egg whites
  • 1/4 teaspoon cream of tartar

Directions:

Preheat oven to 375°F.

Coat four 10-ounce ramekins (or a 2- to 2 1/2-quart soufflé dish) with cooking spray and place them on a baking sheet.

Place broccoli in a medium, microwave-safe bowl.  Cover and microwave until the broccoli is tender-crisp, 1 to 2 minutes.  Set aside.

Melt butter and oil in a large saucepan over medium-high heat.  Whisk in flour and cook, whisking, for 1 minute. Adjust heat as needed to prevent the mixture from getting too dark; it should be the color of caramel.  Add milk, mustard, rosemary and salt and cook, whisking constantly, until thickened, 1 to 2 minutes.  Remove from heat and immediately whisk in goat cheese and 3 egg yolks until well combined.  Transfer to a large bowl.

Beat the 5 egg whites in a medium bowl with an electric mixer on high speed until soft peaks form.

Add cream of tartar and continue beating until stiff peaks form.  Using a rubber spatula, gently fold half of the whipped whites into the milk mixture.  Gently fold in the remaining egg whites and the reserved broccoli just until no white streaks remain.  Transfer to the prepared ramekins or soufflé dish.

Bake until puffed, firm to the touch and an instant-read thermometer inserted into the center registers 160°F, about 20 minutes in ramekins or 30 minutes in a soufflé dish.

Serve immediately.

~*~*~

Easy.  I was blown away by how easy this was to make.  I was hoping mine would puff up a little more, but that will come with more practice.  For now, so very happy with the results of this soufflé.  My roommate and I both enjoyed the taste and the fluffy, airy texture.  And the recipe…so clean.  So amazing.  And yeah…the perfect meal to end a busy day.

Go ahead.  Don’t let the idea of a soufflé scare you.  Give it a whirl.  You might surprise yourself.

Recipe: Shredded Rainbow Salad

You ever look at the food you have in your fridge and wonder what you might be able to make with all of it?  Especially when, in the next couple days, another fresh produce delivery will land on your doorway and you’ve barely scratched the surface of the last bin as it was delivered later than usual due to weather?  Or something to that affect?

That’s my life these days.  The Polar Vortex caused there to be a delay in my CSA bin delivery…which isn’t a problem…but it gave me fewer days to work through the fresh produce.  I’ve managed some…but I still have plenty left.

That being said…Jamie Oliver came to my rescue tonight.  For dinner I got out my brand-spankin’-new food processor and whipped up a delicious, healthy, and colorful salad from the fresh produce I had on hand.  The dressing was a magical touch.  Talk about clean eating!

Recipe: Shredded Rainbow Salad

Shredded Rainbow Salad

Servings: 8
Time: 20 minutes

Ingredients for Salad:

  • 2 raw medium beets (any color) trimmed, scrubbed & quartered
  • 4 leaves kale
  • 2 large carrots, scrubbed & trimmed
  • 1/4 white cabbage, quartered
  • 1 apple, quartered
  • 1 cup walnuts, roughly bashed


Ingredients for Dressing:

  • 1 teaspoon Dijon mustard
  • 3 tablespoons apple cider vinegar
  • 6 tablespoons extra-virgin olive oil
  • sea salt & ground pepper
  • Gluten-Free Tamari
  • hot sauce (I used Sriracha)


Directions:

Put a coarse grater attachment into a food processor and push ingredients through in the following order (to stop the beets from staining everything): beets, kale, carrots, white cabbage and apple. (If your food processor is small, do this in batches.)

Turn vegetables out onto a platter so get a pile of rainbow colors.

Mix the mustard, vinegar, and oil, then season with salt, pepper, tamari, and hot sauce.

Add walnuts and toss everything together until you get a big, beautiful plate of dressed vegetables.

~*~*~

Simple…but the flavors are amazing and work well together.  You get this great sweetness from the beets and the apple.  The cabbage and carrots give this earthy flavor.  And the kale…just a bit of that bitter zing.  Topping it with walnuts gives an added boost to the texture.  And the dressing…necessary.  It ties it all together.

My roommate declared this her favorite way to eat a salad.  Me…I devoured it!  Healthy and delicious.  Definitely making this again!


Recipe: White Chocolate Peppermint Coconut Milk Ice Cream

I love ice cream.

Seriously.

Obviously.  I mean…who else in their right mind would make ice cream when it is -100°F outside.  That might be a slight exaggeration on the temperature…but it has felt like that the past couple of weeks.  And it’s driving me insane.  And when I go insane…I make ice cream.

A local ice cream store does some seasonal flavors every year, and one of the ones that is introduced at Christmas time is called Candy Cane Lane.  It’s a white chocolate base with peppermint candies broken up and incorporated into the ice cream.  It is phenomenal.

With the holidays now behind us…that ice cream flavor has gone back to the vault until next December.  With that being said…I set out to recreate it, but instead of using a base made with whole milk and heavy cream, I used culinary coconut milk.  Once again, So Delicious Culinary Coconut milk proves that it is just as good of a base as the heavy dairy, which tears my stomach up.

What was even better…it tasted just like the flavor at the ice cream shoppe.  You’d never even guess coconut milk was used to make it.  So, dig out that ice cream maker and give this one a whirl!

Recipe: White Chocolate Peppermint Coconut Milk Ice Cream

White Chocolate Peppermint Coconut Milk Ice Cream

Servings: 8
Time: Prep 10 minutes; Freeze 30 minutes

Ingredients:

  • 2 cans full fat coconut milk (I used So Delicious Culinary Coconut Milk)
  • 1 cup coconut sugar (or your preferred sweetener)
  • 8 ounces white chocolate, melted
  • 1/2 cup crushed peppermint candies or Andes Peppermint Crunch Baking Chips

Directions:

In a saucepan, add a couple inches of water and bring to a simmer.  Place a large bowl over the saucepan, making sure the base of the bowl does not touch the water.  Break up the white chocolate into pieces, add them to the bowl, keeping the heat at its lowest, and allow the chocolate to melt slowly.  The chocolate will take about 5-10 minutes to melt and will become smooth and glossy.  Remove it from the heat and give it a good stir.

In a large bowl, mix the coconut milk, sugar, and melted white chocolate together until completely incorporated.  Refrigerate for 4 hours or overnight.

Add the ice cream base to the ice cream maker and freeze according to the manufacturer’s directions.

In the last two minutes of processing, add in the peppermint candies/baking chips and continue to process until well incorporated.

Transfer the ice cream to a freezer-safe container, cover the ice cream with plastic wrap, cover with the lid, then freeze until firm.

~*~*~

Yep…it’s super simple…and REALLY good.  And, no worries, you can’t even taste the coconut milk.  You get the smoothness of the white chocolate and that hit of peppermint from the addition of the candies or baking chips.  And in the end…it makes a delicious treat that everyone will enjoy.  Even when it’s colder than Christmas out there.

But…ice cream is good anytime, right?

Right!