Restaurant Review: The Village Anchor, Anchorage, Kentucky

The Village Anchor, Anchorage, Kentucky

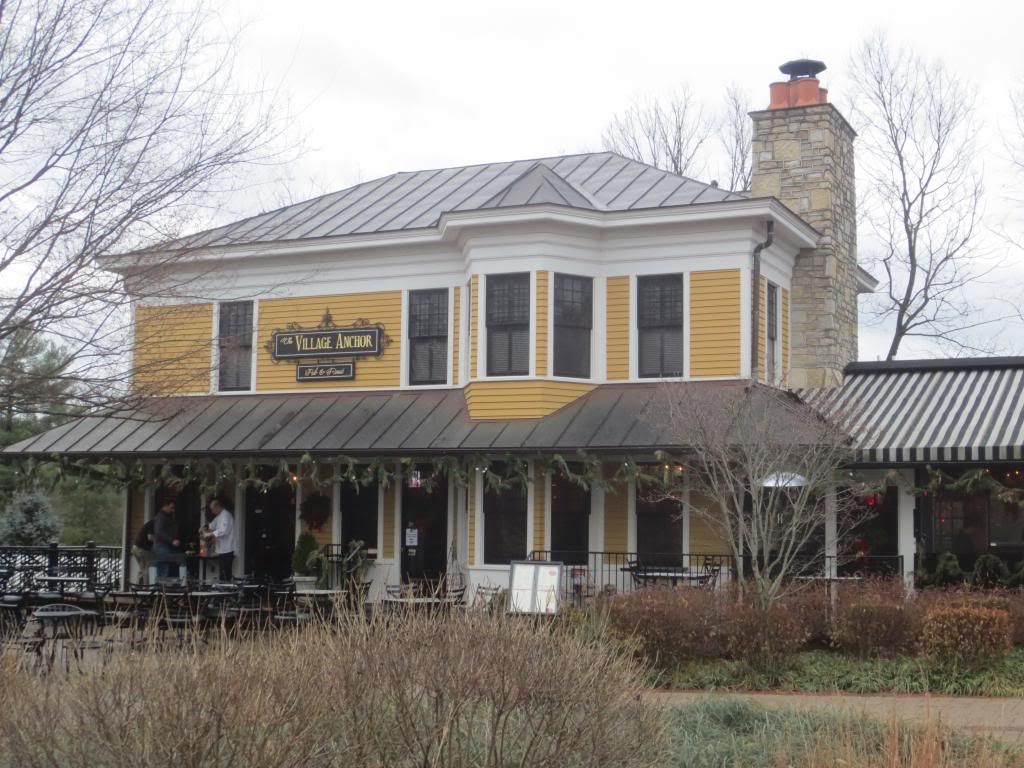
Restaurant: The Village Anchor, Anchorage, Kentucky

Twas the weekend before Christmas and my roommate and I were set to have our official Christmas dinner out at a local restaurant.  We started this tradition of a holiday meal a couple years back.  It gives me a break from the kitchen, which, no matter how much I love to cook, is always welcome, and gives us a great excuse to try out a restaurant we might not have picked otherwise.  It’s usually a little more upscale…a little pricier…but this only happens once a year.  The splurge is worth it.

This year, the roomie chose the restaurant.  It was one we had visited before, but never had the luxury of eating there.  I ran a short mile run there during the summer.  In fact, I never had set foot in the restaurant part, only the bar – The Sea Hag – prior to this visit.  We chose the earliest dinner seating available, as we knew this was going to be a crazy-busy weekend for dinners out.

The Village Anchor opened at 5 p.m.  We were actually there way ahead of schedule, so we took the opportunity to walk up and down the streets of Anchorage.  If you’ve never been to Anchorage, Kentucky…it’s gorgeous.  Go there and be awed.  It was even more beautiful as a lot of the homes and businesses were lit up and decorated for the holidays.  I love this time of year for that reason.

At 5 p.m. though, we were both starving and ready to get our meal on.  We stepped into the restaurant itself and were immediately greeted by a very friendly hostess.  I gave her my name, which the reservation was under, and she picked up a couple of menus and took us through the dining room, sitting us down at a quiet table not too far from the hearth.  And that fireplace had a nice fire going in it too.  It felt like the perfect winter’s night.

Our server, Alan, came over to introduce himself.  Our water glasses were filled and we were asked if we’d like anything else to drink.  We both decided to stick with water.  He said, “I noticed that we have a vegetarian with a gluten allergy…”  I raised my hand.  “That would be me!”  He gave me a very relaxing smile and said that the chef could do up a great roasted veggie plate for me as an entree.  He mentioned Brussels sprouts, asparagus…yeah…he won me over right there.

What this also indicated to me was that The Village Anchor pays attention to the reservations that are made through Open Table.  I have made reservations before for so many other places, but this was the first time my food allergies were ever addressed right away without me having to bring them up.  I raise a glass and give high kudos to The Village Anchor for this.  As always, I get a bit nervous when I try out somewhere new…but this really put my mind at ease and relaxed me for the rest of the meal.

The Village Anchor's Hummus Trio (top to bottom: Roasted Garlic, Jalapeño-Cilantro, Caramelized Onion-Chipotle) served with fresh veggies for dipping to make it gluten-free
The Village Anchor’s Hummus Trio (top to bottom: Roasted Garlic, Jalapeño-Cilantro, Caramelized Onion-Chipotle) served with fresh veggies for dipping to make it gluten-free

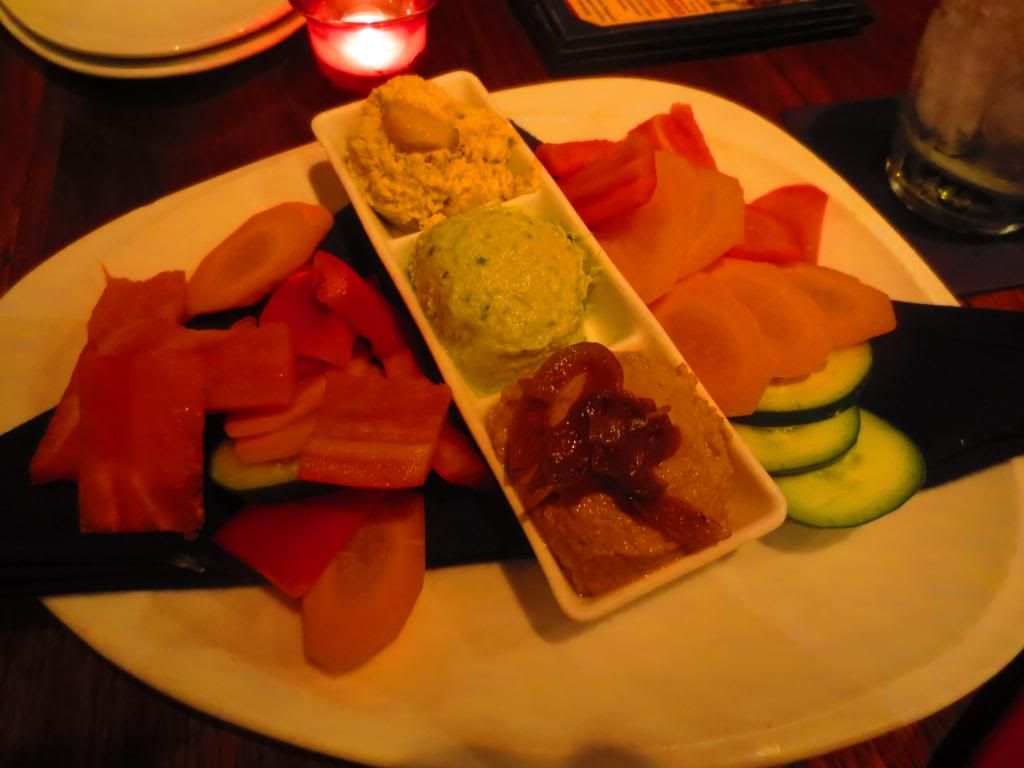
But…we weren’t just here for the entrées.  Like I said…this was our holiday meal.  And after just taking in a very light breakfast, followed by a movie…we were pretty much famished.  So, Cathy already knew she was going to try out a cup of the award-winning Elk Chili ($6.00) as her starter.  We inquired what might be a good option for me.  Alan said he would recommend the risotto, but it has soy sauce in it so it’s not safe for me.  I told him I’d be good with the fresh fruit…but he had other ideas.  He sure did.  And what I ended up getting for my starter was their Hummus Trio ($11.00), which came with fresh sliced vegetables instead of the pita and the grilled crostini.

The Hummus Trio is a plate that contains three different house-made blends of hummus: the roasted garlic, jalapeño-cilantro, and caramelized onion-chipotle.  As I said, my version came with sliced carrots, cucumbers, and red bell peppers.  SO good.  I thought the roasted garlic hummus was really rich.  I love roasted garlic…and blending it into the hummus gave it this nice flavor that went so well with the vegetables.  This one turned out to be Cathy’s favorite.  The jalapeño-cilantro was the next one I sampled.  I actually expected this one to be spicy…but it was actually rather mild.  Even Cathy thought so when she tried it…and we’re talking about a heat wimp here.  The flavors were great and I loved the freshness that came with each dip.  This one went really well on the carrots.  My personal favorite was the caramelized onion-chipotle hummus.  OH MY HUMMUS GODS!  I sampled this one ahead of Cathy and knew she’d be fanning her mouth.  While not super-hot…it did have a kick to it and a slow burn.  The caramelized onion was a brilliant addition, lending a little hint of sweetness to the hummus itself.  Needless to say…this met a very messy death.  If you love hummus, get this.  Just trust me!

It was now time for the entrée round.  As this was a pub, Cathy already knew what she was getting…Fish and Chips ($15.00).  Her meal also came with house-made tartar sauce and coleslaw.  She’s not a coleslaw person normally…but she ate the hell out of that coleslaw.  I might need to see if the kitchen will give me the recipe.  Red cabbage, raisins, and carrots…but it was the vinaigrette-like dressing that made it.  Yes…we asked if it was safe for me to try and after checking with the chef, Alan assured me it was.  It was really good.

The Village Anchor's Chef Creation - Roasted Veggie Plate
The Village Anchor’s Chef Creation – Roasted Veggie Plate

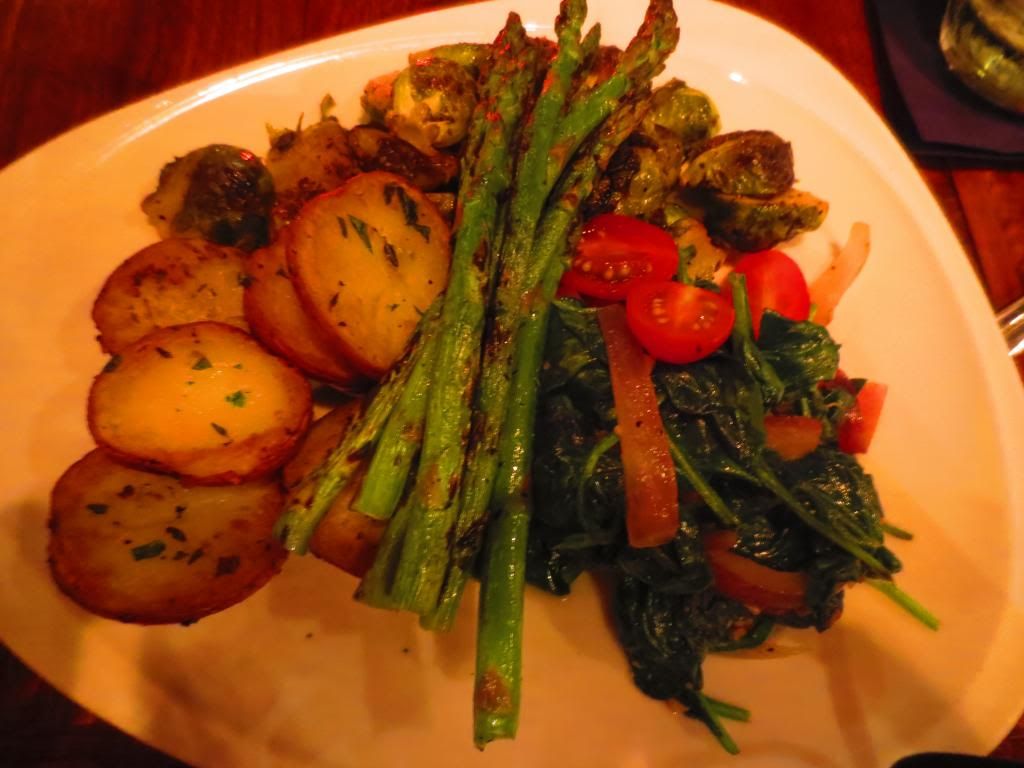
The chef got to play around with my dish and what I got was a vegetable plate masterpiece.  Perfectly seasoned, perfectly roasted, perfectly perfect vegetables.  And what a variety as well.  My Roasted Veggie Plate ($16.00) came complete with roasted potatoes, roasted asparagus, roasted Brussels sprouts, and some sauteed spinach that was cooked with garlic and red onion, topped off with tomatoes.  It was AMAZING!!  I love that the chef included potatoes as well for something more filling.  They were cooked to perfection and seasoned with some fresh herbs.  Carby goodness.  Yum!  The asparagus was really done well.  It still had a bit of crunch to it, without being raw.  I loved the depth of flavor that were drawn from these.  The spinach and the Brussels sprouts were my two favorite things on that plate though.  The spinach was wilted and cooked to absolute perfection.  I loved the hint of garlic, the bite the red onion gave it, and the sweetness of the red tomatoes.  I was in heaven.  And the Brussels sprouts were roasted to perfection.  No burned edges…just flavor and lots of it.  I was beyond impressed with this meal.  Here I was expecting to get stuck, once again, with a salad.  But The Village Anchor totally made my night!!  They definitely went above and beyond for me.

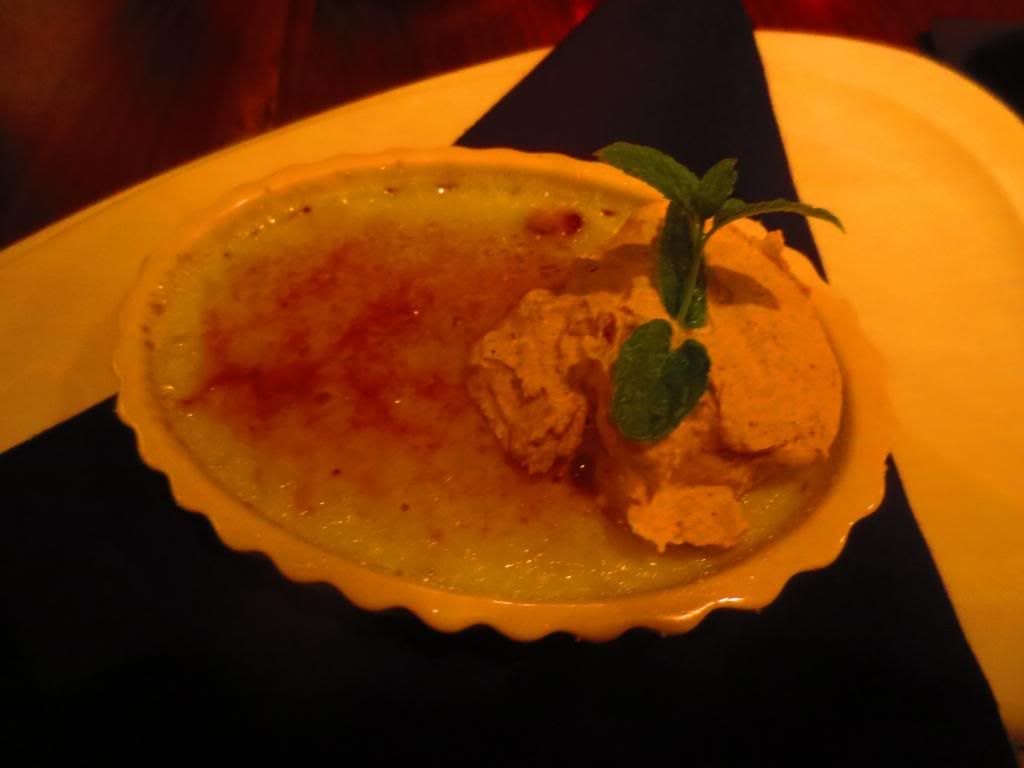
With this being a holiday celebration…we managed to save a little room for dessert.  The special that night, in honor of the holidays, was a Cranberry Crème Brûlée.  Now, more often than not, the crème brûlée is a safe choice for the gluten-free…but I wanted to be certain.  Alan was prepared for this and said that he would check with the chef.  He returned a few moments later with the word – the Cranberry Crème Brûlée was gluten-free…the only other things on their menu that are gluten-free is the ice cream, which is provided by The Comfy Cow.  I get Comfy Cow ice cream a lot…so I decided to give the Cranberry Crème Brûlée ($11.00) a try.  It even came with a cinnamon whipped cream.  It sounded delicious.  Cathy opted for the Granny Smith Apple Crisp, à la mode ($8.00).

When our desserts arrived I was just so happy to be able to enjoy a dessert while eating out at a restaurant.  Thrilled.  And my Cranberry Crème Brûlée looked beyond amazing.  I was ready to dig in…and had to do the thing where I crack the caramelized sugar on top.  It shattered and through the custard, I spotted the red cranberries at the bottom.  One bite…I was in dessert heaven.  SO good.  And that spiced cream that was served with it definitely complimented the holiday flavors and added this little hint of spice and warmth to the dish.  I polished it off…and was definitely full.  But pleasantly so.

Holiday meals are supposed to be relaxing and enjoyable.  The Village Anchor not only had a fantastic, cozy dining area, but the food was amazing.  The staff was more than prepared to work around my food allergies.  And they didn’t act like I was an inconvenience either.  I love that the chef prepared a dish specifically for me…taking care to make it beautiful to look at and delicious to eat.  Both Cathy and I were beyond impressed with The Village Anchor.

You better believe we’ll be coming back for more in the very near future.  My hat is off to the staff, the kitchen, and the owners of this fine restaurant just outside of Louisville, Kentucky.  I was immediately made to feel at ease about my food and knew that I was in good hands.  They didn’t disappoint.  And now…I’m spreading the word as much as I can.  Local places are always worth checking out – but this one is something special.  This one is a keeper!

The Village Anchor's Cranberry Creme Brule
The Village Anchor’s Cranberry Crème Brûlée


Recipe: Gluten-Free Thin Mint Cookies

The cookie monster strikes again!

But this time…for a good reason!

You see, one of the people I run with…a lot…had a birthday.  And he also recently ran yet another marathon, making 11 for this year, I believe.  Well, birthdays and marathons are things to be celebrated.

Originally, I was going to make a Boston Cream Pie to bring to the run group…but I just couldn’t figure out a way to make it dairy-free with the custard inside.  Well, I could…but it wasn’t going to be easy and time was a little tight.  So, I changed my mind at the very last minute, while standing in my kitchen, and instead threw together a version of the Girl Scout favorite (which I haven’t been able to indulge in since my diagnosis three years ago!).  Guess what?  They were a hit.

The recipe came together with a little help from Gluten-Free On A Shoestring.  So, check out the recipe and give it a go.  They brought back so many happy memories and made a lot of people happy that night.

Recipe: Gluten-Free Thin Mint Cookies

Gluten-Free Thin Mint Cookies

Servings: 30 larger cookies (I made 65 small cookies)
Time: Prep 15 minutes; Bake 7 minutes

Ingredients:

COOKIES

  • 5 tablespoons unsalted butter (I used Earth Balance)
  • 4 ounces semi-sweet chocolate, chopped (I used Enjoy Life morsels)
  • ¼ teaspoon pure vanilla extract
  • ½ teaspoon pure peppermint extract
  • ¾ cup high-quality all-purpose gluten-free flour (I used Better Batter)
  • ¼ teaspoon xanthan gum (omit if your blend already contains it)
  • ½ cup unsweetened natural cocoa powder
  • ¼ teaspoon baking soda
  • ½ teaspoon kosher salt

GLAZE

  • ½ pound dark chocolate, chopped
  • pure peppermint extract, to taste

Directions:

Preheat your oven to 300° F.  Line rimmed baking sheets with unbleached parchment paper, and set them aside.

In a medium-size microwave-safe bowl, place the butter and all of the semi-sweet chocolate except for 3 to 4 1-1/2-inch-size chunks.

Microwave at 70% power for 45 seconds at a time, stirring in between, until melted and smooth.  Add the reserved chunks of chocolate, and stir until the chocolate has begun to thicken a bit and the chunks have melted.

Add the vanilla extract and peppermint extract, and stir to combine.  Set the chocolate aside.

In a large bowl, place the flour, xanthan gum (if using), cocoa powder, baking soda, salt and sugar, and whisk to combine well.  Add the chocolate mixture, and mix until the dough comes together and is well-integrated.  Press the cookie dough into a disk.

Place the dough between two sheets of unbleached parchment paper, and roll it out until it is about 1/4 inch thick (any thinner and the cookies are more likely to burn in the oven, and they will crack when you try to coat them in chocolate).  Cut out rounds that are about 1-1/2 inches in diameter, and place them, 1 inch apart, on the prepared baking sheets.

Place the baking sheet in the center of the preheated oven and bake, rotating once, for 7 minutes.

Remove from the oven, and allow the cookies to cool completely on the baking sheet.

Once the cookies are cool, make the glaze.

Place all of the dark chocolate except for 3 to 4 1-1/2 inch-size chunks in a medium-size, microwave-safe bowl.

Microwave at 70% power for 45 seconds at a time, stirring in between, until melted and smooth.  Add the reserved chunks of chocolate and the peppermint extract, and stir until the chocolate has begun to thicken a bit and the chunks have melted.

Place the cookies, one at a time, in the glaze.  Press down on the cookie with the tines of a fork, then flip it gently in the chocolate.  Pull the cookie out of the chocolate by slipping the fork under it and bobbing the cookie on the surface of the chocolate a few times before pulling it along the edge of the bowl and carefully placing it on a clean sheet of parchment paper.  Allow the chocolate to set at room temperature.

Serve and enjoy!

~*~*~

While it has been ages since I have last been able to eat a Thin Mint Cookie (or 12 in one sitting)…these reminded me SO much of the cookies I grew up devouring.  I loved them enough to have as much trouble stopping myself from eating them as I did the real things.  So, from this one-time Girl Scout to all of you Celiacs and gluten-intolerant people out there…don’t give up hope.  You can now make your own Girl Scout favorite in the comfort of your own kitchen.

They’re probably less expensive too.  *WINK*

Recipe: Paleo Snickerdoodle Cookies

I love Snickerdoodles.  Seriously.  I loved it in the winter time when my mom would bake all the holiday cookies, bars, fudge, etc…and we’d have a literal smorgasbord to choose from each night for dessert.  One treat.  So…make your decision wisely.

Never failed.  I wanted the Snickerdoodles.

It has been years since I have had my mom’s homemade Snickerdoodles.  And she will probably never make them again, sadly, since she has since had to go gluten-free as well and has switched over to eating paleo.

Lo and behold…I came up with a solution.  You see, one of my running buddies is also on the paleo diet.  And I love, love, love to bake goodies for my run group.  I’ve been craving Snickerdoodles for awhile now, so today I decided that’s what I would make for my fellow runners.  But, I wanted everyone to be able to enjoy them, so I did a little searching on the Internet.

And with a little guidance from various blogs, especially The Urban Poser, I was able to make Snickerdoodles tonight that are paleo, vegan, egg/grain/dairy-free.  Gluten-Free Snickerdoodles.

They aren’t my mom’s specialty…but they are good.  So, go ahead and give this recipe a spin.

Recipe: Paleo Snickerdoodle Cookies

Paleo Snickerdoodle Cookies

Servings: 15-16
Time: Prep 10 minutes; bake 10 minutes

Ingredients:

  • 2 cups blanched, fine ground almond flour
  • 1/4 teaspoon salt
  • 1/4 teaspoon baking soda
  • 4 tablespoons coconut oil, softened or liquid (5 for a softer cookie)1/4 cup mild honey (like clover) or vegan alternative (such as agave)
  • 1 tablespoon gluten-free vanilla extract

Cinnamon coating:

  • 1 tablespoon raw coconut crystals (I used Coconut Secret)
  • 1 tablespoon ground cinnamon
Directions:
 
Preheat the over to 350 degrees F and line and grease or line a baking sheet with parchment paper.In a medium sized bowl, combine the dry ingredients; mix together well.  (When measuring almond flour, use the dip & sweep method for best results.  Dip the measuring cup into the loose almond flour and drag the flat edge of a knife over the top.  Pouring the flour directly into the measuring cup can result in too much or even too little almond flour in the recipe).In a separate bowl, mix together the oil, honey and vanilla.  Add the wet ingredients to the almond flour mixture and stir until combined.

In another small bowl, combine the coconut sugar crystals and the ground cinnamon in a small bowl.

Using a rounded tablespoon, scoop out the dough, then gently form into a ball.  Roll the dough in the cinnamon mixture.

Place the balls of cookie dough on a parchment lined baking sheet, about 3 inches apart.

Using a mason jar or your hands, slightly flatten each cookie.

Bake the cookies for 8-9 minutes.  Leave the cookies on the cookie sheet while cooling.  They may seem under-baked at first, but they will firm up to just the right texture as they cool.

Dig in and enjoy!

~*~*~

So, they aren’t my mom’s Snickerdoodle cookies…but these do come out sweet, thin, crackled and chewy.  Not cake-y, which so many Snickerdoodles tend to be when sold in stores.  These remind me of how my mom’s used to cook up.  They don’t taste the same…but they are totally Snickerdoodles in their own right.

And yeah…they are amazingly good!

Recipe: Apple Cider Poached Pears

I’ve been wanting to poach pears for a long time.  I see those celebrity and television chefs do it all the time.  Then they serve it up all pretty with ice cream or this rich sauce.

I did neither of those last things.

But, thanks to having a bunch of pears, compliments of my CSA bin, and no more cookies left in my apartment…I figured…why not give poached pears a shot.  Usually done in a dessert wine…I opted for something I had in my fridge…apple cider.

It was fantastic!  My roomie is still raving.  And that means a lot since she’s not a big fan of pears.  But this was a simple, light, and quite nutritious dessert tonight.  Easy to make as well.  Here’s what I did…

Recipe: Apple Cider Poached Pears

Apple Cider Poached Pears

Servings: 2
Time: Prep 10 minutes; Cook 10 minutes

Ingredients:

2 cups apple cider (NOT apple juice)
1 cinnamon stick
1/2 tsp vanilla
2 pears, pealed, halved, cored
1 tsp arrowroot powder or cornstarch

Directions:

In a small saucepan, add the 2 cups of apple cider, vanilla, and cinnamon stick.  Bring to a simmer.

Add the pears, flat side down, in the saucepan.

Simmer for about 10 minutes, until they are fork tender.  Do not leave them in too long or they will get mushy.

Remove the pears from the saucepan.  Using the cider in the pan, add the arrowroot or cornstarch and bring to a boil to thicken.

Place pears in a bowl with a scoop of vanilla Greek yogurt (or ice cream), then top with the apple cider sauce.  Sprinkle with granola or nuts for a little texture and serve.

Product Review: EatPastry Gluten-Free Sugar Momma Cookie Dough

EatPastry Gluten-Free Sugar Momma Cookie Dough

Product: EatPastry Gluten-Free Sugar Momma Cookie Dough – $6.49+

COOKIE!

We all know…I am one big cookie monster.  I mean…give me a chance to try a gluten-free cookie and I’m on it like Cookie Monster.  OM NOM NOM!!  Seriously…cookies are one of my biggest weaknesses when it comes to treats.  I love them.  I always have.  I grew up with my mom constantly baking cookies, from scratch, on snow days, for special occasions, and especially during the holidays.

While my favorite will always be her Snickerdoodles (which I intend to attempt to make gluten-free this year…so wish me luck), I also love it when she would make sugar cookies.  Not only did we get to help cut them into the fun shapes, but we got to help decorate them too.  Sugar cookies are so simple…yet have always been one of my favorite cookies to reach for and devour…er…I mean eat.

Why?

Simple flavors.  Simple ingredients.  Pure awesomeness.

They are basically sugar, butter, and flour, but damn…they are awesome.  I’d be hard-pressed to find someone who didn’t enjoy a sugar cookie.  And if they said anything of the sort, I’d deem them a liar…just like everyone I know who says they hate chocolate.

LIES!  ALL LIES!!

*cough*

Anyway…here I was…before the release of Pillsbury Gluten-Free Cookie Dough (which is refrigerated)…walking around my local natural foods store during one of their fun gluten-free events…when…the roommate says I can pick out some new products to try.  WOOHOO!  I love it when she expands my grocery budget as a treat…sometimes for no good reason.  She says she benefits from it too…so it’s win/win!  I never go overboard…and generally pick a few items that I’ve not seen anywhere else.  And one of those items this last time was a gluten-free sugar cookie dough in the refrigerator section.  It’s EatPastry Gluten-Free Sugar Momma Cookie Dough.

EatPastry is a line of vegan and some vegan and gluten-free cookie doughs.  The company was founded, according to the website, by confusion, curiosity, and dedication.  The company experimented until they came up with what they thought to be the best tasting, best “feeling” cookie dough.  They use only high quality, all natural ingredients.  And it has been a priority from the inception of EatPastry to maintain 100% vegan ingredients, meaning none have come into contact with any animal ingredients.  Their cookie dough also uses only organic and fair trade sugar (evaporated cane juice) and select organic ingredients.  They even make their own peanut butter for their (not gluten-free) vegan Peanut Butter Chocolate Chip Cookie Dough.  EatPastry’s doughs contain no eggs, no dairy, no preservatives, no processing, no fillers, no GMOs and no funny business.  None.  Good cookie dough is serious business, folks!  They even state that all flavors were created with various moods in mind.

Mood food.  Love it.

Well…I am just now getting around to using this dough because…well…I ran out of desserts in my freezer and pantry.  HA!  I wanted to try this before but I was working against a deadline on expiration dates.  So…this little container was just hanging out in my fridge…waiting patiently.

It’s time to shine came yesterday!  I just polished off a delicious, fresh dinner and knew I needed something sweet.  I always have dessert.  Always.  So…I pulled this out of the fridge, preheated my oven to 350 degrees and laid out a strip of parchment paper across a baking sheet.  I scooped up two tablespoons of dough, flattened each spoonful out, and then threw the pan in the oven.

How easy is that?  About 12 minutes later…out they came.  Delicious, individual cookies that were fresh from the oven.  That is a total dessert win.

And…oh…my goodness.  The EatPastry Gluten-Free Sugar Momma Cookie Dough is sassy, sweet and seductive.  No…really…that’s what the Web site says.  But I couldn’t agree more.  First of all, with the scoopable refrigerator dough, you can make one cookie at a time if that’s what you wanted.  You don’t have to make an entire batch right away…which you may or may not polish off before they start to get hard.  This is easy and convenient.  Seriously.  They have this great texture to them.  They are soft on the middle, but golden on the edges.  And fresh from the oven…that is unbeatable.  The flavors are subtle…but fantastic.  There is that rich, delicate undertone of vanilla in each bite.  And these cookies aren’t gritty with sugar.  Not one bit.  They are so amazing that it’s probably a good thing I can cook them up personally.  Or I might eat the entire container.

Let’s talk ingredients and nutrition now…because I like to know what I’m getting myself into.

The EatPastry Gluten-Free Sugar Momma Cookie Dough is made of from a gluten-free flour blend (garbanzo, brown rice), Earth Balance, filtered water, pure salt, natural flavor (derived from corn with no MSG, no alcohol, no gluten) sunflower lecithin, lactic acid (derived from sugar beets), organic evaporated cane juice, pure apple sauce, pure vanilla extract, nutmeg, baking soda, and sea salt.  Not too bad for a cookie right?

You’ll fee the same way about the nutrition.  One serving is 1 tablespoon, which spoons you up only 60 calories and 2.5 grams of fat.  This serving also has only 25 mg sodium and 5 grams of sugar.  Yes…5 grams of sugar in a SUGAR COOKIE!!!  You don’t get any fiber of protein from these cookies, but they are free of trans fats as well as cholesterol.

And they are fantastic.  Really sexy, smooth, sinful gluten-free cookies of awesomeness.  Without the guilt.  Because, let’s face it…you don’t find 60 calorie cookies just anywhere, right?

I hope to try the other two vegan and gluten-free varieties offered by EatPastry…the Chocolate Chip and the Snickerdoodle (SQUEE!).

If you can find EatPastry refrigerated vegan and gluten-free cookie dough in your grocery store or natural food store…get it…and try it.  You can scoop what you like and keep the rest for later.  I’m loving it.

Cookie made from EatPastry's Gluten-Free Sugar Momma Cookie Dough
Cookie made from EatPastry’s Gluten-Free Sugar Momma Cookie Dough

Restaurant Review: Da Luciano – Pasta, Pizza & Catering, River Grove, Illinois

Da Luciano - Pizza, Pasta & Catering, River Grove, Illinois
Da Luciano – Pizza, Pasta & Catering, River Grove, Illinois

Restaurant: Da Luciano – Pasta, Pizza& Catering, River Grove, Illinois

This…was an important dining choice to make when I was coming to Chicago, Illinois.  I mean…for real.  This was a big…heap…deal.

Why?

Because I was in town for the Chicago Marathon.  I needed a safe meal…one that would guarantee that I would have no stomach issues…and…being that I was running on Sunday morning…this needed to include gluten-free pizza.  It HAD to be gluten-free pizza.  That is my stipulation when it comes to the night before a big run.  If it’s a half marathon or marathon…it has to be gluten-free, vegetarian pizza.  It just works for me.  Some down pasta…not this girl.  This girl indulges in a few epic slices of (hopefully) amazing pizza.  Gluten-free pizza isn’t tasteless cardboard, you know.  When done right…it is a culinary work of art.

And I’ve eaten good and bad gluten-free pizzas…as they are well documented in this blog.

But there was something special about Da Luciano, which is one of the reasons, despite meaning a car ride outside of downtown Chicago, that I felt I needed to eat there the night before the Chicago Marathon.

What was so special about this place?

They understand Celiac Disease.  They totally get me.  They totally know how to handle and prepare my food so that I won’t get sick from eating there.  And how do I know this?  Well, as stated on their Web site, the owners, Luciano and Rosalia, were first introduced to the gluten-free world when four of of their seven children were diagnosed with Celiac Disease.  Being an Italian family, bread and pasta were daily staples in their diets.  Rosalia set out on a mission to find quality gluten-free bread and pasta for her children, but found that her options were limited.  So, she began to experiment with her own recipes, succeeding in making gluten-free bread, pasta, pizza, and desserts that satisfied all of her children.  When Da Luciano Pizza, Pasta & Catering opened the following year, they decided to offer their customers a gluten-free menu featuring Rosalia’s amazing recipes.  The response from the gluten-free community was huge.

So…as you can see…this place won me over right from the start.  And, upon arriving at the restaurant, we were immediately asked if anyone needed a gluten-free menu.  I didn’t have to request one.  I didn’t have to ask if one even existed.  The hostess just flat-out asked.  And so, when we were seated, I was given their rather extensive (no one sheet of paper here…but a true menu, my friends!) gluten-free menu to peruse.

So many of the dishes sounded awesome.  And part of me wanted to do the gluten-free bruschetta for an appetizer…but we had all decided that dessert was happening…so the appetizer went to the wayside…this time.  The gluten-free menu at Da Luciano is about as big as the regular menu.  So many of the dishes are offered as a gluten-free option.  From the dishes with meat (as I’m a vegetarian, I didn’t look at the extensive seafood, chicken, and veal offerings), but there were many amazing sounding pasta dishes.  BUT…I never change up the night before a race…and it was one of their individual gluten-free pizzas for me.

When our waitress returned to the table to take our orders…we were all settled on what we wanted.  Heather is not big on carbs, so she went with one of the chicken entrees.  Her choice – Chicken Scaloppine ($14.95), which was thinly sliced chicken served in what looked like a tomato and mushroom sauce.  Cathy opted for the Rigatoni Porcini ($11.95), which was rigatoni pasta cooked with porcini mushrooms in a light cream sauce.  Jenn went with the Gnocchi al Pesto ($11.95), which was delicious looking gnocchi served in a creamy (probably) basil pesto sauce.  It looked fantastic.

Da Luciano's Gluten-Free Pizza with Mushrooms, Onions, and Roasted Red Peppers
Da Luciano’s Gluten-Free Pizza with Mushrooms, Onions, and Roasted Red Peppers

But for me…I went with the Gluten-Free Pizza ($8.50) topped off with mushrooms, onion, and roasted red pepper ($0.75 each).  I couldn’t wait to get a taste of this pizza.  And…I wanted to make sure that Heather got a bite as well, because she suffered through the disaster of Pizza Ranch in Minnesota with me…and I wanted her to know good gluten-free pizza was out there.  If we had been in Louisville…I’d take her to Annie May’s Sweet Café and split one of those amazing pizzas with her…but when in Chicago…you find a place that works.

We had a little wait, but soon our food was arriving at the table.  And it all looked and smelled amazing!  I photographed every dish…especially my pizza.  And it was time to dig in.

So…

WINNING!!  Granted, I still like my local bakery’s crust better…but this definitely is one of the best crusts I’ve had on a gluten-free pizza.  Cooked to golden perfection, so it was crispy, without being burnt or overdone.  And it still had that nice doughy texture with it as well.  The sauce was amazing.  The cheese…was more than I would have liked…but…it starts off as a cheese pizza.  The other toppings get added.  The star of the toppings, however, were the roasted red peppers.  OMG…YES!  Packed with flavor.  Mild…but with that right amount of kick to keep the palate interested.  The onions didn’t overpower anything.  And the mushrooms were done to perfection.  Nothing watery.  Nothing disappointing.  And, as I cut off pieces for my friends to try, the rest of it was mine.  All mine.  And yes…I devoured it all.  Every slice.  I might have licked the plate clean.  It was delicious…and I needed to top off the tanks for the marathon the next morning.  This was the key.

And, as I mentioned earlier…dessert was going to happen.  I had 6 options to choose from on the gluten-free dessert menu.  And while they all sounded fantastic, I was down to three choices…the cream puffs, the tiramisu, and the cannoli.  It took a lot of pondering, internal debate, and deliberation with myself to pick between them.  I rarely have so many options for a dessert…so choosing one was not easy.  The cream puffs almost won, but I wasn’t sure how big they were and it came with two on the plate.  The tiramisu was SO tempting.  I haven’t had tiramisu in a long, long time.  I wanted it.  But…ultimately…I settled on the Gluten-Free Cannoli ($4.95).  Both Jenn and Cathy opted for the regular Cannoli ($3.95) and Heather went with the regular Tiramisu ($3.95).

I was so excited when our desserts emerged from the kitchen and at our table.  My cannoli definitely looked different from Cathy & Jenn’s…but it was the color and thickness of the shell.  That was the only difference.  Heather’s tiramisu looked absolutely amazing.  Next time…(and there will be a next time!)…I’ll get the gluten-free tiramisu.  It looked fluffy and amazing.

So…how was the gluten-free cannoli?  SO SO SO good.  SO GOOD!!  MMMMMMMM….GOOD!  OMG…GOOOOOOOOOD!  The cannoli cream was amazing.  Sweet, but not overly sweet.  Creamy.  Amazing.  Delicious.  It had bits of chocolate chips and fruit.  There was a candied orange peel on each end.  And the shell…sugary-sweet goodness.  The crunch that it had with each bite was satisfying.  And it all just blended together.  It worked.  And I devoured my dessert happily.

With that…I went and purchased a few bags of their gluten-free pasta, available at the register, and we paid our bill.  As we were leaving, I overheard the restaurant manager explaining to a customer that the way the manage no cross-contamination is that all the gluten-free dishes are prepared in the kitchen upstairs at the restaurant…and the regular menu items are all done in the kitchen downstairs.  Brilliant.  And so safe for Celiacs.  I loved learning that about Da Luciano’s.  It’s nice to know I had nothing to worry about when eating there…which is good because the last thing you want before running 26.2 miles is tummy troubles.

We had to head back downtown…after dropping Heather off at a train station to head back to her hotel.  We had plans for when she would arrive at The Hilton Chicago to meet up with us before the the marathon the following morning.  We were all satisfied and happy with the meal we ate at Da Luciano.  I will be back the next time I find myself in Chicago…which I hope is soon.

Speaking of which…the gluten-free pizza worked its magic as always…I had a fantastic marathon.  Thank you, Da Luciano…for giving me my pre-race carbs in my favorite form.  I can’t wait to come back and try more of your amazing menu.

So, if you find yourself in the Chicago area, make a point to head to River Grove and eat at the fantastic Da Luciano – Pasta, Pizza & Catering.  It’s worth the short drive because the food is simply that amazing.

Da Luciano's Gluten-Free Cannoli
Da Luciano’s Gluten-Free Cannoli

Recipe: Gluten-Free and Vegan Pumpkin Spice Ice Cream

I love pumpkin.

I’ve said it countless times before…because, after all, this is pumpkin season.  So…I’ll say it again.

I.  LOVE.  PUMPKIN.

Get it?  Got it?  Good!

Well, this past weekend I met up with some great friends at the local ice cream shop.  There, I indulged in a great ice cream called “Pumpkin Spice and Everything Nice.”  Why?  Because it’s pumpkin time and it’s one of the seasonal rotating flavors.  It only comes around in the fall, my friends…so I take advantage…believe me!  Of course, as I am sitting there eating it, I’m wondering if I could make something like this…but using the coconut milk and the cans of pumpkin I had in my pantry.

After a little researching, it turned out I could.  And with a little guidance from PBS and Kitchen Explorers, I was able to make my own pumpkin spice ice cream…completely vegan…gluten-free…packed with flavor.  I was one happy girl when I took this out of the ice cream maker.

Recipe: Gluten-Free and Vegan Pumpkin Spice Ice Cream

Gluten-Free and Vegan Pumpkin Spice Ice Cream

 Servings: 8
Time: Prep 10 minutes; Freeze 30 minutes

Ingredients:

  • One 13.5 ounces can coconut milk (do not use skim or low-fat) (I used the 11 ounce carton of So Delicious Culinary Coconut Milk)
  • 1-1/2 cups unsweetened canned pumpkin puree (I used Libby’s)
  • 1 cup sugar
  • 1/2 cup packed dark brown sugar
  • 2 teaspoons vanilla extract
  • 1-1/2 teaspoon pumpkin pie spice
  • 1/4 teaspoon cinnamon
  • 1/4 teaspoon ginger powder
  • 1/4 teaspoon cloves
  • 1/4 teaspoon salt

Directions:

Whisk all the ingredients in a large bowl until well mixed and smooth.

Transfer the mixture to an ice cream maker and freeze according to the manufacturer’s directions.

Transfer the ice cream to a freezer-safe container, cover the ice cream with plastic wrap, cover with the lid, then freeze until firm.

~*~*~

Yes…it truly is that easy.  And the flavor.  OMG…the flavor.  This is now going to be incorporated into my Thanksgiving Day menu.  I’m hosting this year…and I got inspired with this ice cream to do a dessert for the occasion.  No pumpkin pie at my house.  I hate pumpkin pie with a passion.  But this…this will blow away the pie competition anyway.  The flavor of this ice cream is like eating a chilled pumpkin pie…except that it tastes good.  It’s hard to stick to just the one serving, but if you do…you’ll have 8 delicious 1/2 cup servings of this amazing ice cream.

It’s my favorite one I have made so far.  And now I just want to keep making it to keep it stocked in my freezer.  You will too.  Trust me.

Product Review: Katz Gluten Free Vanilla Rugelech

Katz Gluten Free Vanilla Rugelech

Product: Katz Gluten Free Vanilla Rugelech – $5.49

It is because of Katz Gluten Free that I have been introduced to the awesomeness of rugelech.  I had never heard of rugelech before, let alone ever tried it…until I was received some from Katz Gluten Free.  My life…my foodie world…changed.

For those of you who may be like me and have been in the dark as to what rugelech is…well…read on.

Rugelech is a traditional Jewish pastry that is eaten year-round, but particularly on holidays.  It is made of rolled up dough and a sweet, fruity filling.

These little rolled cookies are life changing.  Honestly.  I had the chocolate ones first as part of the sample pack I ordered from Katz when I first went gluten-free.  The cinnamon flavor I ordered on my own…and they were like eating miniature cinnamon rolls.  My personal favorite.  During a special, I ordered enough product to get a free pack of rugelech from Katz Gluten Free.  I requested the vanilla because it was the only one I had yet to try.

Wise choice.

Katz Gluten Free has yet to really let me down on a product.  I trust them and their food.  And the Gluten-Free Vanilla Rugelech is just as amazing as I thought it would be.  These moutwatering treats are perfect as a palate cleanser after dinner.  But…they are really good anytime.  In fact, I like to give mine a little 15 second warm in the microwave so they taste like they are fresh out of the oven.  The Vanilla Rugelech taste like a cinnamon roll…if it were made with vanilla instead.  Amazing flavor.  The sweetness tingles across the tongue with each bite.  It’s just…so delicious.  I savor mine, nu-spiriling them in little pieces and nipping them so that the time I am enjoying them lasts a little longer.  You can’t blame me.  Once you try them, you’ll want the moment to last as well.  These are fantastic.  And I am going to be sure to stock up on more of them…very soon!

When it comes to ingredients, I know what everything is that Katz Gluten Free uses in their products.  For the Vanilla Rugelech…it’s a mix of their gluten-free flour (potato, tapioca, white rice, brown rice, sorghum, corn), sugar, canola oil, eggs, orange juice, water, dry yeast, baking powder, xanthan gum, salt, and pure vanilla.

Looking at it nutritionally speaking…these are cookies…little pastries of delicious gluten-free joy.  Treat them as a treat.  But do enjoy them.  Do try them.  A serving of the Gluten Free Vanilla Rugelech is 1 cookie.  This one cookie provides you with 90 calories and 3.5 grams of fat.  One cookie also serves up 30 mg sodium and 6 grams of sugar.  The Vanilla Rugelech also will provide you with 1 gram of fiber and 1 gram of protein.  It’s not awful…not at all.  I usually eat two of them though…so whoops!

Ah well…the goodness and the great flavor makes the splurge worth it.  These are delicious and amazing and I would buy them again in a heartbeat.  Any of the three flavors that Katz offers, actually.  I’m a huge fan. now, of rugelech.  And you will understand why when you give these a try to.  You can order them from Katz off their Web site, or check with your local natural foods stores.  Many carry a few of Katz products, and I most often see their rugelech.

Enjoy!!

Recipe: Gluten-Free and Vegan Cookies & Cream Ice Cream

I love ice cream.  The problem is…ice cream doesn’t always love me back.  And, more so, some of my favorite flavors from the “pre-gluten-free” days, I am no longer able to consume.  Totally bums me out on occasion.

But then…I haul out the ice cream maker and do something about it.  In this case…I make my own gluten-free and vegan ice cream.  This is actually very simple and uses basic ingredients.  Nothing too outlandish or crazy.  No dairy either.  The base is coconut milk.  Seriously.  Full fat coconut milk.  So good.

I used Glutino sandwich cookies for the “cookie” portion of this recipe and sweetened it with coconut palm sugar.  The recipe is super simple…and super good.  As my friend Greg said…”This is rich…and delicious!”

YAY!

So, the recipe is below, adapted from Food Babe so that it fit my dietary needs.

Recipe: Gluten-Free and Vegan Cookies & Cream Ice Cream


Gluten-Free and Vegan Cookies & Cream Ice Cream


Ingredients:

Base:

  • 1 can of full fat coconut milk (13.5 ounces)
  • 1 tbsp arrowroot powder (optional thickener)
  • 3frozen bananas or ½ cup coconut palm sugar (I used the coconut palm sugar)
  • pinch of sea salt

For Cookies & Cream Flavor:

  • 1 tbsp vanilla extract
  • 10 Glutino Chocolate Vanilla Creme Sandwich Cookies broken into pieces (or cookie of your choice)

Instructions:

Combine base ingredients in blender and blend until smooth.

Add vanilla into blender and blend again.

Pour mixture into ice cream machine and turn on.

Mix for at least 20 minutes or until ice cream is formed.

Stir in cookies.

Serve.

Store in an airtight container in the freezer.

~*~*~

Hello delicious ice cream that won’t upset my stomach.  Where have you been all my life?  I still have some Glutino cookies and just bought more coconut milk.  You know what’s going back in my freezer very soon?  Yep.  Because this recipe is SO easy to make and yes…it really does make a delicious, rich ice cream.  You don’t have to be gluten-free or a vegan to enjoy this.

Make some for yourself.  I promise…the real ingredients will change the way you think about ice cream.

Besides…I got to have cookies and cream ice cream again.  Pardon me while I sit down with a spoon and indulge a little…or a lot.

Going local for a “Sweet” and a “Savory” birthday

September 19th.

It’s an important day.  And not just because it’s International Talk Like A Pirate Day.

It’s important…because it’s my birthday.

And this year I was turning the big double 3.  Yes.  I don’t mind my birthday or getting older.  It’s one of my favorite days…even though most of the time I do nothing really to commemorate it.  But this year…I decided to enjoy the delicious offerings of two of my favorite, local, gluten-free businesses, both of whom went above and beyond to make the occasion more than special.

It all started on the day before my birthday when my roommate and I took a longer lunch from the office and headed down to Frankfort Avenue in Louisville, Kentucky to pick up the birthday cake we ordered from Annie May’s Sweet Café.  Now…by now most of you know that my local running store nicknamed me Wonder Woman last year.  It’s stuck.  And I mean…stuck!  I get called Wonder Woman more than I care to admit.  It’s flattering.  I love it.  Wouldn’t change it for the world.

Well, back when Annie May’s Sweet Café started showing off some of their custom cakes they were making, I told them they were definitely doing a special cake for my birthday this year.  They replied on their Facebook page…”How about a Wonder Woman cake?” (See…my reputation precedes me).  I was totally all about it.  They actually made a simple birthday cake for me last year too (strawberry cake with a vegan chocolate ganache), which is how I found out about them…and how they won me over in the first place (that and the apple cider donuts we bought when we picked up the cake…just sayin’.).  The cake was amazing.  So, naturally, as it is my belief that no matter how much you love to cook and bake…you should never have to make your own birthday cake…we hit them up again this year.  And, per their suggestion via their Facebook page months and months ago…I thought…I think I should have a Wonder Woman cake.

As we are in Annie May’s Sweet Café every Saturday morning if we are in town for their delicious breakfast offerings…that Saturday we went ahead and placed the cake order (and a soft pretzel order for Soft Pretzel Wednesday) to pick up on Wednesday around lunch time.  My roommate asked what kind of cake I wanted.  I’m not big on cake…and I like simple.  So…this year I went with a vegan vanilla cake with vegan vanilla icing.  And yes…WONDER WOMAN!

On Wednesday, when we showed up to pick it up, I was blown away.  Kenna does the cake decorating and she did fantastic.  I made sure I told Annie May that whenever possible (and I told Kenna when I saw her the following Saturday morning!).  Seriously…I couldn’t have been happier with the way it turned out.  The Wonder Woman logo was PERFECTION!! I mean, Kenna nailed it!!  And the cake…SO delicious.  The flavors were vibrant.  The icing was sweet and meshed well with the vegan vanilla cake layers.  Four layers…of cake-y goodness.  And this from a girl who isn’t big on frosting or cake.  How about that?  I was SO happy with this cake.  It was a 6-inch round cake that we got 12 good-sized portions from.  I was in sugar-rush heaven.  And happy to devour it all.  Well, I had some help from Cathy (the roomie), Harry, and Laura.

But…here is the cake in all it’s gluten-free and vegan wonder (woman):

Wonder Woman Birthday Cake from Annie May's Sweet Cafe (vegan vanilla w/ vegan vanilla icing)
Wonder Woman Birthday Cake from Annie May’s Sweet Cafe (vegan vanilla w/ vegan vanilla icing)

Honestly…I have yet to have anything I didn’t like from Annie May’s Sweet Café.  So…even if you don’t have food allergies…get over there.  My friend Greg (not food allergic at all) would definitely direct you to their gluten-free Double Fudge Brownies.  Me?  I say…their allergen-free Chocolate Chip Cookies.  Or…honestly…EVERYTHING!!  Support local businesses!!  I will continue to support this one.

HUGE thanks going out to Annie May, Kenna, and the rest of the staff who continue to show the world (or at least the Louisville area) just how good and delicious gluten-free can be!!

But…the birthday celebrations didn’t stop with a cake.  Nope.  Not for 33.  Not ever.

Very randomly, about two weeks out from my birthday, I went over to the Facebook page of my favorite local (and gluten-free) food truck, Sweet ‘N’ Savory, and commented that I would love them forever if around my birthday, at one of their outings, if they could offer a Crepe Suzette, as it has always been one of my favorite types of crepes.  I was told that they would be happy to cater a private event for me, featuring a 3-course meal, for only $20/person.  I needed to make sure that I would have a decent enough crowd for them, and started asking my closest friends if anyone was interested.  Most everyone I knew was free on the Sunday, September 22, and said they would be happy to come and celebrate with good eats.  I was thrilled.  And I went ahead and set it up with Richard and Ashley, the fantastic owners of the food truck.

They found a location, at Louisville’s The Beer Store in NULU.  This turned out to be a perfect setting as they had a patio for seating and the side door was opened so we could trek out to the food truck to place our orders, return our plates, and all that good stuff.  Guests could also imbibe in beers of any kind (SO MANY) or sodas or water…or whatever else they could find inside.  It was a hit.  I ended up having 10 of the 12 guests show up to the shindig, so that wasn’t bad at all.  Very pleased.  Although totally missed the ones who were unable to make it.

It was a very diverse crowd, but they all came hungry and they all socialized and blended well.  YAY!!

So, what did Sweet ‘N’ Savory cook up for my special day?  An amazing menu that every guest raved about and devoured.  No one left hungry.  In fact, we were all completely stuffed.  But it was a good kind of stuffed.  Trust me.

The menu, as I mentioned, was 3 courses: appetizer, entree, dessert (like Chopped…but without the surprise basket of ingredients!).

For the appetizer round, Sweet ‘N’ Savory prepared two of my favorite gluten-free vegetarian crepes: Caprese and Veggie Caponata.  You could either get one large one of your choice, or one of each in a mini-crepe form.  I totally forgot to take a picture of mine, but I went with one of each in the mini-form.  What a way to start out.  Everyone raved about them…especially the Veggie Caponata.  That seemed to be the crowd favorite (and mine as well!!).  It was the perfect way to start off the feast that day.  We were given plates and a ticket and when we were done with the appetizer, all we needed to do was walk the plates and ticket back out to the truck, hand them over, and they would get to work on the entree.

The entree…is super special.  Awhile back, Sweet ‘N’ Savory took part in a food truck event called Cluster Trucked.  Each truck served up food that wasn’t their normal fare.  For the event, Sweet ‘N’ Savory did gluten-free ravioli.  And I fell in love with them all over again.  For my event, they were dishing up two different varieties of ravoili.  Once again, you could either get a full serving of one version, or split the difference and try both.  The options: Butternut Squash, Ricotta, and Sage Ravioli topped with a Brown-Butter Sage Sauce or Four-Cheese Ravioli topped with a Red-Pepper Cream Sauce.  When I was at Cluster Trucked, I had the Four-Cheese with Red Pepper Cream Sauce.  I am in LOVE with that red-pepper cream sauce.  I want to beg for the recipe.  Seriously.  But at my party, I was all about the Butternut Squash, Ricotta and Sage Ravioli with the Brown-Butter Sage Sauce.  They had told me all about this one prior to the event and that was all I wanted.  Observe:

Sweet 'N' Savory's Gluten-Free Butternut Squash, Ricotta and Sage Ravioli with a Brown Butter Sage Sauce
Sweet ‘N’ Savory’s Gluten-Free Butternut Squash, Ricotta and Sage Ravioli with a Brown Butter Sage Sauce

I made a fantastic choice.  The ravioli was so rich and creamy.  The pasta itself was melt-in-your-mouth good.  The sauce…so much flavor.  The filling…it doesn’t get better than butternut squash (a personal favorite) with ricotta and sage.  Honestly.  I fell in love with the way this entire dish just danced across my taste buds.  Savory.  Rich.  Delicious.  I was in food heaven.  I think I might have hoovered this up and licked the plate.  It’s possible.  For real.  For being a gluten-free crepe food truck, they totally rock the ravioli.  That is NO joke!

Following the dinner portion of the meal…naturally is something that hits that sweet tooth.  And, per my request, Sweet ‘N’ Savory offered up a Crepe Suzette.  What is a Crepe Suzette?  It’s a crepe with sugar that has Grand Marnier poured over it, and then is ignited.  Flaming food!  The alcohol in the liqueur evaporates and what emerges is a thick, caramelized sauce.  I first had a Crepe Suzette in Denver, Colorado a couple years back and I fell in love with it.  So it was nice that they took an extra step to provide this for me at my request.  Along with the crepe, they offered some of their famous and delicious gluten-free gelato…either (my personal favorite) Salted Caramel or Vanilla.

They attempted to light the crepes tableside, but the wind wasn’t cooperating.  Points for trying!!  That being said…CREPE SUZETTE FTW!!  There is a reason this is one of my favorite sweet crepes to devour…er…eat.  It’s sweet…it has brilliant flavor to it…and it’s still light.   So it isn’t too much.  I, naturally, paired mine with the Salted Caramel gelato.  Best choice ever!!  It paired so well with the Crepe Suzette.  So, while this is not something that usually graces their menu, I was so glad when they offered this just for my little event.  Heaven was in the form an amazing dessert crepe that day.  Topped off with delicious gelato.  YUM!

Sweet 'N' Savory's Gluten-Free Crepe Suzette
Sweet ‘N’ Savory’s Gluten-Free Crepe Suzette

I am eternally grateful for both Annie May’s Sweet Café and Sweet ‘N’ Savory Food Truck for helping to make my birthday so special this year.  Everything they gave me was awesome.  And no one would have guessed any of it was gluten-free.  Because these places make food that is just that amazing.  No one was disappointed and everyone commented on how good everything was.

Birthday win.  Done with a little local flair.

And check out these beautiful people who came out to celebrate and enjoy good food, good conversation, and good times.  I love them all!

Me & My Gang (from left and looping around to right): Kelsie, Cathy, Harry, Howard, Michael, Judi, Natalie, Me, Justin (Not pictured: Greg (he's taking the photo) and Maureen (who hid from the camera))
Me & My Gang (from left and looping around to right): Kelsie, Cathy, Harry, Harold, Michael, Judi, Natalie, Me, Justin (Not pictured: Greg (he’s taking the photo) and Maureen (who hid from the camera))