Recipe: Gluten-Free Morning Bread Pudding with Salted Caramel

There is one thing that I love to do over at my friend Jenn’s house…and that’s cook.  Especially a breakfast on Sunday.  Saturday we sometimes cook in…sometimes we out.  But Sunday…we normally always make something.  And that was the case this past weekend after we discovered a drool-worthy recipe on Pinterest…hosted on Smitten Kitchen’s blog.  What drew my attention to it was the salted caramel portion of the bread pudding recipe.  It sounded divine.

So…I planned it out with Jenn.  I’d order the gluten-free challah bread if she could get the rest of the necessary ingredients.

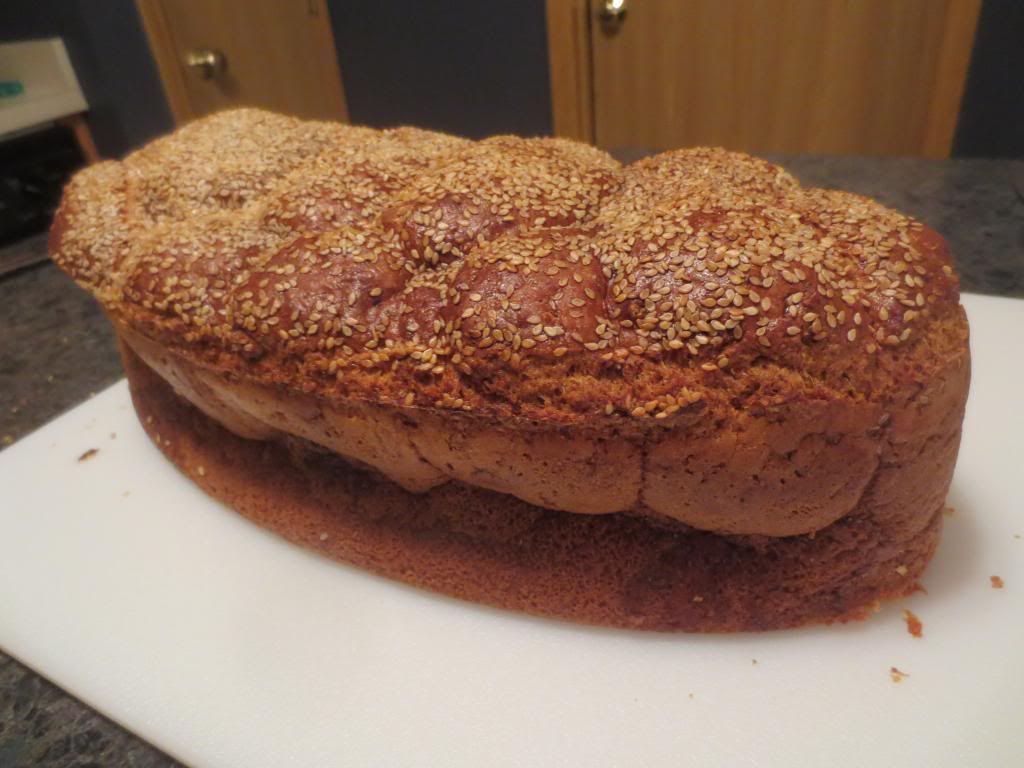
The plan to bake this on Sunday morning was totally on.  And that morning, with my ginormous gluten-free braided challah loaf from Katz Gluten-Free ready to slice…we set to work.  While this recipe does take some time to prep…it’s worth it.  I’d make this again in a heartbeat.  And I will.  I have plenty of extra bread to use up.  So…go ahead…try it.  Don’t be intimidated.  My modifications were made to make it gluten-free.  It didn’t take away from any part of this dish.  The texture and flavors were to DIE for.

One word of warning…that caramel can get pretty hard…so make sure you don’t do what we did and throw it in the freezer.  LOL!!  Lesson learned.

Recipe: Gluten-Free Morning Bread Pudding with Salted Caramel

Gluten-Free Morning Bread Pudding with Salted Caramel

Servings: 8
Time: Prep 30 minutes; Bake 45 minutes

Ingredients:

  • 3/4 cup plus (optional) 2 tablespoons granulated sugar
  • 6 tablespoons unsalted butter
  • 1/4 teaspoon flaky sea salt or just 2 or 3 pinches of a coarse one
  • 10 to 12-ounce loaf brioche or challah bread (cut into slices about 1/2-inch thick and about 3 inches square or round, which sounds really persnickety, but they really do fit better in the pan this way) (I used Katz Gluten Free Large Braided Challah Loaf)
  • 6 large eggs
  • 1 cup mascarpone cheese, divided (1/4 cup for custard; 3/4 cup for serving)
  • 1 cup milk
  • 1/4 teaspoon almond extract


Directions:

First, choose your baking dish.   We opted to use a 9-inch round cake pan, which was a squeeze, but we made it work.  Other options would be 2-quart oval gratin/roasting dish, a 9- to 10-inch cast iron skillet, a 2-quart casserole dish or 1 deep-dish pie pan.

If your dish is safe for the stove top, use this to make the caramel. If not, use a small, heavy saucepan and place 3/4 cup sugar, butter and sea salt and heat over medium heat. The butter will melt and, after 7 to 10 minutes, the sugar will dissolve and begin to brown. Reduce heat to medium-low and stir with a spoon or spatula so that it browns evenly.  The butter does separate from the sugar, but that’s okay.  Just continue to stir them together.  It will all work out in the end even if it splits.  I know…because ours did!

If you’re using a saucepan, your caramel is done when it reaches a copper color.  Pour it over the base of your baking dish.

If you’re making the caramel in your dish (like a cast iron skillet), your caramel should be taken off the stove a step sooner, a shade more pale than copper, something of a medium brown; this is because it will continue cooking and darkening for a minute off the stove.

Regardless of what you choose to bake it in, place the dish in refrigerator and chill until caramel is cold and solid, about 30 minutes. Once chilled, arrange the bread slices. Place the heel of the bread in the center and do what you can to fan the slices around it, overlapping each slightly and knowing with complete confidence that even if your dish doesn’t resemble a blooming rose, nobody will care at all.  Mine looked nothing like a blooming rose…and, honestly, no one cared.

In a large bowl whisk together eggs, remaining 2 tablespoons sugar (if using; I skipped this) and 1/4 mascarpone cheese (save rest for serving), until very smooth.  Add milk and almond extract.  Pour this over the bread, making sure to saturate all of it.  Cover tightly with plastic wrap and chill for about 30 minutes to an hour.  You can let it soak overnight if you have that sort of time or plan that far in advance.  If you bread seems too high in the vessel to get a good soak, you can weight it with a plate in the fridge.

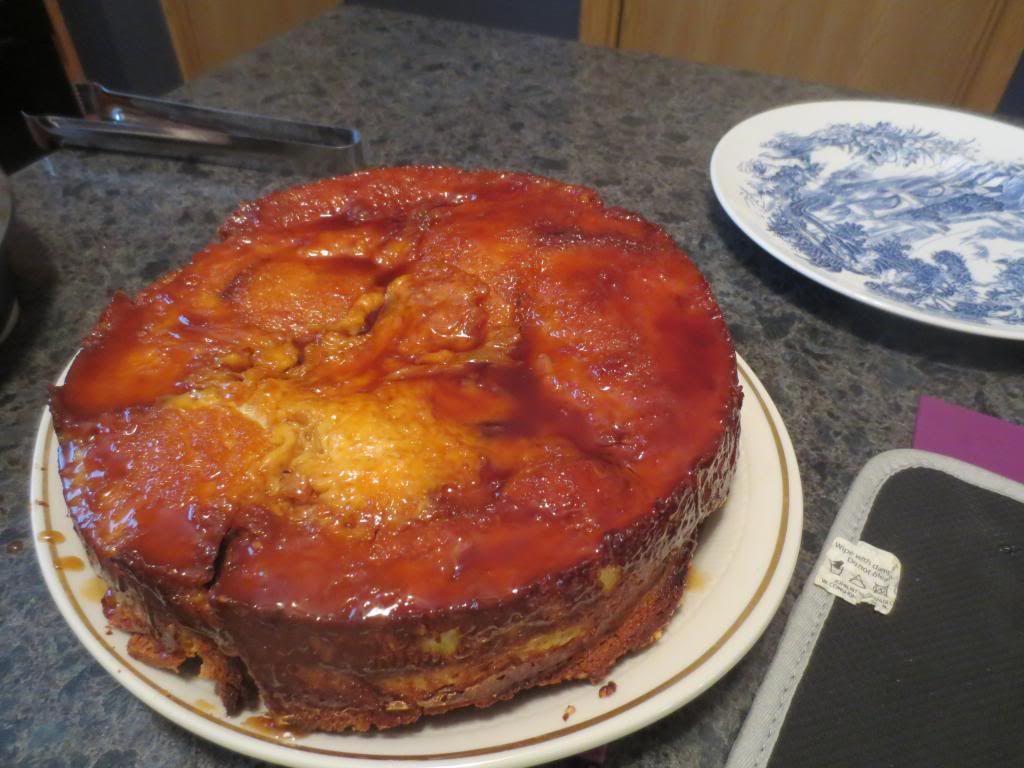
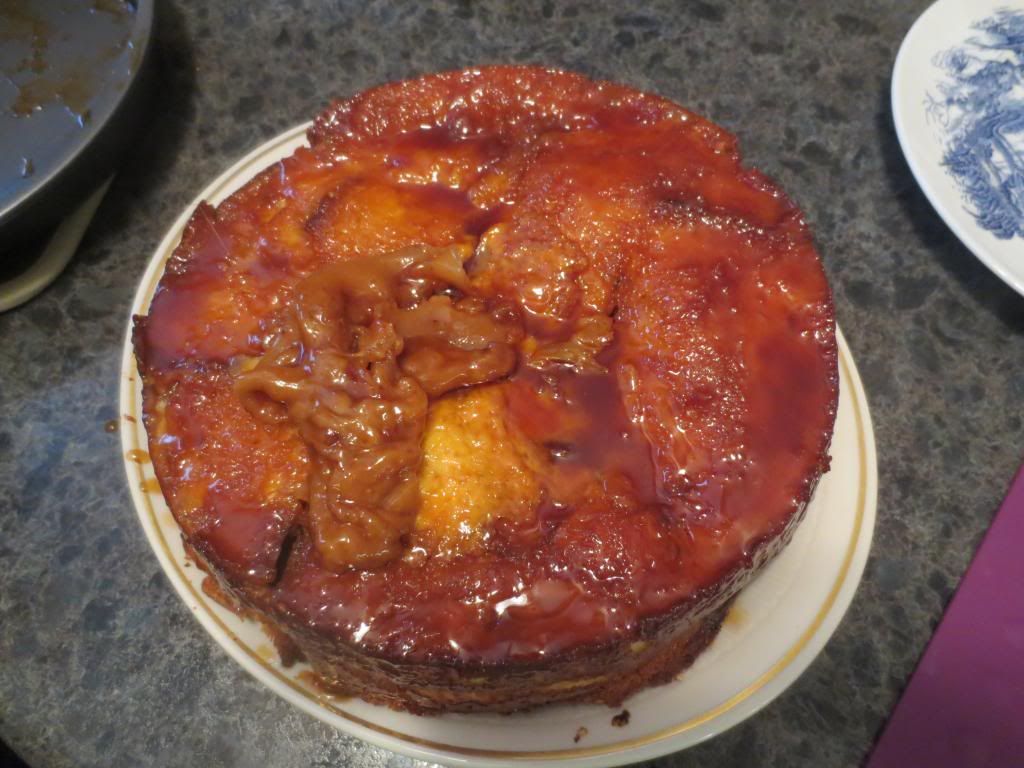
After the allotted time (or in the morning), take your dish from the fridge.  Heat oven to 375°F.  Remove plastic from dish and bake 30 to 35 minutes, until moist but not wet in center. Remove from oven and run a knife around edge of dish, loosening bread from sides. Place a serving plate over top of dish (bottom side up), and, using potholders, hold pudding over sink and flip pudding onto the plate. Lift baking dish off plate; scrape any extra caramel from pie dish over pudding.

Serve, cutting it into wedges at the table and spooning a healthy dollop of mascarpone onto each plate.

A slice of Gluten-Free Morning Bread Pudding with Salted Caramel

~*~*~

While the original recipe called for this to soak overnight, we were busy watching Thor 2…so that didn’t happen.  The fact that we only let it soak for about 30 minutes in the fridge did not, at all, make the dish any less of a delicious treat.  It worked perfectly.  So, don’t feel like you have to make it the night before…unless you have that sort of time.  Do plan ahead though, because this does take some time.  Jenn and I took out 2 of the eggs from the original recipe as we thought 8 eggs was a bit much.  I think we made a good call.  This cooked up to a beautiful perfect meal.  And we all sat and enjoyed it…and kept the leftovers for the next couple of mornings.  SO amazing and delicious!!

Yeah…totally making this one again!

Product Review: Katz Gluten Free Large Braided Challah Loaf

Katz Gluten Free Large Braided Challah Loaf

Product: Katz Gluten Free Large Braided Challah Loaf – $35.00

Let me tell you…I adore products from Katz Gluten Free.  I have been pimping the quality, taste, and everything about their variety of products since I have tried so many of them.  However…in order to make a gluten-free breakfast bread pudding with a friend of mine…I needed some gluten-free challah.  And I knew the only place to get it was from Katz Gluten Free.

I debated for a long moment over whether to go ahead and order the very, very, very pricey Large Braided Challah Loaf…or just skimp on that line of thinking and get either the sliced challah loaf or the rice challah.  I debated.  Price had a lot to do with it.  I mean…holy gluten-free gods…$35 was a lot to spend on a loaf of bread.  But…I figured I wanted to go for quality of what we were making and opted to go ahead and place an order for Katz Gluten Free Large Braided Challah Loaf.  I just hoped it was worth the $35 I was spending on it.  Oy!

A few days later, the loaf arrived via UPS…and I was really excited to take a look at what a $35 loaf of bread looked like.

Little did I know that when the loaf is called a large braided loaf…it really is LARGE!!  Seriously…the size of two of my heads put together.  That is not an exaggeration!

I only hoped the Large Braided Challah Loaf was worth the investment in the end.  I’d find out on Sunday morning…after a short run…when my friend, Jenn, and I raided her kitchen and began working on a recipe for Gluten Free Morning Bread Pudding with Salted Caramel.  We had the recipe picked out prior to the get-together weekend…and I told her if she got the rest of the ingredients, I would get the bread.  And with both of us following through on the deal…it was time to open up this monster loaf and see if I made a wise investment.

The bread smelled fantastic the moment I got that plastic wrap off of it.  I mean…almost like it was fresh out of the bakery.  So amazing.  I sniffed the air quite a few times, ignoring the slight hunger rumbles in my belly. There was a lot of time between this moment and breakfast time…so I had to focus on getting it made if I wanted to get myself fed.  I sliced off the end piece and, instead of using it as the center of the bread pattern as suggested by the recipe…we cut it up to sample.

Gluten-Free Morning Bread Pudding with Salted Caramel made with Katz Gluten Free Large Braided Challah Loaf

OMG…it was good.  It was really, really good.  I loved the taste of the crust and the actual challah bread itself.  The sesame seeds that are scattered on the top of the loaf are a brilliant touch and a very tasty addition.  I wouldn’t have though that those little seeds could be so important, but the taste and texture was only elevated with their presence.  I was impressed.  And, let me tell you…this is one very soft and fluffy loaf of bread.  You’d never guess it because it feels so heavy…but you slice into it and it is just super airy and light.  It’s so weird, I know…but that’s the truth.  It didn’t crumble or fall apart as I sliced into it, as so many loaves of gluten-free bread can do.  And the taste was out-of-this-world delicious.  It tasted like it had just been made and pulled out of the oven.  It didn’t even need a reheat to make it taste edible.  It can go straight from the freezer to the counter top with only a quick defrost.  Amazing.  Totally worth all $35 I paid for it.

I don’t know how this ranks nutrition-wise as no nutrition information is available on the site.  Just know this bread loaf is HUGE!!  HUGE!!  The recipe we were making called for about 12 ounces and I used less than 1/3 of the loaf.  Honestly.  The rest is sitting in my freezer until my next culinary adventure arises.

I can, however, list off the ingredients that Katz Gluten Free uses to make its legendary Large Braided Challah Loaf.  This gigantic loaf is made from a mix of gluten-free flour (white rice, tapioca, arrowroot, corn, soy, and potato), fresh eggs, palm oil, brown sugar, honey, xanthan gum, yeast, salt, flaxseed, and apple cider vinegar.  Mine came topped with sesame seeds, however you can choose to purchase the loaf without the seeds on top.  However, if you don’t have an allergy…I highly recommend keeping them on there.

This bread was amazing in the bread pudding that we baked up for breakfast.  It’s amazing on its own.  It’s amazing with a little butter schmeared on it.  It’s amazing with pizza toppings cooked on it.  It’s awesome as a grilled cheese sandwich.  It holds up to anything and everything.  It won’t fall apart on you.  The flavor is amazing.  The texture is more than superb.  And the versatility this loaf offers is unmatched.  And you’ll want to use it in a variety of ways…since there is so damn much of it.  Not a complaint anymore.  One of my favorite gluten free breads I have ever eaten.  I will definitely spend another $35 in the future without a second thought.

Thanks Katz Gluten Free…for this amazing addition to my gluten-free menu!!

A slice of Gluten-Free Morning Bread Pudding with Salted Caramel made with Katz Gluten Free Large Braided Challah Loaf

Recipe: Gluten-Free and Dairy-Free Chocolate Chip Yogurt Quick Bread

My refrigerator has something incredible in it.  Really.

I have these cartons of So Delicious Dairy Free Unsweetened Cultured Coconut Milk.

Let me tell you…these were the most fantastic yogurts to ever enter into my life.  And I was feeling the need to bake last night.  Using a guide recipe from Gluten-Free on a Shoestring, I baked up what is turning out to be one of my favorite breads I have ever made.  Made with Enjoy Life Mini Chocolate Morsels, Better Batter Gluten-Free All-Purpose Flour, and So Delicious Dairy Free Unsweetened Cultured Coconut Milk, this is a recipe that will wow your friends and family.  You might even surprise yourself with how moist and delicious this bread is when it is baked and cooled and finally…sliced.  All of this was from scratch and, as luck would have it, I had everything necessary already in my apartment.  Check out the recipe below.

Recipe: Gluten-Free and Dairy-Free Chocolate Chip Yogurt Quick Bread

Gluten-Free and Dairy-Free Chocolate Chip Yogurt Quick Bread

Servings: 12-16
Time: Prep 20 minutes; Bake 50 minutes

Ingredients:

  • 1-3/4 cups all-purpose gluten-free flour (I used Better Batter)
  • 6 tablespoons cornstarch
  • 1 teaspoon xanthan gum (omit if your blend already contains it)
  • 1-1/2 teaspoons baking powder
  • 1/2 teaspoon baking soda
  • 1/2 teaspoon kosher salt
  • 3/4 cup granulated sugar
  • 6 tablespoons unsalted butter, at room temperature (I used Earth Balance)
  • 1 cup plain yogurt, at room temperature (I used So Delicious Dairy Free Unsweetened Cultured Coconut Milk)
  • 2 eggs, at room temperature, beaten
  • 3 ounces miniature chocolate chips, tossed with 1 teaspoon cornstarch (I used Enjoy Life Semi-Sweet Mini Chocolate Chips)


Directions:

Preheat oven to 350°F.  Grease well a standard 9-inch by 5-inch loaf pan and set it aside.

In the bowl of a stand mixer (or a large bowl with a hand mixer), place the flour blend, cornstarch, xanthan gum, baking powder, baking soda, salt and sugar, and whisk to combine well with a separate, handheld whisk.  Create a well in the center of the dry ingredients, and add the butter, yogurt and eggs.  Mix on medium speed to combine with the paddle attachment (or your handheld mixer) after each addition.  The batter will be thick.  Add the chocolate chips tossed with cornstarch, and mix with a spatula or spoon until the chips are evenly distributed throughout the batter.  Scrape into the prepared baking pan and, with wet hands, smooth the top.  To create a dome shape, run a wet spatula along the edges of the pan and pull the batter toward the center.  For a uniform split down the center as the bread rises in the oven (instead of a more haphazard split), slash down the center of the loaf with a sharp knife, about 1/4-inch deep.

Place the pan in the center of the preheated oven and bake for 30 minutes.  Reduce the oven temperature to 325°F, and continue to bake for another 20 minutes, or until the top of the loaf springs back when pressed lightly and a toothpick inserted in the center comes out with, at most, a few moist crumbs attached.  Remove from the oven and allow to cool in the loaf pan for 15 minutes before transferring to a wire rack to cool completely.  Slice once cool and serve.

~*~*~

You will love this bread.  Light, moist, and packed with flavor.  And using the Unsweetened Cultured Coconut Milk meant adding flavor without the added sugar.  It was fantastic.  And the bread…definitely one of my new favorites.  This is amazing.  I can’t wait to make more breads using the Cultured Coconut Milk.  Fantastic.

Chocolate chip bread-y love!

Product Review: So Delicious Dairy Free Unsweetened Cultured Coconut Milk

So Delicious Dairy Free Unsweetened Cultured Coconut Milk

Product: So Delicious Dairy Free Unsweetened Cultured Coconut Milk – $5.99+

Love is finding a product that you can literally do just about anything with…and getting creative with it.  I love to come up with new ways to make things when I’m in my kitchen.  I love to see just what I can accomplish with what I have on hand.

Currently, in my refrigerator, I have two 16 ounce cartons of So Delicious Dairy Free Unsweetened Cultured Coconut Milk.

What is cultured coconut milk?  Glad you asked.

It’s the dairy-free, coconut milk based version of a creamy, dreamy yogurt.  Yes…all you dairy-free people who have lamented the loss of yogurt in your diet…welcome to the world of So Delicious and their fantastic coconut milk based yogurts.  Also known as…cultured coconut milk.

I love that So Delicious has released two new varieties of their cultured coconut milk products.  I already reviewed the Unsweetened Vanilla Cultured Coconut Milk…but now it is simply the Unsweetened Cultured Coconut Milk.  First of all, as someone trying to keep their sugar intake in check, the unsweetened offering makes me so happy.  Even better…it has great texture and good flavor.  It actually has a bit of a tang to it, reminding me of a sour cream.  And, certainly, this could easily be used in place of sour cream.  But…not in my case.

I got into my kitchen last night and decided to use some of the So Delicious Dairy Free Unsweetened Cultured Coconut Milk…to make bread.  Yep.  Bread.  Delicious…dairy free and gluten-free Chocolate Chip Yogurt Bread.

Here’s what I found out…my bread cooked up amazing.  The Unsweetened Cultured Coconut Milk made this a very light, very moist bread when all was said and done.  The best part was how it tasted.  Because this also adds flavor without adding more sugar.  And that…that is an amazing thing.  I love how versatile this product is.  It can be used in dressings, breakfast parfaits, smoothies, as a garnish for meals…you name it.  And it does it all with style and without upping the sugars you’re consuming.  LOVE!

A serving of the So Delicious Dairy Free Unsweetened Cultured Coconut Milk is 1/2 cup or 4 ounces.  This serving will provide you with 50 calories and 4 grams of fat.  You will be provided with 95 mg sodium and 1 gram of sugar.  The Unsweetened Cultured Coconut Milk doesn’t provide any protein, but you do get 4 grams of fiber.  This product is cholesterol free, gluten-free, vegan, kosher, non-GMO, and made with organic ingredients.

I have truly fallen in love with this product.  I am so glad I have two containers of it chilling in my fridge.  There are tons of other things I want to try this with.  But…below, take a look at how amazing my bread baked up using the So Delicious Dairy Free Unsweetened Cultured Coconut Milk.  I am beyond impressed.  You will be too!

Gluten-Free and Dairy-Free Chocolate Chip Yogurt Quick Bread made with So Delicious Dairy Free Unsweetened Cultured Coconut Milk

Product Review: So Delicious Dairy Free Unsweetened Vanilla Cultured Coconut Milk

So Delicious Dairy Free Unsweetened Vanilla Cultured Coconut Milk

Product: So Delicious Dairy Free Unsweetened Vanilla Cultured Coconut Milk – $5.99+

Do you know what love is?

Love is…a new and fabulous product from a company who prides itself on good quality products.  And, lucky me…I had the opportunity to test drive a few of these new products from So Delicious!!  I have not been disappointed.

One of the new products out there from So Delicious Dairy Free is their 16 ounce containers of Unsweetened Cultured Coconut Milk.  They have two varieties of the unsweetened ones…plain and vanilla.  And let me tell you…these do not disappoint.

I am a huge smoothie fan.  And, for Christmas, I was given a personal blender.  So smoothie making is SO much easier now.  They are great for pre-run and post-run fueling and nutrition…as long as you use the right ingredients.  Well, I’m not running much right now due to a severely sprained ankle.  But…smoothies are still one of the best things in life.  So…this week, I broke out a tub of the So Delicious Dairy Free Unsweetened Vanilla Cultured Coconut Milk.

It was brilliant.  I put 1 cup of the Unsweetened Vanilla Cultured Coconut Milk into my blender, then added 1/4 cup pineapple juice, 1 tablespoon of flaxseed, and then a tropical fruit mixture of frozen fruit (mangoes, pineapple, strawberries, and peaches)…gave it a whirl…and viola.  Smoothie.

Let me tell you…this makes a smooth, rich and creamy smoothie without adding sugar to the mix.  There is plenty of sugar via the fruit that is used.  I love having that option as I am trying to cut back a bit on the sugar I consume.  This is one of my new favorite products from So Delicious.  And it is so versatile.  I used one of the plain ones in a very…very different manner and I’ll post about that in a bit.  The fact of the matter remains, the vanilla doesn’t overpower or overwhelm.  The cultured coconut milk is creamy and dreamy.  It makes this velvety smooth, low sugar smoothie and it is fantastic.  Every last bit of it.  Fantastic.  Slurp that smoothie down…it’s good for you.  The bit of coconut flavor really played well with my tropical fruit blend.  So much love.

This product is nutritionally sound too!  A serving size is 4 ounces, or about 1/2 cup.  This serving will dish you up 60 calories and 3.5 grams of fat.  You will also be taking in 95 mg sodium and only 1 gram of sugar.  LOVE IT!  This product has no protein in it, but you do get 4 grams of filling fiber.  If you need a protein boost…use a good and trusty protein powder.  This product is cholesterol free, gluten-free, and vegan.

I can’t say enough good things about this product.  I am over the moon for it.  And I can’t wait to share what I did with the plain unsweetened either.  Although the vanilla would have worked just as well too.  I don’t think my fridge will ever be without this now.  I am, above all else, hooked.  Loving it!  I promise…you will too!

Tropical Smoothie made with So Delicious Dairy Free Unsweetened Vanilla Cultured Coconut Milk

Restaurant Review: C’est Si Bon Café, Columbus, Ohio

C'est Si Bon Café, Columbus, Ohio
C’est Si Bon Café, Columbus, Ohio

Restaurant: C’est Si Bon Café, Columbus, Ohio

It was about a month ago that my good friend Jenn tweeted at me after eating at a local restaurant not far from where she works.  The main thing…crepes.  The bigger deal was…gluten-free options.

I told her that when I came to visit in a couple of weeks, that was a requirement.  She agreed.  And we held each other to our word.

On Saturday morning, after snagging coffee, we headed out to Bexley…and there…not far from my favorite Columbus gluten-free bakery (Cherbourg Bakery), was C’est Si Bon Café.  It is a small, quaint, unassuming place.  Not very many tables, and a little bar that runs along the side wall for customers to sit and eat.  It was bustling that morning and we were grateful to find a place to settle in…stealing a chair from the table in the window so three of us could sit at the table.  I held our spot while Jenn and Cathy went to order.

They went for traditional breakfast crepes, each of them getting a Bacon, Egg and Cheese Crepe ($5.95).  As for me, I wanted something sweet.  I opted for the Gluten-Free Cinnamon and Sugar Crepe ($6.00).  Gluten-free crepes are a $1.25 upcharge there, so that’s why mine seems so pricey for such a simple crepe.  A regular version of the same crepe runs $4.75.  Just an FYI.

It took about 10 minutes for our orders to be filled.  No problem on the wait…since they make everything to order.  And, mine was a specialty one…being gluten-free and all, so that was important too.  They do have a separate crepe stone for the gluten-free crepe orders and the crepes are made from buckwheat flour.

When the order was up…I was so happy.  My local gluten-free crepe truck is out of the state for the winter and won’t be back until April.  Therefore, I have been crepe-less since the end of fall.  This felt like such a treat because I hadn’t had a crepe in so long.  My crepe was stunning and huge.  It looked really good.

As stated above, the Gluten-Free Cinnamon and Sugar Crepe is made from buckwheat flour.  Folded into it is butter, sugar and cinnamon.  Simple.  Easy.  And I was betting tasted a lot like French Toast.  And I love French Toast.  So this was bound to be the best of both worlds.

I wasn’t disappointed.  One bite of the folded, light, crepe and I was in heaven.  The sugar and butter gave it this toasty feel…and the cinnamon brought a bit of spice.  It was just what I wanted.  It was what I really, really wanted.  The crepe itself might seem so basic, but the flavors were fantastic.  I gave a piece to both Jenn and Cathy and both agreed it was like eating French toast.  Count me as one very happy girl.

I’ve already said that C’est Si Bon Café is a must now every time we’re in town.  I mean…the menu is extensive and there are both sweet and savory ones that are just begging for me to try them.  I already know what flavor I’m going to get next time.  Just going to work my way through the ones that interest me greatly.

C’est Si Bon Café definitely is a place that everyone needs to try out.  Honestly, I was so impressed, not just with the care and service, but the crepes themselves were OUTSTANDING!!  I am one happy crepe-loving gluten-free girl.  And I’m already trying to plot a return to the Columbus, Ohio area to visit Jenn and come try out another fantastic crepe creation.

Go…dine…enjoy…repeat.

You’ll want to.  Trust me.

C'est Si Bon Café's Gluten-Free Cinnamon and Sugar Crepe
C’est Si Bon Café’s Gluten-Free Cinnamon and Sugar Crepe

Product Review: Udi’s Gluten Free Crunchy Original Granola

Udi's Gluten Free Crunchy Original Granola
Udi’s Gluten Free Crunchy Original Granola

Product: Udi’s Gluten Free Crunchy Original Granola – $6.50+

Granola.

I love it.  I use it every other morning (as in…mornings I don’t go to the gym) in breakfast fruit parfaits or over hot cereal.  I love it.  And, thankfully, I have found some better choices when it comes to the sugars that are included.  And I love finding granola I haven’t tried yet.  And Udi’s Gluten Free released quite a few new options recently.

Now Udi’s Gluten Free has had granola out on the market for awhile…but the new varieties bring some extra oomph to the mix.  For real.

The variety that I purchased was the Udi’s Gluten Free Crunchy Original Granola.

So…what is it?  Simple.  It’s a blend of oats that have been toasted and mixed with sweet and salty toppings.  What might these be?  Raisins, banana chips, walnuts, cashews, almonds, and pistachios.  Mmmm…delicious!  I love that blend.  The raisins and the banana chips bring nice variety in texture, soft and crunchy…and also the sweetness that meshes with the honey toasted oats.  The blend of nuts also adds variety as each has a distinct flavor and texture.  And it just works!  It works well.

The oats are that right level of granola perfect.  Kind of soft, but still crunchy.  The raisins are plump and sweet.  The nuts are amazing…because I love nuts.  And the banana chips are a nice addition of sweetness that is a little unexpected but very welcome.  The variety of ingredients and flavors really works well over the palate.  It’s a fantastic play on the tongue.  And I put this over some gluten-free hot cereal and it was really delicious.  I mean…YUM!

Ingredients are basically already listed above…with a few additions.  Udi’s Gluten Free Crunchy Original Oats are made from certified gluten-free oats, wildflower honey, canola oil, raisins, banana chips, walnuts, cashews, almonds, pistachio nuts.  I love, love, love it.  Clean eating…right here!

As for nutrition…this isn’t bad either.  A serving size is 1/4 cup of granola.  This is actually a rather large amount believe it or not.  This serving will provide you with 140 calories and 6 grams of fat (of which, much is the healthy variety from the nuts).  This granola is cholesterol free and sodium free.  A serving also provides 7 grams of sugar, which is amazing in a granola.  This serving will also give you 2 grams of fiber and 3 grams of protein.

I am wowed!

No, for real.  This is one of my favorite granola I have had to date.  And trust me…I have eaten a lot of granola.  Why I never purchased this before, I don’t know.  But I’m sold.  The different textures, tastes…it works.  It works magic, whether you top something off with it or eat it straight from the bag.  You won’t be disappointed either.

Now…excuse me…there is an open package of this in my pantry calling my name…

A serving of Udi's Gluten Free Crunchy Original Granola
A serving of Udi’s Gluten Free Crunchy Original Granola

Recipe: Homemade Gluten-Free and Vegan Bacon

It was almost five years ago that I made a decision to become a vegetarian.  And as of this month…three years ago that I had to go gluten-free.  My…time sure does fly!  That being said, when I first became a vegetarian, my life was filled with Morningstar Veggie Bacon Strips and faux meat products…which…looking at now makes me cringe due to the number of chemicals and processed crap that are in them.  Besides that…most all processed-to-death faux meat products contain vital wheat gluten…which means…I can’t consume it anyway.

Honestly, after three years I’ve worked around this.  But, you see, my roommate has a love of BLT sandwiches.  As you know, Cathy eats what I eat at home, so she’s 80% gluten-free and vegetarian.  But when we go out…meat is her treat (think those Beggin’ Strips commercials…).  Anyway…she’s acquired this taste for BLT sammies…and with a plethora of lettuce from my CSA bin, she put in that request.

So…I needed bacon.  And no one makes a gluten-free and vegetarian version of this.  So, I had to make it myself.  And it’s mainly made up with…beans.  So…beancon?  I guess?  The recipe was adapted from the No Meat Athlete…and now…will forever be made and kept in my kitchen.  What’s even better…after you cook the batter up and slice it, the slices can be kept in the freezer and go immediately from the freezer to the pan.  Oh yeah…beancon time!

Recipe: Homemade Gluten-Free and Vegan Bacon

Homemade Gluten-Free and Vegan Bacon

Servings: 24-32
Time: Prep 20 minutes; Bake 10 minutes

Ingredients:

  • 1/2 cup dried adzuki beans, or other small red beans
  • 1/3 cup whole grain buckwheat groats (not buckwheat flour)
  • 1 tsp onion powder
  • 1/3 tsp garlic powder
  • 1/3 tsp rubbed sage
  • 1/2 tsp thyme
  • 1-1/2 tsp smoked paprika
  • 1 tsp liquid smoke (not all brands are gluten-free, but Colgin is…and that’s what I use)
  • 3 tbsp pure maple syrup
  • 1-1/2 tbsp coconut aminos (I subbed San-J Gluten-Free Tamari)
  • 1 tbsp tomato paste
  • 1-1/2 tbsp nutritional yeast (optional)
  • 1 tsp coconut oil (may sub any oil you prefer)
  • 1/2 tsp salt

Directions:

Rinse the beans and buckwheat, place in large bowl covered with several inches of cold filtered water; let soak overnight.

Preheat the oven to 400°F.

Drain and rinse the soaked beans and buckwheat.  Place in the bowl of a food processor fitted with an s-blade, along with all of the other ingredients. Pulse several times to combine, scrape down the sides and bottom of bowl and continue pulsing until uniform, but not completely pureed.

Line a 9 x 13 casserole dish or rimmed baking sheet with parchment paper and spray with baking spray. Place bacon batter in pan and spread evenly with a spatula.  You may choose to spray another piece of parchment paper lightly with baking spray and press the paper on top of the mixture and flatten with your hands.  Remove and discard the top piece of parchment paper, then use a spatula to spread over and fill in any bare spots.

Bake for 10 minutes.  Remove from oven and let cool for 10 minutes.  Slice into 24-32 strips, whatever size you prefer, I cut mine into 1 inch by 4 inches slices (Do this by making one lengthwise cut down the center, and then 12-16 cuts across the shorter side).

At this point freeze any strips your don’t plan on eating immediately. Frozen strips can go straight into the skillet at a later date, no need to thaw first. To fry, heat a skillet with a small amount of oil and fry both sides to desired level of crispiness. You may also choose to fry slices in cooking spray, for a less crispy, but still very delicious result.

~*~*~

The liquid smoke gives it that smokey feeling of bacon and they taste great.  Honestly.  I made this once before and used them on breakfast sandwiches, to pair with pancakes, and now…on BLTs.  Brilliant recipe.  Bacon really can be for everyone…even gluten-free vegetarians and vegans.  Because this no meat treat is a delicious, homemade, and easy recipe.  And no chemicals.  Real food.  Real good!

Gluten-Free and Vegan BLT Sandwich

Recipe: Broccoli and Goat Cheese Soufflé

Tonight…I made my first soufflé.  I’m not going to lie…it made me feel chef-y.  Really, really chef-y.

Because soufflé’s can be tricky.  They are picky.  They are very, very, very difficult to master.  And this recipe seemed easy enough…so I decided to give it a try.

The result?  A light, airy, fluffy treat that made for a delicious dinner.  It wasn’t perfect, but for my first soufflé, I’m quite happy with the results.  It tasted phenomenal.

The recipe comes from Eating Well magazine, one of my favorites.  And yeah…I’ll make this again in a heartbeat.

Recipe: Broccoli and Goat Cheese Souffle


Broccoli and Goat Cheese Soufflé

Servings: 4-8
Time: Prep 25 minutes; Cook 20 minutes

Ingredients:


  • 1-1/2 cups finely chopped broccoli florets
  • 1 tablespoon butter
  • 1 tablespoon extra-virgin olive oil
  • 2 tablespoons all-purpose flour (I used Better Batter Gluten-Free All Purpose)
  • 1-1/4 cups low-fat milk (I used unsweetened almond milk)
  • 1 teaspoon Dijon mustard
  • 1/4 teaspoon dried rosemary
  • 1/4 teaspoon salt
  • 1/2 cup crumbled goat cheese
  • 3 large eggs, separated
  • 2 large egg whites
  • 1/4 teaspoon cream of tartar

Directions:

Preheat oven to 375°F.

Coat four 10-ounce ramekins (or a 2- to 2 1/2-quart soufflé dish) with cooking spray and place them on a baking sheet.

Place broccoli in a medium, microwave-safe bowl.  Cover and microwave until the broccoli is tender-crisp, 1 to 2 minutes.  Set aside.

Melt butter and oil in a large saucepan over medium-high heat.  Whisk in flour and cook, whisking, for 1 minute. Adjust heat as needed to prevent the mixture from getting too dark; it should be the color of caramel.  Add milk, mustard, rosemary and salt and cook, whisking constantly, until thickened, 1 to 2 minutes.  Remove from heat and immediately whisk in goat cheese and 3 egg yolks until well combined.  Transfer to a large bowl.

Beat the 5 egg whites in a medium bowl with an electric mixer on high speed until soft peaks form.

Add cream of tartar and continue beating until stiff peaks form.  Using a rubber spatula, gently fold half of the whipped whites into the milk mixture.  Gently fold in the remaining egg whites and the reserved broccoli just until no white streaks remain.  Transfer to the prepared ramekins or soufflé dish.

Bake until puffed, firm to the touch and an instant-read thermometer inserted into the center registers 160°F, about 20 minutes in ramekins or 30 minutes in a soufflé dish.

Serve immediately.

~*~*~

Easy.  I was blown away by how easy this was to make.  I was hoping mine would puff up a little more, but that will come with more practice.  For now, so very happy with the results of this soufflé.  My roommate and I both enjoyed the taste and the fluffy, airy texture.  And the recipe…so clean.  So amazing.  And yeah…the perfect meal to end a busy day.

Go ahead.  Don’t let the idea of a soufflé scare you.  Give it a whirl.  You might surprise yourself.

Product Review: The Pfunky Griddle Gluten-Free Pancake Mix

The Pfunky Griddle Gluten-Free Pancake Mix

Product: The Pfunky Griddle Gluten-Free Pancake Mix – $7.99

Awhile back, on a return trip from visiting my family in Birmingham, Alabama, my roommate and I were hungry.  Very hungry.  And I got onto my Find Me Gluten-Free app to find somewhere in Nashville, TN, where we might be able to safely grab a bite to eat.  My app never steers me wrong…and it threw a few options at me.  But…we were very intrigued by The Pfunky Griddle.  And after a quick read of the reviews, I felt confident I could eat there and not get sick.

Breakfast food!  YES!!  They serve salads and sandwiches as well, but if you’re going to The Pfunky Griddle…you’re probably seeking out something to put on the griddle.  And that was what we did, splitting an order of the gluten-free pancake mix and topping them off with our toppings of choice.

While we were waiting on a table, however, I spotted my danger zone.  They sell their pancake mixes.  Seriously.  And one of the options they offered was their gluten-free pancake mix.  After eating the pancakes at the store, I wanted some to take home.  And after working through the plethora of gluten-free pancake mixes (I seriously LOVE pancakes)…I finally got to this one today.

And…you know I can’t do anything simple.  The actual making of the batter is easy.  Add to mix 2 eggs and 8 ounces of milk.  I used my unsweetened almond milk.  That was actually the easy part.  I made 4 pancakes (1/4 cup of batter each) just plain…just the batter…so I could get an unadulterated taste of it.  Then, I made 4 pancakes with blueberries added to them.  And then, finally, I made 4 pancakes with white chocolate chips added to them.  One batter…3 servings of different pancakes.  I was excited, because from what I recall, I loved this batter when I ate at the restaurant.

However…today…I was way less enthusiastic about it.  Not that it was bad; it wasn’t.  It just…it isn’t able to compare to some of the other mixes I have used in between eating at the restaurant and making them myself at home.  The pancakes actually cook up beautifully.  Thin little cakes, toasted evenly on each side to a gorgeous golden brown color.  The issue, I found, was that they actually tasted…gritty.  Now, sometimes gritty is good, but not with pancakes.  I was feasting on the plain pancakes this morning…my roommate said hers were pretty good.  Which, sometimes means she likes them…and sometimes means that she is just being polite.  I should learn not to ask her sometimes…

But, yeah…gritty.  Gritty is not a good thing when it comes to pancakes.  The batter was well mixed together…so it wasn’t an error on my behalf.  And it didn’t have a horrible flavor either.  Don’t get me wrong there.  They taste like delicious pancakes, but that gritty texture is a little…off putting.  In fact, I was happy to down these quickly and then finish off breakfast with my coffee instead of my usual vice-versa finish.  My biggest hope is that the pancakes with the added fruit or sweet white chocolate chips offset a bit of that odd, gritty texture.  Perhaps that’s why I didn’t notice it at the restaurant…because I was adding blueberries and bananas to my batter on the separate griddle pan.

The Pfunky Griddle Gluten-Free Pancake Mix is a blend of brown rice flour, corn starch, potato starch, salt, sugar and baking powder.  Not bad on the ingredients.  I managed to get 12 pancakes out of the mix.  And they were all of a very decent size too.

So, they weren’t bad…but I just wasn’t as impressed with them at home.  The gritty texture was a little…off for me.  But, the flavor was good.  I’ll give them that.  However, I probably wouldn’t buy this again, even if I do stop in at the restaurant for breakfast/brunch again.

Pancakes made from The Pfunky Griddle Gluten-Free Pancake Mix