Indian inspired Spinach Dal another Tasty Bite on a busy day

Tasty Bite Spinach Dal

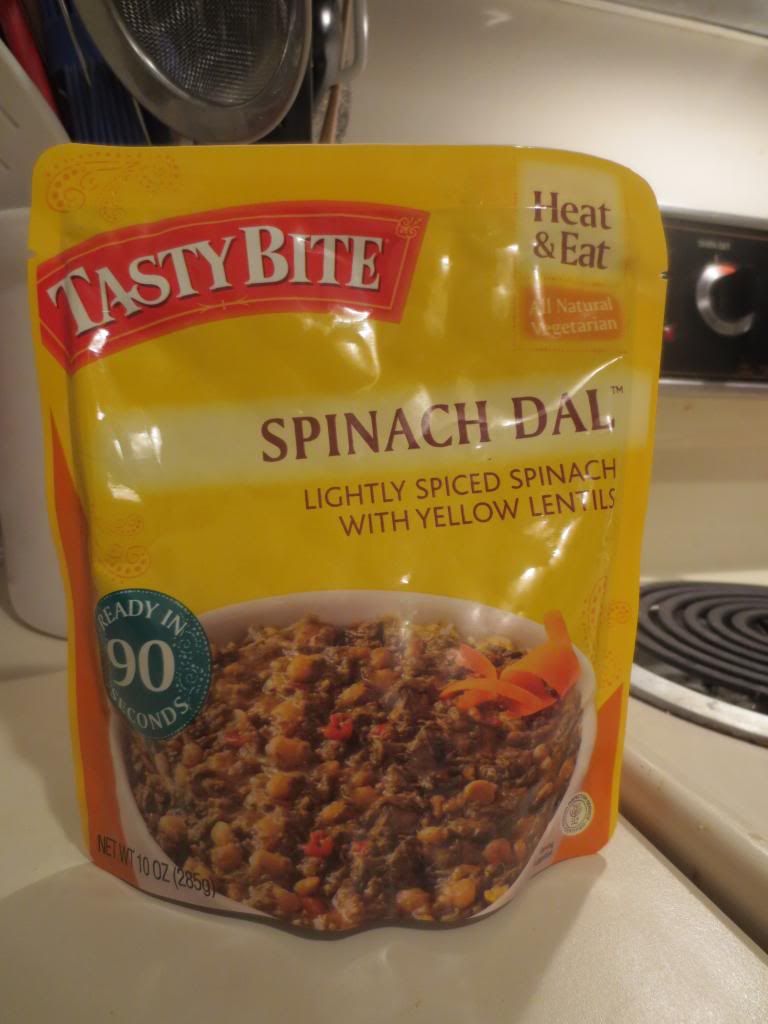
Product: Tasty Bite Spinach Dal – $3.29+

I lead a very busy life.  No, really…I do.  There are some weeks that I just never really find a moment to relax.  Between my training sessions, my gym time, my yoga, my JOB, life can sometimes spin wildly out of control and just keep me too busy for my own liking.  Honestly.  I sometimes have to eat breakfast standing up in the kitchen, I can be that busy.

Monday is one of my busiest and most hectic days.  Not only does it mean the start of the work week, but it also brings in my fun run.  Every Monday night and I hate missing it.  This, however, does require bolting home from work, changing into my running gear, and shoveling some sort of dinner down my throat.  I have to be particular though…because in less than 30 minutes after that, I’ll be out running.  Not hard…but still.  Nothing worse than something not sitting right in your stomach before a run (eggs, anyone?).

Normally, a gluten-free (and vegan) grilled cheese sandwich is my go-to option on Monday night.  But…I have a lot of “easy meals” in my pantry and I’m attempting to sort through all that craziness.  After all…can’t change up the eating habits until the old stuff is out.

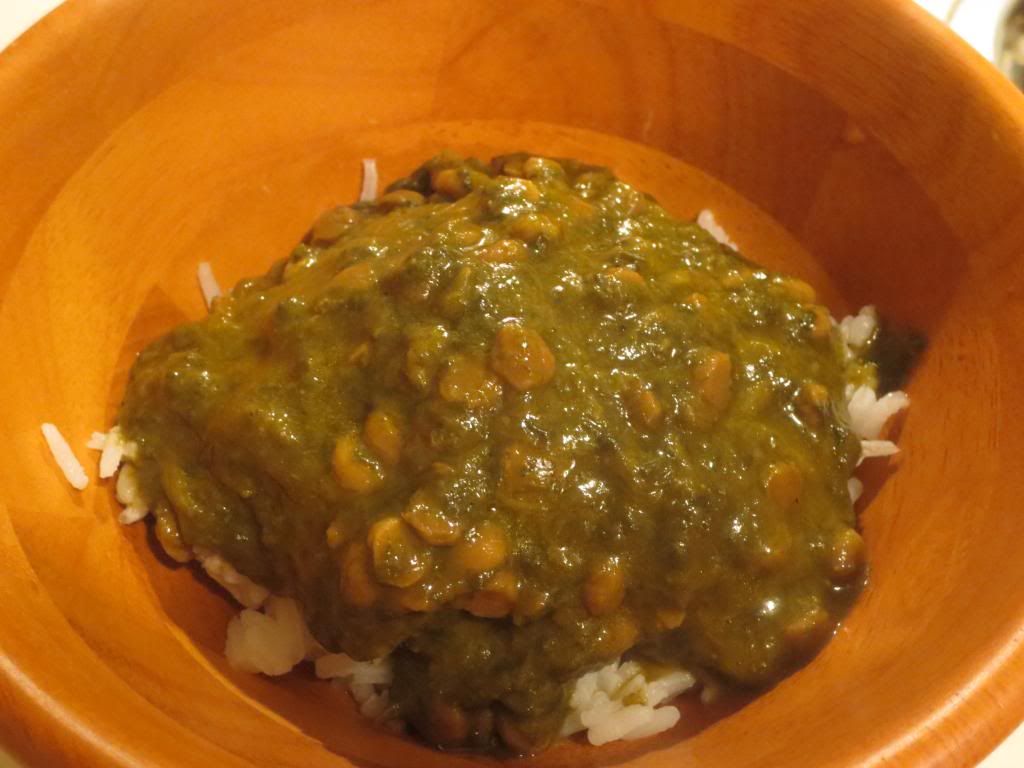
One of the best choices in my pantry, however, is a heap of Indian-inspired meals that are ready in 90 seconds.  No…really!  These little pouches of deliciousness are made by Tasty Bite and I have found them in regular grocery stores and natural food stores.  This past Monday morning, I cooked up two servings of jasmine rice, because that’s easy to reheat in minutes when I get in from work.  I figured I could grab one of the Tasty Bite pouches from the pantry and serve up a filling, but not going to kill my stomach when I run, sort of meal.

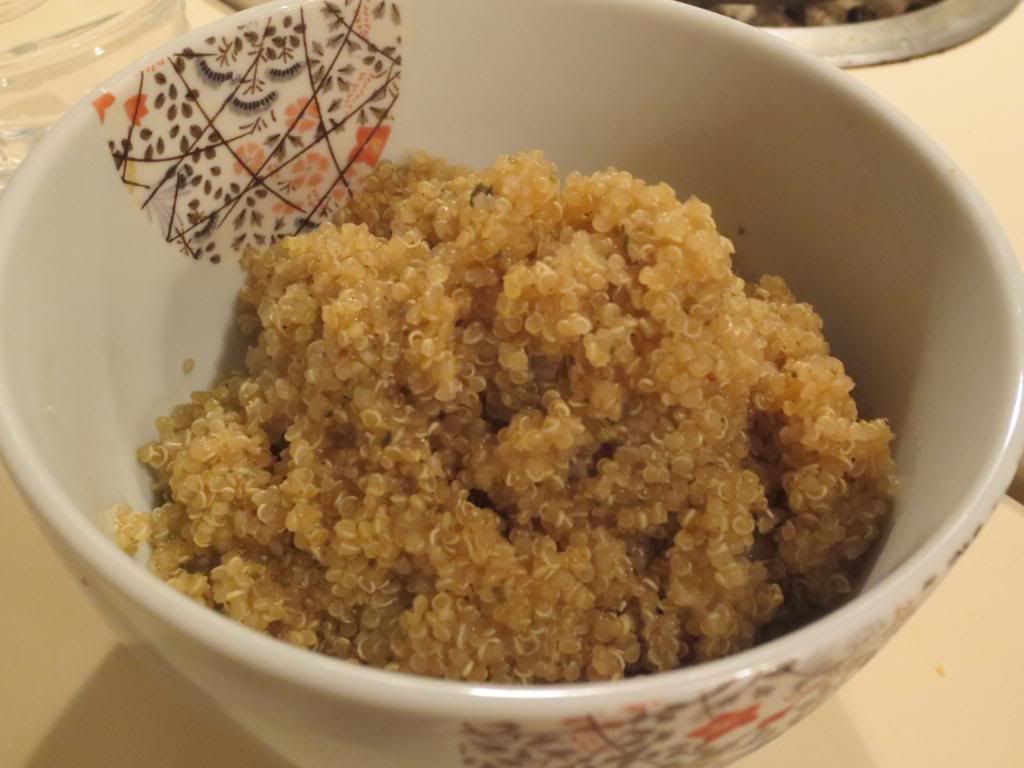
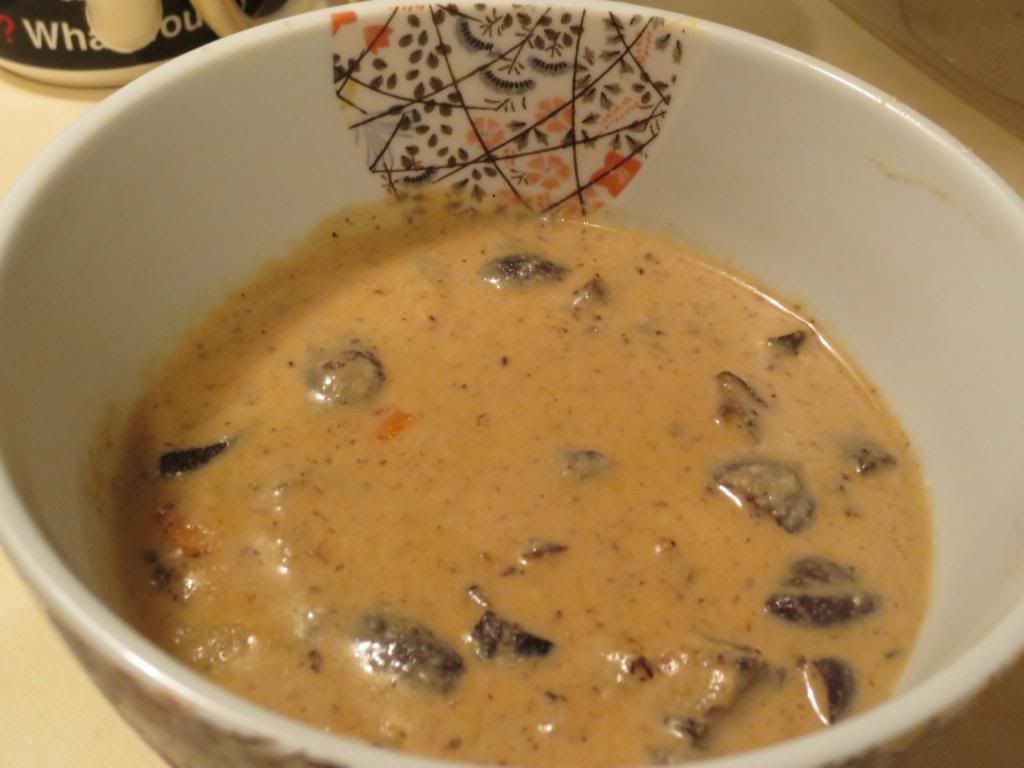
My flavor of choice – Spinach Dal.

For those of you unfamiliar with Indian food, Dal is simply lentils.  And I am a huge fan of lentils!!  The Tasty Bite Spinach Dal is a blend of spinach, yellow lentils, and spices.  Nothing hot.  A lot of people just assume Indian food is going to be hot.  I wouldn’t want to eat something spicy before a run either.  The Spinach Dal is the perfect balance of mild Indian spices with delicious lentils and spinach, cooked down, and served over the rice I made that morning.

And it only takes 90 seconds.  Told you…it’s an easy, go-to, and VERY tasty meal.

I actually prefer spice, but the milder choices make for great Monday Run Day meals, I’ve found.  The combination of the carbs from the rice and the protein from the lentils is that perfect balance I need to fuel my body for what is always my second run of the day.  The spinach was soft and spiced to perfection.  The lentils added a nice hit of texture and flavor…and a bit of meatiness to this vegetarian meal.  I found the spices to mesh perfectly with the ingredients.

Speaking of ingredients…what all went into this?  You’d be surprised at the short list of natural ingredients.  This is why I love having these on hand.  The Tasty Bite Spinach Dal meal contains simply water, spinach, lentils, tomatoes, onions, sunflower oil, salt, cornstarch, ginger, garlic, sugar, chilies, turmeric, cinnamon, cumin, pepper, and spices.  I recognize every ingredient on that list.  Every single one.  And while there are more than the 6-7 ingredients I prefer to see, most of them are spices and I’m okay with that.  The less salt and sugar used, the better.

Nutritionally speaking, this is a healthy choice for a meal as well.  One pouch contains two 100 calorie servings.  Each of these servings also deliver 5 grams of fat to your daily intake.  For being a packaged meal, the fact that it only contains 480 mg sodium per serving is awesome.  In addition, you get a healthy dose of 3 grams of fiber and 3 grams of protein.  While sugar is listed on the ingredient list…only 2 grams are found in each serving.  The Tasty Bite Spinach Dal is also vegetarian, vegan, gluten-free, and kosher!  Awesome!

Healthy.  Tasty.  Delicious.  You really can’t go wrong with these.  If you love Indian food as much as I do…and need something easy to prepare for dinner one night…look no further than Tasty Bite.  And, if you aren’t afraid of cooked spinach and lentils…than the Spinach Dal makes for one of the best choices they have.  Very delicious!  Very…well…tasty!

Tasty Bite Spinach Dal over jasmine rice

Recipe: Gluten-Free Zucchini Muffins

I love to bake.  No, really…I do.  Just as much as I love to cook.  But baking…baking sort of gives you that extra level of difficulty.  All measurements have to be precise.  Nothing can be off.  Not even one bit.

Want to add another level of difficulty to the mix?  Try converting a recipe to gluten-free!  It’s not always as easy as it sounds.  Sometimes measurements have to change.  Sometimes other ingredients have to be added.

I had a lot of zucchini due to my CSA bin being laden with it this time of year.  I love squash and zucchini.  I love playing around with cooking it different ways.  And growing up, I was always a huge fan of zucchini bread.  No need for that chocolate stuff that gets added to it.  Nope.  The zucchini and the other ingredients can definitely speak for themselves.

So…every Saturday when I am in town, I have been meeting up with a great group of people to go running.  This gets my long run in and I am able to enjoy it with some company…and really focus on the long slow distance (LSD) pace that I am supposed to be practicing.  I’m no good at this running slower thing, but I’m learning.  It’s important to build up stamina and strength.

That being said, a great group was taking me on a 13 mile run last weekend and I wanted to supply some eats for afterwards.  I stumbled across a recipe for Zucchini Muffins in a blog called Eat, Live, Run…so it was maintained by a runner…and it sounded easy and delicious.  Plus…I had every ingredient necessary.  BONUS.  The result?  Everyone who took a muffin LOVED it.  And so…here is my adapted recipe to make it gluten-free and delicious…and, loved by runners and non-runners alike!

Recipe: Gluten-Free Zucchini Muffins

Gluten-Free Zucchini Muffins


Servings: 16
Time: Prep 15 minutes; Bake 30 minutes

Ingredients:

  • 1.5 cups all purpose flour (I used Better Batter Gluten-Free All Purpose)
  • 1/2 cup white sugar
  • 1/2 cup packed brown sugar
  • 1.5 cups grated zucchini (about two small-medium sized zucchini)
  • 1/2 tsp salt
  • 2 eggs
  • 1/2 tsp cinnamon
  • 1/4 tsp nutmeg
  • 1 tsp vanilla extract (or, vanilla paste)
  • 1/3 cup canola oil
  • 2 tsp baking powder
  • Cinnamon and sugar for topping

Directions:

Preheat the oven to 375.

In a large bowl, whisk together the flour, sugar, brown sugar, salt, baking powder, cinnamon and nutmeg.  Set aside.

In a medium sized bowl, combine the grated zucchini, eggs, vanilla and oil.  Stir well to combine and then gently stir into the flour mixture.  Be careful not to overwork this—it will lead to dense muffins!

Fill lined muffin tins about 3/4th of the way up with the batter and then sprinkle cinnamon and sugar on each.

Bake for about 30 minutes or until golden.

~*~*~

These were so moist and delicious.  I did feel, however, that the nutmeg almost overpowered the rest of the muffin, so I think next time I’ll do maybe 1/8 tsp nutmeg.  Aside from that, these were fantastic.  And they keep well too.  My roommate and I polished these off this morning after hitting up the gym and they were still as moist and delicious as they were the night I baked them.  I received a lot of praise and compliments from my running group on these muffins, so I would say they were a definite hit.

The recipe is super easy…and super delicious.  Each muffin has only 136 calories in it

La Pasta offers perfect Gluten-Free Spinach and Cheese Ravioli

La Pasta Gluten-Free Spinach and Cheese Ravioli

La Pasta Gluten-Free Spinach and Cheese Ravioli – $5.99+

Thank you, grocery shopping gods.  Thank you for that one day that my roommate and I were at Whole Foods for something specific, but we decided to walk the aisles.  Thank you for letting her turn her head at the right time and spot the most epic thing ever in the pasta aisle.  Thank you…for La Pasta.  And thank you, La Pasta, for your gorgeous Gluten-Free Spinach and Cheese Ravioli.

In the past, my best gluten-free pastas have been of the fresh variety.  I blogged about the amazing RP Pasta Company’s fresh gluten-free noodles awhile back.  I have some fresh gluten-free gnocchi to try as well from Nuovo.  That will be next.  But…hands down, the best pastas are the ones that aren’t made to be frozen.  Gluten-free pasta can be so finicky and can go from perfect to gummy to mushy within seconds.

Yes…seconds.

But, I wasn’t passing up the opportunity to try these out.  So, after going out for gluten-free pizza with a co-worker one Friday night and getting the roomie completely toasted on a beer flight, it was time to go grocery shopping.  (Note: Grocery shopping with a sorta drunk roommate is the best grocery shopping ever…because I can buy, literally, anything I want).  We hit up Trader Joe’s first and behaved, sticking to the list.  So…her sandwich bread and some of their potato chips for her lunch.  Then…it was Whole Foods time.  And I was prepared for my moment of gluten-free grocery shopping glory.

Walk the aisles?  You better believe it.  Grab whatever I have been wanting to try?  You betcha!  I had almost forgotten about the pasta but it struck me just as we were about to head for the checkout line.  Whew.  Close call.  We scurried back to the pasta section and had to make the choice between La Pasta’s Gluten-Free Cheese Ravioli or La Pasta’s Gluten-Free Spinach and Cheese Ravioli.  The tipsy wonder chose for me, snagging a package of the Gluten-Free Spinach and Cheese Ravioli.

With no plans in the works for dinner tonight, I figured I could use up the rest of the pasta sauce in the fridge if I simply cooked up the package of ravioli for dinner.  Perfect.  And not very time consuming either.  The part that took the longest was waiting on the 4 quarts of water to come to a boil.  But, like any good chef, I just slapped a lid on the pot and it happened a lot faster than it would have otherwise.

With the pasta sauce working on the stove, and the water now heated to a boil, I cut open the plastic packaging holding the little pockets of spinach and cheese wonder and poured them into the boiling water, immediately turning down the heat.  It came up to a boil and the pasta cooked for about 2 – 3 minutes.  BOOM.  Done.  That simple.

La Pasta Gluten-Free Spinach and Cheese Ravioli (cooked)

I drained the pasta and shook out all the excess water.  Then, it was already time to serve up dinner.  I split the package between us, which worked out to about 12 ravioli each.  These were very light and I could see the stuffing through the pasta after I cooked it up.  And it smelled absolutely fantastic.  The best part was, nothing was sticking together.  Each ravioli easily slid from the spoon I was dishing it up with onto the plate.  No casualties of war.  Not one.  I was already impressed and just praying now that I had cooked them long enough.  Hey, I cooked as instructed on the packaging…which sometimes works out…and sometimes does not.

I sauced each plate with a serving of the marinara sauce (Classico’s Florentine Spinach and Cheese, for the record) and topped off my roomie’s with fresh Parmigiano Reggiano and hit up mine with some crushed red pepper.  Yummy!!  Dinner was served.

Moment of truth.  One swipe of the fork and I knew I was in for a treat.  The pasta was perfection.  It cooked up soft, without turning to mush or becoming gummy and sticky.  The little pockets of ravioli held the stuffing, the fresh spinach and ricotta cheese, perfectly.  And when I took my first full bite, everything just melted together and made the most perfect bite of ravioli I have ever experience since going gluten-free.  It was full of flavor, cooked to perfection, and just made for a perfect bite.  I was hooked…and sort of wishing I had more of it on my plate.

So, let’s talk nutrition.  A serving of La Pasta Gluten-Free Spinach and Cheese Ravioli is 95 grams.  There are 2.5 servings per container.  My roommate and I split the entire package.  An actual serving of this ravioli will serve up 170 calories and 5 grams of fat.  A serving also contains 40 mg of cholesterol and 480 mg sodium.  As far as fiber goes, the Gluten-Free Spinach and Cheese Ravioli only offers 1 gram of fiber, but you do get a healthy dose of 7 grams of protein.  Loving it.

And as for the ingredient list, it doesn’t get much simpler than a filling made from ricotta cheese, spinach, Parmesan cheese, mozzarella cheese, sea salt, canola oil, olive oil, black pepper, garlic, potato flakes, and nutmeg.  As for the pasta itself…that’s a blend of corn starch, whole dried eggs, potato starch, sea salt, tapioca starch, filtered water and xanthan gum.  Yep.  It’s really that simple.  And it tastes like homemade.  That’s the very best part.  Tender with a cheesy center that just melts…it melts.  It’s awesome.

La Pasta…you’ve won my heart…and my gluten-free pasta loving soul.

For life.

La Pasta Gluten-Free Spinach and Cheese Ravioli (cooked and sauced)

Recipe: Curried Sweet Potatoes with Kale and Chickpeas

I admit…I’m a sucker for interesting and different cookbooks.  Really, I am.  I just can’t help myself when I see them.  Thankfully, for the most part, I don’t always purchase said cookbooks.  I just simply borrow them from my library and page through them until something catches my eye.

Of course, being a gluten-free vegetarian, this sometimes means I am only hitting up the sides or vegetable sections of said cookbooks…but at least it’s fun to look at some recipes and imagine how I could redo them without the use of meat.  I rarely actually put these re-imaginings into action…but it’s the thought that counts.

But then…sometimes I run across a cookbook that was just meant for me.  That was the case on my last visit to the local library, where on the shelf of new books to the library, I spotted one called Wild About Greens: 125 Delectable Vegan Recipes for Kale, Collards, Arugula, Bok Choy. and Other Leafy Veggies Everyone Loves by Nava Atlas.  I get a lot of fresh greens in my CSA bin and a cookbook dedicated specifically to utilizing them in a variety of vegan recipes just totally made my day.  There were few pictures in this book…which makes it difficult to judge a recipe, but one of them that did have a picture was for Curried Sweet Potatoes with Chard and Chickpeas.  And, wow, did it ever look fantastic?!

I just had to make it…and since I had fresh kale in my CSA bin, I changed out the chard for that…and we were golden.  I had everything else on hand except the sweet potatoes, but as my roommate had been craving baked sweet potatoes, we picked up a bunch of them while out grocery shopping earlier that week.

Recipe: Curried Sweet Potatoes with Kale and Chickpeas

Curried Sweet Potatoes with Kale and Chickpeas

Servings: 4-6
Time: Prep 15 minutes; Cook 40 minutes

Ingredients:

  • 1 tablespoon olive oil
  • 2 to 3 cloves garlic, minced
  • 2 large sweet potatoes or 4 medium garnet yams, peeled and cut into large dice
  • One 16- to 20-ounce can chickpeas, drained and rinsed
  • One 16-ounce can diced tomatoes (try a flavorful variety such as fire-roasted)
  • 2 scallions, thinly sliced
  • 2 teaspoons good-quality curry powder, or more, to taste
  • 2 teaspoons minced fresh ginger, more or less to taste
  • 1 teaspoon ground cumin, or more, to taste
  • 8 to 12 ounces kale (or chard, or any other leafy green on hand)
  • 1/4 cup chopped cilantro or parsley, or more or less to taste
  • 1/4 cup raisins, optional (but highly recommended)
  • Salt and freshly ground pepper to taste

Directions:


Heat the oil in a large skillet or a stir-fry pan.  Add the garlic and sauté over low heat until golden.

Add the sweet potato dice and  cup and a half or so of water; bring to a simmer and cook until just tender, adding just enough additional water if needed, as they cook, to keep the mixture moist.

Stir in the chickpeas, tomatoes, scallions, curry powder, ginger, and cumin and bring the mixture to a simmer again; cook over low heat for 10 minutes or so, until the sweet potatoes are tender.

Meanwhile, strip or cut the kale leaves away from the stems.  Slice the stems thinly, and cut the leaves into strips.

Add the kale to the skillet, in batches if necessary, and cover.  Cook briefly, just until the kale wilts, then stir in.  Cook over low heat for 5 minutes, or until the kale is tender but not overdone.  Stir in the cilantro and optional raisins.  Season with salt and pepper, then serve.

~*~*~

Oh…yes!!  This was really, really, really good.  The flavors just worked well together.  I loved how the sweet potatoes and the kale meshed with the variety of spices and seasonings that went into this dish.  It was fantastic.  And it made enough for a couple days between my roommate and I.  I agree with the book…add the raisins.  I did…and it just added a nice bit of texture and burst of sweetness.  I would make this again in a heartbeat.

Delicious.  Nutritious.  Packed with flavor and all things good for you.  Yep…can’t ask for a better supper than that.  YUM!

Recipe: Gluten-Free Avocado Toast

Sometimes the simplest and best meal ideas come from the most unlikely places.  Honestly.  And this recipe is no exception.  Why do I say that?  Because this recipe comes from a cookbook called It’s All Good: Delicious, Easy Recipes That Will Make You Look Good and Feel Great.  What?  That doesn’t sound strange?  What if I told you that the cookbook author is none other than actress Gwyneth Paltrow.

I was at the library last week and spotted this book on the shelf of the new releases.  I picked it up and paged through it, seeing a few recipes of interest.  So, I had my roommate check it out for me (I didn’t have my library card with me) so I could look through it some more when I had more time.  The cookbook pretty much sat on the coffee table until Saturday morning.  I had a race in Frankfort, Kentucky.  Cathy was driving, so this gave me some time to page through the story in the beginning about why this cookbook came to be and a little bit about the author and co-author, Julia Turshen.  And then…I got to soak in the recipes.

One of the most enticing sounding recipes was one that actually didn’t have ingredients listed off.  It didn’t need it.  But when Gwyneth Paltrow compares a recipe to a favorite pair of jeans – “so reliable and easy and just always what you want” – I admit…I get intrigued.  And it sounded so easy.  And so delicious.  And now…I will share it with you.

Recipe: Gluten-Free Avocado Toast

Gluten-Free Avocado Toast

Servings: 2
Time: Prep 5 minutes; Cook 5 minutes

Ingredients:


  • 2 slices gluten-free bread (I used Udi’s Gluten-Free Millet-Chia Bread)
  • 1 avocado
  • Vegenaise (or other vegan mayonnaise)
  • Sriracha (optional)
  • Salt
  • Pepper
  • Red pepper flakes (optional)
  • Lemon juice (optional)

Directions:

Toast the gluten-free bread.  Spread it generously with Vegenaise (or other vegan mayonnaise) and top it off with a few slices of a perfectly ripe avocado, ever so gently pressing the avocado into the bread.  Hit it with a nice pinch of salt or Vege-Sal and a few grinds of fresh black pepper.

~*~*~

Yep…that’s it.  Do make note that I mixed a splash of Sriracha into my Trader Joe’s Vegan Mayonnaise to give it a little kick.  I also hit mine up with a bit of red chili flakes for some added heat.  Gwyneth also suggests adding a little zip to the recipe by giving a squeeze of fresh lemon juice over the avocado toast.  But, the fact is…the sandwich is fantastic on its own with the holy trinity of Vegenaise, avocado and salt.  Simple, but delicious.

If I had a restaurant…this would be on the menu.  For real.

Thank you, Gwyneth Paltrow…for giving me a new breakfast to make.  Because I intend to make this often.  It is so delicious and so healthy…and yes…so easy to make.

GalloLea Gluten-Free Pizza Kit is exactly what NOT to do to gluten-free pizza

GalloLea Gluten-Free Pizza Kit

Product: GalloLea Gluten-Free Pizza Kit – $10.99+

Let’s face it, my gluten-free friends.  When it comes to pizza crust, we usually have two options – make it ourselves…or use the frozen pre-packaged cracker crust pizza shells made by numerous gluten-free companies.  While these aren’t all bad…I have been fortunate enough to go to a few restaurants that actually make gluten-free pizza crust that isn’t crunchy thin and tastes like…real…awesome…pizza…crust.

But, tradition for me is a gluten-free pizza before the night of a big race.  For 5Ks…I’m apathetic on the tradition, but on a 10K or higher…you better believe I want my gluten-free pizza the night before.  I’m a superstitious athlete…and this has just been my magic night-before-the-race fuel.  It just works for me.  But…recently I’m on a tighter-than-usual budget (I blame race fees!), so instead of dropping money at a restaurant, I decided to pull out this kit I purchased at my local Earth Fare awhile back and give it a shot.  It would be…the best of both worlds.  A crust made from a mix that I got to roll out like a real pizza…without it feeling or, hopefully tasting, like those gluten-free cracker crusts of gluten-free pizza monotony.

I should trademark that…

Anyway…

It had been a long day at work and I was rather hungry when I walked inside from a long day at the office.  Immediately I settled into the kitchen to get this pizza working.  I opened up the kit, pulled out the vacuum-sealed pizza crust mix, the sauce packet, and the baking paper that they provided.  I preheated the oven to 450 degrees and put my pizza stone in there to warm up.  So far…so good.  Now came the fun part.

I call this the fun part because this is where I felt like I was really, truly, making a real…yes a REAL pizza.  The crust was vegan, which means it had no eggs added to it and no dairy was involved in making it.  In fact…it took 1/2 cup of water, warmed in the microwave for about 30 seconds, then the pizza crust mix that was provided.  This was a simple blend of organic brown rice flour, organic buckwheat flour, teff flour, sweet rice flour, yeast, organic raw sugar, sea salt and vitamin C.  Seems legit, yes?  Well, I did as instructed and poured the mix into the warmed water, stirring it until it was all incorporated and then making a dough ball, as instructed, in the bowl, covering it with the provided baking paper, and letting it sit for 10 minutes to rise.

While that was happening, I prepared the rest of the toppings…which is whatever you want.  For me…vegan Daiya cheese, avocado, pinapple, tomato, onion, green pepper, and broccolette.  Mmmm…veggie pizza with a hit of sweet pineapple.  It would be epic.  I just knew it.

With my veggies chopped and ready for the pizza, I removed the baking paper…and noticed my dough ball hadn’t even altered in size.  It looked just like it did when I rolled it into a ball and left it there.  Hmmm…

Well, I ran with it.  The baking paper was placed on the counter and I put two teaspoons of olive oil on it.  The dough ball was plopped onto the paper and rolled around into the olive oil, then I grabbed my rolling pin and rolled it out into a 12-inch circle as best I could, doing a horrible job at crimping the edges.  No surprise.  This isn’t my forte.  Anyway, I slid the baking paper with my crust base over to the warm pizza stone and set it on the low rack to begin cooking for about 10 minutes.

GalloLea Gluten-Free Pizza Kit includes a gluten-free pizza crust mix, a sauce pack, and baking paper

When that 10 minutes was up, I pulled it out and did as I was instructed by the kit…I poured the sauce packet on top and spread it out to coat the crust.  The sauce, by the way is a simple blend of organic whole peeled tomatoes, organic tomato paste, organic extra virgin olive oil, organic garlic, organic raw sugar, organic basil, organic oregano and more organic spices.  It sounded organically awesome, honestly.  Pure, natural ingredients.  I like it.  Then, over the sauce I added all the toppings and a scattering of my Daiya mozzarella shreds.  Vegan pizza…is awesome.  Trust me.  And back into the oven it went for another 10 minute baking session, allowing the crust to cook more, the toppings to warm, the cheese to melt, and that pineapple to caramelize.

When 10 minutes was up…the pizza stone came out and my pizza was done and ready to eat.  All of this is around 30 minutes time.  Not too bad for a dough you prep by hand.  That was, actually, my favorite part of this process.  I felt like I was eating something real.  Not just a frozen mass of dough already pre-made for my convenience.  I like getting my hands into things and making and rolling the dough was a nice step in that direction.

So…here it is…the truth, the whole truth…and nothing but the truth.

GalloLea Gluten-Free Pizza Kit let me down.  It just…let me down hard.

I went to slice through the crust and found that it was…very difficult to slice into.  My hopes of having this beautifully crisp yet soft pizza crust flew immediately out the window.  I was already frustrated with the crust and I hadn’t even tasted it.  Once I managed to slice it into fourths and then into smaller pieces for consumption purposes, I took a serving (1/4 of the pizza) to my roommate and served up another serving for myself.  I settled in, hoping the taste would make up for the tough to slice through crust.

Nope.  This crust turned out to be completely tasteless.  It was crunchy and bland…reminding me more of the cardboard flavored gluten-free products of yesterday rather than the amazing flavor, texture, and taste that can come with gluten-free products that are done right.  SO frustrating and aggravating.  I was let down.  The underside of the pizza crust got this amazing crunch to it, but the top, the part that was sauced, turned into a soggy mess.  I’m sorry…pizza crust should not be soggy.  Ever.  It was lackluster, uninspired, bland, and just plain…disgusting.  I almost didn’t want to save the other half of the pizza for the following evening.  But I did…because I didn’t want to waste money.  Ugh.  I reheated it the following night in a skillet, hoping it might improve the crust some.  Nope.  Still a bland, soggy mess of a pizza.

GalloLea…you did everything wrong with this mix.  I mean, who says that pizza crust has to be bland and just…not worth the effort to make it.  I was so disappointed with the time I spent rolling out this dough and preparing it.  The sauce was bitter and didn’t taste good at all.  I’d recommend using your own sauce if you happen to have one of these in your pantry.  I’m just saying.

As for the nutritional worth of this bland pizza crust…with the sauce included…the serving of 1/4 of a pizza will set you back 170 calories, and that’s without counting the toppings you add to it.  There is only 1 gram of fat in the mix and sauce, however, and it does provide 3 grams of fiber and 6 grams of protein.  This mix is also low on sodium (220 mg) and contains only 3 grams of sugar.  It is cholesterol free as well.

Unfortunately…it is also disgusting.  And I was so disappointed that once again I was stuck with a less-than-satisfying pre-race pizza.  I want a good pizza before a race, dammit.  Is that too much to ask?

My recommendation…make your own gluten-free crust.  Don’t rely on mixes.  And if you are pressed for time, there are plenty of tasty, frozen, pre-made gluten-free pizza crusts out there to throw into the oven with your own sauce and toppings.  Don’t waste your time and money on the GalloLea Gluten-Free Pizza Kit.  You will regret it.  I sure did.

GalloLea Pizza Crust stopped with my amazing toppings.  The toppings were the best part.  The crust was horrible!
GalloLea Pizza Crust stopped with my amazing toppings. The toppings were the best part. The crust was horrible!

Nature’s Earthly Choice turns up the power of protein with Easy Quinoa Mushroom & Vegetable Medley

Nature's Earthly Choice Mushroom & Vegetable Medley Easy Quinoa
Nature’s Earthly Choice Mushroom & Vegetable Medley Easy Quinoa

Product: Nature’s Earthly Choice Mushroom & Vegetable Medley Easy Quinoa – $3.99+

By now…many of you know that I am obsessed with quinoa.  I mean…obsessed with it.  It is always in my pantry, ready for me to cook up, fluff up, and serve in a variety of ways.  It is so versatile and can be used not only in cooking, but in baking too.  This ancient grain is a protein powerhouse, something that I love about it.  And it cooks up quicker than rice…and is way  better for you too.

But…sometimes I just need something easy for dinner.  Something I can just throw on the stove and not have to do anything else too.  That’s when Nature’s Earthly Choice steps in with their handy-dandy boxes of Easy Quinoa.  I picked up all four varieties that were available last year when I was in Minneapolis, Minnesota.  Why?  Because I had never seen this item before in any of my grocery stores (a few of my natural food stores now carry these) and…it was quinoa.  QUINOA!!

Yes…that did say last year.  I was in Minnesota to run a race and spend time with my family…and as a reward for doing so well on my run…I picked up some items I had never seen before.  Or even heard of for that matter.  These little boxes of quinoa goodness were just some of what ventured home in my luggage.  As I have tried two of the four varieties so far, you will recall that one was a hit and one was a miss.  So…the other night as I was prepping to head out for a fun run with my running group in Louisville, I needed something easy to make and easy on the stomach.

I pulled one of the Easy Quinoa boxes out of the pantry and hoped for the best.  My selection: Mushroom & Vegetable Medley.

Sounded appetizing enough. I love mushrooms.  I love veggies.  I love quinoa.  Had to be something to it, right?

Cooking this up takes about 20-25 minutes total.  Something I didn’t consider when I thought I would be reaching for something quick.  I sort of missed my group run and ended up running it on my own…by myself.  Ah well.

Quinoa and seasoning packets for Nature’s Earthly Choice Mushroom & Vegetable Medley Easy Quinoa

As I was saying, once the water is boiling, the rest is easy.  But you do need to account for the time it takes to bring the water to a boil.  In a saucepan, add 2 cups of water and the pouch of quinoa and bring it to a vigorous boil.  Reduce the heat to a simmer and add the vegetable and seasoning packet.  Give it a good stir so that everything blends together well.  And then you just let the quinoa cook until it is tender and chewy (white spiral threads appear around each grain) and all the water is absorbed.  Remove the pan from the heat and give this mixture a good fluffing with a fork.

Dish into bowls and settle in to eat.  My roommate and I split the box between the two of us…but there are 3.5 servings per box.  With this already being mentioned, I might as well hit you up with the down and dirty nutritional facts.  One serving will provide your body with 160 calories and 2.5 grams of fat.  The sodium content for something that comes from a box is very low, topping off at 230  mg per serving.  You get 3 grams of fiber and an amazing protein hit of 6 grams.  Awesome.

Every ingredient is something that I recognize.  These include: quinoa, potato starch, onion powder, mushroom extract, dry milk, salt, yeast extracts, sugar, olive oil, soybean oil, garlic, tomato powder, glucose syrup, maltodextrin, celery flakes, spices, natural flavorings, citric acid.

So…how does this concoction of quinoa and dried veggies and spices taste?  Better than I thought it would.  The entire time it was cooking, I kept thinking that it smelled like chicken noodle soup…or some soup of that respect.  It had a really great taste to it though.  The onion and the spices really shine.  I didn’t really get the mushroom flavor, but I’m sure it was blended in there.  What mattered was how good it was.  It had this savory, slightly salty flavor in each bite.  The quinoa was cooked to perfection.  And the flecks of veggies throughout the mix rehydrated really well when added to the water and allowed to cook into the quinoa.  Everything just worked together really well and provided a distinct, and delicious flavor.

You could easily bulk this up into a main dish by adding a protein of choice (for me…tofu…for others, perhaps chicken, shrimp, beef or pork).  Or…adding some sauteed vegetables or even some potato might really turn up the volume.  The possibilities are endless…and that’s what is so great about Nature’s Earthly Choice Easy Quinoa.  And, while the Sundried Tomato Florentine is still my favorite, this one is definitely a close second.  I only have one more variety to try…and I’m really looking forward to it.

Search for these at your local grocery stores and/or natural food stores.  Cook up a delicious protein-filled side or meal in no time flat.  Yep…it really can be that simple.

Nature's Earthly Choice Mushroom & Vegetable Medley Easy Quinoa (prepared)
Nature’s Earthly Choice Mushroom & Vegetable Medley Easy Quinoa (prepared)

Recipe: Gluten-Free and Vegan “Clam” Chowder

Awhile back, Prevention magazine did a profile on Kris Carr.  If you’ve never heard that name before, you’d be inspired by this woman.  She is a best-selling author, a wellness activist, and a cancer thriver.  Yes…thriver.  You see, on Valentine’s Day in 2003, Carr was diagnosed with a rare and incurable stage 4 cancer.  This diagnosis made her want to feel better, love harder, and enjoy life more fully.  She wanted to live life to the fullest…and live it like she meant it.

Part of that journey was changing the way she ate.  She went to a complete lifestyle makeover.  She switched to a nutrient dense, plant-based diet, began exercising, and found joy and fun in everything.

Really…this woman is amazing and her story was one I remembered from the plethora of magazines I receive each month.  I appreciate Prevention for profiling her…because it led me to her book: Crazy Sexy Kitchen.

This book just happened to be on the shelf of my local library.  And after flipping through it briefly…I went ahead and borrowed it.  Immediately I had recipes I wanted to try…but the one that interested me most is the one I made for dinner tonight…and, believe me when I say, it’s worth the effort to make.  I had to make modifications with the ingredients at times, but in the end…it turned into a beautiful dish.

The recipe is below.

Recipe: Gluten-Free and Vegan “Clam” Chowder

Gluten-Free and Vegan
Gluten-Free and Vegan “Clam” Chowder

Serves: 12
Time: Prep 60 minutes; Cook 15 minutes

Ingredients for Cashew Cream:

4 cups whole raw cashews, rinsed under cold water

Ingredients for Kombu Broth:

4 pieces kombu seaweed (I didn’t pick this up, so I used sheets of nori)
2 quarts water

Ingredients for Smoked Mushrooms*:

1 tablespoon small hickory chips
1 heaping cup diced king trumpet mushrooms

*(NOTE: I had 10 ounces of crimini mushrooms on hand and no stovetop smoker, so I improvised…)

Ingredients for Chowder Assembly:

1 tablespoon canola oil
1 cup diced white onion
1/2 cup diced celery (I used diced carrot because I didn’t have celery, but I did have plenty of carrots)
1 cup peeled and diced baking potato
2-1/2 to 3 cups water
1 teaspoon lemon juice, more to taste
1/2 teaspoon Tobasco or other hot sauce, more to taste (I used Sriracha)
2 teaspoons kosher salt, more to taste
1 teaspoon black pepper, more to taste

Directions:

Prepare Cashew Cream:  Put the cashews in a bowl and cover with water.  Cover with plastic wrap and refrigerate to soak overnight.

Drain the cashews and rinse under cold water.  Place the cashews in a high-speed blender (this will need to be done in a couple of batches) and add enough water to cover by an inch.

Purée until completely smooth.  If needed, pass the cashew purée through a fine strainer to remove any course bits; the final “cream” should have a smooth, thick consistency of heavy dairy cream.  This will make about 3 cups cream (consistency will depend on the amount of water added while blending, and can vary from just over 2 cups to about 3-1/2 cups; thin as desired)

Prepare Kombu Broth*: Combine the combu and water in a medium pot and bring to a simmer.  Reduce the heat to a gentle simmer and cook 40 minutes, then strain.  This makes about 5 cups kombu broth, more than is needed for the remainder of the recipe.  The broth will keep, covered and refrigerated, up to 10 days.

*(Note: I didn’t have kombu on hand, so I used nori sheets, and followed the instructions as if they were kombu.  The flavor was probably milder than it would have been…but this worked.  I did, however, have to press on the nori to wring out the rest of the broth)

Prepare Smoked Mushrooms*: Prepare a stovetop smoker: Spread the chips in the base of the smoker, directly over the burner.  Place the drip pan (if using) over the chips and a rack on top of the drip pan.  Place the diced mushrooms on the rack (be sure to use a rack fine enough so the mushrooms don’t fall through) indirectly over the chips (do not place the mushrooms directly over the chips, as this can cause them to oversmoke and turn bitter).  Partially cover the smoker with a lid, leaving it open a cuple of inches.  (If you do not have a commercial stovetop smoker, you can substitute by using a heavy roasting pan, a cake rack, and heavy duty foil to cover the pan as a lid.)

Heat the smoker over medium heat just until you see smoke escaping through the opening.  Close the smoker entirely and gently smoke just to infuse the mushrooms with smoke flavor, not to cook, 3 to 5 minutes.  Be careful not to oversmoke, or the mushrooms will become bitter.

*(Note: I don’t have a stovetop smoker or anything I could have used to do the makeshift one…so instead I went about this a little differently.  After rinsing my mushrooms and cutting the stems even to the caps, I put them in a bowl with 1/4 cup olive oil, 2 teaspoons of Liquid Smoke (make sure it is a gluten-free brand), a touch of salt, and some kelp granules.  I mixed this until everything was coated then placed them on a baking pan and roasted in a 350°F oven for 45 minutes.  I then diced them as the recipe called for. It yielded perfect results.)

Assemble Chowder: Heat the oil in a medium-size soup pot over medium-high heat.  Add the onion, celery (in my case, carrots), and potato.  Sweat the ingredients, stirring frequently, until softened, 8-10 minutes.

Add 1-1/2 cups each of the Kombu Broth, Cashew Cream, and all the smoked mushrooms.  Reduce the heat, and cook over low heat, stirring frequently, for 10 to 15 minutes to develop and marry the flavors.  The Cashew Cream will thicken as it cooks, and you will need to add water from time to time to thin and adjust the consistency.  We added about 3 cups of water as the soup cooked.

Season with lemon juice, Tobasco (or hot sauce of choice), salt, and pepper.  Taste and adjust the seasonings as desired.  This makes a generous 2 quarts of soup.

~*~*~

This recipe looks labor intensive at first glance, but I soaked the cashews overnight and making the cashew cream was a synch.  As for the broth, I made that ahead as well and let it chill in the fridge.  Then, when I needed it, I poured out the amount for this recipe and it was all set to go.  All I really needed to do was chop the vegetables and get everything cooking.

And what emerged was a flavorful, creamy, delicious vegan clam chowder.  The flavors were awesome.  And the texture of the mushrooms after roasting in the oven for that long was just like a clam tasted (back before my vegetarian days and when chowder was safe to eat).  I wasn’t sure what to think about this as I started to cook everything together in my big pot on the stove, but the end result was awesome.

I can’t wait to heat up more and enjoy it all over again.

As a side note, this soup is freezer-friendly.  So go ahead and freeze the extra if needed and allow it to thaw when you’re ready to have more.  Otherwise, the soup does keep for about 1 week in the fridge.

This is TOTALLY going to be made over and over again.  Shockingly delicious.  But, then again, Kris Carr enlisted the help of Chef Tal Ronnen for this one…so it’s no surprise this soup is packed with awesomeness.

Make it.  Go ahead.  I dare you!

Create your own pizza on Udi’s Gluten-Free Pizza Crust

Special Delivery of Udi’s Gluten-Free Goodies – including brand new products!

Product: Udi’s Gluten-Free Pizza Crusts (2 Pack) – $5.99+

It was October 24, 2011 when I first was able to finally try Udi’s Gluten-Free Pizza Crusts.  I remember the day like it was just yesterday instead of almost two years ago.  At this point, my gluten-free journey was in the beginning stages.  I had tried Udi’s bread…and loved it.  But that was basically all I could find in my area…until one day…the gluten-free gods smiled upon me…and one of my local stores started carrying Udi’s Gluten-Free Pizza Crusts in their freezer section.  I was so happy (and hungry) at that moment, I damned my budget, threw a pack of them into my cart and went home to make some gluten-free pizza for dinner.

Almost two years ago.

Sometimes things change over the span of a couple years.  Companies toy around with recipes…sometimes because it is needed (Udi’s Gluten-Free Cinnamon Rolls…yes…you…and I still am not the biggest fan of those)…and sometimes because they just want to see if they can improve on the awesome product they already have on the market (Rudi’s Gluten-Free Bread…your new recipe is awesome!).

One thing that hasn’t changed, however, is the quality, taste, and sheer awesomeness that comes in each pack of Udi’s Gluten-Free Pizza Crusts.  Sure, Udi’s now makes pre-topped frozen pizzas…and those are all fine and good.  But sometimes…most of the time…I have my own pizza toppings in mind and I want to get into my kitchen and draw on my inner allergic chef and just…create.

Udi's Gluten-Free Pizza Crusts
Udi’s Gluten-Free Pizza Crusts

Most people would think that would mean…make your own gluten-free crust.  I have.  And sometimes I still do.  But when you’re hungry or in a hurry…you work with what is available to you.  And what my area happens to have in almost every grocery store now…are Udi’s Gluten-Free Pizza Crusts.  And I couldn’t be happier about it.

Recently, I received an amazing box of gluten-free goodness from Udi’s of products, both classic and new…to try for my blog.  One of the included items was a pack of their Gluten-Free Pizza Crusts.  As I run a lot and my favorite pre-race meal is gluten-free pizza…this had me stoked.  I already knew I was a huge fan of their pizza crusts…although it had been…probably about a year since I had last had one.

Well, yesterday I ran two 5K races…one in the morning and one in the evening.  And that meant…Friday night was gluten-free pizza night.  Normally, my roomie and I would just pick a local restaurant that had a respectable, safe gluten-free pizza on the menu.  But…we’re on a tight budget this month…and now…I had pizza crusts in my freezer.  So…yes…I would make my own.

I got out my pizza stone, put some cornmeal down, then got the pizza crusts out of the freezer.  I removed one of them and put the other one away.  Once my pizza stone was properly heated and the corn meal beginning to brown, I placed the crust down on the stone and began to top it with what ingredients I had on hand.  I made my own version of a gluten-free and vegetarian Hawaiian pizza.  A little marinara, some homemade gluten-free and vegan bacon, some red onion, chunks of fresh pineapple, and topped it off with Daiya mozzarella vegan cheese.  Oh…my pre-race meal was already making me drool and it still had to bake.

Udi's Gluten-Free Pizza Crust (ready for toppings and baking)
Udi’s Gluten-Free Pizza Crust (ready for toppings and baking)

Into the oven it went for about 10-12 minutes.  It smelled fantastic as it started to bake, the cheese getting melty and gooey…the pineapple beginning to caramelize under the heat of the oven, the crust turning to that perfect golden brown.  Oh yes…this was gluten-free pizza that was going to get me through two races in one day.  And it was turning into pizza perfection.

And the best part was…I still LOVED it.  Every last bite of it.  My pizza turned out brilliantly.  The crust baked to a crispy, yet still chewy, perfection.  It was able to sustain the heavy pineapple chunks among the other toppings.  And it tasted so good.  SO good.  This crust is light and thin, so you don’t feel like a glutton for downing half of the entire crust (which is the serving size, BTW).  I am just as in love with these pizza crusts now as I was almost two years ago.  Nothing about them has changed.  They are amazing.  Top them off however you wish.  You can’t go wrong when you’re making it your own.  And thanks to Udi’s…you can do this on a super busy  night…or if you just want to have some time to relax.  Pizza doesn’t have to be about making your own crust.  Let Udi’s do that for you…because this is a crust worth slicing into and devouring.

Nutritionally speaking, this is also one of the best pre-made gluten-free pizza crusts on the market.  The serving size, as I mentioned before, is 1/2 of the pizza.  It makes sharing with someone so simple and easy.  My roomie gets her half and I get mine.  I leave a zone between the halves for easy slicing, as she uses real cheese on hers…whereas I am lactose intolerant and use vegan cheese on mine.  It works out beautifully.  A serving of the crust alone will only set you back 190 calories and 5 grams of fat.  Trust me…this is on the low end of most of the pre-made gluten-free crusts out there.  Believe me…I have searched.  On top of that, your half of a pizza serves up 4 grams of protein.  AWESOME.

These crusts are made from a blend of tapioca starch, brown rice flour, water, canola oil, egg whites, evaporated cane sugar, tapioca syrup, tapioca maltodextrin, salt, xanthan gum, yeast, and cultured corn syrup solids (to prevent mold).  Combine it and what you end up with is one of the best gluten-free pizza crusts in your grocer’s freezer section.  These have been on the market for quite awhile…but if you are new to the gluten-free lifestyle or just haven’t spent the money to try them out…I encourage you to do so…and do so now.  These are fantastic and…make having a pizza party a whole lot less stressful.

Bake up one for yourself and taste the awesomeness of Udi’s Gluten-Free Pizza Crusts.  No really.  Do so.  Pizza waits for no one.

Gluten-Free and Vegetarian Hawaiian Pizza made on Udi's Gluten-Free Pizza Crust
Gluten-Free and Vegetarian Hawaiian Pizza made on Udi’s Gluten-Free Pizza Crust

Slide into a vegan and gluten-free burger season with SoL Cuisine’s Original Sliders

SoL Cuisine Original Sliders

Product: SoL Cuisine Original Sliders – $5.49+

For the past month or so, I’ve been experimenting with dinner rolls…as slider buns.  And having found out that my very own local allergen-free bakery, Annie May’s Sweet Café, makes the best I’ve ever tasted…well…sliders have become one of my go-to menu items.  And with summer on the way, despite not having a grill, it is burger time.

BUT…being a gluten-free vegetarian sometimes means…I have to make my own sliders.  And, trust me, some recipes work out better than others.  For one thing, mine tend to not want to hold together, turning to mush and not really having that “meaty” texture to them.  Granted, the two recipes I’ve done haven’t really lent themselves to being faux meat, but…the thought was there.  When you bite into something that is meant to be a burger…that’s sort of the texture and taste that you are going for.

The other day, after buying yet another bag of allergen-free dinner rolls from Annie May’s…and knowing I had plenty of fresh produce in my fridge…I thought…sliders for dinner on Sunday might be awesome.  The thing was…I really didn’t want to make my own.  It was a super-busy weekend as it was…and Sunday I had spent a majority of my day listening to the Dalai Lama speak in Louisville.  I was starving when I got out of there (no gluten-free and vegetarian options at the venue) and after downing some ice cream…I went grocery shopping for…the Poblano Chick(pea) patties I blogged about not too long ago.  Except…the store didn’t have them anymore.  My plans were about to go down the tubes.

But…then I remembered the glorious day I spotted SoL Cuisine Sliders (vegan and vegetarian, mind you) at Whole Foods in their freezer section.  While it would mean I’d have yet another blog to write (I was backlogged enough I thought) on a product I could eat…I really wanted some real food for dinner that night.  So…neglecting my initial response to make something I’ve already had before…my roommate and I headed over to Whole Foods and picked up a box of SoL Cuisine Original Sliders.

It was like it was meant to be.  Because this box contained six sliders…and I had six dinner rolls.  Awesome!  Granted, the serving size for this product is 2 patties…we really weren’t out that much more by adding one more for each of us for dinner.  A serving (2 sliders…remember…) will set you back only 100 calories.  Yep.  50 calories per slider.  Not too shabby, right?  I thought it was awesome.  The normal serving size also provides a fantastic 13 grams of protein!  These vegan and gluten-free burgers are are low in sodium (240 mg) and have 3 grams of fiber.  I think I should also mention that two patties is only 3 grams of fat as well.  How awesome are these little veggie burgers of gluten-free wonder?!

SoL Cuisine Original Sliders

And they weren’t difficult to prepare either.  You can grill them, microwave them, cook them stove top, or put them in the oven.  I had other things to prep with dinner…so I decided to do the oven method.  I hoped this wouldn’t backfire, as I’m sure grilling or even doing it stove top would have gotten a nice crisp on the outside of these little patties.  That being said, I prepped a cooking sheet and laid out all six patties, putting them into a 350°F oven.  They had to cook for about 10 minutes on one side…and then flip them over and cook for another 10 minutes on the other side.  Perfect, as I would have to throw my dinner rolls in to toast them up for my condiments and add-ons.

They smelled fantastic while they were cooking.  And in that time I mashed up an avocado for the sliders, cut up some lettuce, chopped up a tomato, and sliced into an onion…all in the name of gluten-free vegan slider goodness.  When the rolls and the sliders emerged, it was time to assemble the burgers.  And I was starving and ready to eat.

So easy.  A touch of avocado, then lettuce, the slider, vegan cheese, tomato, onion, and then more avocado before placing the top of the dinner roll on and making…the perfect slider.  I did this for all of the rolls and patties and served them up to my roommate and I for dinner.  She was already digging in by the time I finished putting mine together…and she was raving about the flavor.  This was good news, as the SoL Cuisine Tofu Rubs were just…meh…okay.  I settled in for my own dinner and lifted a slider to taste.

Oh…yeah…these are keepers.  These are one of those products that will continue to find its way into my freezer.  Seriously!

The SoL Cuisine Original Sliders are amazing.  They are perfection.  They taste meaty without being made from meat.  In fact…they have such great texture and taste, if you closed your eyes, you’d think you were truly eating a burger.  It’s amazing.  It’s awesome.  I am in love with these.  Not only do they have fantastic texture and flavor, but they pair so well with any topping you might want to put on there.  I heaped these sliders full with different condiments and vegetables, and they didn’t detract at all from the taste of the burger.  These definitely compliment anything you top it off with.  Or…if you want to sneak a taste on its own (like I did…for the sake of the blog) know that they are also very delicious on their own.  Three sliders were so filling.  But I was happily stuffed.

The SoL Cuisine Original Sliders are gluten-free and vegan.  They are also kosher, and are a great source of calcium and iron.  And what, exactly are they?  Well, according to their ingredient listings, these little patties of meat-free, gluten-free goodness are composed of filtered water, soy protein concentrate, sunflower oil, dried onion, modified vegetable gum, dried tomato, sea salt, dried garlic, spices, organic lemon juice concentrate, and caramel color.  I love seeing ingredients that I recognize.  Love it.

So, not only are these a healthy choice for a meal, but they are delicious as well.  I can’t wait to purchase more of these, or even try the other two slider varieties in the freezer section: Spicy Black Bean Sliders and Quinoa Sliders.  Both sound…awesome!  They will both be purchased for the sake of the blog and consumed.  I hope they can live up to the high bar the Original Slider set.  Totally loving my gluten-free and vegan sliders.  Thanks to SoL Cuisine…I don’t always have to make my own.  Sometimes…I can just cook them up and leave the prep to someone else.

Gluten-Free and Vegan Sliders made with SoL Cuisine Original Sliders