Restaurant Review: Cap City Fine Diner and Bar, Columbus, Ohio

Cap City Fine Diner and Bar, Columbus, Ohio

Restaurant: Cap City Fine Diner and Bar, Columbus, Ohio

Twas two days after my friend Jenn’s birthday and I was visiting her.  That was not planned.  Okay…maybe it was.  I mean…birthdays are so much fun and I wanted to go visit Jenn anyway.  The need to get away from life where I am currently living was a necessity more than anything.  And good friends always offer the best times when you need your spirits lifted and your soul cleansed.

After a morning of delicious gluten-free crepes and an afternoon spent out shopping at the used book stores, a treat at Jeni’s Splendid Ice Creams,  and a stop at the natural food store that literally BROKE my budget (OMG…gluten-free things that I had not even known existed!), Cathy and I were going to take Jenn out to dinner to celebrate her birthday.  I let her know ahead of time and she, even though she didn’t have to, chose a place that features a gluten-free menu.

The place…Cap City Fine Diner and Bar.

And at 5 p.m., we rolled up, parked, and made our way into the restaurant.

First of all, the place was nothing like I expected.  Located on the end of a strip mall, the outside is very unassuming…save for the 50’s style door you walk through to enter the diner.  We were greeted by the hostess after a moment and requested a gluten-free menu for me.  We were shown to a table and settled in when our waitress, Candie, came over to get our drink orders.  Despite the day of celebration, we all just stuck to water.  She went over some specials, and the vegetable soup did spark my interest.  So, after she went to fetch our waters and returned, I asked if it was gluten-free.  She said she thought it was, but she would go double-check.  When she returned, she regretfully informed me that it was not gluten-free.  I had to options in mind for dinner.  They had gluten-free fries offered and that was really tempting.  If I did that, I’d be getting a salad.  And it was pointed out by Jenn and Cathy that I could get a salad anywhere.  True…but I can’t get fries everywhere.  That being said, I made up my mind.

Cap City Fine Diner and Bar's Gluten-Free Dinner Rolls
Cap City Fine Diner and Bar’s Gluten-Free Dinner Rolls

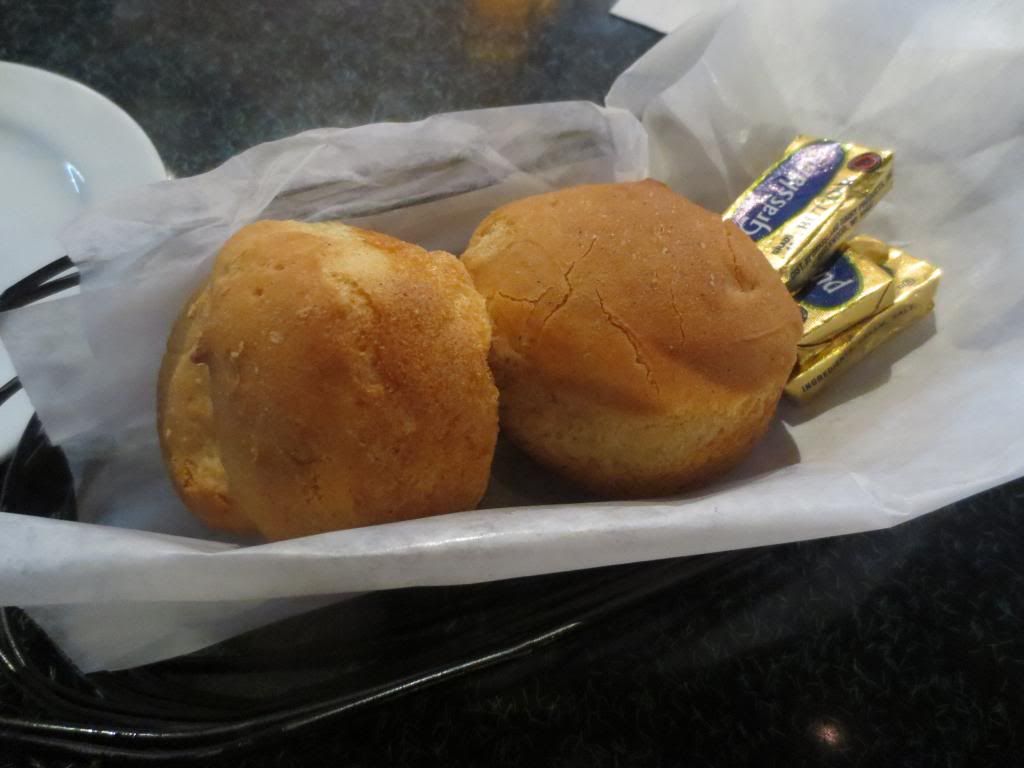
Cathy and Jenn ordered what they normally order when we go out to a restaurant that has this on the menu – Fish and Chips ($15.99).  As for me, I went with the Gluten-Free Seasonal Vegetable Plate ($14.99).  Candie asked if I wanted some gluten-free dinner rolls.  I was taken aback.  I wasn’t expecting that.  I eagerly nodded my head and gave her a “Oh…yes please!”  Happiness.

Orders were in, and we fell into conversation about future plans, things happening around us, the waiter with the really awesome mustache, ate dinner rolls (mine gluten-free…theirs regular)…that sort of thing.  The dinner rolls, for the record, were warm, flaky, and delicious!  I kept myself to just one.  And then…our actual food arrived.

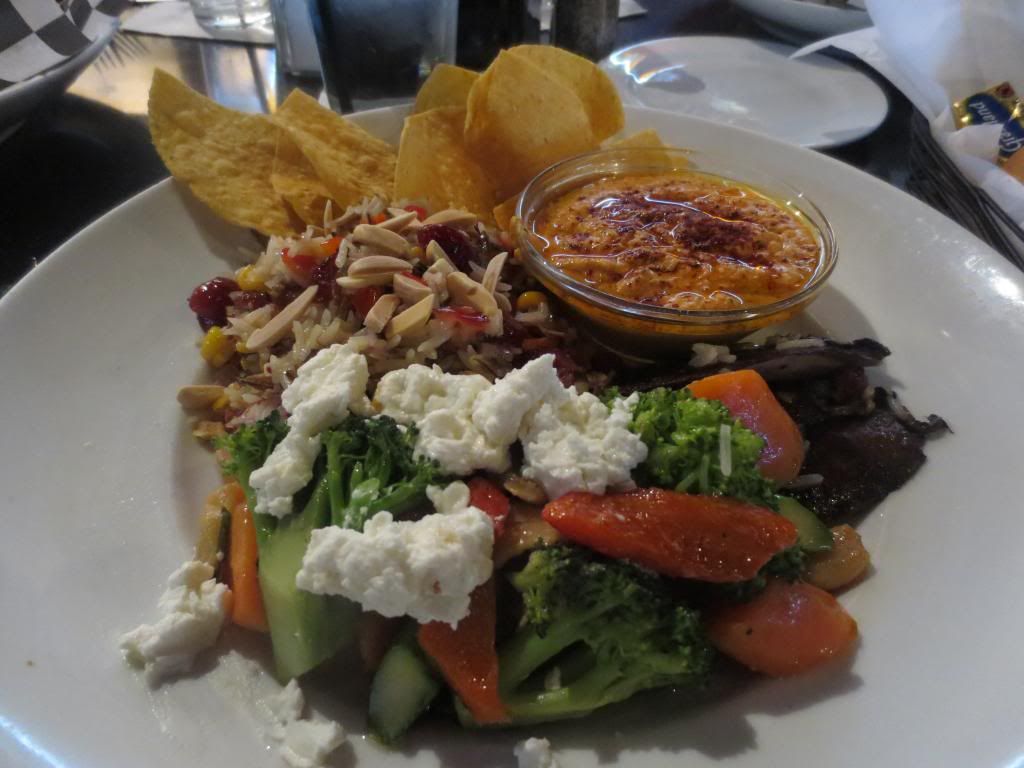
My veggie plate looked amazing.  I mean…I read the description, but this was beyond what I expected.  This plate was stunning.  The colors were vibrant.  The presentation was inviting.  I was beyond impressed and totally ready to dive in and try it out.  But, I composed myself enough to take a picture.  Then let my roomie photograph her fish and chips for her own blog (which maybe one day she’ll actually put up on the interwebs).  And then she promptly stole some of my rice…because she said she really wanted to try it.  LOL!  I also let her steal a tortilla chip and some of the hummus.

Oh…I’m getting ahead of myself here.  I haven’t yet described the actual food on the dish yet.  The menu described the Gluten-Free Seasonal Vegetable Plate as being composed of very wild rice, sliced almonds, goat cheese, roasted red pepper hummus, warm roasted vegetables and cured olives.  I asked for my plate to not include the olives because I disdain olives so much.  I don’t even want to have to pick around them.  The plate came with corn tortilla chips on the side.  The rice had the slivered almonds, corn and craisins in it, really amping up the volume as well as the presentation.  The roasted vegetables were a mix of asparagus, broccoli, carrots, red pepper, portobello mushrooms and garlic.  It was topped off by a very liberal sprinkling of goat cheese.  It looked fantastic.

And it was.  Just popping with flavor.  The corn tortilla chips were my least favorite part, actually and ended up being left on the side of the plate.  The vegetables were roasted to perfection, however.  Packed with flavor and cooked just enough to get them to that brilliant bright hue that catches the eye and really whets the appetite.  I was SO ready for bite after bite.  I ended up using dabs of hummus on my vegetables.  The roasted red pepper hummus was good, but I found it to be very oily and a bit bland.  I felt like it needed a little more seasoning or spice to it.  Believe it or not, though, my absolute favorite part of this entire dish…was the very wild rice.  I loved the play on flavors and textures with the perfectly cooked rice, the crunch of the slivered almonds, the sweetness from the corn and the craisins.  It was absolute perfection.  Everything meshed and mingled well on the plate and I was quite content with eating it.

If I had one complaint it was that the entire plate was swimming in oil.  While I love olive oil as much as the next person, I think there is a thing as way too much.  And this definitely got to that point.  But, the flavors were great and I devoured everything but the chips.  Delicious!

Would I dine here again?  I’d be willing to give it a try.  I might do the salad and french fries next time though.  Cathy said she’d be willing to try a burger the next time as her fish was good…and fell solidly in the middle of everywhere she ate up until now.  Not a bad showing…but it didn’t wow her enough to try it again.  But…each of us are willing to give it another try with other food options.

So, a good showing by Cap City Diner.  We had a great time there.  And we did enjoy the food.  It was a great night out with good friends and that was fantastic in and of itself.  Good food and good times.  Just what I needed.

Cap City Fine Diner and Bar's Gluten-Free Seasonal Vegetable Plate
Cap City Fine Diner and Bar’s Gluten-Free Seasonal Vegetable Plate

Restaurant Review: Village Tavern, Birmingham, Alabama

Village Tavern, Birmingham, Alabama

Restaurant: Village Tavern, Birmingham, Alabama

I’m so disappointed.

I know…any blog that starts with those three words can’t be good, right?  Right.

And, sadly enough, that’s the way of it when it comes to Village Tavern in Birmingham, Alabama.

First of all, finding a restaurant in the South for gluten-free food is not always easy.  There are some, but when you are craving gluten-free pizza…when you require it…well…things can get a bit tricky.

But, after a little research, Cathy and I found Village Tavern in Birmingham, Alabama for the recent journey down there.  I was going to have a great dinner out with my sister, her youngest son, and a great friend of mine…Michelle!

The company at dinner was great.  I hadn’t seen Michelle since I left Alabama eight years ago.  She hasn’t changed a bit.  She’s still bubbly with the best laugh ever.  And my sister…well…she really made it a fantastic night tonight.  I always enjoy my time with my sister.  There isn’t enough of it in my life.  But…tonight…I got her and her youngest son and that was awesome.

So, the five of us total were seated and given our drinks.  We all had water.  Hydration, friends.  Always water.  Then…after a little back and forth, we were ready to order.  My sister opted for the Chicken Quesadilla ($7.95), which came with a salsa and a dipping sauce as well.  She got my four year old nephew the kids Cheese Pizza ($4.95)…which is HUGE for a child, honestly.  He loved it.  Even said it was the best pizza he ever had.  Adorable.

Michelle got the Spring Rolls ($8.95), which she seemed to like.  They weren’t what I was expecting honestly.  But they sure did look good.  With that she got a side Mixed Greens Salad ($4.95).

Cathy and I chose to split a Gluten-Free Margherita Pizza ($8.75), which is a 10-inch pizza.  Usually that’s the standard for a restaurant.  And she got the Tavern Salad ($8.50) to go with it as she hadn’t had any vegetables all day.  I opted for a side of the Broccoli ($4.00).  And that was that…orders in.  We had the chance to sit, talk, catch up and all of that while we awaited the arrival of the food.  And when it came…it smelled fantastic.

Problem:

The waiter knew Cathy and I were splitting the gluten-free pizza…and yet…no extra plate was brought out.  Secondly…the waiter forgot about Cathy’s salad.  In fact, he didn’t even put it on the ticket.  So…yeah…that had to be corrected.

But the greatest problem…the biggest offense…

My gluten-free pizza dough was RAW!  Like…gooey…uncooked rawness.  I was beyond disappointed.

While I was waiting on a plate, Cathy went ahead and started on her half of the pizza.  When my plate finally was brought to the table, well…it took two tries.  First one was a small plate…which was fine.  But soon after that was left for me…a larger, must better suited plate arrived at the table.  Fantastic.  Thank you.  Cathy dished up my half of the pizza and I picked up my fork and knife to slice through what I was expecting to be a crispy crust.  This was that infamous gluten-free cracker crust that all gluten-free pizzas have.  But there was no crunch.  No crispness.  Mushy…soggy…still stretchy doughiness.  Yes, doughiness is a word…because I used it in a sentence.  The disappointment on my face must have been evident because my sister and Michelle both were like…”Is it not good?”  I held up a piece of the dough and said…”It’s not cooked!”

The best part of the pizza was the crust on the edge…because that actually WAS crispy and cooked through.  I know with cracker crusts there is a fine line between crispy and burnt…but this was on a fine line of being fresh from the package and undercooked.  The toppings weren’t even that impressive.  The pizza was just REALLY disappointing overall.  I was not impressed.  Not happy.  And just MEH about the whole thing.

At least I had good company and good conversation.

I had it in my head to return to Village Tavern with my parents the following night, but I was so unhappy with that pizza, that I’m judging the rest of their gluten-free options based on that…and will find somewhere else to eat.  I don’t think I’ll ever be back.

Village Anchor's Gluten-Free Margherita Pizza (doughy disaster)
Village Anchor’s Gluten-Free Margherita Pizza (doughy disaster)

Recipe: Homemade Gluten-Free and Vegan Bacon

It was almost five years ago that I made a decision to become a vegetarian.  And as of this month…three years ago that I had to go gluten-free.  My…time sure does fly!  That being said, when I first became a vegetarian, my life was filled with Morningstar Veggie Bacon Strips and faux meat products…which…looking at now makes me cringe due to the number of chemicals and processed crap that are in them.  Besides that…most all processed-to-death faux meat products contain vital wheat gluten…which means…I can’t consume it anyway.

Honestly, after three years I’ve worked around this.  But, you see, my roommate has a love of BLT sandwiches.  As you know, Cathy eats what I eat at home, so she’s 80% gluten-free and vegetarian.  But when we go out…meat is her treat (think those Beggin’ Strips commercials…).  Anyway…she’s acquired this taste for BLT sammies…and with a plethora of lettuce from my CSA bin, she put in that request.

So…I needed bacon.  And no one makes a gluten-free and vegetarian version of this.  So, I had to make it myself.  And it’s mainly made up with…beans.  So…beancon?  I guess?  The recipe was adapted from the No Meat Athlete…and now…will forever be made and kept in my kitchen.  What’s even better…after you cook the batter up and slice it, the slices can be kept in the freezer and go immediately from the freezer to the pan.  Oh yeah…beancon time!

Recipe: Homemade Gluten-Free and Vegan Bacon

Homemade Gluten-Free and Vegan Bacon

Servings: 24-32
Time: Prep 20 minutes; Bake 10 minutes

Ingredients:

  • 1/2 cup dried adzuki beans, or other small red beans
  • 1/3 cup whole grain buckwheat groats (not buckwheat flour)
  • 1 tsp onion powder
  • 1/3 tsp garlic powder
  • 1/3 tsp rubbed sage
  • 1/2 tsp thyme
  • 1-1/2 tsp smoked paprika
  • 1 tsp liquid smoke (not all brands are gluten-free, but Colgin is…and that’s what I use)
  • 3 tbsp pure maple syrup
  • 1-1/2 tbsp coconut aminos (I subbed San-J Gluten-Free Tamari)
  • 1 tbsp tomato paste
  • 1-1/2 tbsp nutritional yeast (optional)
  • 1 tsp coconut oil (may sub any oil you prefer)
  • 1/2 tsp salt

Directions:

Rinse the beans and buckwheat, place in large bowl covered with several inches of cold filtered water; let soak overnight.

Preheat the oven to 400°F.

Drain and rinse the soaked beans and buckwheat.  Place in the bowl of a food processor fitted with an s-blade, along with all of the other ingredients. Pulse several times to combine, scrape down the sides and bottom of bowl and continue pulsing until uniform, but not completely pureed.

Line a 9 x 13 casserole dish or rimmed baking sheet with parchment paper and spray with baking spray. Place bacon batter in pan and spread evenly with a spatula.  You may choose to spray another piece of parchment paper lightly with baking spray and press the paper on top of the mixture and flatten with your hands.  Remove and discard the top piece of parchment paper, then use a spatula to spread over and fill in any bare spots.

Bake for 10 minutes.  Remove from oven and let cool for 10 minutes.  Slice into 24-32 strips, whatever size you prefer, I cut mine into 1 inch by 4 inches slices (Do this by making one lengthwise cut down the center, and then 12-16 cuts across the shorter side).

At this point freeze any strips your don’t plan on eating immediately. Frozen strips can go straight into the skillet at a later date, no need to thaw first. To fry, heat a skillet with a small amount of oil and fry both sides to desired level of crispiness. You may also choose to fry slices in cooking spray, for a less crispy, but still very delicious result.

~*~*~

The liquid smoke gives it that smokey feeling of bacon and they taste great.  Honestly.  I made this once before and used them on breakfast sandwiches, to pair with pancakes, and now…on BLTs.  Brilliant recipe.  Bacon really can be for everyone…even gluten-free vegetarians and vegans.  Because this no meat treat is a delicious, homemade, and easy recipe.  And no chemicals.  Real food.  Real good!

Gluten-Free and Vegan BLT Sandwich

Recipe: Broccoli and Goat Cheese Soufflé

Tonight…I made my first soufflé.  I’m not going to lie…it made me feel chef-y.  Really, really chef-y.

Because soufflé’s can be tricky.  They are picky.  They are very, very, very difficult to master.  And this recipe seemed easy enough…so I decided to give it a try.

The result?  A light, airy, fluffy treat that made for a delicious dinner.  It wasn’t perfect, but for my first soufflé, I’m quite happy with the results.  It tasted phenomenal.

The recipe comes from Eating Well magazine, one of my favorites.  And yeah…I’ll make this again in a heartbeat.

Recipe: Broccoli and Goat Cheese Souffle


Broccoli and Goat Cheese Soufflé

Servings: 4-8
Time: Prep 25 minutes; Cook 20 minutes

Ingredients:


  • 1-1/2 cups finely chopped broccoli florets
  • 1 tablespoon butter
  • 1 tablespoon extra-virgin olive oil
  • 2 tablespoons all-purpose flour (I used Better Batter Gluten-Free All Purpose)
  • 1-1/4 cups low-fat milk (I used unsweetened almond milk)
  • 1 teaspoon Dijon mustard
  • 1/4 teaspoon dried rosemary
  • 1/4 teaspoon salt
  • 1/2 cup crumbled goat cheese
  • 3 large eggs, separated
  • 2 large egg whites
  • 1/4 teaspoon cream of tartar

Directions:

Preheat oven to 375°F.

Coat four 10-ounce ramekins (or a 2- to 2 1/2-quart soufflé dish) with cooking spray and place them on a baking sheet.

Place broccoli in a medium, microwave-safe bowl.  Cover and microwave until the broccoli is tender-crisp, 1 to 2 minutes.  Set aside.

Melt butter and oil in a large saucepan over medium-high heat.  Whisk in flour and cook, whisking, for 1 minute. Adjust heat as needed to prevent the mixture from getting too dark; it should be the color of caramel.  Add milk, mustard, rosemary and salt and cook, whisking constantly, until thickened, 1 to 2 minutes.  Remove from heat and immediately whisk in goat cheese and 3 egg yolks until well combined.  Transfer to a large bowl.

Beat the 5 egg whites in a medium bowl with an electric mixer on high speed until soft peaks form.

Add cream of tartar and continue beating until stiff peaks form.  Using a rubber spatula, gently fold half of the whipped whites into the milk mixture.  Gently fold in the remaining egg whites and the reserved broccoli just until no white streaks remain.  Transfer to the prepared ramekins or soufflé dish.

Bake until puffed, firm to the touch and an instant-read thermometer inserted into the center registers 160°F, about 20 minutes in ramekins or 30 minutes in a soufflé dish.

Serve immediately.

~*~*~

Easy.  I was blown away by how easy this was to make.  I was hoping mine would puff up a little more, but that will come with more practice.  For now, so very happy with the results of this soufflé.  My roommate and I both enjoyed the taste and the fluffy, airy texture.  And the recipe…so clean.  So amazing.  And yeah…the perfect meal to end a busy day.

Go ahead.  Don’t let the idea of a soufflé scare you.  Give it a whirl.  You might surprise yourself.

Recipe: Shredded Rainbow Salad

You ever look at the food you have in your fridge and wonder what you might be able to make with all of it?  Especially when, in the next couple days, another fresh produce delivery will land on your doorway and you’ve barely scratched the surface of the last bin as it was delivered later than usual due to weather?  Or something to that affect?

That’s my life these days.  The Polar Vortex caused there to be a delay in my CSA bin delivery…which isn’t a problem…but it gave me fewer days to work through the fresh produce.  I’ve managed some…but I still have plenty left.

That being said…Jamie Oliver came to my rescue tonight.  For dinner I got out my brand-spankin’-new food processor and whipped up a delicious, healthy, and colorful salad from the fresh produce I had on hand.  The dressing was a magical touch.  Talk about clean eating!

Recipe: Shredded Rainbow Salad

Shredded Rainbow Salad

Servings: 8
Time: 20 minutes

Ingredients for Salad:

  • 2 raw medium beets (any color) trimmed, scrubbed & quartered
  • 4 leaves kale
  • 2 large carrots, scrubbed & trimmed
  • 1/4 white cabbage, quartered
  • 1 apple, quartered
  • 1 cup walnuts, roughly bashed


Ingredients for Dressing:

  • 1 teaspoon Dijon mustard
  • 3 tablespoons apple cider vinegar
  • 6 tablespoons extra-virgin olive oil
  • sea salt & ground pepper
  • Gluten-Free Tamari
  • hot sauce (I used Sriracha)


Directions:

Put a coarse grater attachment into a food processor and push ingredients through in the following order (to stop the beets from staining everything): beets, kale, carrots, white cabbage and apple. (If your food processor is small, do this in batches.)

Turn vegetables out onto a platter so get a pile of rainbow colors.

Mix the mustard, vinegar, and oil, then season with salt, pepper, tamari, and hot sauce.

Add walnuts and toss everything together until you get a big, beautiful plate of dressed vegetables.

~*~*~

Simple…but the flavors are amazing and work well together.  You get this great sweetness from the beets and the apple.  The cabbage and carrots give this earthy flavor.  And the kale…just a bit of that bitter zing.  Topping it with walnuts gives an added boost to the texture.  And the dressing…necessary.  It ties it all together.

My roommate declared this her favorite way to eat a salad.  Me…I devoured it!  Healthy and delicious.  Definitely making this again!


Recipe: Slow Cooker Sweet Potato and Apple Soup with Brown Buttered Kale Leaves

It’s flippin’ freezing cold outside!  For real.  This entire country is under some sort of deep freeze.  That polar vortex is making air temperatures unbearable.  And, during this sort of weather, my body just wants to shut down…curl up…hibernate.

Unfortunately, life doesn’t work that way.

This past week, we had more winter weather and sub-zero temperatures plaguing my area.  My CSA bin was scheduled to arrive a day later now, for the safety of the delivery drivers.  So, on a very cold and snowy Saturday afternoon, I returned home to find my new bin waiting outside my door.  Inside was a plethora of fruit and veggie goodness.  For real.  But…with one less day to use the items, I needed something I could make that was simple, clean, and perfect for cold weather.

I stumbled across a recipe for a Sweet Potato and Apple Soup at a blog called 100 Days of Real Food.  Intrigued, and having received every necessary ingredient in my bin, I decided to cook it up.  After all, I could leave it going on Sunday while I was out for my long run and finishing up my grocery shopping.  Perfect.

And this soup…also perfect.  As the mercury has fallen again to unbearable temperatures…the fact that I have a nice, steaming bowl of soup waiting for me at home makes the day a little easier to stand.  I did a little crispy kale topping for this soup, which is an extra step and not necessary, but trust me…it’s worth it.  The original recipe called for sage…but I work with what I have.  It’s amazing.

Recipe: Slow Cooker Sweet Potato and Apple Soup with Brown Buttered Kale Leaves

Slow Cooker Sweet Potato and Apple Soup with Brown Butter Kale Leaves

Servings: 6-8
Time: Prep 15 minutes; Cook 5 hours

Ingredients:

  • ½ large onion, cut into large dice
  • 1 lb white potatoes (2 small or 1 large), scrubbed clean and cut into 1 inch pieces with the skin left on
  • 1½ lbs sweet potatoes (3 small or 2 large), scrubbed clean and cut into 1 inch pieces with the skin left on
  • 2 apples, cut into 1 inch pieces with the skin left on
  • 3 cloves garlic, crushed
  • ½ teaspoon salt
  • 4 cups vegetable broth
  • 4 tablespoons butter, divided
  • ¾ cup fresh kale leaves, cut into strips (using culinary scissors or a knife)


Directions:

In the bottom of a slow cooker put in the onion, potatoes, apples, garlic, and salt.  Pour the vegetable stock over top.

Turn the slow cooker onto high and cook for 5 hours.

Puree the hot soup either in batches in a counter top blender or by just sticking a hand immersion blender right into your slow cooker (recommended).

Stir in 2 tablespoons of the butter.

In a medium sized pan over medium heat melt the other 2 tablespoons of butter.  Add the kale leaves and cook while stirring until butter browns and leaves are crisp, about 1-2 minutes.  Top soup with brown buttered sage and serve immediately.

~*~*~

Warm, hearty, yet still light…this soup is the perfect way to warm up in winter.  I love a good soup and this one is definitely packed with flavor.  And made with real ingredients and real food.  It’s no fuss too, which I loved.  Coming home from my errands on Sunday, my apartment smelled amazing.  I pureed the soup and then dished out 8 servings into individual dishes.  I have two in the fridge ready for tonight after I hit up the gym.  The rest are in the freezer, because this recipe freezes well.  So, don’t worry too much about how much it makes.  Make some room in that freezer and save it for a day you really don’t feel like cooking.

ENJOY!

Product Review: Tasty Bite Garlic Brown Rice

Tasty Bite Garlic Brown Rice

Product: Tasty Bite Garlic Brown Rice – $2.49+

As so many of you know, Tasty Bite is my go-to prefabbed food of choice when it comes to needing something quick and on-the-go.  I mean, honestly.  It doesn’t get much easier than a 90 second nuke in the microwave.  The food tastes fresh…like it wasn’t pre-packaged or sold on the shelf of your local grocery store.  All-natural…real ingredients help make this a healthy and better choice than other options out there.

Known for Indian and Asian cuisine (the Asian dishes are NOT gluten-free), these are little packets of amazingly flavorful food.  They are affordable, don’t take up much space in the pantry, and so easy to prepare.  If you haven’t jumped on the Tasty Bite train yet…what are you waiting for?

For those familiar with my blog, you might have read about the past few Tasty Bite meals being…rice.  Simply price.  I had one with lentils and one that was just plain brown rice.  And they were fantastic.  Still moist.  Still seasoned perfectly.  No need to add anything else.  Just…sheer, tasty perfection.

The rice trend continues.  This time with Tasty Bite Garlic Brown Rice.  First of all, I’m a total fan of brown rice.  I have been for ages.  I actually prefer it to the ultra-refined white rice.  I think the texture is better and I love that light, nutty flavor that comes with it.  Mmmm.  But Tasty Bite, this time, stepped it up.  They gave it an extra flavor boost with garlic.

And I LOVE, LOVE, LOVE garlic!

FOR REAL!

So…brown rice…garlic…how can you go wrong?  You can’t.  Tasty Bite seasoned and flavored this rice with the perfect balance of spices and added vegetables.  It made for one interesting and flavorful bite after another.  Seriously.  I served this with some sauteed baby bok choy.  I’m not joking.  As I sauteed it up with some garlic…it was a nice match.  But I kept them separate on the plate because I wanted to enjoy my rice on its own if I chose.  And a few bites…that is exactly what I did.  The rice is amazing.  It microwaves to perfection…still soft…still moist and fluffy.  The flavors melt right into each grain and make it one of the best rices that are pre-made.  Seriously.

And look at these ingredients: water, brown rice, carrots, corn, spinach, sunflower oil, garlic, salt, celery, sugar, cumin, chilies.  Real ingredients.  Recognizable ingredients.  What more could you ask for?

Nutritionally speaking…we’re talking good numbers here.  A serving is half of the pouch.  In this serving, you will be consuming 220 calories and 5 grams of fat.  That’s amazing.  And you do get a lot of rice in that serving.  You will also be treated to a cholesterol-free meal that contains only 420 mg sodium and 1 gram of sugar.  Finally, you will be provided with a filling 2 grams of fiber and 5 grams of protein.

Healthy.  Packed with flavor.  Fluffy.  Light.  Delicious.

TASTY!

If you have yet to try any of the Tasty Bite meals…I encourage you to do so.  And if you aren’t brave enough to go for Indian cuisine, give the rice a try.  The Garlic Brown Rice is amazing.  So if garlic is your thing…it won’t overpower, but it will add plenty of flavor to the rice.  Enjoy!

Tasty Bite Garlic Brown Rice (cooked)

Product Review: Health Is Wealth Sprouted Grains Chipotle Bean Sprout Burger

Health Is Wealth Sprouted Grains Chipotle Bean Sprout Burger

Product: Health Is Wealth Sprouted Grains Chipotle Bean Sprout Burger – $5.99+

Lately…I’ve been doing my best to make my own veggie burgers.  I’ve been a vegetarian for 4 years now and gluten-free for 3 years…and while there is definitely more of a market for gluten-free/vegan or vegetarian burger patties out there…not all veggie burgers are created equally.  I’ve done plenty of experimentation.  And, before I had to go gluten-free…I was all about the Morningstar patties.  There were none better.

Then…going gluten-free took them off the table and out of my freezer.  At first, I lamented this.  However, then I went back awhile ago and looked at the ingredient list on Morningstar patties…and cringed!  It’s mostly chemicals.  YUCK!  Maybe this gluten-free thing was a blessing in disguise.

That being said, I’ve found some great veggie burgers and some not-so-great veggie burgers.  I’ve had burgers that have fallen apart as they cooked and burgers that wowed me.

Tonight…I tried a different veggie burger.

Made by Health is Wealth, the company that once upon a time made vegan and gluten-free not-chicken nuggets.  They no longer make them anymore.  Which I still cry about.  BUT…they do make veggie burgers too.  And these, at least, are vegan and gluten-free.

My natural food store carried two of the varieties of Health is Wealth.  The burgers themselves are called Sprout Burgers.  Why?  Because they are actually made from organic sprouted grains – specifically quinoa, amaranth and millet).  These vegan and gluten-free burgers are made with non-GMO soy as well, are baked and never fried, and are packed with flavor.  They come in three flavor options – original, Chipotle Bean, and Mushroom and Onion.

With my plethora of romaine lettuce, red onion and roma tomato from my recent CSA bin, a gluten-free veggie burger dinner was definitely needed.  So, I pulled out the gluten-free sandwich rolls my local gluten-free bakery (shout-out to Annie May’s Sweet Café on Frankfort Avenue) from my freezer to thaw while I was at work.  When I got home, it was just a matter of getting the burgers cooked.

That task was easy.  While I toasted the rolls to make the buns, I put the Health Is Wealth Sprouted Grains Chipotle Bean Sprout Burgers on my skillet to cook through.  That took about 4 minutes on each side.  It didn’t take long at all.  I plated up the burgers on the toasted buns with the vegetables and some vegan sriracha sour cream…and dinner was served.

So…how good can the Health Is Wealth Sprouted Grains Chipotle Bean Sprout Burger taste?

AMAZING!  First of all, this burger does not crumble.  It won’t fall apart as you try to bite into it.  The texture is meaty and awesome.  The flavor is just the right amount of spice with the right level of spice.  It has just enough heat to keep it interesting.  The beans add a lot of protein.  And the flavor is amazing.  I was so impressed with the Chipotle Bean Sprout Burger.  I’m also excited that I have two more patties left in the freezer for my roommate and I to eat later this week.  These are fantastic.  Even meat eaters (like my roomie) will enjoy these.  They are hearty, healthy, and just amazing.

So…what sort of ingredients go into vegan and gluten-free burgers?  Well, in the case of the Health is Wealth Sprouted Grains Chipotle Bean Sprout Burger…the following: non-GMO hydrated textured soy protein, organic sprouted grains (millet, quinoa, amaranth), non-GMO isolated soy protein, black beans, corn kernels, canola oil, molasses, red pepper, seasonings (sea salt, tomato powder, garlic powder, lime juice), food starch, hydrolyzed soy protein, modified cellulose gum, oat fiber, garlic powder, caramel color, onion powder, sea salt, maltodextrin, yeast extract, lemon juice.

It seems like a lot…but at least it’s not just a load of chemicals and unpronounceable ingredients.

Nutritionally speaking, a serving of the Health Is Wealth Sprouted Grains Chipotle Bean Sprout Burger is one patty.  This one patty will serve you up 90 calories (REALLY good for a veggie burger) and 3 grams of fat.  These are cholesterol free, contain 420 mg sodium, and only 2 grams of sugar.  One serving also gives you 3 grams of fiber and 9 grams of protein.  You will definitely feel full.

I absolutely LOVED this burger.  My roomie did too.  In fact, we both said that we’ll have to try the other Health Is Wealth vegan and gluten-free burgers.  They were that great.  Loved the texture, the flavor, and everything about these.  The price isn’t too bad either.  Not for 4 patties in a box.  If you haven’t given these a try…make sure you do.  They are really fantastic.

Health Is Wealth Sprouted Grains Chipotle Bean Sprout Burger (cooked)

Recipe: Smashed Herbed Potatoes

I am a runner.  Carbs are my friend.  And I just happen to be a huge, huge fan of potatoes.  I love potatoes.  Any way you can serve them up, I will devour them.

Recently in my CSA bin, I received a huge bag full of fingerling potatoes.  Instead of roasting them up as I normally would, I wanted to do something different.  I wanted to think outside of the normal box I hem myself in when potatoes are in my kitchen.

So…that’s exactly what I set out to do.  I decided to finally get to smashing potatoes.  I’m not talking mashed potatoes.  I really mean…smashed potatoes.  I served mine with a dipping sauce of Spinach & Artichoke Hummus.

For real.  And yeah…it was super delicious.

Recipe: Smashed Herbed Potatoes

Smashed Herbed Potatoes (with Spinach and Artichoke Hummus)

Servings: 4-6
Time: Prep 30 minutes; Cook 25 minutes

Ingredients:

12 fingerling potatoes (or other small potatoes, like new potatoes, etc.)
3 tablespoons extra virgin olive oil
kosher salt, to taste
black pepper, to taste
Rosemary (or other herbs of choice), to taste


Directions:

Bring a pot of salted water to a boil.  Add the potatoes to the water and cook them until they are fork-tender.

On a sheet pan, generally drizzle olive oil.  Place the tender potatoes on the cookie sheet, leaving plenty of room between each potato.

With a potato masher, gently press down each potato until it slightly mashes, rotate the potato masher 90 degrees and mash again.  Do this to all the potatoes.  Then, brush the tops of each crushed potato generously with more olive oil.

Sprinkle the potatoes with kosher salt, fresh ground black pepper, and freshly chopped rosemary (or chives or thyme or whatever herb you have available).

Bake in a 450°F oven for 20-25 minutes until they are golden brown.

Serve.

~*~*~

OH. MY. GOD.

This is my new favorite way to eat potatoes.  For real.  I mean…packed with flavor.  The fresh herbs really draw out amazing flavors.  And dipping it into hummus was sheer genius.  Trust me.  This is one dish that is totally worth making.  It takes some time, but…you will be as addicted to these as I am.

I’m already wanting to make it again.  And thankfully, this week’s CSA bin is coming with fingerling potatoes.  Hmmm…

Get smashing and enjoy!

Recipe: Sautéed Garlic Greens with Caramelized Onion and Toasted Pine Nuts

I love, love, love kale.  Seriously.  I do.  I love that it is a nutrient powerhouse.  I use it often…and always!  Kale is high in fiber, unlike many other greens.  It’s a great source of nutrients, especially vitamin A and calcium.  It is a fantastic source of beta-carotene, which many nutrition experts believe is a major player in the battle against cancer, heart disease, and certain age-related diseases.  Kale also contains lutein and zeaxathin, carotenoids which help keep UV rays from damaging the eyes and causing cataracts.

Like I said…nutrient powerhouse.  And it always has a home in my kitchen.

That being said, I was using up the contents of my refrigerator not too long ago, and happened (as I often do) to have some greens inside.  It was, as it normally is, kale!  With a little inspiration from my Clean Food cookbook, I concocted a hearty and healthy dish with only a few ingredients, which I happened to have on hand.

Recipe: Sautéed Garlic Greens with Caramelized Onion and Toasted Pine Nuts

Sautéed Garlic Greens with Caramelized Onion and Toasted Pine Nuts


Servings: 6
Time: Prep 5 minutes; Cook 10 minutes

Ingredients:

2 bunches dark leafy greens (kale, collards, mustard greens, dandelion greens or chard)
2 tablespoons extra virgin olive oil
1/2 sweet onion, sliced thin
3 garlic cloves, minced
1 tablespoon dry sherry
Water, as needed
Sea salt
Toasted pine nuts (optional, but adds great texture)


Directions:

Remove dry stalk ends from the greens and chop the leaves into bite-size pieces.

In a Dutch oven or skillet over medium-low heat, sauté the onion, stirring often, to caramelize.  Add the garlic and cook for another 2-3 minutes, until soft.

Add greens and dry sherry and sauté for 1 minute.

Increase the heat to medium, add water (one tablespoon at a time) as needed to prevent sticking, cover, and cook until greens break down.

Remove from heat and toss with remaining tablespoon olive oil.  Season to taste with salt, top with pine nuts, and serve.

~*~*~

I fell in love with this dish.  The kale cooked down to perfection and mingled so well with the sweetness of the caramelized onion and the added flavor of the garlic and sherry.  The pine nuts really gave it a bit of texture, which just worked so well with the soft feel of the meal.  My roommate and I devoured this dish in no time flat.  Really delicious.

Loving finding new ways to enjoy my greens.  Can’t wait to make this one again.