Product Review: Simply Shari’s Gluten Free and Fabulous Quinoa Mac & Cheese

Simply Shari's Gluten Free and Fabulous Quinoa Mac and Cheese
Simply Shari’s Gluten Free and Fabulous Quinoa Mac and Cheese

Product: Simply Shari’s Gluten Free and Fabulous Quinoa Mac and Cheese – $3.49+

I haven’t had too much experience with products from Simply Shari’s Gluten Free and Fabulous.  However, I have tried one frozen pizza…and loved it…and a couple of cookies…and enjoyed those.  So, that’s a good track record, yes?

I think so.

Which is why when I was shopping at TJ Maxx of all places…when I spotted this macaroni and cheese I figured…why not try it?  I mean…it’s a brand I am familiar with and have liked in the past.  It’s made from quinoa.  HELLO!  And..it’s mac and cheese.  One of my favorite comfort foods of all time.

With this being a no produce bin week, meals have been cobbled together from things in the pantry, fridge and freezer.  While it’s not getting bare…sometimes choices are slim.  With that being said, I’m hitting the pantry the hardest this week and digging out some items I purchased and just haven’t cooked up yet.  Simply Shari’s Gluten Free and Fabulous Quinoa Mac and Cheese…it’s now your turn to shine.

Now, as I have stated before, I prefer to make my gluten-free mac and cheese from scratch.  But it’s a crazy-busy week.  I just got back into town on Monday night and I’m heading back out of town tomorrow after work for a weekend with my friend Jenn (who is always willing to try new gluten-free things because she rocks like that).  No CSA bin…not a lot of grocery shopping went on.  Just the bare necessities.  So, very little time to linger in the kitchen, for sure.  And for that reason, this little meal was popped out of the pantry.  So, if I can’t go homemade, I’ll settle on a box or bag variety.  I just prefer real ingredients as often as possible.

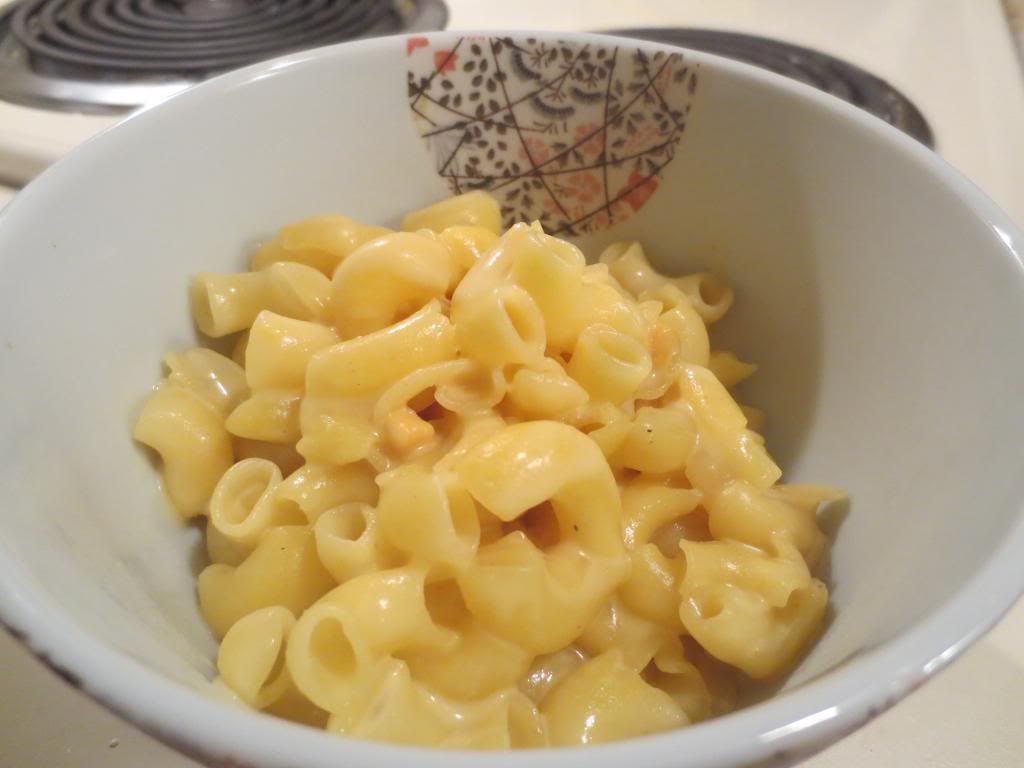
Cooking this was a snap.  I brought a pot of water to a boil and added a bit of salt and oil, per the directions on the package.  Then, in went the gluten-free noodles, which are quinoa, not brown rice.  YAY!  They cooked up in the boiling water for about 10-12 minutes.  It didn’t take long.  After that, you drain them, put them back in the pan on low heat, add a teaspoon of butter, 3/4 cup of milk (I used unsweetened almond milk) and then add the package of cheese powder.  Stir it…let it thicken on the heat, and then…serve.

Simple.

Now, remember those days of long ago when you’d have that orange powder you’d pour into the Kraft Cheese and Macaroni?  (Not macaroni and cheese, always reversed…I remember!).  Anyway…this powder had those clumps, so I broke them up as best I could, and continued to stir until it was blended as best as I could manage.  Into the bowls they went and dinner…was served.

One bite…that’s all it took.  So creamy and tangy and delicious.  The cheese actually gets to this rich velvety texture that coats each noodle.  The noodles cook up perfectly.  And, because they aren’t made completely of brown rice, they aren’t mushy and falling apart either.  They held that elbow macaroni shape, even with all the intense stirring that occurred.  The small clumpy bits of cheese powder reminded me of my childhood days with the Kraft stuff.  I broke up most of them, but a couple lingered.  Nothing that took away from the awesomeness of this dish.  For real.  The cheese was quite tasty.  And the meal itself…quite filling.

I was beyond impressed.

Simply Shari’s Gluten Free and Fabulous Quinoa Mac and Cheese is made up of quinoa pasta (made from quinoa, rice and water), powdered cheese (which contains milk, salt, enzymes, whey, beta carotene for color, corn starch and salt).  That’s it.  Simple…easy ingredients.  All of which I recognize.  Let’s hear it for simple and basic ingredients!  This product is also GMO free as well as gluten-free.

Nutritionally speaking, Simply Shari’s Gluten Free and Fabulous Quinoa Mac and Cheese is on the light side for mac and cheese.  A serving is 4 ounces and the package holds 1.5 servings.  For two people, it’s more than enough, trust me.  This serving will give you 280 calories and 6 grams of fat.  You will also be receiving 15 mg cholesterol, 330 mg sodium, and 1 gram of sugar.  Not bad.  And since I used unsweetened almond milk…no sugar there either.  A serving gives you 2 grams of fiber and (the best part!) 18 grams of protein.  That is NOT a typo!  18 grams of protein.  Thank you quinoa.

So, healthy, creamy, cheesy and wonderful.  Simply Shari’s Gluten Free and Fabulous Quinoa Mac and Cheese lives up to its name.  Yes.  It is…simply awesome!

Simply Shari's Gluten Free and Fabulous Quinoa Mac and Cheese (cooked)
Simply Shari’s Gluten Free and Fabulous Quinoa Mac and Cheese (cooked)

Restaurant Review: Village Tavern, Birmingham, Alabama

Village Tavern, Birmingham, Alabama

Restaurant: Village Tavern, Birmingham, Alabama

I’m so disappointed.

I know…any blog that starts with those three words can’t be good, right?  Right.

And, sadly enough, that’s the way of it when it comes to Village Tavern in Birmingham, Alabama.

First of all, finding a restaurant in the South for gluten-free food is not always easy.  There are some, but when you are craving gluten-free pizza…when you require it…well…things can get a bit tricky.

But, after a little research, Cathy and I found Village Tavern in Birmingham, Alabama for the recent journey down there.  I was going to have a great dinner out with my sister, her youngest son, and a great friend of mine…Michelle!

The company at dinner was great.  I hadn’t seen Michelle since I left Alabama eight years ago.  She hasn’t changed a bit.  She’s still bubbly with the best laugh ever.  And my sister…well…she really made it a fantastic night tonight.  I always enjoy my time with my sister.  There isn’t enough of it in my life.  But…tonight…I got her and her youngest son and that was awesome.

So, the five of us total were seated and given our drinks.  We all had water.  Hydration, friends.  Always water.  Then…after a little back and forth, we were ready to order.  My sister opted for the Chicken Quesadilla ($7.95), which came with a salsa and a dipping sauce as well.  She got my four year old nephew the kids Cheese Pizza ($4.95)…which is HUGE for a child, honestly.  He loved it.  Even said it was the best pizza he ever had.  Adorable.

Michelle got the Spring Rolls ($8.95), which she seemed to like.  They weren’t what I was expecting honestly.  But they sure did look good.  With that she got a side Mixed Greens Salad ($4.95).

Cathy and I chose to split a Gluten-Free Margherita Pizza ($8.75), which is a 10-inch pizza.  Usually that’s the standard for a restaurant.  And she got the Tavern Salad ($8.50) to go with it as she hadn’t had any vegetables all day.  I opted for a side of the Broccoli ($4.00).  And that was that…orders in.  We had the chance to sit, talk, catch up and all of that while we awaited the arrival of the food.  And when it came…it smelled fantastic.

Problem:

The waiter knew Cathy and I were splitting the gluten-free pizza…and yet…no extra plate was brought out.  Secondly…the waiter forgot about Cathy’s salad.  In fact, he didn’t even put it on the ticket.  So…yeah…that had to be corrected.

But the greatest problem…the biggest offense…

My gluten-free pizza dough was RAW!  Like…gooey…uncooked rawness.  I was beyond disappointed.

While I was waiting on a plate, Cathy went ahead and started on her half of the pizza.  When my plate finally was brought to the table, well…it took two tries.  First one was a small plate…which was fine.  But soon after that was left for me…a larger, must better suited plate arrived at the table.  Fantastic.  Thank you.  Cathy dished up my half of the pizza and I picked up my fork and knife to slice through what I was expecting to be a crispy crust.  This was that infamous gluten-free cracker crust that all gluten-free pizzas have.  But there was no crunch.  No crispness.  Mushy…soggy…still stretchy doughiness.  Yes, doughiness is a word…because I used it in a sentence.  The disappointment on my face must have been evident because my sister and Michelle both were like…”Is it not good?”  I held up a piece of the dough and said…”It’s not cooked!”

The best part of the pizza was the crust on the edge…because that actually WAS crispy and cooked through.  I know with cracker crusts there is a fine line between crispy and burnt…but this was on a fine line of being fresh from the package and undercooked.  The toppings weren’t even that impressive.  The pizza was just REALLY disappointing overall.  I was not impressed.  Not happy.  And just MEH about the whole thing.

At least I had good company and good conversation.

I had it in my head to return to Village Tavern with my parents the following night, but I was so unhappy with that pizza, that I’m judging the rest of their gluten-free options based on that…and will find somewhere else to eat.  I don’t think I’ll ever be back.

Village Anchor's Gluten-Free Margherita Pizza (doughy disaster)
Village Anchor’s Gluten-Free Margherita Pizza (doughy disaster)

Recipe: Homemade Gluten-Free and Vegan Bacon

It was almost five years ago that I made a decision to become a vegetarian.  And as of this month…three years ago that I had to go gluten-free.  My…time sure does fly!  That being said, when I first became a vegetarian, my life was filled with Morningstar Veggie Bacon Strips and faux meat products…which…looking at now makes me cringe due to the number of chemicals and processed crap that are in them.  Besides that…most all processed-to-death faux meat products contain vital wheat gluten…which means…I can’t consume it anyway.

Honestly, after three years I’ve worked around this.  But, you see, my roommate has a love of BLT sandwiches.  As you know, Cathy eats what I eat at home, so she’s 80% gluten-free and vegetarian.  But when we go out…meat is her treat (think those Beggin’ Strips commercials…).  Anyway…she’s acquired this taste for BLT sammies…and with a plethora of lettuce from my CSA bin, she put in that request.

So…I needed bacon.  And no one makes a gluten-free and vegetarian version of this.  So, I had to make it myself.  And it’s mainly made up with…beans.  So…beancon?  I guess?  The recipe was adapted from the No Meat Athlete…and now…will forever be made and kept in my kitchen.  What’s even better…after you cook the batter up and slice it, the slices can be kept in the freezer and go immediately from the freezer to the pan.  Oh yeah…beancon time!

Recipe: Homemade Gluten-Free and Vegan Bacon

Homemade Gluten-Free and Vegan Bacon

Servings: 24-32
Time: Prep 20 minutes; Bake 10 minutes

Ingredients:

  • 1/2 cup dried adzuki beans, or other small red beans
  • 1/3 cup whole grain buckwheat groats (not buckwheat flour)
  • 1 tsp onion powder
  • 1/3 tsp garlic powder
  • 1/3 tsp rubbed sage
  • 1/2 tsp thyme
  • 1-1/2 tsp smoked paprika
  • 1 tsp liquid smoke (not all brands are gluten-free, but Colgin is…and that’s what I use)
  • 3 tbsp pure maple syrup
  • 1-1/2 tbsp coconut aminos (I subbed San-J Gluten-Free Tamari)
  • 1 tbsp tomato paste
  • 1-1/2 tbsp nutritional yeast (optional)
  • 1 tsp coconut oil (may sub any oil you prefer)
  • 1/2 tsp salt

Directions:

Rinse the beans and buckwheat, place in large bowl covered with several inches of cold filtered water; let soak overnight.

Preheat the oven to 400°F.

Drain and rinse the soaked beans and buckwheat.  Place in the bowl of a food processor fitted with an s-blade, along with all of the other ingredients. Pulse several times to combine, scrape down the sides and bottom of bowl and continue pulsing until uniform, but not completely pureed.

Line a 9 x 13 casserole dish or rimmed baking sheet with parchment paper and spray with baking spray. Place bacon batter in pan and spread evenly with a spatula.  You may choose to spray another piece of parchment paper lightly with baking spray and press the paper on top of the mixture and flatten with your hands.  Remove and discard the top piece of parchment paper, then use a spatula to spread over and fill in any bare spots.

Bake for 10 minutes.  Remove from oven and let cool for 10 minutes.  Slice into 24-32 strips, whatever size you prefer, I cut mine into 1 inch by 4 inches slices (Do this by making one lengthwise cut down the center, and then 12-16 cuts across the shorter side).

At this point freeze any strips your don’t plan on eating immediately. Frozen strips can go straight into the skillet at a later date, no need to thaw first. To fry, heat a skillet with a small amount of oil and fry both sides to desired level of crispiness. You may also choose to fry slices in cooking spray, for a less crispy, but still very delicious result.

~*~*~

The liquid smoke gives it that smokey feeling of bacon and they taste great.  Honestly.  I made this once before and used them on breakfast sandwiches, to pair with pancakes, and now…on BLTs.  Brilliant recipe.  Bacon really can be for everyone…even gluten-free vegetarians and vegans.  Because this no meat treat is a delicious, homemade, and easy recipe.  And no chemicals.  Real food.  Real good!

Gluten-Free and Vegan BLT Sandwich

Recipe: Shredded Rainbow Salad

You ever look at the food you have in your fridge and wonder what you might be able to make with all of it?  Especially when, in the next couple days, another fresh produce delivery will land on your doorway and you’ve barely scratched the surface of the last bin as it was delivered later than usual due to weather?  Or something to that affect?

That’s my life these days.  The Polar Vortex caused there to be a delay in my CSA bin delivery…which isn’t a problem…but it gave me fewer days to work through the fresh produce.  I’ve managed some…but I still have plenty left.

That being said…Jamie Oliver came to my rescue tonight.  For dinner I got out my brand-spankin’-new food processor and whipped up a delicious, healthy, and colorful salad from the fresh produce I had on hand.  The dressing was a magical touch.  Talk about clean eating!

Recipe: Shredded Rainbow Salad

Shredded Rainbow Salad

Servings: 8
Time: 20 minutes

Ingredients for Salad:

  • 2 raw medium beets (any color) trimmed, scrubbed & quartered
  • 4 leaves kale
  • 2 large carrots, scrubbed & trimmed
  • 1/4 white cabbage, quartered
  • 1 apple, quartered
  • 1 cup walnuts, roughly bashed


Ingredients for Dressing:

  • 1 teaspoon Dijon mustard
  • 3 tablespoons apple cider vinegar
  • 6 tablespoons extra-virgin olive oil
  • sea salt & ground pepper
  • Gluten-Free Tamari
  • hot sauce (I used Sriracha)


Directions:

Put a coarse grater attachment into a food processor and push ingredients through in the following order (to stop the beets from staining everything): beets, kale, carrots, white cabbage and apple. (If your food processor is small, do this in batches.)

Turn vegetables out onto a platter so get a pile of rainbow colors.

Mix the mustard, vinegar, and oil, then season with salt, pepper, tamari, and hot sauce.

Add walnuts and toss everything together until you get a big, beautiful plate of dressed vegetables.

~*~*~

Simple…but the flavors are amazing and work well together.  You get this great sweetness from the beets and the apple.  The cabbage and carrots give this earthy flavor.  And the kale…just a bit of that bitter zing.  Topping it with walnuts gives an added boost to the texture.  And the dressing…necessary.  It ties it all together.

My roommate declared this her favorite way to eat a salad.  Me…I devoured it!  Healthy and delicious.  Definitely making this again!


Product Review: Tasty Bite Garlic Brown Rice

Tasty Bite Garlic Brown Rice

Product: Tasty Bite Garlic Brown Rice – $2.49+

As so many of you know, Tasty Bite is my go-to prefabbed food of choice when it comes to needing something quick and on-the-go.  I mean, honestly.  It doesn’t get much easier than a 90 second nuke in the microwave.  The food tastes fresh…like it wasn’t pre-packaged or sold on the shelf of your local grocery store.  All-natural…real ingredients help make this a healthy and better choice than other options out there.

Known for Indian and Asian cuisine (the Asian dishes are NOT gluten-free), these are little packets of amazingly flavorful food.  They are affordable, don’t take up much space in the pantry, and so easy to prepare.  If you haven’t jumped on the Tasty Bite train yet…what are you waiting for?

For those familiar with my blog, you might have read about the past few Tasty Bite meals being…rice.  Simply price.  I had one with lentils and one that was just plain brown rice.  And they were fantastic.  Still moist.  Still seasoned perfectly.  No need to add anything else.  Just…sheer, tasty perfection.

The rice trend continues.  This time with Tasty Bite Garlic Brown Rice.  First of all, I’m a total fan of brown rice.  I have been for ages.  I actually prefer it to the ultra-refined white rice.  I think the texture is better and I love that light, nutty flavor that comes with it.  Mmmm.  But Tasty Bite, this time, stepped it up.  They gave it an extra flavor boost with garlic.

And I LOVE, LOVE, LOVE garlic!

FOR REAL!

So…brown rice…garlic…how can you go wrong?  You can’t.  Tasty Bite seasoned and flavored this rice with the perfect balance of spices and added vegetables.  It made for one interesting and flavorful bite after another.  Seriously.  I served this with some sauteed baby bok choy.  I’m not joking.  As I sauteed it up with some garlic…it was a nice match.  But I kept them separate on the plate because I wanted to enjoy my rice on its own if I chose.  And a few bites…that is exactly what I did.  The rice is amazing.  It microwaves to perfection…still soft…still moist and fluffy.  The flavors melt right into each grain and make it one of the best rices that are pre-made.  Seriously.

And look at these ingredients: water, brown rice, carrots, corn, spinach, sunflower oil, garlic, salt, celery, sugar, cumin, chilies.  Real ingredients.  Recognizable ingredients.  What more could you ask for?

Nutritionally speaking…we’re talking good numbers here.  A serving is half of the pouch.  In this serving, you will be consuming 220 calories and 5 grams of fat.  That’s amazing.  And you do get a lot of rice in that serving.  You will also be treated to a cholesterol-free meal that contains only 420 mg sodium and 1 gram of sugar.  Finally, you will be provided with a filling 2 grams of fiber and 5 grams of protein.

Healthy.  Packed with flavor.  Fluffy.  Light.  Delicious.

TASTY!

If you have yet to try any of the Tasty Bite meals…I encourage you to do so.  And if you aren’t brave enough to go for Indian cuisine, give the rice a try.  The Garlic Brown Rice is amazing.  So if garlic is your thing…it won’t overpower, but it will add plenty of flavor to the rice.  Enjoy!

Tasty Bite Garlic Brown Rice (cooked)

Product Review: Tasty Bite Brown Rice

Tasty Bite Brown Rice

Product: Tasty Bite Brown Rice – $2.49+

Brown rice.

People either love it or hate it.

Me…I happen to love it.  It just…takes so long to prepare.  In fact, brown rice often takes longer to get to cook perfectly than white rice.  But with white rice being so refined, brown rice is always a better option.

I just don’t always have time to let it cook up on the stove.

Thankfully…Tasty Bite has me covered.

Yes.  Tasty Bite.

Yes…the makers of all those amazing little Indian meals I blog about from time to time.

The very same Tasty Bite.

They do rice too.  They do it well.  And they make it so easy to enjoy.

There isn’t too much I can say about Tasty Bite’s Brown Rice.  I mean…it’s brown rice.  But I can say this…

The package contains fully cooked brown rice that you simply reheat in the microwave for 90 seconds.  Yes.  90 seconds and you have two servings of rice as your fingertips.  It’s brilliant and very convenient.  Brown rice is full of vitamins, minerals and fiber, and is my favorite type of rice to incorporate into meals.  Tasty Bite’s Brown Rice has that nutty flavor and that tougher texture that regular brown rice has.  The flavor…is that of plain brown rice…which is why I served vegetarian baked beans over mine.  Hey…don’t mock.  I had vegetarian baked beans in the pantry…just begging to be used.  It actually worked together very well.

Let’s talk ingredients and nutrition then, since brown rice is…well…brown rice.  The Tasty Bite Brown Rice pouch contains water, brown rice, and sunflower oil.  That’s it.  As it is precooked, you’re steaming it back to life and then pouring it into a dish.  The microwavable pouch contains two servings of brown rice.

Half of the package, that being a serving, will dish you up 240 calories and 3 grams of fat.  This particular rice is cholesterol-free, sugar-free, and contains no sodium.  My roommate will love reading that.  This serving provides 2 grams of fiber and 5 grams of protein.  Filling.  Nutrition.  Delicious.  And the Tasty Bite Brown Rice is vegan, vegetarian, kosher, and gluten-free.  Loving it.

So, you don’t have to spend the better part of the evening at your stove waiting on your brown rice to cook to perfection.  Nope.  Let Tasty Bite do that for you…letting you have your rice ready in a minute and a half as opposed to 20-30 minutes (if not longer!).  The rice you get is fluffy, light, and seriously cooked to perfection.  It sure does make dinner a lot easier and quicker to get on the table.

Thank you, Tasty Bite…for taking the stress and guess work out of cooking brown rice.

Tasty Bite Brown Rice (cooked)

Recipe: Smashed Herbed Potatoes

I am a runner.  Carbs are my friend.  And I just happen to be a huge, huge fan of potatoes.  I love potatoes.  Any way you can serve them up, I will devour them.

Recently in my CSA bin, I received a huge bag full of fingerling potatoes.  Instead of roasting them up as I normally would, I wanted to do something different.  I wanted to think outside of the normal box I hem myself in when potatoes are in my kitchen.

So…that’s exactly what I set out to do.  I decided to finally get to smashing potatoes.  I’m not talking mashed potatoes.  I really mean…smashed potatoes.  I served mine with a dipping sauce of Spinach & Artichoke Hummus.

For real.  And yeah…it was super delicious.

Recipe: Smashed Herbed Potatoes

Smashed Herbed Potatoes (with Spinach and Artichoke Hummus)

Servings: 4-6
Time: Prep 30 minutes; Cook 25 minutes

Ingredients:

12 fingerling potatoes (or other small potatoes, like new potatoes, etc.)
3 tablespoons extra virgin olive oil
kosher salt, to taste
black pepper, to taste
Rosemary (or other herbs of choice), to taste


Directions:

Bring a pot of salted water to a boil.  Add the potatoes to the water and cook them until they are fork-tender.

On a sheet pan, generally drizzle olive oil.  Place the tender potatoes on the cookie sheet, leaving plenty of room between each potato.

With a potato masher, gently press down each potato until it slightly mashes, rotate the potato masher 90 degrees and mash again.  Do this to all the potatoes.  Then, brush the tops of each crushed potato generously with more olive oil.

Sprinkle the potatoes with kosher salt, fresh ground black pepper, and freshly chopped rosemary (or chives or thyme or whatever herb you have available).

Bake in a 450°F oven for 20-25 minutes until they are golden brown.

Serve.

~*~*~

OH. MY. GOD.

This is my new favorite way to eat potatoes.  For real.  I mean…packed with flavor.  The fresh herbs really draw out amazing flavors.  And dipping it into hummus was sheer genius.  Trust me.  This is one dish that is totally worth making.  It takes some time, but…you will be as addicted to these as I am.

I’m already wanting to make it again.  And thankfully, this week’s CSA bin is coming with fingerling potatoes.  Hmmm…

Get smashing and enjoy!

Recipe: Sautéed Garlic Greens with Caramelized Onion and Toasted Pine Nuts

I love, love, love kale.  Seriously.  I do.  I love that it is a nutrient powerhouse.  I use it often…and always!  Kale is high in fiber, unlike many other greens.  It’s a great source of nutrients, especially vitamin A and calcium.  It is a fantastic source of beta-carotene, which many nutrition experts believe is a major player in the battle against cancer, heart disease, and certain age-related diseases.  Kale also contains lutein and zeaxathin, carotenoids which help keep UV rays from damaging the eyes and causing cataracts.

Like I said…nutrient powerhouse.  And it always has a home in my kitchen.

That being said, I was using up the contents of my refrigerator not too long ago, and happened (as I often do) to have some greens inside.  It was, as it normally is, kale!  With a little inspiration from my Clean Food cookbook, I concocted a hearty and healthy dish with only a few ingredients, which I happened to have on hand.

Recipe: Sautéed Garlic Greens with Caramelized Onion and Toasted Pine Nuts

Sautéed Garlic Greens with Caramelized Onion and Toasted Pine Nuts


Servings: 6
Time: Prep 5 minutes; Cook 10 minutes

Ingredients:

2 bunches dark leafy greens (kale, collards, mustard greens, dandelion greens or chard)
2 tablespoons extra virgin olive oil
1/2 sweet onion, sliced thin
3 garlic cloves, minced
1 tablespoon dry sherry
Water, as needed
Sea salt
Toasted pine nuts (optional, but adds great texture)


Directions:

Remove dry stalk ends from the greens and chop the leaves into bite-size pieces.

In a Dutch oven or skillet over medium-low heat, sauté the onion, stirring often, to caramelize.  Add the garlic and cook for another 2-3 minutes, until soft.

Add greens and dry sherry and sauté for 1 minute.

Increase the heat to medium, add water (one tablespoon at a time) as needed to prevent sticking, cover, and cook until greens break down.

Remove from heat and toss with remaining tablespoon olive oil.  Season to taste with salt, top with pine nuts, and serve.

~*~*~

I fell in love with this dish.  The kale cooked down to perfection and mingled so well with the sweetness of the caramelized onion and the added flavor of the garlic and sherry.  The pine nuts really gave it a bit of texture, which just worked so well with the soft feel of the meal.  My roommate and I devoured this dish in no time flat.  Really delicious.

Loving finding new ways to enjoy my greens.  Can’t wait to make this one again.

Recipe: Kale and Black-Eyed Peas

In the South, it is customary on New Year’s Day to eat black-eyed peas to ensure good luck and prosperity.  Now, I am not a southern girl, but I did spend 6 years of my life in Birmingham, Alabama (where my family still resides).  Prior to that, I was a New Yorker all the way.  And now…relocated to Southern Indiana…where the Louisville, Kentucky food scene is taking flight, well…I can’t say that I don’t try anything new!

Granted, traditionally, this dish would be served with collard greens…but I’m a kale girl myself.  Love me some kale.  And I just happened to have kale in my crisper drawer…because…what girl doesn’t?  So, on New Year’s Day…I cooked up a my kale with black-eyed peas and hoped that it would bring luck and prosperity to me this year.

It’s too early to say whether this worked or not…but what I can say is…the dish was phenomenal.  I played around with a recipe out of my Clean Food cookbook.  Whether you have always followed this tradition or are just hearing about it, like me, I figured I had nothing to lose by cooking it up.  And neither do you!

Go ahead…eat up!

Recipe: Kale and Black-Eyed Peas

Kale and Black-Eyed Peas

Servings: 6
Time: Prep 10 minutes; Cook 10 minutes

Ingredients:

  • 1 large bunch of kale
  • 2 tablespoons extra virgin olive oil
  • 2 garlic cloves, minced
  • 1/2 onion, diced
  • water, as needed
  • 1-1/2 cups cooked black eyed peas
  • dash of apple cider vinegar
  • sea salt and freshly ground black pepper

Directions:

Remove the stems from the kale and chop the leaves into bite-size pieces.

In a large Dutch oven over medium heat, sauté garlic and onion in olive oil until soft.  Add the kale and stir until it turns bright green and wilts.  Add water 1 tablespoon at a time, as needed, to keep the kale from burning.

Add the black-eyed peas and vinegar and continue to cook for 3-4 minutes to heat through.  Season to taste with salt and pepper.

Serve.

~*~*~

It’s traditional.  It’s easy.  It’s delicious!  I was actually surprised.  I’m not a huge fan of Southern food…but this was fantastic.  Seasoned perfectly.  Really packed with flavor.  And carrying a traditional promise of good fortune and luck.  If nothing else…I at least got a fantastic meal out of it.

So go ahead…branch out.  Try something clean, something new, and something totally yummy!

Product Review: Canyon Bakehouse Gluten-Free Rosemary & Thyme Focaccia

Canyon Bakehouse Gluten-Free Rosemary & Thyme Focaccia

Product: Canyon Bakehouse Gluten-Free Rosemary & Thyme Focaccia – $4.99+

It is by sheer happenstance that I have had, since going gluten-free, a slice of gluten-free focaccia bread.  And that happy moment occurred at a local, and now relocated (they moved out of Indiana and into Louisville) café here in the area.  The restaurant was Earth Friends Café…and their gluten-free sandwiches were made on gluten-free focaccia bread, provided to them by one of my favorite local businesses, Annie May’s Sweet Café.

That feels like forever ago.  It was…probably just over a year or so.

While I can still go to Earth Friends Café, it has been awhile.  That is something I definitely need to change.  Aside from that, however, that was the only time I had something different when I ordered a gluten-free sandwich.  No Udi’s.  No Schär.  No prepackaged, store brand.  Nope.  It was real and amazing focaccia bread.

And that one time…an eternity ago…set the standard.

I attempted, once, to make a focaccia bread from a mix by Chēbē…which didn’t work out for me…at all.  And that was that.  Nothing more ever came of focaccia in my gluten-free life.

Until…one day…I was at my local natural food store and I spotted something I had never seen before.  While I had heard of the Canyon Bakehouse brand via the various gluten-free magazines I subscribe to, and my annual trip out to Colorado (the Canyon Bakehouse dedicated gluten-free bakery is located in Loveland, Colorado), I had yet to actually taste any of their products.  I had wanted to carry some home with me on my last trip to Colorado, but that final trip to the grocery store never actually happened.  So…YAY…happy dance in the aisle when I spotted the brand in my area.  FINALLY!

The freezer section actually had a few Canyon Bakehouse options inside now, but I zeroed in on the Gluten-Free Rosemary & Thyme Focaccia.  I have an abundance of gluten-free pasta in my pantry at the moment, so I figured…get some focaccia and get motivated to start cooking some of that up for dinner.  With some pleading eyes and maybe a pout, I convinced my roommate to allow one extra splurge this week to our grocery budget.  It worked…and the Canyon Bakehouse Gluten-Free Rosemary & Thyme Focaccia made the journey home to my own freezer.

I just returned from vacation, which means my cabinets, pantry, and fridge are pretty much bare, save for a couple of items.  Pasta.  Naturally.  And lo and behold…my freezer had the focaccia bread inside.  I knew what dinner was going to be the next three nights.  Who doesn’t love a gluten-free rotini with a marinara sauce and a slice of gluten-free focaccia?  I didn’t think I’d hear any complaints!

So, after coming home from the airport and letting the focaccia bread thaw for a couple of hours, I preheated the oven to 400 degrees and began to slice the bread into serving sizes.  The packages says it will serve 8, so I sliced it in half, then cut those halves in half and then halved those again.  Total…8 slices of focaccia.  It worked well.  I put the slices on a pan and then put them in the oven to toast while I worked on the pasta and marinara.  About 10 minutes later, the pasta was ready and I pulled the bread out of the oven.  Plating was easy.  Bowl for the pasta…focaccia over the bowl.  Perfect for mopping up that marinara, yes?  Yes!

Settling in to eat, I couldn’t wait to taste the bread.  So, I took one bite.  And WOW!  Canyon Bakehouse has a great reputation for a reason.  The Gluten-Free Rosemary & Thyme Focaccia caught me off guard.  I was prepared to have a taste of something heavy and dense…but the opposite was true.  This focaccia bread, while not light, was flaky.  The crust was golden from the oven, the inside, soft, flaky, warm, and perfect.  It tasted like real bread.  TOTALLY!!

Canyon Bakehouse states on their Web site that their mission is to create delicious and nutritious gluten-free breads that the entire family will enjoy.  If the Gluten-Free Rosemary & Thyme Focaccia is any indication of their standards, then watch out gluten-free world…because this product is stellar.  You’d be hard-pressed to tell it was gluten-free.  No crazy aftertaste, no too dense.  Just really good flavors, really great texture, and just amazing bread all around.

Let’s get down to the chemistry of the Canyon Bakehouse Gluten-Free Rosemary & Thyme Focaccia, shall we?  The ingredients are simple and recognizable: water, brown rice flour, tapioca flour, extra virgin olive oil, cultured brown rice flour, xanthan gum, eggs, sea salt, yeast, thyme, rosemary, organic agave syrup, black pepper, and natural enzymes.  Nothing fake.  Nothing chemical.  No words I can’t pronounce.  No question marks as to what I’m consuming.  Real ingredients that make really delicious bread.

As for the nutritional aspect of this bread…it’s actually not bad…especially since it is gluten-free bread.  A serving is 1/8 of the loaf of focaccia.  This serving will provide you with 140 calories and 4 grams of fat.  Much of that fat percentage is derived from the olive oil that is used in the dough.  Healthy fat.  A proper slice will also provide you with 15 mg cholesterol, 250 mg sodium, and 2 grams of sugar.  That’s not too bad.  And, finally, you will be biting into 3 grams of fiber and 3 grams of protein, so you won’t be left feeling empty after eating a slice.  I find, so often, that gluten-free bread doesn’t fill me up like regular bread does.  That’s not the case with this one.  One slice is plenty.

I love how Canyon Bakehouse is thinking outside the box when it comes to products.  With the variety of breads they offer (all of which I hope to try very soon), as well as hamburger buns, hotdog buns, and even muffins, the bakery does focus a lot on not just taste, but nutrition as well.  I was beyond happy each night I had my gluten-free pasta to have a slice of the Canyon Bakehouse Gluten-Free Rosemary & Thyme Focaccia.  It was the perfect compliment, seasoned to perfection, toasted up, with great, flaky texture and amazing flavor.

Yeah…you’re now on my radar, Canyon Bakehouse.  And I hope to find more of your products soon!

A slice of Canyon Bakehouse Gluten-Free Rosemary & Thyme Focaccia