Product Review: Cup 4 Cup All Natural Gluten Free Pancake & Waffle Mix

Cup 4 Cup All Natural Gluten Free Pancake & Waffle Mix

Product: Cup 4 Cup All Natural Gluten Free Pancake & Waffle Mix – $5.99+

YES!!  FINALLY!!  At long last, I am trying out one of the Cup 4 Cup baking mixes.  I have been dying to do this since these products emerged on the scene back in 2012.  I had eyed the Cup 4 Cup Original Flour Blend back when it was exclusive only to Williams-Sonoma and online purchases.  The problem was, I couldn’t fathom paying the $20+ dollars to try a flour blend that was being touted as the best on the market.  I wish I could have made room in the budget for it, but I live paycheck to paycheck with very little wiggle room most weeks.  Especially having to eat gluten-free.

So, when I was in Columbus, Ohio at The Raisin Rack, and my roomie told me to fill up a basket with products I wanted to try…I knew, immediately, that I wanted one of the Cup 4 Cup baking mixes.  The problem was choosing which one.  The other one on the shelves at the time was the Pizza Crust Mix…and I have so many pizza crusts here just waiting to be made, the pancake mix seemed like the most obvious choice.  And so…it has the honor of being the first product by Cup 4 Cup that I have tried.

So, if you aren’t familiar with Cup 4 Cup or why I’m so enthusiastic about this product, you must take into consideration that I am a food and chef junkie.

This brand of gluten-free flour and baking mixes was created by Chef Lena Kwak, while serving as Research and Development Chef in the famed French Laundry in Yountville, California.  Her mentor, Chef and Owner Thomas Keller, knew they had stumbled upon something amazing when a guest at the restaurant tasted Lena’s gluten-free brioche and cried because she hadn’t tasted bread in years.  It was then that they knew they needed to share this product with the rest of the world.  Cup 4 Cup is not just great-tasting gluten-free flour, but it’s great-tasting flour for everyone.  The name comes from this brand’s ability to substitute all-purpose flour in traditional recipes, cup for cup, making it easy to translate some past favorites into a gluten-free version.  And no one will be the wiser.  Basically, Cup 4 Cup allows you to not only create, but also enjoy all the foods that you always loved…but now makes them gluten-free so that you can love them again.

It is a pretty high standard and tall order to hold yourself up to.  But you have to trust products when Thomas Keller is involved. Really!

On Friday, last week, I had made the decision to finally break into the Cup 4 Cup Gluten Free Pancake & Waffle Mix and make some pancakes.  This was going to be a little time consuming, as I rush home after my 5:30 a.m. spin class on Friday’s to shower, change, and eat something for breakfast.  But, the roomie and I had no real rush, so…I just had everything that I could prep ahead of time done and ready with all the rest of the ingredients out and waiting…with the glass mixing bowl.  I showered.  I changed.  I went into the kitchen, preheated my skillet, and got to work.

Making the Cup 4 Cup Gluten Free Pancake & Waffle Mix is easy.  Even when I doctored the mix up.  You see, I asked Cathy if she wanted just straight-out pancakes, or if she’d like the Lemon Poppy Seed version that was mentioned on the back of the pouch the mix was in.  She said, “You can’t throw lemon poppy seed at me and expect me not to want that!”  So, one quick trip to the grocery store very early that morning to get lemons…I zested and juiced them before heading to the gym so that I just had to melt the butter and mix things together before scooping it out onto the skillet.

Nothing could be easier.  With the skillet preheating, I poured the contents of the pouch into the mixing bowl and added milk and 1 egg to it.  I stirred this together, then added the melted butter and (optional) vanilla extract.  Then, I added the additional stuff to make it the Lemon Poppy Seed variety…1/4 cup sugar, the zest of 2 lemons, 1 tablespoon of lemon juice, and 1 teaspoon of poppy seeds.  With everything incorporated, I scooped 1/4 cup of the batter onto the griddle and repeated the process again.  With two pancakes cooking, I noticed that they were getting those perfect bubbles around the edges after a couple of minutes.  Time to flip the pancakes!

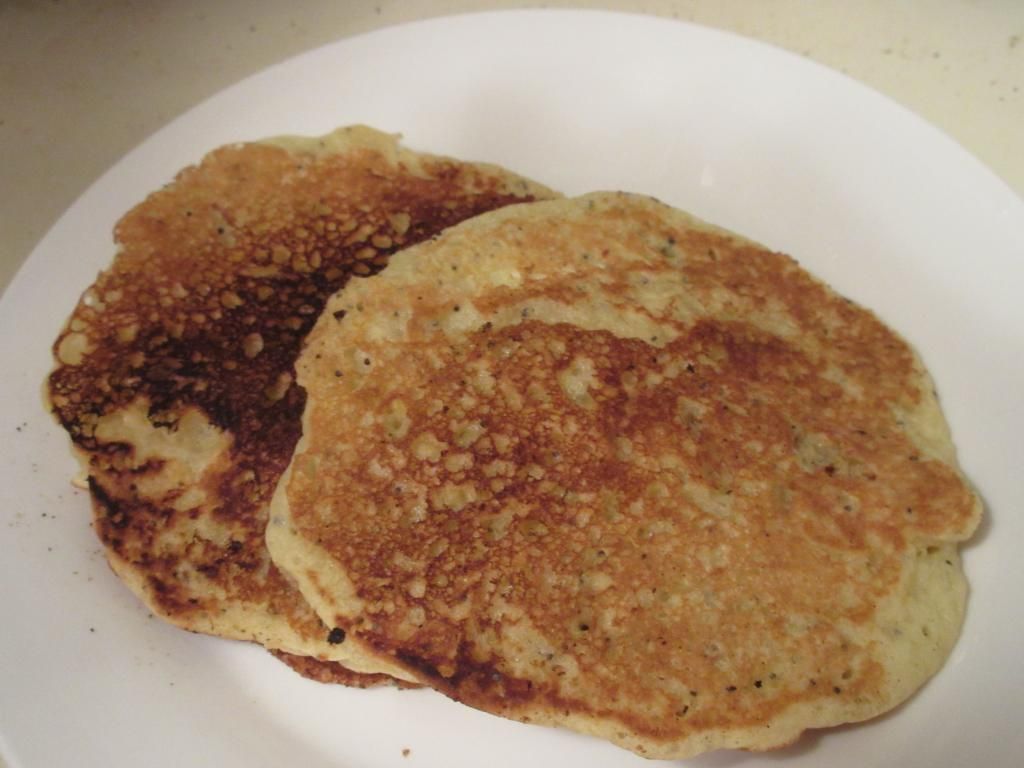
As I did, I noticed the gorgeous golden color on the other side.  These were not only properly crisping, but they were fluffing up to these gorgeous, thick, and light pancakes. I was beyond pleased with the look of them.  And they smelled amazing.  That lemon scent was so refreshing.  I checked the skillet side, and noticed it was now golden too…so they were moved to a plate and a new batch was started.  These got a light treatment of butter and some delicious maple syrup.  Breakfast was served.

Gluten Free Lemon Poppy Seed Pancakes made from Cup 4 Cup All Natural Gluten Free Pancake & Waffle Mix

Cathy got the first two pancakes that morning and when I saw her finish her first bite, I had to ask how they were, since mine were still cooking.  She immediately cut another piece and began to devour it.  “YUMMY” she said, with a mouthful of lemon poppy seed pancakes and maple syrup.

Mine finished up and I ate them in the kitchen while I prepared pancakes from the rest of the mix to have at a later time.  In fact, four of them are coming out of the fridge tomorrow for our post-gym breakfast at the office.  So, it will be interesting to see how they do on a microwave reheat.

That being said…these pancakes did have that perfect golden crust, giving it that amazing golden flavor and initial crunch as your fork slides through it.  These pancakes were not dense or heavy at all.  In fact, I found them rather light and airy in comparison to other pancakes I’ve made from baking blends.  The lemon flavor was incredible…and at just the right level.  Any more and it would have been too tart.  I was glad I left the vanilla extract in, despite it being an optional addition.  I just think it added to the flavor in the end.  Overall, I devoured these in record time, cleaning my plate of every last remnant of the pancakes.

In the end, I ended up making 12 pancakes from the mix itself.

So, let’s talk ingredients.  The Cup 4 Cup Pancake & Waffle Mix is made from cornstarch, white rice flour, sugar, brown rice flour, milk powder, tapioca flour, baking powder, potato starch, salt, and xanthan gum.  It is gluten-free…but trust me…you’d never know it.  No one would.  And these pancakes were definitely diner-style and diner quality.

As for the nutritional information…a serving of the Cup 4 Cup Pancake & Waffle Mix is 1/4 cup of the mix.  This serving provides 140  calories and is fat free.  It is also cholesterol free.  This serving also will provide 440 mg sodium and 8 grams of sugar.  One serving has less than 1 gram of fiber and 2 grams of protein.  Of course, all of that changes when you prepare it with the rest of the ingredients.  I used almond milk in mine, for the record.

Beyond impressed with Cup 4 Cup All Natural Gluten Free Pancake & Waffle Mix.  On a busy morning, breakfast was still simple to make.  And these really are some of the best pancakes I have had since going gluten-free.  I think having a product that was developed by chefs for consumers helps keep up the integrity.  And we all know that nothing that Thomas Keller touches would be sub-par.

I’m hooked.  I sort of always want to have these in my pantry.  Forever.

Product Review: Mrs. Leeper’s Gluten Free Beef Lasagna

Mrs. Leeper's Gluten Free Beef Lasagna
Mrs. Leeper’s Gluten Free Beef Lasagna

Product: Mrs. Leeper’s Gluten Free Beef Lasagna – $5.99+

Mrs. Leeper’s Gluten-Free products have yet to let me down.  Honestly.  The two I have had prior to this one have been out-of-this world delicious.  And, they reheat so well the following day or so as well.  So, I’m having a bit of a foodie love affair with the packaged and easy-to-prepare Mrs. Leeper’s dinners.

The Beef Lasagna was no different.

But…before you freak out…let me assure you…no beef was added to this dish.  Much like when I made the Mrs. Leeper’s Gluten-Free Cheeseburger Mac, I substituted the beef with the Trader Joe’s Soy Chorizo, which is also gluten-free.  So much love for Trader Joe’s for bringing that back to shelves!  WOOT!

Another big plus for these meals is how efficient, convenient, and easy they are to prepare.  Trust me.  I don’t have time every night to prepare something from scratch.  As much as I would like to…

And, as I haven’t had my CSA bin delivered in almost a month (this is what happens when you go out of town…then go out of town…then think you’re going out of town, but end up not going out of town…twice…and having already cancelled the bin), I’m basically living off my pantry/fridge/freezer.  This…has been my unfortunate life.  I hate not getting my fresh produce.  I’m trying to get back into the habit of more clean eating, less processed stuff…but it’s been hard when my fresh produce isn’t delivered to my door and my roomie isn’t big on purchasing it from the grocery.

So, instead of living off the land, I’m living off the stocked shelves of my various kitchen stock rooms.  So, thankfully I had the Trader Joe’s Soy Chorizo in my fridge because that meant…this box could move off my pasta shelf and make an easy dinner.  So…that’s what happened.

Preparing the Mrs Leeper’s Gluten Free Beef Lasagna was easy.  I heated up a skillet and put the soy chorizo into the pan.  I let it warm up a littie and then stirred in three cups of hot water and the packet of sauce mix included in the box.  That all had to come to a rolling boil, and then the pasta was added.  The heat was then reduced, the skillet covered, and the pasta allowed to cook for about 10 minutes (or until tender), with an occasional stir.  The skillet is then removed from the heat and left to stand for about 3 minutes to allow the sauce to thicken.

So, this dinner took about 15 minutes to prepare and it was totally legit and delicious.  The box says that ground turkey or tofu could be substituted for the beef, or the protein could be left out all together.  Any way you decide to serve it up, you have a delicious meal that is fast and easy to prepare…and…most importantly…DELICIOUS!

Because, yes…this, like the Mrs. Leeper’s meals that came before, was perfection.  The flavors were amazing.  The soy chorizo brought a nice touch of heat to the actual dish, but the rich tomato sauce was a great counter-balance to the heat.  And the corn pasta was, as always, brilliant.  I love corn pasta because it doesn’t fall apart, nor does it get gummy.  This cooked to a perfect al-dente, and when the leftovers were heated up later that week, the same held true.  I am actually quite addicted to these easy and fast meals.

Besides…I love pasta!

So, let’s talk ingredients.  The Mrs. Leeper’s Gluten Free Beef Lasagna is made from corn pasta, and a lasagna seasoning, which is a blend of tomato powder, sugar, salt, potato starch, whey, autolyzed yeast extract, onion and garlic powder, hydrolyzed soy protein, citric acid, spices, beet powder, extractives of turmeric and paprika, natural flavor, lactic acid, xanthan gum, caramel color and silicon dioxcide to prevent caking.  Not bad, but not clean eating either.

As for nutrition…the Mrs. Leeper’s Gluten Free Beef Lasagna serves 5.  Each serving contains 130 calories as packaged and 0 grams of fat.  You will also take in 0 mg cholesterol, 480 mg sodium, and 3 grams of sugar.  A serving will also provide 2 grams of fiber and 2 grams of protein.  Of course, that does change with the addition of your protein of choice.

Another brilliant pasta meal that is ready in about 15 minutes from Mrs. Leeper’s.  I am beyond impressed.  And, I’m certain I’ll be giving the remaining few Mrs. Leeper’s meals a try…with or without a substitute protein.  Guess it just depends on what I pick up and what might or might not work with it.  But, if you haven’t given the Mrs. Leeper’s Gluten Free pasta meals a try yet…do so.  It’s like Hamburger Helper…but SO much better!

Mrs. Leeper's Gluten Free Beef Lasagna (prepared)
Mrs. Leeper’s Gluten Free Beef Lasagna (prepared)


Product Review: Mrs. Leeper’s Gluten Free Chicken Alfredo

Mrs. Leeper's Gluten Free Chicken Alfredo
Mrs. Leeper’s Gluten Free Chicken Alfredo

Product: Mrs. Leeper’s Gluten Free Chicken Alfredo – $5.99+

Awhile back, while on Manager’s Special, I picked up a box of Cheeseburger Mac made by Mrs. Leeper’s.  I know what you’re already thinking…

Vegetarian…cheeseburger…and chicken?

Well…yes.

Because when I made the Mrs. Leeper’s Cheeseburger Mac, I used Trader Joe’s Soy Chorizo (also gluten-free!) as the meat instead of the ground beef called for in the recipe.  It worked out beautifully.  So, while at my local grocery store a few weeks ago, some of the other Mrs. Leeper’s boxed meals were on closeout.  To me…this means that they are about to go away…and never return.  So…my roommate said that I should go ahead and choose one for us to try, since we both liked the last one that we had.

After looking them over for a few moments, I decided to go with the Gluten Free Chicken Alfredo.  For two reasons.  Reason number one: YUM!  Reason number two: I had the Beyond Meat “Chicken” Strips in the freezer that were just begging for some vehicle to carry it to the dinner table.  That came in the form of this exact box.  And this weekend was the perfect time to dish it up.

For one thing…BRRRR.  For another…I’m having a bad life right now and comfort food just sounds…comforting.  So, last night, I pulled one of the containers of the Beyond Meet Grilled Strips out of the freezer to thaw in the fridge.  This box came out of the pantry and sat in a place of honor on my counter top.  It would be dinner the following night.  TONIGHT!  I was thinking about cooking it up pretty much all day.

When it was just after 5 p.m., I finally got off the computer (I was blogging!) and went into the kitchen.  I pulled out my big skillet and set it on high-ish heat.  Out of the fridge came the chicken strips.  I opened them up and sliced them into bite-size pieces.  That didn’t take too long.  Then, into the hot skillet they went.  I gave them a stir, letting them warm up a bit.  Then, I opened up the box of Mrs. Leeper’s Chicken Alfredo and removed the sauce mix packet.  I measured out the 2 cups of hot water the box called for, as well as the 3/4 cup of milk.  As this meal actually has milk products in it, not wanting to risk discomfort of my tummy, I used my Silk Unsweetened Almond Milk instead.  Both of these were added to the skillet and then the powder mix inside the sauce packet.  I stirred it all together and brought it up to a boil.  Once there…in went the noodles.  I gave it another stir, reduced the heat, and covered it.  My homemade gluten-free dinner rolls went into the oven and I went to work on folding the first load of laundry, stopping every now and again to give it a stir.  It took about 11 minutes to cook completely and get the noodles to their perfect al dente.  I turned off the heat and let it sit for a few minutes before I was ready to dish it up.

It looked and smelled amazing.  But, then again, how can you go wrong when you have fake chicken and perfectly cooked rice pasta swimming in a creamy sauce?  Oh, I was anticipating dinner already.  I dished it up, two bowls for tonight and two bowls for another time.  I snagged the dinner rolls from the oven…and served it up with a helping of this week’s Dr. Who.  Because, dinner is always better when shared with The Doctor.

Anyway, I digress…

Let me just start by saying…WOW!!  Just…WOW!!  This actually tasted like the butter and cream-laden alfredos that I would devour at Italian restaurants all the time.  Hey, I was young and I didn’t know what calories were.  I just knew what I liked.  And that creamy, rich, delicious sauce over the cooked chicken with the pasta was…honestly…so comforting.  Like I said…comfort food.  So, this…this took me back.  It was that good.  The sauce was amazing.  Perfectly seasoned.  Light.  Yes…light.  Let’s hear it for unsweetened almond milk.  And the pasta…it was perfect.  While this can be served without a protein, the Beyond Meat Grilled Chicken Strips were a perfect substitute.  They really absorbed the sauce and paired well with the soft, velvety noodles.  This was heaven in a bowl.  And I might have attempted to savor it, but, in reality, just scarfed it down.  I’m glad there is another bowl waiting for me in the fridge.  That will be later this week for sure.

So, now that I’ve gone on and on about how great the Mrs. Leeper’s Gluten Free Chicken Alfredo is…let’s talk about what is inside it.  Now, I am lactose intolerant, and I know people with dairy allergies…this does contain milk products.  Just be aware.  The ingredients are brown rice pasta, and the alfredo seasoning: whey, corn starch, salt, sour cream, Romano cheese, nonfat dry milk, Parmesan cheese, garlic powder, spices, lactic acid, malodextrin, citric acid, buttermilk solids, natural cheese flavor, less than 2% soybean oil and silicon dioxcide to prevent caking.

Now, let’s talk nutrition.  Generally speaking, you get 5 servings out of this…but I made 4 slightly bigger servings with mine to keep it even.  A serving, however, is 1 cup prepared.  In this serving, you will be taking in 250 calories and 1.5 grams of fat.  You will also be consuming 5 mg cholesterol, 480 mg sodium, and 5 grams of sugar.  Finally, you will be taking in 1 gram of fiber and 4 grams of protein.  All of this, however, does go up if you use real chicken and/or fake chicken or tofu.  This is just for the pasta and sauce itself.

For the second time, I have been pleasantly surprised by Mrs. Leeper’s Gluten Free products.  First the Cheeseburger Mac took my kitchen by storm, and now…I just want to keep eating more of the Mrs. Leeper’s Gluten Free Chicken Alfredo.  It really was amazing.  Great flavors, great textures, and a great dinner overall.  I couldn’t have asked for a better dinner tonight.  Comfort from comfort food…achieved.  Thanks again, Mrs. Leeper’s.

Product Review: Neat – A Healthy Replacement For Meat Mexican Mix + Recipe Bonus

Neat - A Healthy Replacement For Meat Mexican Mix
Neat – A Healthy Replacement For Meat Mexican Mix

Product: Neat – A Healthy Replacement For Meat Mexican Mix – $4.99+

For the last few issues, I’ve noticed that my Delight Gluten Free magazine has had ads for this vegan meat replacement called Neat.  I was beyond intrigued and immediately went on the hunt in my local natural food stores.  Sadly, but not surprisingly, no one in my area carried this product.  At least not yet.  I said I’d get online and see if I could order it, but, naturally, I forgot to do that.  Story of my life.

I can’t help it.  I have too much to think sometimes and these mental notes and reminders get lost in the shuffle.

But then…it was as if they felt the need to answer my unspoken prayer…my favorite monthly delivery arrived.  Cuisine Cube’s October cube arrived in the mail and I immediately tore into it, wondering what sort of surprises awaited inside.  And if you haven’t looked into ordering a Cuisine Cube yet…get over to their Web site and try it out.  Seriously, this is one of the best investments I have ever made.  Receiving gluten-free items from smaller and lesser known companies each month has become a treat I look forward to every month.  So…if you have made a mental note to check them out, and it’s gotten lost in the shuffle…click on the link above and check it out.  For real.

Now back to your regularly scheduled blog…

So, October’s Cuisine Cube arrived and one of the items inside was…you guessed it…because I’m blogging about it…Neat – A Replacement For Meat!  The version included in the box was the Mexican Mix.  Neat, for the record, also has an Original Mix (for burgers/chili), an Italian Mix (for “meatballs” and lasagna), and also a Breakfast Mix (for quiches and breakfast sandwiches).  Let me tell you…I did this happy little dance of joy and might have squeaked a bit when I pulled that pouch out of the cube.  Seriously…after reading about it and looking for it…I finally had it in my clutches!

As a gluten-free vegetarian, vegan/vegetarian meat substitutes are hard to come by.  Most vegan/vegetarian meat substiutes have some sort of vital wheat gluten in them.  And a lot of companies refuse to go the gluten-free route because it would “jeopardize the integrity of the product.”  BOOOO!!  So, up until recently, I’d just season up some tofu and work with that.  But…it’s not the same.

So, what exactly is Neat?  Neat is a meat replacement that is derived from nuts and other non-GMO natural ingredients.  It is a product that was created by a mother of two children who decided that they were going to become vegetarians.  At first she would puree beans into sauces to help her girls get the protein they wanted, but after awhile, everyone got tired of it.  And that was when she got into the kitchen, experimented, and created what is now marketed at Neat.

Neat - A Healthy Replacement For Meat Mexican Mix (in a skillet with chopped onion and chopped green pepper)
Neat – A Healthy Replacement For Meat Mexican Mix (in a skillet with chopped onion and chopped green pepper)

Neat comes in this shelf-stable pouch in a powdered form.  All you do to prepare it is pour the pouch into a bowl, add two eggs (or a vegan egg replacer), plus two tablespoons of water.  Stir all the ingredients together and throw it into a skillet over medium heat, just as you would ground beef, for about seven minutes.  To make it into crumbles, as it cooks, stir and chop it up, and what you end up with is this perfect texture of meat crumbles that is not just completely vegan/vegetarian…but also gluten-free!

Now…gluten-free and vegetarian tacos are sort of something I’m famous for.  I have gotten really creative with how to prepare tacos (Tour De Taco happens often at my apartment) to make them not just gluten-free, but also meat free.  And a meat replacement hasn’t been used in a long time.  So, while I had a pouch of the Mexican Mix from Neat, I decided to bring back an old favorite of mine as a kid, back when I ate meat and would basically beg my mom to make this for dinner.

What I did was cook up my mom’s famous Enchilada Hotdish.  Normally this is made with ground beef, but this meant I could use the Neat Mexican Mix for a different purpose.  Tacos…been there, done that.  Enchilada Hotdish…haven’t had that in AGES!!  So, that’s what I did.  I picked up a gluten-free and vegetarian can of chili and I got a roll of Teese Vegan Nacho Cheese…and the rest was vegetables and seasonings I already had at home.  Perfect.

So, tonight…I pulled out the Cuisine Cube treat of Neat – A Healthy Replacement For Meat Mexican Mix and set out to prepare it.  I chopped up the vegetables that were needed and then retrieved the can of chili and the vegan nacho cheese (which I substituted for the cheddar cheese soup) and had them ready with my seasoning.  First things first…preparing Neat.

Super easy.  I poured the powdered contents of the package into a medium mixing bowl.  Then, per the instructions, I added two eggs and the water and mixed it up.  It created this…sludge of sorts…but I trusted it and went with it.  I had a non-stick skillet on the stove and put the Neat into it to start browning.  The vegetables were also added so they could start to get soft before I added the rest of the ingredients.  With everything in the pan, and heated through, I began to assemble the hotdish itself.  This meant putting the “meat” mixture into the casserole dish, then layering it with tortilla chips, then repeating it.  Into the oven it went to bake and about 30 minutes later…viola!!  I was enjoying a version of my mom’s Enchilada Hotdish.

So…how was it?

It is not an exaggeration when I say I want to marry Neat.  For real.  WOW!  I was SO impressed, not only with the flavor, but how great the texture it.  Here is a company that is getting ti right.  Going into the pan to cook, it didn’t look appetizing or promising, but it all came together.  And it was the perfect meat substitute for the beef that would have been normally used in this recipe.  I am thrilled with this product and think I’ll be placing an order to try ALL the Neat products.  And, I also might straight-out make tacos next time.  But, I figured I should really put this product to the test.  Trust the hype…it’s amazing.

Also…tested it out straight from the pan on the tortilla chips and…oh…yum.   Makes a great dip too!  HA!

Gluten-Free and Vegetarian Enchilada Hotdish (made with Neat - A Healthy Replacement For Meat Mexican Mix)
Gluten-Free and Vegetarian Enchilada Hotdish (made with Neat – A Healthy Replacement For Meat Mexican Mix)

Let’s first delve into the nitty-gritty ingredients and nutrition of Neat – A Healthy Replacement For Meat Mexican Mix.  The Mexican Mix version of Neat is made from pecans, garbanzo beans, organic whole grain gluten free cornmeal, sea salt, and spices.  So, where this is meat-free and dairy-free, and also gluten-free…it is NOT nut-free.  So, if you have a nut allergy…this product is not for you.

As for nutrition, a serving of Neat Mexican Mix is 40 grams and each pouch contains 4 servings.  This serving will give you 21o calories and 15 grams of fat (healthy fat as it is coming from beans and nuts).  A serving will provide you with 333 mg sodium and 2 grams of sugar.  And, trust me, the 5 grams of fiber and 5 grams of protein will leave you feeling full…whether you’re making a hotdish or having taco night.

But…there is more!

I’ve decided, since it worked out so well, that I would share the recipe I used this product in.  This is a family recipe of my mom’s and it is SO delicious!!  If you are not a vegetarian, you can use 1 pound of lean ground beef…and if you can handle dairy, please use your cheddar cheese soup (as long as it is gluten-free!)…but this is how I prepared the dish tonight…with great success!!

Recipe: Gluten Free Vegetarian Enchilada Hotdish

Gluten-Free and Vegetarian Enchilada Hotdish

Servings: 6
Time: Prep 15 minutes; Cook 40 minutes

Ingredients:

  • 1 package Neat – A Healthy Replacement For Meat Mexican Mix
  • 2 organic cage-free eggs
  • 2 tablespoons water
  • 1 cup chopped onion
  • 1 cup chopped green pepper
  • 1 tablespoon chili powder
  • 1 package Teese Vegan Nacho Cheese Sauce
  • 1 can vegetarian chili (I used Amy’s Organic Light in Sodium Medium Chili)
  • 1/2 can water

Directions:

Preheat the oven to 350° F.

Pour the Neat – A Healthy Replacement For Meat Mexican Mix into a medium bowl.  Add two eggs (or egg replacer if vegan) and 2 tablespoons of water.  Mix well.

In a non-stick skillet over medium heat, brown the Next Mexican Mix, onion, and green peppers.  Cook until vegetables begin to soften and the Neat can be chopped into a meat texture.  Add the chili powder, vegan cheese sauce, chili and water to the mix and mix well.  Allow it to heat through for a few minutes to marry the flavors together.

In a 9×9 oven-proof dish, place in layers, alternating the meat mixture with 1 package of tortilla or nacho chips.

Bake for 30 minutes.

~*~*~

Thanks to Cuisine Cube and Neat – A Healthy Replacement For Meat, I was not only able to recreate a version of an old family favorite, but it tasted so much like how I remembered it tasting when I was growing up.  I couldn’t have been happier tonight as I sat and devoured my dinner.  I can’t wait to get my hands on the other Neat products.  Talk about having a desired product land in your lap!!

Seriously…seek out this product!!  I highly recommend it!  The product is so versatile…beyond just a protein base for tacos.  Try out the recipe above or use it in one of your own family favorites.  You will not be disappointed.  I promise!

Product Review: The Pure Pantry Gluten-Free Organic Old Fashioned Pancake and Baking Mix (with bonus recipe & coupon code)

Product: The Pure Pantry Gluten-Free Organic Old Fashioned Pancake and Baking Mix – $7.29+

A couple weeks ago, I was fortunate enough to be sent a free package of The Pure Pantry‘s Gluten-Free Organic Old Fashioned Pancake and Baking Mix.  I was ecstatic…for quite a few reasons.  For the first thing…most gluten-free baking mixes that I have tried…haven’t lived up to expectations.  Secondly, the pancakes on the package looked heavenly…so, I could only imagine the awesomeness that was enclosed inside.

Included with the mix were two recipes.  I had this perfect vision in my head the moment I saw one for The Pure Pantry’s Gluten-Free/Dairy-Free Cornbread (or Muffins).  You see…I love chili, soup, and stew.  I LOVE…LOVE…LOVE these things…and it’s officially autumn.  It’s fall.  It’s soup season.  It’s time to break into my vegetable crisper and my pantry and whip up some warm, comforting goodness on the stovetop.

Tonight…that’s just what I did.  And I pulled out my package of The Pure Pantry’s Gluten-Free Organic Old Fashioned Pancake and Baking Mix because the perfect accompaniment to any chili (and I made a fantastic Garden Chili with LOTS of veggies!)…is cornbread, of course!!

This was not my first foray into gluten-free cornbread.  I’ve made at least a dozen different versions of it.  None of which I have liked.  Seriously.  None.  They just never seemed to hit that perfect cornbread mark!  Always a disappointment.  If my roommate was game, she’d offer to use the failed versions for some snacks at work…but that was rare.  Yeah…my cornbread record since going gluten-free has not been stellar.

So, you can only imagine my anticipation today when, after a long day of fitness, festivals, and…yes…food…I wanted to cook up a light chili and give this cornbread recipe a whirl.  What could go wrong?  I’d either be amazed…or disappointed once again.

The recipe was very easy and everything needed was in my pantry or fridge already.  Don’t you love it when that happens?  Combining the mix with corn meal, baking powder, salt, and some liquid ingredients, this epic dough that felt light and airy emerged.  I poured it into a greased baking pan and threw it in the oven for about 22 minutes.

What emerged was sheer cornbread perfection.  It looked like cornbread.  It smelled like cornbread.  Once the chili was done simmering away on the stove…I would find out if it tasted like cornbread.  About 20 minutes later…dinner was served.

The first difference between the cornbread made with The Pure Pantry’s Gluten-Free Organic Old Fashioned Pancake and Baking Mix was that it didn’t feel heavy or dense…even as it came out of the oven.  I can tell when I bake whether a recipe is going to be good by how heavy the pan feels as I lift it out of that oven.  This didn’t feel heavy at all.  It was this gorgeous golden color on top. It cooled briefly before I got out a knife and sliced it into 16 squares.  Cutting it was a dream.  I could tell that it was going to be a perfect texture due to how easily the knife cut through it.  Like butter!  It glided right through…no fighting with heavy, gummy insides on this bread.  I might have perfection here!  Each bowl of chili was served with two squares of the cornbread.

The verdict?!

BEST GLUTEN FREE CORNBREAD EVER!!  And, as I stated above, I’ve made so much gluten-free cornbread that I didn’t like or I felt just came out wrong.  There was absolutely nothing wrong with this recipe.  It was hearty and delicious and so easy to prepare.  I loved not just the texture, but how light, but substantial it felt.  I loved the flavor…which…for me…was perfect.  It wasn’t sweet cornbread…which is just how I like it.  Sugar in cornbread is cake.  This didn’t taste like cake.  This tasted like cornbread.  It had that gritty, corn flavor.  Honestly…made my night.

I am going to definitely try the sweet recipe that was sent along with this baking mix as well…so stay tuned for that!!  But for now, please enjoy this recipe from The Pure Pantry:

Recipe: The Pure Pantry’s Gluten-Free and Dairy-Free Cornbread (or Muffins)

The Pure Pantry Gluten-Free Organic Old Fashioned Pancake and Baking Mix (with Gluten-Free and Dairy-Free Cornbread)

Servings: 6
Time: Prep 10 minutes; Bake 20 minutes

Ingredients:

  • 1 cup The Pure Pantry Gluten Free All Purpose Baking Mix
  • 1 cup organic yellow corn meal
  • 1/4 cup agave nectar
  • 1 teaspoon aluminum free baking powder1/2 teaspoon salt
  • 1 cup milk (almond milk or rice milk may be substituted) (I used unsweetened almond milk)
  • 1/3 cup vegetable shortening, butter, or coconut oil – melted
  • 1 large egg, slightly beaten (or egg replacer)

Directions:

Preheat the oven to 400°F.

Grease or butter an 8-inch square baking pan.

Combine dry ingredients in a medium bowl.

Combine milk, oil, agave, and egg in a small bowl; mix well.

Add the milk mixture to flour mixture; stir until just blended.

Pour into prepared pan and bake for 20-22 minutes.  For muffins, spoon batter into greased muffin cups, fill 2/3 full and bake 15-18 minutes.

This recipe may be doubled and baked as above in a 13×9 inch baking pan.

~*~*~

The Pure Pantry has so many mixes to offer.  And they were kind enough to share a coupon code with me to give to all of you, my dear readers.  If you are interested in trying their products, skip over to http://www.thepurepantry.com and take a look at their shop.  You can get $1.00 off your purchase of any two (2) gluten-free products from The Pure Pantry simply by entering PLU 35147 as you are checking out!  Trust me…these products are totally worth it.  I have never been so satisfied with a mix than I was with this one.  The Pure Pantry might actually be selling gluten-free baking perfection.

But…don’t just take my word for it.  Get over to their site…order some of their products and see how life changing your gluten-free foods can be.  Simple.  Delicious.  And…amazing and delicious.

The Pure Pantry is pure gluten-free delicious goodness!

Product Review: Tastefully Simple Gluten-Free Cinnamon Apple Cake Mix

Tastefully Simple Gluten Free Cinnamon Apple Cake Mix

Product: Tastefully Simple Gluten-Free Cinnamon Apple Cake Mix – $10.99

I want to give another quick shout-out to my friend (all the way back through middle school!), Rebecca Fifield, who not only is just an all-around fantastic person, but is also a consultant for Tastefully Simple.  She was kind enough to send me a batch of the original four gluten-free mixes that Tastefully Simple were putting out on the market.  I have one more to go, and this one isn’t one of them.

The product I am  reviewing today, the Tastefully Simple Gluten-Free Cinnamon Apple Cake Mix, actually is part of their second round of gluten-free mix offerings, which also brought about a Gluten-Free Coconut Lime Cake Mix.  Actually, I am just now realizing that Tastefully Simple sneaked out two more mixes while I wasn’t looking…a Gluten-Free Chocolate Chip Cookie Mix and a Gluten-Free Cinnamon Apple Pancake Mix.  I think I know what I’ll be ordering soon!

Anyway…when Tastefully Simple first released second round of products (Coconut Lime Cake Mix and the Cinnamon Apple Cake Mix), I was determined to buy at least one of them.  I would have purchased both, except I was already planning on buying more of the Gluten-Free Beer Bread Mix.  Hey…that stuff is awesome.  So after a little back and forth with myself…I finally chose the Gluten-Free Cinnamon Apple Cake Mix for this time around.

And last night…I baked it up.

One of the things that makes Tastefully Simple products so appealing is how…simple…they are to make.  Normally, they require the addition of 2-3 items, all of which get stirred together and then popped into the oven to bake.  Seriously…that easy.  I love something that won’t take up too much of my time in the kitchen.  Let’s face it…I may love to cook and bake, but I’m a busy girl and I value my time.

As it was, the Tastefully Simple Gluten Free Cinnamon Apple Cake Mix only requires 2 cups of chopped apples (and, hey, my CSA bin gave me apples this week!), 2 eggs (or egg replacer if you are vegan), and 1 cup of chopped walnuts (which are optional, but I always add nuts!).  So, I poured the mix into a mixing bowl, chopped up two large Gala apples, broke two eggs into the bowl, and then added the walnuts.  I stirred the contents until everything was combined and no powdery mix remained in the bowl.  This took a couple of minutes because the only liquid in the bowl came from the two eggs, and for a moment I didn’t think it was going to come together.  I will never doubt again, because it all mixed in beautifully.  I poured the batter into a greased baking pan and threw it into the oven to bake.  This normally takes about 45-55 minutes.  Surprisingly, my old oven perfectly baked the cake in 45 minutes.

Tastefully Simple Gluten-Free Cinnamon Apple Cake Mix (baked and fresh from the oven)

First of all, the Tastefully Simple Gluten Free Cinnamon Apple Cake smells AMAZING as it is baking.  We’re in the midst of September, and autumn is coming.  This made my entire apartment smell like fall.  For real!  When it came out of the oven, it took everything in my power to let it cool down before I sliced it up and tried it for myself.  I’m not good with self control, but somehow…I managed.

The end result?!  One of the most fantastic, moist, and flavorful cakes I have ever had.  This is no joke.  Not one bit.  The apples provide a nice hit of sweetness and texture.  The top of the cake gets this nice crust on it, which crumbles as you slice into it.  It was a beautiful thing.  And the cake itself…aside from being moist, this cake tastes like a flavorful and delicious coffee cake.  It has this rich flavor to it, with the cinnamon adding a sweet spice to it that I love and my taste buds crave.  I was so surprised with how moist this cake was.  I was a bit concerned about it, but I should have known to trust Tastefully Simple.  I might be addicted to this cake.  Self control is definitely being exercised as I have an entire cake now.  It sure does taste like autumn around here.

So, let’s take a look at the ingredients.  The Tastefully Simple Gluten Free Cinnamon Apple Cake Mix is made from sugar, rice flour, potato starch, tapioca flour, sodium bicarbonate, sodium acid pyrophosphate, salt, cinnamon, and xanthan gum.  It is cholesterol free, gluten free and kosher.

The Tastefully Simple Gluten Free Cinnamon Apple Cake Mix isn’t bad for a cake.  Remember though, this is for the mix only, but even after everything is added in, the calories and fat all stay in check.  A serving of the mix is 1/4 cup, and the mix itself makes 9 servings.  This serving will give you 190 calories.  It is fat-free and cholesterol free (until you add the eggs, of course!).  The mix has only 260 mg sodium and a whopping 29 grams of sugar.  But…it’s cake.  It’s going to be sugary!  The mix itself has no fiber and only 1 gram of protein.

Not bad at all for nutrition of a cake, that’s for sure.  I honestly was so pleasantly surprised by this cake.  I think it’s going to become a pantry staple in my apartment.  Because…wow…I am beyond impressed.

Now, I know you’re dying to try it!  You must be.  And you should be.  So, head over to Rebecca Fifield‘s page and place an order.  I promise…you won’t be disappointed.

A slice of Tastefully Simple Gluten-Free Cinnamon Apple Cake (serving size)

Gluten-Free Food Allergy Fest – Indianapolis, Indiana – August 23, 2014

GF Jules and me at the Gluten-Free Food Allergy Fest in Indianapolis, Indiana!

This past Saturday, I had the honor of being able to attend the Gluten Free Food Allergy Fest up in Indianapolis, Indiana.  I love going to gluten-free expos and events and Indianapolis seems to always have one at some point during any calendar year.  This year was no exception, and I was thrilled to read about the new location for this year’s event – the Indian State Fairgrounds.  With all the vendors and exhibitors I saw listed, I knew this year’s event was going to be HUGE! I was not let down at all.One of the magazines I currently subscribe to, Gluten Free & More (formerly Living Without), was putting on the Living Without Gluten-Free Food Allergy Fest in various cities this year as a way to show those with food allergies and/or sensitivities that we can live life without deprivation and missing out on delicious food.  It was a coming together of the magazine, as well as over a hundred of their favorite exhibitors to celebrate living well.  And it was open to anyone who wanted to stop in.

Tickets went on sale and, as a subscriber, I received a free entry, and then received a discount code for another ticket…so I had Cathy taken care of as well.  So, on Saturday morning, we ate a light breakfast before climbing into the car and hauling up to Indianapolis.  We timed it perfectly because we burned through our breakfast just as we got up there, about 30 minutes after it officially opened.

And…there was already a line waiting to get in.

Oh…that made me happy, indeed.

It was a hot summer day already and standing outside in the blazing sun didn’t sound like too much fun…but it wasn’t going to be a long wait.  Just about 5 minutes, at the most.  And while standing in line, I got to listen to people who have done expos like this before (like me) describe the events and how things work to the first timers.  I even got to geek out over favorite products and the like for a few moments.  I love making gluten-free friends!

Before we knew it, we were inside the doors, in the air conditioning, and getting the tickets scanned.  We were given blue wristbands to wear (for re-entry purposes and to show we paid!).  Cathy and I put them on and headed into the expo proper.  We were greeted at the door by people passing out reusable shopping bags from Glutino (a personal favorite!).  Perfect for all the samples and products you are bound to pick up and buy.

Trust me, you don’t walk out of these events empty-handed.

Cathy and I decided that we were going to be systematic about our approach to each table/vendor/aisle.  We’d start on one side and then work our way up, then come back down the other side.  This was a good plan in theory, and we decided to start in the middle aisle to avoid the congestion of the end aisles.  We soon found out…no matter what…it was just hopping and congested.  People were surrounding tables, getting free samples, trying products, trying local baked goods, and the like.  So, we ditched our original systematic plan for the…let’s just see what there is and wriggle into open areas when we can.

We’re pros.  HA!

That being said, we began our Gluten-Free Food Allergy Fest at the Glutino/Udi’s/Earth Balance booth, which was giving out samples of Udi’s Gluten-Free Salted Caramel Cashew Cookies as well as Glutino’s Gluten-Free Multigrain English Muffins, schmeared with Earth Balance Creamy Coconut and Peanut Spread.  It was all crazy, crazy delicious.  I actually have the Glutino English Muffins in my freezer, I just haven’t tried them yet. Now…I know buying them wasn’t a mistake at all.  They were delicious.  And that Earth Balance Creamy Coconut and Peanut Spread…out-of-this-world good!

And from there…it only got better.  We made a point to stop by each vendor’s table and talk to them about their products, if we had tried them.  If we hadn’t…we would ask all about them.  I made a point of raving to the Pamela’s Product people about the Figgies & Jammies.  Because they are awesome and worthy of praise.  I talked to the Hodgson Mills representative and when I mentioned being a food blogger he said to reach out to the Hodgson Mills team anytime.  I was told the same thing by various other vendors as well.  And one local vendor who was selling the most amazing bar-b-que sauce and seasoning (which we purchased) said to tag her on Facebook when I use their products so they can read my blog.  I was having a great time.

I think, though, the best moment had to come at the Freedom Foods table.  Because, as many of you are aware, Freedom Foods only makes my favorite gluten-free cereal, Tropic-O’s.  NOM NOM!  I can’t find this cereal here anymore, since my Whole Foods stopped carrying it, so my parents ship it to me from Birmingham, Alabama.  We have a system down.  But, recently, they put out a gluten-free, dairy-free, and not-free version of Nutella…which I fell in love with.  My local Kroger is the only place that had it…and I bought the last jar of it a few weeks ago.  It has never been restocked.  So…I stocked up on some Quinoa Pancake Mix, lots of “Smudge” (that’s the Nutella stuff!), and a few other products to try, all the time raving about how much I love their products and how they honestly care about what ingredients go into all of their stuff.  It didn’t hurt that the guy at the table had a New Zealand/Australian accent.  HELLO!  I actually ended up going back to the table before leaving that day and buying 4 more jars of Smudge.  I hadn’t opened the one I had at home for fear I would never find it again.  Now…it’s on!

I was able to sample some of the best gluten-free Snickerdoodles I have ever eaten.  And this pasta that was made from lentils that tasted exactly like regular pasta…but I couldn’t afford the hefty price tag on it.  Unfortunately.  It was nice to sample it, however.  At the very back of the building, for those over 21, was the gluten-free cider/beer tasting area.  There was so much food and samples…so I was glad we ate light.  And Cathy and I have a system down…where we split a sample so we aren’t filling up on our own.  It always works at these events.

However, I have to say the greatest moment ever was when I finally got to meet GF Jules in person. GF Jules (formerly Jules Gluten Free) was one of the first Celiac/Gluten-Free bloggers/recipe makers/amazing people I started to follow on social media after my diagnosis.  While I have been to events where she has been present, I have never been able to actually meet her.  That changed.  We discovered that we were food allergy soul sisters, both of us being vegetarian Celiacs who also can’t handle dairy.  Go figure.  She was so nice and just so easy to talk with.  I picked up one of her cookbooks, which she signed, and she was kind enough to take a picture with me.  I might have geeked out a little bit.  Or a lot.  You know how it goes…

And soon, after a couple hours of tasting, testing, buying, talking, and exploring, our time at the expo drew to a close.  We were going to meet our friend, Greg, for lunch that day, so we bid adieu to the fantastic event and made our way out to the car.

This event was probably the best one I have attended so far.  Great people, great vendors, great information all around.  And I came home with samples and products to try in the very near future.  Can’t argue with that, right?  Right!

I hope they return next year.  I’m already making plans to attend.  If one of these events happens near you…I definitely encourage you to go!

Product Review: Breads From Anna Gluten Free Banana Bread Mix

Breads From Anna Gluten Free Banana Bread Mix

Product: Breads From Anna Gluten Free Banana Bread Mix – $7.49+

I don’t remember where I first heard about Breads From Anna bread mixes…but I discovered it one day at work.  I remember messaging my friend, Jenn, on Twitter because the store locator showed that her local natural foods store, The Raisin Rack, carried these mixes.  She said that the next time she made it over there, she’d check.

Well, it just so happened that the next time she was over there…I happened to be with her.  And my roommate happened to be in a generous mood as far as the food budget, because she handed me a basket and told me to fill it up!

I did.  And, lo and behold, in one of the aisles with a bunch of gluten-free baking mixes…I found Breads From Anna bread mixes.  Lots and lots of them.  The hard part was finally choosing which one to try first.  While I love pumpkin bread…in the end I went with the Gluten Free Banana Bread Mix.

Normally I make my own bread, but I have never, ever had a gluten-free banana bread come out right.  I figured it was time to call in some help in the form of a mix.  When in doubt…try the experts.  How did I know that Anna would be an expert?  I didn’t.  But I had heard things.  Good things.  And as a celiac and type 1 diabetic, she wanted to make bread that tastes like bread (not cardboard), and as a trained chef, she was able to put her skills to the test and created safe, allergen-free products that would have superb flavor, texture, and taste.  When her non-celiac brother first tried her bread…he said it tasted like bread.  That was all she needed.  Breads From Anna grew from there.

Regardless of what I heard and the creator’s promise on the side of the box…with me…it just has to be baked and tested.  Making the batter was easy.  After preheating the oven and greasing one bread loaf pan, I mixed together the eggs, the oil, and the 3 bananas, which I had pureed in the food processor.  In went the bread mix, and once that was well blended, I went ahead and folded in the optional chopped nuts.  Because banana bread plays nicely with nuts.  Into the loaf pan and then into the oven for one hour.

Yes.  One hour.  One hour of sheer torture because after about 20 minutes, you get that amazing banana bread smell wafting out of the kitchen.  I was literally doing my hand weight routine and trying really heard not to drool.  The aroma was beyond enticing.  I peaked into the oven about halfway through and the loaf had risen and puffed up gorgeously and was turning this fantastic golden color.  I wasn’t sure it needed the remaining 30 minutes, but kept it in the oven regardless…hoping for the best this time around.  When the timer went off, I pulled it from the oven and set it on a cooling rack to now cool in the pan for an hour.

Sweet torture!

But…well worth the wait.  After an hour…to the exact moment, I made my way back into the kitchen, grabbed a knife, and you better believe I carved a slice out of it.  My roommate, who is non-celiac and a bread connoisseur, was my ultimate test.  I handed her a slice of the still warm gluten-free banana bread and waited for her to take a bite.  She absolutely loved it.  My turn.

Moist.  Light.  Definitely delivering on the flavor, the texture, and the overall feel of banana bread.  This bread isn’t heavy and dense.  It isn’t overly banana.  It’s moist, but without being wet.  It’s perfection.  Honest to goodness bread goodness.  I wish I could claim I made this from scratch.  This loaf of bread puffed up to this gorgeous loaf with a nice golden outer crust.  Inside, you get this fantastic banana and walnut flavor.  And this loaf does bake up big.  Like…better than any other bread I have made, whether from scratch or from a mix.  Never before has it turned out like this one did.  I’m hooked.  I want to buy all the Breads From Anna Mixes and just get into that kitchen and test them all out.

Totally worth it.

So, down to the science of things.  The Breads From Anna Gluten Free Banana Bread Mix is made from powdered honey, tapioca starch, arrowroot, millet four, potato starch, chia flour, chickpea flour, pinto bean flour, navy bean flour, cream of tartar, baking soda, xanthan gum, and sea salt.  This bread mix is gluten-free, yeast-free, corn-free, dairy-free, soy-free, nut-free and rice-free.  For a bread that is yeast free…it sure did rise up beautifully.  This mix is also kosher parve and non-GMO.

Nutritionally speaking, the Breads From Anna Gluten Free Banana Bread Mix contains 14 servings.  One serving of the mix on its own is 80 calories.  The mix is fat free and cholesterol free.  Just the dry ingredients alone, you will be taking in 270 mg sodium and 9 grams of sugar.  In addition, you will be consuming 2 grams of fiber and 1 gram of protein.

I. AM. IN. LOVE.

With a bread mix.  Thank you, Anna Sobaski…for creating this fantastic mix to make gluten-free baking, which is an art and science all itself, easy for someone like me.  This bread is one of the best I have ever cooked up in my kitchen.  I am happily, happily noshing away on this delicious loaf.  And with all the flavor, texture and taste of “real” banana bread…no one would have a clue that they were eating gluten-free.

Thank you.

Product Review: Dinner Tonight Burger Seasoning

Dinner Tonight Burger Seasoning Mix

Product: Dinner Tonight Burger Seasoning – $3.95+

Maybe it’s the “end of summer” last call in this month’s Cuisine Cube, but I was hit up with a product I couldn’t eat (Field Trip Cracked Pepper Turkey Jerky) as a vegetarian, and then, as I was eagerly pulling products out of the box…noted the burger sauce and the burger seasoning.

You’d think I would do as I did with the turkey jerky and put it in the break room as fair game for any hungry or burger-loving co-workers.  But not me.  You see, one thing I love doing is creating products in my kitchen.  And never have burgers been completely limited to meat.  Especially where I am concerned.  What I did was started to ponder what a vegetarian could create using these products meant for burgers and lo and behold…it came to me.

I decided I would create a veggie burger (using green lentils for the main source of protein) and figured I could use the Dinner Tonight Burger Seasoning Mix as I would if I had been cooking with meat.  It was brilliant.  It was…a good reason to dig out those lentils.

Last night, I donned my skull and crossbones apron and set myself to work, creating my veggie burger.  Lentils, mushrooms, and more all got cooked up, and after giving it a little mash, in went the seasoning.  I immediately loved how light and citrus-y it smelled.  It had this very bright aroma to it and I knew it was really going to elevate my veggie burger.  Happiness.  I chilled the base and after about 30 minutes, pounded out about 10 actual patties, freezing 8 of them and using two for dinner (one for me and one for the roomie!).  Some olive oil on my skillet and down went the patties.  No cheese necessary…I was topping these with Russian red kale and green tomato.

Within a couple of minutes, the burgers had a beautiful sear on them and I lifted them off the skillet and put them in the gluten-free buns (which I purchased from my local gluten-free bakery, Annie May’s Sweet Café).  Dinner was served (with a side of smashed purple potatoes!).  I topped these off with the Charleston Gourmet Burger Co. Burger Sauce (see next review!) and then…settled in to see how my own play on a veggie burger came out.

I can honestly say, thanks to the Dinner Tonight Burger Seasoning, I didn’t need to add anything more to these burgers as I formed the base.  No extra salt.  No other spices or herbs.  This was just what these lentils, mushrooms, and other veggies needed.  The seasoning itself wasn’t too strong, but you could definitely taste the variety of flavors that made up this mix.  The veggie burgers that I made with the Dinner Tonight Burger Seasoning were pure perfection…especially when it came to balancing flavors.  Brilliant.

The Dinner Tonight Burger Seasoning Mix is made from garlic, thyme, black pepper, salt, lemon zest, cayenne pepper, onion, parsley, natural lemon juice powder, sugar, and citric acid.  This mix is all natural, cholesterol free, and gluten-free.  And…it’s perfect for carnivores and herbivores alike.  Trust me.

A serving of the Dinner Tonight Burger Seasoning Mix is 1 teaspoon.  This one serving will provide you with 5 calories and less than 1 gram of fat.  You will be taking in 135 mg sodium.  Finally, this serving gives you 0 grams of protein and fiber.

Once again, Cuisine Cube provided me with a product I never would have known about or tried…but thanks to it being in my cube, I found a purpose for it.  I’m not going to let a vegetarian keep me from trying whatever I can in these boxes of happiness each month.  The jerky was one thing…but burger seasoning…hell, I can figure out a use for that!  One delicious veggie burger later, not using it with a meat base made no difference, this seasoning mix should be raved about.  Absolutely loved it.  And now, I have my first official recipe for my own cookbook.

Thank you Dinner Tonight and Cuisine Cube!

Product Review: Southern Culture Artisan Foods Shortstacks Gluten Free Vanilla Pancake & Waffle Mix

Southern Culture Artisan Foods Shortstacks Gluten Free Vanilla Pancake and Waffle Mix

Product: Southern Culture Artisan Foods Shortstacks Gluten Free Vanilla Pancake & Waffle Mix – $7.99

Okay…I think this is a first.  An absolute first since I started receiving my Cuisine Cube orders.  If you’re just tuning in, Cuisine Cube  is a brilliant service that sends a box of 5-6 lesser known company products in the gluten-free world to my door…for me to enjoy…each month.  Yes.  Each month.  And for a really good fee as well.  I always look forward to my cube and have been trying to get through the items that have been sent in May-July as my August cube is to arrive tomorrow and I still have quite a few untried and untested products in each box.  But…I’m getting there for sure!

So…there is my plug for Cuisine Cube.  And I encourage anyone in my gluten-free reading circle (or even if you’re not gluten-free!) to give Cuisine Cube a try.  You can cancel at any time…but I’m loving it too much to even dream about canceling.  Because, it seems, they have nailed these products and sent some of the most amazing products I, otherwise, never have discovered or heard about.

And usually…these products wow me and astound me and make me want to seek them out so I can keep them in my pantry.  But…this time…for the first time in four months…I didn’t care for a product that was inside.

The product in question was in my June Cuisine Cube.  It  was the Southern Culture Artisan Foods Shortstacks Gluten Free Vanilla Pancake and Waffle Mix.  Now…I absolutely love pancakes and waffles.  I wouldn’t be a runner if I didn’t.  Let’s face it.  HA!  Seriously, there is nothing quite as satisfying as a delicious soft pancake with hot maple syrup drizzled over it…or a crunchy on the outside, soft on the inside waffle fresh from my waffle (stick) iron.  And yet…they are a breakfast item I so rarely make as the waffle maker sometimes drives me nuts and, well, I just haven’t done pancakes in awhile.

With my friend, Greg, in town…I figured I could test out the Southern Culture Artisan Foods Shortstacks Gluten Free Vanilla Pancake and Waffle Mix for breakfast on Sunday.  I had already hit up the gym and done some laps in the pool (SIGH!), so after a shower…I grabbed the little container of the Southern Culture Artisan Foods Shortstacks Gluten Free Vanilla Pancake and Waffle Mix and headed into the kitchen.  I dug out my waffle stick maker and got it heating up.  I sprayed it with cooking spray and then got to making  the batter for the waffles.

I realized I had no eggs…but thankfully there is a vegan version of the mix on the container.  No eggs needed.  I emptied the bag of mix into a large bowl and added 1 cup of unsweetened almond milk and 4 tablespoons of vegetable oil.  Per the instructions.  I gave it a mix…and it was just dry and clumpy and…not batter.  So I added more almond milk, and it didn’t do much different…but at least it was a bit creamier.

I pulled out my 1/3 cup scoop (that’s the serving size) and poured the batter into the waffle iron.  I spread it out with a knife, adding a little batter here and there where needed to fill in holes.  Then, I closed the lid and let it steam and cook and get toasted and crispy.  It took about 6 or 7 minutes total.  I decided to take a chance and serve Greg first.  He’s rather particular about his food…so I crossed my fingers, laid it out with some warm maple agave syrup, and went back to start on Cathy’s (the roomie!) waffles.

I repeated this process again, handing over her waffles and heading back to make mine.  And as she dug in I had to ask…

“So, what do you think?”

And her response…was shocking.  “Actually, I’m not a fan.”

“Really?  Why?  What’s wrong?”

“It’s…salty.”

So, this immediately sent me scrambling for the package to see what might be salty in the mix.  And, near the end there is salt, but it was one of the last ingredients listed.  However, I did note that there were two different bean flours that were used in the mix…and I thought, perhaps, the bean flours were giving it that flavor to her.  I would have to wait for my waffles to finish so I could see for myself.

I pulled my waffle sticks from the waffle iron, gave them a drizzle of syrup, and settled in to tuck into my breakfast.

One bite…and I totally knew it was the bean flours.  The flavor of the Southern Culture Artisan Foods Shortstacks Gluten Free Vanilla Pancake and Waffle Mix…is, supposedly, vanilla.  I don’t get vanilla at all.  I did see what Cathy meant about the “salty” aspect of the prepared waffles.  I definitely could pinpoint it as to being a result of using both chickpea and fava bean flours.  It sort of reminded me of why I disliked the flavor of some of the Dr. Lucky’s Gluten-Free Cookies, which also uses bean flours as a base…and you can tell.  The texture of these waffles were perfection.  It got that golden crust on the outside and nice and soft in the middle.  A perfect cook indeed.  It fluffed up in the waffle iron and was golden perfection.  I was really excited about them.  Until I took a bite.  Because they didn’t have that vanilla flavor that was advertised.  They had bean flavor.  And I don’t want bean flavored waffles.  Seriously.  That’s…disgusting. When you bite into a waffle or pancake, you want the buttermilk or vanilla or whatever flavor you expect.  This salty, bean flavor was not what I expected…or wanted.  I was really turned off and it was a fight to actually get me to finish them off at breakfast.  Drown anything with syrup and you can get through it, I guess.

So…yeah…

So, let’s talk about the ingredients in the Southern Culture Artisan Foods Shortstacks Gluten Free Vanilla Pancake and Waffle Mix.  This mix is a blend of an organic gluten-free flour blend (garbanzo bean flour, potato starch, tapioca flour, whole grain sweet white sorghum flour, and fava bean flour), organic sugar, leavening (monocalcium phosphate and sodium bicarbonate, cornstarch), baking soda, salt, vanilla bean powder, and xanthan gum.  The mix itself is gluten-free, vegan, dairy-free, and cholesterol free.

As for nutrition information, a serving of the Southern Culture Artisan Foods Shortstacks Gluten Free Vanilla Pancake and Waffle Mix is 1/3 cup.  There are 4 servings per container.  One serving will provide you with 170 calories and 0 grams of fat.  This serving will give you 590 calories and 3 grams of sugar.  And finally, you will be taking in 1 gram of fiber and 5 grams of protein.

All-in-all…I was just really disappointed with the Southern Culture Artisan Foods Shortstacks Gluten Free Vanilla Pancake and Waffle Mix.  I had gone into it with an open mind and a lot of confidence because it was from Cuisine Cube…and I’ve never disliked something (until now) that was in my Cuisine Cube.  This just was strange…the flavor was way off.  I wish it had been delicious because I liked everything else about the waffles.  Just not the taste.

Too bad.

Well, we can’t win them all.  I can’t wait to move forward and try something else from my next cube.  But I don’t think I’ll be ordering any more of the Southern Culture Artisan Foods Shortstacks Gluten Free Vanilla Pancake and Waffle Mix.