Product Review: Pamela’s Products Gluten Free Spice Cake Mix

Pamela's Products Gluten Free Spice Cake Mix
Pamela’s Products Gluten Free Spice Cake Mix

Product: Pamela’s Products Gluten Free Spice Cake Mix – $5.99+

Back when I first went gluten-free, the receptionist at my office was on this diet kick.  And she brought in these muffins that were made with only two ingredients: spice cake and a can of pumpkin.  That’s it.  I didn’t get to try them, despite her asking me to at least take a bite…because I didn’t want to feel ill the rest of the day, or perhaps the week.  Everyone else who tried them though loved them.

That was over three years ago.  And despite there being at least one gluten-free spice cake mix out on the market (made by Namaste Foods)…I hadn’t really gotten around to purchasing the mix and then giving a gluten-free version of those muffins a try.

And then…this past fall as I was strolling down the back aisle of my Whole Foods Market…I saw a display of gluten free fall baking items, all by Pamela’s Products.  They were the new Gluten Free Pumpkin Bread Mix and the new Gluten Free Spice Cake Mix.  I had just recently gotten a gluten-free pumpkin bread mix from a different company, but the spice cake mix…that made me happy.  I turned to my roommate and asked if we could break the budget for this…because I had two ingredient muffins I wanted to make with it.  She agreed.  YAY!  Home came the cake mix.

However, with the busy, hectic holidays…my time for baking things for me (I baked a lot of gluten-free goodies for family/friends/special businesses) and the muffins got pushed to the back burner.  As a lot of my great ideas at the time…when I am purchasing something often do.  Sadness.  But sadness no more…because I needed some easy breakfast food this week…mostly because I’m attempting to get back into a workout routine, despite my injury, and have some early morning sessions at the gym planned out.  The easier something is to make afterwards, the better!

So, today, I got out a can of pumpkin (I keep cans of pumpkin on hand like they are going out of style!) from my pantry and snagged the bag of Pamela’s Products Gluten Free Spice Cake Mix from the baking shelf.  It was time to make those muffins as planned.

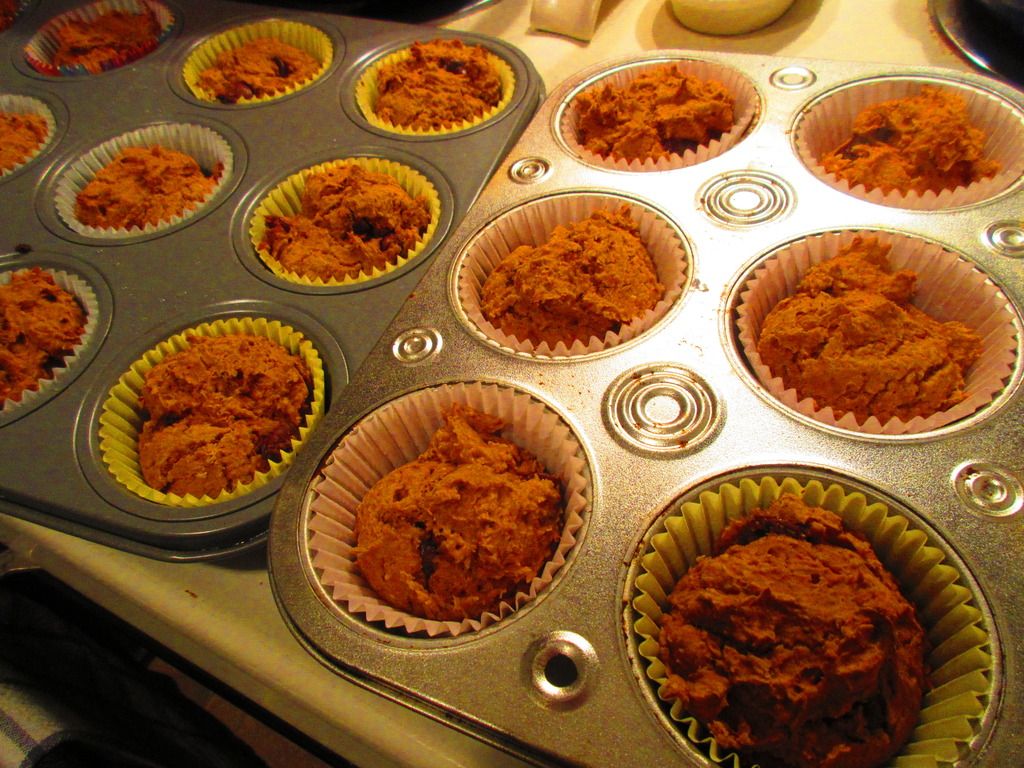
So, into a bowl went the cake mix and the can of pumpkin.  I beat it all together with an electric mixer and then folded in 1/2 cup of semi-sweet chocolate chips.  So…I made mine with three ingredients.  I wasn’t sure how a gluten-free cake mix would take to this recipe (a lot of times you should follow instructions on the package exactly or face epic, massive, culinary fail!), and who doesn’t like a touch of sweet chocolate with their breakfast, right?  RIGHT!  I filled 18 muffin cups with the mix and popped it into a 350°F oven, allowing them to bake for around 24 minutes.  I removed them and let them cool before placing them in a container to keep for the upcoming week.

BUT…I can’t bake something and not try it, right?  If it was an epic fail…well…I didn’t want to find out tomorrow morning when there was nothing to do about it.

My worry was for naught.  I should have known.  Pamela’s Products has always been delicious, no matter if I’m using her flour blends, or product mixes, or feasting on cookies, figgies, or granola bars.  I have never met a Pamela’s Products product that I didn’t fall in love with or enjoy.  And that continues to hold true.

The Pamela’s Products Gluten Free Spice Cake Mix has this delicious fall spice flavor to it.  A hint of cinnamon, nutmeg, allspice, cloves, ginger and cardamom bring out that amazing taste of one of my favorite seasons!  Nothing like a taste of fall at the height of spring, right?  Maybe I was trying to forget that we were in the high 70s already this morning when I set out to make these.  The pumpkin added this great flavor and moistness as well.  And who doesn’t love a little touch of chocolate when all is said and done, right?  Because the addition of the chocolate chips made these a sweet enough treat, without all the guilt.  The muffins didn’t puff up, but that’s gluten-free mixes for you.  They did bake up gorgeously though…with a golden brown top and a moist, cake-y middle.  Loved it at the first bite and will truly enjoy devouring a couple of these each morning this week.  Super easy to make…and super delicious in the finished product.

So, let’s discuss the ingredients that go into Pamela’s Products Gluten Free Spice Cake Mix, shall we?  This mix is made from evaporated cane sugar, tapioca starch, white rice flour, potato starch, brown cane sugar, inulin, grainless & aluminum-free baking powder, rice bran, sea salt, cinnamon, gluten-free flavor, nutmeg, allspice, xanthan gum, cloves, ginger, cardamom, and black pepper.  This mix is certified gluten-free, non-dairy, and kosher.

Let’s discuss the nutrition information of Pamela’s Products Gluten Free Spice Cake Mix, shall we?  This mix makes 12 servings (I made 18 muffins though!), so it’s 1/12th of the dry mix or 1/12th of the finished cake that you bake.  In this serving, you will be consuming 150 calories and less than 1 gram of fat.  This mix will provide you with 340 mg sodium, 36 grams carbohydrates, 15 grams of sugar, 2 grams of fiber and 1 gram of protein.  Not bad for a cake mix, right?  Normally, this mix is prepared using eggs, butter and milk, so your nutrition facts will change when it’s mixed with baking ingredients.

For those interested, the nutrition information for the Gluten Free Pumpkin Spice Muffins that I made with this mix is that 1 muffin will give you 141 calories, 2 grams of fat, 228 mg sodium, 30 grams carbohydrates, 14 grams sugar, 2 grams of fiber and 1 gram of protein.  Only three ingredients.  Easy to bake.  And…YUMMY!

I hope that the fall isn’t the only time I can find the Pamela’s Products Gluten Free Spice Cake Mix.  I haven’t looked recently at my natural foods stores…but if they have another package of it, I’ll be more than happy to pick it up and bake up another batch of these muffins.  Or, maybe next time, I’ll bake up the actual cake itself.  As always, Pamela’s Products impresses me beyond all expectations.  And this is why this is a big-name gluten-free brand I trust.

Gluten Free 3-Ingredient Pumpkin Spice Chocolate Chip Muffins (made with Pamela's Products Gluten Free Spice Cake Mix)
Gluten Free 3-Ingredient Pumpkin Spice Chocolate Chip Muffins (made with Pamela’s Products Gluten Free Spice Cake Mix)

Product Review: Tastefully Simple Gluten Free Pizza Crust & Sauce Mix

Tastefully Simple Gluten Free Pizza Crust & Sauce Mix

Product Review: Tastefully Simple Gluten Free Pizza Crust & Sauce Mix – $10.99

I know some pretty amazing people.  I really do.  One of such people is a friend of mine from high school.  Awhile back, she contacted me and said that Tastefully Simple was releasing some gluten-free products that she would love for me to try.  My friend, Rebecca Fifield, just happens to be a Tastefully Simple Consultant.  So, she sent them to my.  And then Tastefully Simple released more products…and I bought them and some of the ones that had originally just been sent to me.  And I loved every one of them that had tried.

I think what I love most about what Tastefully Simple is doing with their gluten-free mixes is that they are making it so easy to make bread or pizza or cake cookies or pancakes.  They take all that fancy flour mixing and make it so you have it in one easy place, and only need to add 2 ingredients to it.  I love it.  LOVE it.

And now, thanks to both Rebecca and my own trial-by-fire with the gluten-free products that Tastefully Simple offers (they’ve added cookies and pancakes since I last looked!)…I’m obsessed.  Because, as much as I love baking and cooking and being in my teeny-tiny kitchen…I love simplicity too.  Because baking can be stressful…gluten-free baking can be catastrophic if anything is off.

That’s the glory of Tastefully Simple.  They take that guess work off.

So, with me heading out of town on Friday evening, the main goal this week is to use up all the fresh produce that would otherwise go bad in my absence.  So, with fresh basil and some tomatoes and onions lurking about, I remembered that I had a Tastefully Simple Gluten Free Pizza Crust & Sauce Mix in my pantry.  So…pizza it would be.  AND…it would last for three days between my roommate and I.  Added bonus.  No more cooking the rest of the week.  YAY!

Tastefully Simple Gluten Free Pizza Crust & Sauce Mix (prepared)

Preparing the Tastefully Simple Gluten Free Pizza Crust & Sauce Mix is super easy!!  For real.  That’s why there is the word “simple” in the brand.  HA!  To prepare the crust, simply combine the crust mix with 1 cup of water and 2 tablespoons of olive oil.  The dough will be sticky.  Cover it losely with plastic wrap and let it stand for 10 minutes at room temperature.  Using lightly oiled hands to prevent sticking, spread the dough out on a pizza stone or a 12-inch greased pizza pan.  Bake it for 10 minutes in a 400°F oven.

While it’s baking…mix up the sauce.  It’s a breeze.  Simply combine the sauce mix with the remaining 1 tablespoon of olive oil and tomato sauce.  Spread it over the warm crust you have now baked for 10 minutes.  Add your favorite toppings (in my case…tomato, onion, basil and Daiya vegan mozzarella cheese shreds) and place back in the oven to cook for another 17-20 minutes, until the crust is golden brown.  Slice into 6 pieces and devour.

Tastefully Simple Gluten-Free Pizza Crust & Sauce (baked)

The quality, however, always comes in the taste test.  And they totally nailed it.  The dough wasn’t too sticky when I went to press it out on the pizza stone.  And, it cooked up to this amazing crispy, golden brown.  The sauce and toppings didn’t make it soggy.  It held up to slicing and being moved onto plates.  And I loved the flavor.  It had this amazing crusty quality that just made it work.  It was the perfect base for my toppings of choice.  And it was one of my favorite crusts I have made at home.  It was easy, and it didn’t take too long to bake up either.  Perfect way to enjoy my dinner tonight.  Tastefully Simple is not only making gluten-free delicious, but easy too!

So, let’s take a look at what Tastefully Simple puts into their Gluten Free Pizza Crust & Sauce Mix, shall we?  This pizza crust mix is made from rice flour, tapioca flour, sugar, baker’s yeast, potato starch, cassava flour, salt, less than 2% hydrogenated palm kernel oil, soy lecithin, baking powder and, xanthan gum.  The sauce mix is made from maltodextrin, dehydrated garlic, garlic powder, salt, dehydrated onion, spices, roasted dehydrated garlic, sugar, Romano cheese, less than 2% of natural flavors, toasted sesame oil, citric acid, whey, cheddar cheese, hydrolyzed soy protein, disodium phosphate, and silicon dioxide (anticaking).

As far as the nutritional information for the Tastefully Simple Gluten Free Pizza Crust & Sauce Mix goes, this isn’t bad for pizza.  Really.  A serving size is 1/6 of the package.  This serving will dish up 200 calories, 1.5 grams of fat, no cholesterol, 810 mg sodium (it’s a little high, yes), 43 grams carbohydrates, 3 grams sugar, 1 gram fiber, and 4 grams of protein.

If you love pizza and want that “from scratch” appeal with a golden, crispy crunch, without it being the frozen cracker-crusts that the gluten-free community are otherwise delegated to having…then give Tastefully Simple’s Gluten Free Pizza Crust & Sauce Mix a try.  Hop on over to my friend, Rebecca Fifield‘s, page and place an order.  Not only will you be amazed with how easy this is to make, the taste, texture, and everything else will win you over.  I promise you that.

A slice of gluten-free pizza made with Tastefully Simple Gluten Free Pizza Crust & Sauce Mix
A slice of pizza made with Tastefully Simple Gluten Free Pizza Crust & Sauce Mix

Product Review: Neat – A Healthy Replacement For Meat Original Mix + Recipe Bonus

Neat - A Healthy Alternative to Meat Original Mix
Neat – A Healthy Alternative For Meat Original Mix

Product: Neat – A Healthy Replacement For Meat Original Mix + Recipe Bonus – $4.99+

I am so excited.  And the reason why is simple.  I have found the meat replacement, Neat, at a few of my local stores.  My Kroger, my Meijer, and even a few of my natural food stores now carry these little pouches of meat replacement goodness.  Now, mind you, I’m not one who often will replace meat in a dish.  I usually will use something like tofu or mushrooms instead, but there are some recipes (from my childhood, especially!) that just call for using an actual meat replacement.  I have a few go-to brands that are gluten-free as well as either vegetarian or vegan.  But ever since I received a pouch of the Mexican Mix from Neat in my Cuisine Cube back in October, I was hooked.  I just had nowhere in this area to purchase it on my own.

Until now.

Up until yesterday, my pantry held the Italian Mix and the Original Mix.  I’m using a few things up in my pantry (I have a bit of an overstock, HA!), so I decided I would go ahead and bake up some of the Moon Rabbit Foods pie crusts that I had from another Cuisine Cube.  I could freeze two of them, and then give using the third one a shot in an old family favorite, which I would adjust to make gluten-free, dairy-free, and vegetarian.

Neat - A Healthy Replacement For Meat Original Mix (before adding eggs/egg replacer and water)
Neat – A Healthy Replacement For Meat Original Mix (before adding eggs/egg replacer and water)

With a pie crust baked up…it was time to make the filling.  As I was using my mom’s recipe, I began to brown the sweet onion while I mixed up the ingredients for the Neat Original Mix.  This is really easy.  Simply empty the Neat mix into a bowl, add two eggs (or egg substitute) and 2 tablespoons of water.  Mix well.  Once the onions had began to soften, I added the neat mixture and cooked it on medium heat for about 7-10 minutes, chopping at it as one would with regular ground beef.  It looked and smelled perfect.  I added the tomato paste, cooked it a few moments longer and then put it all in the pie crust.  On went the topping of Daiya cheese and…into the oven it went.

Before I talk more about the original mix, let me tell you a bit about Neat.   Neat is a meat replacement that is derived from nuts and other non-GMO natural ingredients.  It is a product that was created by a mother of two children who decided that they were going to become vegetarians.  At first she would puree beans into sauces to help her girls get the protein they wanted, but after awhile, everyone got tired of it.  And that was when she got into the kitchen, experimented, and created what is now marketed at Neat.  Neat comes in this shelf-stable pouch in a powdered form.  All you do to prepare it is pour the pouch into a bowl, add two eggs (or a vegan egg replacer), plus two tablespoons of water. Then, you just cook it in a skillet, as you would ground beef, for about 7-9 minutes.  It’s really easy…and really delicious too.

Neat - A Healthy Alternative For Meat Original Mix (prepared) cooked with onion and tomato paste
Neat – A Healthy Alternative For Meat Original Mix (prepared) cooked with onion and tomato paste

So, a vegetarian and gluten-free Cheeseburger Pie…that was what this was used for.  When I sliced through the pie crust and the filling, I was just anticipating the crumbling and falling apart.  But Neat surprised me.  Much like my mom’s recipe (which used real meat as I wasn’t a vegetarian at that point), this all stuck together and made for a perfect slice.  The Neat seemed to be the meat replacement I was looking for.  And it was the perfect choice for this recipe for sure.  I dished up two slices of the Gluten-Free and Vegetarian Cheeseburger Pie and handed one to my roommate and settled in with mine.  My roommate took the first bite and said that it tasted dead-up like a cheeseburger.  That’s good.  She’s not a vegetarian, nor is she dairy-free or gluten-free like me.  But this impressed her.  It impressed her a lot.  The most disappointing aspect  of the dish was the pie crust and that was a whole unrelated product, and it still worked out well in the end.

The Neat Original Mix is fantastic.  I mean, it is so close to the real thing.  As I said, I don’t often do meat replacements, but sometimes when revisiting old recipes I grew up with, it is necessary.  I don’t think any other replacement for beef will come close to what Neat does for these dishes.  This is the second time I have used a Neat product and both times I have been beyond impressed.  The taste and texture are phenomenal.  Even meat eaters won’t realize they aren’t really eating meat.  That’s the wonder and the glory of this product.  Anyone can have it (unless they have a nut allergy) and enjoy it.  It was, for the second time, love at first bite.  And it was wonderful to be able to adapt an old family favorite to fit my dietary needs.

A slice of Cheeseburger Pie (gluten-free, dairy free, and vegetarian) made with Neat - A Healthy Alternative For Meat Original Mix
A slice of Cheeseburger Pie (gluten-free, dairy free, and vegetarian) made with Neat – A Healthy Alternative For Meat Original Mix

Let’s now take a look at what goes into the Neat Original Mix.  This product is made up of pecans, garbanzo beans, gluten free whole grain oats, organic whole grain gluten free cornmeal, garlic, onion, sea salt and spices.  Simple.  Delicious.  Clean eating!  It is gluten-free, non-GMO, and kosher.

As for nutrition, the Neat Original Mix is a powerhouse.  A serving is 40 grams and there are 4 servings per pouch.  One serving will provide 190 calories and 15 grams of fat.  You will also be getting 232 mg sodium, 11 grams carbohydrates, 2 grams of sugar, 4 grams fiber, and 4 grams of protein.  It is filling, so it makes a fantastic substitute for meat.  But there is that added bonus of protein from the nuts that are blended into the mix.

It really did make a great addition and the perfect substitute for actual ground beef in the following recipe…

Gluten-Free, Dairy-Free, and Vegetarian Cheeseburger Pie

Gluten-Free, Dairy-Free, Vegetarian Cheeseburger Pie

Servings: 8
Prep: 10 minutes; Cook 30 minutes

Ingredients:

  • 1 package Neat – A Healthy Replacement For Meat Original Mix
  • 2 organic cage-free eggs
  • 2 tablespoons water
  • 1/4 cup chopped onion
  • 1 (6 oz) can tomato paste
  • 1 gluten-free pie crust (either made from scratch or bought at the store)
  • 2 cups Daiya Mozzarella Cheese Shreds

Directions:

Preheat oven to 375°F.

Pour the Neat – A Healthy Replacement For Meat Original Mix into a medium bowl.  Add two eggs (or egg replacer if vegan) and 2 tablespoons of water.  Mix well.

In a non-stick skillet over medium heat, brown the Next Mexican Mix and onion.  Cook until vegetables begin to soften and the Neat can be chopped into a meat texture.  Add the tomato paste and stir well.  Allow it to heat through for a few minutes to marry the flavors together.

Pour the mixture into the prepared pie crust and top with 2 cups of Daiya cheese shreds.  Bake in the oven for 20-25 minutes, until cheese is melted and pie crust is browned (with any luck).  Slice and serve.

~*~*~

I have fallen head-over-heels for Neat.  It is, without a doubt, the healthiest replacement of meat out on the market.  I am thrilled that it is more available in my area.  In fact, with so many places carrying it, I’m guaranteed to be able to pick it up at one place or another when I need it for a dish.

Neat…you are by far my best find and my favorite substitute in old family recipes.  Nothing else can do what you do!  So much love.

Product Review: Moon Rabbit Foods Pastry & Pie Crust Mix

Moon Rabbit Farms Gluten Free Pastry & Pie Mix
Moon Rabbit Foods Gluten Free Pastry & Pie Mix

Product: Moon Rabbit Foods Pastry & Pie Crust Mix – $8.79+

So, for awhile now, I’ve been wanting to revamp another one of my mom’s famous recipes.  Making it not only gluten-free, but also vegetarian.  Oh…and dairy free too…but that’s pretty much a given when it comes to me, right?  The actual dish is her delicious Cheeseburger Pie.  Normally, the crust of this amazing meal is made from crescent rolls from the grocery store fridge area zone.  You know, that place I hardly visit these days.

Sadness.

But…then I got to thinking…what if I cooked up a pie crust and used that instead.  Sure, it wouldn’t be the flaky crescent roll shell that this meal was known for, but I was already going to get rid of the whole meat thing (using a meat substitute) and use Daiya cheese for the cheese.  So…why not give a different sort of crust a try?

The problem is…pie crusts and I have never really gotten along.  We are anything but BFFs.  Then…lo and behold…the Thanksgiving (November 2014) Cuisine Cube arrived in the mail.  And inside was Moon Rabbit Foods Pastry & Pie Crust Mix.  Everything in the November Cuisine Cube could have been used for Thanksgiving itself…but I wasn’t allowed to host this year so most of it was used at my own discretion.  Well, the final product is up now…but first…

Cuisine Cube is run by a small group of foodies who have put together a completely gluten-free box of goodies and then sends them to your doorstep each month.  These boxes contain 5-6 full-size products from small, lesser-known artisan producers…mostly local…some not as local.  Some you may even have heard of before, but most will be new to you.  I signed up for Cuisine Cube back in May and have never looked back.  Subscriptions start as low as $29.99…which is a great price and great incentive to sign up for this subscription box service and try out some gluten-free products you have been too nervous about purchasing yourself or, perhaps, didn’t even know existed.

Such as Moon Rabbit Foods.  Never head of this brand before in my life.  Moon Rabbit Foods follows a philosophy of choosing the finest ingredients and using the latest techniques of the craft of baking to give those living a gluten free lifestyle (like me!) a rare opportunity to enjoy delicious refined pastries and baked goods.  Their baking and pastry blends provide a source for hard-to-find gluten-free products, allowing customers to enjoy that high quality at home, and even allowing them to add their own inspirational touches.  So, here, in my clutches was a pie crust mix.  I had no reason to make a pie.  No one ever wants desserts at the family dinners.  I usually do because I never really get to eat much of what is offered (part of why I love to host).  But, I also hate being the only person to eat dessert, especially when I’m the one providing it.  So, instead of going sweet, I opted to go savory and attempt to recreate a gluten-free, dairy-free, vegetarian version of my mom’s Cheeseburger Pie recipe.

Cross your fingers…

This mix makes 3 9-inch pie crusts.  I went ahead and cooked them all up because…well…I could freeze the rest of them instead of just letting the mix sit and having to haul out all the equipment (a food processor, really) and ingredients (only 3) to do whenever I felt the need to make a pie.  Because if I did that, it would only get used this one time.  Therefore…all or nothing.  So, I took 1 cup of the pie mix and mixed it with one stick (4 ounces) of butter (or vegan butter) and pulsed it until it looked like cornmeal.  Then, in went 3 tablespoons of cold water and I ran the food processor until it all came together.  I formed the dough into a 6-7 inch disk and then put it in the fridge for 30 minutes.  Then I rolled it out and fit it into a pie pan.  It fell apart at some points because pie crusts hate me, but I managed to get it into the pie pans and into a 350°F oven for 30 minutes.  Out come the par baked crusts…and there you have it.  Use it as you will.

For the rest of the recipe, I used NEAT original mix and prepared the recipe from my mom’s cookbook as it would have been prepared regularly.  YAY!  That recipe will go in the review for NEAT.  So stick with me here.  Let’s talk about how the pie crusts cooked up and the rest of that important stuff.

A slice of Gluten-Free, Dairy-Free, Vegetarian Cheeseburger Pie on the pie crust made from Moon Rabbit Foods Gluten Free Pastry & Pie Mix

First of all, I think I sort of expected them to be a little more golden.  They cooked, but they were still a pale white color.  I poked it to make sure it wasn’t still dough.  Then I figured it would get more golden as it cooked with my filling of Neat, tomato paste, onion, and vegan cheese…but it still remained a pale shade of…pale.  It was cooked…it just didn’t look that way.  It was a bit disconcerting.  It tasted good though, so I guess that’s the important thing.  It may look underdone, but it is quite a good pie shell.  I was actually happy to have a pie crust that didn’t incorporate sugar into the mix as I was using it for a savory dish.  This made this a great substitute for the refrigerated croissant rolls that used to make this light, flaky crust for this dish.  Being a thinner crust also helped as well.  So, once again, looks can be a wee bit deceiving.  It’s all in the taste, when it all comes down to it.

So, what exactly is in the Moon Rabbit Foods Pastry & Pie Crust Mix?  According to the package, this mix is made up of potato starch, cassava flour, rice flour, sea salt, unrefined cane sugar, and xanthan gum.  That’s it.  Small list and all recognizable ingredients makes me a happy girl. This crust is gluten-free and vegan.  It is also cholesterol free and fat-free until you add the butter…

As for nutrition, the Moon Rabbit Foods Pastry & Pie Crust Mix has around 24 2 tablespoon servings in the package.  A serving will provide 60 calories, 115 mg sodium, 16 grams carbohydrates, 1 gram fiber and no sugar or protein.  No sugar or protein is added to the mix so…it remains that way in the end.  When it’s prepared, all of this changes depending on your ingredients and the like.

If you need an easy pie crust, I highly recommend Moon Rabbit Foods Pastry & Pie Crust.  Yet another product I never would have even know existed (and, hence, never would have made my mom’s Cheeseburger Pie (albeit vegetarian and dairy free)) if not for Cuisine Cube.  Loving this service and the new products and companies that it introduces to me.

Product Review: Le Veneziane Micrawable Gluten Free Penne Al Pomodoro E Basilico Pasta Express

Le Veneziane Microwaveable Penne Al Pomodor E Basilico Pasta Express
Le Veneziane Microwaveable Gluten Free Penne Al Pomodor E Basilico Pasta Express

Product: Le Veneziane Microwavable Gluten Free Penne Al Pomodoro E Basilico Pasta Express – $6.99+

Pasta.  We all know that pasta is one of my favorite things in the world.  I grew up begging for spaghetti each week.  I wanted my mom’s spaghetti when my birthday rolled around each year.  Forget dining out.  I wanted my mom’s cooking.  I didn’t care if it was store-bought boxed pasta noodles.  Her sauce made it.  And that’s what I wanted.  Pasta (in all forms) has been one of my favorite dishes to just dive into.  Ultimate comfort food.  Ultimate meal.

Even after the Celiac diagnosis…one of the first things I sought out were pasta alternatives.  There are so many out on the market.  Some good…others not-so-good…and some that rise above and beyond the bar.  Like…even better than true pasta level of amazing.

Back in my September 2014 Cuisine Cube, I was presented with a box of Le Veneziane Microwavable Gluten Free Penne Al Pomodoro E Basilico (Penne with Tomato and Basil) Pasta Express.  And, yes, even the pasta freak in me didn’t immediately make this up.  But…I’ll explain why in a moment.

For now, let me give you a quick run through of what Cuisine Cube is all about.  Cuisine Cube is a monthly subscription service that delivers healthier, lesser-known, smaller artisan bakers/companies gluten free goodies to your door.  Each box contains 5-6 items (breakfast, lunch, dinner, snack, dessert, and a bonus sometimes!) and subscriptions start as low as $29.99.  Go to their site and check them out.  I’ve really enjoyed my year of Cuisine Cube and intend to keep my subscription rolling.  In fact, I might have to go in for the long-term subscription instead of the month-to-month.  I’m that committed.  LOVE.

So…yes…I realize that September is about 7 months ago and that I am just now reviewing a product from that Cube.  BUT…it is the last item from the September 2014 Cuisine Cube.  And that was one very delicious cube for sure!  The Dinner portion of that box was dedicated to a 1-serving microwavable pasta meal made by Le Veneziane.  Now, I have had Le Veneziane products before and have always been impressed, so I was quite happy to see this company included in the box.  I had no idea they made microwavable pasta meals.  The things you learn!

Le Veneziane corn pasta is actually a very great choice for people trying to stay healthy and for people who follow the Mediterranean Diet.  Why?  It has a very low fat content.  How about that?  Le Veneziane is now one of the most modern companies using high-quality corn and producing amazing gluten-free pasta, polenta, sauces, and cookies.  They put out a high quality product because they believe in using the highest quality ingredients from flour and corn.  It is milled properly and kept in the right conditions to make sure that nothing, including being 100% gluten free, is compromised.  Love that integrity and devotion.

So, last night after a very busy day that included breakfast at my favorite gluten-free bakery and lunch of gluten-free crepes from my favorite food truck at a festival…I wanted something light for dinner.  This was ideal because my roommate and I could split it and it would be the perfect amount.  To accompany it, I made some homemade gluten-free dinner rolls (even though I was so tempted just to grab some out of the freezer section).  So, while the rolls were cooling, I went ahead and opened up the Le Veneziane Microwavable Gluten Free Penne Al Pomodoro E Basilico Pasta Express.  Inside was a microwaveable dish that I peeled the top off of and a measuring cone so that I could get exactly 300 ml of water as directed by the instructions.  The corn pasta in the container was perfect.  It had this deep red-brown powder inside too.  And when I added the water and mixed it well, everything got this muddy brown color.  I hoped for the best and popped it in the microwave for 10 minutes.

Le Veneziane Micrwavable Gluten Free Penne Al Pomodoro E Basilico Pasta Express (cooked)

When 10 minutes elapsed, I pulled the tray out of the microwave, a little put off by the brownish color of the sauce.  But, I gave it a stir and then dished up half to my roommate and half for me, giving us each a dinner roll to have with it.  When I handed her the bowl she said, “That’s an interesting color sauce.”  HAHA!!  Everyone was thinking it; she just said it aloud.

Well, despite the rich brown color of the sauce, the Le Veneziane Microwaveable Gluten Free Penne Al Pomodoro E Basilico Pasta Express was actually very delicious.  I shouldn’t have doubted it.  The sauce was thick and rich with a tomato flavor that was peppered with the right hit of basil.  It was really quite delicious.  The pasta, despite being nuked in a microwave, were cooked to that perfect al dente.  The homemade rolls made the perfect side item for this meal.  And even eating just half of the dish itself was more than enough.  Very filling.  But very, very good.  I don’t know where to find more of the microwave meals from Le Veneziane, but I will keep my eyes open for them now.  It’s nice to have a delicious and healthy meal in 10 minutes sometimes.

So, let’s talk about ingredients, shall we?  The Le Veneziane Microwaveable Gluten Free Penne Al Pomodoro E Basilico Pasta Express pasta is made from corn flour, emulsifier, and the sauce is made from tomato, cream, salt, melted cheese powder, onion, garlic, basil, and sugar.  This is 100% gluten-free.

As for the nutrition information, the Le Veneziane Microwaveable Gluten Free Penne Al Pomodoro E Basilico Pasta Express portion is 1 pack.  In this serving, you will be taking in 350 calories and 7 grams of fat, 10 mg cholesterol, 820 mg sodium (um…yikes!), 64 grams carbohydrates, 4 grams fiber, 3 grams sugar, and 8 grams of protein.  See what I mean…it’s filling.  And delicious.

I want to thank Cuisine Cube for letting me try a new product from Le Veneziane that I didn’t even know existed.  I’ll be on the watch now for more microwavable pasta meals by this great Italian company.

Half of a serving of Le Veneziane Gluten Free Microwaveable Penne Al Pomodoro E Basilico Pasta Express with a homemade gluten-free dinner roll

Product Review: Jaali Bean Cumin and Pea Lentil & Brown Rice Kit

Jaali Bean Cumin and Pea Lentil & Brown Rice Kit

Product: Jaali Bean Cumin and Pea Lentil & Brown Rice Kit – $4.99+

It was the start of a new year.  Yes.  January 2015.  And what happens at the start of a brand new year?  New Year’s Resolutions!  WOOO!!  I am proud to say that I don’t make resolutions, because I don’t like to make promises I can’t keep.  I do, however, try to make each year a good one and try to improve on some things.

Like…eating better.

Well, my New Year 2015 (January) Cuisine Cube, took a lot of the work out of that by providing a box of 6 healthy choices for food/snacks.  YAY!  So, as you all are pretty much aware, Cuisine Cube is a delivery subscription service that brings smaller, lesser-known, artisan products from the gluten-free food world to your door.  Yes, some of them I have heard of…but most I haven’t.  And that’s the beauty of this service.  Without it, I’d have no idea that some of these products or companies even existed.  And, subscriptions start for as low as $29.99/month.  It’s a great deal and a great service.  If you haven’t tried it or have been meaning to give it a try…do it.  You’ll end up loving it as much as I do.

So, January was all about healthy products it seemed.  And the product that was packed inside for the Lunch option was this great little Indian spiced meal kit from Jaali Bean.  It was the Jaali Bean Cumin and Pea Lentil & Brown Rice Kit.  It sounded beyond delicious as I am a huge…and I mean HUGE…lover of Indian food.  Around here, I can find a plethora of the Tasty Bite Indian meals, but this was the first time I ever heard of Jaali Bean.  Already, I was intrigued.

Jaali Bean was created by Brian and Molina Junkins, a husband and wife team who shared a passion for food, family, and healthy living.  They also had a passion for helping people discover the amazing flavors and tastes that are incorporated in Indian cuisine.  They challenge everyone to toss aside their preconceived notions about preparing Indian cuisine at home, because they make it all happen within minutes with these great little kits they put together.  It is super easy and the are just loaded with all-natural ingredients and all the spices that make you fall in love with Indian food.

They really do make it easy.  The Jaali Bean Cumin and Pea Lentil & Brown Rice Kit comes with two packages attached.  Inside is the brown rice and lentil mixture.  In the smaller pouch…the spices.  Simply set a pot on medium-high heat and heat up 1 tablespoon of oil.  Put the spice packet in and stir for about 40-50 seconds.  You’ll know when it’s done when you get that amazing aroma out of the spices.  Do not burn them.  Add 2-1/4 cup water and bring to a boil.  Once the water is boiling, turn the heat down to low, cover the pot, and let it cook for 30 minutes.  After 30 minutes, remove the pot from the heat and give it a stir.  Let it sit for an additional 5 minutes.  All the extra liquid will get absorbed.  Trust me.  It works.  You are left with a fantastic pot of moist and creamy looking rice that smells as amazing as it looks.

But the true test is always with the taste.

And, let me tell you…Jaali Bean Cumin and Pea Lentil & Rice Kit cooks up an amazing taste of India.  Better than Tasty Bite…and as close to authentic restaurant quality as possible at home.  Amazing.  I grew up eating Indian food, thanks to my neighbors up the way, who were from India.  The cuisine has always resonated with me.  And I know what is good and what isn’t.  Jaali Bean is delicious.  Seriously…delicious.  The rice cooks up rich and creamy, seasoned to perfection.  It’s mild in flavor, so add a kick of your own heat if, like me, you like things a little spicier.  I think my only complaint was that there wasn’t enough peas for my liking.  How’s that for a complaint, eh?  Seriously, perfectly seasoned and it cooks up beautifully.  Nothing else I have had packaged has come close to tasting this close to the real deal.  I am beyond impressed.

So…let’s discuss what all goes into the Jaali Bean Cumin and Pea Lentil & Brown Rice Kit, shall we?  This kit is a combination of par boiled long grain brown rice, orange masoor lentils, peas, spices (which include cumin, mustard seeds, coriander, dried red chili powder, and amchur powder), salt, cane sugar, tomato granules, and nutritional yeast.  It is gluten-free, cholesterol free, vegan, and non-GMO.

As for the nutrition information in regards to Jaali Bean Cumin and Pea Lentil & Brown Rice Kit…I was very impressed.  A serving is 1 cup and there are 4 servings per package.  Each serving will provide 160 calories, 2 grams of fat, 380 mg sodium, 32 grams of carbohydrates, 2 grams sugar, 4 grams fiber, and 6 grams of protein.  Healthy, filling, and delicious.  You can’t go wrong.

Honestly, I’ve never seen Jaali Bean products around here, so without my subscription to Cuisine Cube, I might still be in the dark.  With that being said…these products are now on my radar and I know how to get my hands on them via the Internet, if I can’t find any here.  And that, my friends, is a very good thing.  I’ll definitely keep these on hand for a quick and easy go-to meal.

On a side note, this product wraps up my January 2015 cube.  The only product I didn’t get to blog on was the Budi Bar, because somehow I missed the note on freezing it and it got all fuzzy and moldy.  I was sad when I had to throw it away.  But…perhaps I’ll run across them somewhere around here.  Or, I’ll just order one online.  We’ll see.

Jaali Bean Cumin and Pea Lentil & Brown Rice Kit (prepared)

Product Review: Mina’s Purely Divine Gluten Free Bread Mix + Recipe Bonus

Mina's Purely Divine Gluten Free Bread Mix
Mina’s Purely Divine Gluten Free Bread Mix

Product: Mina’s Purely Divine Gluten Free Bread Mix – $5.79+

It was Easter Sunday and I woke up early.  I haven’t been sleeping well due to bouts of chronic pain in my back and hip.  So, I got out of bed and came out to the living room to do my stretches assigned to me by my physical therapist.  It was as I started doing these that I thought to myself:

“Self…what are we having for breakfast this beautiful Easter morning?”

Since I am currently in a state of no running at all…I had plenty of time to come up with something.  And for some strange reason, I recalled having two bags of Mina’s Purely Divine Gluten Free Bread Mix in my pantry.  I bought these and a chocolate cake mix (which I have used already and didn’t review because I never tried the finish product…I made it for someone else…so now I have to purchase another bag) on Manager’s Special at my local grocery store…for $1.99.  How fantastic is that?

I knew very little about the Mina’s Purely Divine products when I bought them, just that I had seen them featured in ads in my gluten-free magazines.  That was the only familiarity I had with them.  So, with the recollection and the realization that I had two pouches of the Gluten-Free Allergen-Friendly Bread Mix in my pantry…I thought…

Bagels.

Because when I already fail at baking up gluten-free bread more often than I succeed…why not bake bagels.  Because that is SO much easier! *SARCASM*

That being said…I had it in my head now to make them.  It was going to either end well…or be a complete and epic fail.  It wouldn’t be my first.  So, while the roomie was still slumbering in her room…I went into the kitchen and plucked one of the bags of Mina’s Purely Divine Gluten Free Bread Mix off the shelf and set out to work.

Long story short…for my first time making bagels (and gluten-free bagels at that!)…this worked wonderfully.  They didn’t rise as much as I had hoped they would, but they did rise some in the 30 minutes I gave them to just sit.  I think next time I’m going to try the oven on warm thing that a friend suggested and see if it makes any sort of distance.  They held up to boiling in the water and even the actual baking.  Totally impressed.  But the real challenge was going to be in the taste.

By the time the bagels were in the oven and baking (given a little bit of egg wash over the top and a sprinkling of the “everything spice” that I picked up in Charleston, SC, the roomie had emerged and was ready for some brekkies.  I told her that breakfast was currently in the oven…and I would have it ready once the timer went off.  It was already starting to smell amazing, so when she asked what it was, I actually told her.

Bagels.

She looked really surprised.  “You made bagels?!”  You see…she has suffered through more than one epic gluten-free homemade bread loaf fail…so I wasn’t insulted at all.  I nodded and as I pulled them out of the oven, called her over to take a look.  They were perfectly golden on the outside.  Fresh and hot out of the oven, I didn’t want to slice into them so just put some vegan cream cheese in a bowl and said we’d dip (kind of how I used to eat soft pretzels).  So, onto some plates the bagels went while the rest cooled on the pan.  I handed a plate and bowl of the cream cheese over to her and went to get my own.  She started her cry of “hot, hot, hot!” as she broke it open and steam from the fresh bagels swirled up from the little breakfast goodie.  She took a bite and said, “It tastes like a bagel!”

Now, she’s had Everything Bagels from some of the top-flight bakeries in New York City…and she seemed quite content to dive into my first attempt at ever making bagels.  Trust me…she’s quite the critic and if she doesn’t like something…she’ll say so.  But she thought the texture and the flavor were spot on.  And after I got settled to try it for myself…I totally agreed.  As a New Yorker, bagels were a way of life growing up.  I still love them, but am often relegated to getting the frozen versions from Udi’s (as they are the only gluten-free bagels outside of Jennifer’s Way in NYC that have come close to tasting like the real thing!)…which is fine in a pinch.  But these…these were mine.  And they wouldn’t have been possible without Mina’s Purely Divine Gluten Free Bread Mix, for sure.

Truth…I can’t wait to make these again with the other batch.  Maybe get a bit more rise out of them so that middle gets all fluffy and amazing.  Cathy said these were very reminiscent of the ones we ate at Jennifer’s Way back in March, which I took as a high compliment as my first bite of one of Jennifer’s Way bagels made me cry.  Good tears.  This mix worked beautifully and made amazing bagels.  Talk about taking a risk and having it pay off in the end.

Let’s discuss the ingredients in Mina’s Purely Divine Gluten Free Bread Mix.  This mix is made up of organic rice flour, potato starch, organic cassava starch, organic sorghum flour, arrowroot starch, rice flour, teff flour, sea salt, yeast, xanthan gum, and guar gum.

As far as nutrition goes, the Mina’s Purely Divine Gluten Free Bread Mix contains about 13 servings, with each serving being about 1/4 cup.  A serving will provide 100 calories, 0 grams of fat, 0 mg cholesterol, 50 mg sodium, 23 grams carbohydrates, 4 grams of sugar, 1 gram fiber, and 1 gram protein.  That’s really good for a bread mix.  I am very impressed.

If you have access to Mina’s Purely Divine Gluten Free Bread Mix…and feel like taking on a challenge, go ahead…whip up your own homemade gluten-free bagels!!  You’ll be very impressed with the results.

Recipe: Gluten Free Everything Bagels

Gluten Free Everything Bagels made with Mina's Purely Divine Gluten Free Bread Mix
Gluten Free Everything Bagels made with Mina’s Purely Divine Gluten Free Bread Mix

Servings: 6-12 (I made 8 good-sized bagels!)
Time: Prep 1 hour; Bake 18-20 minutes

Ingredients:

  • 1 package, approx. 2⅔ cups Mina’s Purely Divine Gluten Free Bread Mix
  • 1 cup warm water
  • 2¼ tsp yeast (included)
  • 1 tsp + 1 Tbsp sugar, divided
  • 2 tsp vegetable oil
  • 2 Tbsp molasses
  • 3 quarts water
  • 1 egg white, whisked (optional)
  • sesame or poppy seeds for toppings (optional)

Directions:

Add to mixer bowl, 1 cup warm water, 1 tsp of sugar and the yeast. Whisk and let rest for 10 minutes.

Add to yeast mixture: 1 cup of bread mix, the rest of the sugar, the oil, the molasses, and mix well.

Add last 1-2/3 cups of bread mix. Mix on medium high for 5 minutes.

Scrape out on a lightly oiled surface. Form dough into a log. Cut into 6 large or 12 small pieces. (I went for the middle and did 8 perfect size pieces). Roll each piece with lightly oiled hands into a 6″ rope. Shape in a circle, crimping edges.

Arrange bagels on parchment paper. Cover with oiled plastic wrap. Let rise in warm draft free area for 30 minutes. Dough will be tender at this point after the initial rise.

Preheat oven to 450 degrees F.

Bring 3 quarts of water to a slow boil. Gently using oiled hands, or spatula, drop each bagel, one at a time, into the water. Boil in small batches, do not crowd. Simmer for 30 seconds on each side, flip over once. Drain on rack for 5 minutes.

Brush with whisked egg white (optional) and sprinkle the toppings on at this point, if using.

Bake on a lightly greased cookie sheet for 20 to 25 minutes for large bagels and 15 minutes for small bagels. (It took mine 18 minutes…so if you do 8…go with that!)

Cool on rack.

DEVOUR!

~*~*~

I was so impressed with the way Mina’s Purely Divine Gluten Free Bread Mix baked up perfect, delicious bagels. And with this being my first time ever attempting such a culinary feat…well…it just made me want to improve on it.

That being said…WOW!!  Total and complete WOW!!  Find Mina’s Purely Divine Gluten Free Bread Mix and, seriously, give this recipe a try.  I am dying to do it all over again!  Maybe even improve on it some.  We shall see!

Mina’s Purely Divine is purely amazing, purely awesome, and…yes…purely divine!  Just WOW!

Product Review: Trader Joe’s Gluten Free Pumpkin Pancake Mix

Trader Joe's Gluten Free Pumpkin Pancake Mix
Trader Joe’s Gluten Free Pumpkin Pancake Mix

Product: Trader Joe’s Gluten Free Pumpkin Pancake Mix – $4.49+

It was October 2014 and I was entering the great land of Trader Joe’s in Louisville, Kentucky.  I had just passed the big center display of bananas when my gaze fell upon an end cap that was holding a bunch of pumpkin goodness.  I love anything pumpkin.  This is no secret.  And a Trader Joe’s mix with pumpkin pancake-y goodness?  HELLO!  Sign me up.

I snagged a box of it and gave the sad Celiac eyes to my roommate.  And…yes…we fit them into the budget.  Sad Celiac eyes work wonders!!  So, checkout was complete.  And fall turned into winter.  And then spring came around.  And while I had been making things for breakfast…pancakes even…I had other mixes and flour blends that had to be used first.  But, as the great kitchen pantry purge continues…Trader Joe’s Gluten Free Pumpkin Pancake Mix was up to bat today!

So, this morning, I decided to haul out the Mickey (Mouse) waffle maker and make some pancake waffles.  Why?  Because waffles are delicious and fun…and these are shaped like Mickey.  They win.  Always.  I mean, pancakes probably would have been less labor intensive but…I was craving waffles for awhile.  In fact, I sort of promised my roommate I’d make waffles after we went to our gluten free bakery Saturday morning for breakfast and she lamented that she wished they still offered their gluten free waffles (and pancakes).  So, a promise is a promise.

Mixing up the Trader Joe’s Gluten Free Pancake Mix is super easy.  Simply get out a bowl and crack an egg inside.  Then, add 2 tablespoons of melted butter (or oil).  I melted down 2 tablespoons of Earth Balance.  Then, whisk them together.  Add in 2/3-cup of water plus 2 additional tablespoons and whisk that up as well.  Then, scoop out a cup of the Trader Joe’s Gluten Free Pumpkin Pancake Mix and add it to the wet ingredients.  Mix until just combined.  It’s okay if it’s a little lumpy.

So easy.  I had all that done by the time my roommate hauled herself out of her room.  Perfect timing.  I ladled the mix into the waffle maker and closed the lid, allowing it to cook to that perfect crusty outside, soft inside consistency.  It usually takes about five minutes to get there.  And while that was working, I warmed up some pure maple syrup to pour over it.  YUMMY!  I lifted the lid of the waffle maker when the steam subsided and lo and behold…the perfect pumpkin-y gluten-free waffle shaped like Mickey Mouse.  YES!  I was already feeling good about this mix.  I slathered it up with some Earth Balance spread and then dowsed it in some maple syrup.  I then got my own waffle working and prepared to do the same thing.  Once again, the perfect waffle emerged, with this golden crust on the outside.  I was elated.  As the third (and final) waffle (now in the freezer) was working, I settled in to enjoy my breakfast.

So…it was awesome.  Let me just say that.  Some flour mixes and pancake mixes don’t get that golden crust on the outside, but Trader Joe’s managed it to perfection with this mix.  It had the perfect amount of pumpkin spice flavor.  Not too much.  And not too little (although my roomie says that she didn’t get much pumpkin).  I disagree with the roomie and think that the amount of pumpkin flavor was spot on.  As I am the pumpkin freak…I know best.  The crust on the outside was crisp and crunchy and the inside of the waffle was light and soft and just…so amazing.  I was in love with each bite.  I may have hoovered it, using the last bite to mop up any extra syrup lingering on the plate.  Really, very impressed.

The Trader Joe’s Gluten Free Pumpkin Pancake Mix was a new product that was introduced last October due to numerous requests from their fans of the original Trader Joe’s Pumpkin Pancake Mix, who had found themselves now eating a gluten-free diet.  The Trader Joe’s peeps went to work for months to get the right texture (no soggy, heavy pancakes allowed) and finally it it spot on, even getting the seasoning right to bring that warm fall-ish feeling to the finished product.  The recipe for the pumpkin pancakes (the one I listed above) was on the side of the box to make sure you succeeded on your pumpkin pancake quest.  They did well.  They did very well.

The Trader Joe’s Gluten Free Pumpkin Pancake Mix is made from white rice flour, potato starch, cane sugar, dehydrated pumpkin flakes, buttermilk powder, tapioca flour, molasses powder, baking powder, sea salt, organic vanilla flavor, expeller pressed canola oil, ground cinnamon, ground allspice, ground ginger, xanthan gum, annatto for color, and ground nutmeg.  This mix is gluten-free and cholesterol free.

A serving of Trader Joe’s Gluten Free Pumpkin Pancake Mix is 1/3 cup dry mix or 2 pancakes prepared.  A serving of the mix will provide 130 calories and 0.5 grams of fat.  It contains 250 mg sodium and 7 grams of sugar.  The dry mix will also give you 29 carbohydrates, 1 gram of fiber, and 2 grams of protein.  When it is prepared as per the instructions on the side of the box, you will be taking in 210 calories and 8 grams of fat.  You will be taking in 70 mg cholesterol, 270 mg sodium, and 7 sugars.  Prepared, you will have29 grams of carbohydrates, 1 gram of fiber and 4 grams of protein.

Honestly, it is one of the better gluten-free pancakes mixes out there.  I was above and beyond happy with the way my Mickey waffles came out.  Not only were these full of perfect pumpkin flavor, they were crispy and soft and the texture was right where it needed to be.  Trader Joe’s definitely nailed the gluten-free pumpkin goodness in these.  I hope this mix is back on the shelves this upcoming fall.  Total yum!

Gluten Free Pumpkin Mickey Waffles made with Trader Joe's Gluten Free Pumpkin Pancake Mix
Gluten Free Pumpkin Mickey Waffles made with Trader Joe’s Gluten Free Pumpkin Pancake Mix

Product Review: Van’s Gluten Free Ultimate Cheddar Penne

Van's Gluten Free Ultimate Cheddar Penne
Van’s Gluten Free Ultimate Cheddar Penne

Product: Van’s Gluten Free Ultimate Cheddar Penne – $3.99+

I am a do-it-yourself kind of girl these days when it comes to pastas.  Not so much making my own gluten-free pasta noodles (I haven’t gotten to that level yet), but I prefer to make my own pasta meals instead of buying the boxed stuff…just because I get some say into what goes into my meal.  That being said, sometimes…I make exceptions to this rule.

Such an exception came to pass awhile back, when on a rare trip to Walmart, I discovered that Van’s had come out with a small line of gluten free pasta sides (or meals in my case).  Seriously!  I think I knew that the gluten-free pastas were around, I had just never seen them in my area out in the wild.  Apparently, braving Walmart does have it’s advantages.  I won’t lie…my Walmart has a rather extensive and impressive gluten-free section.  So it was really no wonder I found these there.  I just never go to Walmart…so it was a nice coincidence in the end.

Prior to this one, I reviewed the Van’s Gluten Free Creamy Herb and Garlic Pasta, which I dished up to not just  my roommate, but my good friend and roomie’s sister – Amanda.  Now, Amanda doesn’t get exposed much to gluten-free foods…unless I subject her to them.  And she loved the Creamy Herb & Garlic Pasta when we enjoyed it for dinner one night.  That left two other gluten-free pasta dishes in my pantry from Van’s.  And last night, after a long week, I just wanted a brainless meal to prepare and enjoy.  Something warm and comforting, as it was a rainy night to boot.  I went to the pantry and spotted the remaining two boxes of Van’s Gluten Free Pastas: Ultimate Cheddar Penne and Rotini and Red Sauce.  I had my roommate make the final decision…and knew before I even asked that she would go cheese.  When I ask her anything and one items involves cheese…that is the one that will be selected.  No problem though.  Totally game.

Van’s Gluten Free choices have never disappointed me.  Never.  Never ever.  That’s a lot to live up to, mind you.  But Van’s puts a lot of love and care into their packaged foods.  And Van’s does believe that nutritious is delicious and that’s why they make their gluten-free pastas with whole grain brown rice, delivering more than a full serving of nutrient dense whole grains.  The cheese sauce over a perfectly cooked pasta…that’s love to me.  Seriously.  And, you can always add in some vegetables or chicken (if you eat meat…which I don’t…) in order to bulk it up.  But as my roommate and I take something that serves three and split it between the two of us…it’s the perfect amount in the end.

Van’s Gluten Free Ultimate Cheddar Penne is a breeze to prepare.  Seriously.  Simply boil 6 cups of water in a medium saucepan.  Add the pasta and allow it to return to a medium boil for about 8-9 minutes, until it is al dente.  Stir occasionally though, so that it doesn’t stick to the pan.  Very important.  Oh…and DO NOT overcook the pasta.  Rice pasta can go from perfect to mush in a moment.  So keep an eye on it.  Drain the pasta and give it a rinse.  In the pan you cooked the pasta in, add 3 tablespoons of fat free milk (I used unsweetened almond milk) and 2 tablespoons of unsalted butter (I used Earth Balance), and allow it to melt together over a low heat.  Then whisk in the cheddar powder until it is smooth.  Then, add the pasta back into the pan and stir them together.  Serve.

Oh…this was good.  Think Kraft Mac & Cheese…but better.  WAY better.  The pasta cooked up perfectly.  It didn’t take too long, but it had that right bit of al dente-ness to it.  I think I just made up a word there…but go with it.  The sauce though…that’s where the magic happens.  No…this sauce is not vegan.  Yes…it has milk in it…but by using the dairy alternatives for the butter and milk, I cut back on the dairy I was consuming. It worked.  The lactose intolerance was there, but it was mild because there isn’t a lot of dairy in this little box of cheesy pasta goodness.  I know, my homemade gluten-free (and dairy free) mac and cheese rocks, but when I don’t have time to do all the prep work and baking that goes into it…this is a definite contender to have on hand in my kitchen for nights where I want a big bowl of comfort food in a snap.  Deliciously creamy, cheesy noodle-y goodness.

One thing that Van’s proudly states is that they use only ingredients that they are proud of.  And that is definitely evident when I read over the list of ingredients they use for the Gluten Free Ultimate Cheddar Penne.  These ingredients are gluten-free penne pasta (brown rice flour, white rice flour), aged cheddar cheese seasoning (cheddar cheese nonfat milk, salt, shey, sugar, buttermilk, rice flour, natural flavors, annatto extract (for color).  Nothing too spooky or weird there, right?  That’s right.  Van’s Gluten Free Ultimate Cheddar Penne is gluten-free, kosher, egg free, contains no trans fats, and has no artificial flavors.

So, how about the nutritional value of a big bowl of gluten-free cheesy pasta noodles?  Actually…not too bad.  Not at all.  Before it’s prepared, the with butter and milk (of your choice), a serving (with 3 per box) contains 210 calories and 2.5 grams of fat.  A serving also has 5 mg cholesterol, 520 mg sodium, and 3 grams of sugar.  One serving will also give you 48 grams of carbohydrates, 2 grams of fiber, and 6 grams of protein.  It will be filling, even as a side.

Once again, Vans Gluten Free has lived up to its standards and name.  These little boxes of pasta are not only convenient, but easy to make and delicious too.  No one would guess they were gluten free if you didn’t tell them.  Yep…when I am in a pinch, these might be my go-to meals.  Super impressed once again!

Product Review: Hodgson Mill Lemon Pepper Quinoa & Brown Rice

Hodgson Mill Lemon Pepper Quinoa & Brown Rice

Product: Hodgson Mill Lemon Pepper Quinoa & Brown Rice – $2.49+

There are quite a few brands and companies out there that I entrust my gluten-free lifestyle to.  These are the ones that I can find on a regular basis…the few, the proud, the ones carried in most, if not every, grocery store or department store with a food section.  One such brand is Hodgson Mill…who has brought quite a few different products to the gluten-free folks that make up a good percentage of the population these days, whether for medical or dietary reasons.

We all have to have these go-to brands that we can hit up in a pinch.  So, when I find new products by such brands, I don’t really hesitate to purchase them.  They go into my shopping basket (if the budget allows) and then into my pantry.  That’s the circle of my gluten-free foodie life.

While at Raisin Rack in Columbus, Ohio, awhile back, I stumbled across a couple of packets of Hodgson Mill products that I hadn’t seen around my area.  These were for their new Quinoa & Brown Rice sides, which come in five flavors: Lemon Pepper, Garlic & Herb, Italian, Mediterranean, and Spicy.  I normally would have immediately lunged for the Spicy version, but as this is something I’d be sharing with my roommate (who is a self-professed spice wimp), I opted for something else.  As she is a connoisseur of all things lemony…the Hodgson Mill Lemon Pepper Quinoa & Brown Rice Side seemed like a win to me.

And so…it came home…and sat in my pantry.  Until tonight.  Because of having no CSA bin delivery for the past two (going on three) weeks, I’ve been trying to make due mostly with what I have in the fridge, freezer, and pantry.  As these next couple nights are going to include me packing for my upcoming trip to NYC, for my roomie’s birthday, some Broadway shows, and the NYC Half Marathon, I needed foods that wouldn’t demand too much of my time, but still be healthy and filling.

Instead of reheating some of the risotto I made last weekend, I decided to save that for tomorrow and plucked the package of Hodgson Mill Lemon Pepper Quinoa and Brown Rice out of the pantry.  Instead of serving it as a side, we’d simply split the entire package and have it as a meal.  We do that a lot with sides.  I mean…why not?  If it has the nutritional value to double as a meal for two people…might as well go for it.

So, after a long, frustrating, and tiring day at the office…I came home and immediately put 1-3/4 cup of water onto the stove to bring to a boil.  I emptied the contents of the Hodgson Mill Lemon Pepper Quinoa & Brown Rice packet into the boiling water, covered it, and lowered the heat to allow it to simmer and continue to cook…which took about 15 more minutes.  Once the water was absorbed, it was done.  I took the pan off the heat and let it sit, covered, for another 5 minutes before fluffing it with a fork.  While all this was cooking, I was able to put together everything I needed for lunches and snacks for both my roomie and I, which freed up some additional time for me later on.  Love that.  When the five minutes ticked past, I fluffed the mixture with a fork and served it up between the two of us.  We settled in for dinner.

I want to say, this mix cooks up to the perfect texture.  The quinoa and brown rice are a perfect match for each other, making a filling, and satisfying dish (whether a meal or as a side).  However, that being said, the seasoning was definitely lacking.  In fact, my roomie and I actually had to add some salt (which we never do) and even gave it a hit of berbere.  Because, hey, why not?  But, once we had everything properly seasoned, this was really delicious.  I think Hodgson Mill took extra precaution not to overwhelm the mix with the lemon and pepper flavor, but that’s really what I want when I purchase something that boasts a lemon pepper flavor.  So, while the taste was a little bland, this was a really great dish.  Easy to prepare…just season it when all is said and done.

As far as ingredients go, the Hodgson Mill Lemon Pepper Quinoa & Brown Rice side is made from organic whole grain prewashed quinoa, whole grain parboiled long grain brown rice, organic garlic, organic onion, organic herbs, organic carrot, organic black pepper, organic bell pepper, organic tomato, organic red pepper, organic spices, organic orange peel, organic lemon peel, and citric acid (contains mustard).  This blend is gluten-free, cholesterol free, low in sodium, all natural, and kosher.

Nutrition-wise…this isn’t a bad choice to serve as a side or as a main dish.  There are 3.5 servings per pouch, with one serving being 1/4 cup.  This serving will provide you with 140 calories and 1.5 grams of fat.  This serving will also give you 45 mg sodium and less than 1 gram of sugar.  You gotta love that.  One serving will also give you 2 grams of fiber and 5 grams of protein.  God bless quinoa!

If you are looking for a healthy side or a hearty dinner without breaking the bank and without having to spend a long time in the kitchen, Hodgson Mill has you covered.  Just make sure you check the seasoning when you finish cooking these up.  You’ll also get a nice protein kick from the quinoa…and the brown rice is a great addition to add a bit of bulk and body to the dish.  Lacking the lemon…that’s my only complaint.  Otherwise…a nice product!