Purely Elizabeth Blueberry Hemp Ancient Grain Granola a step above the rest

Purely Elizabeth Blueberry Hemp Ancient Grains Granola Cereal

Product: Purely Elizabeth Blueberry Hemp Ancient Grain Granola Cereal – $6.99+

Flavor.  Texture.  Taste.  Ingredients.

Everything that goes into a granola has to be spot on.  Because a good granola will not be laden with sugar.  If you are currently consuming a granola with a high sugar content…STOP!  Just stop…now.  There are better, healthier, more filling options out there that give your body the proper balance of nutrients it needs…instead of filling you up (briefly) with sugar.

One such brand…is Purely Elizabeth.

I originally tried the Purely Elizabeth Pumpkin Fig granola a couple months ago…and fell in love with it.  I was a bit leery about it…but it surprised me.  Even more, the fact that it wasn’t laden down with chemicals, sugars, and unhealthy things made it all the more enjoyable to consume.  Flavor was top of the line.  It is one of the more expensive gluten-free granola on the market…but it’s worth it.  Trust me.

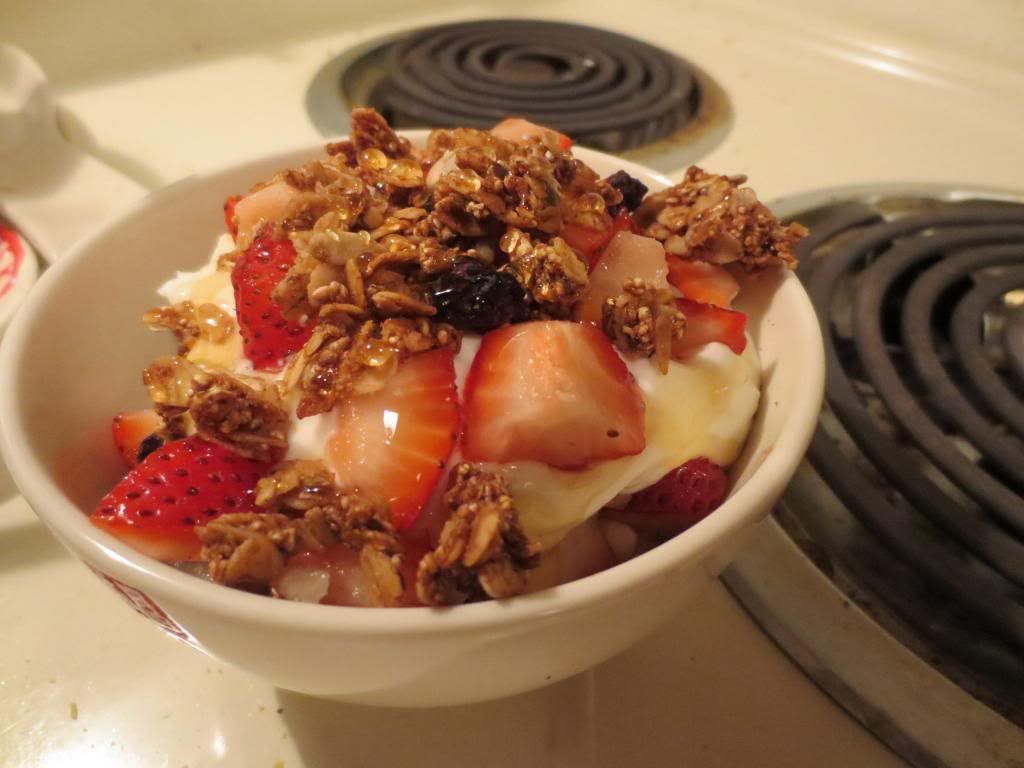
That being said, when I found myself laden with fresh fruits and berries in my CSA bin this week…I picked up some Greek yogurt and figured breakfast parfaits would be an amazing addition to my favorite meal of the day.  But…I’d need granola.  And while there is a wide variety of gluten-free options out there, I was biding my time while hitting the various grocery stores that I haunt week in and week out.  On my very last stop, I decided I would just go with whatever was there.  And what was there were quite a few options…but imagine my joy at seeing the bags of Purely Elizabeth Ancient Grain Granola Cereal on the bottom shelf.  I didn’t hesitate for a moment.  Well…one moment…but that was just because I needed to choose a flavor.  Only two remained…the Pumpkin Fig, which I had already tried previously…and the Blueberry Hemp.

Blueberry Hemp won and found its way into my shopping cart…then in my shopping bag…then in my pantry.

It was opened up and tried the very next morning.

A serving of Purely Elizabeth Blueberry Hemp Ancient Grain Granola Cereal

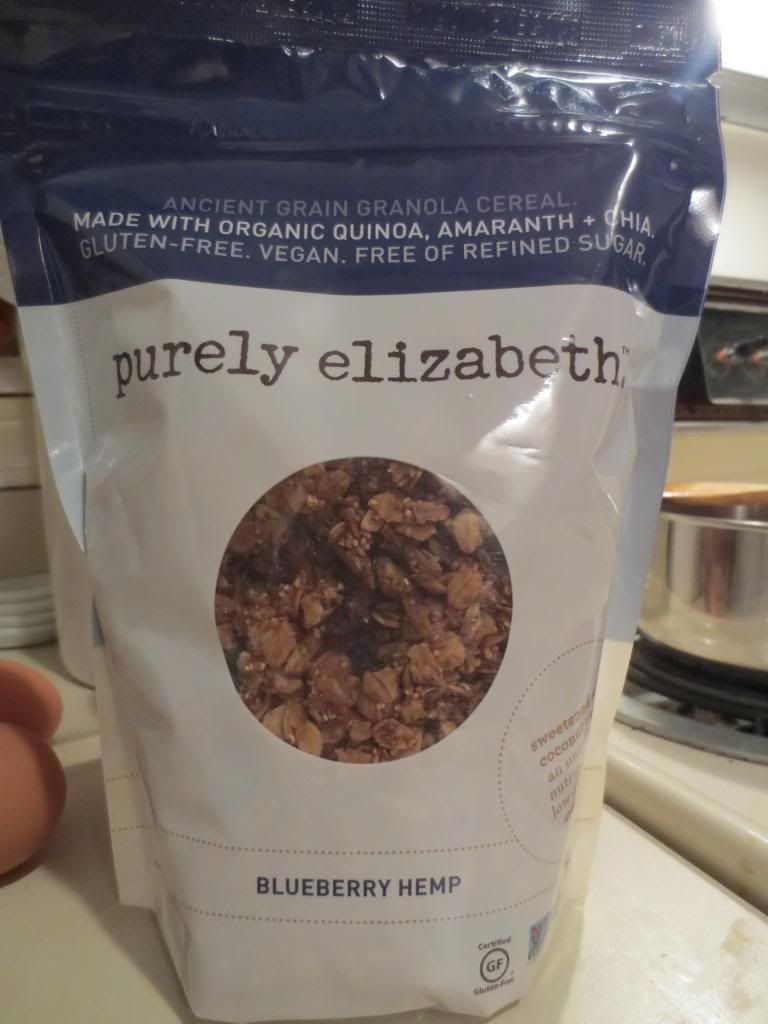
Let’s start with the basics of this variety and brand.  The Purely Elizabeth Blueberry Hemp Ancient Grain Granola is made with all natural, organic, and gluten-free ingredients that include quinoa, amaranth, chia seeds, and raw virgin coconut oil.  What these ingredients impart on the cereal is a nutritious blend of protein, b vitamins, omega-3 fatty acids, fiber, antioxidants, energy-providing fatty acids, as well as anti-viral and anti-microbial properties.  It sounds like a lot of technical mambo-jumbo, I understand.  But it boils down to…you aren’t getting any GMO ingredients, any refined sugars, no artificial colors, some good-for-you fats, and lots of overall vitamins and good stuff for your body.  Not.  Just.  Junk.

The evidence is in the ingredients: organic certified gluten-free oats, organic coconut palm sugar, organic raw virgin coconut oil, dried blueberries, organic puffed amaranth, organic quinoa flakes, organic sunflower seeds, organic hemp seeds, organic chia seeds, organic cinnamon, sea salt.

Anything you don’t recognize?  Exactly my point.  If you can honestly say you know what everything in a product is…I’d say that product is safe to consume.

But…that big looming question awaits…

How does it taste?

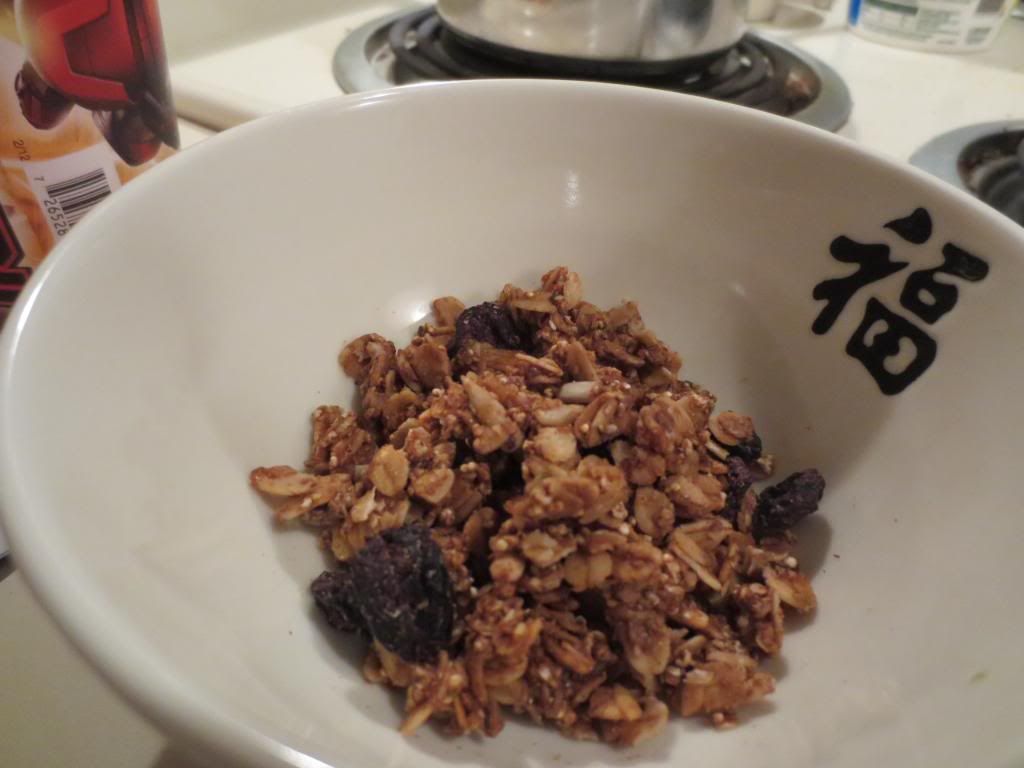
There aren’t enough words…but it is SUPER delicious.  AMAZING.  Really YUMMY!  It is, perhaps, my favorite gluten-free granola I have bought yet.  I mean…the texture is really good.  Crispy, with a hint of sweetness from the coconut palm sugar.  The dried blueberries give it an added boost of sweetness that ties in so wonderfully with the ancient grains and seeds that help give this granola its fantastic, crunchy texture.  This…is granola with the volume turned up to 11.  It’s, by far, the best one I have ever eaten…and trust me…go back through my blog…I have sampled quite a few.

Nutritionally speaking…a serving of Purely Elizabeth Blueberry Hemp Ancient Grain Granola is 1/3 cup.  With this serving, you are consuming 140 calories and 6 grams of fat, much of which is the healthy fats your body uses for energy.  Loving that.  This serving will also give you 2 grams of fiber and 4 grams of protein.  As for that sugar content…only 6 grams in a serving.  That’s awesome from a granola.  This granola is also cholesterol free and low in sodium (only 110 mg).

Granola that supplies your body with nutrients and not sugar…I’m perfectly okay with that.  Even better…it’s not only good for you…it tastes great too.  SOLD!!  Go ahead…find it at your local stores and try it.  Believe me…it’s worth the price tag.  So…so worth it.

Fresh Fruit and Greek Yogurt Breakfast Parfait with Purely Elizabeth Blueberry Hemp Ancient Grain Granola Cereal

Recipe: Gluten-Free Pain Perdu with Blueberries and Raspberries

If I have time on Sunday morning…as in I am back from my long(ish) weekend run before my roommate rises and shines, I sometimes like to take a moment to prepare a hearty breakfast for the two of us.  If she’s awake…I throw together something a little quicker and with less preparation and thought.  So, the mornings I get my run done and come home to a still-quiet apartment are some of my favorite mornings.  I’ve just finished running…and now I get to spend some time, some stress-free moments, in the kitchen…making my favorite meal of the day!

Breakfast!

Don’t get me wrong, breakfast food can be eaten at any time during the day…but I love a good, hearty, and healthy breakfast to get my day off to a good start.

This morning…I made up Gluten-Free Pain Perdu with Blueberries and Raspberries…which I based my version loosely off of Giada De Laurentiis’ recipe.  I say loosely because mine is gluten-free…mine uses raspberries (not oranges) and I sweetened my gluten-free bread with lemon zest…not orange zest.  My syrup is raspberry based instead of orange based.

Pain Perdu, by the way, is French Toast.  So…it’s easy to make and, ultimately, delicious.  Here is the recipe for mine:

Recipe: Gluten-Free Pan Perdu with Blueberries and Raspberries

Gluten-Free Pain Perdu with Blueberries and Raspberries

Servings: 4
Time: Prep 45 minutes; Cook 12 minutes

Ingredients:

French Toast:

  • 4 large eggs, at room temperature
  • 1/2 cup milk (I used unsweetened almond milk)
  • 2 teaspoons lemon zest
  • 1/4 teaspoon ground cinnamon
  • 4  slices of gluten-free bread (I used Udi’s Gluten-Free Millet-Chia Bread) (If not gluten-free, use slices of whole grain bread or country white bread, preferably 1 day old)
  • 1 tablespoon unsalted butter

Syrup:

  • 4-5 ounces raspberries
  • 3/4 cup sugar
  • 1/2 cup water
  • 1/4 cup raspberry liqueur (Chambord) or raspberry fruit juice/fruit juice blend
  • 2 star anise pods
  • 1 cinnamon stick or 1/4 teaspoon ground cinnamon
  • 1 cup (about 6 ounces) fresh blueberries
  • 2 tablespoons finely chopped fresh mint leaves (optional)
  • Powdered sugar, for dusting

Directions:

For the toast: In a medium bowl, whisk the eggs, milk, orange zest, and cinnamon together until smooth. Pour the mixture into a 9-by-13-inch casserole. Add the bread slices in a single layer. Let the bread soak for 10 minutes, turning once.

For the syrup: Place the raspberries into a small saucepan. Add the sugar, water, raspberry liqueur or raspberry juice, if using, star anise, and cinnamon stick. Bring the mixture to a boil over medium-high heat, stirring constantly, until the sugar has dissolved. Simmer for 5 minutes. Remove the pan from the heat and allow the syrup to cool, about 20 minutes. Remove the star anise pods and cinnamon stick and discard.

Preheat a griddle or large nonstick skillet over medium-low heat and add the butter. Using a spatula, remove the bread slices from the egg mixture, allowing any excess liquid to drain. Cook until golden, about 3 minutes each side. Place on 4 serving plates and drizzle with the raspberry syrup and fresh raspberries. In a small bowl, toss the blueberries and mint together and spoon on top of the French toast. Dust with powdered sugar and serve.

Wholesome nutrients and a powerhouse of flavor make Udi’s Gluten-Free Millet-Chia Bread a favorite

Special Delivery of Udi’s Gluten-Free Goodies – including brand new products!

Product: Udi’s Gluten-Free Millet-Chia Bread – $5.99

Dear Udi’s Gluten-Free Millet-Chia Bread:

What can I say?  It wasn’t that I was trying to ignore you.  I just…I was worried about trying you out.  Gluten-free breads and I have this weird relationship.  I either love them…or I don’t.  I was so concerned about breaking my budget on another relationship that just goes bad at the very start that, despite you always catching my eye…I never acted or sought you out.

I simply…kept you at a safe distance.  Always wondering, but never just going for it.

I deeply regret this now.  Because, my dearest Udi’s Gluten-Free Millet-Chia Bread…you have caught me off guard.  You have wowed me.  And now…I never want to let you go.

Call me needy…but I need you in my life from now on.

Love,
Me

Udi's Gluten-Free Millet-Chia Bread
Udi’s Gluten-Free Millet-Chia Bread

Oh…the wonderful things I get to discover due to my dietary restrictions.  Not too long ago, I received a lovely package in the mail from Udi’s Gluten-Free Foods.  Inside was a mix of some of their most famous products…and even some new ones that were hitting the market.  I was elated.  Sometimes finding products, old or new to the market, can be difficult in this area.  And now…I had the opportunity to see and taste what I was missing out on…due to geography and some lack of variety in local stores.

In this box, I received two loaves of Udi’s Gluten-Free Ancient Grains Bread.  One of these loaves was the Millet-Chia Bread.

Now, perhaps you are like me at first and sort of…turn up your nose at the very thought.  Chia…chia…like ch-ch-ch-chia pets.  Yes…that sort of chia.  But the lesson here is…don’t just a book by it’s cover.  Or, in this case, don’t judge a bread just because it contains seeds that usually grow on a pointless head planter on your windowsill.  Just sayin’.

Udi’s Gluten-Free Millet-Chia Bread is, in a word, awesome.  This ancient grain loaf is baked with hearty grains and contains a wholesome balance of nutrients, vitamins, and a unique flavor.  Even more unique is the texture of this bread.  It’s soft and chewy, but the chia seeds that are throughout the slices give it this nice hearty, crunchy texture.  It was love at first taste and first bite.  This bread has a fantastic earthy flavor to it, and the blend of omega-rich chia sees with the millet (yes…like the birdseed!) lends to the fantastic play of flavors and textures on your palate.  It’s unique.  It’s tasty.  It’s…different.  I loved it.

Bird seed…and ch-ch-ch-chia.  It doesn’t sound like a delicious combination…but it is.  Not just delicious, but nutritious too.  Let’s take a look at the nutritional value of Udi’s Gluten-Free Millet-Chia Bread, shall we?

One serving is 2 slices of bread, which will set you back 150 calories and 4.5 grams of fat.  That’s not too bad.  In fact, it’s better than most gluten-free breads on the market.  Especially for 2 slices.  In addition, you get 5 grams of filling fiber and a protein punch of 6 grams.  That’s awesome.  This bread is naturally low in sodium (only 280 mg) and also low in sugar, topping out at 3 grams per serving.  This bread is cholesterol free.  And, this bread contains 350 mg of Omega 3.

Nutritious…and delicious.  And made from something you’d water to grow over a clay head and birdseed, you wouldn’t think there would be anything appetizing about this blend of grains in bread.  But the fact of the matter is…the seeds add this great texture.  And when toasted, the flavor is even more incredible.  My only complaint, as always with Udi’s bread…is that the slices are so tiny.  Like…fit in the palm of your hand tiny.  At least these pack a huge punch for such a small portion.

Ancient Grains are all the rage…so seek out and try Udi’s Gluten-Free Millet-Chia Bread.  I think you’ll be as surprised as I was.  And perhaps you’ll be inspired to write your own love letter to a loaf of gluten-free bread.  Don’t be ashamed.  I’m not.  Because this bread is truly worth the love.

A gluten-free grilled cheese and guacamole sandwich made with Udi's Gluten-Free Millet-Chia Bread
A gluten-free grilled cheese and guacamole sandwich made with Udi’s Gluten-Free Millet-Chia Bread

DR Delish Gluten-Free Animal Cookies addictively, fantastically, amazingly delish

DR Delish Gluten-Free Animal Cookies

Product: DR Delish Gluten-Free Animal Cookies – $2.99+

If you live near a Walgreens…dash out there right this instant.

Well, maybe read this first…then, dash out there and pick up a bag of the DR Delish Animal Cookies.  Why?  Because the brand name is not meant to deceive you.  These cookies are absolutely, positively, 100% one of the best tasting gluten-free cookies out on the market.  And they are exclusive to Walgreens.

I actually never would have found these as I do not frequent Walgreens often.  And it never would have occurred to me to look for gluten-free items there.  I blame this new fascination…this new…addiction, if you will…on my mother.  Yes, my MOM!!  And I love her for it.  I love her for every cookie in that little pouch.

You see…these cookies came to me in the mail.  A little surprise gift from my mom.  She had been out at Walgreens and had spotted those on the shelf.  She knew…she just knew…I had to have them.  She was right.  Because I think when I pulled these out of the shipping box, I might have started to cry.  It had been a rough day for me…nothing in the world seemed right.  And then…my mom sends me cookies.  Not just any cookies, mind you.  But ones shaped like animals.  Like the animal crackers I used to devour as a child.  I won’t lie…I devoured them as a teenager and an adult as well.  Until I no longer could.

You often don’t realize how much you miss something until you can no longer have it.  I didn’t realize how much I missed animal crackers until I pulled this bag of DR Delish Gluten-Free Animal Cookies out of a simple USPS box.  I was a mess of emotions that day…and at that moment, the note from my mom and the cookies themselves meant more than anything to me.

As I have established before…I have a stash of gluten-free goodies going in my pantry, which I am attempting to work through in some semblance of order.  This meant, despite the overwhelming spring of emotions brought on by this gift, these cookies would have to wait their turn in the snack queue.

The wait came to an end…today.

Last night, as I was prepping my lunch, snacks, and breakfast for after my gym workout, I realized I needed a new afternoon snack.  The next item up…DR Delish Gluten-Free Animal Cookies.  I retrieved the bag from the pantry and tore it open to dish out the serving size (about 10 cookies…but if you weigh your food like I do…it’s 30 grams).  I resisted the urge to sneak a bite right then and there, playing it as I always do…and reserving that for my afternoon snack time at the office.  I sealed the bag back up and returned it to the shelf.

Lo and behold, my snack time finally rolled around and I was all too excited to be diving into a serving of animal cracker-like snacks.  Just from first-hand glance, these cookies resemble the cookies you’d find under that layer of high fructose corn syrup-y icing.  They had the same feel to them too…minus the icing of course.

What came as the surprise to me, however, was the flavor.  The taste.  How absolutely fantastic and addictive these were.  It’s a good thing I did sort these by serving instead of just hauling the entire pack with me.  They’d be gone in a New York Gluten-Free Minute!  Holy gluten-free cow, Batman…these were amazing.  They sort of reminded me of a sugary cake.  That was the flavor I got.  Less cracker, more cookie-cake-y flavor.  They aren’t as airy as the traditional animal cracker, having a density closer to butter cookies or shortbread, but they have this soft crispness to them.  And the flavor…out of this world.  For real!!  They have this subtle sweetness of vanilla and honey with that hit of buttery goodness that just makes them…the perfect cookie in every way.  And…they are shaped…LIKE ANIMALS!!  Come on!  These taste identical…if not better…to the non-gluten-free versions I used to be able to eat before I had to go gluten-free.

I could eat these every day and be one very, very happy girl.

Nutritionally speaking, a serving of these cookies (the very difficult to stick to 10 cookies or 30 grams) will set you back 130 calories and only 1 gram of fat.  These also only have a small amount of sugar, topping out at 9 grams.  In addition,, you get 2 grams of fiber and 2 grams of protein in each serving.  Not too bad.  What’s even better is, unlike those regular animal crackers, these cookies do not contain high fructose corn syrup.

DR Delish Gluten-Free Animal Cookies…you are a fun, super delish treat.  If I had less self-control…the entire bag in my pantry would be gone right now.  Yeah.  That good.

It’s Qrunch time…and veggie burgers have never tasted so good!

Qrunch Foods Original Qrunch Burgers

Product: Qrunch Foods Original Qrunch Burgers – $5.99+

Sometimes a product comes along…and it’s intriguing.  It sounds like it could be the most amazing thing ever.  It’s vegan.  It’s gluten-free.  It’s a veggie burger that I don’t have to sit there and ponder the contents of the box.  It’s all laid out…right on the packaging.  No second guessing.  No searching the internet for an FAQ on the company.  No secrets.  Nothing to hide.

That’s what I first loved about Qrunch Foods Qrunch Burgers.

What is a Qrunch Burger, you might ask.  Aside from the earlier prelude that this is, in fact, a veggie burger…let me explain a little more.  Because this is not your ordinary veggie burger.  Not one bit.  In fact, it may be the ultimate veggie burger.  I’ve eaten every brand of gluten-free veggie burger out on the market that I can find in this area.  And while I have raved about many, disliked a few…believe me when I state that the Original Qrunch Burger is…

THE BEST VEGGIE BURGER EVER!

Don’t believe me?  Try it yourself.  But…trust me…you’ll want to believe me.

Where was I?

Oh yes…what is a Qrunch Burger.  The answer to this is simple.  It’s a veggie burger that is “powered” by the superfood – quinoa.  And, as a gluten-free vegetarian, we all know that quinoa is one of my most favorite things in this world.  But the awesomeness doesn’t end there.  This burger is also loaded with organic millet and organic vegetables.  It is free of virtually all common allergens (gluten-free, dairy-free, soy-free, corn-free, wheat-free, egg-free, nut-free) and made in a gluten-free facility.  These burgers are made from all natural ingredients and do not contain any artificial flavors, colors or GMOs.

Even better…it’s fantastic.

Being that it is Memorial Day, my roommate and I decided that we would have the customary all-American holiday feast.  But for us…that means veggie burgers (as opposed to hamburgers) and hand cut shoestring fries, which I bake in the oven to crispy perfection.  I had a box of the Original Qrunch Burgers in my freezer.  As I received a CSA bin with plenty of fresh veggies that I could utilize for these burgers.  Yep…we were good to go.

Qrunch Foods Original Qrunch Burger patty

So, after I made fresh guacamole to go on the burgers (trust me…it’s awesome) and I got the potatoes cut, seasoned, and into the oven, it was time to turn my attention to the actual burgers.  I pulled out my skillet and got it warming up while I pulled the box of Original Qrunch Burgers out of the freezer.  Once my skillet was properly heated, the patties were put on to cook through.  This takes about 5 minutes on each side.  I went ahead and put a slice of vegan cheese on the patties to go along with the rest of the Memorial Day festivities.  Once each side had been properly warmed and browned on the skillet, it was time to dress the burgers.

I didn’t have any gluten-free hamburger buns on hand this week…so I used gluten-free bread.  I dressed the bread with a light coating of vegan Sriracha sour cream, then placed the red leaf lettuce down.  The Original Qrunch Patty was next, followed by a tomato, red onion, and then a spoonful of my homemade guacamole.  I adorned each plate with a healthy serving of my hand-cut shoestring fries.  With the burger assembled, it was now time to settle in for the holiday feast.

I wasn’t sure what to expect when I took my first bite.  I’ve had some pretty epic fails when it has come to taste and texture of veggie burgers.  While most have been passable, the gluten-free varieties just don’t seem to live up to the standard other veggie burgers I used to be able to eat (can’t anymore…because they have gluten in them) laid down.

That is not the case anymore.  I took one bite of my Original Qrunch Burger and was in a new happy place.  Honestly.  What I loved about these was not just the flavor, although it is definitely the best I have had…to date.  The texture is awesome.  The outside of the patty gets this nice crunch to it.  The inside…soft, with that perfect “meatiness” to it that actually makes you believe you are, in fact, eating a burger.  I loved how seasoned this patty was.  You can even see the organic onion, organic carrots, organic broccoli, and organic spinach in the patty.  Nothing fake about these burgers.  Seasoned to perfection with garlic and kosher salt.  The flavors just popped in my mouth.  I was so happy that it took everything in me not to just go into devour mode and shove as much each bite into my mouth at a time.  I savored…and I’m glad I did.

Nutritionally speaking, these burgers do rate a little higher on the calorie scale.  One patty is 190 calories and contains 11 grams of fat.  So…probably not one of the leaner options out there, but not bad as a whole.  I’ve definitely encountered worse.  Each patty will also supply you with 2 grams of fiber and 4 grams of protein.  Love that quinoa…a protein powerhouse!  In addition, these patties are low in sodium, topping out at 150 mg.  Loving it.

For a burger that elliminates so many foods and allergens from their line-up of ingredients, what emerges is one of the most amazing veggie burgers I have ever had the simple joy of eating.  I don’t think any other burger will find its way back into my freezer.  Qrunch Foods has definitely raised the bar with their highly delicious and very tasty Original Qrunch Burgers.

In fact, it seems that other people agree.  In a recent taste test done by the Washington Post Food Section, the Qrunch veggie burger came in third on overall merits.  And…it was the only allergen-free burger in the top seven.  So, it’s not just me.  Others agree that Qrunch Burgers are something special.

I noticed these are also available in a Spicy Italian flavor.  Oh yeah…I’m going to be trying that out.  And very soon.

If you’re looking for a different flavor or a different sort of veggie burger…Qrunch is the way to go.  Honestly.  Veggie burgers have great potential…but these blew away the competition.  No question about it.  Qrunch rocks!

A burger made from Qrunch Foods Original Qrunch Burger and served with homemade hand-cut shoestring fries

Recipe: Gluten-Free and Vegan “Clam” Chowder

Awhile back, Prevention magazine did a profile on Kris Carr.  If you’ve never heard that name before, you’d be inspired by this woman.  She is a best-selling author, a wellness activist, and a cancer thriver.  Yes…thriver.  You see, on Valentine’s Day in 2003, Carr was diagnosed with a rare and incurable stage 4 cancer.  This diagnosis made her want to feel better, love harder, and enjoy life more fully.  She wanted to live life to the fullest…and live it like she meant it.

Part of that journey was changing the way she ate.  She went to a complete lifestyle makeover.  She switched to a nutrient dense, plant-based diet, began exercising, and found joy and fun in everything.

Really…this woman is amazing and her story was one I remembered from the plethora of magazines I receive each month.  I appreciate Prevention for profiling her…because it led me to her book: Crazy Sexy Kitchen.

This book just happened to be on the shelf of my local library.  And after flipping through it briefly…I went ahead and borrowed it.  Immediately I had recipes I wanted to try…but the one that interested me most is the one I made for dinner tonight…and, believe me when I say, it’s worth the effort to make.  I had to make modifications with the ingredients at times, but in the end…it turned into a beautiful dish.

The recipe is below.

Recipe: Gluten-Free and Vegan “Clam” Chowder

Gluten-Free and Vegan
Gluten-Free and Vegan “Clam” Chowder

Serves: 12
Time: Prep 60 minutes; Cook 15 minutes

Ingredients for Cashew Cream:

4 cups whole raw cashews, rinsed under cold water

Ingredients for Kombu Broth:

4 pieces kombu seaweed (I didn’t pick this up, so I used sheets of nori)
2 quarts water

Ingredients for Smoked Mushrooms*:

1 tablespoon small hickory chips
1 heaping cup diced king trumpet mushrooms

*(NOTE: I had 10 ounces of crimini mushrooms on hand and no stovetop smoker, so I improvised…)

Ingredients for Chowder Assembly:

1 tablespoon canola oil
1 cup diced white onion
1/2 cup diced celery (I used diced carrot because I didn’t have celery, but I did have plenty of carrots)
1 cup peeled and diced baking potato
2-1/2 to 3 cups water
1 teaspoon lemon juice, more to taste
1/2 teaspoon Tobasco or other hot sauce, more to taste (I used Sriracha)
2 teaspoons kosher salt, more to taste
1 teaspoon black pepper, more to taste

Directions:

Prepare Cashew Cream:  Put the cashews in a bowl and cover with water.  Cover with plastic wrap and refrigerate to soak overnight.

Drain the cashews and rinse under cold water.  Place the cashews in a high-speed blender (this will need to be done in a couple of batches) and add enough water to cover by an inch.

Purée until completely smooth.  If needed, pass the cashew purée through a fine strainer to remove any course bits; the final “cream” should have a smooth, thick consistency of heavy dairy cream.  This will make about 3 cups cream (consistency will depend on the amount of water added while blending, and can vary from just over 2 cups to about 3-1/2 cups; thin as desired)

Prepare Kombu Broth*: Combine the combu and water in a medium pot and bring to a simmer.  Reduce the heat to a gentle simmer and cook 40 minutes, then strain.  This makes about 5 cups kombu broth, more than is needed for the remainder of the recipe.  The broth will keep, covered and refrigerated, up to 10 days.

*(Note: I didn’t have kombu on hand, so I used nori sheets, and followed the instructions as if they were kombu.  The flavor was probably milder than it would have been…but this worked.  I did, however, have to press on the nori to wring out the rest of the broth)

Prepare Smoked Mushrooms*: Prepare a stovetop smoker: Spread the chips in the base of the smoker, directly over the burner.  Place the drip pan (if using) over the chips and a rack on top of the drip pan.  Place the diced mushrooms on the rack (be sure to use a rack fine enough so the mushrooms don’t fall through) indirectly over the chips (do not place the mushrooms directly over the chips, as this can cause them to oversmoke and turn bitter).  Partially cover the smoker with a lid, leaving it open a cuple of inches.  (If you do not have a commercial stovetop smoker, you can substitute by using a heavy roasting pan, a cake rack, and heavy duty foil to cover the pan as a lid.)

Heat the smoker over medium heat just until you see smoke escaping through the opening.  Close the smoker entirely and gently smoke just to infuse the mushrooms with smoke flavor, not to cook, 3 to 5 minutes.  Be careful not to oversmoke, or the mushrooms will become bitter.

*(Note: I don’t have a stovetop smoker or anything I could have used to do the makeshift one…so instead I went about this a little differently.  After rinsing my mushrooms and cutting the stems even to the caps, I put them in a bowl with 1/4 cup olive oil, 2 teaspoons of Liquid Smoke (make sure it is a gluten-free brand), a touch of salt, and some kelp granules.  I mixed this until everything was coated then placed them on a baking pan and roasted in a 350°F oven for 45 minutes.  I then diced them as the recipe called for. It yielded perfect results.)

Assemble Chowder: Heat the oil in a medium-size soup pot over medium-high heat.  Add the onion, celery (in my case, carrots), and potato.  Sweat the ingredients, stirring frequently, until softened, 8-10 minutes.

Add 1-1/2 cups each of the Kombu Broth, Cashew Cream, and all the smoked mushrooms.  Reduce the heat, and cook over low heat, stirring frequently, for 10 to 15 minutes to develop and marry the flavors.  The Cashew Cream will thicken as it cooks, and you will need to add water from time to time to thin and adjust the consistency.  We added about 3 cups of water as the soup cooked.

Season with lemon juice, Tobasco (or hot sauce of choice), salt, and pepper.  Taste and adjust the seasonings as desired.  This makes a generous 2 quarts of soup.

~*~*~

This recipe looks labor intensive at first glance, but I soaked the cashews overnight and making the cashew cream was a synch.  As for the broth, I made that ahead as well and let it chill in the fridge.  Then, when I needed it, I poured out the amount for this recipe and it was all set to go.  All I really needed to do was chop the vegetables and get everything cooking.

And what emerged was a flavorful, creamy, delicious vegan clam chowder.  The flavors were awesome.  And the texture of the mushrooms after roasting in the oven for that long was just like a clam tasted (back before my vegetarian days and when chowder was safe to eat).  I wasn’t sure what to think about this as I started to cook everything together in my big pot on the stove, but the end result was awesome.

I can’t wait to heat up more and enjoy it all over again.

As a side note, this soup is freezer-friendly.  So go ahead and freeze the extra if needed and allow it to thaw when you’re ready to have more.  Otherwise, the soup does keep for about 1 week in the fridge.

This is TOTALLY going to be made over and over again.  Shockingly delicious.  But, then again, Kris Carr enlisted the help of Chef Tal Ronnen for this one…so it’s no surprise this soup is packed with awesomeness.

Make it.  Go ahead.  I dare you!

thinkThin makes decadent and wholesome Caramel Chocolate Dipped Mixed Nuts Crunch Bar

thinkThin Caramel Chocolate Dipped Crunch Bar

thinkThin Caramel Chocolate Dipped Mixed Nuts Crunch Bar – $1.99+

Oh, I just can’t stop singing the praises of thinkThin and the amazing, gluten-free, delicious, and nutritious bars that they have out on the market.  I have reviewed quite a few along the way, as I often use these as a protein pick-me-up, or even a pre-race or post-race snack.  They are portable…and…even more importantly…impressively filling and delicious.

One of the newer bars out on the market are their line of thinkThin Crunch bars.  They have a few varieties out there.  Previously, I tried out just the regular Chocolate Dipped Mixed Nuts Crunch Bar…and absolutely devoured it and sang its praises along the way.

Well, my roommate loves a good deal…and while I sent her out to grab something from the grocery store one day when I was in the kitchen slaving away over dinner, she returned with gifts.  And one of these gifts was a new flavor of thinkThin Crunch bars.

Happiness.  I love new products.  Especially by companies and brands that I trust.

Enter…the morning of one of my races.  For longer races, I usually dine on a delicious banana about 40 minutes prior to the run.  For shorter races…it’s whatever I can grab.  Banana works then too…but I haven’t been keeping bananas recently.  Sad…I should start doing that again.  But, in a rush to get out the door, it was find something quick from the drawer of race morning snacks.  I didn’t want something with a lot of chocolate…because I don’t think my tummy would handle that well before a run.  The only option, then, that I currently had…was the thinkThin Caramel Chocolate Dipped Mixed Nuts Crunch Bar that Cathy brought home for me.  It still had a small amount of chocolate in it…but far less than the other options in the drawer.  It would have to do.

We ended up being way ahead of schedule to the race…but the guy with all the packet stuff was running late that morning.  It was a little earlier than I liked, but as we were sitting around waiting on someone before anything else race related could be done…I figured I’d go ahead and eat my bar, giving my body some time to work on digesting not just the bit of chocolate, but the nuts as well.

I unwrapped the bar and took a bite.

It reminded me of something…and I still can’t seem to put my finger on it.  But…it was something I used to eat…often.  So, trust me when I say…this bar is yummy!  It is packed with a blend of peanuts, almonds, and cashews.  All of the nuts are bound together and sweetened with a hint of honey, then the bottom layer is dipped in a decadent blend of caramel and dark chocolate.  Together, the salty-sweet mix is the perfect blend for any palate.  Who doesn’t love a hit of sweetness with salty things?  It’s why I loved eating chocolate covered pretzels before I had to go gluten-free (but Glutino makes fantastic gluten-free chocolate covered pretzels)…that combination of salty and sweet just does it for me.  And this bar combines everything I love about that combination…into one healthy and satisfying bar.

Nutritionally speaking, when it comes to bars of this nature, this is one of the best you can choose.  One bar will only set you back 190 calories and 11 grams of fat.  Yes…the fat content may seem high, but most of that is from the nuts, and those are healthy, belly-flattening fats.  This bar is low in sugar, topping out at only 6 grams, which is 70% less than most leading fruit and nut bars.  In addition to that, a healthy dose of 9 grams of protein (that’s 80% more than leading fruit and nut bars as well) and 4 grams of fiber will help keep you feeling full and satisfied long after this bar is eaten.  I ran a hard, hilly 5K race and I wasn’t even starving afterwards like I usually am.

Replace candy bars with this wholesome Crunch bar from thinkThin and you’re right on track to delicious, nutritious snacking.  I absolutely loved the flavor combination and that this bar is so healthy on top of it.  thinkThin has done me proud in the past…and once again…they live up to the high standards they set.  I continue to buy bars from thinkThin because they continue to put out a product worth buying.  The crunch bars will replace your sugar-loaded candy bars or granola bars…and give you added nutrients in the process.

Smart thinking, thinkThin.

thinkThin Caramel Chocolate Dipped Crunch Bar (unwrapped)

Create your own pizza on Udi’s Gluten-Free Pizza Crust

Special Delivery of Udi’s Gluten-Free Goodies – including brand new products!

Product: Udi’s Gluten-Free Pizza Crusts (2 Pack) – $5.99+

It was October 24, 2011 when I first was able to finally try Udi’s Gluten-Free Pizza Crusts.  I remember the day like it was just yesterday instead of almost two years ago.  At this point, my gluten-free journey was in the beginning stages.  I had tried Udi’s bread…and loved it.  But that was basically all I could find in my area…until one day…the gluten-free gods smiled upon me…and one of my local stores started carrying Udi’s Gluten-Free Pizza Crusts in their freezer section.  I was so happy (and hungry) at that moment, I damned my budget, threw a pack of them into my cart and went home to make some gluten-free pizza for dinner.

Almost two years ago.

Sometimes things change over the span of a couple years.  Companies toy around with recipes…sometimes because it is needed (Udi’s Gluten-Free Cinnamon Rolls…yes…you…and I still am not the biggest fan of those)…and sometimes because they just want to see if they can improve on the awesome product they already have on the market (Rudi’s Gluten-Free Bread…your new recipe is awesome!).

One thing that hasn’t changed, however, is the quality, taste, and sheer awesomeness that comes in each pack of Udi’s Gluten-Free Pizza Crusts.  Sure, Udi’s now makes pre-topped frozen pizzas…and those are all fine and good.  But sometimes…most of the time…I have my own pizza toppings in mind and I want to get into my kitchen and draw on my inner allergic chef and just…create.

Udi's Gluten-Free Pizza Crusts
Udi’s Gluten-Free Pizza Crusts

Most people would think that would mean…make your own gluten-free crust.  I have.  And sometimes I still do.  But when you’re hungry or in a hurry…you work with what is available to you.  And what my area happens to have in almost every grocery store now…are Udi’s Gluten-Free Pizza Crusts.  And I couldn’t be happier about it.

Recently, I received an amazing box of gluten-free goodness from Udi’s of products, both classic and new…to try for my blog.  One of the included items was a pack of their Gluten-Free Pizza Crusts.  As I run a lot and my favorite pre-race meal is gluten-free pizza…this had me stoked.  I already knew I was a huge fan of their pizza crusts…although it had been…probably about a year since I had last had one.

Well, yesterday I ran two 5K races…one in the morning and one in the evening.  And that meant…Friday night was gluten-free pizza night.  Normally, my roomie and I would just pick a local restaurant that had a respectable, safe gluten-free pizza on the menu.  But…we’re on a tight budget this month…and now…I had pizza crusts in my freezer.  So…yes…I would make my own.

I got out my pizza stone, put some cornmeal down, then got the pizza crusts out of the freezer.  I removed one of them and put the other one away.  Once my pizza stone was properly heated and the corn meal beginning to brown, I placed the crust down on the stone and began to top it with what ingredients I had on hand.  I made my own version of a gluten-free and vegetarian Hawaiian pizza.  A little marinara, some homemade gluten-free and vegan bacon, some red onion, chunks of fresh pineapple, and topped it off with Daiya mozzarella vegan cheese.  Oh…my pre-race meal was already making me drool and it still had to bake.

Udi's Gluten-Free Pizza Crust (ready for toppings and baking)
Udi’s Gluten-Free Pizza Crust (ready for toppings and baking)

Into the oven it went for about 10-12 minutes.  It smelled fantastic as it started to bake, the cheese getting melty and gooey…the pineapple beginning to caramelize under the heat of the oven, the crust turning to that perfect golden brown.  Oh yes…this was gluten-free pizza that was going to get me through two races in one day.  And it was turning into pizza perfection.

And the best part was…I still LOVED it.  Every last bite of it.  My pizza turned out brilliantly.  The crust baked to a crispy, yet still chewy, perfection.  It was able to sustain the heavy pineapple chunks among the other toppings.  And it tasted so good.  SO good.  This crust is light and thin, so you don’t feel like a glutton for downing half of the entire crust (which is the serving size, BTW).  I am just as in love with these pizza crusts now as I was almost two years ago.  Nothing about them has changed.  They are amazing.  Top them off however you wish.  You can’t go wrong when you’re making it your own.  And thanks to Udi’s…you can do this on a super busy  night…or if you just want to have some time to relax.  Pizza doesn’t have to be about making your own crust.  Let Udi’s do that for you…because this is a crust worth slicing into and devouring.

Nutritionally speaking, this is also one of the best pre-made gluten-free pizza crusts on the market.  The serving size, as I mentioned before, is 1/2 of the pizza.  It makes sharing with someone so simple and easy.  My roomie gets her half and I get mine.  I leave a zone between the halves for easy slicing, as she uses real cheese on hers…whereas I am lactose intolerant and use vegan cheese on mine.  It works out beautifully.  A serving of the crust alone will only set you back 190 calories and 5 grams of fat.  Trust me…this is on the low end of most of the pre-made gluten-free crusts out there.  Believe me…I have searched.  On top of that, your half of a pizza serves up 4 grams of protein.  AWESOME.

These crusts are made from a blend of tapioca starch, brown rice flour, water, canola oil, egg whites, evaporated cane sugar, tapioca syrup, tapioca maltodextrin, salt, xanthan gum, yeast, and cultured corn syrup solids (to prevent mold).  Combine it and what you end up with is one of the best gluten-free pizza crusts in your grocer’s freezer section.  These have been on the market for quite awhile…but if you are new to the gluten-free lifestyle or just haven’t spent the money to try them out…I encourage you to do so…and do so now.  These are fantastic and…make having a pizza party a whole lot less stressful.

Bake up one for yourself and taste the awesomeness of Udi’s Gluten-Free Pizza Crusts.  No really.  Do so.  Pizza waits for no one.

Gluten-Free and Vegetarian Hawaiian Pizza made on Udi's Gluten-Free Pizza Crust
Gluten-Free and Vegetarian Hawaiian Pizza made on Udi’s Gluten-Free Pizza Crust

Another great seafood stand-in found with Sophie’s Kitchen Gluten-Free Breaded Vegan Scallops

Sophie's Kitchen Gluten-Free Breaded Vegan Scallops
Sophie’s Kitchen Gluten-Free Breaded Vegan Scallops

Product: Sophie’s Kitchen Gluten-Free Breaded Vegan Scallops – $5.99+

Yes…more vegan seafood!

Don’t judge.

When you’re a gluten-free vegetarian…you buy and try products like this.  There is nothing wrong with that, right?  In fact, I encourage all you seafood lovers to give these a shot.  Maybe start with the most amazing gluten-free and vegan breaded shrimp…then try some of the other offerings.

You see, this little company called Sophie’s Kitchen, is making these frozen vegan seafood dishes…and I couldn’t be happier about it.

I was on the fence with their Gluten-Free Vegan Fish Filets…but I fell in love with the rich and bold flavors and texture of the Gluten-Free Breaded  Vegan Shrimp.  Well, I had pasta to use up…so I got it in my head to do something with the Gluten-Free Breaded Vegan Scallops.

Why not?  A nice gluten-free angel hair pasta dish with some sort of garlic sauce would pair perfectly with scallops, yes?  Of course it would.  Pasta, garlic and scallops are…like…best mates.

So, the other night for dinner, that’s exactly what I set out to make.  I got my gluten-free angel hair pasta going on the stove top, worked on a side of roasted asparagus (done in the oven with olive oil, balsamic, a little salt and a dash of black pepper).  Then, I pulled the Gluten-Free Breaded Vegan Scallops out of the fridge (I put them in there to thaw while I was at work) to get them onto their own baking sheet and ready for the oven as well.

Sophie's Kitchen Gluten-Free Breaded Vegan Scallops (cooked)
Sophie’s Kitchen Gluten-Free Breaded Vegan Scallops (cooked)

That’s really all there is to these.  You place them in the 375°F oven for 10-15 minutes, or until they are golden on top, and then…you’re ready to serve them up, however your little heart desires.

My pasta turned out to be an epic fail.  My sauce was awesome.  And as for Sophie’s Kitchen Gluten-Free Breaded Vegan Scallops?

I really liked these!  I mean…really liked these.  Not to the epic scale that I love the Gluten-Free Breaded Vegan Shrimp…but the scallops are really tasty as well.  The texture was great.  They weren’t grainy or anything.  They didn’t taste like rubber.  They had the perfect texture of a seared scallop.  I felt that it really was the star of the entire dish that I whipped together.  These just looked and tasted authentic.  I was very happy with feasting on them.  I actually saved a scallop as my last bite since the pasta was an epic fail (see blog post before this one).  My sauce was awesome though.  But the vegan scallops, as any “meat” portion of a dish should be, was the star.

So…what exactly are these seafood imitations made from?  The answer is…konjac root, which is an ancient superfood staple across Southeast Asia and is very popular in traditional Japanese cuisine.  It’s also known as the elephant yam.  The konjac is combined with seaweed and other ingredients and viola…vegan (and in most cases, gluten-free) seafood.  In this case, the Gluten-Free Breaded Vegan Scallops are made from water, konjac powder, beta glucan, modified potato starch, organic agave nectar, sea salt, rice flakes, potato starch, white pepper, carrageenan, and seaweed.  Put them together…and you get…amazing imitation scallops that have some of the best texture and definitely soaked up the garlic and olive oil in my sauce.  Delicious.

Nutritionally speaking, a serving of Sophie’s Kitchen Gluten-Free Breaded Vegan Scallops is 8 pieces.  This serving will only set you back 50 calories!  FIFTY CALORIES!!  You will also be taking in only 1 gram of fat, 3 grams of fiber…and sadly…no protein here.  These little breaded vegan scallops of awesome have no cholesterol, no trans-fat, no preservatives, no added colors, no MSG, no added sugar, are naturally low in sodium…and basically contain no artificial…ANYTHING!

Loving it!!

This is the third product that I have tried by Sophie’s Kitchen and these are definitely my second favorite thus far.  I would love to try them in another way for preparation purposes.  I am really loving what Sophie’s Kitchen is brignign to my gluten-free and vegetarian table.  Thanks to their vegan line of seafood…fish can be back on my menu!

I think I’m in love with Sophie’s Kitchen.

No…I know I am.

Thank you…great people behind Sophie’s Kitchen…for giving this gluten-free vegetarian delicious options for a seafood dinner.

Sophie's Gluten-Free Breaded Vegan Scallops (served over DeBoles Gluten-Free Rice Plus Golden Flax Angel Hair Pasta)
Sophie’s Gluten-Free Breaded Vegan Scallops (served over DeBoles Gluten-Free Rice Plus Golden Flax Angel Hair Pasta)

DeBoles Gluten-Free Rice Plus Golden Flax Angel Hair Pasta is a gummy, delicate mess

DeBoles Gluten-Free Rice Plus Golden Flax Angel Hair Pasta

Product: DeBoles Gluten-Free Rice Plus Golden Flax Angel Hair Pasta – $2.69+

Ah…gluten-free pasta.

It can be just as good as the full-barrel pasta.  Or it can be…beyond disappointing.  I always hope for the best and tonight when I got it into my head to make an angel hair pasta dish with some vegan and gluten-free scallops on top.  I happened to have some gluten-free angel hair pasta in my pantry, however, so this wasn’t going to be an issue.  The most difficult part of dinner prep was going to be making the garlic sauce.

Upon arriving home, the gluten-free angel hair pasta was pulled out of the pantry and I got some water boiling in my large pot on the stove.  The pasta that was debuting in my kitchen was none other than DeBoles Gluten-Free Rice Angel Hair Pasta…now with Golden Flax.  I have had DeBoles pasta before…and it’s been…okay.  Nothing to really scream about.  But…decent enough to get by.

While I got the water boiling, I prepped some asparagus to roast as a side dish and got that in the oven.  Then, I got the gluten-free and vegan breaded scallops set on their baking sheet for when they would join the asparagus in the oven.  By then, my water was boiling, so I got the scallops into the oven and then got out the ingredients for my sauce and put the skillet on a burner to warm up.

It was now time to add the noodles to the boiling water.  I opened up the box of DeBoles Gluten-Free Rice Plus Golden Flax Angel Hair Pasta and poured it into the water.  The boiling water immediately calmed, and I gave the pasta a stir until everything was covered by the water.  A rolling boil returned and I went ahead to focus on making my garlic sauce, giving the noodles a stir every now and again.

As the pasta began to soften, I noticed how brittle and delicate these noodles were going to be.  When I would stir the noodles, they would occasionally split or break apart into smaller noodles.  Okay…that’s fine.  My mom used to split the noodles in half and cook spaghetti like that.  I just…was hoping for something that would really hold up.

DeBoles Gluten-Free Rice Plus Golden Flax Angel Hair Pasta noodles, cooked...and unclumpy!
DeBoles Gluten-Free Rice Plus Golden Flax Angel Hair Pasta noodles, cooked…and unclumpy!

I cooked these to the perfect al dente (about 9 minutes), then drained them.  I shook out the excess water and went to put the noodles into the skillet to mix with the sauce.  And that was when I poured them into the skillet that I noticed just how gummy and sticky they were.  They clumped together terribly.  I was not happy.  I poured a little more olive oil into my garlic sauce in hopes that it would help de-stick the noodles, but it didn’t.  They just became this massive clump of gluten-free rice noodle pasta.  I was livid.  Honestly.  No good at all.

But the pasta was all I had to work with…so I had to use it, despite it all being one ball of noodles now.  I managed to scoop up four servings and place two in Pyrex containers for the following night…and the clumpy noodles that were left went into bowls for dinner.  Over the top went the vegan and gluten-free breaded scallops from Sophie’s Kitchen.  And then I gave mine a hit of crushed red pepper flakes, where my roommate took freshly grated Parmesan.

Dinner was…served, I guess.  The image of it in my head seemed a lot better than the actual result.  Stupid pasta.  And, just as it appeared, it tasted.  Not mushy, but gummy.  The noodles broke as you tried to lift them from the bowl, perhaps due to the weight of the other noodles now stuck together…or the fact that this pasta was very delicate.  I was not pleased.  They tasted fine…the texture was great.  But they just didn’t cook up properly, despite me doing everything right.

As for the bowls of noodles in the fridge…when reheated, I went ahead and left the lids off the Pyrex, hoping it might take some of the gumminess out of the noodles.  Is it weird that I preferred the noodles on the second day as opposed to the first.  My plan did work, although they were still a clump of really short noodles, instead of single long strands of angel hair pasta that could be wound around a fork.  Suckage.  But…like I said…at least they taste good.

Nutritionally speaking, this is like any other pasta noodle.  For a 2 ounce serving (yes…I do measure and weigh), you’ll be set back 210 calories and 1.5 grams of fat.  Not too shabby for pasta, yes?  Thanks to the flax, you get a nice hit of 4 grams of protein.  Unfortunately, the fiber content in this is rather low, so it may not be as filling as a regular pasta noodle would be.  But, when you’re gluten-free…you use what you are given.  And this is what I had.  These noodles are gluten-free, wheat-free, and an excellent source of Omega 3…something this gluten-free vegetarian doesn’t really get regularly.

So…while not a horrible choice for noodles, there are others out there I would return to before picking up another box of DeBoles Gluten-Free Rice Plus Golden Flax Angel Hair Pasta.  I prefer my noodles not to stick together…break…have a gumminess to them…you know…what any good gluten-free eater should get.  Something done right and something done well.  These noodles…failed me.  And now…I have no love for them.  I liked them…but it’s not love.

We’re just…acquaintances.

DeBoles Gluten-Free Rice Plus Golden Flax Angel Hair Pasta, now shortened and stuck together, topped with Sophie's Kitchen Vegan and Gluten-Free Breaded Scallops
DeBoles Gluten-Free Rice Plus Golden Flax Angel Hair Pasta, now shortened and stuck together, topped with Sophie’s Kitchen Vegan and Gluten-Free Breaded Scallops