Product Review: Lentilicious Mediterranean Lentil Meal

Lentilicious Mediterranean Lentil Meal

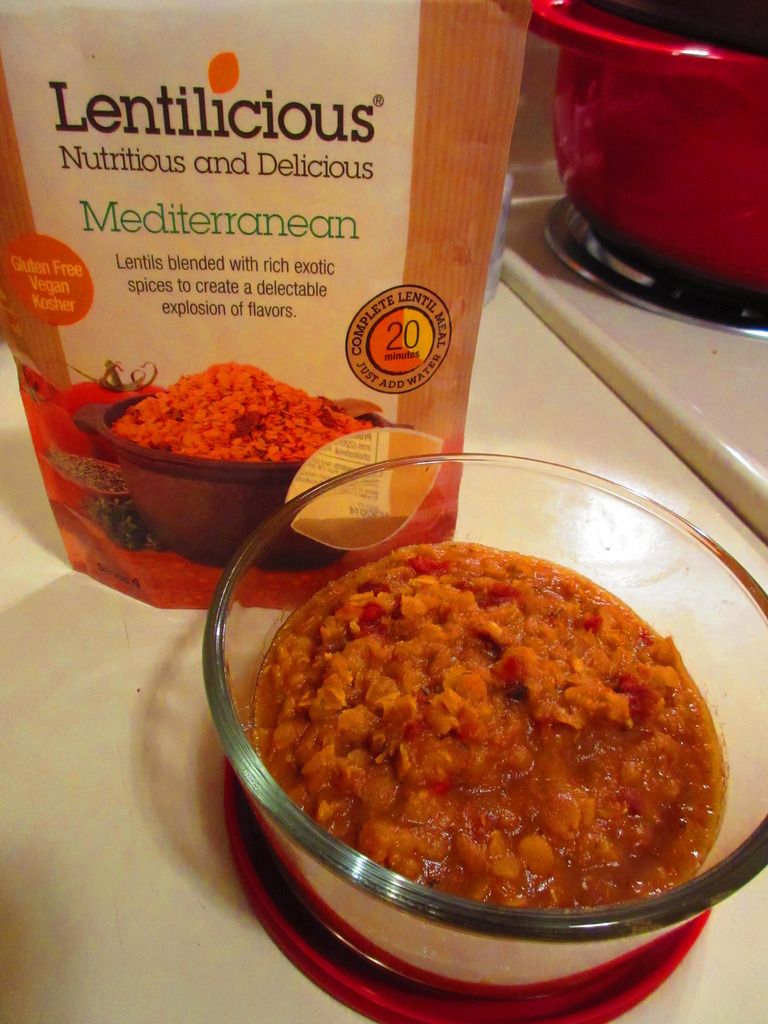
Product: Lentilicious Mediterranean Lentil Meal – $4.99+

It was the heat of the summer – July 2014.  Yes…think back with me.  I was in my third month of Cuisine Cube and was sent a box full of goodies, most of which I have already used up.  Only two remained.  One is the Citrus Herb breadcrumbs, which is meant for chicken, but as a vegetarian, I’ll repurpose them (like on broccoli or tofu or something)…and the Lentilicious Mediterranean Lentils.

If you’re veterans of my blog, you know all about the amazing delivery service that is Cuisine Cube.  If you are new, then let me give you a quick run-down.  Cuisine Cube is a gluten-free subscription box that specializes in pantry/meal items, delivered to your door once a month.  Included are 5-6 products, not samples, but full-size products, that cover breakfast, lunch, dinner, dessert, a snack…and then an added bonus once and awhile.  It’s fantastic.  I’ve been introduced to products and small artisan companies that specialize in gluten-free products that I otherwise never would have known about.

One of these is definitely Lentilicious.  Lentilicious originated in a small town near Byron Bay, Australia.  It was a startup company for two women who wanted to share their love of quick, easy and nutritious food – mainly lentils.  Lentils are a nutrient dense “superfood” that cooks up quickly without having to soak them.  Lentils are bursting with planty protein and dietary fiber, and red lentils, such as those found in Lentilicious meals, are low on the glycemic index and also low in fat.  Lentilicious offers a package that is nutrient rich, quick to make, portable, and a surefire way to keep you full and provide sustained energy.  Oh…it’s also good for you.

So…now almost a year had gone by and these were still in my pantry.  Definitely no good.  I’m working my way through my pantry and freezer and finally getting to the stuff that I’ve put aside for way too long.  I am so sorry that I waited so long to try the Lentilicious Mediterranean Lentils.  Why?  Well…you’re about to find out.

First of all, Lentilicious meals are super easy to make.  It takes 20 minutes of your day.  That’s it.  You can cook them in the microwave or on the stove.  I opted for the stovetop…which was just more convenient for me.  Either way…20 minutes.  So, to prepare by stovetop, I simply poured the entire packet of lentils and spices into the pot and covered with 3 cups of cold water.  I simply brought that to a boil, lowered the heat, and allowed it to simmer, uncovered, for 20 minutes, just stirring every now and again.  That’s it.  EASY!  I cooked this up while I was cooking dinner.  It required no extra supervision.  Because, this was going to be lunch for my roommate and I for half of this week.  Monday and Tuesday…this was what we were having.  And, as it cooked up, I could already tell I was going to love it.

In fact, I reheated these at work both days, and each day I was complimented on how delicious my lunch smelled.  But, food is all about the scent and the flavor.  So…it was time to give it a taste.  Let me say this…AMAZING!!  This tastes like a lentil chili.  The texture and the flavors are phenomenal.  I thought it was spiced up to perfection, with a mild hit of Mediterranean spices and this creamy, yet “meaty” dish.  I was in love at first bite and would savor each spoonful.  Total win!  It was also filling and just tasty.  Beyond impressed.  Already making some plans to seek it out or at least order it online.

With all that being said, let’s take a look at what goes into the Lentilicious Mediterranean Lentil Meal.  This meal is made up of red split lentils, sundried tomatoes, onion flakes, sea salt, and contains less than 2% spices.  That’s it.  Clean eating, indeed!! This product is gluten-free, vegan, kosher, low GI, non-GMO, 97% fat free, high in protein and high in fiber.  LOVE IT!

As for nutrition, a pouch of the Lentilicious Mediterranean Lentil Meal contains 4 servings.  Each serving will provide you with 180 calories, 1 gram of fat, 240 mg sodium, 30 grams of carbohydrates, 8 grams of fiber, 2 grams of sugar, and 13 grams of protein.  AMAZING!  Lentils and I are BFFs forever.

Once again, Cuisine Cube delivered an amazing product!  Totally loving, and now on the hunt for, Lentilicious.  If you are looking for an amazing plant-based source of protein…lentils are a fantastic choice.  Even better…you simply have to add water to and cook up!  Lentilicious for the big win!

Product Review: Mina’s Purely Divine Gluten Free Bread Mix + Recipe Bonus

Mina's Purely Divine Gluten Free Bread Mix
Mina’s Purely Divine Gluten Free Bread Mix

Product: Mina’s Purely Divine Gluten Free Bread Mix – $5.79+

It was Easter Sunday and I woke up early.  I haven’t been sleeping well due to bouts of chronic pain in my back and hip.  So, I got out of bed and came out to the living room to do my stretches assigned to me by my physical therapist.  It was as I started doing these that I thought to myself:

“Self…what are we having for breakfast this beautiful Easter morning?”

Since I am currently in a state of no running at all…I had plenty of time to come up with something.  And for some strange reason, I recalled having two bags of Mina’s Purely Divine Gluten Free Bread Mix in my pantry.  I bought these and a chocolate cake mix (which I have used already and didn’t review because I never tried the finish product…I made it for someone else…so now I have to purchase another bag) on Manager’s Special at my local grocery store…for $1.99.  How fantastic is that?

I knew very little about the Mina’s Purely Divine products when I bought them, just that I had seen them featured in ads in my gluten-free magazines.  That was the only familiarity I had with them.  So, with the recollection and the realization that I had two pouches of the Gluten-Free Allergen-Friendly Bread Mix in my pantry…I thought…

Bagels.

Because when I already fail at baking up gluten-free bread more often than I succeed…why not bake bagels.  Because that is SO much easier! *SARCASM*

That being said…I had it in my head now to make them.  It was going to either end well…or be a complete and epic fail.  It wouldn’t be my first.  So, while the roomie was still slumbering in her room…I went into the kitchen and plucked one of the bags of Mina’s Purely Divine Gluten Free Bread Mix off the shelf and set out to work.

Long story short…for my first time making bagels (and gluten-free bagels at that!)…this worked wonderfully.  They didn’t rise as much as I had hoped they would, but they did rise some in the 30 minutes I gave them to just sit.  I think next time I’m going to try the oven on warm thing that a friend suggested and see if it makes any sort of distance.  They held up to boiling in the water and even the actual baking.  Totally impressed.  But the real challenge was going to be in the taste.

By the time the bagels were in the oven and baking (given a little bit of egg wash over the top and a sprinkling of the “everything spice” that I picked up in Charleston, SC, the roomie had emerged and was ready for some brekkies.  I told her that breakfast was currently in the oven…and I would have it ready once the timer went off.  It was already starting to smell amazing, so when she asked what it was, I actually told her.

Bagels.

She looked really surprised.  “You made bagels?!”  You see…she has suffered through more than one epic gluten-free homemade bread loaf fail…so I wasn’t insulted at all.  I nodded and as I pulled them out of the oven, called her over to take a look.  They were perfectly golden on the outside.  Fresh and hot out of the oven, I didn’t want to slice into them so just put some vegan cream cheese in a bowl and said we’d dip (kind of how I used to eat soft pretzels).  So, onto some plates the bagels went while the rest cooled on the pan.  I handed a plate and bowl of the cream cheese over to her and went to get my own.  She started her cry of “hot, hot, hot!” as she broke it open and steam from the fresh bagels swirled up from the little breakfast goodie.  She took a bite and said, “It tastes like a bagel!”

Now, she’s had Everything Bagels from some of the top-flight bakeries in New York City…and she seemed quite content to dive into my first attempt at ever making bagels.  Trust me…she’s quite the critic and if she doesn’t like something…she’ll say so.  But she thought the texture and the flavor were spot on.  And after I got settled to try it for myself…I totally agreed.  As a New Yorker, bagels were a way of life growing up.  I still love them, but am often relegated to getting the frozen versions from Udi’s (as they are the only gluten-free bagels outside of Jennifer’s Way in NYC that have come close to tasting like the real thing!)…which is fine in a pinch.  But these…these were mine.  And they wouldn’t have been possible without Mina’s Purely Divine Gluten Free Bread Mix, for sure.

Truth…I can’t wait to make these again with the other batch.  Maybe get a bit more rise out of them so that middle gets all fluffy and amazing.  Cathy said these were very reminiscent of the ones we ate at Jennifer’s Way back in March, which I took as a high compliment as my first bite of one of Jennifer’s Way bagels made me cry.  Good tears.  This mix worked beautifully and made amazing bagels.  Talk about taking a risk and having it pay off in the end.

Let’s discuss the ingredients in Mina’s Purely Divine Gluten Free Bread Mix.  This mix is made up of organic rice flour, potato starch, organic cassava starch, organic sorghum flour, arrowroot starch, rice flour, teff flour, sea salt, yeast, xanthan gum, and guar gum.

As far as nutrition goes, the Mina’s Purely Divine Gluten Free Bread Mix contains about 13 servings, with each serving being about 1/4 cup.  A serving will provide 100 calories, 0 grams of fat, 0 mg cholesterol, 50 mg sodium, 23 grams carbohydrates, 4 grams of sugar, 1 gram fiber, and 1 gram protein.  That’s really good for a bread mix.  I am very impressed.

If you have access to Mina’s Purely Divine Gluten Free Bread Mix…and feel like taking on a challenge, go ahead…whip up your own homemade gluten-free bagels!!  You’ll be very impressed with the results.

Recipe: Gluten Free Everything Bagels

Gluten Free Everything Bagels made with Mina's Purely Divine Gluten Free Bread Mix
Gluten Free Everything Bagels made with Mina’s Purely Divine Gluten Free Bread Mix

Servings: 6-12 (I made 8 good-sized bagels!)
Time: Prep 1 hour; Bake 18-20 minutes

Ingredients:

  • 1 package, approx. 2⅔ cups Mina’s Purely Divine Gluten Free Bread Mix
  • 1 cup warm water
  • 2¼ tsp yeast (included)
  • 1 tsp + 1 Tbsp sugar, divided
  • 2 tsp vegetable oil
  • 2 Tbsp molasses
  • 3 quarts water
  • 1 egg white, whisked (optional)
  • sesame or poppy seeds for toppings (optional)

Directions:

Add to mixer bowl, 1 cup warm water, 1 tsp of sugar and the yeast. Whisk and let rest for 10 minutes.

Add to yeast mixture: 1 cup of bread mix, the rest of the sugar, the oil, the molasses, and mix well.

Add last 1-2/3 cups of bread mix. Mix on medium high for 5 minutes.

Scrape out on a lightly oiled surface. Form dough into a log. Cut into 6 large or 12 small pieces. (I went for the middle and did 8 perfect size pieces). Roll each piece with lightly oiled hands into a 6″ rope. Shape in a circle, crimping edges.

Arrange bagels on parchment paper. Cover with oiled plastic wrap. Let rise in warm draft free area for 30 minutes. Dough will be tender at this point after the initial rise.

Preheat oven to 450 degrees F.

Bring 3 quarts of water to a slow boil. Gently using oiled hands, or spatula, drop each bagel, one at a time, into the water. Boil in small batches, do not crowd. Simmer for 30 seconds on each side, flip over once. Drain on rack for 5 minutes.

Brush with whisked egg white (optional) and sprinkle the toppings on at this point, if using.

Bake on a lightly greased cookie sheet for 20 to 25 minutes for large bagels and 15 minutes for small bagels. (It took mine 18 minutes…so if you do 8…go with that!)

Cool on rack.

DEVOUR!

~*~*~

I was so impressed with the way Mina’s Purely Divine Gluten Free Bread Mix baked up perfect, delicious bagels. And with this being my first time ever attempting such a culinary feat…well…it just made me want to improve on it.

That being said…WOW!!  Total and complete WOW!!  Find Mina’s Purely Divine Gluten Free Bread Mix and, seriously, give this recipe a try.  I am dying to do it all over again!  Maybe even improve on it some.  We shall see!

Mina’s Purely Divine is purely amazing, purely awesome, and…yes…purely divine!  Just WOW!

Product Review: Pastabilities Gluten Free Tagliolini + Recipe Bonus

Pastabilities Gluten Free Tagliolini

Product: Pastabilities Gluten Free Tagliolini – $5.99

There are probably a few things that you know about me by now.  These may include the fact that Cuisine Cube has revolutionized my life in introducing me to products I never would have known about or thought to seek out.  Another fact may be that I am a pasta-holic.  Yep.  I love pasta.  I know…that whole athlete who loves pasta thing is pretty cliche (hey…my pre-race night of carb loading doesn’t include pasta…always gluten-free pizza!).  But, ever since I was a child and could eat my first plate of spaghetti…I was hooked.  I love any and all pasta and sauces.  And while my options for pasta and their sauces have narrowed after first becoming a vegetarian and then, a year later, being diagnosed with Celiac…well…I haven’t let it hinder me from devouring one of my favorite food groups in the world.  Yes…pasta is a food group.  It…it just is.

But, before I go into detail about this new-to-me brand of gluten-free pasta, let me share with you some information about the people who brought it into my life.  Cuisine Cube is run by a small group of foodies who have put together a completely gluten-free box of goodies and then sends them to your doorstep each month.  These boxes contain 5-6 full-size products from small, lesser-known artisan producers…mostly local…some not as local.  Some you may even have heard of before, but most will be new to you.  I signed up for Cuisine Cube back in May and have never looked back.  Subscriptions start as low as $29.99…which is a great price and great incentive to sign up for this subscription box service and try out some gluten-free products you have been too nervous about purchasing yourself or, perhaps, didn’t even know existed.

Pastabilities Gluten Free Tagliolini (cooked)

So…Pastabilities.  Yes…you had me at the name.  I love the play on words.  And I was beyond excited to pull a gluten-free pasta out of my March 2015 Cuisine Cube.  Pasta + me = LOVE.  Seriously, we are a match made in carb heaven.  We are BFFs for life.  And it will always be this way.  One of the first things I staked out when I had to go gluten-free was good gluten-free pasta.  While there are uncountable varieties out there on the market…the key word there was good and not all of them fall into that category.  I want a gluten-free pasta to be like real pasta.  I don’t want it to fall apart or turn to mush.  I want it to cook through and have that perfect al dente bite to it.  I want it to reheat well if I cook too much of it and need to eat some for lunch the next day.  I want it to pair well with a variety of sauces and I want it to stand out.

Pastabilities Gluten Free Tagliolini does exactly that.  Tagliolini is a long, flat ribbon-shaped pastsa that is similar to linguini or fettuccine, and is traditionally from the Northern regions of Italy.  This brand is crafted from high quality ingredients.  Even better, the actual pasta itself is manufactured in Italy using bronze dies that give the pasta a matte look and makes the surface rough…which is perfect for sauces.  We all want sauces to stick to our noodles, not fall away like water.  Pastabilities Gluten Free Tagliolini is also made in a dedicated gluten-free facility.

YAY!

Pastabilities Gluten Free Tagliolini is fantastic.  Seriously.  This pasta is made with a blend of 70% corn and 30% rice, which makes it cook up within 8-9 minutes to a perfect al dente texture.  And the taste…amazing.  It isn’t gummy and it isn’t mushy.  It has that “real” pasta feel.  Like it was just made fresh for you.  Completely gluten free to boot.  As a connoisseur of gluten-free pasta, this ranks right up there as one of the best.  It is fantastic.  These ribbons of pasta held their own with the arrabbiata sauce, which makes me one happy pasta lover.  Nothing worse than going to take a bite of pasta and having it fall apart and needing to chase it around on your plate.  Pastabilities is, honestly, gluten-free pasta done right.  And it really is amazing.

Let’s talk about ingredients.  Pastabilities Gluten Free Tagliolini is made from corn flour and rice flour.  That’s it.  Simple. Perfection.

As for nutrition, this is phenomenal for a gluten-free pasta.  A serving of the Pastabilities Gluten Free Tagliolini is 2 ounces.  In this serving, you will be consuming 200 calories and 1 gram of fat.  You will also be taking in 1 gram of sugar.  This pasta is cholesterol free and sugar free.  And, trust me…it will fill you up just like “real” pasta as it packs 45 grams of carbohydrates, 3 grams of fiber, and 4 grams of protein!

So, what do I do?  I go for a traditional approach to pasta in an nontraditional way.  I cooked up the pasta as I normally would…but served it in tacos instead of in a bowl.  Yes…spaghetti tacos.

You see, my roommate has apparently led a very sheltered life and had never indulged indulged in the Italian/Mexican infusion that is…Spaghetti Tacos.  It’s a traditional iCarly treat…one that my friends have raved about and that I have eaten myself.  And no one should ever miss out on spaghetti tacos.  So, below is the easy and delicious recipe for Spaghetti Tacos featuring…Pastabilities Gluten Free Tagliolini!

Recipe: Gluten Free Spaghetti Tacos

Spaghetti Tacos made with Pastabilities Gluten Free Tagliolini

Servings: 2
Time: Prep 5 minutes; Cook 10 minutes

Ingredients:

  • 4 Gluten-Free Hard Taco Shells (I used Trader Joe’s)
  • 4 ounces Gluten-Free Pasta (I used Pastabilities Gluten Free Tagliolini)
  • 1 cup Gluten Free Pasta Sauce (I used BonGiovi Arrabbiata Sauce)

Directions:

Cook gluten-free pasta according to directions on the package.  Don’t overcook it.  Get it to the perfect al dente texture.

While the pasta is boiling, start warming up the sauce.

Preheat the oven to 425°F and toast your crunchy taco shells for 2-3 minutes.  Remove from oven.

Drain the pasta and add it to the pan with the sauce.  Allow the noodles and sauce to cook together (this is for flavor).

Spoon the pasta and sauce into the taco shells.  Top with your favorite pasta toppings (cheese, red pepper flakes, etc).

Devour.

~*~*~

If you haven’t tried the wonder of Spaghetti Tacos…remedy that.  It has revolutionized my roommate’s world.  I mean, savory good pasta inside a crunch tortilla shell…yeah…that’s good eats right there.  And thanks to Pastabilities Gluten Free Tagliolini…I had the perfect pasta to introduce this meal to my friend with.  It doesn’t get any better or fun than this.

Don’t miss out on amazing products like this one.  Hop on over to Cuisine Cube and sign up today for a subscription.  You won’t regret it.  Trust me.

Product Review: Glutenfreeda Gluten Free Roasted Garlic Artisan Flatbread and Pizza Crust

Glutenfreeda Gluten Free Roasted Garlic Artisan Flatbread and Pizza Crust

Product: Glutenfreeda Gluten Free Roasted Garlic Artisan Flatbread and Pizza Crust – $6.99+

If nothing else, this blog post is to remind you about how much I love pizza.  Pizza is the ultimate food to me.  Seriously.  It satisfies every food craving I really have.  Except maybe chocolate.  But I’ve been cutting way back on that, except for an every-now-and-again 1 ounce dark chocolate treat.

But I digress.

Back to the pizza.  Anyway, I have a myriad of gluten free pizza crust mixes that have worked and not worked in the past.  I’ve tried just about every gluten-free pizza shell out there.  If gluten free pizza is on the menu at a restaurant…you better believe that’s what I’m ordering.  Pizza…is perfection to me.  Food perfection.

It’s my go-to pre-race (half marathon or over) meal, which somehow equals out to the perfect amount of fats, carbs, and protein for me to perform at the top of my game.  Trust me, I’ve tested this numerous, countless times.

So, imagine my glee when I was on a miniature shopping spree at The Raisin Rack in Columbus, Ohio, and came across the Glutenfreeda Gluten Free Artisan Flatbread and Pizza Crusts in their freezer section.  I was beyond elated.  Seriously.  They come in four flavors, so I knew I was going to take one home with me, it was a matter of narrowing it down to which one.  The Glutenfreeda Gluten Free Artisan Flatbread and Pizza Crusts come in Sun-Dried Tomato & Herbs, Roasted Garlic, Original, and Parmesan and Asiago.

I love garlic…so I went right for the Roasted Garlic flavor.

Now, I had no intention of letting these linger in my freezer for as long as they did.  I swear to you.  However, that being said, they did.  I just had fresh produce and other, older products to work through first.  That being said, yesterday was a good day.  I guess the Gluten Free Pizza Bites I ate after the soccer match on Saturday got my tastebuds craving more, because both my roommate and I were really wanting pizza.

But I can’t just make any pizza, you know.  I had some fresh produce that needed to be used, so I thought…Brussels sprouts on a pizza.  That could rule.  But what to pair it with?  Vegan and gluten-free bacon.  Perfect.  What else?  Bar-b-que sauce, of course!  Add a bit of sauteed onion and it would definitely be a nice change of pace for a pizza.  After all, who does Brussels sprouts on a pizza?

I DO!

Glutenfreeda Gluten Free Roasted Garlic Artisan Flatbread and Pizza Crust

And thanks to having the Glutenfreeda Gluten Free Roasted Garlic Artisan Flatbread and Pizza Crust in my freezer…I could indulge in my pizza craving without hassle or going to my grocer’s freezer section for a pre-made one.  This one…this one would be all mine.

Super easy.  I preheated the oven with the pizza stone and took the frozen flatbread out of the freezer, defrosting it a little in the microwave.  Once the oven and stone were heated, I placed two flatbreads onto the stone and then topped it with some local barbeque sauce, some sauteed onions and Brussels sprouts, the vegan and gluten-free bacon, and then a bit of vegan cheese.  Into the oven it went for about 10-12 minutes, to allow the cheese to melt and the flatbread/pizza crust to get that perfect crispness on it (I hoped).

Well…it worked.  This was, perhaps, the most durable pizza crust that I can buy in a freezer section at the grocery store that I have ever had.  Most gluten-free pizzas are thin and fall apart if loaded up with toppings.  But because this is also a flatbread, Glutenfreeda has given it some more heft than most gluten-free crusts out on the market.  And, even though it was flavored, it didn’t overpower any of the toppings that went on it.  The crust toasted up beautifully and sliced into perfect triangles.  If using it as a sandwich bread…I’ve heard it can be a little thick for that, but it was perfect for the pizza.  And I’m totally looking forward to baking up another round of these tomorrow for dinner.  I have more Brussels sprouts, after all.  Glutenfreeda really impressed me with their Gluten Free Roasted Garlic Artisan Flatbread and Pizza Crust.

Let’s talk ingredients.  The Glutenfreeda Gluten Free Roasted Garlic Artisan Flatbread and Pizza Crust is made from water, brown rice flour, tapioca starch, potato starch, expeller pressed canola oil (non-GMO), psyllium powder, egg whites, evaporated cane sugar, yeast, teff flour, seasoning (natural roasted garlic flavor, dehydrated garlic, hydrolyzed soy protein, spices, and salt) flax seed, salt, cultured dextrose, xanthan gum, and citric acid.  It is wheat-free, cholesterol free, non-GMO, dairy-free, gluten-free, and contains no trans fats.

As for nutrition…a serving size is 1/2 of the flat bread.  I was using this as my meal, so I ate the entire flatbread.  As did my roomie.  However, if you stick to the serving size, you will be consuming 110 calories and 3 grams of fat.  You will be taking in 380 mg sodium and 0 grams of sugar.  Yes…no sugar.  LOVE.  In addition, you will be consuming 18 grams of carbohydrates, 3 grams of fiber, and 4 grams of protein.  This does make for a filling meal…but one that won’t break the calorie bank either as long as you are smart with your toppings.

I think, when I can’t pick up a pizza crust from my local gluten-free bakery, I need to find a local store that carries these.  Because I was beyond impressed with how it cooked, held up, and tasted.  Forget everything you think you know about frozen gluten-free pizza crusts.  Pick up a package (there are 4 flatbreads per package) of Glutenfreeda Gluten Free Artisan Flatbread and Pizza Crust (in any flavor…but Roasted Garlic is YUMMY!) and see for yourself.  It is amazing.  You’ll see!

Gluten-Free Brussels Sprout and (Vegan) Bacon Pizza on Glutenfreeda Gluten Free Roasted Garlic Artisan Flatbread and Pizza Crust

Product Review: Trader Joe’s Gluten Free Pumpkin Pancake Mix

Trader Joe's Gluten Free Pumpkin Pancake Mix
Trader Joe’s Gluten Free Pumpkin Pancake Mix

Product: Trader Joe’s Gluten Free Pumpkin Pancake Mix – $4.49+

It was October 2014 and I was entering the great land of Trader Joe’s in Louisville, Kentucky.  I had just passed the big center display of bananas when my gaze fell upon an end cap that was holding a bunch of pumpkin goodness.  I love anything pumpkin.  This is no secret.  And a Trader Joe’s mix with pumpkin pancake-y goodness?  HELLO!  Sign me up.

I snagged a box of it and gave the sad Celiac eyes to my roommate.  And…yes…we fit them into the budget.  Sad Celiac eyes work wonders!!  So, checkout was complete.  And fall turned into winter.  And then spring came around.  And while I had been making things for breakfast…pancakes even…I had other mixes and flour blends that had to be used first.  But, as the great kitchen pantry purge continues…Trader Joe’s Gluten Free Pumpkin Pancake Mix was up to bat today!

So, this morning, I decided to haul out the Mickey (Mouse) waffle maker and make some pancake waffles.  Why?  Because waffles are delicious and fun…and these are shaped like Mickey.  They win.  Always.  I mean, pancakes probably would have been less labor intensive but…I was craving waffles for awhile.  In fact, I sort of promised my roommate I’d make waffles after we went to our gluten free bakery Saturday morning for breakfast and she lamented that she wished they still offered their gluten free waffles (and pancakes).  So, a promise is a promise.

Mixing up the Trader Joe’s Gluten Free Pancake Mix is super easy.  Simply get out a bowl and crack an egg inside.  Then, add 2 tablespoons of melted butter (or oil).  I melted down 2 tablespoons of Earth Balance.  Then, whisk them together.  Add in 2/3-cup of water plus 2 additional tablespoons and whisk that up as well.  Then, scoop out a cup of the Trader Joe’s Gluten Free Pumpkin Pancake Mix and add it to the wet ingredients.  Mix until just combined.  It’s okay if it’s a little lumpy.

So easy.  I had all that done by the time my roommate hauled herself out of her room.  Perfect timing.  I ladled the mix into the waffle maker and closed the lid, allowing it to cook to that perfect crusty outside, soft inside consistency.  It usually takes about five minutes to get there.  And while that was working, I warmed up some pure maple syrup to pour over it.  YUMMY!  I lifted the lid of the waffle maker when the steam subsided and lo and behold…the perfect pumpkin-y gluten-free waffle shaped like Mickey Mouse.  YES!  I was already feeling good about this mix.  I slathered it up with some Earth Balance spread and then dowsed it in some maple syrup.  I then got my own waffle working and prepared to do the same thing.  Once again, the perfect waffle emerged, with this golden crust on the outside.  I was elated.  As the third (and final) waffle (now in the freezer) was working, I settled in to enjoy my breakfast.

So…it was awesome.  Let me just say that.  Some flour mixes and pancake mixes don’t get that golden crust on the outside, but Trader Joe’s managed it to perfection with this mix.  It had the perfect amount of pumpkin spice flavor.  Not too much.  And not too little (although my roomie says that she didn’t get much pumpkin).  I disagree with the roomie and think that the amount of pumpkin flavor was spot on.  As I am the pumpkin freak…I know best.  The crust on the outside was crisp and crunchy and the inside of the waffle was light and soft and just…so amazing.  I was in love with each bite.  I may have hoovered it, using the last bite to mop up any extra syrup lingering on the plate.  Really, very impressed.

The Trader Joe’s Gluten Free Pumpkin Pancake Mix was a new product that was introduced last October due to numerous requests from their fans of the original Trader Joe’s Pumpkin Pancake Mix, who had found themselves now eating a gluten-free diet.  The Trader Joe’s peeps went to work for months to get the right texture (no soggy, heavy pancakes allowed) and finally it it spot on, even getting the seasoning right to bring that warm fall-ish feeling to the finished product.  The recipe for the pumpkin pancakes (the one I listed above) was on the side of the box to make sure you succeeded on your pumpkin pancake quest.  They did well.  They did very well.

The Trader Joe’s Gluten Free Pumpkin Pancake Mix is made from white rice flour, potato starch, cane sugar, dehydrated pumpkin flakes, buttermilk powder, tapioca flour, molasses powder, baking powder, sea salt, organic vanilla flavor, expeller pressed canola oil, ground cinnamon, ground allspice, ground ginger, xanthan gum, annatto for color, and ground nutmeg.  This mix is gluten-free and cholesterol free.

A serving of Trader Joe’s Gluten Free Pumpkin Pancake Mix is 1/3 cup dry mix or 2 pancakes prepared.  A serving of the mix will provide 130 calories and 0.5 grams of fat.  It contains 250 mg sodium and 7 grams of sugar.  The dry mix will also give you 29 carbohydrates, 1 gram of fiber, and 2 grams of protein.  When it is prepared as per the instructions on the side of the box, you will be taking in 210 calories and 8 grams of fat.  You will be taking in 70 mg cholesterol, 270 mg sodium, and 7 sugars.  Prepared, you will have29 grams of carbohydrates, 1 gram of fiber and 4 grams of protein.

Honestly, it is one of the better gluten-free pancakes mixes out there.  I was above and beyond happy with the way my Mickey waffles came out.  Not only were these full of perfect pumpkin flavor, they were crispy and soft and the texture was right where it needed to be.  Trader Joe’s definitely nailed the gluten-free pumpkin goodness in these.  I hope this mix is back on the shelves this upcoming fall.  Total yum!

Gluten Free Pumpkin Mickey Waffles made with Trader Joe's Gluten Free Pumpkin Pancake Mix
Gluten Free Pumpkin Mickey Waffles made with Trader Joe’s Gluten Free Pumpkin Pancake Mix

Product Review: Russo’s Gluten Free Gourmet Pizza Bites

Russo's Gluten Free Gourmet Pizza Bites
Russo’s Gluten Free Gourmet Pizza Bites

Product: Russo’s Gluten Free Gourmet Pizza Bites – $6.99+

They had me with the product name – Pizza Bites.  PIZZA. BITES.  PIZZA-FREAKIN’-BITES!  As in…pizza rolls?  Maybe? Possibly?  Could I be that fortunate to stumble across (finally) one of the products that I no longer ate, not because it was made of crap (and they are), but because they were my favorite go-to snack when I needed something to eat while very, very busy?

Well…kinda.

In fact, these were more like breaded cheese ravioli, rather than pizza bites, but we’ll go with it. Let’s just run with it.  Pizza Bites! WOOO!

So, I found these at my local natural food store, Rainbow Blossom, and had a freakin’ dance of joy in the freezer section.  Honestly.  I mean, I’ve been to parties where pizza rolls are laid out and everyone is just enjoying a few here and there.  I get to stare at them.  Dammit.

No longer.

Thanks to Russo’s Gluten Free Gourmet…Pizza Bites (rolls…ravioli?) are back on my every-now-and-again want list.  And now…I know where to get them.  After purchasing these, I had to go through more fresh produce before allowing myself an indulgence from the freezer or fridge…but after a full day of professional soccer and time with friends…I needed to have something quick for dinner.  I was going to do up some green beans with almonds, but my roommate was craving pizza.  So…these made their debut in our kitchen.

Russo’s Gluten Free Gourmet came about from Neil Russo, a professional chef who was hard at work on gluten-free recipes, which he was striving to perfect after hearing about the many people connected to himself that were having a hard time finding food while on a gluten-free diet due to intolerance or Celiac disease.  After experimenting on his Italian bread loaves and Tiramisu, Russo was ready to give his food to the world.  He first introduced the gluten free food in his restaurant, where he got high praise.  Soon, he opened up Russo’s Gluten Free Gourmet.  And from there…the frozen versions of some of the classic Italian foods he perfected in gluten-free form.  So good, that people even would ask if he was certain it was gluten free.  All of Russo’s products are prepared in a strictly gluten-free facility.

So, two hungry soccer fans (my roommate and I) were ready to give these a try.  I was surprised, when I opened up the bag to find large ravioli like bites inside.  I was definitely expecting more of the pizza roll just from the name.  They were frozen, lightly breaded stuffed pasta.  But…I was hungry.  Cathy was hungry.  Pizza.  Bites.  Rolls.  Whatever.  Give us something delicious in some sort of pizza form.

Cooking the Russo’s Gluten Free Gourmet Pizza Bites is super easy.  Simply preheat the oven to 350°F and place the frozen bites on a cookie sheet.  Bake for 5 minutes, then flip them and bake for another 5 minutes.  Take out when or if the cheese starts to show.  Mine cooked in 10 minutes without the cheese leaking out or anything.  Bonus.

So, it was chow time.  I dished up half the bag for my roommate and half for me.  That was about 6 of the Russo’s Gluten Free Gourmet Pizza Bites each.  We settled in with an episode of Star Trek: The Original Series and dug in.  One bite…and I couldn’t argue…they were delicious.  I was a bit thrown by the ratio of dough to filling…but that is a small, slight complaint.  I thought there was too much dough encasing a cheese filling…that was a little scant.  The pocket had more air than filling, but it was still crispy on the outside with a melty, molten center, regardless.  And yes…they were really, really great.  Delicious.  Amazing.

Yeah…I’d buy these again.

Let’s talk about the ingredients that are in Russo’s Gluten Free Gourmet Pizza Bites.  These pasta pockets of pizza goodness are made from gluten free flour (rice flour, corn starch, tapioca dextrin, xanthan gum, rice extract) tomatoes, part skim mozzarella, vegetable oil, soybean oil, soybean lecithin, water, whole eggs, yellow corn flour, ricotta, onions, sugar, salt, granulated garlic, onion powder, parsley, basil, and black pepper.

As for nutrition, this isn’t bad for pizza bites.  There are three servings in a bag of the Russo’s Gluten Free Gourmet Pizza Bites.  One serving is 4 pieces.  These 4 pieces will provide you with 260 calories and 15 grams of fat.  You will be taking in 40 mg cholesterol, 430 mg sodium, and 2 grams of sugar.  In addition, a serving dishes up 27 grams of carbohydrates, 1 gram of fiber, and 6 grams of protein.

I was actually impressed by Russo’s Gluten Free Gourmet Pizza Bites.  But, what’s not to love about a company that does 100% gluten free products right, that is family owned and operated, and has exceptional quality.  And…they are doing products no one else has managed to put out there.  And they are doing them well.

If you can find Russo’s Gluten Free Gourmet Pizza Bites in your grocery store or natural food store freezer…buy them and try them.  You’ll love them.  And…pizza rolls are, kinda, back in your life.  And that…is amazing in and of itself.  For real!

Russo's Gluten Free Gourmet Pizza Bites
Russo’s Gluten Free Gourmet Pizza Bites


Product Review: Sophie’s Kitchen Breaded Vegan Coconut Shrimp

Sophie's Kitchen Breaded Vegan Coconut Shrimp
Sophie’s Kitchen Breaded Vegan Coconut Shrimp

Product: Sophie’s Kitchen Breaded Vegan Coconut Shrimp – $5.99+

Dear Sophie’s Kitchen:

I love you.  I love everything about you.  I love everything you develop and offer to the vegan and gluten free community.  Your products have gone from wowing me to astounding me.  Sometimes I go into something thinking that it will end up horribly wrong, but then…everything about it just seems right.

That was how I felt about the Sophie’s Kitchen Breaded Vegan Coconut Shrimp.

For the record, back when I used to eat seafood (and other meats)…shrimp was my favorite thing in life.  However, that being said, I never developed a taste for coconut shrimp.  I don’t know why…but that was the case.  It disgusted me.  So, why, then, was I ever tempted to even purchase a vegan version of a seafood I didn’t like?  I have no clue.  No answer.  Nothing except that I get really excited when I see new products from a beloved and trusted company, and that is the case with Sophie’s Kitchen.  I have loved everything from the Fish Filets to the Crab Cakes to the Calamari to the Shrimp and Prawns.  Love.  Just lots of vegan seafood love.  I went into it nervous and a little bit concerned and found out that sometimes, the vegan version from Sophie’s Kitchen is even better than I remember the original and actual seafood version being.

Talk about amazing, right?

So that…my dearest readers…has to be why I picked up a box of the Sophie’s Kitchen Breaded Vegan Coconut Shrimp.  I got new product happy.  I couldn’t help it.  It was in my freezer for awhile…just begging to be made.  And with a little determination to clear out items that I’ve been hoarding in my freezer/pantry/fridge…I made sure that this box of vegan seafood got used this weekend.  Enter…Sunday night.

My roommate was craving shrimp po’boys.  She told me so.  And she reminded me of the box of vegan coconut shrimp in the freezer.  I told her that I was a little bit nervous about those as I never liked coconut shrimp to begin with…but she insisted.  Po’boys.  Besides…one more item out of the freezer.  So, Saturday night, I pulled the shrimp out of the freezer and placed it in the fridge to thaw.  I finished up grocery shopping (and discovered my local store stopped carrying the gluten-free sandwich rolls…so I had to purchase gluten-free hotdog buns…which are SO not the same!) and came home to a fun afternoon of hanging out with my downstairs neighbors, eating gluten-free lemon chiffon birthday cake (I made it…as my roomie requested it for her birthday and that happened while we were in New York City), cleaning up the apartment, getting laundry done, and taking a nice walk in the beautiful weather.  We were both ready for dinner soon after 5 p.m.  And Sophie’s Kitchen makes it a breeze.

While my makeshift sandwich rolls (aka: hotdog buns) toasted in the oven, I prepared a sweet chili aoili to put on top of the sandwich itself.  I sliced up some grape tomatoes and washed a mixture of various super greens (kale, spinach, arugula).  Then, as the hotdog buns were finishing up in the oven, I put a spoonful of coconut oil into a hot pan and gave a quick pan fry to 12 of the Sophie’s Kitchen Breaded Vegan Coconut Shrimp.  I mean, coconut oil just seemed logical to me.  I allowed them to cook on one side for about 3 minutes, then flipped them over to find them a perfect golden brown on the side that had cooked through.  So, I did the same on that side, then removed them to a paper towel and began to assemble the po’boys.  A little Veganaise…the greens, the tomatoes, the vegan shrimp, then the aoili to top it all off.  It all came together so well…even if the bread was a bit of a challenge.

Okay…so I ate a bit of the shrimp on its own first.  Why?  Because I needed to taste it without my drizzle of aoili on it.  Guess what?  My tastebuds lit up.  And I was amazed with how much I loved this flavor.  Honestly…the texture was meaty and perfect…with the crispiness of the breading on the outside and the soft vegan shrimp on the inside.  There was this nice sweet kick in the breading that I absolutely adored.  And sort of wished I was eating these outside of the actual sandwich itself.  Both my roommate and I saved a shrimp to eat alone.  Sophie’s Kitchen definitely did it once more and let me know that I can, in fact, love coconut shrimp.  Either tastes change or, more likely, they just do it better than the real thing.  But, I devoured this faster than any other product I’ve tried from Sophie’s Kitchen.  Big, big love!!

So…what exactly is vegan seafood made from?  Well, the Sophie’s Kitchen Breaded Vegan Coconut Shrimp is made from water, konjac powder, pea protein, potato starch, coconut powder, rice flakes (from brown rice), canola oil, paprikia, fenugreek, organic agave nectar, sea salt, turmeric, white pepper, alginate (from seaweed), and calcium hydroxide.  Is it clean eating…nope.  Not even close.  But…it’s not too bad as processed, frozen products go.  Not at all.  These are soy-free, vegan (100% plant based), non-GMO, gluten-free, contain no artificial preservatives, no artificial colors, no MSG, they are free of trans fats, and they are cholesterol free.  These also contain no added sugar.  Nothing about them is artificial.  Nothing.

So, let’s talk nutrition.  A serving of Sophie’s Kitchen Breaded Vegan Coconut Shrimp is 4 pieces of shrimp.  This serving will provide you with 130 calories and 10 grams of fat.  This serving also gives you 150 mg sodium and 1 gram of sugar.  A serving will give you 12 grams of carbohydrates, 3 grams of fiber, and less than one gram of protein.  You’ll feel full, but mostly due to what you pair it with.  In this case…I made it into a sandwich…and that definitely gives it a dinner heft that kept me full until the next morning.

Once again, blown away by how much I am loving the products that come from Sophie’s Kitchen.  Seriously, if you turned vegan, vegetarian, or are gluten-free and want some breaded “seafood”…I encourage you to seek out Sophie’s Kitchen and try it.  Take it from me…you’ll fall in love with the products.  If Sophie’s Kitchen can make me fall in love with coconut shrimp…imagine what it can do for you.

I’m so glad to be dining on this once more tonight.  Beyond YUM!

Sophie's Kitchen Gluten Free Coconut Shrimp in a Gluten Free Vegan Coconut Shrimp Po'Boy
Sophie’s Kitchen Gluten Free Coconut Shrimp in a Gluten Free Vegan Coconut Shrimp Po’Boy

Product Review: Van’s Gluten Free Ultimate Cheddar Penne

Van's Gluten Free Ultimate Cheddar Penne
Van’s Gluten Free Ultimate Cheddar Penne

Product: Van’s Gluten Free Ultimate Cheddar Penne – $3.99+

I am a do-it-yourself kind of girl these days when it comes to pastas.  Not so much making my own gluten-free pasta noodles (I haven’t gotten to that level yet), but I prefer to make my own pasta meals instead of buying the boxed stuff…just because I get some say into what goes into my meal.  That being said, sometimes…I make exceptions to this rule.

Such an exception came to pass awhile back, when on a rare trip to Walmart, I discovered that Van’s had come out with a small line of gluten free pasta sides (or meals in my case).  Seriously!  I think I knew that the gluten-free pastas were around, I had just never seen them in my area out in the wild.  Apparently, braving Walmart does have it’s advantages.  I won’t lie…my Walmart has a rather extensive and impressive gluten-free section.  So it was really no wonder I found these there.  I just never go to Walmart…so it was a nice coincidence in the end.

Prior to this one, I reviewed the Van’s Gluten Free Creamy Herb and Garlic Pasta, which I dished up to not just  my roommate, but my good friend and roomie’s sister – Amanda.  Now, Amanda doesn’t get exposed much to gluten-free foods…unless I subject her to them.  And she loved the Creamy Herb & Garlic Pasta when we enjoyed it for dinner one night.  That left two other gluten-free pasta dishes in my pantry from Van’s.  And last night, after a long week, I just wanted a brainless meal to prepare and enjoy.  Something warm and comforting, as it was a rainy night to boot.  I went to the pantry and spotted the remaining two boxes of Van’s Gluten Free Pastas: Ultimate Cheddar Penne and Rotini and Red Sauce.  I had my roommate make the final decision…and knew before I even asked that she would go cheese.  When I ask her anything and one items involves cheese…that is the one that will be selected.  No problem though.  Totally game.

Van’s Gluten Free choices have never disappointed me.  Never.  Never ever.  That’s a lot to live up to, mind you.  But Van’s puts a lot of love and care into their packaged foods.  And Van’s does believe that nutritious is delicious and that’s why they make their gluten-free pastas with whole grain brown rice, delivering more than a full serving of nutrient dense whole grains.  The cheese sauce over a perfectly cooked pasta…that’s love to me.  Seriously.  And, you can always add in some vegetables or chicken (if you eat meat…which I don’t…) in order to bulk it up.  But as my roommate and I take something that serves three and split it between the two of us…it’s the perfect amount in the end.

Van’s Gluten Free Ultimate Cheddar Penne is a breeze to prepare.  Seriously.  Simply boil 6 cups of water in a medium saucepan.  Add the pasta and allow it to return to a medium boil for about 8-9 minutes, until it is al dente.  Stir occasionally though, so that it doesn’t stick to the pan.  Very important.  Oh…and DO NOT overcook the pasta.  Rice pasta can go from perfect to mush in a moment.  So keep an eye on it.  Drain the pasta and give it a rinse.  In the pan you cooked the pasta in, add 3 tablespoons of fat free milk (I used unsweetened almond milk) and 2 tablespoons of unsalted butter (I used Earth Balance), and allow it to melt together over a low heat.  Then whisk in the cheddar powder until it is smooth.  Then, add the pasta back into the pan and stir them together.  Serve.

Oh…this was good.  Think Kraft Mac & Cheese…but better.  WAY better.  The pasta cooked up perfectly.  It didn’t take too long, but it had that right bit of al dente-ness to it.  I think I just made up a word there…but go with it.  The sauce though…that’s where the magic happens.  No…this sauce is not vegan.  Yes…it has milk in it…but by using the dairy alternatives for the butter and milk, I cut back on the dairy I was consuming. It worked.  The lactose intolerance was there, but it was mild because there isn’t a lot of dairy in this little box of cheesy pasta goodness.  I know, my homemade gluten-free (and dairy free) mac and cheese rocks, but when I don’t have time to do all the prep work and baking that goes into it…this is a definite contender to have on hand in my kitchen for nights where I want a big bowl of comfort food in a snap.  Deliciously creamy, cheesy noodle-y goodness.

One thing that Van’s proudly states is that they use only ingredients that they are proud of.  And that is definitely evident when I read over the list of ingredients they use for the Gluten Free Ultimate Cheddar Penne.  These ingredients are gluten-free penne pasta (brown rice flour, white rice flour), aged cheddar cheese seasoning (cheddar cheese nonfat milk, salt, shey, sugar, buttermilk, rice flour, natural flavors, annatto extract (for color).  Nothing too spooky or weird there, right?  That’s right.  Van’s Gluten Free Ultimate Cheddar Penne is gluten-free, kosher, egg free, contains no trans fats, and has no artificial flavors.

So, how about the nutritional value of a big bowl of gluten-free cheesy pasta noodles?  Actually…not too bad.  Not at all.  Before it’s prepared, the with butter and milk (of your choice), a serving (with 3 per box) contains 210 calories and 2.5 grams of fat.  A serving also has 5 mg cholesterol, 520 mg sodium, and 3 grams of sugar.  One serving will also give you 48 grams of carbohydrates, 2 grams of fiber, and 6 grams of protein.  It will be filling, even as a side.

Once again, Vans Gluten Free has lived up to its standards and name.  These little boxes of pasta are not only convenient, but easy to make and delicious too.  No one would guess they were gluten free if you didn’t tell them.  Yep…when I am in a pinch, these might be my go-to meals.  Super impressed once again!

Product Review: Sol Cuisine Smoky Chipotle Tinga Meatless Chicken

Sol Cuisine Smoky Chipotle Tinga Meatless Chicken

Product: Sol Cuisine Smoky Chipotle Tinga Meatless Chicken – $6.49+

Ever since I discovered Sol Cuisine vegetarian and vegan protein products, I have been hooked.  Seriously.  I’ve tried falafal, burgers, and sausage from this fantastic company.  One thing that really caught my attention was how Sol Cuisine focuses on organic, non-GMO Kosher, halal, wheat-free, gluten-free, nutritious and delicious ingredients that aren’t loaded with fillers and chemicals.  Yes…they are actually healthy and good for you!

Now, I used to do these “faux-meat” replacements all the time when I first went vegetarian.  This came to an abrupt end (for the most part) when I was diagnosed as a Celiac.  Most meat-replacement products out on the market contain vital wheat gluten or wheat protein to “give it better texture” and other such excuses.  Very few companies have made the leap to both vegan/vegetarian and gluten-free for their protein products.

Some have and have failed.  Some have and been successful.

Sol Cuisine…has definitely been successful.  This was not the first product I have tried from Sol Cuisine, and it certainly won’t be the last.  That being said, this was the first of the frozen meatless chicken meals that they put out last year.  I have had this in my freezer for a long while, just begging to be used.  I have gone to focusing on more natural and fresh ingredients, especially since I get a CSA bin delivered to my door each week.  When I leave town though…my bin gets canceled and when I return, I usually try to make the most out of what I have in my freezer, fridge, and pantry.

I returned from New York City this past Monday with very little in my fridge.  I wanted to still keep it nutritious and healthy, but really was on a tight budget after the trip.  So, I managed to get enough to pick up a few necessities (kale, tomatoes, and some other necessities)…and said the rest could be done through pantry/freezer picking.  And that’s when I discovered (all the way in the back) the packet of Sol Cuisine Smoky Chipotle Tinga Meatless Chicken that I picked up at my local Whole Foods…a bit ago.  I kept saying I was going to make it…then never did.  No excuses this time.  Tuesday after work…this is what came out of my freezer.

Sol Cuisine’s Smoky Chipotle Tinga Meatless Chicken incorporates an authentic recipe from Cuernavaca Mexico and brings it to your home – vegan style.  I was hoping for something rich and spicy and saucy and yummy.  I even served it up as it suggested on the package, but taking my gluten-free corn tortillas and rubbing them down with some oil and toasting them in the oven for some homemade tostadas.  Seriously.  So easy and can be done while the meal is cooking.  You can get tostadas already made, but why?  They don’t take much time to make…just a warm oven and a timer so you don’t burn them and remember to flip them.  HA!

As I was having a busy week, trying to make up the entire day I missed with delayed flights out of NYC, I needed easy, but healthy dinners this week.  And the Sol Cuisine Smoky Chipotle Tinga Meatless Chicken definitely fit the bill.  It is so easy to prepare.  Simply open the package and remove the sauce packets.  Place into a bowl of hot water for about 4 minutes to thaw out.

Then, you can either cook the meatless chicken on the stovetop or in the microwave.  I find these things work best on the stovetop…so that was the method I used.  To cook on the stovetop, simply place the frozen strips into a lightly oiled skillet and sauté over medium heat for about 3-6 minutes.  Then add the sauce and stir until heated through.  SO EASY!  The microwave technique is super-easy as well and just involves pouring the sauce over the strips in the bag it came in and microwaving the open bag for about 3 minutes on medium…allowing it to rest for 1 minute before serving.  Stovetop worked for me and it yielded an amazing end product too.  The sauced and cooked chicken was placed on my homemade tostadas over some kale and spinach and arugula.  And…dinner…was served.

Now, I’ve had plenty of meat replacements since becoming a vegetarian.  Since then, I’ve found a few meatless chicken products that are also gluten-free.  This is one of the first times that I haven’t gotten that fake soy/tofu/weirdness that I often do with such products.  Not one bit.  It tasted amazing.  The strips of meatless chicken had a great texture too, chewy without being too chewy or rough.  It was amazing.  The sauce was spicy with just enough heat that I knew my roommate could tolerate it.  I was right…she said it was the perfect level of heat.  Meaning…there wasn’t too much of a kick.  Not, at least, to the level I like it…but it was really good.  And the sauce coated the chickenless strips perfectly, without watering down everything.  It was thick and rich and perfect.  Pairing it with the greens and the tostada brought nutrients and a great bit of texture and crunch to the dish.  I loved it!  Every bite of it.

Let’s look at ingredients, shall we?  The Sol Cuisine Smoky Chipotle Tinga Meatless Chicken Strips are made from filtered water, soy protein isolate and concentrate, okara, a vitamin and mineral blend (potassium, magnesium, rice flower, iron, B3, zinc, B12, folic acid, Copper, B1, B6, and B2), expeller pressed sunflower roil, yeast extract, tapioca starch, sea salt, and spices.  The sauce is made from filtered water, tomato paste, onion, cane syrup, sunflower oil, garlic, lemon juice concentrate, sea salt, chipotle pepper, turmeric, natural flavor and spices.

As for nutrition, I loved what this offered per serving.  A serving size is 1/4 of the package.  One serving of strips dishes up 60 calories, 2 grams of fat, 110 mg sodium, 190 mg potassium, 2 grams of carbohydtrates, 2 grams of fiber, no sugar, and 10 grams of filling protein.  The sauce dishes up 30 calories, 1.5 grams of fat, 120 mg sodium, 4 grams of carbohydrates, no fiber, 3 grams of sugar, and 1 gram of protein.  So, all-in-all…AMAZING!!  And it tastes amazing too!!

My roommate and I actually split the entire package between the two of us…and it was so amazing and guilt-free!!

Once again, Sol Cuisine has astounded me with its flavorful and delicious (and healthy) options for a gluten-free vegetarian.  I am in love with this meal.  And now I want to try the other varieties in my Whole Foods freezer…which are Ginger Lime Teriyaki Meatless Chicken and Tangy Korean BBQ Meatless Chicken.  Both sound intriguing and amazing.  And I’ll definitely pick up the Smoky Chipotle Tinga Meatless Chicken again too!  SO DELICIOUS!

Sol Cuisine Smoky Chipotle Tinga Meatless Chicken (prepared), served over fresh greens and an oven-baked tostada

Product Review: Dr. Praeger’s Sensible Foods Gluten Free Sweet Potato Pancakes

Dr. Praeger's Gluten Free Sweet Potato Pancakes
Dr. Praeger’s Sensible Foods Gluten Free Sweet Potato Pancakes

Product: Dr. Praeger’s Sensible Foods Gluten Free Sweet Potato Pancakes – $4.99+

You might be able to tell that I’m on a bit of a sweet potato kick.  And who can blame me?  Sweet potatoes are nutritional powerhouses.  I mean, this one food is an excellent source of B6 vitamins and potassium, but in addition to that, you will be provided with over 400% of your daily needs for Vitamin A and 37% Vitamin C.  Sweet potatoes are a great source of beta-carotene, which has been shown to reduce risk of developing certain types of cancer, offers protection against asthma and heart disease as well.  Sweet potatoes are one of my favorite plant powerhouses when it comes to foods I consume often.

While I love to incorporate baked sweet potatoes into recipes or stuff them with healthy avocado and some onion and eat them fresh out of the oven…I recently found my stash of frozen sweet potato pancakes in my freezer.  I knew they were there, I just made no effort to actually pull them out to eat.  Go figure.  But with a lack of fresh produce coming in from my bin these last couple of weeks, I have been doing some slimming down on what I have in my pantry and my fridge and freezer.  Last week, I ate a different variety of sweet potato pancakes, more like the familiar pancakes I would settle in to at breakfast.

And that’s one of the first things I noticed about the Gluten Free Sweet Potato Pancakes from Dr. Praeger’s Sensible Foods.  They look more like hash browns than your breakfast pancakes.  Which, is fine by me, for sure.  While I liked the Julian’s Recipe version, I found that they tasted a bit…odd.  But that wasn’t the case with the ones from Dr. Praeger’s.

Dr. Praeger’s Sensible Foods began in 1994, when a New Jersey cardiothoracic surgeon, Dr. Peter Praeger, and his medical partner, Dr. Eric Somberg, helped keep a family business alive by purchasing Ungar’s Gefilte Fish, a popular kosher food company within the Jewish community.  The two doctors set out on a mission – to introduce people to nutritious food that actually tasted great.  They opted to keep the Ungar’s brand, but also developed Dr. Praeger’s Sensible Foods to include all natural and convenient (and wow…they are convenient!) frozen products that could appeal and draw in a wider consumer based.  This family owned and operated company has grown into a leader in the all-natural, vegetarian, gluten-free, vegan, and kosher frozen food categories, with products ranging from veggie burgers to home-style veggie cakes, to breaded fish items, and veggie-packed goodies for children too in their “Kid’s Littles” line, and many more options.  The Dr. Praeger’s items are found in the frozen or ethnic foods section of most retailers, but certainly in most natural food stores.

I’m quite familiar with the Dr. Praeger’s brand.  In fact, I have enjoyed some of the Kid’s Littles (hey…I’m a kid at heart!) and have tried the veggie burgers as well…and have loved everything I have tried.  But, I won’t lie…I was beyond intrigued by the Gluten Free Sweet Potato Pancakes when I spotted them at Whole Foods awhile back.  This morning, as I was packing like a wild woman to head out to New York City for some birthday shenanigans with my roommate (her birthday is tomorrow), as well as a possible race (depending on my hip), I needed something that would be filling, yet easy to prepare.  I hit up my pantry, but all the mixes just seemed time consuming.  My freezer was next, and the final bit of breakfast-like food (hey…pancakes are pancakes…even if they are savory!) caught my attention when I spotted the white box for Dr. Praeger’s Sensible Foods Gluten Free Sweet Potato Pancakes.  SCORE!

I pulled out four of the individually wrapped pancakes (think of a large hash brown, and you get the basic size and thickness of these pancakes) and placed them on a baking sheet.  I put them into an oven set at 450°F and baked them for about 5 minutes before turning them over and baking them for another 4 minutes, or until they began to brown.  Simple and something that I honestly didn’t need to babysit.  I just had to check in every few minutes to make sure I wasn’t burning them.  That gave me some time to throw things into a suitcase…HA.  Granted, I should have done that the night before…but I was busy watching Star Trek – The Original Series.  Priorities.

So…first of all…these aren’t your typical pancakes that you might imagine drowning in maple syrup and devouring for breakfast.  Nope.  They aren’t thin and light and look like something you cooked up in a skillet that morning.  Like I said…these will remind you of a hash brown.  And they are hearty and thick just like hash browns too.  Seriously.  These are amazing.  I loved these more than the previous round of sweet potato pancakes (savory and more of the breakfast pancake type) that I had last week.  These are actually perfect for a healthy snack, a light meal, or a side dish.  Honestly.  But mine…mine were going to be breakfast for my roommate and I.  And after I had them baked up, I served them up with some marshmallow fluff (which I toasted with my kitchen torch) and some roasted almonds on top.  I served them up and settled in for breakfast before finishing up my packing that morning.

Dr. Praeger’s Sensible Foods Gluten Free Sweet Potato Pancakes are AMAZING.  Hearty and healthy is one thing, but these also tasted amazing.  These are made from real food and real ingredients, so nothing tasted off or weird when I dove into these.  I sort of wish I cooked them up with some scrambled eggs and topped them off with a bit of ketchup, but I still have two more pancakes in order to do that with.  So it’s all good.  These have great sweet potato flavor and tasted really good the way I dressed them up.  But when I sampled a piece on its own, that amazing sweet potato flavor just came through.  And that was what I wanted.  Honest.  Real.  Healthy.  Food.  A sophisticated hash brown masquerading as a pancake.  I LOVE IT!  And I loved these.  I sort of want to stock my freezer with them for future use.  Seriously.  If you want an easy and go-to option for your clean eating diet.  THIS…would be my suggestion.

Let’s discuss ingredients.  Real ingredients and real food is what you’ll find in Dr. Praeger’s Sensible Foods Gluten Free Sweet Potato Pancakes.  These delightful disks of goodness are made from sweet potatoes, egg whites, potato flakes, expeller pressed canola oil, brown sugar, arrowroot, and salt.   That’s it.  Amazing.  Clean eating in your freezer!  These potato pancakes are gluten-free, kosher, dairy-free, cholesterol-free, non-GMO, and free from saturated fat and trans fats.

As far as nutrition goes…these are little pancakes of power.  The nutrition stats on the Dr. Praeger’s Sensible Foods Gluten Free Sweet Potato Pancakes wowed me and they will wow you too.  A serving is 1 pancake, but my roommate and I each had 2 this round as it was breakfast.  One pancake will serve you up 80 calories and 2.5 grams of fat.  One sweet potato pancake will also give you 120 mg sodium and 7 grams of sugar.  One serving also provides you with 2 grams of fiber and 2 grams of protein…so filling without being too filling.  Double it to two pancakes, and you’ll be full until lunch time.  Trust me.  I know I am.

I was completely impressed with and blown away by Dr. Praeger’s Sensible Foods Gluten Free Sweet Potato Pancakes.  I’m not kidding when I saw these will find their way back into my freezer.  Honestly, they were beyond what I anticipated and totally captured my attention and the attention of my taste buds.  Delicious.  Healthy.  And amazing.  You can’t beat that.  If you haven’t tried them…do it now.  Next time…ketchup!