Product Review: GeeFree Gluten Free Puff Pastry Sheets

GeeFree Gluten Free Puff Pastry Sheets

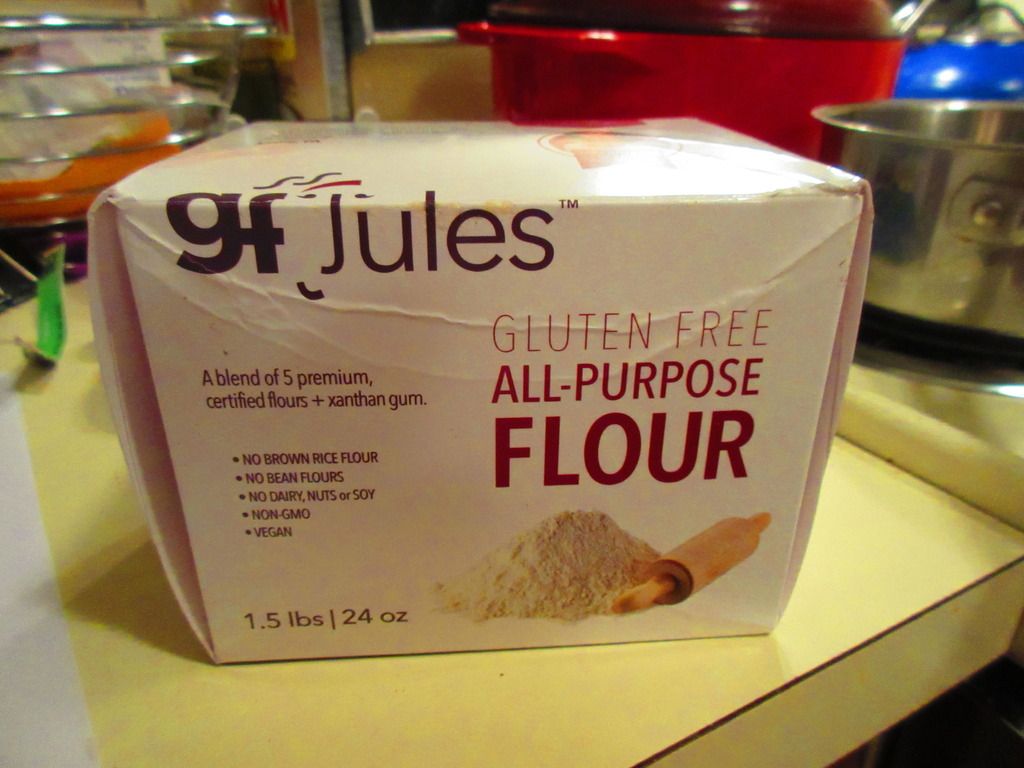
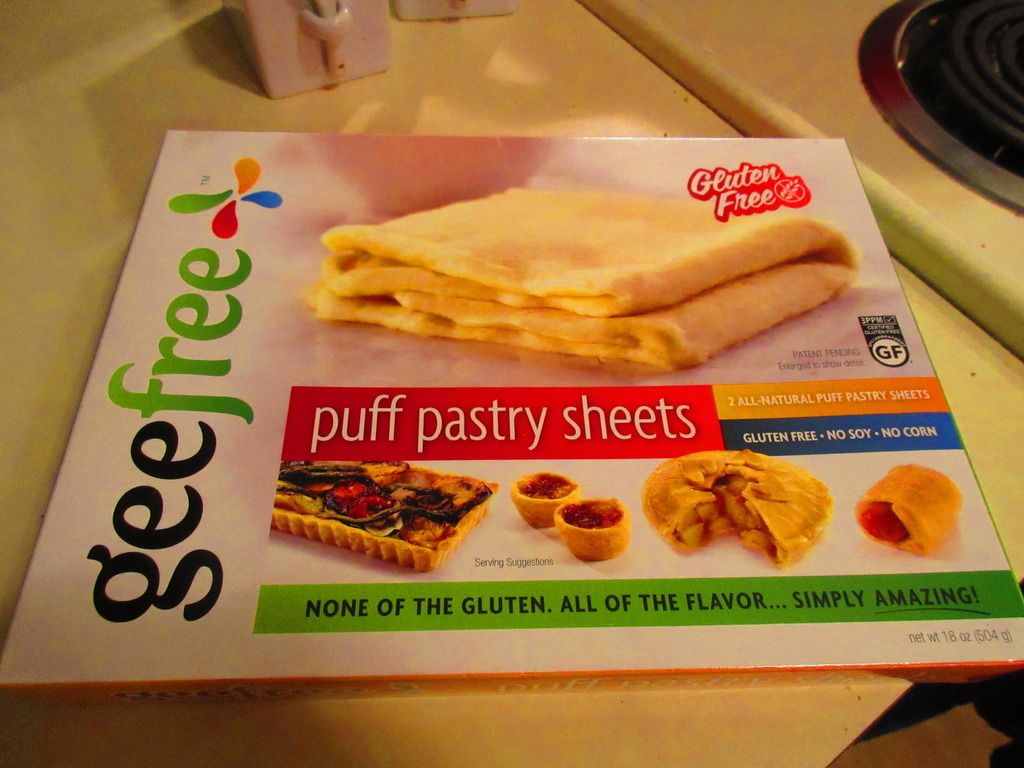
Product: GeeFree Gluten Free Puff Pastry Sheets – $8.49+

HOLD. THE. GLUTEN. FREE. PHONE.

Reread that product name…

Go ahead.

YES!!  Gluten Free Puff Pastry Sheets.

FINALLY!!

Bless you GeeFree.  Bless you for bringing these into the gluten-free world.  Thank you for putting these out on the market.  Why?  Because I’ve looked at the very complicated and confusing instructions on how to make gluten-free puff pastry at home and it was not something I thought I was capable of producing.  Not well.  Not at all.  And I love to bake and cook.  So…THANK YOU!!

It was at Expo West in 2014 that the GeeFree Gluten Free Puff Pastry Sheets were introduced.  I saw the pictures on the various Twitter feeds and Instagrams that I follow of people who were fortunate enough to attend.  And I was excited.  SO excited.  And then…let down at the fact that I have never…ever…seen this brand carried anywhere in my area.  I looked though.  And it took a trip to Columbus, Ohio…and the natural food store Raisin Rack, before I found these…three weekends ago.  Believe it or not…it took over a year.  I bet you’re wondering if the wait was worth it.

GeeFree Gluten Free began when Susan Hougui, a veteran of the food industry for over a decade, was visiting with friends while traveling overseas.  The family needed to avoid gluten and Susan was served the most delicious puff pastries.  Intrigued, as she had never seen anything like it, she tried them and found them to be crispy, yet tender, treats.  Excited with this discovery, she called her friend and master baker, Steve Leyva, to help her recreate and perfect the treats that Hougui had been served…and that she knew would be a sensational hit.  The first three products to be released in the savory line from GeeFree were Spanakopita, Franks in Blankets, and Chicken Pot Pie.  And now…PUFF PASTRY!!

Puff Pastry…for sweet or savory.  For desserts or dinner.  PUFF PASTRY!!  GLUTEN FREE PUFF PASTRY!!

Thank you…GeeFree Gluten Free.  Thank you!

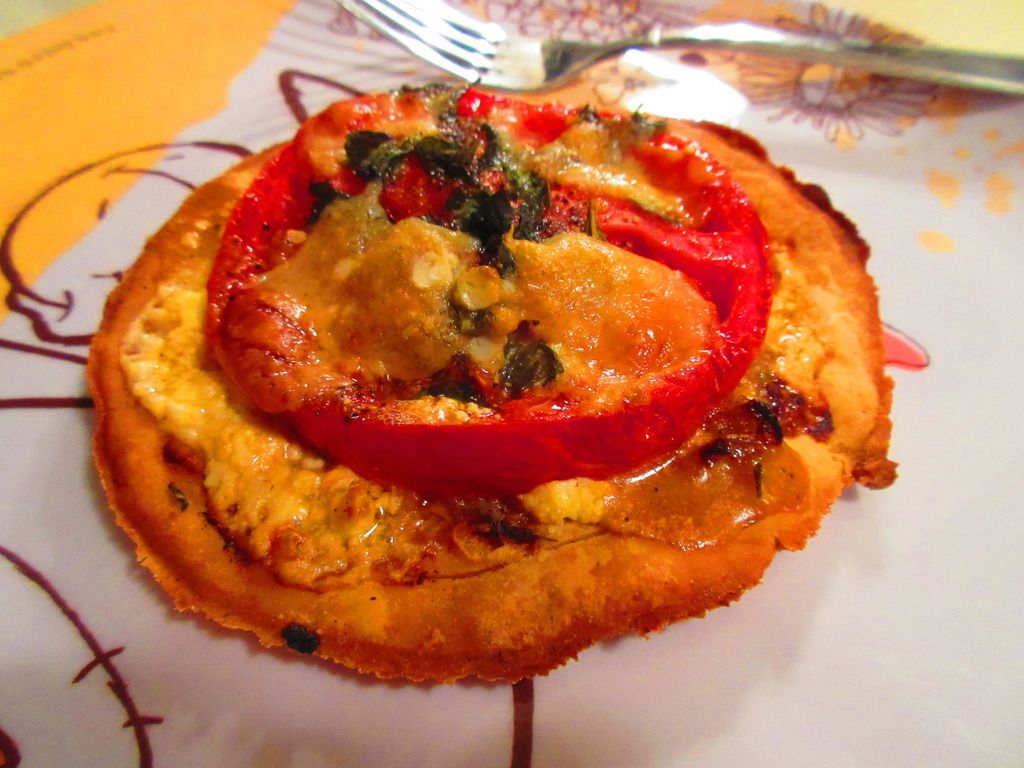
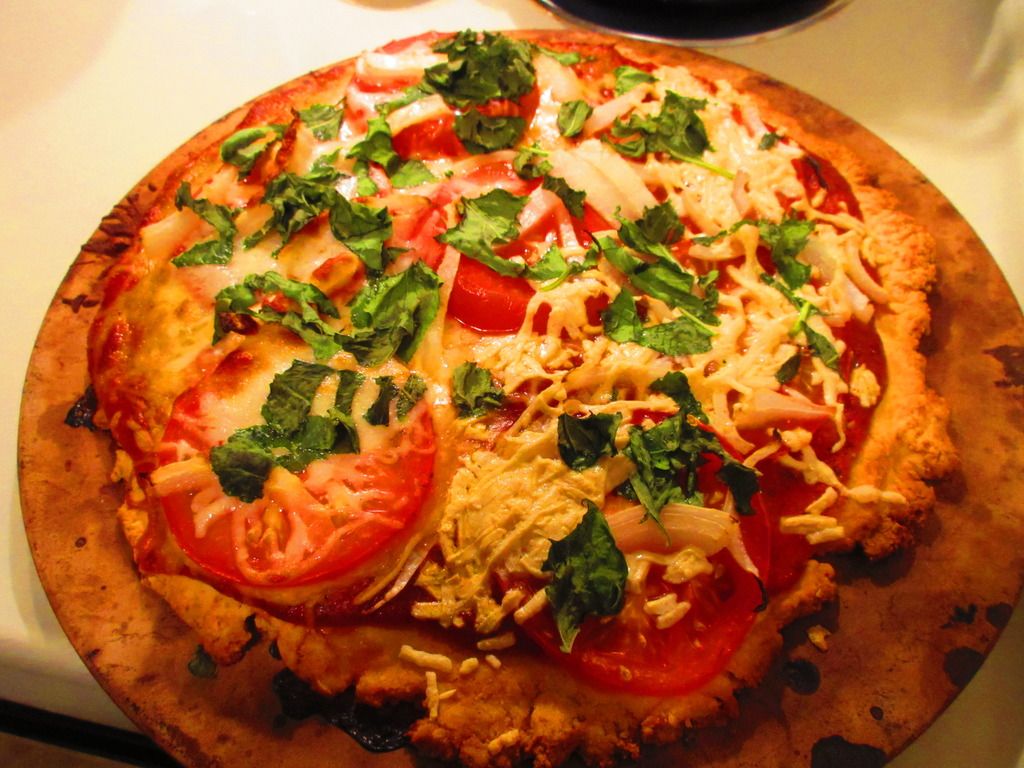
So…since I now had the GeeFree Gluten Free Puff Pastry Sheets in my clutches…and my freezer…I knew immediately the first thing I wanted to make with them.  Way back…back before I went gluten-free, I made these amazing Tomato and Goat Cheese Tarts, with the aid of a recipe from The Barefoot Contessa, and fell in love with them.  This was just before I had to go gluten-free…and so…when it happened, this new favorite recipe was now forever gone.  I attempted it a couple of years ago, in 2013, with the Pillsbury Gluten Free Pie & Pastry Dough.  It wasn’t the same at all.  So…when a recipe that actually calls for puff pastry now can have real (gluten-free) puff pastry, I, naturally, have to make it.  So I did.

GeeFree Gluten Free Puff Pastry Sheet

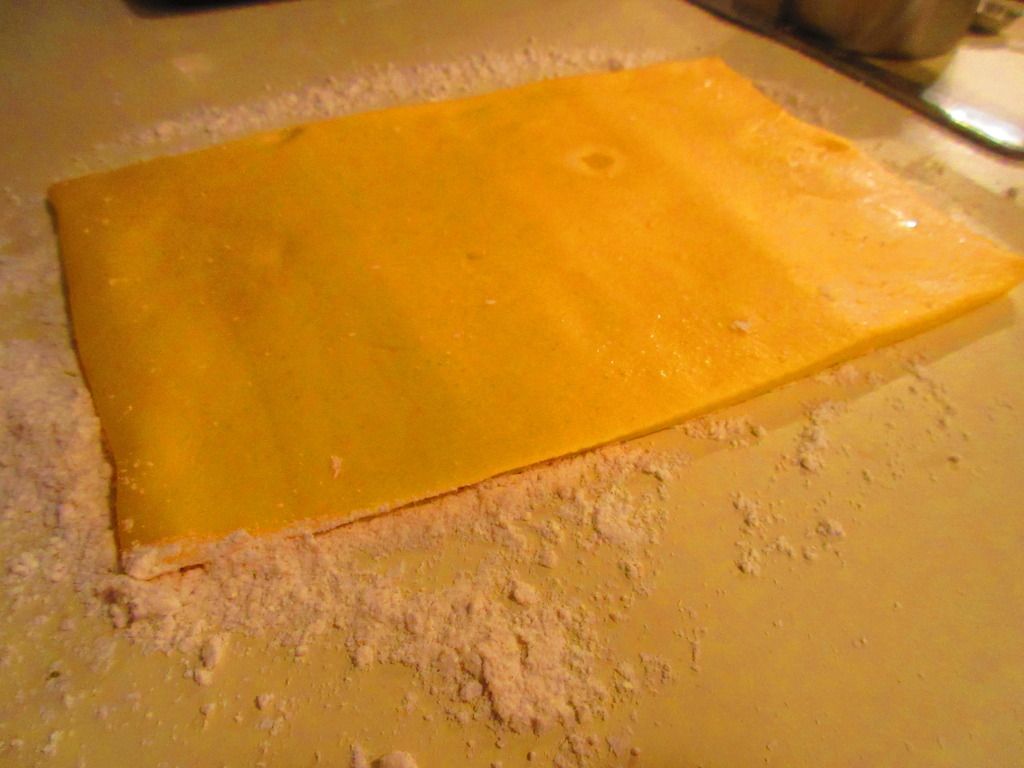
I put the pastry sheets into the fridge the night before I was going to make this dish, allowing them to thaw from frozen.  When I got home from work, I began to work on caramelizing onions for the recipe, slicing tomatoes, giving my homegrown basil a julienne, and then went to snag the pastry sheets from my fridge to prep them.  My counter top got a liberal sprinkling of gluten-free flour, as did my rolling pin, and I rolled out the sheet to be thinner before cutting 6 inch circles from it.  I used a paring knife to score a ¼-inch-wide border around each pastry circle.  Then, the center circle was scored with the tines of a fork and given a sprinkle of Parmesan cheese, not leaving the border of that second circle.  The caramelized onions were placed on top, along with crumbled goat cheese, a slice of tomato, olive oil, basil, salt and pepper.  I sliced shards of Parmesan to put over the top and went to bake these tarts, praying that this all worked out just as I remembered.

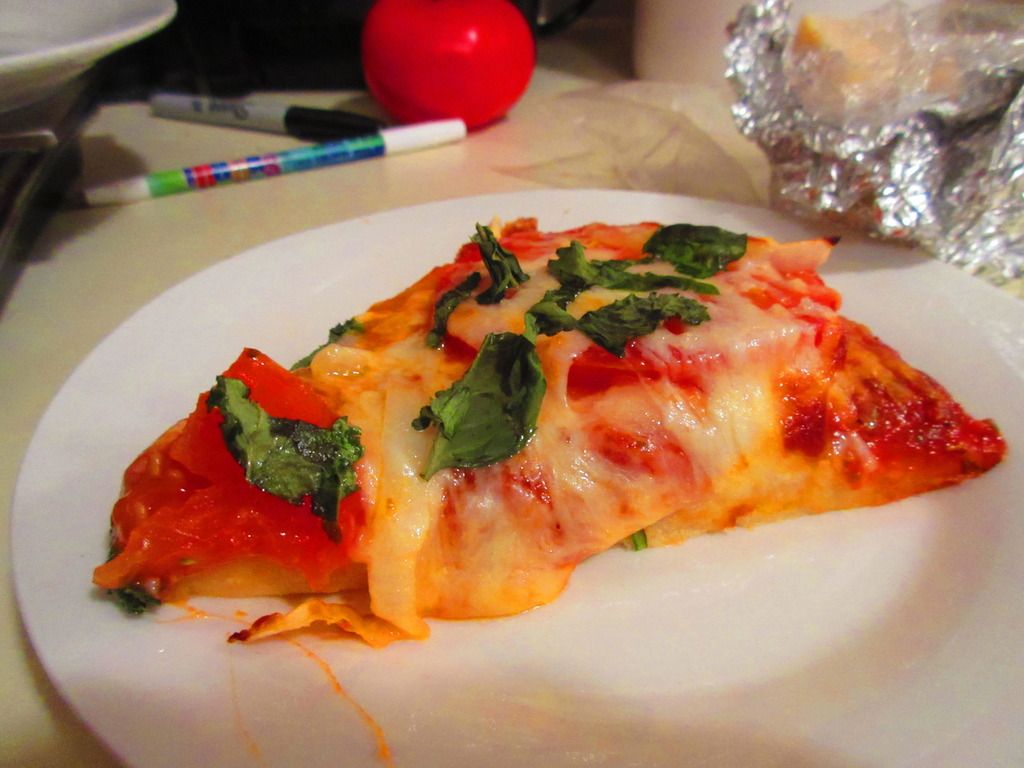
The bad…the puff pastry didn’t puff up around the edge that was not scored.  So, if you are looking for that flaky, layered, soft crust that puff pastry produces when it puffs in the oven…this didn’t happen.  The puff pastry remained completely flat…like a pizza crust.

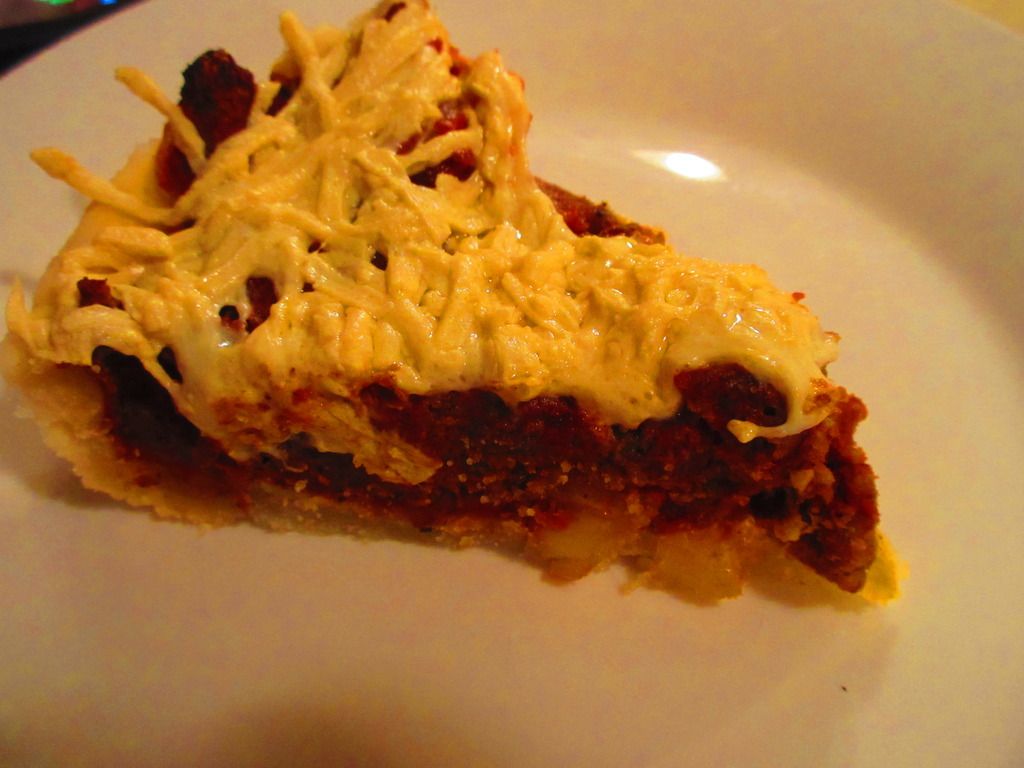
The good…it tasted phenomenal.  And even though I baked it at a higher temperature (per the recipe I was using, as opposed to the box directions), it didn’t burn (like the Pillsbury pastry dough did), and it did have that light texture you expect from a puff pastry…just without the lift.  And that’s fine.  It got to this gorgeous golden color.  And it worked as a great base for the tart I was making.  So, it wasn’t like the one I used to be able to eat…it sure tasted like it.  Looks aren’t everything.  And this didn’t look bad, it just didn’t get puffy.  The flavor, buttery, crispy, soft, amazing…yeah…it was worth the wait for over a year to actually try this stuff.  And I think next time I’m going to try it in one of their suggestions online…like a fruit tart…or a vegan version of a pot pie.  Hmmm…that might be what I do actually.  YUM!!

Let’s discuss what goes into the making of the GeeFree Gluten Free Puff Pastry Sheets.  These pastry sheets are made from potato starch, butter (sweet cream, natural flavorings), water, canola oil, eggs, sugar, baking powder, salt, xanthan gum, flaxseed meal, whey protein concentrate, inulin (chickory root), guar gum, baking soda, citric acid, and annatto.

Each package contains two 9×7 frozen puff pastry sheets.  This box is meant to serve 6 people.  A serving size is 1.5 ounces of a pastry sheet.  This serving will provide you with 150 calories, 9 grams fat, 4.5 grams saturated fat, 0 grams trans fat, 25 grams cholesterol, 250 mg sodium, 18 grams carbohydrates, 1 gram fiber, 1 gram sugars, and 0 grams of protein.  Not extremely filling…but definitely full of delicious flavor and texture.

I am impressed with the innovation of gluten free puff pastry sheets that can be bought at the store in the freezer section instead of having to go through the quite labor-intensive way of making it from scratch.  GeeFree Gluten Free took all the hard work out of the task and simplified it into puff pastry sheets that are there for your convenience.  I am one happy little baker and chef right now.  Oh yes…so very happy.  If you can find the GeeFree products, get the Gluten Free Puff Pastry and create some puff pastry goodness.  Just…amazing that it has happened.

Gluten Free Tomato & Goat Cheese Tart made with GeeFree Gluten Free Puff Pastry Sheets

Product Review: Sticky Fingers Bakeries Gluten Free Meyer Lemon Scones

Sticky Fingers Bakeries Gluten Free Meyer Lemon Scones

Product Review: Sticky Fingers Bakeries Gluten Free Meyer Lemon Scones – $6.25+

I have been a fan of scones ever since I bit into my first one while visiting Europe in 2003.  Scones, after that, became this legendary thing, and something I was determined to enjoy every time I went overseas.  At that point I was either living in Birmingham, Alabama or in Louisville, Kentucky…which are not exactly a hotspot for scone making and feasting.  Not to say some bakeries didn’t turn them out.  As I was going through the initial stages of my Celiac diagnosis, before we really pinpointed it, I was enjoying a homemade, amazing scone from a local coffee shop, which was produced by a local bakery…which I often bought out of their scones and froze at home for later enjoyment.

Then…the gluten-free diet kicked in…immediately…for my health.

So, after a hiatus from my scone indulgences, I just couldn’t take it anymore.  I had to have them back in my life.  So, I got into my kitchen and using what gluten-free flour I had on hand (mostly Pamela’s Products pancake mix) at that point, I began making my own versions and variety of flavors for gluten-free scones.  And while they weren’t as good as the ones I had overseas or the ones the bakery made, they were pretty damn good in their own right.

It has been awhile since I’ve made scones.  A very long while.  But while I was out shopping one day, I ran across a box that was labeled “GLUTEN FREE” and had the word “SCONES” on it.  Okay…you have my undivided attention!!  The company was Sticky Fingers Bakeries, and they had a line out of gluten-free scone mixes in a variety of flavors: Apple Oat, Wild Blueberry, Meyer Lemon, Original, Chocolate Chip, and Pumpkin Cranberry.

My roommate, knowing me elation said we could purchase one to make…and then grabbed the Sticky Fingers Bakeries Gluten Free Meyer Lemon Scones mix.  HA!  Should have known.  If it is lemon, she wants to have it.  So…it came home with us and went into the pantry.  Months later, I finally decided it was time to stop putting it off and start baking.

This past Monday night, I did just that, deciding that the scones could be the breakfast we eat post-gym while settling in at work.  In fact, I had made my own blueberry jam not too long ago, which would pair nicely with the lemon pastry, if all went well.

Sticky Fingers Bakeries began with a scone…and a dream.  Seriously!  It was founded in 1987 by fraternity brothers Tom Owens and Ted Vogelman in San Diego, California.  It initially began as a thriving retail bakery.  The scones, in particular, were selling out every day.  When recipe request kept flooding in, they knew they were on to something.  Owens and Vogelman got to work on a scone mix that their patrons could purchase and recreate the bakery’s most popular item at home…just by adding water.  The mix was a hit…so they kept going…and the company kept growing.  Today, their products include their popular scone mixes as well as muffin mixes, an Irish soda bread mix, three brownie mixes, a line of premium fruit spreads (including curds, jams jellies and fruit butters), and now…GLUTEN FREE SCONES!

Sticky Fingers Bakeries prides itself on the quality of their ingredients.  None of their mixes contain artificial flavors, colors, preservatives, trans-fats, or saturated fats.

Sticky Fingers Bakeries carries their commitment to quality over to their gluten-free scone mixes as well.  They are made with high quality ingredients that give them the same delicate, crumbly texture with just a touch of sweetness.  Even better, this line of their products is produced in a certified gluten-free manufacturing facility.

Baking these are so easy, you will think someone at a bakery did it for you.  Simply get out a baking sheet and line it with parchment paper.  Then, pull the box containing the Sticky Fingers Bakeries Gluten Free Meyer Lemon Scone Mix out of your pantry and open it up.  Pour the mix into a large mixing bowl and add to it 3/4 cup + 3 tablespoons water and 3 tablespoons of vegetable oil.  Mix everything together with a fork until a sticky dough forms.  Then, drop heaping spoonfuls of the batter onto the baking sheet and allow to bake for 13-15 minutes, or until firm and light golden brown.  The mix makes 10 scones, but I managed to get 12 out of it.  HA!  The box says these are great warm, on their own, or with butter, honey, jams of curds.

I highly recommend jam.  Preferably a homemade blueberry.  Blueberry + lemon = AMAZING!

Want to know what else is amazing?  These scones, that’s what!  The Sticky Fingers Bakeries Gluten Free Meyer Lemon Scones bake up all light and pillow-y on the inside and get this beautiful golden crust on the outside.  The scone is packed full of lemon flavor, without it overpowering the baked good itself.  I mean, it strikes the perfect balance of flakiness and yumminess and it is sheer perfection.  I am so in love with these.  I need to try to remember where I bought this box from so I can try to find more.  That is how impressed I am with these.  I only have 2 left for breakfast after the gym…so now I have to come up with some yummy treat to heat up at the office for a quick breakfast as I settle into work.  These were ideal and perfect.  But…all good things must be devoured.

Let’s discuss the ingredients that go into Sticky Fingers Bakeries Gluten Free Meyer Lemon Scones!  These scones are made from white rice flour, sugar, potato starch, buttermilk powder, tapioca starch, leavening (sodium acid pyrophosphate, sodium bicarbonate, corn starch, monocalcium phosphate), lemon bits (sugar, rice syrup, corn cereal, corn starch, palm oil, natural flavor, tumeric concentrate), natural meyer lemon flavors, canola oil (ascorbic acid & rosemary added to preserve freshness), sea salt, baking soda, xanthan gum, and natural vanilla powder. As mentioned before, these scones are certified gluten-free, contain no artificial colors or flavors, contain no preservatives, contain no trans-fats or saturated fats, are certified kosher…oh…and are amazingly scrumptious!

As for the nutritional information, a box of the Sticky Fingers Bakeries Gluten Free Meyer Lemon Scones makes 10 (but I got 12) scones.  The mix itself will give you 180 calories, 5 grams fat, 0 mg cholesterol, 290 mg sodium, 30 grams carbohydrates, 1 gram fiber, 9 grams sugars, and 2 grams of protein.  Do not expect these to be filling, unless you eat two of them…which I do.  I also slather mine with a delicious and liberal amount of my own homemade blueberry jam.  Hence, the recommendation above.

The Sticky Fingers Bakeries guys sure do have scones down to pefection.  And they make it easy for you to make them yourself in the comfort of your own home.  Easy to mix, easy to bake, and SO easy to consume.  It will be hard not to eat them all at once.  They are worth spreading out over a few days…trust me.  Phenomenal flavor.  Perfect scones.  So much love.


Product Review: gfJules Gluten Free All-Purpose Flour + Recipe Bonus

gfJules Gluten Free All-Purpose Flour

Product: gfJules Gluten Free All-Purpose Flour – $8.42+

I have had this fun and passing relationship with the famous (in the gluten-free community, anyway) Jules Shepard, formerly known as Jules Gluten Free, now know as gfJules.  When I had to go gluten-free three years ago, one of the first people I encountered through social media was none other than Jules Gluten Free.  She was funny and knowledgeable, and she had these elusive product mixes (from all-purpose flour to bread mixes to cookie mixes to cake mixes to pizza crust mixes) that nowhere in my area carried.  At one point, she was presenting in Lexington, Kentucky, and I had intended to drive down and see her presentation…until the Sherman-Minton bridge here in Louisville was closed indefinitely due to a large crack in the weight bearing portion…making going anywhere from the Indiana side of the river a real nightmare.

finally met gfJules last year, at a Gluten Free Expo in Indianapolis, Indiana.  I bought her cookbook.  We talked.  We laughed.  We took a picture together.  It was awesome.  And it was like meeting a celebrity, to be honest.  I have followed her Facebook page, saw her through the very public break from her partners in the company that she founded, Nearly Normal Cooking, and had grandiose plans to find and purchase her flour at some point.  Or a mix.  I didn’t care.

Until December 2014, that had yet to happen.

But then, my Holiday 2014 (December) Cuisine Cube arrived in the mail with loads of holiday goodness just ready to be explored and used.  For those of you who may be new to some of my blogging, let me quickly tell you a little about Cuisine Cube!

Cuisine Cube is a subscription service that delivers 5-6 gluten-free, full-size products to your door for as little as $34.99/month. Inside the cube, you will discover full-size products (not sample sizes) that are made by local and smaller, artisan companies, rather than those that you can find at the average grocery store.  It has introduced me to so many new and delightful products.  Each box contains a breakfast, lunch, dinner, snack, and dessert product…and then, sometimes, an extra bonus item.  Who doesn’t love a little something extra, right?   Keep in mind, however, that Cuisine Cube has gone through some changes as of May.  No longer do they strictly only offer gluten-free cubes.  In addition to their gluten-free option, they now also offer Artisan and Vegan cubes as well.  The Artisan cube means that you have no food allergies and foods that contain common food allergens will be included.  The Vegan cubes contain products that are dairy and animal free.  And, they still have the Gluten Free cubes, which will have products that contain no gluten or wheat.  So, if you’re really interested in being introduced to the smaller, lesser-known, artisan companies, give Cuisine Cube a try!

So…here I was…in December and inside my cube was a 1.5 ounce box of gfJules Gluten Free All-Purpose Flour.  With this item, Cuisine Cube also provided a recipe card for Baguettes.  I don’t have a baguette pan, so I tucked this box into my pantry to use…and then got distracted by the open bags of Better Batter and Cup4Cup in my pantry.  It happens.  But it shouldn’t.  This product never should have gone untouched for that long.  But, before I tell you why, let me first tell you a little bit about Jules Shepard.

Jules Shepard was diagnosed in 1999 as a Celiac.  She didn’t see this diagnosis as the end of the world though.  In fact, the former attorney was unwilling to accept the dry, gritty, vacuous foods that were the norm for the gluten-free diet back then. After two years of hard work in her kitchen, Shepard perfected an all-purpose gluten free flour blend that allowed her to continue to do something she loved – bake!  Even she never would have guessed that this one thing would eventually set her apart in the gluten-free community as a leader, inspiration, and advocate.  She perfected her ‘acts-just-like-wheat-flour’ blend, and word spread in her circles.  People began to beg her to make her 5-flour blend for them.  She introduced this flour to the gluten-free community at large in 2008, with her former company, Jules Gluten Free, but it is now developed and available exclusively through her new company, gfJules, which began in March 2014.  From there, her journey has only become more amazing…and her products remain top of the line!

I can vouch for that, mind you, as I was preparing a dessert for a birthday party at the office (and 4th of July celebration) this week.  I have delicious local blueberries that my friend, Harry, picked for me.  I love blueberries, and always am happy to receive a bunch of his harvest.  With all these amazingly fresh berries on hand, it occurred to me that I could make a festive and (hopefully) delicious blueberry cobbler.  Because my kitchen is strictly gluten-free, everything I provide to office pitch-ins is gluten-free.  Some people at the office won’t even give my food a try, but some do…and most are surprised by the flavor and texture…and how normal it is.

Well, my love affair with gluten-free flours just reached a whole new level.  I actually found a recipe for the gluten-free (and vegan) blueberry cobbler on gfJules sight.  And being that I had a box of gfJules Gluten Free All-Purpose Flour in the pantry.  New recipe…why not go for broke and try a new flour too.  As this was one of her recipes, I figured it was best to stick with the flour originally used to make it.  Logic!

Let me tell you something…from the get-go, I realized how amazing this flour truly was.  When I mixed it with the vegan butter and the egg substitute, it all just came together perfectly.  It had this great biscuit texture to it.  And this was before topping off my blueberries with it!  How’s that for being impressed really early in the game.  It worked as a thickener with the heated sugar and water that the blueberries were stirred into, and it produced the most amazing batter for the biscuit-y top that gets baked right on top of the fruit.  I was nervous when I popped it into the oven to bake…but I should have never doubted it.

When my cobbler emerged from the oven, piping hot, it was warm and sweet on the bottom, and the cobbler part…that top bready portion, was this perfect crisp, golden brown.  I had to wait until the following day to actually taste it…but when I did, I was beyond impressed.  The flour really made this remarkable crusty top…and it didn’t have that weird gluten-free flavor or texture to it.  No one, save for the fact that I brought it in, would have known it was gluten-free.  Seriously…and everyone who was brave enough to try it gave only the highest praise for the treat.  The perfect blueberries…with the perfect flour…made for the perfect summer dish for this little pitch-in.  As I have failed miserably at gluten-free bread, this makes me want to pick up baguette pans so that I can give the recipe that accompanied this product in my Cuisine Cube.  This might happen.  Williams-Sonoma…I’m coming for you.

So, now that I’ve gone over why I fell in love with the gfJules Gluten Free All-Purpose Flour, let me tell you a little bit about what is inside.  This flour is made from modified tapioca starch, potato starch, corn starch, corn flour, white rice flour, and xanthan gum.  It is gluten-free, wheat-free, dairy-free, nut-free, soy-free, vegan, KOSHER – and now NON-GMO!

As far as the nutrition information goes, gfJules Gluten-Free All-Purpose Flour really falls in with others on the market.  A serving size is 31 grams of flour, which will give you 110 calories, 0 grams fat, 0 grams saturated fat, 0 mg cholesterol, 10 mg sodium, 26 grams carbohydrates, less than 1 gram fiber, 0 grams sugars, and 1 gram of protein.

And if you don’t believe me, the truth is in the use!!  And below is the recipe I used this flour in!  You should really try it out.  I think you’ll be impressed too!

Recipe: Gluten Free Old-Fashioned Blueberry Cobbler

Servings: 8
Time: Prep 10 minutes; Bake 40 minutes

Gluten Free Old Fashioned Blueberry Cobbler (made with gfJules Gluten Free All-Purpose Flour)

Ingredients:

  • 3 Tbs. gfJules Gluten Free All-Purpose Flour
  • 3/4 cup granulated sugar
  • 1/2 cup water
  • 1 tsp. pure vanilla extract
  • 4 cups fresh blueberries
  • 1 cup gfJules Gluten Free All-Purpose Flour
  • ¼ cup lightly packed brown sugar or unrefined coconut palm sugar
  • ¼ cup milk, dairy or non-dairy
  • 1 egg or favorite egg substitute
  • 2 tsp. baking powder
  • 1/2 tsp. baking soda
  • ¼ cup butter or non-dairy alternative (Earth Balance® Buttery Sticks)

Directions:

In a medium-sized saucepan, combine gfJules™ Flour, sugar and water. Stir and cook over medium heat until thickened, approximately 12-15 minutes. The mixture will over-boil and burn if not stirred often, so watch the pot and reduce the heat if the mixture is too bubbly or is browning. Add the vanilla extract.

Wash and remove all blueberry stems. Stir the blueberries into the cooked sugar mixture to coat.

Pour the filling into a 9- or 10- inch, deep pie plate (it’s important not to bake the cobbler in too small or too shallow of a plate, or the hot blueberry filling will bubble all over the sides).

Preheat oven to 375° F.

In a medium-sized bowl, whisk together gfJules™ Flour, brown sugar, baking powder and baking soda. Using a pastry cutter or two butter knives, cut in the butter until the flour looks like small gravel or pebbles.

In a separate bowl, stir the egg and milk to mix. Slowly add this mixture to the flour bowl and stir with a fork until completely combined.

Scoop several large spoonfuls of this batter onto the top of the filling in the pie plate. It will rise and touch the other spoonfuls as it bakes, to cover most of the top of the filling, as pictured.

Line the oven rack with foil and place the filled pie plate on top of the foil to prevent any bubbly mixture from falling onto your oven floor and burning.

Bake for 20-25 minutes, or just until the cobbler is browning and somewhat firm to the touch. A toothpick inserted into the cobbler, then removed, should be clean.

Serve warm or cold.

~*~*~

This flour is the best yet.  Honestly, it bakes up perfectly.  It is light, fluffy, and amazing.  It would fool the unassuming person into not even guessing that it was gluten-free.  This product is as amazing as the woman who created it.  Thank you gfJules (Jules Shepard) and Cuisine Cube…for finally giving me the opportunity to try this fantastic flour.  Now…to get more!

Product Review: Don Tamal All Natural Veggie Vegan Gourmet Tamales

Don Tamal All Natural Veggie Vegan Gourmet Tamales

Product: Don Tamal All Natural Veggie Vegan Gourmet Tamales – $6.99+

Happy Cinco de Mayo!  Or I should probably say Feliz Cinco de Mayo!

Either way…it’s May 5th…Return of the 5th…and yes…Cinco de Mayo.

And I felt the need to celebrate.  This time at home…not at Moe’s or Q’doba.  Home.  Because I have no money.  What I did have, however, was a local product in my freezer.  Yes.  Local.  Let me tell you the tale…

It was a few months ago.  I was wandering around Whole Foods, attempting to stick to my tight food budget and epically failing at it.  But…I was trying.  As I was making my way up to the registers, my roommate pointed out a table where a nice gentleman was handing out samples of vegan tamales.  Vegan.  Gluten Free.  Tamales.  I had to have this in my life, so I bee-bopped over that way and tried a sample.  Cathy was right behind me.  He was just removing some fresh tamales from his steamer.  He plated a few bits and one bite sold us both.  The nice man was actually the founder of the local Don Tamal…and pointed out that we could purchase them in the freezer section and directed us that way.  We were already a bit over budget, but we couldn’t pass this up. They were REALLY good.

So, the purchase was made.  I took the Don Tamal Veggie Vegan Tamales home and placed them in the freezer.  Where they have been ever since.

But…as I said…it’s Cinco de Mayo.  Time to get our tamales on.

Don Tamal is a local business based out of Louisville, Kentucky that specializes in…TAMALES.  This business strives to provide authentic, all natural, Mexican tamales for people on-the-go who love to eat healthy without sacrificing enticing flavors and textures.  Their philosophy is that all people should have the chance to eat delicious food that is free of additives, preservatives, chemicals, trans fats, growth hormones, and genetically engineered ingredients.  The reward…traditional food of better quality.  In fact, the wife of the founder, Marcela, pursued a PhD in Food Science and Engineering and came up with ways to make flavorful food without sacrificing the texture or flavor.  Same traditional fare…better ingredients.  A healthier choice.

Oh yeah…they had my attention.

There are two ways to cook up the frozen tamales.  You can use the preferred method of using a veggie steamer on the stove top.  Which, if I had a veggie steamer, I’d have done.  But…I don’t.  Luckily…it’s not required.  I used the microwave method, where in I wrap the two tamales that come in the package in a very tamp paper towel and place them in a microwave safe container with a lid.  I microwaved these for about 3 minutes and 15 seconds (the package says 2.5 minutes, but my microwave is old and not very powerful), and then let it stand and steam for about 1 minute.  Then, discard the husk and enjoy!

It really doesn’t get much easier than that.  I served mine up with some tortilla strips and salsa.  Yummy!

Let me tell you…these are fantastic.  I forgot what drove me right over to that freezer in the first place.  Holy cow, these were just amazing.  The masa was soft and creamy.  The veggies that were mixed in tasted so good.  And the different veggies stuffed inside…those were just…yummy.  Despite having habanero pepper in it, it wasn’t spicy.  Which is good, or my roommate (Cathy) would never have let me live it down.  Superb.  Not bad at all for reheating from frozen.  I was beyond impressed back at Whole Foods and tonight just re-introduced to me the reason why.  After one bite, I started pointing at it with my fork and finally managing a, “We’re getting more of these tamales” in between forkfuls.  It was gone way too soon.

Let’s look at the ingredients that go into the Don Tamal All Natural Veggie Vegan Gourmet Tamales, shall we?  These tamales are made from corn dough (corn with lime, vegetable base (organic carrots, organic celery, organic onion, organic tomato, salt, organic and gluten free soy sauce, organic cane sugar, organic maltodextrin, yeast extract, organic potato starch, organic onion powder, organic garlic powder, and organic spices), poblano pepper, organic carrots, organic corn, purple onion, yellow onion, olive oil, organic palm oil, cilantro, organic kale, fresh garlic, spices, aluminum free baking powder, habanero pepper and vinegar.  These tamales are made without hydrogenated oils or lard.  And, yes, they are certified vegan.

As this is a local business selling these, I don’t have the nutrition information…but…I can tell you…they are YUMMY!

Nutritious.  Delicious.  Tamales.  Happy Cinco de Mayo indeed!  Thanks, Don Tamal.  I’m heading to Whole Foods for more this weekend!

Don Tamal All Natural Veggie Vegan Gourmet Tamales (cooked)

Product Review: So Delicious Dairy Free Snickerdoodle Cashew Milk Non-Dairy Frozen Dessert

So Delicious Dairy Free Snickerdoodle Cashew Milk Non-Dairy Frozen Dessert

 Product: So Delicious Dairy Free Snickerdoodle Cashew Milk Non-Dairy Frozen Dessert – $6.99+

A life without ice cream isn’t a very happy life.  But, where I used to be able to take something to help me digest milk proteins, my lactose intolerance has only become a little stronger.  Sadly, I have said goodbye to my dairy-filled favorite treat in life.  Ice cream and I just don’t get along like we used to.

But…thanks to So Delicious Diary Free…ice cream isn’t gone from my life.  It’s just…well…a little different.  And not a sorbet.  Sorbets are all fine and good, but sometimes you just want something rich and creamy and sinful.

Cashew milk is, honestly, my latest obsession.  It is my go-to milk of choice these days.  Over coconut milk and almond milk.  Why?  It’s creamier.  It’s thicker.  It just, to me, tastes better.  I love the nutty flavor that comes with it and it just tastes amazing.  It’s all I want in my refrigerator these days.

So…talk my favorite beverage of the moment and combine it with…one of my favorite desserts…

That’s what So Delicious did.  They have created a new line of non-dairy frozen desserts that are made with cashew milk, instead of soy, almond, or coconut milks.  Currently, these ice cream pints come in five different flavors: Cappuccino, Creamy Cashew, Dark Chocolate Truffle, Salted Caramel Cluster, and Snickerdoodle.

You know my first purchase would have been Salted Caramel Cluster…but my Kroger store didn’t have that particular flavor when I was shopping and treating myself.  So…my next favorite thing after salted caramel anything (especially ice cream) is Snickerdoodle cookies.  Therefore, Snickerdoodle was the pint I purchased.  I also have the Salted Caramel Cluster in my freezer now…but Snickerdoodle came first…therefore it gets consumed first.

After dinner tonight, as the week has been crazy stressful and I’ve been on this roller coaster of emotions.  Ice cream seemed like the perfect way to wrap up the day.  I took out the pint of So Delicious Dairy Free Snickerdoodle Cashew Milk Non-Dairy Frozen Dessert and let it thaw slightly on the counter while I ate dinner.  That way it was scoop-ready by the time dessert rolled around.  I opened it up, spooning out beautiful servings of the ice cream treat and serving it up to myself and my roommate.

Snickerdoodle anything has a lot to live up to, as it has always been my most favorite cookie.  Ever.

So, when my roommate dug in first while I was dishing up my serving and I hear, “Holy crap! That tastes just like a snickerdoodle!” I knew I was about to experience dessert magic.  I stuck the pint back into the freezer and settled in with my own bowl of ice cream.  I ran my spoon through the serving and lifted my first taste to my mouth.  As it began to melt against my tongue it was love.  Sheer, pure, happy love.  Meant to be love.  Because, YES, it does taste just like a snickerdoodle cookie.  We’re talking a cinnamon infused ice cream that is infused with generous bites of actual gluten-free snickerdoodle cookie dough.  This just happens to make this THE BEST ICE CREAM EVER!  It reminded me of the holidays, as that was when my mom always made her famous snickerdoodle cookies.  It reminded me of growing up, of old friends, of home, and of happy places.  THIS…was one fantastic scoop of ice cream.  It is, by far, the best ice cream (dairy and non-dairy) that I have ever consumed.  In my life.  If Cookie Monster and the Good Humor Man had children…it would be weird…but it would probably introduce something like this to the world.  I almost want to dive in for another serving.  But I will resist.  For now.  I must.

Or not…

Let’s talk ingredients.  The So Delicious Dairy Free Snickerdoodle Cashew Milk Non-Dairy Frozen Dessert is made from cashew milk (water, cashews, non-GMO canola oil), organic dried cane syrup, snickerdoodle dough (dark brown cane sugar, natural oil blend (palm fruit, canola and olive), natural flavor, sunflower lecithin, lactic acid, annatto rice flour, potato flour, tapioca flour, cane sugar, invert  sugar, cinnamon, salt, vanilla extract, guar gum, baking soda) cinnamon, gum acacia, guar gum, and sea salt.  It is verified non-GMO, vegan, kosher and gluten-free.

As far as nutrition goes…well…it’s basically ice cream without the dairy that hurts my tummy.  It isn’t going to be a powerhouse of good things…but it’s tasty.  And, sometimes, that’s all you need.  A serving size of the So Delicious Dairy Free Snickerdoodle Cashew Milk Non-Dairy Frozen Dessert is 1/2 cup.  In this serving you will be provided with 190 calories and 10 grams of fat (much of which is the healthy fat that comes from the nuts themselves!).  You will also be taking in 45 mg sodium, 24 grams carbohydrates, 1 gram fiber, 20 grams sugars, and 2 grams of fiber.  It’s a dessert, so you won’t be feeling full after a serving, but it should fill you up after a meal.  This ice cream has no cholesterol.

And…it’s basically a cookie on frozen crack.  Frozen cashew ice cream crack.  It’s…amazing, is what I’m trying to say.  If you are like me and LOVE, LOVE, LOVE Snickerdoodle cookies…then this ice cream is going to satisfy your love of the cookie and your crave for the ice cream.  It’s creamy and rich and perfect.  Yes…I said perfect.

I’m in love.

A serving of So Delicious Dairy Free Snickerdoodle Cashew Milk Non-Dairy Frozen Dessert

Product Review: Tastefully Simple Gluten Free Pizza Crust & Sauce Mix

Tastefully Simple Gluten Free Pizza Crust & Sauce Mix

Product Review: Tastefully Simple Gluten Free Pizza Crust & Sauce Mix – $10.99

I know some pretty amazing people.  I really do.  One of such people is a friend of mine from high school.  Awhile back, she contacted me and said that Tastefully Simple was releasing some gluten-free products that she would love for me to try.  My friend, Rebecca Fifield, just happens to be a Tastefully Simple Consultant.  So, she sent them to my.  And then Tastefully Simple released more products…and I bought them and some of the ones that had originally just been sent to me.  And I loved every one of them that had tried.

I think what I love most about what Tastefully Simple is doing with their gluten-free mixes is that they are making it so easy to make bread or pizza or cake cookies or pancakes.  They take all that fancy flour mixing and make it so you have it in one easy place, and only need to add 2 ingredients to it.  I love it.  LOVE it.

And now, thanks to both Rebecca and my own trial-by-fire with the gluten-free products that Tastefully Simple offers (they’ve added cookies and pancakes since I last looked!)…I’m obsessed.  Because, as much as I love baking and cooking and being in my teeny-tiny kitchen…I love simplicity too.  Because baking can be stressful…gluten-free baking can be catastrophic if anything is off.

That’s the glory of Tastefully Simple.  They take that guess work off.

So, with me heading out of town on Friday evening, the main goal this week is to use up all the fresh produce that would otherwise go bad in my absence.  So, with fresh basil and some tomatoes and onions lurking about, I remembered that I had a Tastefully Simple Gluten Free Pizza Crust & Sauce Mix in my pantry.  So…pizza it would be.  AND…it would last for three days between my roommate and I.  Added bonus.  No more cooking the rest of the week.  YAY!

Tastefully Simple Gluten Free Pizza Crust & Sauce Mix (prepared)

Preparing the Tastefully Simple Gluten Free Pizza Crust & Sauce Mix is super easy!!  For real.  That’s why there is the word “simple” in the brand.  HA!  To prepare the crust, simply combine the crust mix with 1 cup of water and 2 tablespoons of olive oil.  The dough will be sticky.  Cover it losely with plastic wrap and let it stand for 10 minutes at room temperature.  Using lightly oiled hands to prevent sticking, spread the dough out on a pizza stone or a 12-inch greased pizza pan.  Bake it for 10 minutes in a 400°F oven.

While it’s baking…mix up the sauce.  It’s a breeze.  Simply combine the sauce mix with the remaining 1 tablespoon of olive oil and tomato sauce.  Spread it over the warm crust you have now baked for 10 minutes.  Add your favorite toppings (in my case…tomato, onion, basil and Daiya vegan mozzarella cheese shreds) and place back in the oven to cook for another 17-20 minutes, until the crust is golden brown.  Slice into 6 pieces and devour.

Tastefully Simple Gluten-Free Pizza Crust & Sauce (baked)

The quality, however, always comes in the taste test.  And they totally nailed it.  The dough wasn’t too sticky when I went to press it out on the pizza stone.  And, it cooked up to this amazing crispy, golden brown.  The sauce and toppings didn’t make it soggy.  It held up to slicing and being moved onto plates.  And I loved the flavor.  It had this amazing crusty quality that just made it work.  It was the perfect base for my toppings of choice.  And it was one of my favorite crusts I have made at home.  It was easy, and it didn’t take too long to bake up either.  Perfect way to enjoy my dinner tonight.  Tastefully Simple is not only making gluten-free delicious, but easy too!

So, let’s take a look at what Tastefully Simple puts into their Gluten Free Pizza Crust & Sauce Mix, shall we?  This pizza crust mix is made from rice flour, tapioca flour, sugar, baker’s yeast, potato starch, cassava flour, salt, less than 2% hydrogenated palm kernel oil, soy lecithin, baking powder and, xanthan gum.  The sauce mix is made from maltodextrin, dehydrated garlic, garlic powder, salt, dehydrated onion, spices, roasted dehydrated garlic, sugar, Romano cheese, less than 2% of natural flavors, toasted sesame oil, citric acid, whey, cheddar cheese, hydrolyzed soy protein, disodium phosphate, and silicon dioxide (anticaking).

As far as the nutritional information for the Tastefully Simple Gluten Free Pizza Crust & Sauce Mix goes, this isn’t bad for pizza.  Really.  A serving size is 1/6 of the package.  This serving will dish up 200 calories, 1.5 grams of fat, no cholesterol, 810 mg sodium (it’s a little high, yes), 43 grams carbohydrates, 3 grams sugar, 1 gram fiber, and 4 grams of protein.

If you love pizza and want that “from scratch” appeal with a golden, crispy crunch, without it being the frozen cracker-crusts that the gluten-free community are otherwise delegated to having…then give Tastefully Simple’s Gluten Free Pizza Crust & Sauce Mix a try.  Hop on over to my friend, Rebecca Fifield‘s, page and place an order.  Not only will you be amazed with how easy this is to make, the taste, texture, and everything else will win you over.  I promise you that.

A slice of gluten-free pizza made with Tastefully Simple Gluten Free Pizza Crust & Sauce Mix
A slice of pizza made with Tastefully Simple Gluten Free Pizza Crust & Sauce Mix

Product Review: Moon Rabbit Foods Pastry & Pie Crust Mix

Moon Rabbit Farms Gluten Free Pastry & Pie Mix
Moon Rabbit Foods Gluten Free Pastry & Pie Mix

Product: Moon Rabbit Foods Pastry & Pie Crust Mix – $8.79+

So, for awhile now, I’ve been wanting to revamp another one of my mom’s famous recipes.  Making it not only gluten-free, but also vegetarian.  Oh…and dairy free too…but that’s pretty much a given when it comes to me, right?  The actual dish is her delicious Cheeseburger Pie.  Normally, the crust of this amazing meal is made from crescent rolls from the grocery store fridge area zone.  You know, that place I hardly visit these days.

Sadness.

But…then I got to thinking…what if I cooked up a pie crust and used that instead.  Sure, it wouldn’t be the flaky crescent roll shell that this meal was known for, but I was already going to get rid of the whole meat thing (using a meat substitute) and use Daiya cheese for the cheese.  So…why not give a different sort of crust a try?

The problem is…pie crusts and I have never really gotten along.  We are anything but BFFs.  Then…lo and behold…the Thanksgiving (November 2014) Cuisine Cube arrived in the mail.  And inside was Moon Rabbit Foods Pastry & Pie Crust Mix.  Everything in the November Cuisine Cube could have been used for Thanksgiving itself…but I wasn’t allowed to host this year so most of it was used at my own discretion.  Well, the final product is up now…but first…

Cuisine Cube is run by a small group of foodies who have put together a completely gluten-free box of goodies and then sends them to your doorstep each month.  These boxes contain 5-6 full-size products from small, lesser-known artisan producers…mostly local…some not as local.  Some you may even have heard of before, but most will be new to you.  I signed up for Cuisine Cube back in May and have never looked back.  Subscriptions start as low as $29.99…which is a great price and great incentive to sign up for this subscription box service and try out some gluten-free products you have been too nervous about purchasing yourself or, perhaps, didn’t even know existed.

Such as Moon Rabbit Foods.  Never head of this brand before in my life.  Moon Rabbit Foods follows a philosophy of choosing the finest ingredients and using the latest techniques of the craft of baking to give those living a gluten free lifestyle (like me!) a rare opportunity to enjoy delicious refined pastries and baked goods.  Their baking and pastry blends provide a source for hard-to-find gluten-free products, allowing customers to enjoy that high quality at home, and even allowing them to add their own inspirational touches.  So, here, in my clutches was a pie crust mix.  I had no reason to make a pie.  No one ever wants desserts at the family dinners.  I usually do because I never really get to eat much of what is offered (part of why I love to host).  But, I also hate being the only person to eat dessert, especially when I’m the one providing it.  So, instead of going sweet, I opted to go savory and attempt to recreate a gluten-free, dairy-free, vegetarian version of my mom’s Cheeseburger Pie recipe.

Cross your fingers…

This mix makes 3 9-inch pie crusts.  I went ahead and cooked them all up because…well…I could freeze the rest of them instead of just letting the mix sit and having to haul out all the equipment (a food processor, really) and ingredients (only 3) to do whenever I felt the need to make a pie.  Because if I did that, it would only get used this one time.  Therefore…all or nothing.  So, I took 1 cup of the pie mix and mixed it with one stick (4 ounces) of butter (or vegan butter) and pulsed it until it looked like cornmeal.  Then, in went 3 tablespoons of cold water and I ran the food processor until it all came together.  I formed the dough into a 6-7 inch disk and then put it in the fridge for 30 minutes.  Then I rolled it out and fit it into a pie pan.  It fell apart at some points because pie crusts hate me, but I managed to get it into the pie pans and into a 350°F oven for 30 minutes.  Out come the par baked crusts…and there you have it.  Use it as you will.

For the rest of the recipe, I used NEAT original mix and prepared the recipe from my mom’s cookbook as it would have been prepared regularly.  YAY!  That recipe will go in the review for NEAT.  So stick with me here.  Let’s talk about how the pie crusts cooked up and the rest of that important stuff.

A slice of Gluten-Free, Dairy-Free, Vegetarian Cheeseburger Pie on the pie crust made from Moon Rabbit Foods Gluten Free Pastry & Pie Mix

First of all, I think I sort of expected them to be a little more golden.  They cooked, but they were still a pale white color.  I poked it to make sure it wasn’t still dough.  Then I figured it would get more golden as it cooked with my filling of Neat, tomato paste, onion, and vegan cheese…but it still remained a pale shade of…pale.  It was cooked…it just didn’t look that way.  It was a bit disconcerting.  It tasted good though, so I guess that’s the important thing.  It may look underdone, but it is quite a good pie shell.  I was actually happy to have a pie crust that didn’t incorporate sugar into the mix as I was using it for a savory dish.  This made this a great substitute for the refrigerated croissant rolls that used to make this light, flaky crust for this dish.  Being a thinner crust also helped as well.  So, once again, looks can be a wee bit deceiving.  It’s all in the taste, when it all comes down to it.

So, what exactly is in the Moon Rabbit Foods Pastry & Pie Crust Mix?  According to the package, this mix is made up of potato starch, cassava flour, rice flour, sea salt, unrefined cane sugar, and xanthan gum.  That’s it.  Small list and all recognizable ingredients makes me a happy girl. This crust is gluten-free and vegan.  It is also cholesterol free and fat-free until you add the butter…

As for nutrition, the Moon Rabbit Foods Pastry & Pie Crust Mix has around 24 2 tablespoon servings in the package.  A serving will provide 60 calories, 115 mg sodium, 16 grams carbohydrates, 1 gram fiber and no sugar or protein.  No sugar or protein is added to the mix so…it remains that way in the end.  When it’s prepared, all of this changes depending on your ingredients and the like.

If you need an easy pie crust, I highly recommend Moon Rabbit Foods Pastry & Pie Crust.  Yet another product I never would have even know existed (and, hence, never would have made my mom’s Cheeseburger Pie (albeit vegetarian and dairy free)) if not for Cuisine Cube.  Loving this service and the new products and companies that it introduces to me.

Product Review: Mina’s Purely Divine Gluten Free Bread Mix + Recipe Bonus

Mina's Purely Divine Gluten Free Bread Mix
Mina’s Purely Divine Gluten Free Bread Mix

Product: Mina’s Purely Divine Gluten Free Bread Mix – $5.79+

It was Easter Sunday and I woke up early.  I haven’t been sleeping well due to bouts of chronic pain in my back and hip.  So, I got out of bed and came out to the living room to do my stretches assigned to me by my physical therapist.  It was as I started doing these that I thought to myself:

“Self…what are we having for breakfast this beautiful Easter morning?”

Since I am currently in a state of no running at all…I had plenty of time to come up with something.  And for some strange reason, I recalled having two bags of Mina’s Purely Divine Gluten Free Bread Mix in my pantry.  I bought these and a chocolate cake mix (which I have used already and didn’t review because I never tried the finish product…I made it for someone else…so now I have to purchase another bag) on Manager’s Special at my local grocery store…for $1.99.  How fantastic is that?

I knew very little about the Mina’s Purely Divine products when I bought them, just that I had seen them featured in ads in my gluten-free magazines.  That was the only familiarity I had with them.  So, with the recollection and the realization that I had two pouches of the Gluten-Free Allergen-Friendly Bread Mix in my pantry…I thought…

Bagels.

Because when I already fail at baking up gluten-free bread more often than I succeed…why not bake bagels.  Because that is SO much easier! *SARCASM*

That being said…I had it in my head now to make them.  It was going to either end well…or be a complete and epic fail.  It wouldn’t be my first.  So, while the roomie was still slumbering in her room…I went into the kitchen and plucked one of the bags of Mina’s Purely Divine Gluten Free Bread Mix off the shelf and set out to work.

Long story short…for my first time making bagels (and gluten-free bagels at that!)…this worked wonderfully.  They didn’t rise as much as I had hoped they would, but they did rise some in the 30 minutes I gave them to just sit.  I think next time I’m going to try the oven on warm thing that a friend suggested and see if it makes any sort of distance.  They held up to boiling in the water and even the actual baking.  Totally impressed.  But the real challenge was going to be in the taste.

By the time the bagels were in the oven and baking (given a little bit of egg wash over the top and a sprinkling of the “everything spice” that I picked up in Charleston, SC, the roomie had emerged and was ready for some brekkies.  I told her that breakfast was currently in the oven…and I would have it ready once the timer went off.  It was already starting to smell amazing, so when she asked what it was, I actually told her.

Bagels.

She looked really surprised.  “You made bagels?!”  You see…she has suffered through more than one epic gluten-free homemade bread loaf fail…so I wasn’t insulted at all.  I nodded and as I pulled them out of the oven, called her over to take a look.  They were perfectly golden on the outside.  Fresh and hot out of the oven, I didn’t want to slice into them so just put some vegan cream cheese in a bowl and said we’d dip (kind of how I used to eat soft pretzels).  So, onto some plates the bagels went while the rest cooled on the pan.  I handed a plate and bowl of the cream cheese over to her and went to get my own.  She started her cry of “hot, hot, hot!” as she broke it open and steam from the fresh bagels swirled up from the little breakfast goodie.  She took a bite and said, “It tastes like a bagel!”

Now, she’s had Everything Bagels from some of the top-flight bakeries in New York City…and she seemed quite content to dive into my first attempt at ever making bagels.  Trust me…she’s quite the critic and if she doesn’t like something…she’ll say so.  But she thought the texture and the flavor were spot on.  And after I got settled to try it for myself…I totally agreed.  As a New Yorker, bagels were a way of life growing up.  I still love them, but am often relegated to getting the frozen versions from Udi’s (as they are the only gluten-free bagels outside of Jennifer’s Way in NYC that have come close to tasting like the real thing!)…which is fine in a pinch.  But these…these were mine.  And they wouldn’t have been possible without Mina’s Purely Divine Gluten Free Bread Mix, for sure.

Truth…I can’t wait to make these again with the other batch.  Maybe get a bit more rise out of them so that middle gets all fluffy and amazing.  Cathy said these were very reminiscent of the ones we ate at Jennifer’s Way back in March, which I took as a high compliment as my first bite of one of Jennifer’s Way bagels made me cry.  Good tears.  This mix worked beautifully and made amazing bagels.  Talk about taking a risk and having it pay off in the end.

Let’s discuss the ingredients in Mina’s Purely Divine Gluten Free Bread Mix.  This mix is made up of organic rice flour, potato starch, organic cassava starch, organic sorghum flour, arrowroot starch, rice flour, teff flour, sea salt, yeast, xanthan gum, and guar gum.

As far as nutrition goes, the Mina’s Purely Divine Gluten Free Bread Mix contains about 13 servings, with each serving being about 1/4 cup.  A serving will provide 100 calories, 0 grams of fat, 0 mg cholesterol, 50 mg sodium, 23 grams carbohydrates, 4 grams of sugar, 1 gram fiber, and 1 gram protein.  That’s really good for a bread mix.  I am very impressed.

If you have access to Mina’s Purely Divine Gluten Free Bread Mix…and feel like taking on a challenge, go ahead…whip up your own homemade gluten-free bagels!!  You’ll be very impressed with the results.

Recipe: Gluten Free Everything Bagels

Gluten Free Everything Bagels made with Mina's Purely Divine Gluten Free Bread Mix
Gluten Free Everything Bagels made with Mina’s Purely Divine Gluten Free Bread Mix

Servings: 6-12 (I made 8 good-sized bagels!)
Time: Prep 1 hour; Bake 18-20 minutes

Ingredients:

  • 1 package, approx. 2⅔ cups Mina’s Purely Divine Gluten Free Bread Mix
  • 1 cup warm water
  • 2¼ tsp yeast (included)
  • 1 tsp + 1 Tbsp sugar, divided
  • 2 tsp vegetable oil
  • 2 Tbsp molasses
  • 3 quarts water
  • 1 egg white, whisked (optional)
  • sesame or poppy seeds for toppings (optional)

Directions:

Add to mixer bowl, 1 cup warm water, 1 tsp of sugar and the yeast. Whisk and let rest for 10 minutes.

Add to yeast mixture: 1 cup of bread mix, the rest of the sugar, the oil, the molasses, and mix well.

Add last 1-2/3 cups of bread mix. Mix on medium high for 5 minutes.

Scrape out on a lightly oiled surface. Form dough into a log. Cut into 6 large or 12 small pieces. (I went for the middle and did 8 perfect size pieces). Roll each piece with lightly oiled hands into a 6″ rope. Shape in a circle, crimping edges.

Arrange bagels on parchment paper. Cover with oiled plastic wrap. Let rise in warm draft free area for 30 minutes. Dough will be tender at this point after the initial rise.

Preheat oven to 450 degrees F.

Bring 3 quarts of water to a slow boil. Gently using oiled hands, or spatula, drop each bagel, one at a time, into the water. Boil in small batches, do not crowd. Simmer for 30 seconds on each side, flip over once. Drain on rack for 5 minutes.

Brush with whisked egg white (optional) and sprinkle the toppings on at this point, if using.

Bake on a lightly greased cookie sheet for 20 to 25 minutes for large bagels and 15 minutes for small bagels. (It took mine 18 minutes…so if you do 8…go with that!)

Cool on rack.

DEVOUR!

~*~*~

I was so impressed with the way Mina’s Purely Divine Gluten Free Bread Mix baked up perfect, delicious bagels. And with this being my first time ever attempting such a culinary feat…well…it just made me want to improve on it.

That being said…WOW!!  Total and complete WOW!!  Find Mina’s Purely Divine Gluten Free Bread Mix and, seriously, give this recipe a try.  I am dying to do it all over again!  Maybe even improve on it some.  We shall see!

Mina’s Purely Divine is purely amazing, purely awesome, and…yes…purely divine!  Just WOW!

Product Review: Russo’s Gluten Free Gourmet Pizza Bites

Russo's Gluten Free Gourmet Pizza Bites
Russo’s Gluten Free Gourmet Pizza Bites

Product: Russo’s Gluten Free Gourmet Pizza Bites – $6.99+

They had me with the product name – Pizza Bites.  PIZZA. BITES.  PIZZA-FREAKIN’-BITES!  As in…pizza rolls?  Maybe? Possibly?  Could I be that fortunate to stumble across (finally) one of the products that I no longer ate, not because it was made of crap (and they are), but because they were my favorite go-to snack when I needed something to eat while very, very busy?

Well…kinda.

In fact, these were more like breaded cheese ravioli, rather than pizza bites, but we’ll go with it. Let’s just run with it.  Pizza Bites! WOOO!

So, I found these at my local natural food store, Rainbow Blossom, and had a freakin’ dance of joy in the freezer section.  Honestly.  I mean, I’ve been to parties where pizza rolls are laid out and everyone is just enjoying a few here and there.  I get to stare at them.  Dammit.

No longer.

Thanks to Russo’s Gluten Free Gourmet…Pizza Bites (rolls…ravioli?) are back on my every-now-and-again want list.  And now…I know where to get them.  After purchasing these, I had to go through more fresh produce before allowing myself an indulgence from the freezer or fridge…but after a full day of professional soccer and time with friends…I needed to have something quick for dinner.  I was going to do up some green beans with almonds, but my roommate was craving pizza.  So…these made their debut in our kitchen.

Russo’s Gluten Free Gourmet came about from Neil Russo, a professional chef who was hard at work on gluten-free recipes, which he was striving to perfect after hearing about the many people connected to himself that were having a hard time finding food while on a gluten-free diet due to intolerance or Celiac disease.  After experimenting on his Italian bread loaves and Tiramisu, Russo was ready to give his food to the world.  He first introduced the gluten free food in his restaurant, where he got high praise.  Soon, he opened up Russo’s Gluten Free Gourmet.  And from there…the frozen versions of some of the classic Italian foods he perfected in gluten-free form.  So good, that people even would ask if he was certain it was gluten free.  All of Russo’s products are prepared in a strictly gluten-free facility.

So, two hungry soccer fans (my roommate and I) were ready to give these a try.  I was surprised, when I opened up the bag to find large ravioli like bites inside.  I was definitely expecting more of the pizza roll just from the name.  They were frozen, lightly breaded stuffed pasta.  But…I was hungry.  Cathy was hungry.  Pizza.  Bites.  Rolls.  Whatever.  Give us something delicious in some sort of pizza form.

Cooking the Russo’s Gluten Free Gourmet Pizza Bites is super easy.  Simply preheat the oven to 350°F and place the frozen bites on a cookie sheet.  Bake for 5 minutes, then flip them and bake for another 5 minutes.  Take out when or if the cheese starts to show.  Mine cooked in 10 minutes without the cheese leaking out or anything.  Bonus.

So, it was chow time.  I dished up half the bag for my roommate and half for me.  That was about 6 of the Russo’s Gluten Free Gourmet Pizza Bites each.  We settled in with an episode of Star Trek: The Original Series and dug in.  One bite…and I couldn’t argue…they were delicious.  I was a bit thrown by the ratio of dough to filling…but that is a small, slight complaint.  I thought there was too much dough encasing a cheese filling…that was a little scant.  The pocket had more air than filling, but it was still crispy on the outside with a melty, molten center, regardless.  And yes…they were really, really great.  Delicious.  Amazing.

Yeah…I’d buy these again.

Let’s talk about the ingredients that are in Russo’s Gluten Free Gourmet Pizza Bites.  These pasta pockets of pizza goodness are made from gluten free flour (rice flour, corn starch, tapioca dextrin, xanthan gum, rice extract) tomatoes, part skim mozzarella, vegetable oil, soybean oil, soybean lecithin, water, whole eggs, yellow corn flour, ricotta, onions, sugar, salt, granulated garlic, onion powder, parsley, basil, and black pepper.

As for nutrition, this isn’t bad for pizza bites.  There are three servings in a bag of the Russo’s Gluten Free Gourmet Pizza Bites.  One serving is 4 pieces.  These 4 pieces will provide you with 260 calories and 15 grams of fat.  You will be taking in 40 mg cholesterol, 430 mg sodium, and 2 grams of sugar.  In addition, a serving dishes up 27 grams of carbohydrates, 1 gram of fiber, and 6 grams of protein.

I was actually impressed by Russo’s Gluten Free Gourmet Pizza Bites.  But, what’s not to love about a company that does 100% gluten free products right, that is family owned and operated, and has exceptional quality.  And…they are doing products no one else has managed to put out there.  And they are doing them well.

If you can find Russo’s Gluten Free Gourmet Pizza Bites in your grocery store or natural food store freezer…buy them and try them.  You’ll love them.  And…pizza rolls are, kinda, back in your life.  And that…is amazing in and of itself.  For real!

Russo's Gluten Free Gourmet Pizza Bites
Russo’s Gluten Free Gourmet Pizza Bites


Product Review: gfJules Cornbread Mix + Recipe Bonus

gfJules Gluten Free Cornbread Mix

Product: gfJules Cornbread Mix – $6.26+

I am a stranger in a not so strange land.  Seriously.  Because for the past three three years that I’ve had to be gluten-free…I’ve followed, discussed, and even met the infamous Jules Shepard, AKA: Jules Gluten Free, AKA: gfJules.  And, despite all of that…it has taken me up until now to actually try one of her products!  Hard to believe, right?  Truth of the matter is…no store in my area currently carries any of the Jules line.  I hope that changes.

So…it was due to my November 2014 Cuisine Cube (aka: the Thanksgiving Cube) that my Jules drought finally came to an end.  Thank you, Cuisine Cube.  Because, honestly, I was beginning to wonder if I was ever going to be able to give this an easy try, without it involving some online ordering and shipping and…yeah.  So, yes, Jules brand is not new to me…but it is.  Confused yet?  Don’t be.

Jules Shepard is one of the biggest advocates and leaders that I know in the gluten-free community.  She was diagnosed with Celiac back in 1999 and embarked upon her new diet.  As a former attorney who was unwilling to accept the dry, gritty, vacuous foods that the gluten-free community was limited to.  Two years later, Shepard perfected an all-purpose flour blend that allowed her to continue her passion for baking.  Soon, people were begging for her to sell it commercially…which she did.  She introduced this flour blend back in 2008, with her former company, Jules Gluten Free, and now exclusively through her new company – gfJules.  Not only is she an entrepreneur, but Shepard has written three highly regarded books and attends various speaking engagements at gluten-free consumer, business, and trade gatherings.  She is the mother of two children, hosts a weekly radio show, pens one of the gluten-free community’s most active blog, organizes an annual Gluten Free Cookie Swap, and personally monitors all forms of her social media network.  She’s doing it all…but not letting her high standards slip in the slightest.

So…here I was, three years after having discovered Jules via Facebook and Twitter, having met her in person last year at a Gluten Free Expo in Indianapolis, Indiana, and having spent forever longing to try her flour and mixes…it finally happened.  Thanksgiving.  A time for giving thanks and eating comforting and hearty foods.  Like…cornbread.  And that is what Cuisine Cube sent me!

gfJules Cornbread Mix (prepared)
gfJules Cornbread Mix (mixed)

The gfJules Gluten Free Cornbread Mix is a gluten free cornbread mix that “will put a smile on anyone’s face.”  Or, so I was told by the Web site.  As cornbread is one of Jules’ favorite sides, she took extra care when she crated this mix, making it so authentic, some restaurants even serve it and don’t promote it as being gluten-free.  It’s really easy to prepare and make too.  Simply whisk together sour cream, milk and an egg.  Stir in the mix using a fork or whisk until smooth. Spread into a hot buttered pan (or into muffin cups) and bake for 25-30 minutes.  The cornbread is done when the edges are crispy and brown and a toothpick inserted in the center comes out clean.  That is…if you bake it according to the instructions on the box.

By now, you should know…that’s not what I do.

Before I get to the recipe I used this amazing product in, let’s discuss it, shall we?

I loved how a light and airy this batter was once I had it all mixed together.  It just whisked up beautifully and perfectly.  I had a good feeling that this wasn’t going to bake up heavy and dense like most gluten-free cornbread…and I was right.  The cornbread turned a perfect golden in the oven, the edges browning perfectly.  And it had this amazing crust that gave it some great texture.  And the inside was light and soft and moist and…so good.  It ranks up in my top gluten-free cornbreads I have made and tried.  I am blown away by just how delicious and perfect this bread was.  Now I want to try more of her mixes…and will have to skip over to her Web site and make it happen. This was one of the best parts of this entire dish.

gfJules Cornbread Mix (prepared, not baked)

The gfJules Cornbread Mix is made from the following ingredients: yellow cornmeal, modified tapioca starch, cane sugar, potato starch, cornstarch white rice flour, corn flour, baking powder, flaxseed meal, xanthan gum, baking soda, salt, tocopherols (vitamin E).  It is made in a certified facility free of gluten, wheat, dairy – all of the Top 8 food allergens.  All her ingredients in the cornbread mix are also non-GMO.  Love it.

The gfJules Cornbread Mix makes 8 servings per box.  In each serving, you will be provided with 160 calories and 1 gram of fat.  This serving will give you 490 mg sodium and  5 grams of sugar, which is really good for cornbread, if you ask me!  And, finally, you will be taking in 2 grams of fiber and 2 grams of protein.

And now…how about the recipe that featured the always amazing gfJules Cornbread Mix?  I won’t keep you waiting any longer, I promise…

Recipe: Gluten Free and Vegan Cheddar Chili Cornbread Pasta Bake

gf Jules Cornbread (prepared) on top of the Gluten Free and Dairy Free Cheddar Chili Cornbread Pasta Bake

Servings: 6
Time: Prep 4 hours; Cook 30 minutes

Ingredients:


  • 1-1/2 cups uncooked gluten-free elbow noodles (I used Meijer Gluten Free Corn Pasta Elbow Noodles)
  • 3/4 cup Daiya Cheddar Style Shreds (if you do dairy…freshly shredded cheddar works!)
  • 2 1/2 – 3 cups of leftover chili (I used Mary Ann’s Beans Gluten Free White Chili)
  • 1 batch of your favorite cornbread (I used gfJules Cornbread)


Directions:

Preheat oven to 425° F.

Bring  the water to a boil and prepare the pasta according to the directions on the package, taking about 1-2 minutes off of the cooking time, as the noodles are going into the oven.

While the noodles are cooking, mix up a batch of your favorite cornbread (just the batter…do not cook it!) and get the cheese prepared.

Drain the pasta when it’s ready.

In an 8 x 8 inch baking dish, spray non-stick cooking spray.  Add the pasta to the botom of the dish.  Then top it with a layer of cheese.  Then add the chili.  Top with the cornbread batter, spreading it evenly over the top with a spoon.  It’s okay if it doesn’t reach the edges.

Bake for 30-35 minutes, or until the cornbread is golden on top and cooked all the way through.  You can use a spoon to lift up the cornbread layer to make sure that it is completely cooked.  Cooking times may vary with the cornbread mixture you use, but keep an eye on it and check it.  The cooking time might increase due to the “wet” layers that are underneath the layer.

Serve immediately.

~*~*~

I don’t think a better upper crust could have existed.  No doubt about it.  gfJules lives up to the high pedestal that I have regarded it on since I first discovered Jules Gluten Free three years ago.  So happy that, because of Cuisine Cube, I finally got to try one of her amazing products.  It was everything I thought it would be.  Maybe even more.  Count me one happy cornbread loving girl!

And, if you have yet to give gfJules a try, or Cuisine Cube for that matter…head over to the Cuisine Cube page and sign up for at least a month.  If you aren’t impressed (but, trust me, you will be), you can opt out after that.  With plans starting as low as $29.99/month for each cube, you get the convenience and amazing pleasure of having box of gluten-free goodies arrive each month, featuring lesser-known and smaller gluten-free artisan products.  I have been amazed, wowed, and completely blown away at times by the items I have had the opportunity to find out about and try thanks to Cuisine Cube.  We aren’t talking sample sizes either…you get a full size product, as you would purchase it in the store.  So…what are you waiting for?  Go sign up!

And, gfJules…I loved meeting you this past year…and I have really enjoyed finally getting to try one of your outstanding and top-of-the-line gluten-free products.  I hope more people hop over to your site and order.  Now that I have tried it…there’s no stopping me now!