Recipe: Gluten-Free and Vegan Pumpkin Spice Ice Cream

I love pumpkin.

I’ve said it countless times before…because, after all, this is pumpkin season.  So…I’ll say it again.

I.  LOVE.  PUMPKIN.

Get it?  Got it?  Good!

Well, this past weekend I met up with some great friends at the local ice cream shop.  There, I indulged in a great ice cream called “Pumpkin Spice and Everything Nice.”  Why?  Because it’s pumpkin time and it’s one of the seasonal rotating flavors.  It only comes around in the fall, my friends…so I take advantage…believe me!  Of course, as I am sitting there eating it, I’m wondering if I could make something like this…but using the coconut milk and the cans of pumpkin I had in my pantry.

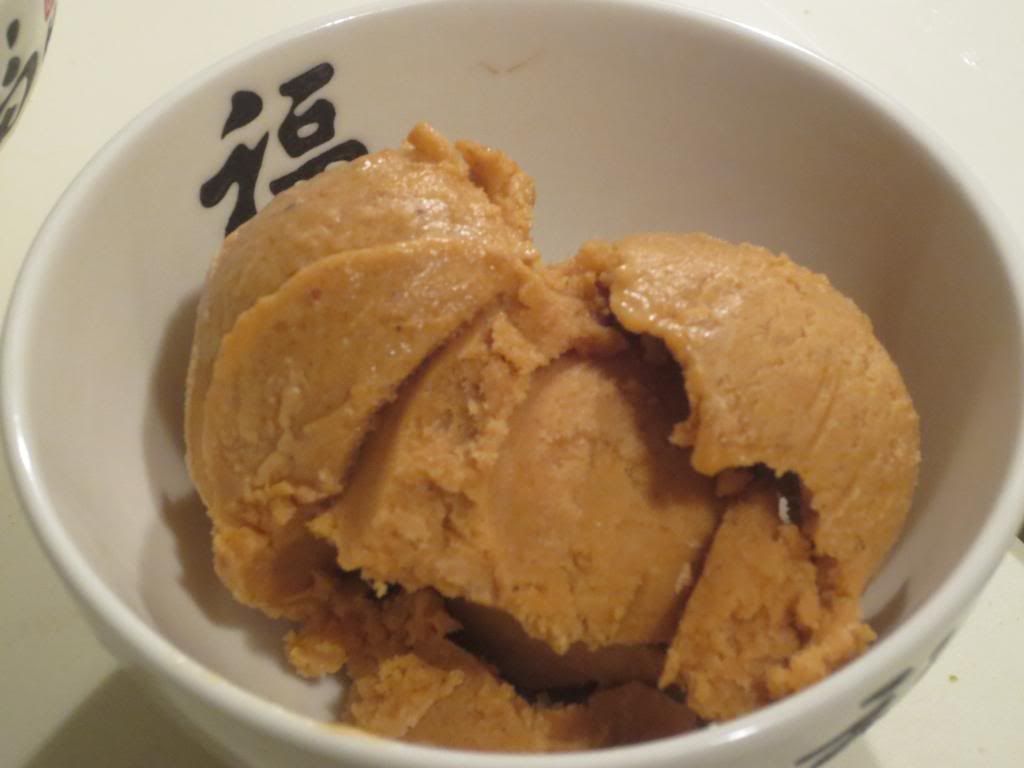
After a little researching, it turned out I could.  And with a little guidance from PBS and Kitchen Explorers, I was able to make my own pumpkin spice ice cream…completely vegan…gluten-free…packed with flavor.  I was one happy girl when I took this out of the ice cream maker.

Recipe: Gluten-Free and Vegan Pumpkin Spice Ice Cream

Gluten-Free and Vegan Pumpkin Spice Ice Cream

 Servings: 8
Time: Prep 10 minutes; Freeze 30 minutes

Ingredients:

  • One 13.5 ounces can coconut milk (do not use skim or low-fat) (I used the 11 ounce carton of So Delicious Culinary Coconut Milk)
  • 1-1/2 cups unsweetened canned pumpkin puree (I used Libby’s)
  • 1 cup sugar
  • 1/2 cup packed dark brown sugar
  • 2 teaspoons vanilla extract
  • 1-1/2 teaspoon pumpkin pie spice
  • 1/4 teaspoon cinnamon
  • 1/4 teaspoon ginger powder
  • 1/4 teaspoon cloves
  • 1/4 teaspoon salt

Directions:

Whisk all the ingredients in a large bowl until well mixed and smooth.

Transfer the mixture to an ice cream maker and freeze according to the manufacturer’s directions.

Transfer the ice cream to a freezer-safe container, cover the ice cream with plastic wrap, cover with the lid, then freeze until firm.

~*~*~

Yes…it truly is that easy.  And the flavor.  OMG…the flavor.  This is now going to be incorporated into my Thanksgiving Day menu.  I’m hosting this year…and I got inspired with this ice cream to do a dessert for the occasion.  No pumpkin pie at my house.  I hate pumpkin pie with a passion.  But this…this will blow away the pie competition anyway.  The flavor of this ice cream is like eating a chilled pumpkin pie…except that it tastes good.  It’s hard to stick to just the one serving, but if you do…you’ll have 8 delicious 1/2 cup servings of this amazing ice cream.

It’s my favorite one I have made so far.  And now I just want to keep making it to keep it stocked in my freezer.  You will too.  Trust me.

Product Review: Tasty Bite Spinach Dal

Tasty Bite Spinach Dal

Product: Tasty Bite Spinach Dal – $3.29+

It’s Monday again.  And you know what that means, right?

It means I use the rice I cooked up last week for Monday…until the world got loopy…and enjoy another quick Indian meal from Tasty Bite.  That’s what it means.  Why?  Because it’s the night I come straight home from work, feed myself quickly, change into my running clothes and then head out to get at least 3 miles in with my friends at my local running store.

I’m currently tapering…3 miles would have been ideal.  Except we did something different tonight, and Patrick (he’s tricksy), somehow got me to climb Dog Hill in Cherokee Park twice.  TWICE!  I hate dog hill…but he said, as we entered Cherokee Park…let’s make this the start of one loop, so we’ll  go all the way around and then when we come back around we’ll head back to the store.  Um…okay?  I guess.  Regardless…I was one of three people who did it.

During taper.

Bad.  Bad me.

But…one thing that wasn’t bad was my dinner.  In fact, I was once again blown away by the authentic flavor and taste that Tasty Bite puts into each of their entrees.  Since I love Indian food with a passion, then I want my Indian food to be good.  I want it to taste like Indian food.  And Tasty Bite accomplishes just that.  It’s incredible how good these little microwavable pouches actually are.  I continue to be impressed, surprised, and happy with my meal.

Today was a new flavor for me.  Today’s pouch introduced me to Spinach Dal.  Dal is lentils.  So, if you like lentils and spinach…well…this is a great opportunity for you to combine the two into one.  The Tasty Bite Spinach Dal entree is spinach that has been cooked down and combined with yellow lentils.  This forms an amazing sauce that is packed with nutrients and protein.  These two components are accented with a variety of spices (including ginger, garlic, sugar, chilies, turmeric, cinnamon, cumin, and pepper) as well as water, tomatoes and onions.  What emerges is this great green spinach-y sauce with tons of flavor, seasoned to perfection, with yellow lentils swimming throughout.  The texture is great.  The taste is superb.  You’ll be blown away by it.  I hoovered mine down, which isn’t always a good thing to do before going for a run, but I was hungry…and loving every bite.

Nutritionally speaking, the Tasty Bite Spinach Dal is a powerhouse of nutrients.  One serving is half of the pouch, which dishes up only 100 calories and 5 grams of fat.  One serving also provides 480 mg sodium and 2 grams of sugar.  Not too shabby for a shelf-stable item, right?  And one serving will give you 3 grams of fiber and 3 grams of protein as well.

Once again, Tasty Bite exceeds all expectations and wows me once again with their bold flavors, their ability to replicate Indian food to perfection, and just how easy they are to prepare.  Just a 90 second zap in the microwave and serve.  Add it over rice, eat it on its own or add it to a meal to change it up or turn it up a notch.  I saw a recipe on their Web site where someone placed Spinach Dal on a pizza crust.  Sounds delicious, yes?

The possibilities are endless…and taste oh, so good!

Tasty Bite Spinach Dal over jasmine rice

Recipe: Baked Parmesan Risotto with Peas and Portobello Mushrooms

I am addicted to the Food Network.

Really.

If I am out of town or at the gym, that is my preferred station.  I might be a gluten-free vegetarian, but I love food.  And I love to learn about food.  And, even more, I love to learn new ways to cook food.  Lucky for me HULU airs a few Food Network shows, and one evening my roommate and I tuned into an episode of The Barefoot Contessa.  I know, a lot of people don’t like Ina that much, but sometimes the things she does with food is awesome.  And on this particular episode…she was making risotto.  The difference was, she was not going to stand over a pan on a stove, stirring and stirring and stirring as the rice worked its way to the perfect texture.

Nope.  She was going to bake it.

BAKED RISOTTO!!  Who would have thought that would work?

I changed up the original recipe to be vegetarian and make use of what I had in the kitchen, which meant I even (God forbid) took out the use of the white wine.  I didn’t have any on hand.  I include some sauteed fresh portobello mushrooms as well.

Recipe: Baked Parmesan Risotto with Peas and Portobello Mushrooms

Baked Parmesan Risotto with Peas and Portobello Mushrooms

Servings: 6
Time: Prep 10 minutes; Cook 50 minutes

Ingredients:

  • 1-1/2 cups Arborio rice
  • 5 cups simmering vegetable stock, divided
  • 1 cup freshly grated Parmesan cheese
  • 3 tablespoons unsalted butter, diced
  • 2 teaspoons kosher salt
  • 1 teaspoon freshly ground black pepper
  • 1 cup frozen peas
  • 1 cup portobello mushrooms, chopped

Directions:

Preheat the oven to 350°F.

Place the rice and 4 cups of the vegetable broth in a Dutch oven.

Cover and bake for 45 minutes, until most of the liquid is absorbed and the rice is al dente.

While it bakes, clean and chop your portobello mushrooms (if using).  Place a pan over medium heat and add olive oil.  When the olive oil is heated, add the portobello mushrooms and a dash of salt and saute until the mushrooms are lightly browned on each side.  Remove from the heat and set aside.

Remove the risotto from the oven, add the remaining cup of vegetable broth, the Parmesan, butter, salt, and pepper.

Stir vigorously for 2 to 3 minutes, until the rice is thick and creamy.  Add the peas and mushrooms and stir until heated through.

Serve hot.

~*~*~

I couldn’t believe how beautifully this actually worked out.  Honestly.  It was amazing.  The rice was fluffy and soft.  The risotto itself had that thick risotto feel to it.  The cheese melted beautifully and really helped give it that added bit of creaminess.  I didn’t even miss the wine.  And by sauteing up the mushrooms, I gave the risotto a little meatiness.  The seasoning was good, but if you are using a good Parmesan cheese, I recommend maybe cutting back slightly on the salt that is added.

My roomie loved this dish and was so happy we had leftovers.  I even took a serving in to a co-worker because I had mentioned I was making it for dinner, and he had been having a rough week.  When I saw him later that day, he said it was SO good.  It made me happy.

So, if you love risotto but don’t want to slave over a hot stove to make it…give this recipe for baked risotto a try.  I think you’ll be more than pleased with the results.  As for me…I think I will forever bake my risotto in the future.  So much easier and much better results.

Recipe: Gluten-Free Spaghetti Squash Alfredo

A couple of years ago, you never would have caught me buying a spaghetti squash or even cooking with squash.  For as much as I could remember, growing up, I disliked squash.  Wouldn’t touch it.  Hated the taste.  Hated the texture.  Hated everything about it.  Did. Not. Want.

But when I signed up for my CSA bin, before I knew I could swap out items…squash season came around and my bin was being inundated with different varieties of the vegetable.  And there I was…not wanting to let anything go to waste.

Now…whenever I get a squash I do a happy dance of joy.  I have learned that tastes can change over time and now squash is one of my favorite things to prepare.  There are so many different varieties of squash and so much that can be done with them because of that.  This is one rockstar of a vegetable, that’s for sure.

One of my favorite varieties of squash is the spaghetti squash.  I love it.  I have made so many different meals with the inner strands of the spaghetti squash, even substituting it for pasta noodles.  But when my CSA bin recently delivered a small spaghetti squash to my door…I wanted to do something outside of the box.  With a little Google-foo and a recipe from a blog called Chocolate & Carrots…I was able to do just that.  I baked my spaghetti squash…shredded it with a fork…then topped it off with a lightened up, gluten-free alfredo sauce.

Recipe: Spaghetti Squash Alfredo

Gluten-Free Spaghetti Squash Alfredo

Servings: 2
Time: Prep 10 minutes; Cook 1 hour

Ingredients:

  • 1 spaghetti squash
  • 1 tablespoon unsalted butter
  • 3 cloves garlic, finely minced
  • 2 tablespoons flour (I used Better Batter Gluten-Free All-Purpose Flour)
  • 1 cup of milk (I used unsweetened almond milk)
  • 1 tablespoon reduced fat cream cheese (I used Daiya Deliciously Dairy Free Cream Cheese Style Spread)
  • 1 cup grated melty cheese like Parmesan (I used Dill Havarti Cheese…because that’s what I had)
  • 1/4 cup grated mozzarella or Parmesan, for topping


Directions:

Bake your spaghetti squash as usual.  There are so many ways to bake a spaghetti squash…in the oven or the microwave.  But I cooked mine by slicing the squash in half and removing the seeds and pulp.  On a baking sheet, I placed the squash rind-side up and slid it into a 375°F oven for about 40 minutes.  After 40 minutes, I removed the squash from the oven and used a fork to break up the spaghetti squash strands inside of the spaghetti squash casing.

While the squash is baking…make the sauce.

In a small sauce pan over medium heat, melt the butter.

Whisk in the garlic and cook for 1 minute, until fragrant.

Whisk in  the flour until combined.

Slowly whisk in the milk until it is combined and there are no lumps.

Keeping the pan on the heat, whisk in the cream cheese.

Remove the pan from the heat and whisk in the cheese until it has melted.

Evenly distribute the sauce to both halves of the spaghetti squash and stir.

Top with the remaining cheese and place the halves under a broiler for a minute or two, until the top becomes a light brown.

Serve immediately with pepper, red pepper flakes, or hot sauce.

~*~*~

I discovered that the next time I choose to make this dish, I definitely want to use a stronger cheese.  While I love Dill Havarti for a cheese, it really wasn’t made for an alfredo sauce.  It melted just fine, but the flavor profile needed a bit more of a boost.  I recommend a Gouda cheese or an extra sharp cheddar.  Something with a little bite behind it.

All that being said, regardless of the use of mild cheese, I found that I absolutely LOVED this dish.  It was nutritious and filling all at the same time.  The spaghetti squash paired well with the lightened up alfredo sauce.  And I found topping it with a little heat from red pepper flakes and a dash of my favorite hot sauce just gave it that little extra kick.  It’s optional…but amazing.  My roommate preferred hers with just some grated Parmesan cheese on top.

If you are looking for a new way to enjoy a spaghetti squash…or are just now being introduced to the vegetable…give this recipe a try.  It takes a little time to prep the squash…but the end result is always worth it.

Recipe: Broccoli Pizza Crust

Yes…you read that title right.  This is a pizza crust…made out of broccoli.  Hey…I’m doing this whole clean eating thing, and while I love a real (gluten-free) pizza crust as much as anyone else, sometimes you just want to think outside the pizza box and try something new.  And since it’s getting to the point where I always have broccoli in my CSA bin…well…instead of doing a typical cauliflower crust (if you can call that typical)…I decided to give it a go with one of my favorite veggies…broccoli.

It’s a little bit of work, but it’s a beautiful and nutritious alternative to standard pizza crust.  I make mine with vegan cheese do to lactose intolerance, but regular cheese works just as well.  Don’t mock it until you try it:

Recipe: Broccoli Pizza Crust

Broccoli Pizza Crust

Servings: 2
Time: Prep 10 minutes; Cook 25 minutes

Ingredients:

  • 1 medium head of broccoli
  • 1 cup grated mozzarella cheese (I use Daiya mozzarella shreds)
  • 1/2 teaspoon dried basil
  • 1/2 teaspoon dried oregano
  • 1/2 teaspoon salt
  • 1/4 teaspoon pepper
  • 1 teaspoon nutritional yeast (optional…but I highly recommend it)
  • 1 large egg

Directions:

Preheat the oven to 450°F and line a baking sheet with parchment paper.

Chop the broccoli into florets (try to remove the stems) and place them in the large bowl of a food processor.  Pulse for about 30 seconds, just until all of the florets have been cut down into very fine crumbs.  You should have about 3 cups of crumbs.

Transfer to a microwave safe bowl, cover, and microwave on high for 4 minutes.  Remove and let cool slightly.

Transfer to a clean tea towel (not paper towels because they will shred).  Wrap the broccoli bits up tightly in the towel and wring all the water out over the sink.  There is actually quite a bit of water in the broccoli, so keep wringing to get out as much water as you can.  This will help keep the crust from crumbling.

Combine dried broccoli with the cheese, basil, oregano, salt, pepper, nutritional yeast, and egg.  Use your hands (that’s it…get a little dirty) to mix everything together.

Transfer the mixture to the prepared baking sheet and form into a 10-inch thin circle.  Bake in preheated oven for 10-11 minutes.

Once crust has precooked, remove from the oven and top with whatever toppings you like.  For this particular pizza, I topped mine off with slices of fresh red tomato, caramelized onion, chopped yellow pepper, chopped avocado and topped it off with goat cheese.

Return to oven and bake for another 15-20 minutes.

Remove from oven and serve.

~*~*~

As you can imagine, this crust doesn’t keep very well so you’ll want to eat the entire thing that day.  So either share with a friend of come to dinner hungry.  Cheese, herbs and fresh veggies made up my entire pizza and it was super delicious.  You won’t even miss the actual crust.  Honestly!  This has become one of the meals my roommate begs me to make.  It’s a good thing we get lots of broccoli.

Give it a try…I dare you!

Product Review: Nuovo Gluten-Free Basil Potato Gnocchi

Nuovo Gluten-Free Basil Potato Gnocchi

Product: Nuovo Gluten-Free Basil Potato Gnocchi – $5.99+

I know…I’ve been blogging a lot lately.  And even more so…I’ve been blogging a lot about gnocchi.  And can you blame me?  I mean…if you’ve ever had a properly cooked gnocchi, you know that there is nothing more rustic and traditional than that in Italian food.  It’s one of the first pastas ever prepared by Italians…and probably my absolute favorite.

But gluten-free…that makes it difficult.

You will recall from a few blog entries prior to this one…I was at my local Earth Fare when I stumbled across (did a happy dance and a few frolicking laps of joy around the store) Nuovo Gluten-Free Gnocchi in the fridge/freezer pasta area.  Fresh…gluten-free…pasta.  Not just any pasta…gnocchi.  *DROOL*  There were three different flavors to choose from.  And I decided I didn’t want to make decisions that day…I wanted gluten-free gnocchi.  So all three flavors came home with me and spent a little time in my freezer.

But…when the pantry and fridge are becoming bare and you’re waiting on the next paycheck and your next CSA bin…you make do with what you have.  And I happened to have some marinara in the fridge and some gnocchi in the freezer.  Dinner…simply served.  It only took a little bit of boiling water, some salt, and a little warm on the stove.

Nuovo Gluten-Free Basil Potato Gnocchi (boiled and drained)

I started with the classic…and moved to the next natural choice…Basil Potato Gnocchi.  Just one step above Classic Potato.  This one, the little potato-pasta clouds are seasoned with flecks of basil.  You can see them.  They look amazing.  They smell amazing as they boil away in the big pot of water.  Trust me…I was so happy that the sauce was warming because it helped me keep from sneaking a taste.  These were coming from frozen, so they took a bit longer to float to the top water and show they were done.  But when they all were floating happily at the top of a rolling boil, I switched off the stove, drained the gnocchi, and then tossed them in with the sauce.  And yes…I used only one serving of sauce this time…and it still felt like too much.  I have one more chance to get it right.

So…let’s discuss the Gluten-Free Basil Potato Gnocchi from Nuovo for a moment.  Not only did this version smell delicious, it totally topped the Classic Potato as far as flavor goes.  It’s amazing what a little basil can do.  Not that the Classic Potato Gnocchi was bad, but…this one had a little more flavor…and all it had was some fresh basil chopped and added into the dough.  I happen to love the smell and taste of fresh basil.  Once again…these gnocchi boiled up and cooked through to that soft perfection that you want.  Where you still have some give, but it almost melts in your mouth.  Ahhhh…sweet gnocchi goodness.  I loved the addition of basil to this version.  It just gave it that added…oomph.  And I liked the Classic Potato well enough.  This just turned the volume up to 11.  It even paired well with the marinara sauce.  In fact…it was a perfect match.  I was sad to gobble up the last little morsel in my bowl.  I need to buy stock in these…seriously.

Let’s talk nutrition, shall we?  A serving of Nuovo Gluten-Free Basil Potato Gnocchi is half of the packet.  This dishes up 240 calories and 1.5 grams of fat.  You also will be consuming 210 mg of sodium and 2 grams of sugar.  Love how low it is in both of those.  In addition, each serving provides you with 4 grams of fiber and 6 grams of protein, making you feel full and satisfied.

Not bad for a dinner, right?  RIGHT!  And it’s super tender, super delicious, and so versatile.  Eat it with any sauce of your choice, but I highly recommend an amazing marinara.  It just really meshed well.  YUM!

Nuovo…I hope your gluten-free gnocchi goodness never leaves me.  Because, while I know I am capable of making my own gluten-free gnocchi…sometimes it’s nice to have someone take over that task for you.

These…are amazing.

Nuovo Gluten-Free Basil Potato Gnocchi in Mezzetta Napa Valley Bistro Homemade Style Marinara

Product Review: Tasty Bite Aloo Palak

Tasty Bite Aloo Palak

Product: Tasty Bite Aloo Palak – $3.29+

Indian food is love, yes?

Of course it is.  In fact, this coming Friday I’m heading out to my favorite Indian restaurant here in town with my roomie and my friend Jenn because we are prepping for the trip to Chicago early Saturday morning for my marathon.  Pardon me while I freak out a wee tiny bit here.  Or a lot.  Take your pick.

Ahem.

Unfortunately, I don’t make enough money to afford to feed (see what I did there?) my Indian food habit.  Nope.  I’m a poor, starving, soon-to-be marathoner who loves to eat but can’t always justify the means.  And, I grew up eating Indian food thanks to my neighbors who were from India.  I loved being invited to eat dinner with them because the food was so different and seasoned so different than what I was used to.  It was love at first bite…and continues that path.

So, when I get a hankering for Indian food…or it happens to be a Monday when I need a quick bite before speeding over to my fun run group after work, well, I turn to Tasty Bite.  Because they bring Indian food to my kitchen in the easiest form possible.  Yep.  A microwavable pouch.

Don’t turn your nose up at the microwave.  It has its uses…aside from blowing things up or making butter get everywhere when you’re just trying to soften it…

You can’t mock something until you try it.  And you’ll want to give Tasty Bite a chance.  Especially if you like Indian food.  The flavors are so authentic.  And all the ingredients…they’re natural, not over processed or made of chemicals.  You will recognize every single one of them printed on that little yellow pouch of curried goodness in your grocery store.  Peace of mind…and delicious food?  Yep…it is possible.  Very possible.

Two weeks ago…because I’m behind…yes…two weeks ago, I used the magical microwave powers to heat up and create a delicious pre-run meal…with the help of Tasty Bite.  And this week’s flavor…Aloo Palak.

Those of you unfamiliar with Indian cuisine, Aloo Palak is simply potatoes and spinach that are simmered together with onions, tomatoes and spices.  What might these spices be?  Well…ginger, garlic, sugar, chilies, and turmeric.  That’s not so scary, right?  Exactly!  And the best part is…it all comes together beautifully.

Now, don’t judge me, because I admit I double-starched this meal.  I cooked up two servings of jasmine rice to serve this entree over.  It’s not necessary, but I do love having rice with my Indian food.  So…potatoes and rice.  Consider it…carbing up for the 3 mile run I was going to be doing.

Double starch or not…Tasty Bite’s Aloo Palak is delicious.  It’s filling.  It’s mild…meaning it won’t bother your tummy if you eat and run like I do.  I love my spicy food, believe me…but not 30 minutes before I go for a 3 or more mile run.  Yeah…not good.  But…this one…the potatoes beef it up.  The spinach is creamy and just makes a great sauce for the potatoes to bed in.  The tomatoes and onions give it a sweet and savory feel.  The spices…they give it that Indian flare.  When you eat Indian food, you want it to taste ethnic.  You want to feel like you are in India.  This little pouch of gluten-free, vegan, kosher, culinary goodness delivers that flavor.  No questions asked.  It’s a little taste of India…straight out of your microwave.  No passport required.  Just a spoon.  Or a fork.  Whatever you wish.

I loved this.  I wish I had eaten the whole pouch myself.  But…I don’t want the roomie to starve either…so I share.

Let’s talk nutrition, since I already covered ingredients.  A serving is 1/2 of the pouch of Tasty Bite Aloo Palak.  This dishes up 100 calories and 3 grams of fat.  Each serving will give you 400 mg of sodium and 3 grams of sugar.  That’s not bad for something packaged.  And you get dished up 3 grams of fiber and 3 grams of protein as well.  In addition, this meal is cholesterol free and trans-fat free.  Love it.

If you are unfamiliar with Indian food and don’t want to risk a trial with a local restaurant…make Tasty Bite your first stop.  If you love Indian food, but just can’t justify yet another meal out at your favorite place…make Tasty Bite your next option.  Honestly, Tasty Bite is one of the best heat and eat meals out there…and they do Indian food right.  Transport yourself to Indian food awesomeness in just 90 seconds.  Grab a spoon…and dig in.

Tasty Bite Aloo Palak over jasmine rice

Product Review: Mezzetta Napa Valley Bistro Homemade Style Marinara

Mezzetta Napa Valley Bistro Homemade Style Marinara

Product: Mezzetta Napa Valley Bistro Homemade Style Marinara – $4.49+

We all know that I am no stranger to making my own marinara sauce for my pasta dishes.  But when a deal hits…and when there just isn’t enough time and tomatoes in the world or kitchen…sometimes purchasing one from the store isn’t such a bad thing.  Especially when it is made with real ingredients and promises home-style flavor.

That’s how I stumbled across Mezetta Homemade Style Marinara, part of the Napa Valley Bistro line.  I was walking the aisles of my local grocery store, and a there were jars of this marinara sauce on Manager’s Special.  I couldn’t pass up the discounted price, and as it is labeled gluten-free, and all ingredients were recognizable…I figured I would give it a try.

But I had to have a dish to prepare for it.  And after returning from a long vacation away from home and not having all the fresh produce from my CSA bins to create meals with, I turned to my pantry, freezer, and fridge.  I had some gluten-free gnocchi in the fridge, so I figured…why not pair it with this marinara.  What was the worst that could happen?

The answer…nothing.  No bad could come from this at all.

I got the gnocchi working in the boiling water and while they cooked, I heated up two servings (one for me and one for my roomie) in a saucepan on the stove.  I loved the way this marinara sauce looked.  It wasn’t too thick and you could see that sheen of olive oil as it was added to the pan.  Love that healthy fat.  It had little chunks of tomato throughout it and it smelled so amazing as it came to a gentle simmer on the stove.  When the gnocchi was done and drained, I tossed it right into the sauce and coated each and every little pasta dumpling with the sauce.  I noticed then that for gnocchi, I had made too much sauce.  So the next time I made the gnocchi…I halved the sauce…and it still felt like too much.

That being said…WOW!!  What great flavor.  The tomatoes are the absolute star.  This sauce is seasoned to perfection, has the perfect texture, isn’t too rich or too runny…it’s just right.  Perfect.  And I was actually surprised.  Because, when I see jars of something on Manager’s Special I have to wonder what may be the reason for the dramatic price cut-back.  And I had two jars of it.  Now I think…YES!!  I HAVE TWO JARS OF THIS!!  It is jarred pasta sauce at it’s homemade finest.  It tastes like homemade, which is the point.  But…it is just culinary perfection in a jar.  I was beyond impressed.  The reason for this fantastic flavor?  Mezzetta Homemade Style Marinara is made in the traditional Italian way, with wine to enhance the taste and richness.  It is slow cooked in small batches with only natural ingredients.  And, honestly, that can make all the difference in the world.  And it did in this case.

So, let’s talk about the ingredients for a moment.  This pasta sauce is simply composed of imported Italian plum tomatoes from the San Marzano region, imported olive oil, fresh onions, sea salt, fresh garlic, Napa Valley Cabernet Sauvignon wine, fresh basil, black pepper, oregano.  The label itself declares that this product is gluten-free.  I can look at the ingredients and see that, but it’s nice to have confirmation.  I am more likely to buy a product that is labeled than one that is not.

Nutritionally speaking, a serving of Mezzetta Napa Valley Bistro Homemade Style Marinara is 1/2 cup.  In this serving you will receive 90 calories and 5.5 grams of fat.  There are 490 mg sodium and 3 grams of sugar in each serving as well.  This sauce is cholesterol free.  And one serving also dishes up 1 gram of fiber and 1 gram of protein.

Top off your favorite Italian dish with this amazing sauce.  Trust me, the flavor profile does wonderful things to whatever it is added to.  True Italian flavor right on your local grocery store shelf.  Seek it out…and give it a taste.  Trust me…you’ll love it.

Mezzetta Napa Valley Bistro Homemade Style Marinara over Nuovo Gluten-Free Classic Potato Gnocchi

Product Review: Nuovo Gluten-Free Classic Potato Gnocchi

Nuovo Gluten-Free Classic Potato Gnocchi

Product: Nuovo Gluten-Free Classic Potato Gnocchi – $5.99+

Prior to my gluten-free life…I discovered the awesomeness of those delicious potato pasta pillows of awesomeness, known simply as gnocchi.  I was addicted.  Truly.  Completely.  100% in love with these little puffs of potato and flour.  There is just something so special and amazing about the way they just sort of melt against your tongue.

Gnocchi rules.

No argument.  No disagreement.  Gnocchi is tough to beat.

But when you’re gluten-free…anything in the Italian world…especially where one of the major components is flour…becomes a no-go.  Off limits.  Do. Not. Consume.  Or else.

Sadness.  Sure, I can make my own…but sometimes you just don’t want to mess with it.  Let’s face it, while gnocchi rocks the culinary world of Italian food…it isn’t the easiest dish to make.

Imagine then, my elation, when I was visiting my local Earth Fare one day and spotted three varieties of gluten-free gnocchi in the refrigerator section.  Seriously.  Please insert happy dance and lap of joy around the store.  No…that is not an exaggeration.  The gnocchi is part of the gluten-free line by Nuovo Pasta.  And, you better believe I grabbed all three varieties and went to store them in my freezer upon returning home from another budget-busting grocery trip.  Sometimes I just can’t help myself.

Anyway…with a return from vacation and a lot going on lately, I found myself without much fresh produce to create dishes…but I did have marinara sauce in the pantry and gnocchi in the freezer.  Dinner problem…solved.

For the first taste of Nuovo Gluten-Free Gnocchi…I decided to go with the classic – Potato Gnocchi.

If you screw up the original…there isn’t much hope for the rest, right?  Right!

Nuovo Gluten-Free Classic Potato Gnocchi (boiled and drained)

First of all, this is such an easy meal to make.  Boil water according to package instructions (and yes…do salt the water), add the gnocchi and cook until they float.  Drain.  Enjoy!  It truly is that easy.  And it all gets done within 10 minutes if you get your water boiling in good time.  So, while I was waiting on the water to boil, I began to heat up a new marinara sauce I was trying.  With that going, in went the gnocchi…watching for those potato pasta puffs to start floating.  When they did and reached that perfect tenderness, I drained them, then tossed them into the marinara.  I actually prepared too much marinara for the serving, but, hey…it’s all good.

I settled in with my roomie and we dug in, quite happy to have dinner without a long wait.  I was so impressed with the tenderness and the texture of the gnocchi as I took my first bite.  The density was just right.  The texture…soft with that bit of melt-in-your-mouth goodness, yet still requiring you sink your teeth into each bite to ensure total satisfaction. Oh yes…Nuovo did good.  They did really, really good with these.  They have this mild flavor to them that makes them perfect to pair with any tomato sauce or even a cream sauce.  Light.  Fluffy.  Goodness.  Honestly, someone would be hard-pressed to call these out as gluten-free.  You can’t tell.  Not one bit.  And that’s entirely the point!

So, let’s get the nitty-gritty details out of the way.

Nuovo Gluten-Free Classic Potato Gnocchi is created by combining potato flour, potato flakes, water, canola oil, salt, and rice flour.  Yes…that’s really all that goes into this.  Hello clean eats!!

Nutritionally speaking, a serving of Nuovo Gluten-Free Classic Potato Gnocchi is 1/2 of the little plastic pack that it comes in.  That’s around 4.5 ounces.  This serving gives you 240 calories and 1 gram of fat.  Your serving of this gluten-free gnocchi provides a scant 220 mg sodium and 2 grams of sugar.  In addition, you will be provided with 4 grams of fiber and 6 grams of protein.  So, just just made from real ingredients but really good for you too.  These are very impressive nutritional stats.

I fell in love with the lightness of Nuovo Gluten-Free Classic Potato Gnocchi, as well as the mild flavor.  It’s so versatile and so delicious.  And even better…so easy to prepare.  No one would know it was gluten-free unless you told them.  How’s that for impressive?

If you can find Nuovo Gluten-Free Classic Potato Gnocchi at your local grocery store or health food store…buy it and try it for yourself.  You will not be disappointed.

Nuovo Gluten-Free Classic Potato Gnocchi in Mezetta Napa Valley Bistro Homemade Style Marinara

Product Review: Nature’s Path Gluten Free Selections Summer Berries Granola

Nature's Path Gluten Free Selections Summer Berries Granola
Nature’s Path Gluten Free Selections Summer Berries Granola

Product: Nature’s Path Gluten Free Selections Summer Berries Granola – $5.99+

Gluten-free granola is a staple in my apartment and my pantry.  Honestly.  My roommate and I go through it each week, using it on the breakfast parfaits that are part of the morning rotation every other day.  It’s nice to change things up every now and again and have something other than cereal.  I often will pair Greek yogurt and granola with fresh berries…or caramelized apples or pears.  Sometimes even banana.  It just depends on what produce I happen to have in the house.

Recently, while scouting the grocery store for some granola, I had my roommate choose the one she’d like to have.  Now, she, like me, has her favorites.  But, she chose one we hadn’t tried before.  I was actually surprised.  Even more as this was actually a newer product from Nature’s Path.

Now, Nature’s Path has a few great gluten-free options.  I have eaten their EnviroKidz cereals (and still do!) and have even given some love to their regular cereals and one of their frozen waffle options.  So, Nature’s Path is rather consistent on quality products.  I don’t think I’ve had a product that I haven’t liked.  Which is why I am not ashamed of my EnviroKidz Koala Crisps in my pantry.

But…granola?  Why not?

My roomate chose the Gluten Free Selections Summer Berries Granola.  This granola is a blend of gluten-free rolled oats, yogurt chips, freeze-dried blueberries, freeze-dried strawberries, and freeze-dried strawberries.  Now, I’ve always been a fan of the dehydrated fruits in cereals because I find them to be so packed with flavor.  I was actually looking forward to sampling this one.

Well…Nature’s Path really nailed it.  The Gluten Free Selections Summer Berries Granola is amazing.  While the sweetened and seasoned gluten-free rolled oats make for a great base, and the intensity of the freeze-dried berries brought a great sweet tang to each bite.  But the star of this granola…far and away…was the yogurt chips.  They really won me over with each bite.

I always sample the granola on its own, and would have been happy eating just this, on its own, for breakfast.  But granola hits the Greek yogurt and the fruit in my kitchen, so I caramelized apples and served them up over the Greek yogurt, topping them off with this granola.  How would the berries blend with the sweet caramelized apples?  Perfectly.  Every bite of this granola, whether on its own or in my breakfast parfaits was a burst of flavor.  But should you get a bite with a yogurt chip…the magic happens.  I commend Nature’s Path for that decision!

Let’s dive deeper into this product, shall we?  Nature’s Path upholds its commitment to providing safe, gluten-free products.  The ingredients in this granola are organic, non-GMO, and free of synthetic preservatives and additives.  I love that.

A serving of this granola is 1/4 cup.  This serving will provide you with 140 calories and 4 grams of fat.  Impressive, yes?  Each serving only has 8 grams of sugar, 55 mg sodium, and is cholesterol free.  You also are provided with 2 grams of fiber and 3 grams of protein.  Not bad at all.

Nature’s Path Gluten Free Selections Summer Berries Granola is sweet, savory, and so refreshing.  Start your day off right with a granola that sings across your taste buds and tastes like summer.  Even with fall creeping in, you can still enjoy that sweet taste of summer each morning.  And do seek out those yogurt chips…and see why I say they really make the mix.

Nature's Path Gluten Free Selections Summer Berries Granola over a Caramelized Apple and Greek Yogurt Breakfast Parfait
Nature’s Path Gluten Free Selections Summer Berries Granola over a Caramelized Apple and Greek Yogurt Breakfast Parfait