Recipe: Jamie Oliver’s Vegetarian Chilli

Ah, Jamie Oliver…I adore you.

Obviously.  Because when I went to Huntington, West Virginia, I made a point to go by Huntington’s Kitchen.

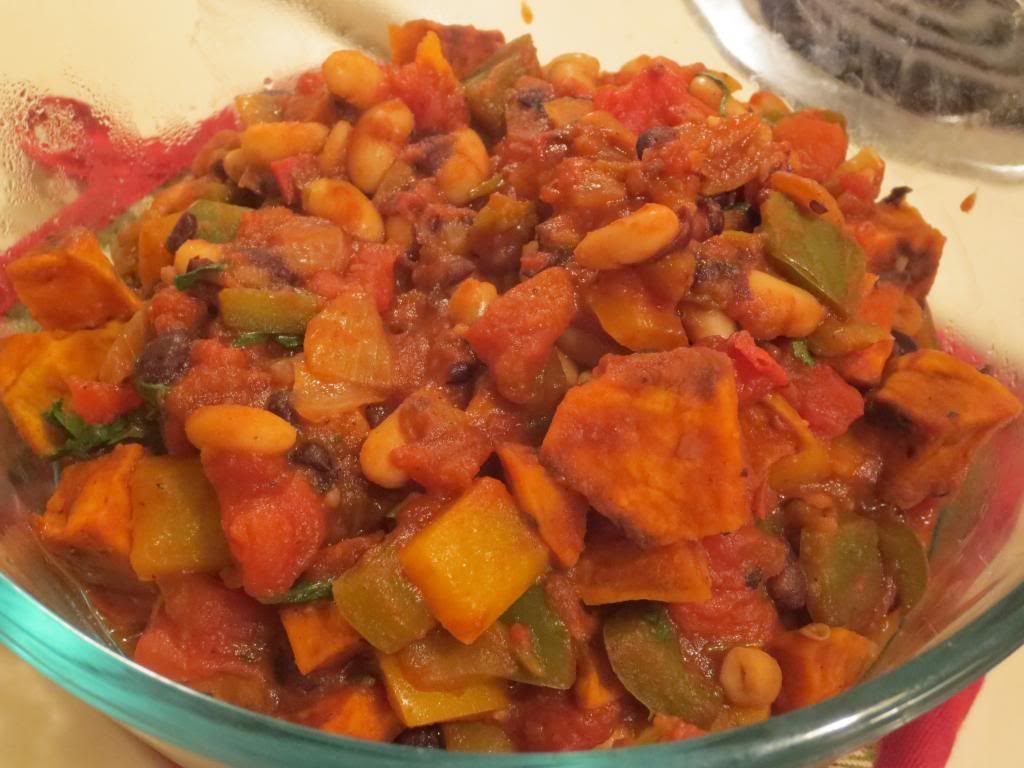
So, when I had some sweet potatoes that I needed to use up from my CSA bin this past week, my roomie suggested that I finally get around to making the vegetarian chilli recipe from your Web site.

We only needed a couple of items for the rest of the dish itself…so it was on!!

What I love about this recipe is how much depth of flavor the roasted sweet potatoes add to this dish.  It’s indulgent, but guilt-free.  So healthy.  I think it might be my favorite chilli so far.

So…thank you, Jamie Oliver.

And for my followers and readers…here is the recipe:

Recipe: Jamie Oliver’s Vegetarian Chilli

Jamie Oliver's Vegetarian Chilli
Jamie Oliver’s Vegetarian Chilli

Servings: 6-8
Time: Prep 10 minutes; Cook 50 minutes

Ingredients:

  • 2 medium-sized sweet potatoes, approximately 500g
  • 1 level teaspoon cayenne pepper, plus extra for sprinkling
  • 1 heaped teaspoon ground cumin, plus extra for sprinkling
  • 1 level teaspoon ground cinnamon, plus extra for sprinkling
  • olive oil
  • sea salt
  • freshly ground black pepper
  • 1 onion
  • 1 red pepper
  • 1 yellow pepper
  • 1 bunch fresh cilantro
  • 1 red chilli
  • 1 green chilli
  • 2 cloves garlic
  • 2 cans beans (I used black beans and great northern beans)
  • 2 cans chopped tomatoes (I used Muir Glen organic fire roasted tomatoes)


Directions:

Preheat the oven to 400°F.

Peel the sweet potatoes and cut into bite-sized chunks.  Sprinkle with a pinch each of cayenne, cumin and cinnamon, drizzle with olive oil and scatter with a pinch of salt and pepper.  Toss to coat then put them on a baking tray.

Peel and roughly chop the onion.

Halve, de-seed and roughly chop the peppers.

Pick the cilantro leaves and put aside, finely chop the stalks.

De-seed and finely chop the chillies.

Peel and finely chop the garlic.

Put the tray of sweet potato in the hot oven to cook for 40 minutes until soft and golden.

Meanwhile, place a large pan on a medium-high heat and add a couple lugs of olive oil.  Add the onion, peppers and garlic and cook for 5 minutes.  Add the cilantro stalks, chilli and spices and cook for another 5 to 10 minutes, stirring every couple of minutes.

Drain the cans of beans, then tip them into the pan with the tinned tomatoes.  Stir well and bring to the boil, then reduce to a medium-low heat and leave to tick away for 25 to 30 minutes.  Keep an eye on it, and add a splash of water if it gets a bit thick.

Get the roasted sweet potato out of the oven and stir it through your chilli with most of the cilantro leaves.

Taste and season with sea salt and freshly ground black pepper, if needed.

Scatter the remaining leaves over the top, and serve with some soured cream, guacamole and rice or tortillas.

~*~*~

Best vegetarian chilli I have ever made.  Or eaten.  I love the sweet potato.  It’s a super nice addition to the ingredients and really sets this chilli apart from other vegetarian chillies.  It has a mild heat…which is perfect for my roomie.  I like mine a little spicier, so if you’re like me, feel free to turn up the heat as you desire.

This recipe freezes really well, which is great, because you’ll definitely want more!

Recipe: Paleo Snickerdoodle Cookies

I love Snickerdoodles.  Seriously.  I loved it in the winter time when my mom would bake all the holiday cookies, bars, fudge, etc…and we’d have a literal smorgasbord to choose from each night for dessert.  One treat.  So…make your decision wisely.

Never failed.  I wanted the Snickerdoodles.

It has been years since I have had my mom’s homemade Snickerdoodles.  And she will probably never make them again, sadly, since she has since had to go gluten-free as well and has switched over to eating paleo.

Lo and behold…I came up with a solution.  You see, one of my running buddies is also on the paleo diet.  And I love, love, love to bake goodies for my run group.  I’ve been craving Snickerdoodles for awhile now, so today I decided that’s what I would make for my fellow runners.  But, I wanted everyone to be able to enjoy them, so I did a little searching on the Internet.

And with a little guidance from various blogs, especially The Urban Poser, I was able to make Snickerdoodles tonight that are paleo, vegan, egg/grain/dairy-free.  Gluten-Free Snickerdoodles.

They aren’t my mom’s specialty…but they are good.  So, go ahead and give this recipe a spin.

Recipe: Paleo Snickerdoodle Cookies

Paleo Snickerdoodle Cookies

Servings: 15-16
Time: Prep 10 minutes; bake 10 minutes

Ingredients:

  • 2 cups blanched, fine ground almond flour
  • 1/4 teaspoon salt
  • 1/4 teaspoon baking soda
  • 4 tablespoons coconut oil, softened or liquid (5 for a softer cookie)1/4 cup mild honey (like clover) or vegan alternative (such as agave)
  • 1 tablespoon gluten-free vanilla extract

Cinnamon coating:

  • 1 tablespoon raw coconut crystals (I used Coconut Secret)
  • 1 tablespoon ground cinnamon
Directions:
 
Preheat the over to 350 degrees F and line and grease or line a baking sheet with parchment paper.In a medium sized bowl, combine the dry ingredients; mix together well.  (When measuring almond flour, use the dip & sweep method for best results.  Dip the measuring cup into the loose almond flour and drag the flat edge of a knife over the top.  Pouring the flour directly into the measuring cup can result in too much or even too little almond flour in the recipe).In a separate bowl, mix together the oil, honey and vanilla.  Add the wet ingredients to the almond flour mixture and stir until combined.

In another small bowl, combine the coconut sugar crystals and the ground cinnamon in a small bowl.

Using a rounded tablespoon, scoop out the dough, then gently form into a ball.  Roll the dough in the cinnamon mixture.

Place the balls of cookie dough on a parchment lined baking sheet, about 3 inches apart.

Using a mason jar or your hands, slightly flatten each cookie.

Bake the cookies for 8-9 minutes.  Leave the cookies on the cookie sheet while cooling.  They may seem under-baked at first, but they will firm up to just the right texture as they cool.

Dig in and enjoy!

~*~*~

So, they aren’t my mom’s Snickerdoodle cookies…but these do come out sweet, thin, crackled and chewy.  Not cake-y, which so many Snickerdoodles tend to be when sold in stores.  These remind me of how my mom’s used to cook up.  They don’t taste the same…but they are totally Snickerdoodles in their own right.

And yeah…they are amazingly good!

Recipe: Apple Cider Poached Pears

I’ve been wanting to poach pears for a long time.  I see those celebrity and television chefs do it all the time.  Then they serve it up all pretty with ice cream or this rich sauce.

I did neither of those last things.

But, thanks to having a bunch of pears, compliments of my CSA bin, and no more cookies left in my apartment…I figured…why not give poached pears a shot.  Usually done in a dessert wine…I opted for something I had in my fridge…apple cider.

It was fantastic!  My roomie is still raving.  And that means a lot since she’s not a big fan of pears.  But this was a simple, light, and quite nutritious dessert tonight.  Easy to make as well.  Here’s what I did…

Recipe: Apple Cider Poached Pears

Apple Cider Poached Pears

Servings: 2
Time: Prep 10 minutes; Cook 10 minutes

Ingredients:

2 cups apple cider (NOT apple juice)
1 cinnamon stick
1/2 tsp vanilla
2 pears, pealed, halved, cored
1 tsp arrowroot powder or cornstarch

Directions:

In a small saucepan, add the 2 cups of apple cider, vanilla, and cinnamon stick.  Bring to a simmer.

Add the pears, flat side down, in the saucepan.

Simmer for about 10 minutes, until they are fork tender.  Do not leave them in too long or they will get mushy.

Remove the pears from the saucepan.  Using the cider in the pan, add the arrowroot or cornstarch and bring to a boil to thicken.

Place pears in a bowl with a scoop of vanilla Greek yogurt (or ice cream), then top with the apple cider sauce.  Sprinkle with granola or nuts for a little texture and serve.

Recipe: Almost the Best Ever Gluten-Free Potato Soup

Okay…claims are made all the time about something being “the best ever _____” and they hardly ever live up to the reputation they have just put out there in public.  Trust me…I’ve been disappointed many times.

That’s life.

Life also is a smorgasbord of different tastes, textures, and ingredients.  So, when I’m in the kitchen, sometimes I like to change things up…get a little creative.  And that’s what happened.  You see, I was sitting at work on Monday trying to figure out the best way to use up some bin ingredients that I have yet to touch.  Sometimes my week gets too busy and cooking with the items from my CSA bin isn’t always possible.  I tend to make it up the following week as another week of CSA bin goodies are cramming my fridge.  I love it…but it can be overwhelming.

That being said, I messaged my roomie and told her I had red potatoes that needed to be used…and she sent me a recipe from Gluten Hates Me (.com) for what was being described as the BEST gluten-free potato soup…EVER!  EVER!  That’s a huge, huge claim to be making.  But, there were only 5 ingredients, so…I figured why not?  I had most of them on hand anyway.

The best part is…this soup cooks in the slow cooker.  I started mine after dinner the night before and it was ready for me to tackle it with the immersion blender when I woke up.  EASY!!  This recipe is easy.  Is it the best gluten-free potato soup ever?  Probably not…but I will tell you this…it is rich, creamy, and packed with flavor.  I even added a few touches of my own, which I’ll include in this recipe.

Recipe: Almost the Best Ever Gluten-Free Potato Soup

Almost the Best Ever Gluten-Free Potato Soup

Servings: 8
Time: Prep 15 minutes; Cook 10 hours

Ingredients:

  • 2.5 pounds Russet potatoes, washed but NOT peeled, and diced into 1/2 inch(ish) cubes (I used red potatoes)
  • 1 small yellow onion, diced
  • 5 cloves of garlic, peeled and left whole
  • 4 cups gluten free vegetable broth (I used Pacific.  Do make sure yours is gluten-free!)
  • Cinnamon
  • Salt
  • Cumin
  • 8 ounces cream cheese (I used Tofutti Better Than Cream Cheese)

Directions:

Put the diced potatoes, onion, garlic, and vegetable broth into the crock pot.  Season with your chosen seasonings.  I used cumin, cinnamon, and salt.  Stir to combine.  Cover and cook on low for 10 hours or on high for 6 hours.

Once it has cooked, cube your cream cheese into 2-inch cubes and stir it into the crock pot.

Then, using an immersion blender, carefully blend the soup in the crock pot.  If you do not have an immersion blender, don’t add the cream cheese into the crockpot.  Simply put it in the blender with 1/3 of your soup and blend.  Then reincorporate it back into the crockpot.  This will give you a chunkier soup…so I do recommend the immersion blender.

Top off however you like.  I topped mine with green onion and vegan cheese.

~*~*~

Simple flavors, but what a combination they had.  The soup is this rich, thick, creamy consistency, aided by the cream cheese.  It is really fantastic and just wows the taste buds.  It is definitely soup season and this was a hearty, delicious, and rather healthy soup to add to the winter lineup.  I was very impressed with every bite.  And I have more in my fridge and freezer…just waiting for another cool evening.

Enjoy!

Recipe: Garlic Roasted Brussels Sprouts

Fact: I take after my mom in the fact that I love, love, love Brussels sprouts.  I mean…LOVE them.  I didn’t know this, of course, until they turned up in my CSA bin one week.  Instead of freaking out…I decided I would coax some flavor out of them.  Try them a couple of ways.  See if they were really as bad as those family shows growing made them out to be.

Turns out…they are awesome.  And my favorite way to make them…is roasting them in the oven.

Simple, delicious, healthy, clean eating.  Sign me up!

Well, this week when I received my CSA bin…I was ecstatic to find Brussels sprouts inside.  I sensed some roasting coming up in my near future.  So…I figured what better thing to have on a gray Saturday night.  They make a fantastic dinner.  Except this time, I roasted them up a little differently.  I still seasoned them as I always did and tossed them with a light drizzle of extra virgin olive oil…but this time I sliced up some red onion and chopped up some fresh garlic cloves to roast with the Brussels sprouts as well.

Delicious!!  The idea cropped up on a page I followed on Facebook.  All I needed was a red onion, and I just happened to be heading to my grocery store.  So, a huge thank you to The Slow Roasted Italian for the inspiration and a way to turn up the volume on one of my favorite ways to enjoy one of my favorite vegetables.

Recipe: Garlic Roasted Brussels Sprouts

Garlic Roasted Brussels Sprouts

Servings: 2
Time: Prep 5 minutes; Cook 20-25 minutes

Ingredients:

  • 12 ounces fresh Brussels sprouts, cut in half (or quarters if sprouts are large)
  •  3 garlic cloves, rough chopped
  • 1/2 medium red onion, sliced
  • 1 tablespoon extra virgin olive oil
  • salt and pepper to taste


Directions:

Preheat oven to 450°F.  Line a baking sheet with aluminum foil.

Add Brussels sprouts, onions and garlic to pan.  Drizzle with olive oil.  Sprinkle with salt and pepper.  Toss with clean hands, until coated.  Wiggle the pan until Brussels spouts are in a single layer. Bake 20-25 minutes until fork tender.

Serve and devour…er…enjoy!

~*~*~

I know too many people who have yet to give Brussels sprouts a try.  If cooked properly…they can be one of the most fantastic things in this world.  I fell in love with them at first bite.  My mom loves them.  My dad won’t touch them.

But, you won’t know how you feel about them until you give them a shot.  Don’t discount these hearty little vegetables.  They are amazing.  Go ahead…roast them up and see what you think!!

This recipe might change your mind!

Recipe: Garlic and Herb Roasted Fingerling Potatoes

It was Friday.

Yep.  Friday.  Which many of you know means…BIN DAY!!  I love my CSA bin.  The problem was…I had a lot to use up still from the previous week.  Like…potatoes.  Both red potatoes and fingerling potatoes.  The fingerling potatoes were actually from two bins ago…so I knew I needed to do that first.

Thankfully, I have a board for that on Pinterest…so I hit that up and found a recipe that sounded absolutely delicious.  My version is a slight variance on a recipe from Bon Appétit.  Really…it was delicious.

Better yet…it was easy to make.

Even better…healthy…and delicious!!

Recipe: Garlic and Herb Roasted Fingerling Potatoes

Garlic and Herb Roasted Fingerling Potatoes

Servings: 2-4
Time: Prep 5 minutes; Cook 45-55 minutes

Ingredients:

  • 6 sprigs of fresh herbs, chopped (I used rosemary and thyme)
  • 4 garlic cloves, peeled, grated
  • 1 pound fingerling potatoes, unpeeled
  • 2 tablespoons extra virgin olive oil
  • Kosher salt
  • Freshly ground pepper

Directions:

Preheat oven to 375°F.

Place herbs, garlic, potatoes, and oil in a large bowl.  Season with salt and pepper and toss to coat.

Place in a large baking dish or rimmed cookie sheet and toss.

Bake for 45-55 minutes.

Serve hot.

~*~*~

See how easy that is.  The difficult part is smelling the potatoes as they cook because it really smelled amazing and delicious.  I was ready to dive in when I pulled them out of the oven.  Total win with the potatoes.  It was nice to cook them up differently this time around.  I am going to search for more fun and different potato recipes for the very near future.

Until then…give this one a try.  I promise…you’ll fall in love with it.  Especially if you like potatoes.

I just happen to LOVE potatoes.  YUM!


Recipe: Gluten-Free Sweet-and-Sour Tofu with Bok Choy

Bok Choy.

It seems to be a seasonal favorite of my CSA bin as of late.  For two weeks in a row, it has been one of the components of my bin.  Now, normally I would simply make a stir-fry out of it…but I’ve been attempting to expand on my culinary skills a little.  Step a little outside the comfort zone.  Do something…different.

I think I accomplished that last night when I cooked up a meal inspired by the blog Big Girls Small Kitchen.  I had all the components on hand in my pantry and fridge…including the bok choy and tofu.

What emerged was a fantastic meal that really worked together.  I served mine over basmati rice…which I cooked up while I was working on the rest of the dish as well.  It was a fantastic meal and not too difficult to create either.

Recipe: Gluten-Free Sweet-and-Sour Tofu with Bok Choy

Gluten-Free Sweet-and-Sour Tofu with Bok Choy

Servings: 2
Time: Prep 10 minutes; Cook 20 minutes

Ingredients:

  • 6 ounces firm tofu
  • 2 tablespoons flour (I used Better Batter Gluten-Free All Purpose Flour)
  • Pinch salt
  • 2 tablespoons safflower, grapeseed, or other neutral oil
  • 1/4 cup lemon juice
  • 1/4 cup honey
  • 1/4 cup soy sauce
  • 1 tablespoon grated ginger (I used 1 teaspoon ground ginger)
  • 1 tablespoon grated garlic (3 cloves)
  • Sriracha
  • 2 bunches baby bok choy, rinsed, trimmed and cut into bite-sized pieces
  • 3 scallions, white and green parts chopped and separated (I substituted 1/2 a white onion)

Directions:

Cut the tofu into slices about 1 inch thick. Press the water out of the slices, then cut them into 1-inch square cubes. In a baggie or on a wide plate, toss the tofu with the flour and salt until all the pieces have a thin coating.

Mix the lemon juice, honey, soy sauce, sriracha, garlic and ginger in a small bowl.  Add 1 tablespoon water.

In a frying pan, warm the oil.  In one layer, brown the tofu (in two batches if your pan is small), about 4 minutes per side.

Return all the tofu to the pan if you browned it in two batches.

Put in the onions and the crunchy part of the bok choy and cook for 2-3 minutes, stirring constantly.  Add the green leaves and cook 1 more minute.

Add the sauce.

Bring the tofu to a boil, then lower the heat and let is simmer until the sauce has reduced and coats the tofu thickly, about 10 minutes.

~*~*~

I was so happy with the way this meal turned out.  The tofu was perfectly cooked, the flour giving it this slight texture to it, even after cooking in the sauce.  The bok choy and onion, along with the sauce brought this amazing flavor to every component.  I loved this sauce.  It smelled amazing and it had the perfect balance of sweet and sour…nothing overpowering the other.

This meal is a great source of protein.  As I said, I served mine over a serving of basmati rice…and it was delicious.  This meal was so easy to put together and cook…perfect for those nights where you don’t want to spend all night in the kitchen cooking up dinner.

Recipe: Crispy Potato Chips and Sautéed Cabbage

So…I know I have the ability to change out the items I receive in my CSA bin.  The truth is…sometimes I don’t want to.  Sometimes I like to be challenged by an ingredient…sit there for a couple days and ponder exactly how to best use this piece of produce that I don’t commonly have on hand, nor would I normally buy.  Why do I do this?  To keep my culinary skills up, of course.

Well, this week’s big challenge was this gorgeous head of cabbage.  While I could easily make a coleslaw with it…my roomie despises coleslaw and I’m not a big fan of it myself.  So…I was hoping to figure out a unique way to utilize it in a breakfast.  With a little guidance form a blog called Ditch The Wheat, I got inspired to make my own little cabbage breakfast, adding a bit of texture with some homemade potato chips.  That would give them some crunch.  I also added a hint of flavor by adding some sliced shallots and some minced garlic to my sautéed cabbage.

And…to make it all breakfast-like…I topped each bowl off with a fried, over-easy egg.  Surprisingly…very delicious and really packed with flavor.

Recipe: Crispy Potato Chips and Sautéed Cabbage

Crispy Potato Chips with Sautéed Cabbage

Servings: 2
Time: Prep 10 minutes; Cook 10 minutes

Ingredients:

  • 4 fingerling potatoes
  • 1 shallot, sliced
  • 2 cloves garlic, minced
  • 1 cup sliced cabbage
  • salt
  • pepper
  • 2 organic eggs

Directions:

Slice the fingerling potatoes thin like a chip.  I recommend using a mandolin.

Pour enough olive oil into the pan to lightly fry the potato slices.  Turn the pan to medium. Place the potato slices into the pan, sprinkle salt on them and flip when one side is crispy and sprinkle salt on them again.  These are done when both sides are crispy.  (NOTE: I used the Mastrad Topchips Chip Maker instead of pan frying them…or you could even bake them in the oven.  I’m not big on frying…but not everyone has a chip maker like I do).

Take out all of the sweet potato chips and place on paper towel.

Place the shallot in the oil and stir, allowing to soften slightly.  Add the cabbage and saute until desired crispiness.  I prefer it to be well done.  When you have about a minute left, add the garlic and stir.

While the cabbage finishes up, in a small pan, crack an egg and allow to fry on one side.  Carefully flip the egg to cook the white through, but keep the center a little runny (unless you hate runny yolks, in which case…cook the hell out of that egg).

When the cabbage is done take out of the pan and mix with the chips.  Place in two bowls and add a fried egg on top of each one.  Serve immediately.

~*~*~

I admit…I was surprised with how good this recipe turned out to be.  I found elevating the flavor with shallot and garlic was a great call.  The cabbage cooked perfectly, just slightly browned by the heat of the pan, giving it this nice caramelization.  And the egg on top just made all the difference.  One very healthy, nutritious, and different breakfast for sure.  But one that I would repeat…in a heartbeat!

Rudi’s Gluten-Free Bakery launches new product and a giveaway!

Rudi's NEW Gluten-Free Savory Herb Stuffing
Rudi’s NEW Gluten-Free Savory Herb Stuffing

With Halloween over…the next big holiday coming up is none other than Thanksgiving.  And we all have a lot to be thankful for this year.

Do you know what I’m thankful for?

Stuffing.

Yep…you read that right.  Stuffing!

You see, Rudi’s Gluten-Free Bakery just recently launched its first ever Gluten-Free Savory Herb Stuffing.  Yep…just in time for the holidays.  I mean, if being gluten-free isn’t stressful enough at the holidays, tackling the homemade buffet at the dinner table can be enough to set you on edge.  But not anymore.  Not this year.  Rudi’s wanted to help make the holidays brighter and easier this season, and they have certainly accomplished that with their delicious…yummy…made for everyone (not just the gluten-free) stuffing.  The stuffing is a blend of Rudi’s Gluten-Free Multigrain and Original breads with savory spices that will tie in with any holiday dish on the table.  Guaranteed.  Oh, and it only takes 5 minutes to prepare…and is free of dairy, soy, and (of course) gluten.  However, this product will only be available for a limited time…while supplies last through the 2013 holiday season.  If you want to see what stores in your area carry Rudi’s Gluten-Free Savory Herb Stuffing, you can check out their Facebook page!

But…that’s not all!  To celebrate the launch of their Gluten-Free Savory Herb Stuffing, Rudi’s is also providing a giveaway on their Facebook page, running from November 4-15.  Every day, for 10 days straight, Rudi’s Gluten-Free Bakery is giving away daily prizes of fun “stuff” for their fans to use and enjoy over the holidays with their family.  In addition, fans can also download a coupon for $1 off any Rudi’s Gluten-Free Savory Herb Stuffing through the More Fun Stuff(ing) Giveaway app.

How do you enter?

Hop over to Rudi’s Gluten-Free More Fun Stuff(ing) Giveaway and enter the information needed…and who knows…you might be chosen to win one of the prizes!

GOOD LUCK!!  And stuff your holidays with delicious goodness this season with Rudi’s Gluten-Free Savory Herb Stuffing!

Product Review: Star Anise Foods Happy Pho – Garlic Goodness Vietnamese Brown Rice Pho Noodle Soup

Star Anise Foods Happy Pho Garlic Goodness Vietnamese Brown Rice Noodle Soup
Star Anise Foods Happy Pho Garlic Goodness – Vietnamese Brown Rice Noodle Soup

Product: Star Anise Foods Happy Pho – Garlic Goodness Vietnamese Brown Rice Pho Noodle Soup – $3.49+

Splurges happen.

For real.

And for me…splurges tend to happen when food is involved.  Mainly…grocery shopping.  Something catches my eye, peeks my interest, and before you know it, the plan to stick to the already tight budget is out the window and I’m scraping by the rest of the week.  But it’s okay…because I have food.  Right?

Sure.

Well, a splurge happened this past weekend.  I was wandering the aisles of Whole Foods, which already is a dangerous thing, when my roomie spotted these little brown boxes.  The words “PHO” caught her attention first.  Followed by “GLUTEN-FREE.”  Now we’re talking.  She’s been wanting to have pho for a long, long while…but…I just don’t know of where to go in Louisville to make that happen for her.  Instead…we figured this might be a good way to use up some of the produce and make our own version of a pho.  And why not?  If you can’t get creative in the kitchen…there’s no point to having one.

The product we spotted was by Star Anise Foods.  It’s called Happy Pho, and it comes in three different flavors.  We chose the Garlic Goodness Vietnamese Brown Rice Pho Noodle Soup.  We figured we’d eventually try them all…if the one we tried was any good.  Cathy loves garlic…so I had a feeling that would be the one to start us off.

Instead…with a little refrigerator magic…and a Organic Vegetarian Pho Base by Pacific Natural Foods (which was in my pantry, swear to the culinary gods!), this splurge of a purchase became tonight’s dinner.  And tomorrows lunch for that matter.

Let’s talk a little bit about this product though.  First of all, Star Anise Foods Happy Pho – Garlic Goodness Vietnamese Brown Rice Pho Noodle Soup is not only gluten-free, but also non-GMO, low in sodium, contains no MSG, made from 100% brown rice with organic green tea, vegan, all natural, made with organic ingredients, fat-free, wheat-free, egg-free, dairy-free, free from artificial colors and preservatives.  It’s ALL NATURAL, my little pho babies!!

One serving is 1/2 the packet, which my roommate and I stretched out into 4 meals, so we’re only eating 1/4 of the packet each.  Regardless, a regular serving will provide you with 222 calories.  A serving only has 190 mg of sodium, which is amazing for a shelf-stable, packaged product.  The Garlic Goodness variety of Happy Pho also will has 1 gram sugar, 3 grams of fiber, and 4 grams of protein.  That’s really good!!

To make my pho…I pan fried up some thinly sliced tofu.  While the pho starter came to a boil, I added the packet of seasoning that comes with the noodles and allowed it to blend with the pho starter.  I then sliced up some bok choy (compliments of my CSA bin) and put it into the broth.  Once the tofu was nearing completion, in went the brown rice noodles to soften up in the hot soup base.  As the noodles finished up, I poured the tofu in to warm and…dinner was easily served.

And…OMG…was it ever good!!  I mean super good.  As in I make a mean vegetarian pho thanks to Star Anise Foods and their Happy Pho starter kits.  Honestly.  I was so happy with the flavor of this noodle soup.  The brown rice noodles were a bit gummy, but that tends to be the trend with brown rice noodles.  Sadly enough.  But…the flavor was there, and the noodles, broth, tofu, and bok choy all married together to make this incredible, flavor-filled meal.  The seasoning packet combined with the pho soup base made a perfect base for the vegetables, tofu, and…the noodles.  My roommate and I devoured this with chopsticks.  Happy girls, we were!  Food Yoda, I speak like.

Go to your local Whole Foods…check out their aisle with the Asian foods.  If you spot Star Anise Foods Happy Pho kits…buy one.  Buy them all.  Trust me, they are totally amazing and I intend to pick up more of them, other flavors, and give them a taste as well.  This made for a quick, easy, and very delicious (and nutritious) dinner tonight.  I was beyond impressed.

Star Anise Foods Happy Pho - Garlic Goodness Vietnamese Brown Rice Noodle Soup
Star Anise Foods Happy Pho – Garlic Goodness Vietnamese Brown Rice Noodle Soup