Restaurant Review: The Grape Leaf, Louisville, Kentucky

The Grape Leaf, Louisville, Kentucky

Restaurant: The Grape Leaf, Louisville, Kentucky

It’s not my birthday…but my roommate and I have a tradition to treat each other to a birthday meal someplace new, interesting, or a personal favorite for each others special day.  Mine was pushed back to this weekend as my birthday fell on the start of the weekend and I already had Indian food on the mind at my favorite place in Louisville!

So, I had said that what I really wanted was…finally…some Chinese food.  We had read a review a couple years ago about a place called the Tea Station in Louisville that had gluten-free options.  However, after e-mailing them and not hearing anything back…then the roomie calling and basically being told they can give me rice and vegetables and tofu…and after seeing reviews about how the place has sort of been on a downward spiral…it was time for a second option.

The problem was…I really wanted Chinese food.  So, now, nothing sounded like something I wanted.

Perfect.

I tried to get some feedback from Cathy, but she kept saying it was my choice.  Which only stressed me out.  I narrowed it down to a couple of places…and after scanning the menu pages a few times, I settled…on The Grape Leaf.

Yep.  Mediterranean food!  I love everything about Mediterranean food…so I figured…why not try out somewhere new and different and interesting?  So…after work, we drove out to Frankfort Avenue…and attempted to find parking.  We finally managed to find a spot well up the road and made a bit of a hike to the restaurant itself.  The Grape Leaf prides itself on being a friendly, locally owned, pan-mediterranean neighborhood restaurant.  I loved everything about that statement, so I was pretty excited about it.  Not to mention, their chef, Nabil Al-Saba, is the real deal – serving up authentic cuisine since 1992.

Impressive, yes?

We stepped into the restaurant and were greeted by the hostess.  We were taken to our table and seated.  One of the chairs had a balled up cloth napkin on it, but it was near the window and I was sitting in the seat nearest the aisle.  So, I set my purse down in the chair, away from the napkin, and settled in to look at the menu.  The hostess/waitress asked if we wanted any appetizers like hummus or grape leaves, but Cathy said this was our first time there so we were going to familiarize ourselves with the menu first.  So, she went to retrieve glasses of water while we perused the menu.

When she returned, she asked if we had any questions or if we were ready to order.  We had done a bit of discussion while sitting there…but finally settled on what we were going to eat.  Cathy went first, as she had the easier order.  She went with the Lamb Schwarma with her two sides being the Lentil Soup with Pita and the Cauliflower Rice ($13.25).

I was going with a couple of items on the Appetizer list.  I settled on a cup of the Organic Vegan Red Lentil Soup ($4.00) and the Vegetarian Grape Leaves ($7.50).  Order was in.

A cup of The Grape Leaf's Vegan Red Lentil Soup
A cup of The Grape Leaf’s Vegan Red Lentil Soup

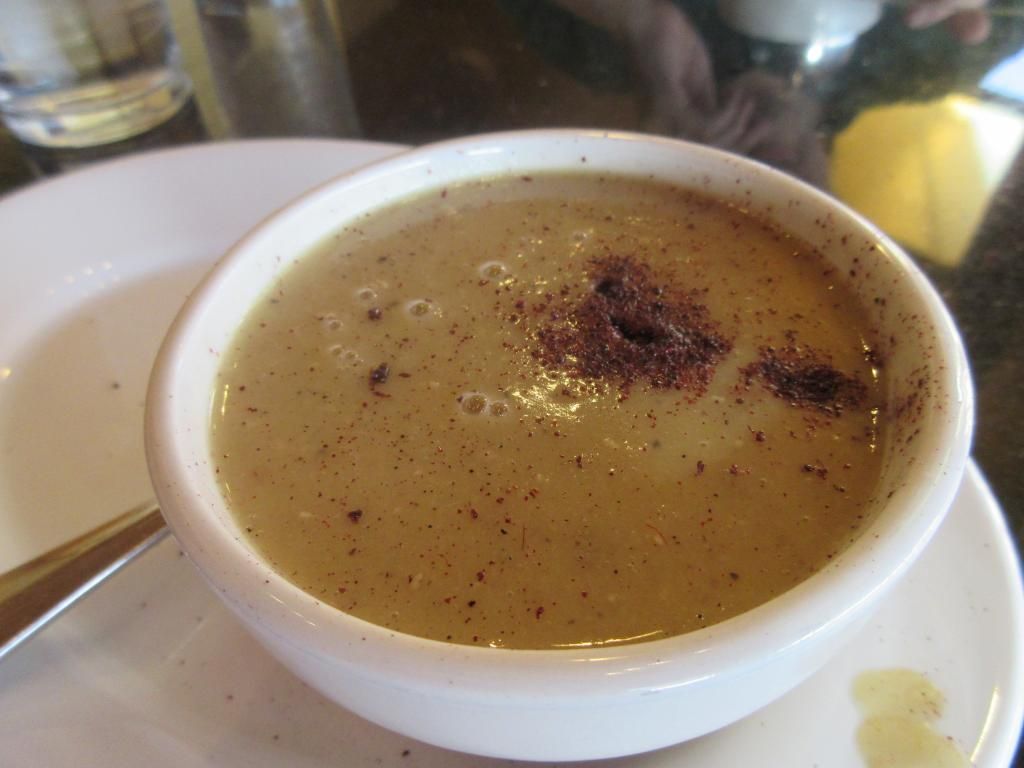
And just moments later, our appetizer soups arrived.  I had to take a picture for the blog, but Cathy dove in and said…”It tastes citrus-y.”  That made me giggle and once my photo was taken, I spooned up a bit myself and tasted it.  I didn’t get citrus at all, but I did get this smokey-sweet flavor from the paprika that was sprinkled on top.  The menu lists the ingredients of this sup as being organic red lentils, extra virgin olive oil, onion, and spices.  What it was was this thick and rich soup that had a gentle, tame flavor that was elevated by the dashes of paprika over the top.  It was warm and soothing and smooth.  And it was a good way to start the meal, for sure.

In fact, we had just polished off our cups of soup when the entrées arrived at the table.  Wow.  Fast.

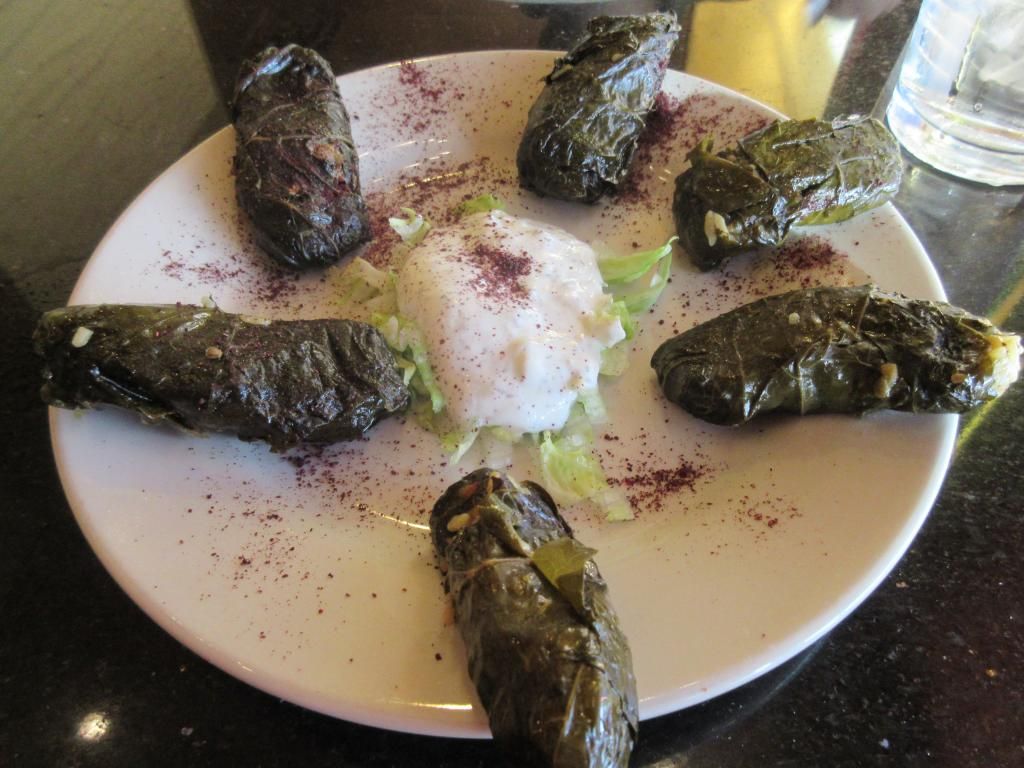
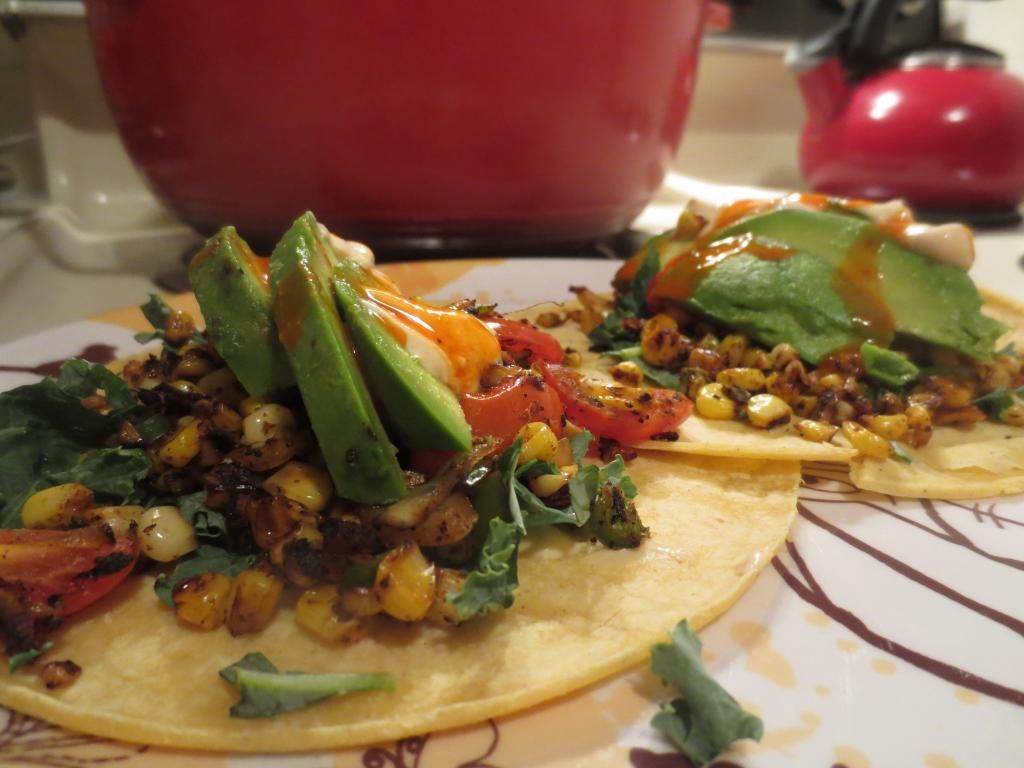
The grape leaves looked like…grape leaves.  I mean, you can’t really dress those up, can you?  Except with spices…like that same sprinkling of paprika…everywhere.  I mean…everywhere.  I had six stuffed grape leaves on the plate with a dollop of tzatziki and lettuce in the middle.  The grape leaves themselves were wrapped around a blend of tomato, parsley, onion, Egyptian rice, and herbs.  I cut into one of them.  They looked really great.  I dipped my fork in the tzatziki and added it to the bite…and gave it a try.

It was…pretty good.  It was okay.  The textures were great.  The grape leaves were cooked perfectly, kept soft.  The stuffing was creamy and had a bit of flavor.  Not a lot though.  In fact, the star of the entire dish was the tzatziki.  So, thank goodness for that.  I had Cathy try a bite and she liked the creamy inside…but just didn’t look like she was a fan at all.  And, sadly, being a schwarma lover…she was most impressed with her side of Cauliflower Rice.  I was also…really…really…concerned with how quickly the food came to the table.  I watch Kitchen Nightmares…I know how this works…

The food was just…okay.  Not meh.  Not gross.  But not something I would actively make a point to go back and try again.  Which…is so sad.  This was my birthday meal and it didn’t live up to expectations.  I feel cheated.  I feel like my going out on a limb…trying something different…was a letdown.  Do I get a do-over?  We left after paying the bill and decided we couldn’t end the night with food that we weren’t happy with…so we hiked just up the street to The Comfy Cow for kiddie scoops of their Strawberry Fields Forever ice cream.

So…The Grape Leaf…has an amazing reputation…but it wasn’t busy when we were there…nor was the food anything to scream from the rooftops about.  It was just…eh…good.

And I was hoping for great.  I was expecting great.

I don’t think I’ll be back.

The Grape Leaf's Vegetarian Grape Leaves
The Grape Leaf’s Vegetarian Grape Leaves

Product Review: Freedom Foods Ancient Grain Flakes Cereal

Freedom Foods Ancient Grain Flakes

Product: Freedom Foods Ancient Grain Flakes Cereal – $5.99+

It’s no secret how much I have latched onto and been supportive and vocally outspoken about how the natural and naturally delicious products from Freedom Foods are surprisingly nutritious and packed with nutritious goodness.  So many cereals out there are loaded down with sugars and artificial ingredients.  But Freedom Foods prides itself on using only natural ingredients…yes…even for those wild colors in my much loved Tropicos.  So…yeah.  There is a lot of love here.

Last month, I went to the Gluten-Free Food Allergy Fest in Indianapolis, and one of the vendors in attendance was none other than Freedom Foods.  After buying them out of Smudge (their nut-free and dairy-free Nutella), I decided I would try one of the cereals in their lineup that I don’t see at any of my stores.  Right now, only Kroger carries some of their products, and very few of their cereals.  After a little bit of pondering…I finally decided to try the Freedom Foods Ancient Grain Flakes.

This cereal is a blend of sorghum and buckwheat, creating a cereal that is a good source of fiber and also low in salt.  What sets this cereal apart from others on the market, Freedom Foods Ancient Grain Flakes are a true super food.  Why?  Because they grains that they rely on are those that were consumed around the world for thousands of years.  The Aztecs relied heavily on these superfoods for both strength and endurance.

Strength…and…endurance.

This runner definitely perks up hearing that!  So, I gave it a try.  And on the morning before I attempted my first double-digit run since I was injured…I ate a serving and went to meet up with some friends for my run.  As I poured my bowl of cereal, the flakes reminded me of those that would be in, say, Raisin Bran.  They were that dark flake without a coating of heavy sugar.  Very nutritious looking.  No raisins in sight.  None needed, apparently.  Right?

Well…mostly.

I love the nutritious aspects of this cereal.  I really do.  But…the flavor, on their own…was not good.  Really dry and sort of like…cardboard.  Not to be deterred though, I went ahead and poured some almond milk over the flakes themselves…and that actually helped.  It wasn’t…say…my favorite…but…it wasn’t bad.  It wasn’t great…but I didn’t want to just pour it into the sink and start the garbage disposal either.  It definitely is my least favorite product I have tried from Freedom Foods to date…I mean…cardboard is not a good taste at all.  But…it is packed with a lot of nutrition, which does my body good.  And with the almond milk…it was consumable.  So, there is that.

This cereal is made from rice flour, yellow corn flour, sorghum flour, buckwheat flour, psylliam husk, cane sugar, apple juice concentrate, and less than 2% salt and sunflower oil.  This cereal is preservative free, a great source of fiber, non-GMO certified, low in salt, and also gluten-free, wheat-free, nut-free, dairy-free, soy-free, and egg-free.

Nutritionally speaking, this cereal is definitely higher in calories than I would like…especially since it’s not knock-me-over delicious…but it still has some great things going for it.  One serving is a cup of the Freedom Foods Ancient Grains Flakes cereal is 1 cup.  In this serving, you are dished up 220 calories and only 1 gram of fat.  This serving also provides 60 mg sodium and 5 grams of sugar.  You also get 5 grams of fiber and 5 grams of protein.  Filling…for sure.

So, while I wouldn’t personally purchase this cereal again, it isn’t so bad.  Nutrition wise it is a powerhouse.  And if you like bran flakes or something similar, perhaps this is for you.  For me, it lacked something…but…it’s edible.  I’ll polish off the box.  Maybe it will at least bring me some added strength and endurance…

Recipe: Grilled Eggplant with Gluten Free Couscous and Greek Yogurt Dressing

Sometimes…it’s fun to ignore those magical CSA bin vegetables and go off the beaten path.  Besides, while I love having fresh and local produce delivered to my door, I also love the fun and buzz of the local’s farmer’s market.  And that’s exactly what my roommate and I did this week.  While we have some great bin ingredients, there was an amazing recipe in the October 2014 issue of Vegetarian Times…and the only ingredient I currently had in the home was the couscous.

Don’t panic.  This is gluten-free couscous that came in my Cuisine Cube this month.  I was pretty stoked about that and really wanted to use it right away.  So, that same day as I was flipping through the Vegetarian Times magazine (that had also just arrived)…one dish stood out, as it utilized couscous.  When Cathy read the magazine after me, she also spotted it.  So, that Saturday morning, we went out to a large farmer’s market in Louisville and picked up the necessary ingredients to make this dish.

I prepped most of it last night, so today, the only thing I needed to do to complete the dish was slice and grill the eggplant.  Simple…

Recipe: Grilled Eggplant with Gluten Free Couscous and Greek Yogurt Dressing

Grilled Eggplant with Gluten Free Couscous and Greek Yogurt Dressing

Servings: 4
Time: Prep 30 minutes; Cook 10 minutes

Ingredients for salad:

  • 2/3 cup couscous (I used a gluten-free brand)
  • 1 cup pomegranate seeds, divided
  • 2 Persian cucumbers, diced (1 cup)
  • 1/4 cup sliced green onion
  • 2 tablespoons chopped mint leaves
  • 1 tablespoon olive oil
  • 2 tsp white wine vinegar

Ingredients for dressing:

  • 7 ounces low-fat plain Greek yogurt (or dairy-free yogurt)
  • 1/2 cup chopped Persian cucumber
  • 1/4 cup mint leaves
  • 1 green onion, chopped
  • 1 tablespoon white wine vinegar
  • 1 clove garlic

Ingredients for eggplant:

  • 4 teaspoons olive oil
  • 1 teaspoon finely chopped fresh mint
  • 2 small Italian eggplants, each but on the bias into 6 slices

Directions:

To make the salad: Bring 1 cup of water to a boil in a small saucepan.  Stir in couscous.  Cover pan, remove from heat, and let stand for 5 minutes.  Transfer to bowl and cool for 10 minutes.

Stir 3/4 cup pomegranate seeds and remaining ingredients into couscous, and season with salt and pepper, if desired.

Chill for 1 hour, or overnight.

To make the dressing: Purée all ingredients in a blender until smooth.

To make eggplant: Preheat grill or grill pan over medium-high heat.  Whisk together oil and mint in a small bowl.  Brush eggplant slices with mint oil and season with salt and pepper, if desired.  Grill slices 4 minutes per side, or until tender and nicely grill-marked.

Divide salad among plates.  Top each serving with 3 eggplant slices, 1 tablespoon of remaining pomegranate seeds, and 2 tablespoons of the dressing.

Serve any remaining dressing on the side.

~*~*~

I made only one minor change.  Instead of making the mint oil, I instead added a hit of cayenne pepper, cumin, and garlic powder to the olive oil instead, then brushed that over each slice of eggplant and grilled it.  It worked out perfectly.  And the mint dressing is so light and fresh that it really just brings everything together on the plate.  I highly recommend this hot and cold salad.  It’s simple and easy and beyond delicious for sure!  I can’t wait to make it again.

Product Review: Molina di Nicoli Gluten Free Couscous

Molino di Nicoli Gluten Free Couscous

Product: Molina di Nicoli Gluten Free Couscous – $3.00+

There was a time…back before I was diagnosed as a Celiac…when I used to make numerous dishes with a grain known as couscous.  But, as couscous is made from the semolina of hard wheat…so any couscous dish I started to ignore or substitute quinoa.  It worked…but it wasn’t the same.

You cannot imagine my excitement when I opened up this month’s Cuisine Cube and found a box of Molino di Nicoli Gluten Free Couscous.  I was beyond thrilled.  Seriously, I might have done a happy dance in my office.  Okay…I did do a happy dance.  And with that being said, I was already making plans in my head to recreate some of my favorite couscous dishes with this little box.  My roommate immediately said, “BREAKFAST COUSCOUS!”  Which, is definitely going to happen.  But…it just so happened that I ended up making a salad first with this product.

It was this month’s issue of Vegetarian Times, highlighting hot and cold salads.  And the one that really, really caught her attention was one of Grilled Eggplant with Couscous and Greek Yogurt Dressing.  We looked over the ingredients and they all seemed within reason to pick up at the local farmer’s market (as none of the ingredients were in the CSA bin this week), so I made a pact…if we could find the ingredients, I would cook up the dish.  Because now…I could absolutely use couscous in a dish that asked for it.

The shopping was a success and last night, I found myself prepping most of the ingredients for our dinner tonight.  I cooked up the couscous, seeded the pomegranate, diced the cucumbers, chopped the green onion, and chopped the mint leaves.  I blended together the yogurt dressing ingredients, after a quick run to the store for the actual yogurt itself.  It was the one ingredient we forgot about.  HA!  Not bad.

Molino di Nicoli Gluten Free Couscous (cooked)

I have to say…the couscous is easy enough to cook.  I actually didn’t follow the ingredients on the box.  I went off the instructions in Vegetarian Times for the cooking of the whole-wheat couscous they used in the original recipe.  So, instead of 2/3 cup of couscous with 2/3 cup of boiling water, I used the 2/3 cup of couscous and 1 cup of boiling water, letting it cook for 5 minutes.  Usually the said amount of boiling water and the same ratio of couscous would sit for 2 minutes, then the box says to add oil or butter and cook for 3 more minutes over a slow flame.  The way I did it worked just as well, and when the 5 minutes was up, I emptied the pan of couscous into a bowl to cool for 10 minutes.  Then I added the pomegranate seeds and the remaining ingredients, seasoning with olive oil and white wine vinegar.  I let it chill overnight in the fridge.

After work today, my roomie and I returned home and I set out to grill the eggplant and piece the dish together.  That’s what I did.  I plated the couscous salad, then topped it with the grilled eggplant, gave a drizzle of the Greek yogurt dressing and topped it off with a few more pomegranate seeds.  It looked amazing.  And it tasted just as good!

Now, my roommate said her least favorite part of the dish was the couscous, but to me, it was one of the highlights.  Maybe it was because I haven’t had it in a long time.  But I did nothing special to season this couscous, as I used to hit up the regular couscous with cayenne while it steamed.  I left this one plain, as I was adding enough flavors via the fresh ingredients and the oil and vinegar…and a touch of salt to season.  I thought the texture was clearly different.  This was a lighter, smoother, not as gritty couscous, but it was the perfect ingredient for this dish.  In fact, I can’t wait to try it in my “Breakfast Couscous” later on this week.

The grains of the Molino di Nicoli Gluten Free Couscous were finer and smoother than regular couscous.  However, this is not to say that it was mush.  Anything but that.  In fact, the grains were still very noticeable on the palate and tongue.  I found that it really blended well with all the fresh vegetables and ingredients that were placed on top of it.  It was perfection…quinoa wouldn’t have been the same.  The couscous was perfect.  And it tasted brilliant.

I was beyond impressed!

So, I bet you’re wondering what a gluten-free couscous is made from.  Simple.  One ingredient is all that is listed on Molino di Nicoli’s Web site – corn flour.  Yes, the Molino di Nicoli Gluten Free Couscous is simply corn flour.  That explains the different texture from regular couscous…but ultimately still delicious.  It felt more like grits than couscous…but…it will do.  Different…but close enough in my eyes.

As far as nutrition goes…well…let me see if I can figure this out.  A serving size of Molino di Nicoli Gluten Free Couscous is 50 grams, which is about 1/4 of a cup.  This serving will provide you with 177 calories and 0.5 grams of fat.  You will be consuming 0.002 mg sodium (yes…that is the actual measurement) and 0.3 grams of sugar.  A serving provides you with 1.3 grams of fiber and 3.8 grams of protein.  It’s not too filling, but you won’t fell starved an hour later either.  Molino di Nicoli Gluten Free Couscous is gluten-free and cholesterol free.

I will be savoring this couscous for as long as I can, as I have a few more dishes I want to make with it.  But tonight’s meal was a success.  It was the perfect base for the grilled eggplant and the light and lively dressing that brought everything together.  Beyond happy.  It’s not exactly couscous, but when you’re gluten-free…this is close enough.  Close enough…and really, really good!

Thank you, once again, Cuisine Cube.  Because of you…I’m one happy couscous eating girl again!

Grilled Eggplant with Greek Yogurt Dressing over a Gluten Free Couscous Salad using Molino di Nicoli Gluten Free Couscous


Recipe: Gluten Free Avocado Bruschetta with Green Sauce

Ah, Martha Stewart.  I have to hand it to you!  You always come through for me in a pinch.  Always.

You see, I’m running short on time and have quite a few things left from my CSA bin delivery.  Yes.  I know.  I don’t even eat out that often anymore.  Once a week…generally on the weekend…and it’s usually always at Annie May’s Sweet Café on Saturday morning.

But…with my bin ingredients needing some attention, I noted this morning that my avocado was now ripe.  Not just ripe…but at that perfect creamy ripeness.  So…I scrapped my original plan to make Maple Roasted Brussels Sprouts and instead thought about what I could do with the ingredients I have in my fridge and pantry…that I could use avocado with.

I puzzled it out for much of the day…until I found this recipe.  It’s one of Martha Stewart’s.  And yes…it is sheer perfection.  The only thing I did differently was I used kale in my sauce instead of parsley…because I have plenty of kale to use!  HA!  Oh, and I used slices of gluten-free sandwich bread instead of the crispy French bread that you would normally use to make bruschetta.

Trust me…you’ll eat this up as fast as Cathy and I did tonight!

Recipe: Gluten Free Avocado Bruschetta with Green Sauce

Gluten Free Avocado Bruschetta with Green Sauce

Servings: 4
Time: Prep 10 minutes; Bake 10 minutes

Ingredients:

  • 2 ripe Hass avocados, pitted and peeled
  • 1 tablespoon freshly squeezed lemon juice
  • 8 slices gluten-free sandwich bread, toasted
  • 1 small clove garlic, peeled
  • 6 leaves of kale, trimmed
  • 3/4 cup packed basil leaves
  • 5 tablespoons plus 2 teaspoons extra-virgin olive oil
  • 1-1/2 teaspoons red-wine vinegar
  • Salt and freshly ground pepper


Directions:

Place the garlic in a food processor, and pulse.

Add the kale, basil, 5 tablespoons olive oil, vinegar, and salt and pepper to taste; puree.

Set the sauce aside.

Cut the avocados into 1/2-inch chunks.  Toss with the lemon juice and remaining 2 teaspoons olive oil.

Spread a scant tablespoon of the green sauce on each slice of bread.

Arrange the avocado chunks on the bread, sprinkle with a pinch of ground pepper.

Serve immediately.

~*~*~

This dinner was so simple and yet…so fantastic all at once.  It really wasn’t hard to make at all.  When toasting the bread is what takes up most of your time, you’re doing it right.  Seriously…this was a flavor haven of sheer recipe awesomeness.  The avocado was smooth, creamy, and soft.  The sauce had this great flavor to it…without being overly oily.  Think of it as a sort of kale and basil pesto.  What that ended up doing was really bringing this amazing earthy and light flavor to the dish itself.

One bite…and you’ll be hooked.  I added a sprinkle of red chili flakes to mine…because a little hit of heat is an amazing thing.  I sort of want to make it all over again.  YUM!


Product Review: Dinner Tonight Burger Seasoning

Dinner Tonight Burger Seasoning Mix

Product: Dinner Tonight Burger Seasoning – $3.95+

Maybe it’s the “end of summer” last call in this month’s Cuisine Cube, but I was hit up with a product I couldn’t eat (Field Trip Cracked Pepper Turkey Jerky) as a vegetarian, and then, as I was eagerly pulling products out of the box…noted the burger sauce and the burger seasoning.

You’d think I would do as I did with the turkey jerky and put it in the break room as fair game for any hungry or burger-loving co-workers.  But not me.  You see, one thing I love doing is creating products in my kitchen.  And never have burgers been completely limited to meat.  Especially where I am concerned.  What I did was started to ponder what a vegetarian could create using these products meant for burgers and lo and behold…it came to me.

I decided I would create a veggie burger (using green lentils for the main source of protein) and figured I could use the Dinner Tonight Burger Seasoning Mix as I would if I had been cooking with meat.  It was brilliant.  It was…a good reason to dig out those lentils.

Last night, I donned my skull and crossbones apron and set myself to work, creating my veggie burger.  Lentils, mushrooms, and more all got cooked up, and after giving it a little mash, in went the seasoning.  I immediately loved how light and citrus-y it smelled.  It had this very bright aroma to it and I knew it was really going to elevate my veggie burger.  Happiness.  I chilled the base and after about 30 minutes, pounded out about 10 actual patties, freezing 8 of them and using two for dinner (one for me and one for the roomie!).  Some olive oil on my skillet and down went the patties.  No cheese necessary…I was topping these with Russian red kale and green tomato.

Within a couple of minutes, the burgers had a beautiful sear on them and I lifted them off the skillet and put them in the gluten-free buns (which I purchased from my local gluten-free bakery, Annie May’s Sweet Café).  Dinner was served (with a side of smashed purple potatoes!).  I topped these off with the Charleston Gourmet Burger Co. Burger Sauce (see next review!) and then…settled in to see how my own play on a veggie burger came out.

I can honestly say, thanks to the Dinner Tonight Burger Seasoning, I didn’t need to add anything more to these burgers as I formed the base.  No extra salt.  No other spices or herbs.  This was just what these lentils, mushrooms, and other veggies needed.  The seasoning itself wasn’t too strong, but you could definitely taste the variety of flavors that made up this mix.  The veggie burgers that I made with the Dinner Tonight Burger Seasoning were pure perfection…especially when it came to balancing flavors.  Brilliant.

The Dinner Tonight Burger Seasoning Mix is made from garlic, thyme, black pepper, salt, lemon zest, cayenne pepper, onion, parsley, natural lemon juice powder, sugar, and citric acid.  This mix is all natural, cholesterol free, and gluten-free.  And…it’s perfect for carnivores and herbivores alike.  Trust me.

A serving of the Dinner Tonight Burger Seasoning Mix is 1 teaspoon.  This one serving will provide you with 5 calories and less than 1 gram of fat.  You will be taking in 135 mg sodium.  Finally, this serving gives you 0 grams of protein and fiber.

Once again, Cuisine Cube provided me with a product I never would have known about or tried…but thanks to it being in my cube, I found a purpose for it.  I’m not going to let a vegetarian keep me from trying whatever I can in these boxes of happiness each month.  The jerky was one thing…but burger seasoning…hell, I can figure out a use for that!  One delicious veggie burger later, not using it with a meat base made no difference, this seasoning mix should be raved about.  Absolutely loved it.  And now, I have my first official recipe for my own cookbook.

Thank you Dinner Tonight and Cuisine Cube!

Product Review: Feel Good Foods Gluten Free Vegetable Dumplings

Feel Good Foods Gluten Free Vegetable Dumplings

Product: Feel Good Foods Gluten Free Vegetable Dumplings – $5.99+

There are quite a few things I really miss in my life at times.  Like…makes me sad and really wanting to cry kind of miss.  Maybe not the way I miss my family (and I really miss my family)…but people and food have relationships too.  And one of my favorite cuisines growing up was none other than Chinese food or Asian-style cuisine.

It was tradition in my family to visit my great grandmother in Winona, Minnesota, every year that we went to visit both sets of grandparents.  And one thing that I always looked forward to when visiting my great grandma was…Chinese food.  She always ordered in the most amazing Chinese food in town.  It was always egg rolls and chow mein and rice and there was more of it than the group of us could eat…but we always gave it our best shot.  It was tradition.  It was one of the many highlights I experienced growing up and something I came to look forward to every time we headed over to great grandma’s house.

I haven’t had true Chinese food since I went gluten-free…three years ago.  The sauces…the way things are cooked…it’s risky.  And it’s a risk I no longer am willing to take.  It’s sad, because Asian food is one of my favorite types of cuisine.  Sure, there are places like P.F. Chang’s that offers a gluten-free menu…but the vegetarian choices are very limited…and that’s not true Chinese.

Then…along came a little miracle in my Whole Foods (and other natural food stores) freezer section.  A company, known as Feel Good Foods, introduced the first (and I believe the only) gluten-free Asian dumplings and egg rolls to the market.  The hardest part was choosing if I wanted egg rolls or dumplings.  It was a tough decision, but I finally chose the dumplings.  One of the interesting things about this company is that it was created by husband and wife duo, Chef Tryg and Vanessa Phillips.  They created Feel Good Foods gluten-free frozen foods after they opened a gluten-free restaurant and were told that they needed to put their food out on the market.  Their foods are non-GMO, all-natural and completely gluten-free.  You see…Vanessa is a Celiac…so they take food allergies really seriously.

Cathy had some leftover rice from our treat on Friday at the local Indian restaurant.  So, after work and a trip to the gym, I wanted something that was easy to prepare and wouldn’t require me to read off a recipe or attempt something new.  With the rice in the fridge, I figured I could steam up some of the last of the jasmine rice in my pantry for myself and then pull the Feel Good Foods Gluten Free Vegetable Dumplings out of the freezer to prepare while my rice was cooking on the stove.

These are super easy to prepare.  In a non-stick pan, add a cup of water and 1 tablespoon of oil.  Bring it to a boil and add the dumplings to the pan, flat side down.  Cover and reduce the heat to medium-high, leaving the dumplings in the pan until the water completely evaporates.  It takes around 10-11 minutes.  They are fine to eat on their own, but I served mine with rice.  These even come with a fantastic dipping sauce, which I ended up just pouring over the top so that the rice could absorb it too.

I settled in for dinner and dug into my little bowl of Asian gluten-free food.  I wasn’t sure what to expect…but I was very happy with what I started to eat.  The dumplings were soft and tender, with a nice crust on the flat side that was on the pan.  The rest of it was that doughy stickiness you associate with potstickers.  Amazing.  The stuffing inside the wrapper was flavorful and very much like a delicious egg roll.  So it was like a dumpling with an egg roll flavor.  Happy girl right here.  And the dipping sauce helped add a bit of seasoning and flavor to the entire dish.  I am already wanting to restock my freezer with more of these.  And the egg rolls for that matter.  Delicious!

The Feel Good Foods Gluten Free Vegetable Dumplings are a simple blend of ingredients.  The wrapper is made from water, sweet rice flour, rice flour, potato starch, canola oil, salt, xanthan gum, and corn starch.  The filling is a combination of cabbage, yellow onion, bean vermicelli, carrots, green onion, corn starch, sesame oil, and less than 2% of evaporated cany syrup, ginger, salt, black pepper, yeast extract, and shiitake mushrooms.  The dipping sauce is made from water, organic tamari soy sauce, sugar, ginger juice, garlic juice, and natural flavors of garlic and black pepper.  These dumplings are gluten-free and cholesterol free.

Real and recognizable ingredients.  LOVE it.

As far as nutrition goes, a serving size of the Feel Good Foods Vegetable Dumplings is 4 dumplings.  There are two servings per box.  One serving provides you with 290 calories and 9 grams of fat.  They contain 430 mg sodium and 3 grams of sugar.  These contain 2 grams of fiber and 3 grams of protein.  The sauce packet contains 45 calories, is completely fat free, has 10 grams of sugar, and 2 gram of protein.  Not bad for a frozen package of gluten-free foods.

If I could hug both Chef Tryg and Vanessa, I totally would.  Because of them, I am once again able to revisit one of my favorite cuisines…Asian.  And I can’t wait to try the Vegetable Egg Rolls and replenish my freezer with the Vegetable Dumplings.  These are one of my favorite frozen dishes I have had to date.  It might be the nostalgia, but I definitely think it has more to do with the product itself.  Taste, texture, flavor and just all around goodness.

It doesn’t get much better than this!

Chinese food is BACK in my life!

Feel Good Foods Gluten Free Vegetable Dumplings and Dipping Sauce

Recipe: Broccoli Masala

Ever since I started going to my favorite (and Louisville’s most popular) Indian restaurant, one of the best dishes I have ever eaten has been their Broccoli Masala.  No joke.  It is amazing.  It has so much depth of flavor.  I always get mine done up spicy…because I love some heat with my food.

I’ve done a baked version of a Broccoli Masala before and even blogged on it…but I wanted to see if I could find a better recipe to use.  And, lo and behold, I found one that would incorporate items that I already had in my apartment.  I had broccoli from my last CSA bin, before having to take a couple weeks off as I was out of town.  I had onion.  I had cherry tomatoes.  And so…this recipe from Spicy Treats just seemed ideal.  I made up my mind to make it…so after I got home from work,  I got busy chopping up veggies and seaming some rice on the stove top.

The rest…was just a matter of cooking.  It was so easy and Cathy even preferred it to the baked one I made previously.  It’s still not Shalimar’s (that would be my favorite Indian restaurant)…but it is, so far, the next best thing!

Recipe: Broccoli Masala

Broccoli Masala
Broccoli Masala

Servings: 2
Time: Prep 20 minutes; Cook 15 minutes

Ingredients:

  • 1 medium sized crown of broccoli, chopped into small florets
  • 1 big onion, sliced
  • 1 tomato, chopped (I just sliced grape tomatoes in half)
  • 2 cloves garlic, crushed
  • 1/4 teaspoon turmeric powder
  • 1/2-1 teaspoon chili powder
  • 1/2 teaspoon cumin
  • 1 teaspoon curry powder
  • salt to taste
  • cilantro, finely chopped (optional)
  • 2-3 teaspoons coconut oil
  • 1/4 teaspoon fennel seeds


Directions:

Wash Broccoli crown, drain and chop into small florets.  Chop the onion , tomato, and crush the garlic and keep ready.

Heat oil in a pan.

Add fennel seeds and when they splutter, add garlic and saute it.

Add onions and saute for 1-2 minutes or until it turn light golden brown.

Add tomato and saute until soft and mushy.

Add turmeric powder, chilli powder, cumin powder, and curry powder.  Stir fry well.

Add broccoli florets.  Season with enough salt and then add a dash of water.  Stir fry for a minute.

Cover and cook for 2-3 minutes, or until the florets turn soft and tender.  Do not over cook.  The broccoli should retain that bright green color.

If you are using it, add the cilantro and stir fry for a moment.

Serve over steamed jasmine rice.

~*~*~

My roomate really dove into this dish, loving the further depth of flavor that the addition of the tomatoes and the onions made.  In addition, the coconut oil made the perfect oil in which to cook the vegetables.  They cooked up to perfection, and I hit the seasoning just right for my roommate (she is not one who likes spicy foods…I do).  So, that was a win.  If you prefer a spicier meal, add more chili powder.  This delicious and nutritious meal is a great and fun way to enjoy Indian food in the comfort of your home.  Simple to make…and delicious too.

And now I’m craving…

Recipe: Gluten-Free Charred Corn Tacos (with Homemade Taco Seasoning)

So…I was back from some time away and without my CSA bin for yet another week.  I still had a couple of produce items from the week prior in my fridge.  Nothing that would have gone bad while I was out of town for the weekend…but…you know…just some things I hadn’t gotten to just yet.  One of these items were 2 ears of corn.  I had previously grilled up the other 2 ears of corn that were in the bin…and I really, really wanted to try something different this time around.

So, I went on a little bit of a hunt…and somehow discovered the amazing recipe for Charred Corn Tacos (as well as homemade (so it can be gluten-free) taco seasoning) from Joy the Baker.  I was elated.  Because I love tacos and because it was definitely a different and unique way to consume said corn…and do something different with your average tacos.  The best part?  This recipe was super easy and I just needed to swing by the grocery store for a couple of items that I didn’t have due to not getting my produce bin.

If you love tacos…I highly recommend these.  If you are a carnivore…I swear, you won’t even miss the meat!

Recipe: Gluten-Free Charred Corn Tacos (with Homemade Taco Seasoning)

Gluten-Free Charred Corn Tacos (with homemade Taco Seasoning)
Gluten-Free Charred Corn Tacos (with Homemade Taco Seasoning)

Servings: 2
Time: Prep 25 minutes; Cook 15 minutes

Ingredients for Taco Seasoning:

  • 2 teaspoons chili powder
  • 1 teaspoon ground cumin
  • 1 teaspoon paprika
  • 1 teaspoon dried oregano
  • 1 teaspoon garlic powder
  • 1 teaspoon onion powder
  • 1/2 teaspoon coriander
  • 1/2 teaspoon salt
  • 1/2 teaspoon crushed red pepper flakes


Directions for Taco Seasoning:

Toss together.  Store in a jar.  Apply liberally to most everything.


Ingredients for Gluten-Free Charred Corn Tacos:

  • 2 ears of fresh corn, kernels cut from the cob
  • a handful of chopped scallions
  • a handful of sliced cherry tomatoes
  • a seeded fresh Serrano pepper, chopped
  • a liberal amount of homemade taco seasoning
  • 4 corn tortillas
  • 1 ripe sliced avocado
  • 1 tablespoon olive oil


Directions for Gluten-Free Charred Corn Tacos:

Heat a few tablespoons of olive oil in a large skillet over medium-high heat.

Add the corn and allow to char for several minutes.  Stir infrequently to allow the corn to really char.

Remove from the heat and stir in scallions, cherry tomatoes, jalapeno, and taco seasoning to taste.

Warm up the tortillas.

Spoon the charred corn into the tortillas.  Top with avocado.

DEVOUR!

~*~*~

My roommate declared this one of her favorite taco dishes that I have ever prepared.  And, a couple years back we did what we called a “Tour de Taco” where I did different flavors and versions of tacos throughout the entire week.  To hear that sort of exclamation really made my day.  The char on the corn really does make all the difference, so be sure you start to get that blackened color on the kernels.  These aren’t too spicy…and the seasoning is perfect.  Honestly, it just brought this wash of flavor to the entire dish.  Top off however you like.  I added kale to mine for a bit of a leafy green.  It was awesome.  My roomie had me whip up some vegan Sriracha sour cream and I topped mine with hot sauce.  However you like it…it’s yours for the making.

Recipe: Roasted Garlic, Cheddar and Chive Biscuits

This spring, my roommate and I decided to take on a new challenge.  This challenge was…we were going to see if we could…possibly…grow our own herbs.  We actually picked up a little kit from a local store that gave us five different herbs to grow.  Sadly, the cilantro and the parsley didn’t quite survive the first wave of heat and humidity, despite our best efforts.  This left us with chives, basil and oregano.  So far…they’ve been doing well.  The break in the hot summer weather has worked in favor for those three herbs, at least.

Well, the chives were getting a bit crazy and I was informed by the roomie that we needed to use them.  And I know how she loves biscuits.  Does she ever love biscuits…

So I promised her that I would make her some biscuits that included chives in some way, shape or form.   I also know that she loves cheese and she loves garlic.  I found a base recipe for some flaky biscuits on a blog called Whole and Heavenly Oven…and then made my own adjustments to make it work within my own diet restrictions.  I will note that I didn’t roast my own garlic.  I had a jar of roasted garlic in my fridge, so I used about 2 tablespoons of the garlic instead of roasting a head of garlic myself.  But, roasting garlic is easy and I’ll include those instructions from the original recipe in case you don’t have the jar of roasted minced garlic like I did.

Recipe: Gluten-Free Roasted Garlic, Cheddar and Chive Biscuits

Gluten-Free Roasted Garlic, Cheddar and Chive Biscuits

Servings: 20
Time: Prep 50 minutes; Bake 15 minutes

Ingredients:

  • 1 small head of garlic, top cut off*
  • 1/2 teaspoon olive oil*
  • 4-1/2 cups flour (I used Better Batter Gluten-Free All Purpose)
  • 4 teaspoons coconut sugar
  • 2 tablespoons baking powder
  • 2 teaspoons baking soda
  • 2 teaspoons salt
  • 1-1/4 cups cold butter, cubed (Earth Balance is a great non-dairy option)
  • 1 cup shredded cheddar cheese (Diaya is great for a non-dairy option)
  • 2 tablespoons fresh chives, chopped
  • 2 cups buttermilk (I used unsweetened almond milk)*NOTE: If you are using the jarred minced roasted garlic, you don’t need these ingredients.

Instructions:

If you are roasting your own garlic, preheat the oven to 400°F.  Place garlic in a small baking dish and drizzle with olive oil.  Cover with foil and bake for 35-40 minutes, or until garlic is soft.  Cool slightly then finely chop.  Set aside.

In a large bowl, combine flour, sugar, baking powder, baking soda, and salt.

Using a pastry cutter, or your fingers, work in cold butter, shredded cheese, chives, and chopped roasted garlic until crumbly.

Pour buttermilk over all and gently stir until a shaggy clump of dough forms.

Turn dough onto a floured surface and gently knead until dough is smooth.

Pat dough into a 3/4 in circle.  Using a biscuit cutter, cut out biscuit shapes and place on parchment paper-lined baking sheets.  Keep doing this until all the dough is used up.

Bake biscuits at 400°F for 15-18 minutes, or until lightly golden.  Cool on wire cooling racks.

Store biscuits in an airtight container at room temperature up to 3 days.

~*~*~

Much to my delight (and I admit…surprise), what emerged were these golden, flaky, amazing biscuits.  My roommate had one hot from the oven and she raved about the flavors.  These will be part of our breakfast lineup this week for certain.  I already scrambled up eggs and placed between a sliced biscuit with some greens for breakfast this morning.  HUGE win on the breakfast front.  I will definitely be making these again!