It is naturally gluten free. It is cheesy. It is soft and gooey and amazing. It is one of the most amazing things you will ever eat. I first made Brazilian cheese bread when I used a Chebe bread mix a long, long time ago. But after having the real thing at the Disney World Wine & Dine Festival…Pão de Queijo has been on my mind.
This weekend, I am visiting my friend, Jenn, and we are having a culinary cooking experience, as usual. Last night, to accompany our delicious gluten-free gnocchi main course…we baked up a batch of this amazing Brazilian cheese bread. And…were we ever impressed! Holy cheesy gods of goodness!
So…here’s how we did it…
Recipe: Pão de Queijo (Brazilian Cheese Bread)
Pão de Queijo (Brazilian Cheese Bread)
Servings: 12-30 (we got 30 out of ours)
Time: Prep 10 minutes; Bake 20 minutes
Ingredients:
1 egg
1/3 cup olive oil
2/3 cup milk
1 1/2 cups (170 grams) tapioca flour
1/2 cup (packed, about 66 grams) grated cheese – I used mature cheddar
1 teaspoon of salt (or more to taste)
Directions:
Preheat the oven to 400°F.
Grease a mini muffin tin. Put all the ingredients in a blender, pulse the mixture till smooth. (This mixture keeps in the fridge for up to a week, so you can pre-mix some of this for a quick snack during the week).
Fill the muffin tin, slightly more than two thirds full.
Bake in the oven for 15-20 minutes or until slightly golden.
Serve fresh and warm from the oven.
~*~*~
Seriously…a great bread to serve up with whatever dinner you are eating. Or have it with breakfast (we are this morning!). Or as a snack. The outside gets golden and a little crispy…but that inside…it is just gooey and soft and just amazing. I am going to make the hell out of this recipe. Over and over and over and over again!
Even if you aren’t gluten-free…you will seriously love these bite-size breads of cheesy goodness. Bake some up now. Do not try to substitute the tapioca flour for a different flour. It won’t be the same. Bake it. Bake it up now!
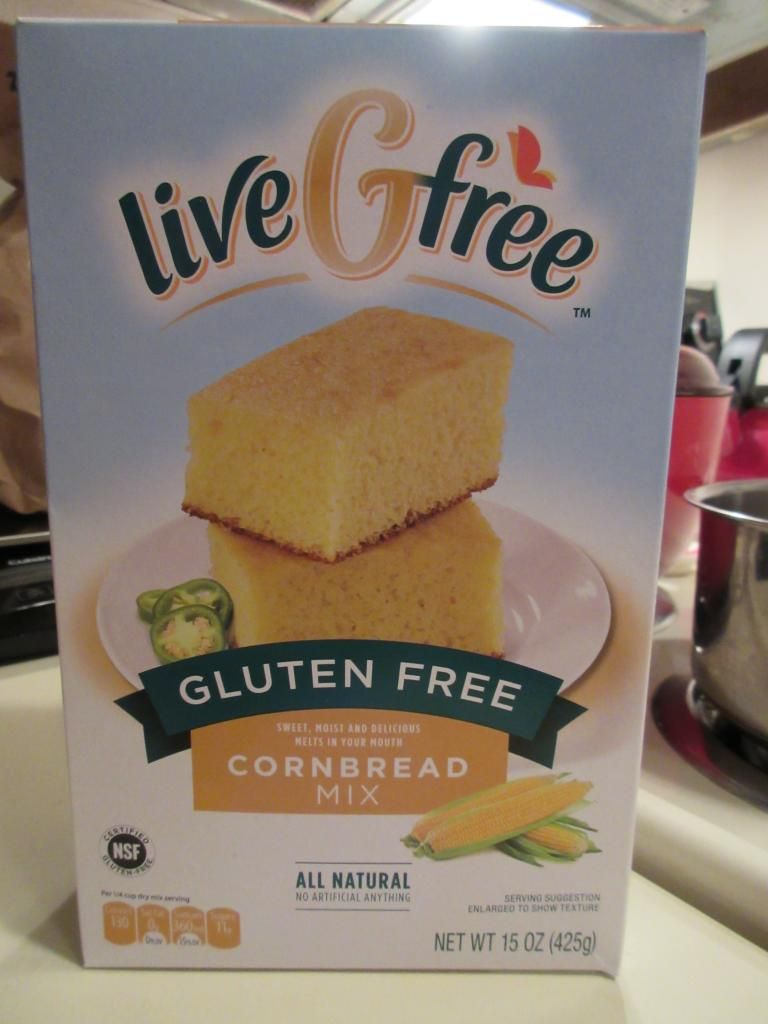
Product: Aldi liveGfree Gluten Free Cornbread Mix – $2.99+
Yep…I still have some items from my original pillaging of Aldi back in May for their new (at the time) gluten-free products. The mixes usually take some time for me to actually use. I just have gotten out of the habit of making things from a simple mix. That’s not a bad thing, mind you, except then my pantry remains very, very full.
Well…the other day I discovered a recipe for a Ethiopain dish that I wanted to try to make for dinner. I didn’t want to serve it with rice. But I knew that I wanted something more than just the black eyed peas and coconut milk mixture (with tons of veggies and spices). When I realized that we still needed a habanero pepper for the dish, I sent my roommate out to the store while I got to work on cooking. It dawned on me that I still had the cornbread mix from Aldi in my pantry.
I figured you can’t go wrong with an African dish served alongside a Southern favorite, right?
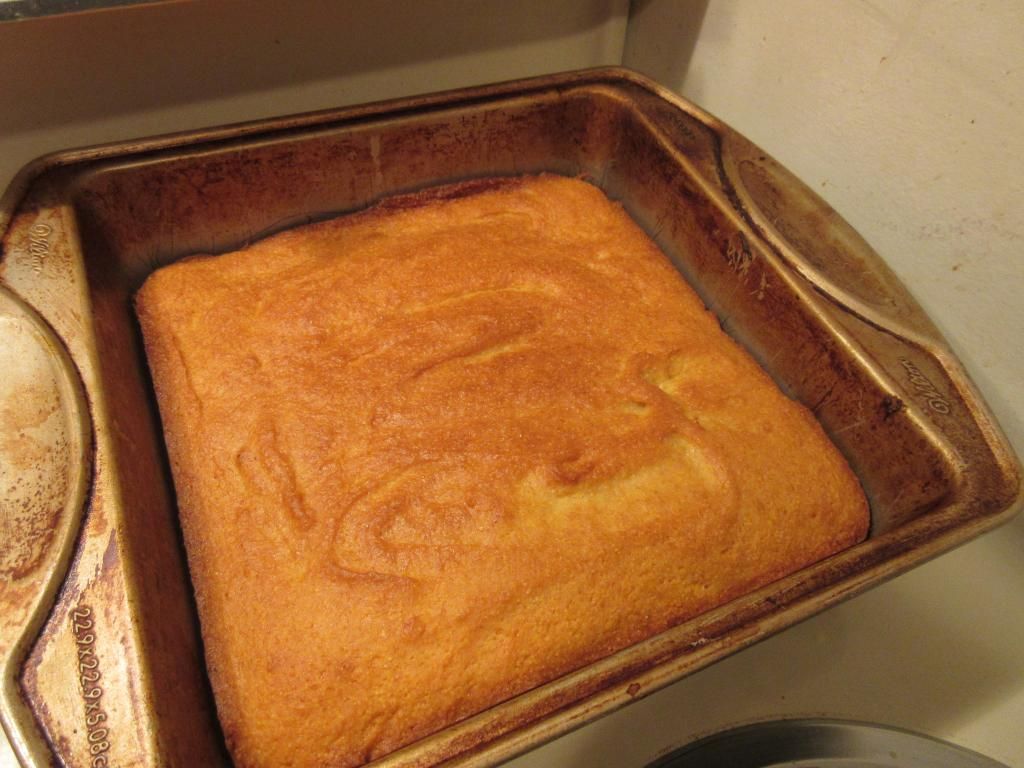
Let me start by saying that this is actually a very simple mix to put together. Preheat the oven and then mix together 1 egg, 3/4 cup milk (I used almond milk), and 1/2 cup oil. Add the cornbread mix and beat well for around 2-3 minutes. Place in a greased 8×8 baking pan and allow to stand for 10 minutes. Then, pop it in the oven to bake until golden brown and a toothpick inserted in the middle comes out clean. For me, it was between 20-25 minutes.
Aldi liveGfree Gluten Free Cornbread
Somehow, my roommate missed the cornbread baking and cooling, although she entered the kitchen a few times. How that happened, I’ll never know. But, when my Black-Eyed Peas with Coconut Milk and Ethiopian Spices was done simmering…dinner was served. And when I handed her a bowl of the curried black-eyed peas, she seemed most excited about the surprise slice of cornbread. She dove right into it.
“It’s really sweet!” she said, as I prepared my own bowl and plate.
She was right. Very right. I settled into my seat and took a bite of my spicy dish Then…the cornbread.
Sweet. Like…cake. Reminds me of the Mark Lowery riff on Southern cornbread. “Do not put sugar in your cornbread. Sugar in the cornbread is cake.” HAHAHA! Ah…funny. *ahem* Sorry. But, yes…this is a sweet cornbread. Not that it is a bad thing…except I grew up in the North…and we don’t do sweet tea or sweet cornbread. That being said, this was the moistest, best tasting gluten-free cornbread from a mix that I have ever made. I’ve even made some from scratch that haven’t baked up this moist and rich. I can overlook that sweetness for the taste and texture that came out of this mix. I am way beyond impressed. Even more impressive…it reheats beautifully, retaining its moistness. Simply amazing. I would definitely purchase this again in a heartbeat. And you certainly can’t beat that price.
Let’s discuss the ingredients that go into the liveGfree Gluten Free Cornbread Mix. This mix is made up of sugar (yep…first ingredient!), yellow corn meal, white rice flour, potato starch, brown rice flour, tapioca starch, baking powder, natural vanilla flavor, salt, and xanthan gum. This mix is gluten-free, lactose free, nut free, soy free, and wheat free. The mix itself is cholesterol free…but that gets negated when you add the egg.
Speaking of which, how about the nutrition information? A serving size is 1/4 cup of the mix. It makes 12 servings. One serving of the mix is 130 calories and is fat free. One serving will provide you with 360 mg sodium and 11 grams of sugar. One serving also provides 1 gram of fiber and 1 gram of protein.
Sometimes love can come in the form of a simple gluten-free cornbread mix. I was really happy with the way this baked up, the way it tasted, and the way it all came together. Amazing. I have been more than impressed by Aldi’s liveGfree line of products. And this one is right on top! Highly recommended.
‘Twas the month of December and I was starting to contrive
Brand new recipes for when my Cuisine Cube was due to arrive…
Yes! The December cube is here! It arrived on Monday and I happily dug right in, wondering what sort of goodness lay under the flaps of cardboard and paper. What I was met with was a delightful array of items. It was like Christmas had come early as I sorted through the breakfast, baking, lunch/snack, dessert dinner, and other dessert options. I was ready to dive right in and have a little of everything. But, self-control does still in handy at times.
First of all, let’s discuss Cuisine Cube. I’ve blogged on items I’ve received since signing up in May. Cuisine Cube is a gluten-free delivery service put together by a team of enthusiastic eaters, food professionals, and allergy suffers from New York City. They have scoured the country looking for lesser known brands made by small artisan producers that taste better than the highly processed and subpar items you can find at virtually every grocery store. This was a way to help support small businesses. These products are meticulously selected and then delivered right to your door. So, you get to try a new brand or item you may never have discovered otherwise. It’s a great, efficient, and fantastic service. One that I always look forward to each month.
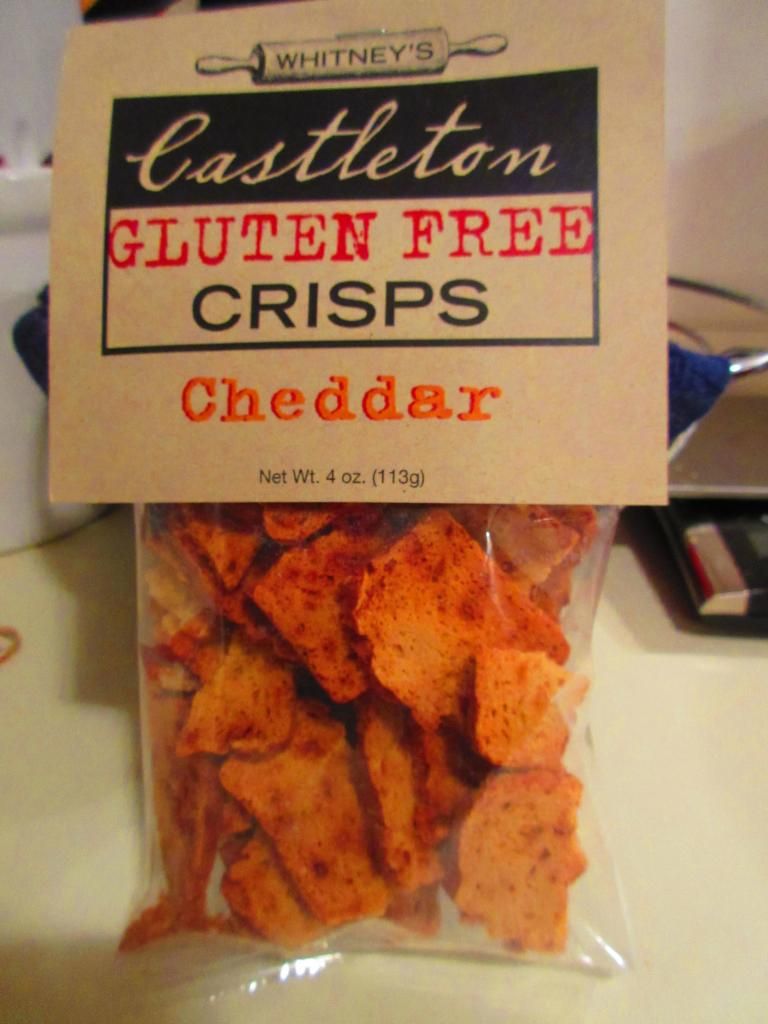
So, this month, I selected Whitney’s Castleton Gluten Free Cheddar Crisps to lead off my month of delicious eating. I thought they looked a lot like the Glutino Bagel Chips that you can find in most grocery stores these days. But, I didn’t just want to eat these straight out of the package…or just throw them on top of a salad. I wanted to do something a little different with them. And I did.
But…not without trying one first. I can’t just re-purpose a product without trying it out as it is first…
There you have it…I opened up the package and popped one of the crisps into my mouth. And I was immediately greeted with the crunchy texture. I love that for these kinds of crisps. They are called crisps for a reason…they should be crispy. But, even more importantly…the flavor! Before I had to go gluten-free…and before I started to really pay attention to what I ate, I was a Cheeze-It connoisseur. And the cheddar flavor in these crisps…reminded me of those. But better. WAY better. I was almost sad to repurpose these for my recipe…because they were amazing on their own.
But my creative chef mind was calling…
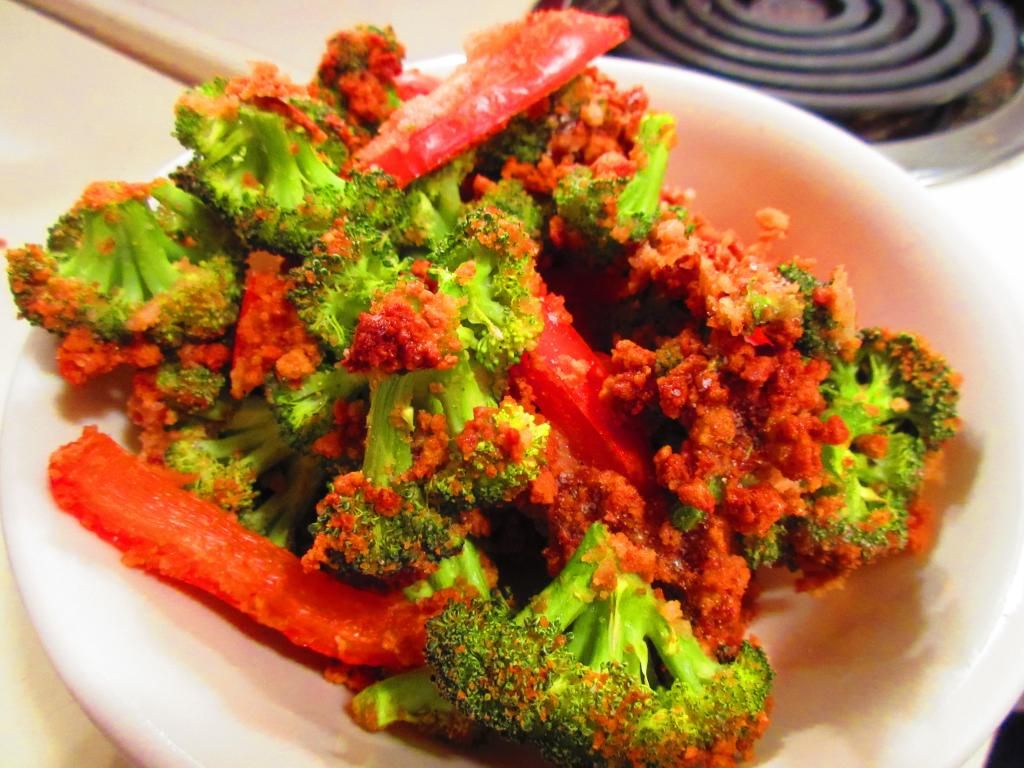
So…the rest of these amazing and delicious crisps went into my food processor and got pulverized.
Now, before I share this recipe with you, let’s talk about the Whitney’s Castleton Gluten Free Cheddar Crisps. As far as ingredients go, these are made from sorghum flour, tapioca flour, brown rice flour, white rice flour, xanthan gum, Vermont Farmstead’s Farmstead Cheddar, milk, white vinegar, brown sugar, baking soda, kosher salt, dry mustard and cayenne pepper. These are produced in a designated gluten-free facility.
Nutritionally speaking, a serving is 1 ounce of these crisps…and the package holds 4 servings. One serving will provide you with 120 calories and 3 grams of fat. You will be consuming 10 mg cholesterol, 230 mg sodium, and 2 grams of sugar. In addition, these have 1 gram of fiber and 3 grams of protein.
So, what came of these crisps?
Well, back before I became a vegetarian, and definitely back before I was diagnosed as a Celiac…one of my favorite things to order at Red Lobster was the Fried Calamari appetizer. My roommate would eat the calamari…I wanted the fried broccoli and red peppers that were served with it. Honestly, one of my favorite foods (and definitely not good for you by any means…but it was so good)…which I hadn’t even thought about in years…
But I happened to have a red bell pepper and some broccoli from my CSA bin in my fridge…and now…a breading. I do not fry anything. I just don’t. So, I set out to recreate the infamous Red Lobster vegetables…by baking them. And thanks to Whitney’s Castleton Gluten Free Cheddar Crisps…I now had the perfect gluten-free breading.
Recipe: Crispy Broccoli and Red Peppers
Crispy Broccoli and Red Peppers (made with Whitney’s Castleton Gluten Free Cheddar Crisps)
4 ounces gluten-free breading (I used a package of Whitney’s Castleton Gluten Free Cheddar Crisps)
Directions:
Preheat the oven to 350°F.
In a large plastic bag, place in the broccoli florets and red pepper slices. Add the egg white(s). Close the bag and shake to coat. Add the gluten-free breading. Reseal the bag and shake again. Spread the vegetables onto a baking sheet and bake for 15-20 minutes, until crispy.
~*~*~
Guess what? This was so close to how I remember the original tasting. I love the flavors that baking something in the oven can really coax out of things like vegetables. And the Whitney’s Castleton Gluten Free Cheddar Crisps made the perfect coating for these vegetables. It gave it a nice cheese flavor on top of turning a beautiful golden color in the oven and really making the apartment smell fantastic. I was smelling a great cheddar aroma after these were in the oven for only 5 minutes. Way beyond impressed. I sort of want these in my pantry for always.
So, if you are curious about the Whitney’s Castleton Gluten Free Cheddar Crisps, head over to their site and read more about their products and order some for yourself. Or order from Cuisine Cube’s stock up site!
And if you want to give Cuisine Cube a try, head over to their Web site and check out their subscription options…joining for a monthly, three month, or six month subscription. This Cube (box of goodies) will arrive at your door within the first week of each month and you will have at least 5 full-size gluten-free items inside. I encourage you to give it a try…
…because I never would have heard of these crisps without the aid of Cuisine Cube.
And yeah…they were really fantastic…on their own and in my dish.
There are a lot of Thanksgiving foods that, as a gluten-free vegetarian, I no longer indulge in at the dinner table. That being said, my Thanksgiving meal usually consists of a scoop of vegetables, some plain potatoes, and usually a fruit of some sort…or whatever I brought with me for the occasion.
This year for my contribution to the Thanksgiving meal, I brought desserts. YAY! I also, however, brought gluten-free stuffing. From my local gluten-free bakery. I actually pre-ordered it prior to receiving my November 2014 Cuisine Cube. But…this just gave me the opportunity to have stuffing…all over again.
And this is a good thing. Because I absolutely LOVE stuffing! I never ate it much as a kid, because, prior to going vegetarian, my family’s go-to Thanksgiving meal was shrimp creole, not turkey, but sometimes, on Christmas, my mom would cook up a turkey and I would request stuffing. And…it was usually Stove Top. But, to me, it was amazing!
So, stuffing was one of my guilty pleasures that I rarely indulged in, but would devour every time I had the chance.
When my Cuisine Cube happened to have a box of a gluten-free stuffing in it, I might…might…have done a happy dance of joy with a few bounces and jumps and squeals of happiness. This isn’t uncommon each month when I open up my Cuisine Cube…but we are talking GLUTEN FREE STUFFING!! Did I make that clear yet?
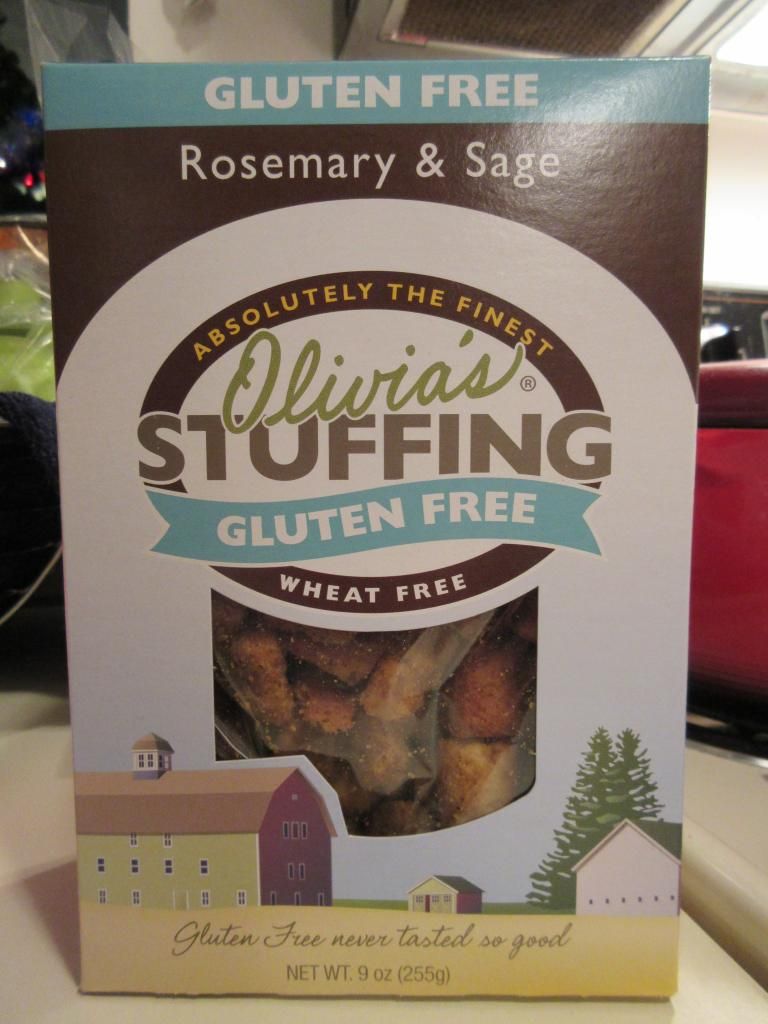
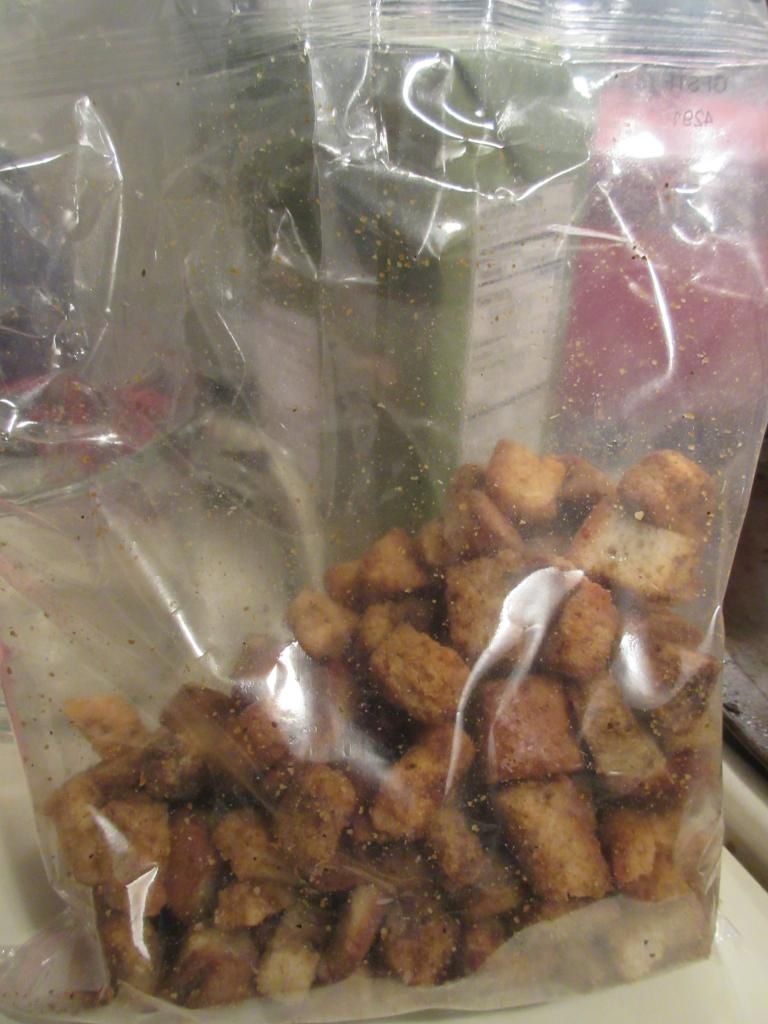
Olivia’s Gluten Free Rosemary & Sage Stuffing
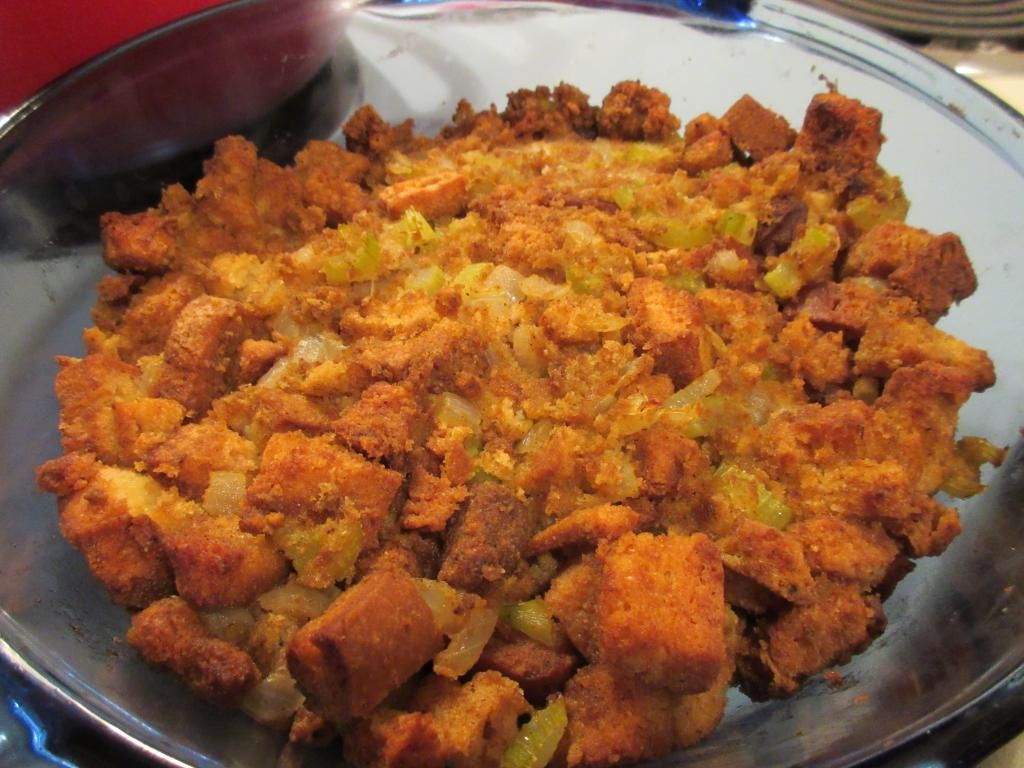
So, since I had my local allergen-free bakery make me some gluten-free stuffing for the big meal on Thursday, I got to have some fun and get a little creative with my box of Olivia’s Gluten Free Rosemary & Sage Stuffing. But, this still meant that I needed to cook it up properly. And this stuffing is really easy to make! I cut up some onion and celery per the instructions on the box, cooked it in my vegan butter, and then added some vegetable broth. I transfered the liquid into a large mixing bowl and added in the Olivia’s Gluten Free Rosemary & Sage Stuffing mix. I gave it a stir and let it sit for about 8-10 minutes, until the cubes were moist and the liquid was completely absorbed. After that, I put the mix into a baking dish and baked it for 30-40 minutes per the instructions on the box until it was beautifully golden and ready to eat.
I won’t lie…I had a small serving of it then. I had to. The smell as it was baking was phenomenal. Really. I was practically salivating the entire half hour it was cooking. So, yeah…I wanted to try it so I could tell you, my readers, how it was before I had some fun with it.
It was amazing. No joke. Freakin’ fantastic. The chunks of bread got to that perfect golden crispness, while the vegetables and the absorbed liquid kept it moist and delicious. The level of flavors was spot on. Definitely perfect on its own. I didn’t even need to add any additional salt and pepper. Olivia’s Gluten Free Rosemary & Sage Stuffing was better than any stuffing I have ever eaten in my life. Way better. That goes for the boxed stuff as well as the stuff made from scratch. This was an total win. I wish I had made it up for dinner at my roommate’s family’s home. Perhaps next year. They wouldn’t even begin to guess that it was gluten-free…except for I’d be eating it, so they would know!
I am so in love with this stuffing. My only complaint was there was only one box of it. Good thing I can order more through Cuisine Cube and Olivia’s Gluten Free Web site. Trust me…this will be happening!
Let’s talk about the ingredients in Olivia’s Gluten Free Rosemary & Sage Stuffing. This stuffing is made from gluten-free bread, certified non-GMO canola oil, granulated onion and garlic, rosemary, sage, thyme, celery seed, sea salt and pepper. It is cholesterol free, gluten-free and made in a dedicated gluten free facility.
As far as nutritional information goes, Olivia’s Gluten Free Rosemary & Sage Stuffing makes about 9 servings per container. If you use it traditionally. A serving size is 3/4 cup prepared. This serving will provide you with 110 calories and 4 grams of fat. You will also be taking in 200 mg sodium and 1 gram of sugar. In addition, you will be consuming only 1 gram of fiber and 1 gram of protein. On its own, this stuffing won’t make you feel stuffed, but you will love every single bite of it. Trust me.
But…as I mentioned earlier…I had some fun with this stuffing.
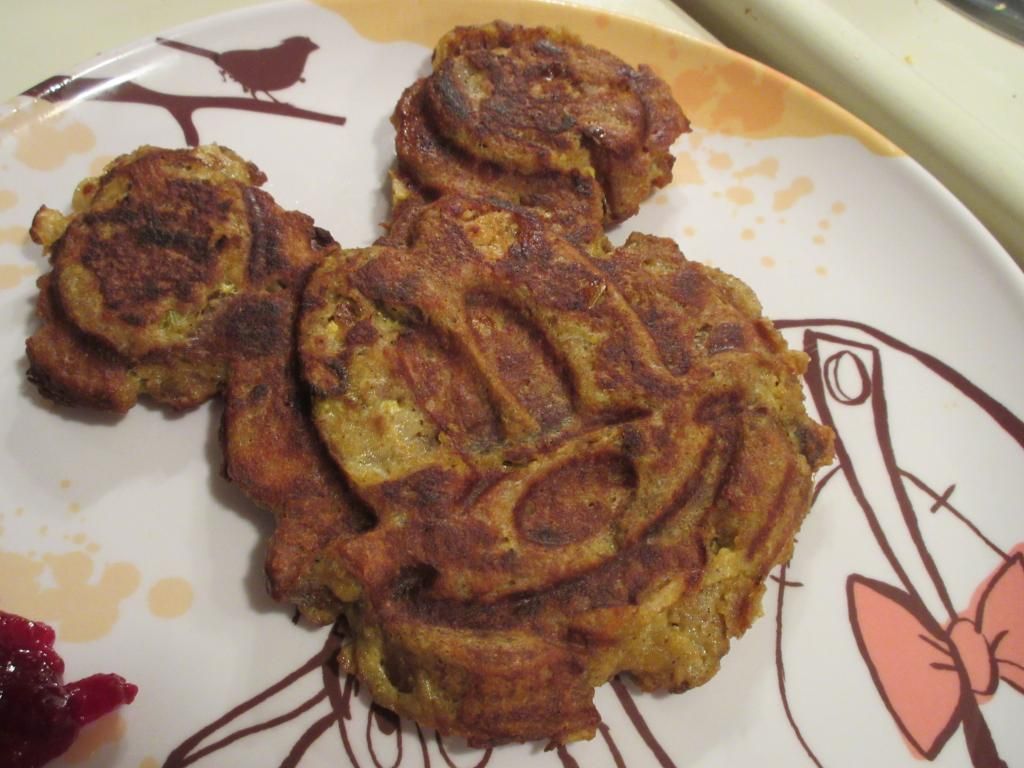
Why eat it straight up when you can do something a little outside the box, right? Well, on Black Friday, I picked up a new waffle maker (shaped like Mickey Mouse!) and I really wanted to test it out. I’m like a child…I get something new and I want to try it out right away. So, on Saturday night, I took the stuffing that I cooked up out of the fridge and put it into a big mixing bowl. It was time to use the “leftovers” in a new way. Prepare yourself…
Recipe: Gluten Free Leftover Stuffing Waffles
Gluten Free Leftover Stuffing Waffle (shaped like Mickey Mouse)
1/4 cup vegetable broth (or chicken broth if you’re not vegetarian)
Directions:
Preheat the waffle maker and grease it with cooking spray.
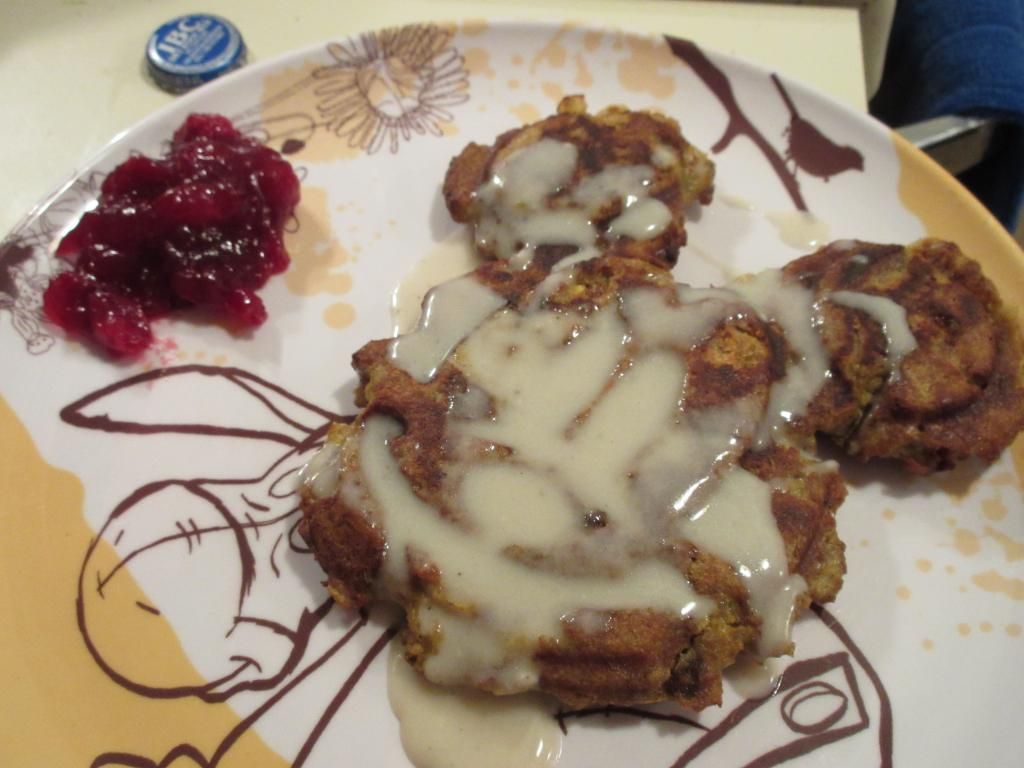
Gluten Free Leftover Stuffing Waffle with Vegan Homemade Vegan White Gravy and Cranberry Chutney
In a large bowl, stir together the leftover stuffing and eggs. Add 1/4 cup of vegetable broth and mix until well combined. Continue adding broth as needed until the mixture is well-moistened.
Scoop the stuffing mixture into the prepared waffle maker, spreading it evenly. (The stuffing will not spread or expand like regular waffle batter as it bakes, so arrange it in an even, thin layer). Close the lid and let the waffle bake until golden brown and the egg is cooked throughout. Stuffing waffles take longer to cook than regular waffles, as the egg must be completely cooked throughout. Don’t be afraid to let the waffle bake until it’s golden brown and crispy!
Transfer the waffle to a serving plate then repeat the filling and baking process with the remaining stuffing.
Serve.
~*~*~
I know what you’re wondering…you are pondering what I served these waffles with. Simple. I prepared a gluten-free white gravy and took some fresh cranberries from my CSA bin and made a cranberry chutney. I poured a bit of the warm gravy over the waffle with a side of the cranberry relish and…BAM…dinner was served.
It tasted amazing. Mine, being in a Mickey Mouse waffle maker, was shaped like Mickey Mouse…but it came to this perfect golden crispiness on the outside. It paired great with gravy, making it a savory dinner. And the cranberry chutney tied it all together. A great way to use up some of those holiday leftovers for sure!
TRUST ME!
Thanks to Cuisine Cube for including a box of Oliva’s amazing Gluten-Free Rosemary & Sage Stuffing in my box for Thanksgiving. I am forever thankful!
I totally broke tradition. I did. I was in New York City to run the TCS New York City Marathon…and so far I had managed really amazing gluten-free pizza the night before the race. Normally, after I race, my friends and I go to a pub to celebrate the occasion.
Not. This. Time.
But, it was of my own doing that we ended up in Harlem just after 6 p.m. on Sunday evening.
How?
Well…since we were going to be in New York City, I thought it might be fun to check out a restaurant that belongs to one of my favorite chefs of all time.
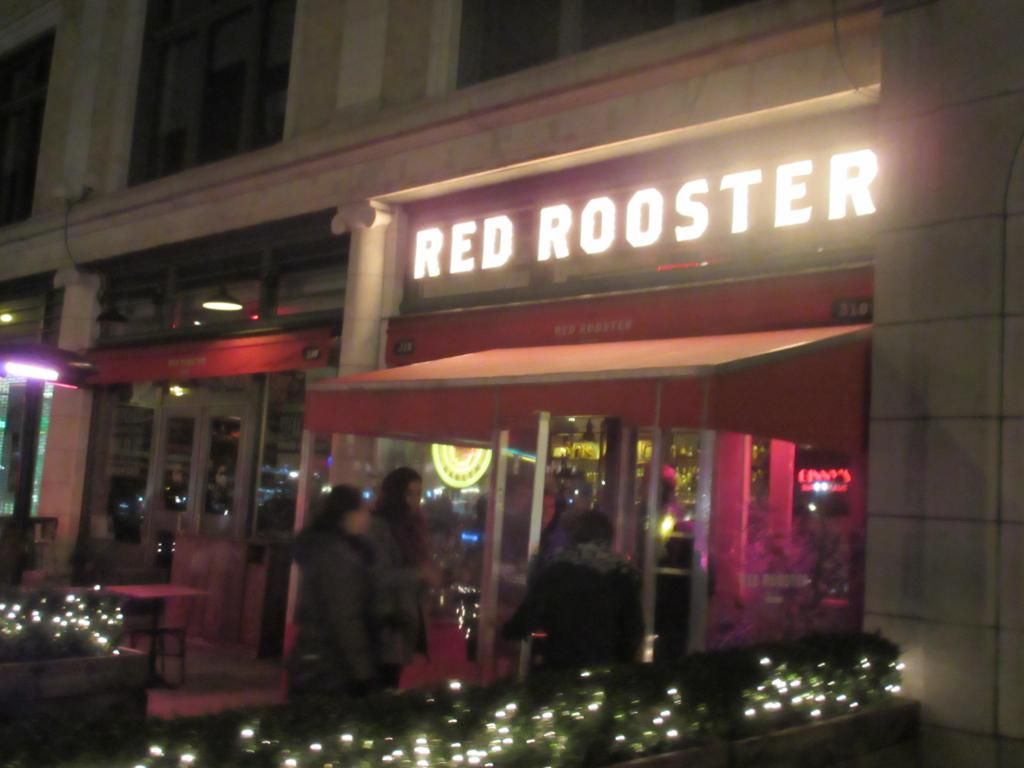
The venue: Red Rooster.
The chef: Marcus Samuelsson.
After all, we were celebrating my finish at the marathon earlier that afternoon. Why not make it special. So, yeah…I broke tradition and decided to forgo the pub for something…a little different. And I have never made a better decision in my life.
Prior to heading to New York City, I had told Cathy that I really wanted to go into Harlem and eat at Red Rooster. She knows how much I adore Marcus Samuelsson. And, honestly, we’re both foodies…she was right there with me. So, she went ahead and called the restaurant and talked to them about reservations on marathon eve. She mentioned that I was a gluten-free vegetarian and they said that food for me would not be an issue. With that done, Cathy set up a reservation for 6 p.m., giving me plenty of time to run, shower, walk around, come back and change, and get there with my group of friends. We had reservations for 4 people…me, Cathy, Heather, and my good friend Marisa.
So, that night, I dressed up in this elegant vintage dress…but kept on my recovery compression socks (and wore them with my heels, HA!), and my three friends and I went down to the subway and hopped the train to Harlem. We emerged steps away from Red Rooster. Literally.
And about 10 minutes late. Whoops. But…we got there…before they handed our table away.
We were seated near the kitchen, which was fantastic for me because I could see the people bustling around in there, working hard at the various stations. I loved the feel of Red Rooster…very chic casual. A fun, vibrant, laid back, but classic vibe. It was the kind of place I would want to return to and bring everyone I know…at least once. Totally my style.
Our server, Ryan, came over to greet us. He said that if we had any questions regarding the menu to let him know. I mentioned that I was a gluten-free vegetarian, and he said that wouldn’t be a problem. In fact, he would go and talk to the chef and see what they could do for me. I thanked him and we all studied the different menu options. At one point, I know Cathy was trying to convince Marisa to try the soup with tripe in it, but that wasn’t happening.
Ryan returned, and said that he mentioned that I had run the TCS New York City Marathon and was a gluten-free vegetarian, to which he said the chef would like to create a dish for me. I was thrilled and thanked him for checking.
Glasses of Brotherhood Riesling
With that said, Cathy took one matter into her own hands. We were, after all, celebrating. So, she ordered a bottle of wine for the table. We went with a sweet wine (Heather prefers dry…but she was a good sport), opting for a local Riesling – the 2013 Brotherhood from Washingtonville, New York ($48.00).
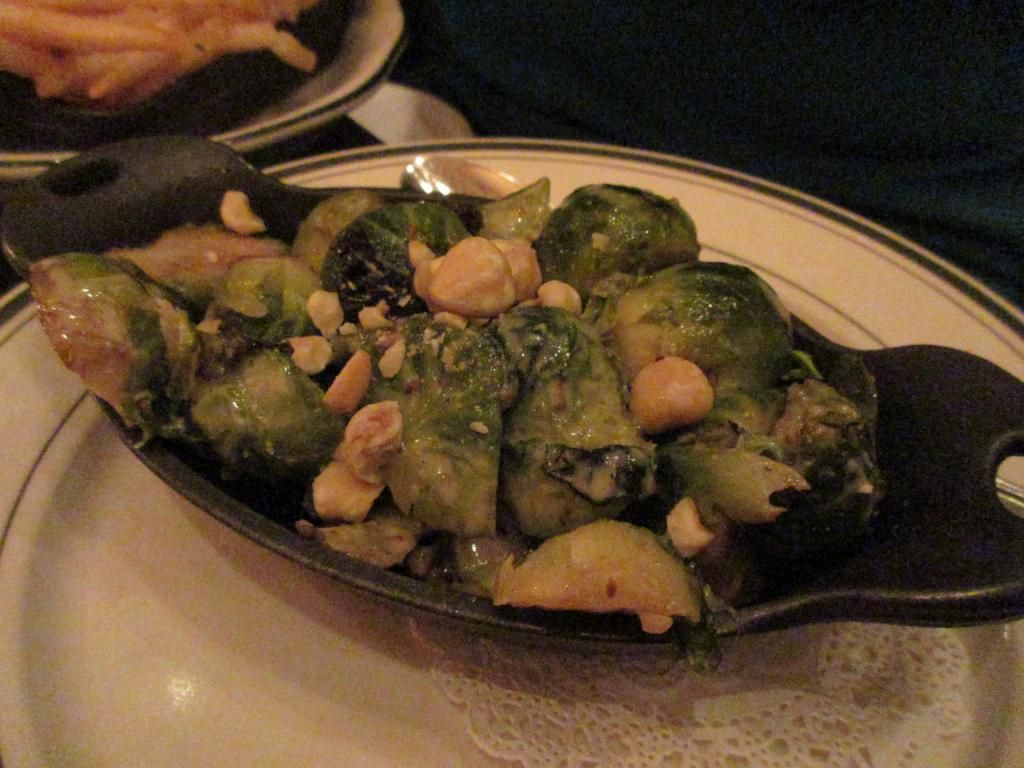
We were ready to order, it seemed. Ryan already had mine. He said the chef was going to do up a Vegetable Plate ($21.00) for me. So, I was excited to see what would emerge from the kitchen. Cathy went with Marcus Samuelsson’s signature dish – Helga’s Meatballs, which are served with lingonberries, braised green cabbage, and buttermilk mashed potatoes ($23.00). Heather ordered the Triple-Double Burger, which is served with bacon, jarlesburg, and rooster sauce ($19.00). Marisa did a little picking and choosing, and went with the Upstate Farms Squash Soup, which includes yogurt, honeycrisp apples, and lentils ($12.00) with a side of the Cornbread ($4.00). And, because they sounded good…Heather and I split a side of the Hearth Roasted Brussels Sprouts ($8.00).
Red Rooster Entrees: Helga’s Meatballs, Upstate Farms Squash Soup, and Triple-Double Burger
Ryan went to put or order in and we all got down to talking about New York, about work, about life, about the race, about food, about events…whatever we wanted to talk about. We were in no rush and the restaurant was not rushing us. I loved being able to just drink in the atmosphere.
Just before the food arrived, Ryan returned with our Riesling bottle, pouring a little bit into Cathy’s glass. Cathy lifted the glass and took a sip. And it was love at first taste for her. So he poured some in each of our glasses, and I made sure to keep drinking my water too. No dehydration here.
And then…our entrees arrived, each one settled down in front of us carefully.
The plates…were gorgeous!
Chef Creation: Vegetable Plate – Curried Black Eyed Peas, Charred Broccolini, Berbere Carrots and Parsnips, and Roasted Brussels Sprouts
The chef created a fantastic dish for me. In a bowl on my left was Curried Black Eyed Peas. And on the platter beside it…Charred Broccolini, Berbere Carrots and Parsnips, and Roasted Brussels Sprouts. Oh…I will note, these Brussels Sprouts tasted different than the side that Heather and I were splitting. It was chef magic. And it was a beautiful and gorgeous plate. One that I looked forward to eating.
Let’s start with the Curried Black Eyed Peas. Just…WOW. WOW! So much flavor. Lots going on. And yet…simple. I like to traditionally have black eyed peas on New Years Day…and this is how I would want them this year. For real. Just this incredible depth of flavor with the curry spices. Not hot…just simply bringing out more of the peas themselves. One of the best dishes involving peas of any sort I have ever had in my life. And, trust me, I’ve eaten plenty.
The vegetables that the chef prepared were a delicious and filling treat for me. The broccolini was gorgeously cooked and vibrant green. It had the right amount of crisp to it, yet, still soft and easy to bite through. I love broccolini, and this was just as it should be…simple and delicious. The Brussels Sprouts were roasted to perfection, giving that outer layer some depth of flavor, yet keeping the vegetable itself soft on the inside. Fork tender perfection.
My favorite thing, however, on that plate was the Berbere Carrots and Parsnips. HOLY COW! This side is exactly why I rushed out to a spice store in order to purchase berbere. This spice is awesome. It has this great flavor to it, followed with a little bit of heat at the end. It paired beautifully with this root vegetables. In fact, these were what I saved for my last bite. Completely in love with a plate of vegetables. How amazing! My compliments to the marathoning chef. My meal was sheer perfection.
Red Rooster’s Hearth Roasted Brussels Sprouts
And I know you’re wondering about the Hearth Roasted Brussels Sprouts that Heather and I split, right? Of course you are! These were different from the ones that were on my plate. These sprouts had this amazing char to them, but also hit up with a bit of a lemon or citrus flavor. Sprinkled on top were macadamia nuts. It was a combination that I hadn’t had before with Brussels sprouts…and I liked it.
But, wait…there is more!
Because when we celebrate we get dessert too! We were handed the menus so we could peruse the options. Ryan was taking care of another party at that moment, so I asked the new server about gluten-free options. She highly recommended The Green Apple Viking Delight ($11.00). I was game. Heather actually ended up doing that too. Leave it to the Scandinavian Minnesotans to order something with the word “viking” in it. HA! Cathy knew she wanted to have cheesecake in New York City, so her choice was the obvious one…Vanilla Cheesecake, served with yogurt, a granola crumble and pomegranate sorbet ($11.00). Marisa went for the signature dessert of the restaurant, the Red Rooster Doughnuts, which are filled with sweet potato and coated in cinnamon and sugar ($12.00). It came with an icing to dip them in as well.
Red Rooster’s Vanilla Cheesecake and Red Rooster Doughnuts
Red Rooster’s Green Apple Viking Delight
Desserts arrived shortly after and…yeah…we were quite happy with our choices. I thought The Green Apple Viking Delight was like a cold crème brûlée. It was a green apple sorbet set on top of a white chocolate fennel cream. On the side was chopped apple and fennel. And a little tuile was set on top, giving it a little crunch and texture. I was totally in love with the flavors, even though I wasn’t completely certain, at first, that they would work. They complimented each other perfectly and each bite was a burst of sweetness, with a bit of richness from the white chocolate. Divine.
Cathy loved her cheesecake (it looked deconstructed…so cool!) and Marisa was more than pleased with the doughnuts. Needless to say…we are girls. Desserts are awesome. But these…these took awesome up to the next level. Which I guess is phenomenal. Or, in the culinary world, a sweet note to end the night on.
We left the restaurant completely satisfied with the meal. The ambiance of Red Rooster was like no other restaurant that I have been in to date. A live jazz band had started to play during our desserts and we really just took a moment to not only savor the food, but savor the experience as well.
I have been a Marcus Samuelsson fan for years…being able to eat at his restaurant was a dream come true. Having a dish created for me, and having a careful and very caring staff made it unforgettable. I was congratulated so many times on finishing the marathon. It was an amazing day, but that night really just sealed it as one of the best days of my life. Good race…good friends…good food…good times.
Ah, Martha Stewart. I have to hand it to you! You always come through for me in a pinch. Always.
You see, I’m running short on time and have quite a few things left from my CSA bin delivery. Yes. I know. I don’t even eat out that often anymore. Once a week…generally on the weekend…and it’s usually always at Annie May’s Sweet Café on Saturday morning.
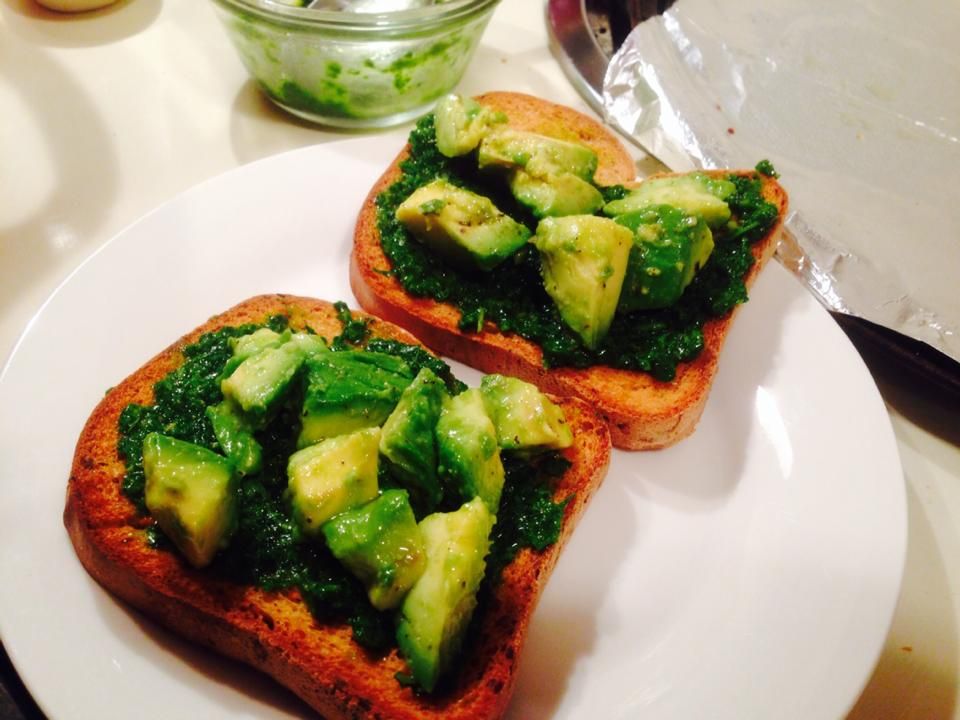
But…with my bin ingredients needing some attention, I noted this morning that my avocado was now ripe. Not just ripe…but at that perfect creamy ripeness. So…I scrapped my original plan to make Maple Roasted Brussels Sprouts and instead thought about what I could do with the ingredients I have in my fridge and pantry…that I could use avocado with.
I puzzled it out for much of the day…until I found this recipe. It’s one of Martha Stewart’s. And yes…it is sheer perfection. The only thing I did differently was I used kale in my sauce instead of parsley…because I have plenty of kale to use! HA! Oh, and I used slices of gluten-free sandwich bread instead of the crispy French bread that you would normally use to make bruschetta.
Trust me…you’ll eat this up as fast as Cathy and I did tonight!
Recipe: Gluten Free Avocado Bruschetta with Green Sauce
5 tablespoons plus 2 teaspoons extra-virgin olive oil
1-1/2 teaspoons red-wine vinegar
Salt and freshly ground pepper
Directions:
Place the garlic in a food processor, and pulse.
Add the kale, basil, 5 tablespoons olive oil, vinegar, and salt and pepper to taste; puree.
Set the sauce aside.
Cut the avocados into 1/2-inch chunks. Toss with the lemon juice and remaining 2 teaspoons olive oil.
Spread a scant tablespoon of the green sauce on each slice of bread.
Arrange the avocado chunks on the bread, sprinkle with a pinch of ground pepper.
Serve immediately.
~*~*~
This dinner was so simple and yet…so fantastic all at once. It really wasn’t hard to make at all. When toasting the bread is what takes up most of your time, you’re doing it right. Seriously…this was a flavor haven of sheer recipe awesomeness. The avocado was smooth, creamy, and soft. The sauce had this great flavor to it…without being overly oily. Think of it as a sort of kale and basil pesto. What that ended up doing was really bringing this amazing earthy and light flavor to the dish itself.
One bite…and you’ll be hooked. I added a sprinkle of red chili flakes to mine…because a little hit of heat is an amazing thing. I sort of want to make it all over again. YUM!
When it comes to food, there are certain cuisines that I absolutely love. Seriously. From Italian to Indian to Greek and more…there is something about the various tastes, seasonings, and textures of each different type of food that just awakens my palate every time.
One such cuisine that I love to eat, but haven’t had much of it in the past…oh…8 years…is Cajun!
YUM!
I love Cajun food, and not just because it famously is known to be spicy. I mean, we all know that I like it hot and spicy…but there is something so comforting and simplistic, even when the dish is anything but easy. As a vegetarian, a lot of Cajun food doesn’t fall into my diet. As a Celiac…it makes it even harder. We have a couple of small chain Cajun places around here, but they aren’t making the real deal. I forgot just what I was missing up until Saturday afternoon, when Cathy and I followed up our Gluten Free Food Allergy Fest with a lunch date with our good friend, Greg.
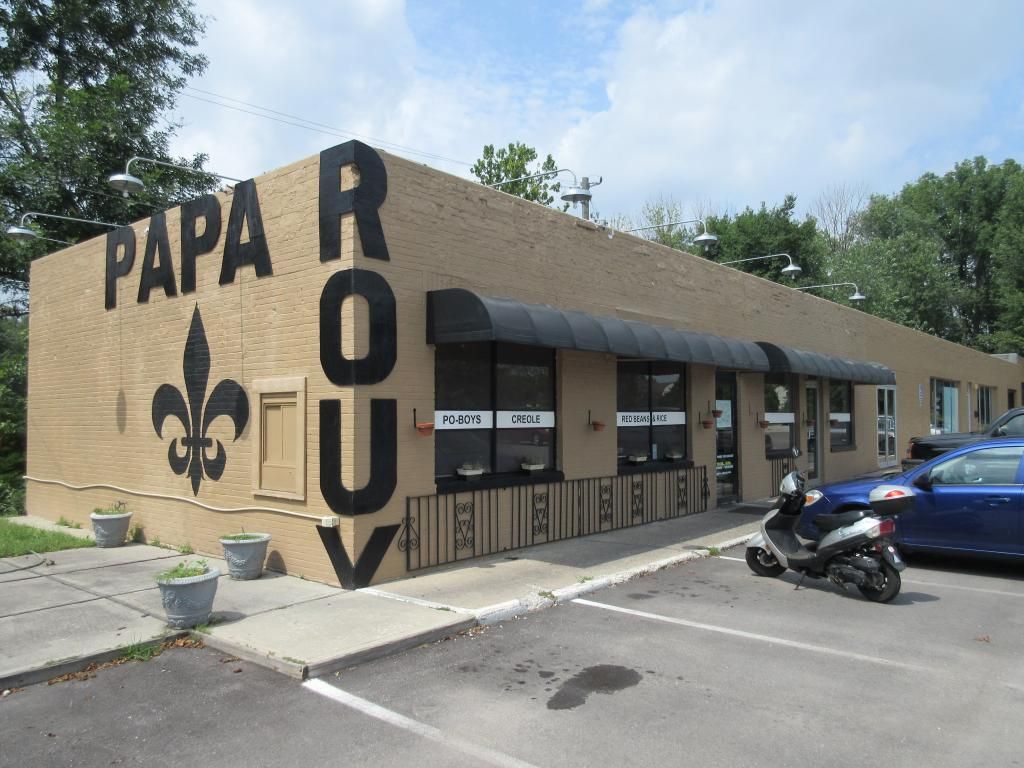
As you guys know, Greg can be quite particular about the places and foods that he eats. Well, for years now he has been raving about the food at a local Cajun place called Papa Roux. And he always pointed out that this particular place had plenty of vegetarian options…as well as gluten-free. While we are in Indianapolis quite often, we never seem to be there at a decent time to actually go to Papa Roux. So, we default to a personal favorite – Cheeseburger in Paradise.
But…NOT. THIS. TIME.
I was excited to try out Papa Roux. With all that Greg had talked it up to be, I was happy that he decided that would be our place to meet and eat that day. Cathy and I arrived just as Greg had pulled in. So we had good timing. Papa Roux may not look like much from the outside, but don’t let the dive atmosphere turn you off or away. Go inside. And you’re in for a treat.
Upon entering, you are greeted at the counter where you place your order. I had to look at the options for me, and finally decided that I was going to get the Spicy Tomato Creole ($8.00). I ordered an unsweetened iced tea with that (that’s free, by the way!) and then let Cathy get her order in. Cathy opted for the Chicken Po-Boy ($9.00) with a handcrafted lemonade to drink ($2.00). And Greg went for the Spicy Bean Chili ($8.00) with an unsweetened iced tea as well. You pay there, put a name on the order, and go find a table.
At the table, you get to choose your sides. This was exciting. You can choose as many as you want and as often as you want. When you dine-in at Papa Roux…the unlimited sides are free and unlimited. Honestly. I knew my creole was going to be spicy, so I went with something soothing and refreshing. Applesauce. Greg got the Coleslaw and something else, which I don’t recall. And Cathy opted for the Red Beans and Rice.
Our drinks arrived and we were invited to sign the autograph wall. Yes…the walls inside Papa Roux are covered in signatures. It’s a really cool, very nice touch. So, both Cathy and I added our signatures to the graffiti. And, after a little bit of a wait (they cook to order!), our food was soon arriving.
The first thing I noticed…Cathy’s Chicken Po-Boy was bigger than her head. She said she’d be lucky to make a dent in it. But after she pulled it apart, ate the chicken with the spicy mustard and coleslaw mixed in and not much of the bread, she managed a bit more than expected. The star was the stuff inside, not the giant, thick bread, for sure! Greg let me try the chili that he ordered, as he had raved about it for as long as he’s raved about the restaurant itself. He said it wasn’t as spicy as usual, and I had to agree…because my Spicy Tomato Creole was spicier than his chili.
So…how was the Spicy Tomato Creole? Spicy!! And that’s a good thing. It had this nice, rich flavor…like an amazing marinara, with a kick. The heat was perfect…for me. Some might have said it was too much, but I didn’t find it to overwhelm or completely kill my palate. Nope. This was amazing. Before I was a vegetarian, my mom would make a fantastic shrimp creole for Thanksgiving each year…so the creole definitely caught my attention. I loved the chunks of tomato and onion that were throughout, lending a bit of texture. And the spice definitely didn’t overwhelm but I wasn’t underwhelmed either. It said “spicy” in the title, so I wanted spicy. And it delivered, for sure. I was impressed. The stew, itself, came with small servings of rice that were dished on the side…just the right amount. The applesauce was delicious too…not sure if they make it, but the cool, soothing nature of it was a nice compliment to the spicy creole stew I was devouring.
We were all quite happy with the food, the prices, and the experience overall. I can see why Greg raves about Papa Roux all the time. I already want to go back and try more of their gluten-free and vegetarian stews. Really fell in love with the place. The atmosphere is great. The service is good. And the food…beyond fantastic. And any reservations I might have had about just how gluten-free the food was going to be was put to rest when the person who took our order at the counter asked if it was a dietary preference or an allergy. YES! A place that truly gets it.
Thank you, Greg…for finally getting us to Papa Roux to try the amazing food and take in the place in person…instead of through your mouthwatering stories of what you’ve had there. Thank you, Papa Roux, for giving me a safe, delicious, and spicy meal that day. It was just what I needed.
It’s no secret…I love pizza. Pizza, to me, is the perfect food. Honestly. Some people would probably disagree…but, I ignore them. Because every thing that is right and good in this world…can happen on a pizza. Pizza is a basic staple in my diet, especially the night before a big race. I just have found that if I eat pizza before a half marathon or marathon (or, hell, even the shorter distances), I seem to run better. I don’t know if it’s all just in my head, or if I have found that magic food that offers that perfect balance of protein, carbs, and fats that fuel my body on the long run.
Regardless…I love my pizza. I love to make pizza and order pizza. Around here, there are quite a few places in Louisville, Kentucky that offer gluten-free pizza. And I love them for that. On this side of the river, options are definitely more limited. Therefore, I usually end up making my own (on the best gluten-free pizza crust ever…from Annie May’s Sweet Cafe – here in Louisville, Kentucky) or purchasing a frozen one (usually Udi’s, Ian’s, Glutino, or even Daiya). That’s if I’m not planning on pizza that day. Otherwise, I normally will head to Annie May’s Sweet Café on Friday or Saturday (pizza day’s) or hit up one of the restaurants around the area that offer gluten-free pizza…but I have to feel safe eating there, and that narrows down the possibilities.
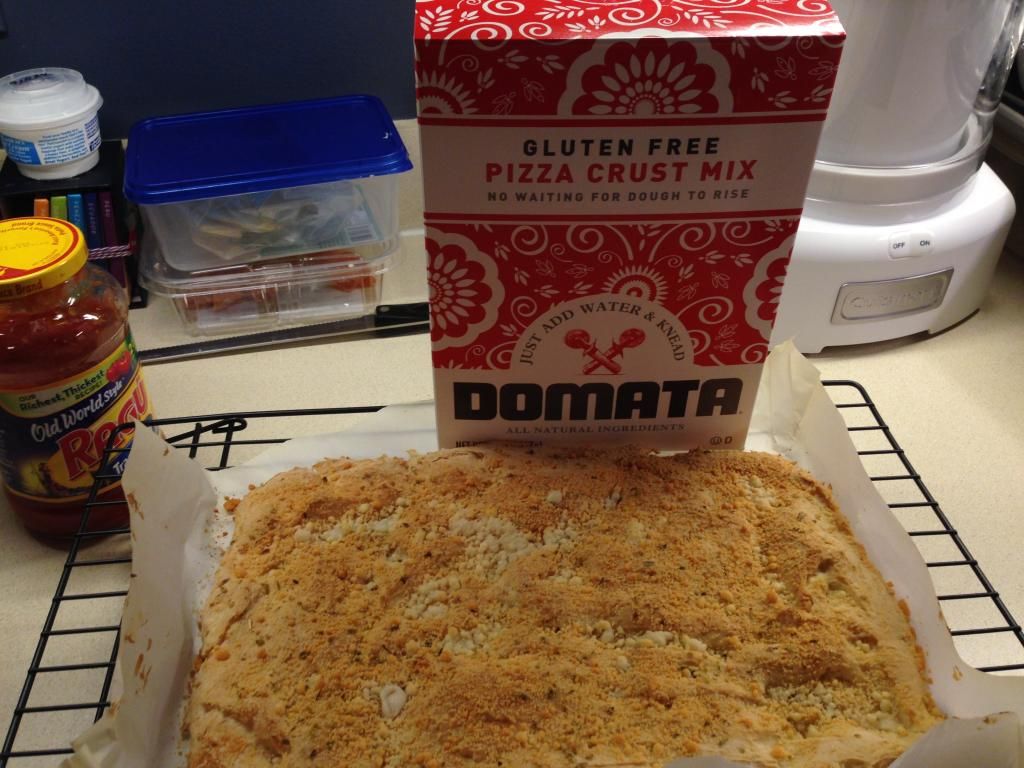
That being said, on a recent trip to Columbus, Ohio, I made a stop by the infamous natural food store I have come to love…Raisin Rack. In the aisle with various baking flours, I spotted this red and white box with bold black lettering. It really stuck out and, therefore, it drew my attention. It turned out to be the Pizza Crust Mix from Domata, a company owned by David and Julie Madison, who understand how difficult a gluten-free diet can be, and also believe in the importance of affordable gluten-free foods. They kept this in mind when they created their gluten-free flour mixes: Recipe Ready Flour, Pizza Crust Mix, and their Seasoned Flour. These flours are easy to work with too. The recipe ready is a cup-for-cup exchange on all recipes and the pizza crust mix…well…I’ll get into that. These products are made in a dedicated gluten-free and nut-free manufacturing facility, so there is no worries about cross contamination. And Domata does pride itself on using all natural ingredients with nothing artificial. I appreciate that too.
Ironically, I didn’t use this mix to make pizza crust. Not this time, anyway. This time, I used it to make the recipe for Gluten Free Foccacia Bread that is listed on the box. Because, I was in Columbus, Ohio, visiting my friend Jenn…and we were making pasta for dinner. Foccacia bread is a great side to have with gluten-free pasta…so that evening, after a busy day of shopping around town (and hitting up Raisin Rack for more goodies), she and I got busy in her kitchen, prepping this super-easy recipe for gluten-free foccacia.
The great thing about the Domata Gluten Free Pizza Drust Mix is that all you need to do is add water. It’s that simple. Put it in a mixer and blend the dough. It will be sticky. That’s why you turn it out onto a floured surface. Jenn and I skipped this step because…eh…we didn’t want to mess with it. So, using our oiled fingers, we spread the dough out in the baking pan and gave it a little brush of olive oil and seasoned it with the garlic powder and dried oregano that the recipe on the box suggests. Super simple. Into the oven it went to bake for 20 minutes. We started to prep the water to cook the gluten-free noodles in and got out the marinara sauce for the noodles and, of course, to mop up with the bread. When the noodles were in, the bread came out to get a dusting of Parmesan cheese…then it was back in the oven for another 5 minutes. The noodles finished up. They were drained and properly sauced (the Italian way), and dished up. The bread was set on the table to rip into (instead of slicing it into strips) as we wanted to get as much as we wanted. Dinner was served.
I have to say…I was very impressed with the quality and flavor of the Foccacia bread that we baked with the Domata Gluten Free Pizza Crust Mix. It wasn’t too heavy or dense and it browned up beautifully. The herbs that we scattered throughout the dough and on top brought a nice pop of flavor. And the bread itself was airy and light, rather than the kind that feels heavy and sits like a lump in your stomach. The crispy outside gave way to a soft middle, which was bread perfection, if you ask me. I have enough of the mix left to do a pizza crust with and I think I might do that sometime this week or next…just to see how well it works in pizza crust form. But as a flour to make Gluten Free Foccacia bread…Domata totally wins. It was delicious!
When Domata exclaims that “life is hard enough, baking gluten free shouldn’t be”…they hit the nail on the head. This flour requires no time to rise. It’s straight from the mixer to the pan to the oven to the table to the plate to the stomach. It is fantastic and so easy!! We all (me…the Celiac, and my two non-gluten-free compatriots, Cathy (the roomie) and Jenn (the hostess with the mostest!)) agreed that it made a very tasty and highly acceptable loaf of gluten-free foccacia bread. Definitely impressed with the flavor, the lightness, and the texture. I’d purchase this again in a heartbeat. I mean, come on…you just add water!!!! It doesn’t get easier than that!
So, let’s talk ingredients for a moment. The Domata Gluten Free Pizza Dough Mix is a blend of rice flour, corn starch, tapioca dextrim, nonfat dry milk, whole egg, sugar, salt, xanthan gum, baking powder, soybean oil, and rice extract. It is gluten-free, nut-free, and kosher.
Nutritionally speaking, a serving of Domata Gluten Free Pizza Dough Mix is 1/4 cup. In this serving you will be taking in 150 calories and 1.5 grams of fat. This serving will also be giving you 30 mg cholesterol, 460 mg sodium, and 2 grams of sugar. In addition, you will be taking in 1 gram of fiber and 3 grams of protein. Not bad for a pizza crust or pan of foccacia bread, right? Especially when it’s gluten-free. Because so often the calories and fat go way, way, way up in gluten-free items such as this.
Impressive!
I am definitely more than willing to try the other two flours and purchase the Domata Gluten Free Pizza Crust Mix again. Honestly. I was impressed with how easy it was to make the bread with and how delicious each bite turned out to be. If this holds true for their Seasoned Flour and their Recipe Ready Flour…you might just have me sold on it for life…simply for simplicity. HA!! But let’s not forget, it also bakes up into something amazing and totally delicious. I want to make more foccacia bread. I want to make pizza crust. I just want to bake it all and see how this flour fares against others I have used…including my current favorite.
Only time will tell…but this was a winning flour mix in my book!
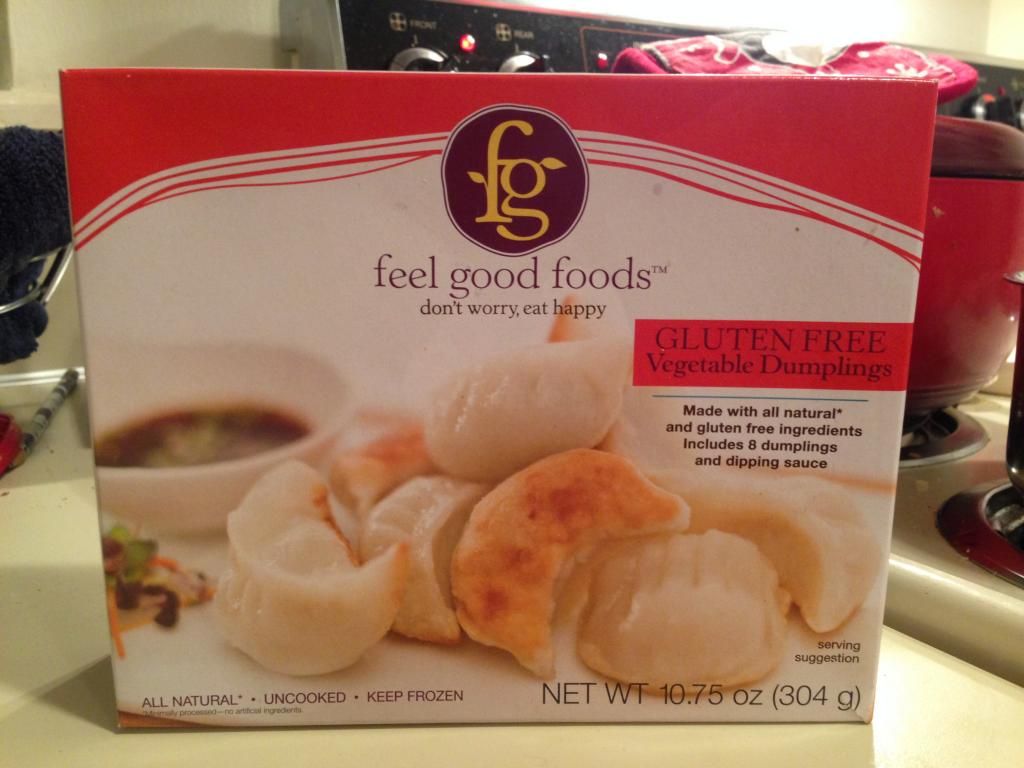
Product: Feel Good Foods Gluten Free Vegetable Dumplings – $5.99+
There are quite a few things I really miss in my life at times. Like…makes me sad and really wanting to cry kind of miss. Maybe not the way I miss my family (and I really miss my family)…but people and food have relationships too. And one of my favorite cuisines growing up was none other than Chinese food or Asian-style cuisine.
It was tradition in my family to visit my great grandmother in Winona, Minnesota, every year that we went to visit both sets of grandparents. And one thing that I always looked forward to when visiting my great grandma was…Chinese food. She always ordered in the most amazing Chinese food in town. It was always egg rolls and chow mein and rice and there was more of it than the group of us could eat…but we always gave it our best shot. It was tradition. It was one of the many highlights I experienced growing up and something I came to look forward to every time we headed over to great grandma’s house.
I haven’t had true Chinese food since I went gluten-free…three years ago. The sauces…the way things are cooked…it’s risky. And it’s a risk I no longer am willing to take. It’s sad, because Asian food is one of my favorite types of cuisine. Sure, there are places like P.F. Chang’s that offers a gluten-free menu…but the vegetarian choices are very limited…and that’s not true Chinese.
Then…along came a little miracle in my Whole Foods (and other natural food stores) freezer section. A company, known as Feel Good Foods, introduced the first (and I believe the only) gluten-free Asian dumplings and egg rolls to the market. The hardest part was choosing if I wanted egg rolls or dumplings. It was a tough decision, but I finally chose the dumplings. One of the interesting things about this company is that it was created by husband and wife duo, Chef Tryg and Vanessa Phillips. They created Feel Good Foods gluten-free frozen foods after they opened a gluten-free restaurant and were told that they needed to put their food out on the market. Their foods are non-GMO, all-natural and completely gluten-free. You see…Vanessa is a Celiac…so they take food allergies really seriously.
Cathy had some leftover rice from our treat on Friday at the local Indian restaurant. So, after work and a trip to the gym, I wanted something that was easy to prepare and wouldn’t require me to read off a recipe or attempt something new. With the rice in the fridge, I figured I could steam up some of the last of the jasmine rice in my pantry for myself and then pull the Feel Good Foods Gluten Free Vegetable Dumplings out of the freezer to prepare while my rice was cooking on the stove.
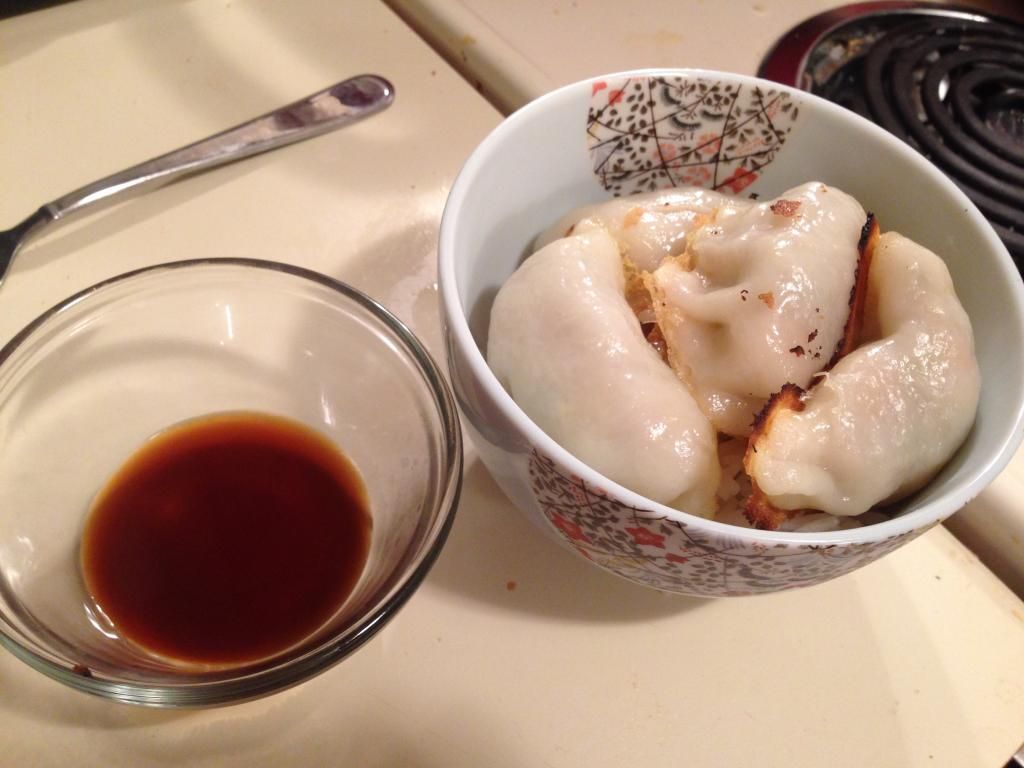
These are super easy to prepare. In a non-stick pan, add a cup of water and 1 tablespoon of oil. Bring it to a boil and add the dumplings to the pan, flat side down. Cover and reduce the heat to medium-high, leaving the dumplings in the pan until the water completely evaporates. It takes around 10-11 minutes. They are fine to eat on their own, but I served mine with rice. These even come with a fantastic dipping sauce, which I ended up just pouring over the top so that the rice could absorb it too.
I settled in for dinner and dug into my little bowl of Asian gluten-free food. I wasn’t sure what to expect…but I was very happy with what I started to eat. The dumplings were soft and tender, with a nice crust on the flat side that was on the pan. The rest of it was that doughy stickiness you associate with potstickers. Amazing. The stuffing inside the wrapper was flavorful and very much like a delicious egg roll. So it was like a dumpling with an egg roll flavor. Happy girl right here. And the dipping sauce helped add a bit of seasoning and flavor to the entire dish. I am already wanting to restock my freezer with more of these. And the egg rolls for that matter. Delicious!
The Feel Good Foods Gluten Free Vegetable Dumplings are a simple blend of ingredients. The wrapper is made from water, sweet rice flour, rice flour, potato starch, canola oil, salt, xanthan gum, and corn starch. The filling is a combination of cabbage, yellow onion, bean vermicelli, carrots, green onion, corn starch, sesame oil, and less than 2% of evaporated cany syrup, ginger, salt, black pepper, yeast extract, and shiitake mushrooms. The dipping sauce is made from water, organic tamari soy sauce, sugar, ginger juice, garlic juice, and natural flavors of garlic and black pepper. These dumplings are gluten-free and cholesterol free.
Real and recognizable ingredients. LOVE it.
As far as nutrition goes, a serving size of the Feel Good Foods Vegetable Dumplings is 4 dumplings. There are two servings per box. One serving provides you with 290 calories and 9 grams of fat. They contain 430 mg sodium and 3 grams of sugar. These contain 2 grams of fiber and 3 grams of protein. The sauce packet contains 45 calories, is completely fat free, has 10 grams of sugar, and 2 gram of protein. Not bad for a frozen package of gluten-free foods.
If I could hug both Chef Tryg and Vanessa, I totally would. Because of them, I am once again able to revisit one of my favorite cuisines…Asian. And I can’t wait to try the Vegetable Egg Rolls and replenish my freezer with the Vegetable Dumplings. These are one of my favorite frozen dishes I have had to date. It might be the nostalgia, but I definitely think it has more to do with the product itself. Taste, texture, flavor and just all around goodness.
It doesn’t get much better than this!
Chinese food is BACK in my life!
Feel Good Foods Gluten Free Vegetable Dumplings and Dipping Sauce
This spring, my roommate and I decided to take on a new challenge. This challenge was…we were going to see if we could…possibly…grow our own herbs. We actually picked up a little kit from a local store that gave us five different herbs to grow. Sadly, the cilantro and the parsley didn’t quite survive the first wave of heat and humidity, despite our best efforts. This left us with chives, basil and oregano. So far…they’ve been doing well. The break in the hot summer weather has worked in favor for those three herbs, at least.
Well, the chives were getting a bit crazy and I was informed by the roomie that we needed to use them. And I know how she loves biscuits. Does she ever love biscuits…
So I promised her that I would make her some biscuits that included chives in some way, shape or form. I also know that she loves cheese and she loves garlic. I found a base recipe for some flaky biscuits on a blog called Whole and Heavenly Oven…and then made my own adjustments to make it work within my own diet restrictions. I will note that I didn’t roast my own garlic. I had a jar of roasted garlic in my fridge, so I used about 2 tablespoons of the garlic instead of roasting a head of garlic myself. But, roasting garlic is easy and I’ll include those instructions from the original recipe in case you don’t have the jar of roasted minced garlic like I did.
Recipe: Gluten-Free Roasted Garlic, Cheddar and Chive Biscuits
Gluten-Free Roasted Garlic, Cheddar and Chive Biscuits
4-1/2 cups flour (I used Better Batter Gluten-Free All Purpose)
4 teaspoons coconut sugar
2 tablespoons baking powder
2 teaspoons baking soda
2 teaspoons salt
1-1/4 cups cold butter, cubed (Earth Balance is a great non-dairy option)
1 cup shredded cheddar cheese (Diaya is great for a non-dairy option)
2 tablespoons fresh chives, chopped
2 cups buttermilk (I used unsweetened almond milk)*NOTE: If you are using the jarred minced roasted garlic, you don’t need these ingredients.
Instructions:
If you are roasting your own garlic, preheat the oven to 400°F. Place garlic in a small baking dish and drizzle with olive oil. Cover with foil and bake for 35-40 minutes, or until garlic is soft. Cool slightly then finely chop. Set aside.
In a large bowl, combine flour, sugar, baking powder, baking soda, and salt.
Using a pastry cutter, or your fingers, work in cold butter, shredded cheese, chives, and chopped roasted garlic until crumbly.
Pour buttermilk over all and gently stir until a shaggy clump of dough forms.
Turn dough onto a floured surface and gently knead until dough is smooth.
Pat dough into a 3/4 in circle. Using a biscuit cutter, cut out biscuit shapes and place on parchment paper-lined baking sheets. Keep doing this until all the dough is used up.
Bake biscuits at 400°F for 15-18 minutes, or until lightly golden. Cool on wire cooling racks.
Store biscuits in an airtight container at room temperature up to 3 days.
~*~*~
Much to my delight (and I admit…surprise), what emerged were these golden, flaky, amazing biscuits. My roommate had one hot from the oven and she raved about the flavors. These will be part of our breakfast lineup this week for certain. I already scrambled up eggs and placed between a sliced biscuit with some greens for breakfast this morning. HUGE win on the breakfast front. I will definitely be making these again!