BiAglut Maccheroncini best packaged gluten-free pasta around

BiAglut Maccheroncini (Gluten-Free Elbow Pasta)

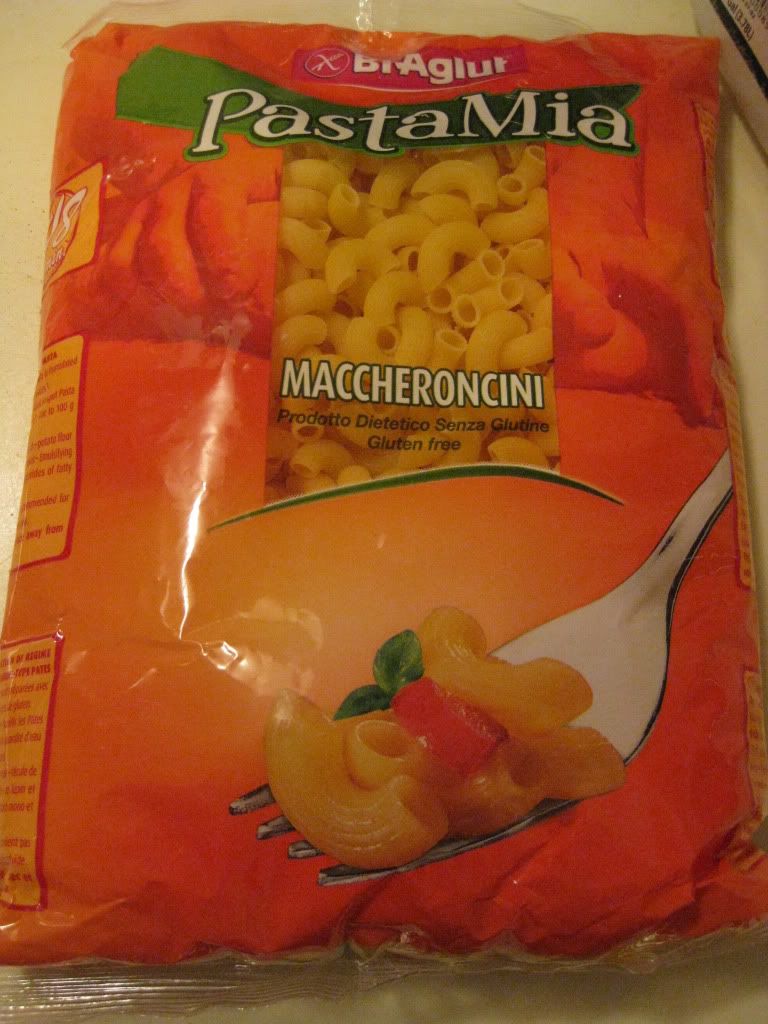
Product: BiAglut Maccheroncini (Elbows) – $5.45+

I’m declaring it now.  Right there in my subject line for this post.  After all years of searching for the best pre-packaged gluten-free pasta, I think I may have finally found the crème de la crème.  I didn’t think many things can live up to the standard that RP’s fresh gluten-free pasta set…and then I find it…just waiting to be discovered in my pantry.

Fresh pasta is always best, but it’s not always the most practical.

When it isn’t practical, BiAglut should be.  Trust me, I have tried mostly every gluten-free pasta out there.  Rice noodles, corn noodles, tofu noodles, quinoa noodles…I’ve had them all.  Some do better than others.  Some brands I prefer over others.  Some are just easier and more cost efficient in the end.  That being said, I think I would pay a pretty penny to have more noodles from BiAglut.

BiAglut  is an Italian brand of gluten-free products that have been produced in Italy for more than 45 years by the Italian affiliate of H. J. Heinz Company.  The company’s main focus is on individuals with Celiac disease, gluten intolerance, or those who follow a gluten-free diet.  By keeping to this focus group, the brand offers a variety of gluten-free products to the market, including pasta, breads, bread substitutes, flours, cookies, crackers, snacks, and desserts.

But the main item that BiAglut is known for is…their pasta.

I was at a gluten-free expo awhile back and BiAglut was one of the companies there.  It was a very small expo with very few vendors.  But the people who were at the BiAglut table had me try some of their pasta and I loved it.  Great texture.  Great flavor.  It was cold…but…well…you can’t have everything.  After a little discussion, my roommate and I decided to go ahead and buy a bag of their noodles.  They had very few options left (yes…it was going fast), so I snagged the very last bag of BiAglut Maccheroncini (elbows).

And then…it joined the plethora of other noodles in my pantry.  And it sat…as I worked my way through the rest of them.

But, then we had another dreaded office potluck.  I say that because, with the exception of one or two other people in the office, nothing brought in is something I can eat.  Granted, being a gluten-free vegetarian does limit my diet, but it is nice when someone puts for the effort to make something that I can also eat so I’m not stuck with just two things on my plate (the two items I bring, mind you).

With that in mind, I signed up to bring two dishes…some crock pot caramelized apples and a vegan pumpkin macaroni and cheese.

I checked my pantry list and the next pasta noodle to have it’s day in the spotlight was the BiAglut Maccheroncini.  I was kind of sad to be using this pasta on my office because I knew full well that since I was the person bringing it in…hardly anyone would touch it.  It’s…weird.  It’s…*GASP*…GLUTEN-FREE!  I swear to God, no one in that office quite understands what that means and just won’t even try the food I bring in…which is why I hate to bring things in.  I can cook for myself at home and it will save me money, time, and food that won’t go to waste because only 2-5 people are eating it.

BiAglut Maccheroncini (cooked and drained)

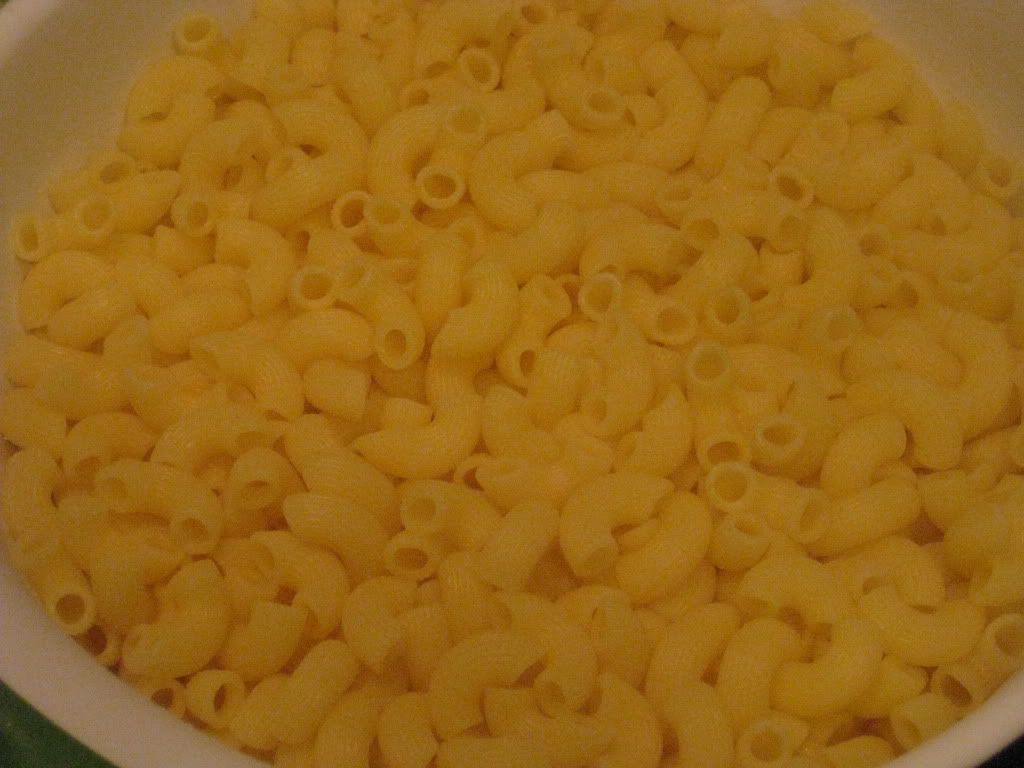
That being said, I sucked it up and went ahead and made the items I signed up for.  Early that morning, I stood in the kitchen boiling a pot of water to pour the BiAglut Maccheroncini in and allow it to cook most of the way.  It only took about 6 minutes to get to where I needed them to be.  I mean…it was fast.  Most gluten-free pasta noodles have to be boiled for around 12-16 minutes, if not longer, to get that perfect consistency.  Not these.  They were done so fast I had time to spare.

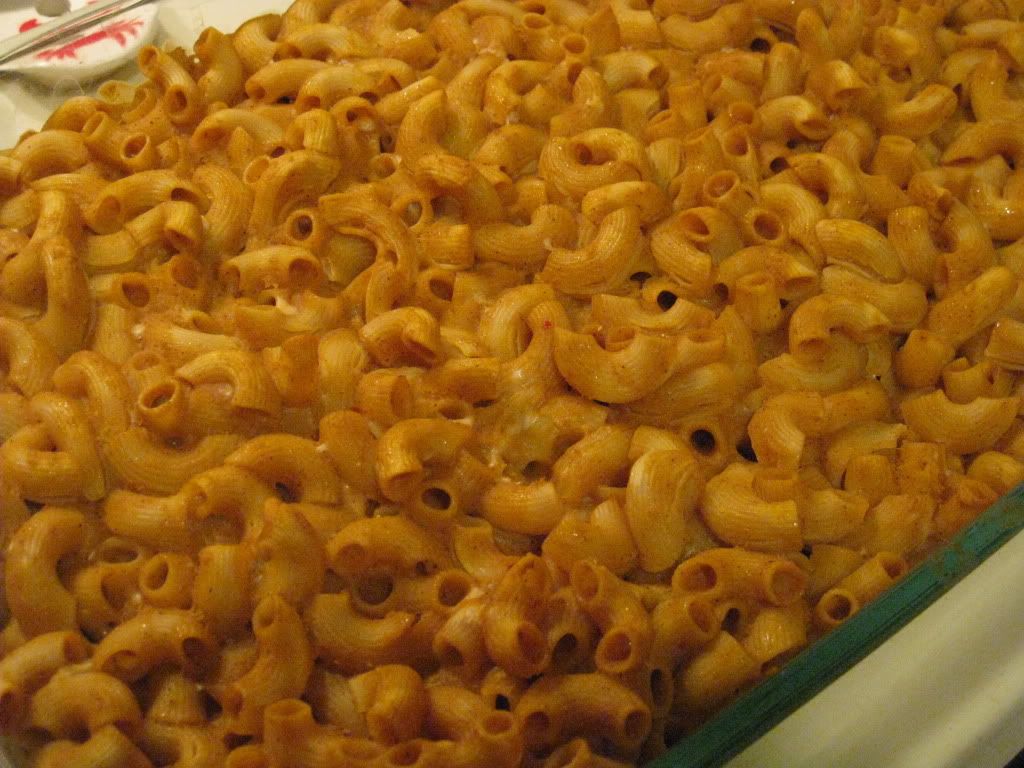
After I drained the noodles, I put them back into the big pot and poured my vegan pumpkin cheese sauce over the top of it.  With a spatula, I stirred it all together, delighted in the fact that the noodles were holding together.  They weren’t turning to mush.  They weren’t falling apart in the sauce or with the movement of the spatula.  I was already impressed.  Then, the mixture was poured into the baking pan and into the oven it went for about 45 minutes.

When it emerged…the noodles were still perfect.  They already survived boiling and baking.  I was very surprised.  I’m just not used to my gluten-free pastas being so sturdy.  Well, before I could serve this to myself and the brave few who just might have a little taste at the office, I had to make sure it was good.  I plucked a noodle from the casserole dish and…oh yeah…it was good.  The noodle was a perfect al dente.  Perfect.  It cooked up beautifully in the sauce and didn’t fall apart in the baking process.

The true test was going to be lunch.  So, about 10 minutes before lunch was to be served, I got to the kitchen and pulled my mac and cheese out of the fridge.  I brought a splash of almond milk to add to the pasta for when I reheated it, and poured it over the top.  Then, into the microwave it went.  As I reheated it a few minutes at a time, I would stir it around to make sure it heated evenly.  And the noodles held together.  They didn’t crumble as I stirred them.  They didn’t shred.  They held.  And I was so elated.

The moment of truth came – the office luncheon began.  My roommate, myself, and the office vegan I knew would be eating the macaroni and cheese.  Others seemed a bit hesitant.  Some took just a smidge.  Most didn’t even give it another look because…I made it…therefore it’s gluten-free and must be disgusting.  Ignorant fools!

As I sat down to dig in…I was hoping I’d be as impressed with the BiAglut Maccheroncini as I had been this entire time leading up to the first actual bite.  One bite and it was all the confirmation I needed.  Through boiling, baking, and nuking, the BiAglut Maccheroncini not only held its shape, but it still tasted great.  It didn’t mush up or disintegrate under pressure.  It is pure, honest, gluten-free pasta perfection.

BiAglut Maccheroncini is made from cornstarch, potato flour, lupin flour and lupin proteins.  No eggs.  No dairy.  And what comes of this is the best packaged pasta I have had to date.  Gluten-free pasta is so tricky, but BiAglut held up to everything I could put it through and still tasted great in the end.  And, on a personal note, it worked very well in my vegan and gluten-free pumpkin mac and cheese.  Tasted great.

Best texture.  Best quality.  Best all-around when it comes to dry pasta.  BiAglut is amazing.  Now I wish I had purchased more of their products at the time.  Guess I’m going to have to get online and place an order.

If you can find BiAglut…I encourage you to try it.  It is heads and tails above the competition.  It’s happiness in pasta form.

Gluten-Free Vegan Pumpkin Mac & Cheese made with BiAglut Maccheroncini

Recipe: Scalloped Russet Potato and Yam Gratin with Fresh Herbs

As I mentioned, my CSA bin was exploding this past week with treats to help make any Thanksgiving feast complete.  Honestly…everything in there would go in a Thanksgiving meal.  And if I was making a Thanksgiving meal…that would be ideal.  As it was, being the token vegetarian among my roommate’s family, I am always asked to supply a vegetable dish.  And as I had green beans in my bin…I went with that.  Although, I honestly could have provided a healthy and fresh side item (forget canned yams and cranberry sauce…I could have made it from scratch with fresh and local ingredients), I stuck with what I was told to bring and let them open up canned yams and cranberry sauce.  That’s their tradition.

But I’m a firm believer in fresh is best and therefore now had a plethora of Thanksgiving fruits and vegetables to play around with.  As a result…I found a recipe that utilized Yukon Gold potatoes and sweet potatoes, and decided that I could alter it to accommodate my ready supply of fresh Russet potatoes and fresh yams that came in my bin.  It even used some of the fresh, local herbs that I received as well.

WINNING!

So, last night…I cooked up this amazing gratin…and it emerged smelling fantastic and bubbling with goodness.  At first bite…I knew I made a good choice.  The original recipe was printed in a 2008 edition of Bon Appétit magazine.  I adapted it to fit my ingredients.  All of which…I had on hand and begging to be used.

Break out that mandolin slicer and bake up potatoes in a fresh, tasty new way.

Recipe: Scalloped Russet Potato and Yam Gratin with Fresh Herbs

Scalloped Russet Potato and Yam Gratin with Fresh Herbs

Servings: 8-12
Time: Prep 20 minutes; Cook 55 minutes

Ingredients:

  • 1-1/2 pounds medium Russet potatoes
  • 1-1/2 pounds medium red-skinned sweet potatoes (yams)
  • 2 cups heavy whipping cream (I used 1 cup heavy whipping cream and 1 cup unsweetened almond milk)
  • 1/4 cup (1/2 stick) butter (I used Smart Balance)
  • 2 garlic cloves, minced
  • 1 tablespoon minced fresh Italian parsley
  • 1 tablespoon minced fresh rosemary
  • 1 tablespoon minced fresh sage
  • 1 tablespoon minced fresh thyme
  • 1-1/2 teaspoons fine sea salt
  • 3/4 teaspoon freshly ground black pepper (I used 1/4 teaspoon black pepper and 1/2 teaspoon ground red pepper)
  • 1-1/4 cups (packed) coarsely grated Gruyére cheese (about 5 ounces) (I used Extra Sharp Cheddar Cheese)

Directions:

Fill large bowl with cold water.

Working with one Russet potato at a time, peel, then cut into 1/8-inch-thick rounds and place in bowl with water.  Repeat with sweet potatoes.

Combine cream, butter, and garlic in medium saucepan; bring to simmer.  Remove from heat.

Mix all herbs in small bowl.

Mix sea salt and black pepper in another small bowl.

Butter a 13x9x2-inch glass baking dish.

Drain potatoes, then pat dry with kitchen towels.  Transfer half of potatoes to prepared baking dish.  Use hands to distribute and spread evenly.

Sprinkle with half of salt-pepper mixture, then half of herb mixture.  Sprinkle with half of cheese.

Repeat with remaining potatoes, salt-pepper mixture, herb mixture, and cheese.

Pour cream mixture over gratin, pressing lightly to submerge potato mixture as much as possible.

Preheat oven to 400°F.  Cover gratin tightly with foil.  Bake 30 minutes.  Uncover; bake until top of gratin is golden and most of liquid is absorbed, about 25 minutes longer.  Let stand 10 minutes.

Serve.

~*~*~

Cheesy, potato goodness…that’s what this was.  I mean…full of amazing flavor.  The yams were the actual star, though.  The flavor they brought to this gratin was out-of-this-world delicious.  I loved the use of the fresh herbs as they complimented every ingredient that went into this dish.  This would make a fantastic entree or even a delicious side dish at Thanksgiving (or just for a get-together of family dinner).  The hardest part was getting that potato sliced on the mandolin.  But, once that part was done, the rest was super-simple and easy.

Love potatoes and cheese?  Trust me…you’ll love this!

Gillian’s Foods brings outstanding gluten-free French rolls to the table

Gillian's Foods Gluten-Free French Rolls
Gillian’s Foods Gluten-Free French Rolls

Product: Gillian’s Foods Gluten-Free French Rolls – $3.49+

First of all, let me give a shout-out and a HUGE thank you to my friend, Kathy Lubbers, because she is the person responsible for introducing the awesomeness of Gillian’s Foods to me.  No joke.  When I was in Hershey, Pennsylvania, we got together for dinner and she told me she had some small gifts for me.  One of said gifts was a sack of Gillian’s French Rolls.  I had heard of Gillian’s, but have never seen them in the wild before.  As in…no one in this area actually carries them.

But…in Pennsylvania, it’s a different story.  She picked up some for me from the Annville Natural Market and told me to try them out.  I wouldn’t hurt her feelings if I didn’t like them.

So, these little rolls made their way back home with me.  And, as I wasn’t sure when I would get to them…they got tucked away in my freezer.  And then…along came the holidays.  And with holiday insanity comes the burden of being the food allergic girl coming to dinner.  I navigated the Thanksgiving meal quite well by providing two of the main components…a fruit and a vegetable.  The starch component was compliments of Amanda, the hostess, who pulled out some potato for me before adding milk and butter.

And so, the holiday season of rushing and insanity began.  And with it…and the shorter days…I often find myself behind schedule.  Be it for breakfast, for dinner, or for just a simple errand.  This time of year…nothing is simple.

But…rolls.  Those can be simple.

This morning, after a very hectic Sunday and a five mile run in the dark and cold, I came home to change and get ready for work.  One thing was on my mind – food, of course.  I was hungry.  And since my roommate had been ill the day before, I wasn’t too sure what her stomach could handle.  In the freezer, I spotted the bag of Gillian’s Foods French Rolls.

Gillian's Gluten-Free French Roll
Gillian’s Gluten-Free French Roll

BINGO!  Simple and not too much preparation needed.  I pulled out two rolls (the serving size is half a roll…but this was breakfast!) and put them in a plastic bag to thaw.  They did that up until the moment my roommate’s alarm clock went off.  The directions on the bag say to microwave to warm up.  Now…that’s what I’m doing tomorrow, because these rolls are breakfast again tomorrow.  But…I decided I wanted to treat them like an English muffin.  So, I cut each one in half and put it on a baking sheet.  Into the oven it went to toast while I got out the peanut butter and a banana.

It took about 10 minutes to get a nice golden color on these.  I removed them from the oven, gave each one a little schmear of peanut butter and then topped each one off with slices of banana.  A good, healthy, protein and potassium packed breakfast, if you ask me.  But…of course I had to leave some of mine plain.  Because I needed to see what these rolls tasted like without being gussied up with condiments and delicious fruit.

Well, let me tell you…I am in love with Gillian’s Foods French Rolls.  Honestly.  And I can’t wait to see what they taste like when microwaved, like the bag says to do.  But, toasting them in the oven as a nice touch, I think.  It gave the outside a little bit of a crunch, while the inside remained soft and full of yumminess.  Yes…these rolls are definitely full of yumminess.  Trust me.

The French Rolls are Gillian’s Foods most popular rolls that they make.  Made from a combination of white rice flour, tapioca flour, water, soy flour, guar gum, egg whites, yeast, salt and sugar, these don’t get much more straight forward.  Notice how you can recognize every ingredient.  No strange chemicals or preservatives are added, which is why these are best stored in the freezer.  Even better, unlike a lot of gluten-free bread out there, these do not crumble in your hands or fall apart.  They are quite substantial, great texture, not too heavy.  They are…in other words…perfection in roll form.  And I’ve been searching for the perfect roll.  I even tried to make some and it was an epic fail.  Gillian’s makes it easy…and super delicious.

Even my roommate devoured these up.  And after having been sick to her stomach, these didn’t bother her at all.  She was the first to get a bite of one this morning and she absolutely loved the taste and texture as well.  And she can have, and does have, regular bread quite often.  We were both very highly impressed.

These would be great to build a sandwich with…use as hamburger buns…or even just warm up and serve on the side with a delicious gluten-free meal.  Honestly, they are quite delicious on their own.  Which is more than I can say for some gluten-free breads out there.

Now…to seek out a local store that might carry these and these products.  Because if the rest of the products are as good as these rolls…well, I’m eager to try all I can.

Thank you Kathy, thank you, Annville Natural Market, and thank you Gillian’s…for giving this gluten-free girl a French Roll to rave about.

Gillian's Gluten-Free French Roll (halved and toasted)
Gillian’s Gluten-Free French Roll (halved and toasted)

Recipe: Magic Beans (Green Beans)

It happens without fail…every time.  When I am attending a big get-together and asked to supply a dish…it’s a vegetable.  I can count on it.  I can place money on that bet and win every time.  Perhaps, in this group of people, it’s because I’m the only vegetarian…so it just makes sense.  Regardless…sometimes getting a bit creative with a vegetable can be a task.  Anyone can bring those steam-in-the-bag veggies and just give them a quick nuke in the microwave…but that’s not my style.  Not anymore.

So, it came as no surprise to me on Thanksgiving that I was asked to supply the vegetable dish for the meal with my roomie’s family.  At first, I thought of doing my famous confetti corn dish, but I had received 24 ounces of green beans in my CSA bin (along with a plethora of Thanksgiving veggies and fruits…that I probably could have cooked all the side dishes had I been allowed), so I changed my mind.  But…how to dress up green beans and make them…interesting?

Well, for that I turned my attention to a Top Chef.  No joke.  I found a recipe on the Internet from Stephanie Izard (Season 4 winner of Top Chef, and the first female winner).  The recipe was for her restaurants green beans, known as Girl and the Goat Magic Beans.  It sounded…really good.  And I only had to make a few minor adjustments to make it fit into my diet.  Like…I didn’t use fish sauce, I just used more tamari sauce instead.  That sort of thing.

The recipe was super-easy to prep for and really easy to prepare.  Better yet…it was enjoyed by all at the table.  These really are magic beans.  Delicious green beans everyone will love.  And the recipe…is below.

Girl and the Goat Magic Beans (Green Beans) – adapted from Stephanie Izard’s recipe

Girl and the Goat Magic Beans (Green Beans)


Servings: 8-10
Time: Prep 15 minutes; Cook 15 minutes

Ingredients:

  • 24 ounces green beans, stems trimmed
  • 4 fluid ounces olive oil
  • 1 shallot, sliced in small rings
  • 4 ounces lemon juice
  • 5 ounces fish sauce (I replaced with San-J Gluten-Free Low Sodium Tamari Sauce)
  • 2.5 ounces soy sauce (I used San-J Gluten-Free Low Sodium Tamari Sauce)
  • 1 tablespoon Dijon mustard
  • 3/4 teaspoon Sriracha
  • 3 cloves garlic
  • 1 cup mayonnaise (I use Trader Joe’s Reduced Fat Vegan Mayonnaise)
  • cashews (I used walnuts…but your favorite nut will do…or leave out if you have a nut allergy)

Directions:

Make the green bean dressing (yields 2 cups):

Combine lemon juice, fish sauce, soy, Dijon and sriracha.  Transfer to blender, add garlic and emulsify with oil.

Make the aioli:

In a bowl, combine 1/3 cup of the green bean dressing (above) with 1 cup mayonnaise.  Whisk together.  Set aside.

Make the green beans:

Wash and trim the stems off the green beans.

In a large frying pan, heat a small amount of oil.  Add the green beans and some sliced shallots for flavor.

Add enough vinaigrette to coat the green beans.  Cover and allow to steam.

Add a handful or two of cashews (or nut of your choice) for flavor.  Season with salt.

Transfer to a serving dish and drizzle with aioli.

Serve hot.

~*~*~

Stephanie Izard has said that her restaurant gets compliments for its vegetable dishes all the time.  That being said…there is a reason for that.  These were some of the best green beans I have ever eaten.  The dressing and aioli really stepped up the flavor.  And, the addition of the walnuts added a necessary texture to them.  I would make these again in a heartbeat.  Normally not a huge fan of green beans, these were fantastic.

There is a reason Stephanie won Top Chef all those years ago.  With recipes like this…she’s winning over fans of her food even now.  Even little home chef’s like me.

Want to dress up your green beans differently, I highly encourage you to give this recipe a shot.  I wasn’t disappointed.  My roomie’s family wasn’t disappointed.  I promise…you won’t be either.

Lakewood, Ohio boasts fantastic gastropub with Deagan’s Kitchen & Bar

Deagan's Kitchen & Bar, Lakewood, Ohio
Deagan’s Kitchen & Bar, Lakewood, Ohio

Restaurant: Deagan’s Kitchen & Bar, Lakewood, Ohio

Sometime the best laid plans fall through and you have to find a plan B.

Welcome to my world on the night of The Monkees concert up in Lakewood, Ohio.  Now, I have a friend who lives in Lakewood and we had made plans to all meet up prior to the show for dinner.  Our original spot of choice was somewhere I found on Find Me Gluten Free.  A little joint called Tommy’s Pizza and Chicken.  Sounds like a dive, yes?  But sometimes dives have the best food.

Unfortunately…we never found out.  Upon arriving at Tommy’s, we could see that it was more of a carry-out sort of place than an eat-in.  That wasn’t going to work…at all.  It definitely was a dive.  And after a couple of texts with my friend in the area, Cathy (yeah…2 Cathy’s…try to keep them straight), we laid out a couple of alternatives.  Get gluten-free pizza to go and bring it to her place.  Check out Aladdin’s (they serve up Lebanese/American food).  But, with a little magic from my Yelp app on my phone under the gluten-free friendly tag…I discovered Deagan’s Kitchen & Bar, a gastropub that wasn’t too far away.  It had good ratings.  I suggested it.  We all agreed to meet there.

Deagan’s was a happening place that night.  Very busy.  Very lively.  We stepped inside and were greeted by the hostess.  I said that there would be five of us so they went to prepare a table.  We ended up being positioned near one of the windows in the front…but in a quieter side room.  That was definitely a good thing.  We were given menus to look at and brought some water to start with.  Although tempted with the drink menu, we forwent that.  Cathy (the roomie) got a Diet Coke for caffeine purposes, but Jenn and I stuck with water.  I explained to our waitress, Anisa (she’s awesome, BTW!), that I was a gluten-free vegetarian.  She said they had a special menu for me and would swap mine out with it.  She returned a moment later with a menu with certain items highlighted and little notes written on it for how to make something gluten-free (like no pita bread).  She said there were some vegetarian options on there as well.  It was nice to have that kind of peace of mind.

Cathy (the other one) and her sister arrived soon after and got settled in with drinks and menus.  We talked and talked and talked and finally decided that we should probably order since we did have a concert to make.  Anisa returned ready to take our orders.

Cathy (the roomie) ordered her standard, must-have, when it is on the menu.  Fish and chips ($18.00).  Jenn decided to try one of their small plates and ordered the Polenta Croutons ($8.00).  The polenta croutons are cubes of fried polenta served with sauteed mushrooms, Parmesan and parsley.  It was different and it looked really good.  And Jenn even tried to eat the mushrooms…but in the end, they were left behind.  The rest, however…she devoured.  Cathy (the local) ordered the small plate of Mac and Cheese ($11.00), which was a rather big bowl of noodles, Gruyere cheese and  chives.  She got it with a side of the Brussels sprouts ($ Cathy’s sister, Sarah, ordered the small plate of Seared Scallops ($12.00), which consisted of two large scallops and was served with shaved Brussels sprouts with grapefruit and pomegranate.  She got a side of the House Fries with it.  As for me…I decided to go with a salad in the end.  I chose to go with their Arugula Salad ($8.00) and, since it was marked gluten-free, give their House Fries ($7.00) a try.

Anisa went to put our orders in and for the rest of the time before food arrived, all of us were chatting up a storm.  We talked movies, books, music, concerts, work…you name it.  And conversation continued even when food arrived to the table.  It took some time.  I was okay with that.  Again, I don’t mind having to wait on my food.  It means that it is prepared fresh and to order.  Not sitting under some heat lamp somewhere or getting to know a microwave.

Deagan's House Fries
Deagan’s House Fries

My Arugula Salad was stunning, by the way.  Simple.  Very pleasing to the eye.  Not a lot of color, but what was there popped.  Deagan’s Arugula Salad consists of arugula, shaved fennel, Parmesan and pine nuts.  It is lightly dressed in a lemon oil.  Now, normally I find arugula to be too peppery on its own…but with the saltiness of the Parmesan and the pine nuts, it all balanced out.  The lemon oil, however, is what really tied it all together.  While the salad looked simple, the layers of flavor in there seemed complex.  It all worked.  It was fantastic and delicious.  And I enjoyed it more than I normally enjoy a salad at restaurants.  Honestly.  This one was really good.

There were a lot of House Fries in my side order, so I shared with Jenn and Cathy (the roomie).  They were fantastic cuts of potato that were topped with shaved Romano cheese and truffle oil.  It was served with a spicy mayo.  Oh.  My.  Potato.  Gods.  These fries were really good and really addictive.  No joke.  The simple addition of shaved Romano cheese and a hit of truffle oil just took them from standard fries to something that was out-of-this-world good.  And different.  The spicy mayo that it was served with was delicious and I took great pleasure in dipping my fries into them.  Yeah…for a different twist on fries…I highly recommend these.

In the end, we all agreed that Deagan’s was the perfect place to end up when all was said and done.  Our waitress took fantastic care of our table.  We all enjoyed and devoured our food.  Cathy (the local) had left over mac & cheese…which she took home in a box.  There was a lot in that bowl they brought her.  She and Sarah ended up splitting the special dessert of the night, a bread pudding with caramel and pear.  It sounded divine…and looked it too.

Afterwards, we paid our checks and headed out.  Cathy and her sister were heading back to her place.  We had The Monkees to go and see.  In the end, I am happy we ended up at Deagan’s.  Sure…this meant I didn’t get my traditional gluten-free pizza the night before a big race (yeah…I was running a 15K the very next morning back down in Columbus, Ohio)…but I did get some carbs (thank you gluten-free House Fries) and had great company and amazing food.  I’d go back to Deagan’s Kitchen & Bar in a heartbeat next time I’m in the area.  Sometimes the best laid plans have to change to lead you to somewhere even better.

Beyond impressed.

Deagan's Arugula Salad
Deagan’s Arugula Salad

Recipe: Rosemary Roasted Carrots and Fingerling Potatoes

So, this past weekend, my roomie purchased a new cookbook for me.  I actually told her not to get it.  As, at full price, it was rather expensive.  But she insisted that it was necessary because the holidays happen every time you turn around.  And not just the fall/winter holidays.  All the little ones in between too.  After a quick flip through of the book, I finally relented my stance and let her get it for me.

The book is Gluten-Free and Vegan Holidays: Celebrating the Year with Simple, Satisfying Recipes and Menus by Jennifer Katzinger, who also authored Flying Apron’s Gluten-Free & Vegan Baking Book.  So, if there is any authority in this area…this would be the person to turn to.  And the recipes really did sound amazing.  Everything was something I was willing to try.

Now, the first recipe I chose to do out of this cookbook is considered a side dish.  But I eat side dishes for meals all the time.  The original recipe calls for new potatoes, but I had 24 ounces of fingerling potatoes in my fridge from my CSA bin, along with baby carrots.  It would work.  The only ingredient for this recipe that I didn’t have on hand was fresh rosemary, but my grocery store happens to have that.  And so, last night, I set out to prepare this recipe for dinner.  And yeah…I wasn’t disappointed at all.

Recipe: Rosemary Roasted Carrots and Fingerling Potatoes

Rosemary Roasted Carrots and Fingerling Potatoes

Servings: 4-6
Time: Prep 10 minutes; Cook 50 minutes

Ingredients:

  • 1 pound new red potatoes (I used organic fingerling potatoes), halved
  • 1/2 pound carrots, peeled and cut diagonally into 1/2-inch pieces
  • 1/4 cup canola oil
  • 3 tablespoons minced fresh rosemary
  • 4 cloves garlic, minced1 teaspoon sea salt
  • 1/2 teaspoon freshly ground pepper

Directions:

Preheat the oven to 400 degrees F.

Combine all the ingredients in a large bowl and toss well to coat the potatoes and carrots with the seasonings and oil.

Pour the contents of the bowl onto a large baking sheet and roast the vegetables for about 50 minutes, or until the exteriors are crisp and the interiors can be easily pierced with a fork.  (Halfway through cooking, using tongs or a spatula, turn the potatoes and carrots so that they brown evenly).  Transfer to a serving bowl and season to taste with additional salt and pepper.

~*~*~

First of all…this smells amazing while it is baking up.  Honestly.  It really gave the apartment an amazing aroma.  The vegetables really do crisp up nicely on the outside, leaving the inside nice and soft.  Perfect.  And wow…packed with flavor.  This is a super simple, but super tasty dish.  Honestly.  I thought about bringing this to Thanksgiving, but mashed potatoes are always abundant there…so I don’t want to repeat the potato.  Looking for a new way to enjoy potatoes and carrots…give this recipe a try.

Gluten Free You And Me mixes up a light, delicious Gluten Free French White Bread

Gluten Free You And Me Gluten Free French White Bread Mix

Product: Gluten Free You And Me Gluten Free French White Bread Mix – $6.00

You know…it would figure.

I’ve been searching for the ultimate bread mix to bake up and continue to bake up because I make a lot of meals that just taste good with a small slice of bread, toasted in the oven with a spritz of olive oil and seasoning.  And I’ve tried a lot of the name brands.  Some I have fallen in love with.  Some…I’ve been rather indifferent on.  I haven’t hated any of them…but I don’t like a dense loaf of bread.  I don’t want my bread to be heavy.  It’s accompanying my meal, not becoming my meal.

Awhile back, while I was visiting my friend Jenn in Columbus, Ohio, she happened to make mention of a gluten-free event going on at a local gluten-free bakery/café of sorts.  As we were already going to be out and about that day in town, we decided to stop by that morning and check it out.  Although there were only a few things at this little event, one vendor in the front room really caught my attention.

Gluten Free You And Me is the company and they are based out of Dublin, Ohio.  They had a few samples out, including cookies and their French White Bread, made from a mix that they were selling.  Cathy tried a cookie and loved it.  But Jenn and I…we were all about the bread.  One taste and I about melted.  It was light.  It was fluffy.  And it tasted…like fresh-baked, full-barrel, French bread.  I knew then…I had to have it in my life.

So, for a small fee of $6.00, a tub of the mix was mine.  I was excited and couldn’t wait to bake this up myself.

A loaf of Gluten-Free French White Bread (from Gluten Free You And Me Mix) fresh from the oven

But…other products in my expansive gluten-free pantry had to be used up first.  However, this past weekend…it was time to see if I could do up the French White Bread as well as they had for the event.  I could only hope.

Making the bread couldn’t be easier.  Using a mixer, you put the dry mix into a bowl, add 1-1/2 cups of water, 1 tsp red wine vinegar (I didn’t have red wine vinegar, so I went out on a limb and used apple cider vinegar), 2 tablespoons of canola oil…and mix until the dough forms and is sticky.  Then, you pour it into a 4 x 8 bread loaf pan (spray it with some cooking spray) and pat it down to evenly form a loaf shape. Score it across the tip with a knife and let it rise for about 35 minutes.  Once it has risen within 1/2 inch of the top of the pan, you bake it in a 400 degree oven for around 40 minutes.  Remove it from the pan and let it cool on a rack for 1 hour.  Then…it is yours to enjoy.

Let me tell you, the  most difficult part of this entire process was waiting for it to cool.  I normally just want to slice right into the bread and give it a try…but I patiently (or as patiently as I could) waited the correct time before slicing into it.

Well, it was definitely as good as I remembered it.  Figures.  Because this is a little harder to get my hands on than, say, one of the major gluten-free bread mixes at the grocery store.  But…definitely worth ordering online (yes…they do ship) if I can’t get out to where their products are sold in the Columbus area.

The Gluten Free You And Me French White Bread Mix bakes up a beautiful loaf of bread.  The crust turned a perfect shade of gold and inside was a light, fluffy bread just begging for a schmear of butter.  Yeah…this bread is damn near gluten-free bread perfection.  The taste is exquisite.  If you didn’t tell people it was gluten-free…they wouldn’t have a clue.  At all.  It tastes, dead-up, like the bread I used to be able to eat.  And that, my friends, is nothing short of awesome.  And I loved that I didn’t have to haul out my bread maker for this loaf.  It was all done by hand, by the oven, and it baked to perfection.  Happiness is a delicious loaf of gluten-free bread.  It doesn’t get much better than this one.

I encourage you to visit the Web site for Gluten Free You And Me and take a look at the small, but amazing products that this company has to offer.  They can ship some of their items, so check that out, especially if you are not in or around the Columbus, Ohio area.  Their products are pretty hard to beat.  Let me tell you…I’m still dreaming of this bread and thankful I have the other half of the loaf chilling in the freezer for future use.  Well worth the purchase…trust me.

A loaf of bread made with Gluten Free You And Me Gluten Free French White Bread Mix and baked in the oven

Zoë’s Kitchen prepares variety of delicious gluten-free foods that will bring you back for more

Zoë's Kitchen, Louisville, Kentucky
Zoë’s Kitchen, Louisville, Kentucky

Restaurant: Zoë’s Kitchen, Louisville, Kentucky

It was a beautiful early November afternoon.  And I was hungry.  I was hungry and standing in Blue Mile, a local running store at The Summit in Louisville, Kentucky, shopping for reflective gear to wear while running since the days are growing shorter and the nights longer.  And it hit me.  I was hungry.  So was my roomie.  And we had no idea where I could eat.

Granted, I know I have the Find Me Gluten-Free app on my phone, but still…

At the mention of choosing somewhere to eat, the very helpful employee at the running store, who I know from group runs I go on every Monday night, suggested a few options, one of them being just up the shopping center sidewalk – Zoë’s Kitchen.

Now, I had been wanting to try out Zoë’s Kitchen for awhile now, but my roommate had been pretty certain that their gluten-free menu was either non-existent or just not very big.  But, as I mentioned above, I have an app for that…so I pulled out my phone and the first place Find Me Gluten-Free listed was…yep…Zoë’s Kitchen.  I pulled up the menu, and while much of the rather extensive gluten-free menu was meat-based…there were quite a few vegetarian/vegan options as well on there.

It was just up the way.  I was hungry.  I was sold.

So…with the reflective gear purchased, we thanked our food pimp/employee and away we headed to feed our bellies.  Stepping into Zoë’s Kitchen for the first time, I was immediately reminded of how Noodles & Co. is run.  You place an order and are given a number.  The order is sent to the line and is prepared by the very capable staff in the back and then brought to your table.  Simple.  Easy.  Effective.  Right away, I informed the cashier taking the order that I am a Celiac and can’t have gluten.  Then, I placed my order and the proper deductions from the dish were immediately taken.  I loved that.

My order…the Gluten-Free Veggie Kabobs, which comes with a side of White Beans and a Side Greek Salad ($8.55).  To make the dish gluten-free, the pita and the feta cheese are left off.  This entree was not charged extra for being gluten-free.  It was a simple button pressed on the cash register, and the computer took off the ingredients so that the kitchen staff knew how to prepare it.  I loved that.

My roomie decided to give the Steak Stack sandwich a try, and got it with the highly recommended Rice Pilaf ($7.39).  Her sandwich consisted of sliced steak, portobello mushrooms, mozzarella, caramelized onions, feta spread, tomato, and rosemary oil all piled into two slices of sourdough bread.  She loved every bite of it, and is totally in love with the rice pilaf.  It was recommended by a runner.  Of course it’s going to be awesome.

My entree was much larger than I expected, despite not having pita bread to go with it.  The Veggie Kabob’s are grilled to ultimate perfection, with just the right amount of charring on each vegetable.  The kabob’s themselves are made up of charbroiled portobello, zucchini, peppers, onions, and tomatoes.  A bowl of the braised white beans with fresh rosemary comes on the side, and a HUGE side Greek salad comes along with it.  The salad was secondary, but I took a few bites of it anyway.  What I really wanted to dig into were those kabobs.  And that was what I did.  I eased all the charbroiled vegetables off the wooden skewer and tried each and every one of them.  They were very fresh and broiled to absolute perfection.  The tomatoes were still juicy.  The zucchini, peppers and onion were all cooked to perfection.  But the star was the large chunks of meaty portobello mushroom.  Cooked and charbroiled to a blackened perfection, these were my favorite part of the entire dish and what I kept saving for last when it came to what I chose to skewer with my fork.

The White Beans with Fresh Rosemary were delicious.  Not overly seasoned, but packing a delicious flavor.  The gravy that they were nestled and hidden in was absolutely amazing.  And as for the side salad…the humungous side salad…what I could eat of it was very good.  It didn’t even need any dressing.  That was the best part.  Trust me…that’s weird for me to say.  But the greens, the onions, the chopped veggies were all very ripe and just worked.  But, it was the least interesting part of the entree, so I focused on the kabobs and beans…and it satisfied and filled me up.

For the record, my roommate loved the Steak Stack sandwich and said that her portobello mushrooms were also the star of the entire sandwich.  Leave it to a Mediterranean-inspired comfort food restaurant to nail mushrooms!!  Honestly…we both raved about them and they were both cooked in different ways.  That speaks volumes.

What also speaks volumes is that we returned for lunch…today.  Yep.  We were out that way to finish off grocery shopping and lunch was needed.  We didn’t even hesitate to stop back into Zoë’s Kitchen once again.  I got the same thing as yesterday, but with the Fresh Fruit instead of the beans.  And my roomie…she opted to try the Greek Chicken Pita with the Rice Pilaf ($7.39), although originally had thought to get the Steak Stack again.

Yeah…twice visited in two days…and amazing food each time.  That definitely speaks volumes.  Now, Zoë’s Kitchen is a minor chain, which crops up in 12 states.  They have around 54 stores scatted in these 12 states, and are based out of Birmingham, Alabama.  Nothing on their menu is fried.  Everything is made fresh.  And you can tell.  The quality of the food really shines.  And that’s what is important.

I’m already anticipating my next visit back.  Maybe this time I’ll get the Hummus…but it’s so hard to even consider not getting those charbroiled portobello mushrooms again.  They still make me crave.

If you happen to live in Alabama, Arizona, Florida, Georgia, Kentucky, Louisiana, Maryland, North Carolina, South Carolina, Tennessee, Texas, or Virginia, chances are you can find a Zoë’s Kitchen somewhere nearby.  Otherwise, you’re going to have to do some traveling if you’re seriously interested in this fast, delicious, Mediterranean-inspired food.  I promise…it’s worth seeking out.  I’m glad I did.

Zoë's Kitchen's Veggie Kabobs with White Beans and a Side Greek Salad
Zoë’s Kitchen’s Veggie Kabobs with White Beans and a Side Greek Salad

Recipe: Oven Roasted Potatoes, Peppers, and Collard Greens in a Vegan Cream Sauce

Okay…I lived in Birmingham, Alabama for six years…and never once ate collard greens!  Never.  Not once.  Why?  I don’t know.  Perhaps it was the ill-fated attempt my mom had cooking okra that turned me away from those “southern” vegetables.  I can’t say for sure.  But I never felt the need to try them, nor the desire.

But, much like with the Brussels sprouts, along came my CSA bin and inside…collard greens.

Now, my roommate happened to scoop up a recipe card for a Collard Green Hash while we were out at the grocery store, but the problem was, it was going to take an hour and fifteen minutes (not including prep time) to throw that together.  And I was hungry and not wanting to deal with it.  So, instead, I had one of my “I’m just going to make this up” moments and created my very own recipe using a leafy green vegetable that I had never tasted nor cooked with before.

And surprisingly…it worked!

Recipe: Oven Roasted Potatoes, Peppers, and Collard Greens in a Vegan Cream Sauce

Potato, Sweet Peppers, and Collard Greens in a Vegan Ancho Chile Cream Sauce

Servings: 2-4
Time: Prep 10 minutes; Cook 30 minutes

Ingredients:

2 small Russet potatoes, cubed
6 mini sweet peppers, chopped
5 collard green leaves, stalks trimmed and cut into strips
olive oil
salt
red pepper flakes
garlic powder
3 tablespoons sour cream (I used Tofutti Better Than Sour Cream)
1/4 teaspoon Ancho chile powder
dash of lime juice

Directions:

Preheat oven to 425 degrees.

Spray a baking sheet with cooking spray and set aside.

Wash the potatoes and pat them dry.  Slice the potatoes into cubes and place in a zip lock bag.  Drizzle with a bit of olive oil and season with salt, red pepper flakes, and garlic powder.  Seal the bag and shake to coat the potatoes.

Next slice the sweet peppers away from the seeds.  Chop them and add them to the bag with the potatoes.  Give another shake.  Then pour the peppers and potatoes out onto the baking sheet that has been sprayed with cooking spray to prevent sticking.

Pour the potatoes out onto a baking sheet and spread them out over the surface.  Place the baking sheet in the oven for 15 minutes.

While the potatoes and peppers begin to roast, wash the collard greens and cut away the stems.  Slice the collard greens in half, then into strips.  Place in another zip lock bag and drizzle with a little olive oil.  Season with a little red pepper flakes and garlic powder.  Seal the bag and shake to coat the greens.  Set aside.

In a bowl, place 3 tablespoons of sour cream (I used a vegan sour cream) and add 1/4 teaspoon of Ancho chile powder.  Stir until combined.  Add a small dash of lime juice and stir.  Set aside.

After 15 minutes, remove the potatoes and peppers and give them a stir.  Spread the strips of collard greens over the potatoes and peppers and place in the oven for another 15 minutes.

Remove from the oven and transfer the mix of potatoes, peppers and greens to the bowl with the cream sauce in it.  Stir to coat.

Serve.

~*~*~

I was actually surprised with how much I enjoyed this side.  I probably could have eaten it as my meal and been completely content with it.  But I had a veggie burger calling my name.  I’m actually excited to be making this again tomorrow night with my dinner, I loved it so much.  If you have never tried collard greens before, or if you are looking for a new way to enjoy them…I recommend this recipe.  Not just because I made it up…but because it is actually quite yummy!

Recipe: Creamy Brussels Sprouts Bake

Okay…I’m going to admit it.  When I received my bin from my CSA, I had a major crisis in my kitchen.  No, nothing hazardous or spoiling.  In fact, the issue was more with one of the items in my bin itself.  The culprit – Brussels sprouts.

Laugh it up, but these little mini heads of cabbage really threw me for a loop.  While they have always been one of my mom’s favorite vegetables, we never had them when I was growing up.  Ever.  She never made them and never even attempted to get us to try them.  I knew every joke from television shows and movies though regarding Brussels sprouts, so…yeah…I was sort of thrown for a loop.  Not only had I never tasted these myself, but I had no idea how to prepare them.

My roommate claimed she maybe had them once…and she wasn’t a fan…but probably because they weren’t cooked correctly.

This didn’t boost my confidence in this vegetable at all.  But…I was determined to find a recipe to make…where both of us would hopefully enjoy these little leafy greens.  And after a few searches online, and a few recipes tossed at my roommate, she finally decided on one that would use a couple other items from the bin.  Good thinking!

I embellished the recipe a little as I only had 16 ounces of Brussels sprouts in my bin and the recipe calls for 20.  So, I substituted 4 ounces of broccoli.  No harm no foul, right?  So…for all of you lovers of Brussels sprouts and for those of you, who like me, have no idea if you like them or not…I encourage you to try this recipe.  It’s compliments of Taste of Home…but this is my own take on it.

Recipe: Creamy Brussels Sprouts Bake

Creamy Brussels Sprouts Bake

Servings: 6
Time: Prep 15 minutes; Cook 35 minutes

Ingredients:

  • 1 package (8 ounces) cream cheese, softened (I used Tofutti Better Than Cream Cheese)
  • 1 cup (8 ounces) sour cream (I used Tofutti Better Than Sour Cream)
  • 1/2 pound sliced fresh mushrooms
  • 1 medium onion, chopped
  • 2 tablespoons butter
  • 16 ounces fresh Brussels sprouts
  • 4 ounces fresh broccoli
  • 3/4 cup shredded cheddar cheese


Directions:

Onions, mushrooms, broccoli, and Brussels sprouts sautéing in pan

In a small bowl, beat cream cheese and sour cream until smooth; set aside.

In a large skillet, saute mushrooms and onion in butter until tender.  Stir in Brussels sprouts.  Remove from the heat; stir in cream cheese mixture.

Spoon into a greased shallow 2-qt. baking dish.  Cover and bake at 350F for 25-30 minutes or until bubbly.

Uncover; sprinkle with cheddar cheese.  Bake 5 minutes longer or until cheese is melted.

Serve.

Creamy Brussels Sprouts Bake (fresh from oven)


~*~*~

I admit it…I was nervous going into this one.  With not knowing what to expect from Brussels sprouts, I was actually quite nervous about taking my first bite.  My roommate, as she so often does, threw herself on it immediately and assured me that it was actually really good.  She said the Brussels sprouts had a bit of a nutty flavor to them…and she was right.  And the cream cheese/sour cream soup that surrounded the greens, mushrooms, and onions was out of this world.  This was actually quite delicious…and yes…quite filling.

But I am no longer afraid of Brussels sprouts.  And, perhaps, next time I’ll try simply roasting them in olive oil and give that a go.

Trust me…this is at least worth a taste.