Product Review: Daiya Cheezy Mac (Deluxe Cheddar, Deluxe Alfredo, White Cheddar Style Veggie)

Product Review: Daiya Cheezy Mac (Deluxe Cheddar, Deluxe Alfredo, Deluxe White Cheddar Style Veggies) – $4.99+/each

There is just something that is so uplifting about finding a newly released product rather quickly in your regular grocery store.  That was exactly how I felt when I stumbled across the new line of Daiya Cheezy Mac, which I didn’t even know existed.  So…surprise, surprise!

Usually I keep very up-to-date on any forthcoming gluten-free and dairy-free products, and Daiya is always my go-to when it comes to anything involving cheese!  I have been a fan of Daiya vegan cheese products since I first had to go dairy-free.  While I find that most of their products have that “Daiya” flavor…it doesn’t really change the fact that it is delicious vegan cheesy goodness.  Gotta love it.

So, yes…imagine the happy dance of joy that occurred when I was walking the natural food aisles at my local Kroger and…as I turn around from the vegan milks…there on a shelf right at eye-level are three different varieties of the Daiya Cheezy Mac products.  OH. MY. GOD.  There were only 1 box left of each on the shelf.  And they were all coming home with me.

I’ve been cutting out a lot of processed foods, but there is always a time and a place for easy-to-prepare products, especially on those weeks where you’ve planned out breakfast, snacks, and dinners…but forget about the ever-important lunch meal.  Which is exactly what happened this past week.  But, thankfully these beautiful boxes were sitting on a shelf in my pantry and definitely saved three days of lunches this past week (the other days brought allergen-free soft pretzels from the local gluten-free bakery, Annie May’s Sweet Cafe, and I cooked up a gluten-free vegan pasta with fresh veggies from the garden).  Guess it was a week of pasta lunches…and I’m way okay with that.

So…let’s start with the first one that we tried right out of the gate…

Daiya Deluxe White Cheddar Style Veggie Cheezy Mac

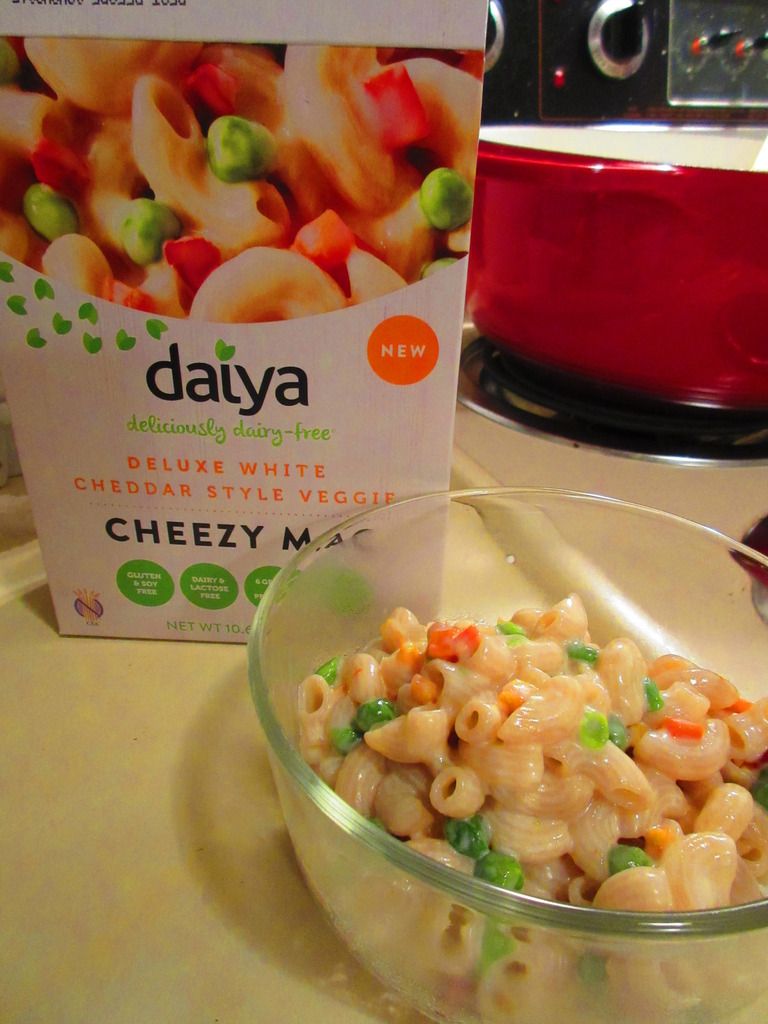
Daiya Deluxe White Cheddar Style Veggie Cheezy MacDaiya Deluxe White Cheddar Style Veggie Cheezy Mac

This was the smartest pic of the day when we devoured this for lunch of Tuesday.  There was a serious lack of veggies happening that day, with our local professional soccer team playing that night.  The morning was filled with some gym-time and leftover couscous cakes and dairy-free yogurt.  That at least had some fruit in it.  But dinner, for me, was simply a protein bar (Luna Protein Mint Chocolate Chip if you were wondering…) so the veggies were a nice touch and perfect on this day.  This box comes complete with a package of gluten-free brown rice pasta and dehydrated veggies (think peas, carrots, and red bell pepper) and a pouch of dairy-free “cheeze” sauce (not powder), which is white cheddar flavored in this particular version.  As the noodles are boiled for 7-8 minutes to reach that perfect al dente, the veggies re-hydrate, adding not only a touch of color but some depth of flavor too.  Noodles are drained and then put back into the pot and the cheeze sauce is then poured over top and mixed in.  LOVE!!  I LOVED THIS!  I was so happy with the first bite I took of this pasta.  It was creamy and dreamy and fluffy and awesome.  And just…REALLY FREAKIN’ GOOD!  How’s that.  The veggies are a very nice touch and one that doesn’t leave semi-hard veggies into perfectly cooked pasta.  It all came together.  And the sauce being in a pouch and being a sauce, not a powder, meant it was silky and creamy and not lumpy and gunky.  I really enjoyed this!  I shouldn’t have been surprised…but I was.

Ingredients for the Daiya Deluxe White Cheddar Style Veggie Cheezy Mac are: Brown rice pasta (whole grain brown rice, rice bran, water), filtered water, dried vegetable blend (pea, carrot, red bell pepper), tapioca starch, non-GMO expeller pressed: canola and/or safflower oil, coconut oil, sea salt, vegan natural flavors, pea protein isolate, potato protein, tricalcium phosphate, evaporated cane sugar, lactic acid (vegan, for flavor), xanthan gum, yeast extract, titanium dioxide (naturally occurring mineral), onion, vitamin B12.  It is gluten-free, dairy-free, soy-free, certified vegan, and also kosher.

As for nutritional information for the Daiya Deluxe White Cheddar Style Veggie Cheezy Mac…my roommate and I split these to make a bigger meal, but the serving size is 1/3 of the package with 3 (obviously) servings per box.  One serving will provide 290 calories, 9 grams fat, 3.5 grams saturated fat (from the coconut oil), 0 grams trans fat, 0 mg cholesterol, 590 mg sodium, 48 grams carbohydrates, 3 grams fiber, 1 gram sugars, and 6 grams protein.  How about that??!!

Daiya Deluxe Cheddar Style Cheezy Mac

Daiya Deluxe Cheddar Style Cheezy Mac

So then, along came Thursday.  And when I went to the pantry on Wednesday night to prepare the pasta for Thursday’s lunch, I asked my roomie if she wanted alfredo or cheddar.  She went with the classic cheddar.  And so, out that box came.  Same basic cooking instructions as the other box.  Which makes it really easy to plan on preparation timing.  HA!  Into the boiling water went the noodles (no veggies this time).  Once they were done, they were drained and sauced accordingly.  And this one…this one really wins the day.  When I first started making the (highly processed) Velveeta Mac & Cheese meals at home, I loved how the sauce would just taste on the noodles, coating all of them in this great ooey-gooey-ness.  And THAT was what Daiya did here.  Daiya brought me the flavors of my adolescent years…in a version that I safely can devour and gorge myself on.  Which, I could easily do.  The rich, velvety cheeze sauce is a perfect cheddar flavor, coating each noodle in its creamy goodness.  I was in heaven while I devoured this one at my desk that day.  Seriously…beyond anything that I expected!  I would marry this product.

The ingredients in the Daiya Deluxe Cheddar Style Cheezy Mac are: Brown rice pasta (whole grain brown rice, rice bran, water), filtered water, tapioca starch, non-GMO expeller pressed: canola and/or safflower oil, coconut oil, sea salt, vegan natural flavors, pea protein isolate, potato protein, tricalcium phosphate, evaporated cane sugar, lactic acid (vegan, for flavor), xanthan gum, yeast extract, titanium dioxide (naturally occurring mineral), annatto (color), onion, vitamin B12.  This product is also gluten-free, dairy-free, soy-free, certified vegan, and kosher.

As for nutrition, a serving of the Daiya Deluxe Cheddar Style Cheezy Mac is 1/3 of the package and the package is meant to serve 3.  A serving of the Daiya Deluxe Cheddar Cheezy Mac will provide you with 300 calories, 9 grams fat, 3.5 grams saturated fat (again…coconut oil), 0 grams trans fat, 0 mg cholesterol, 580 mg sodium, 48 grams carbohydrates, 2 grams fiber, 0 grams sugars, and 5 grams protein.  It is filling and delicious and amazing and I love, love, love it.

Diaya Deluxe Alfredo Style Cheezy Mac

Daiya Deluxe Alfredo Style Cheezy Mac

My roommate didn’t grow up eating anything with alfredo sauce…so moving in with me has been an adventure.  I’ve made this usually dairy-heavy sauce out of cauliflower and now have dished it up using Daiya’s version of this amazing sauce.  While this one turned out to be her least favorite, I think this was my second favorite (cheddar being the best!).  Same easy prep…same simple directions, but this time…that awesome those cooked noodles were drenched in the comforting white sauce that is alfredo.  Yes…alfredo can be just as delicious without all the cream and dairy and Daiya proves it.  I loved the little touch of black pepper, which brought a depth of flavor to each bite.  The creamy sauce clung to the noodles, making each bite feel so sinful, but in honesty, it wasn’t.  And that is what makes this the ultimate comfort food of all time.  And, yes, this does have that cheesy, creaminess that is associated with alfredo for sure.  You won’t even miss the real thing.  This was true love.  True, true love.

The ingredients that go into the Daiya Deluxe Alfredo Style Cheezy Mac are: Brown rice pasta (whole grain brown rice, rice bran, water), filtered water, tapioca starch, non-GMO expeller pressed: canola and/or safflower oil, coconut oil, vegan natural flavors, sea salt, pea protein, potato protein, tricalcium phosphate, evaporated cane sugar, lactic acid (vegan, for flavor), xanthan gum, titanium dioxide (naturally occurring mineral), yeast extract, spices, onion, garlic, vitamin B12.  As before, this product is gluten-free, dairy-free, soy-free, certified vegan, and kosher!

As for the nutritional information for the Daiya Deluxe Alfredo Style Cheezy Mac…a serving size is 1/3 of the package with (again, obviously) 3 servings per package.  If you stick to that serving (my roomie and I just split it in half), you will be taking in 290 calories, 9 grams fat, 3.5 grams saturated fat (hello, coconut oil), 0 grams trans fat, 0 mg cholesterol, 600 mg sodium, 48 grams carbohydrates, 2 grams fiber, 0 grams sugars, and 5 grams of protein.  A creamy and dreamy product.

I believe in Daiya.  I really do.  They are experts and proving dairy-free and gluten-free alternatives to the grocery store aisles.  Seriously…these boxes were some of the best investments I ever made.  I loved the flavors and the creaminess that each different variety provided.  And they really did all taste different…and while I certainly have my favorites, all three were a fantastic way to enjoy one of life’s best comfort foods, without destroying my stomach in the process.  Daiya is proof that there is a God that loves the dairy-free (and gluten-free) people.  And even if you aren’t required to eat this way, I highly recommend trying out these products regardless.  My roomie is very much in love with these products and she doesn’t have to eat this way.  She just does because I do.

Daiya…our love affair continues.  Thank you!!

Product Review: Neat – A Healthy Replacement For Meat Italian Mix

Neat - A Healthy Replacement for Meat Italian Mix
Neat – A Healthy Replacement for Meat Italian Mix

 Product: Neat – A Healthy Replacement for Meat Italian Mix – $4.99+

I am so glad that Neat exists in the world.  I really, really am.  Because, it is sometimes hard to find a good protein base when you are not only a vegetarian (or perhaps a vegan), but also gluten-free.  Trust me…the struggle is real…FOR REAL!!  Most of the vegetarian/vegan faux-meat products out on the market have some sort of vital wheat gluten or glutenous substance inside (for texture purposes, I’ve been told).  I don’t need faux-meat in my life, but sometimes it’s nice to step away from the mushrooms and whatever else I get creative with and use something that is already prepared.

And that…brings me to Neat – A Healthy Replacement for Meat.  Ever since I became a subscriber to Delight Gluten Free magazine I noticed ads for this vegan meat replacement called Neat.  I was beyond intrigued and immediately went on the hunt in my local natural food stores.  Sadly, but not surprisingly, no one in my area carried this product.  At least not yet.  I said I’d get online and see if I could order it, but, naturally, I forgot to do that.  Story of my life.  But after a pouch of the Mexican Mix turned up on my Cuisine Cube, I started finding it on the shelves of my local Kroger stores, my natural food stores.  I was getting Neat where I could purchase it when I suddenly decided to make something spontaneous for dinner.

YAY!

So, what exactly is Neat?  Neat is a meat replacement that is derived from nuts and other non-GMO natural ingredients.  It is a product that was created by a mother of two children who decided that they were going to become vegetarians.  At first she would puree beans into sauces to help her girls get the protein they wanted, but after awhile, everyone got tired of it.  And that was when she got into the kitchen, experimented, and created what is now marketed at Neat.

Neat comes in this shelf-stable pouch in a powdered form.  All you do to prepare it is pour the pouch into a bowl, add two eggs (or a vegan egg replacer), plus two tablespoons of water.  Stir all the ingredients together and throw it into a skillet over medium heat.  Or…if you happen to have the Italian Mix and want to make meatballs…well…you just change it up a little.

I wanted meatballs to make vegan meatball subs and some vegan spaghetti and meatballs for lunch the following day at the office.  SO…I took the mix from the pouch and poured it into a bowl, adding 1 egg, about 2 tablespoons of nutritional yeast (although now I think I should have gone for the full 1/3 cup (which was the amount of Parmesan cheese the recipe said to add), and 1 tablespoon of water and gave it a mix.  Then, with clean hands, I ended up rolling 12 meatballs (you normally would do 8 larger meatballs, but I had multiple meals planned for these…this way my roommate and I each got 3 in each dish I prepared).  Then, into an oven at 350°F for about 18 minutes, turning them over once.  That simple.

Near the end of their cooking time, I began warming up some marinara sauce on the stove.  And when these meatballs came out of the oven, into the sauce they went.  I gave the sauce a stir and just coated the meatballs the best I could.  I was using an open jar of sauce, so I had a little less than I wanted, but I figured the entire point of the meatball sub was the meatball itself.  So…with any luck, I didn’t screw those up.  Into the gluten-free hotdog buns they went (no one around here seems to carry the Schär Gluten Free Sub Rolls anymore).  I topped them with a bit of the sauce, then some Daiya mozzarella style shreds then placed them back in the oven under the broiler for about a minute to get the vegan cheese as gooey as I could manage.

Then…dinner was served.

Given that this was my first attempt at the “neatballs,” I was quite happy with them.  As I said, I should have done a perfect swap for the Parmesan cheese with the nutritional yeast, but I didn’t want to overkill it.  My oven is old, so I set it a little higher in temp, and baked these for the full 18 minutes, instead of maybe just 15…so they were slightly dry, but the texture was very meaty and very dense, like a meatball should be.  I thought these were amazing in both the subs and the pasta I cooked up for the following work day.  While I might have overcooked them slightly, it didn’t make me dislike what emerged from the oven and saucepan.  I loved biting into a vegetarian meatball sub and having it feel like I was actually eating a sub.  That was a nice treat.  I loved forming these meatballs to cook, because it’s like making it yourself instead of pulling them from the freezer (for the record, I know of only 2 kinds of vegan/gluten-free meatballs…Franklin Farms (which I can’t find anymore) and Beyond Meat (which I haven’t found here) which are both kept in the fridge/freezer.  So, this was a bit more rustic and a bit more like you were putting in the work yourself to make the protein base for your meal.  It was messy, but quite fun and quite satisfying.

Let’s first delve into the nitty-gritty ingredients and nutrition of Neat – A Healthy Replacement For Meat Italian Mix.  The Italian Mix version of Neat is made from pecans, garbanzo beans, organic whole grain gluten free oats, garlic, onion, sea salt, and spices.  So, where this is meat-free and dairy-free, and also gluten-free…it is NOT nut-free.  So, if you have a nut allergy…this product is not for you.

As for nutrition, a serving of Neat Italian Mix is 40 grams and each pouch contains 4 servings.  This serving will give you 190 calories, and 15 grams of fat (healthy fat as it is coming from beans and nuts), 1.5 grams saturated fat, 218 mg sodium, 12 grams carbohydrates, 4 grams fiber, 1 gram sugars, and 4 grams protein.  These meatballs will fill you up.  Seriously.  I really appreciate when a faux protein is made with filling, real foods that won’t leave me feeling hungry an hour or so later.  Trust me, that isn’t a problem with Neat.

I am so in love with the two mixes I have picked up from Neat – A Healthy Replacement to Meat.  I still have the Breakfast Mix and the Original Mix to try so I’ll be picking those up soon.  They also make an Egg Replacer as well, which I’d love to try.  So far, there isn’t anything bad I can say about Neat.  So, if you haven’t tried it and you, perhaps, have been missing your spaghetti and meatballs or meatball subs…you gotta try this!!  Order online if you can’t find it in your stores.  Trust me, you won’t regret it.

Spaghetti & Neatballs and Neatball Sub made with Neat - A Healthy Replacement for Meat Italian Mix
Spaghetti & Neatballs and Neatball Sub made with Neat – A Healthy Replacement for Meat Italian Mix

Product Review: Kite Hill Ricotta

Kite Hill Ricotta
Kite Hill Ricotta

Product: Kite Hill Ricotta – $9.99+

Color me charmed.  For real.  A couple of weeks ago, I took a chance and tried a new product I discovered (exclusively) at my local Whole Foods.  In fact, all of the products from this particular brand are only available at Whole Foods…currently.  They are a little pricey, but as I’ve been discovering…they are totally worth it.

Kite Hill was started due to a vision for a plant-based food that would have all the qualities we love in the best artisan dairy cheeses.  Using simple ingredients and using traditional methods, Kite Hill has created artisan cheeses, yogurts, and cream cheeses that can all be incorporated into entrées and desserts.  Created by a dedicated team with deep culinary, cheese-making, and scientific expertise, including Tal Ronnen, Monte Casino, Jean Prevot, Pat Brown, and Matthew Sade, Kite Hill has stepped up to the challenge  to create a non-dairy cheese that met their high standards for quality.  So often, vegan cheese tastes fake or plastic-like.  After years of recipe testing and countless trials and errors to develop the perfect nut milk, cultures, and enzymes needed to create a worthy product, Kite Hill emerged on the market place.

Kite Hill Ricotta
Kite Hill Ricotta

You will recall that I have already given a raving review for the Kite Hill Plain Cream Cheese Style Spread.  Well, I had pasta on my mind this past week.  Really.  And I had gluten free lasagna noodles in my pantry.  And ramekin dishes in my cupboard.  See where this is headed?  Yep…individual mini lasagnas…all made possible by the introduction of Kite Hill’s Ricotta – which is completely soy free, vegan, gluten free and dairy free.

Let me tell you, I was beyond blown away by this product.  It surprised me.  It really, really did.  The Kite Hill Ricotta is light and fluffy right off the bat.  It looked just like real ricotta…the stuff I am incapable of consuming anymore.  Damn lactose intolerance.  But let me say this, if Kite Hill continues to produce their version of ricotta cheese, then I will never miss it again.  I know that tofu can be substituted in pasta dishes for ricotta…as can Tofutti’s Better Than Ricotta…and I have actually used both in successful recipes.  But…it wasn’t the same.  The texture was different.  The flavor was different.

Not with Kite Hill.  My roommate and I both tried some of the Kite Hill Ricotta on its own before I blended it with some herbs for the actual meal.  Oh.  My.  God.  I probably could have eaten the entire tub on my own, with just a spoon.  There is that much amazing flavor in this cheese.  The texture is light, but with a bit of heft to it.  So, it mimics that of real ricotta.  Oh…this was already looking good for my mini lasagnas.  I just had to keep myself from eating all the cheese out of the container and to use it, instead, in the actual recipe.

No easy task.

But I did end up blending it with my herbs and some Daiya Mozzerella Shreds to complete the cheesy filling of the lasagna, which would also include sautéed onion and kale with some garlic.  YUMMY!!  The noodles were cooked, cooled, and put into the dishes.  The ricotta & cheese filling was added, and layered with the vegetables…and of course an amazing sauce from Rao to top it all off.  Into the oven for 40 minutes and…viola…we’re in business!  The mini-lasagnas came out of the oven bubbling hot with cheese and sauce and a whole lot of goodness.  I eased them out of the ramekins and dinner was served.

Oh. My. God.  This was the best ricotta cheese substitute I have tried yet.  Not only was this flavorful, mimicing both ricotta and/or mascarpone cheese, but it didn’t make the dish heavy at all.  The ricotta has a slight tanginess to it, making it a nice addition not just to pastas, but also to desserts.  This product is ridiculously tasty.  I want to make ricotta pancakes now.  And I think I might just do that…maybe tomorrow.  We’ll see.  I have some left over to do just that.  And I have all these fresh local blueberries to use as well.  Oh yes…I sense an epic gluten-free and dairy free pancake breakfast.  It’s the best ricotta substitute I have ever stumbled upon.  It’s made from almond milk, so if you have a nut allergy, it’s not for you, but it’s nice to have a soy-free alternative.

So, now let’s talk about the ingredients.  Nothing beats real, wholesome ingredients.  What’s even better, the Kite Hill Ricotta only has 5 ingredients in it.  Yep.  Just five!  These include: almond milk (water, almonds), salt, enzyme, tartaric acid, and cultures.  This product, as mentioned before, is gluten-free, soy free, dairy free and vegan.  It also contains no cholesterol, no saturated fat, and no trans fats!

And with that in mind, this is the best time to discuss Kite Hill Roctta nutritional facts, yes?  A serving of the Kite Hill Ricotta is 1 ounce (28 grams…or about 2 tablespoons).  This serving will provide you with 70 calories, 6 grams of fat, 0 grams saturated fat, 0 grams trans fat, 0 mg cholesterol, 90 mg sodium, 2 grams carbohydrates, 0 grams dietary fiber, 0 grams sugars, and 3 grams of protein.  Are you loving it?  I’m loving it!

Seriously, you won’t find anything better than Kite Hill Ricotta.  It’s so versatile.  Pastas, pizza toppings, desserts, or even in hot chocolate, this will do it all.  And the taste, oh my God, the taste is fantastic.  I am hooked.  I’ll pay the price to have a good tasting, good quality product.  And Kite Hill totally makes it worth it.  If you live near a Whole Foods, I encourage you and highly recommend that you check out the Kite Hill lineup of vegan artisan cheese.

Mini Vegan Kale Lasagna (made with Kite Hill Ricotta)

Recipe: Lemony Quinoa Breakfast Bowl with Earl Grey Strawberry Compote

If there is one thing that my roommate loves…it is anything citrus.  Especially lemon.  But, then again, I know very few people who don’t appreciate the zippy flavor of something infused with lemon.  I am a huge fan myself.

Imagine, then, receiving an e-mail from Vegetarian Times with the spotlighted meal for the week.  It was from their June 2015 issue, which I had just finished eating, and had made mention of this recipe to my roommate.  The only thing I lacked in order to make this dish was Earl Gray Tea.  I love Earl Gray Tea, I was just out of it at this point.  So, we went grocery shopping and made a point of picking up some good Earl Gray Tea.

Today was a big day.  This morning, Cathy (that’s the roomie for those of you just joining my blog) was heading out to Atlanta for her Jeopardy audition.  I wanted to make sure her drive got started on the right foot…and that was with a healthy, nutritious and filling breakfast.  Per her request, this recipe was breakfast.

Recipe: Lemony Quinoa Breakfast Bowl with Earl Grey Strawberry Compote

Lemony Quinoa Breakfast Bowl with Earl Grey Strawberry Compote

Servings: 4
Time: Prep 10 minutes; Cook 27 minutes

Ingredients:

  • 3 tablespoons plus 1 teaspoon lemon juice, divided
  • 1 cup quinoa, rinsed and drained
  • 1/2 teaspoon salt
  • 2 large coins fresh ginger
  • 1/4 cup low-fat milk (I used rice milk)
  • 1 teaspoon grated lemon zest
  • 1/4 cup pure maple syrup
  • 1/4 cup strongly brewed Earl Grey tea
  • 1 cup halved fresh or frozen strawberries
  • 4 tablespoons sliced almonds

Directions:

Add 3 tablespoons lemon juice and enough water to make 1-2/3 cups liquid in 2-cup measuring cup; pour into medium saucepan, and bring to a boil.

Stir in quinoa, salt, and ginger, and reduce heat to medium-low. Cover and simmer 20 minutes, or until all liquid is absorbed. Remove from heat, and stir in milk and lemon zest. Cover, and let stand 5 minutes.

Meanwhile, bring maple syrup and tea to a boil in small saucepan over medium-high heat. Boil 6 minutes, or until liquid thickens and bubbles turn frothy. Pour over strawberries in bowl, and stir gently to coat. Stir in remaining 1 teaspoon lemon juice.

Spoon 3/4 cup quinoa into each serving bowl, top each with 1/4 cup berry compote, and sprinkle each with 1 tablespoon almonds.

ENJOY!

~*~*~

I don’t think it was love at first bite.  Cathy said that there was a lot going on and she wasn’t immediately sure what she thought of it.  That being said, she ate it all, so that says something about the recipe.  Me…I enjoyed the new play on quinoa.  It paired really well with the strawberries and, when hit up with that lemon zest, was a bright and flavorful base for this dish.  I had an issue with the syrup and tea sauce going solid the minute it was drizzled in with the strawberries.  I did my best to improvise, but that was the only problem I encountered.

All of that aside, an amazingly light, but filling way to start your day.  Give it a try!

Recipe: Gluten Free Garlic Mushrooms on Toast

I was watching a British cooking show a few years ago and absolutely began to salivate over the dish that was being prepared.  A simple European breakfast of Mushrooms on Toast.  With my food allergies and dietary restrictions, I, naturally had to adjust the original recipe, but it quickly became a favorite here in my apartment.  I started making this about five years ago, and then forgot all about it…until I got fresh crimini mushrooms in my CSA bin.

And so…I decided to revive a favorite.

Recipe: Gluten Free Garlic Mushrooms on Toast

Gluten Free Garlic Mushrooms on Toast

Servings: 2
Time: 15 minutes prep; Cook 10 minutes

Ingredients:

  • 1 tablespoon butter (I used Earth Balance)
  • 1 tablespoon olive oil
  • 1/4 cup red onion, chopped
  • 8 ounces crimini mushrooms, stems trimmed, thickly sliced
  • 1 garlic cloves, crushed
  • 1/4 cup rice milk
  • 1 tablespoon water
  • 1 tablespoon chopped fresh thyme
  • 4 slices gluten free bread, toasted (I used Food For Life Sprouted For Life Gluten Free Flax Bread)

Directions:

Heat butter and oil in a large non-stick frying pan over high heat until sizzling. Add onion and mushrooms. Cook, stirring, for 5 minutes or until tender. Add garlic. Cook for 1 minute or until aromatic.

Add rice milk and water. Stir until heated through. Sprinkle with thyme. Serve on hot buttered gluten-free toast.

~*~*~

After digging into this amazing dish (if you do gluten-free, I highly recommend the gluten-free Food For Life Sprouted For Life breads for this recipe), I remembered why I loved it so much all those years ago.  The mushrooms were tender and enriched with the garlic and freshy thyme.  I topped mine off with a poached egg, which, when paired with the sauced mushrooms was the perfect addition to the meal, although on its own, this would still be delicious.

If you are a fan of mushrooms, I highly recommend this recipe!

Product Review: Evol Foods Sweet Potato, Black Bean and Goat Cheese Street Tacos

Evol Foods Gluten Free Sweet Potato, Black Bean and Goat Cheese Street Tacos

Product: Evol Foods Sweet Potato, Black Bean and Goat Cheese Street Tacos – $3.99+

There are very few products out on the market these days that fill me with excitement and pure elation when I see them on the shelf for the first time.  I know that might be hard to believe…but it’s true.  Honestly.  It’s true.  Granted, there are some things that make me happy and truly excited when I find them…enough to run, flailing, up and down the aisles at the local Whole Foods or grocery store…but it’s not an everyday or even an every week occurrence.

That being said, one of my favorite foods in the world is…tacos.  “Why tacos?” you might be wondering.  Well…the reason I have a taco obsession (and have had weeks where all I cook are different varieties of vegetarian tacos…and call it Tour de Taco) is that you can literally put just about anything into a taco.  For real!  And it can be delicious.  My favorite creation, by far, has been my veggie burger and fries taco.  Yep…unhealthy but…OMG…yummy!

So, yeah, I was really, really excited to be shopping the frozen food aisles at my local Target one afternoon and spotting the orange and white box from Evol Foods for their new line of street tacos.   Currently Evol Foods offers three gluten-free varieties with only one being vegetarian.  So, hell yes, it came home with me and took up residence in my freezer.  And, for some reason, I was unprepared for my lunches this past week…don’t know why.  The never happens.  But it did.  So, on Friday, as I was intending on Indian food that night to celebrate my roomie (Cathy) heading out to audition for Jeopardy…this made the perfect lunch for us to share.  I thought.

So Evol Foods mission is “to inspire people to care about where food comes from and how it is produced by making real food that tastes delicious.  Love what you eat.”

Simple.  Basic.  And, as someone who has tried a couple of Evol Foods gluten-free and vegetarian products before, was pretty confident that the latest products to hit the market, the Evol Foods Street Tacos, would live up to not only their mission, but the high bar they set with the quality of their previous products.

Evol Foods Gluten Free Sweet Potato, Black Bean, and Goat Cheese Street Tacos (frozen, out of the box)

That being said, the first thing I noticed when I removed the tray containing the two (2) street tacos that are in each package were just how small these were.  I mean…SMALL!  Maybe 4-5 bites each small.  Given the size of the packaging and the picture on the box, I don’t know, I just expected…more.

Ah well…I was fortunate enough to have planned ahead, bringing the rest of the Good Boy Organics Organicasaurus Tangy Tomato Puffs (previously blogged on) with me for my roomie and I to split as we had intended to split the street tacos to keep lunch lighter in preparation for a bit of a bigger dinner.  So…size…it does matter when you see a product with 220 calories and figure…well…a regular size (6-inch) soft corn tortilla has 40 calories in each tortilla.  What I got were two very tiny tacos with doubled up corn tortillas that were about the size of the palm of my hand.  I was shocked.

It came with frozen pouch containing a somewhat mild-spicy salsa verde, so before I even worked on the tacos, I brought some water to a boil and set the pouch into that to thaw while I warmed up the teeny-tiny tacos for 2 minutes on the tray.  They then sat for 1 minute more…until they were considered ready to consume.

Let me start by saying this…the taco stuffing looked like…a hairball a cat threw up.  Seriously.  The image on the box is so deceiving, showing impeccably orange sweet potatoes, surrounded by crumbled goat cheese and perfect black beans, topped up with the perfect drizzle of salsa verde.  Do not let this fool you.  Because one the taco is cooked, the insides look more like something mashed up together and left out for the dog.  Or…as stated before…a coughed up hairball.  People eat first with their eyes, so it looked rather unappealing.  I gave each taco a healthy dose of the salsa verde, which I had to cut the packet open as it is not one of those that gives you a corner to tear across.  Good thing my office is equipped with such things in the kitchen.  I was still going with it, however.  Because I’ve eaten quite a few things that didn’t look all that appetizing, but in the end were phenomenal.

Tiny tacos were placed on two giant plates and I carried one over to where my roommate was working.  I think she thought I was joking when I set it down in front of her.  Eager to see how it tasted, I shrugged, apologized for the lack of size in the taco, and hurried to my own desk to tuck into my lunch.

It was…bland.  Honetsly.  If it wasn’t for the healthy squirt of salsa verde, I would venture to say that the Evol Sweet Potato, Black Bean and Goat Cheese Street Tacos would be nigh-on tasteless.  Some things taste like a frozen dinner…and this is one of those things.  The tiny corn tortillas began to fall apart.  The filling was not appetizing to look at and not even seasoned.  The salsa verde, thawed in a coffee cup full of hot water, was the best part of this entire dish.  In fact, I ate my entire taco and then savored the little dinosaur puffs I brought as a side, instead of the other way around.  I wasn’t impressed, and my roommate was less than impressed as well.

I get it…street vendors are big into tacos, and street tacos might be smaller than the average taco.  But this was really not even close to being a filling and decent-sized meal.  What a complete and utter disappointment.  When the best part is the part I almost didn’t mess with…well…there is a problem.  Never underestimate a good salsa verde with a nice kick of cilantro.

So, let’s take a look at the ingredients for Evol Foods Sweet Potato, Black Bean and Goat Cheese Street Tacos.  These tacos are made from corn tortillas (white corn flour cooked in lime water, yellow corn flour cooked in lime water, water, and guar gum), sweet potatoes, organic black beans, goat cheese (pasteurized goat milk, salt, cheese cultures, vegetarian rennet, cellulose powder), roasted corn, salsa blend (jalapeños, green onion, cilantro, garlic), cheese sauce (whole milk, cheddar cheese [milk, cheese, cultures, salt enzymes], heavy cream, butter [cream, salt], water, potato flour, onions, rice starch, Parmesan cheese [part-skim milk, cheese cultures, salt, enzymes], sea salt spices), cilantro, jalapeños, salt, lime juice, cumin, and black pepper.  The ingredients in the salsa verde are fire roasted tomatillo puree, jalapeños, cilantro, corn starch, lime juice, salt, onions and black pepper.

As for nutrition facts, the Evol Foods Sweet Potato, Black Bean and Goat Cheese Street Tacos have 1 serving per container, which holds 2 small tacos.  This serving will provide you with 220 calories, 5 grams of fat, 3 grams of saturated fat, 0 grams trans fat, 15 mg cholesterol, 160 mg sodium, 36 grams carbohydrates, 5 grams fiber, 5 grams sugars, and 8 grams of protein.  These are gluten-free and vegetarian.

So, yeah, you can say that I feel betrayed and really let down by both the presentation and the flavor of the Evol Foods Gluten Free Sweet Potato, Black Bean and Goat Cheese Street Tacos.  Thank goodness I decided to go ahead and thaw out the sauce packet or I would have been very, very disappointed.  I hate to say I wouldn’t purchase these again, but I wouldn’t.  I’m glad I tried them, but I just wasn’t impressed.  What a let down from Evol Foods.

Evol Foods Gluten Free Sweet Potato, Black Bean and Goat Cheese Street Tacos (prepared)

Recipe: Gluten Free Penne with Kale in a White Wine Sauce

I’m getting back into the swing of using up everything that comes in my CSA bin before the next one arrives.  Sometimes, it’s hard…but this past week, I have literally used up every bit of produce that came to me last Friday in my green bin of happiness.  Ah, I love Friday because it is BIN DAY!

So, after using up the cucumber (I made a childhood favorite…cucumbers in vinegar), zucchini, squash, blueberries, apples, green beans, broccoli, watermelon, and onion, all that remained was the kale.  And, I do love cooking with kale.  Usually I make kale chips or use it in a breakfast egg scramble of sorts.  But I wanted to get a little more creative than that this time around.  So…with just enough white wine remaining in the bottle in the fridge, I set out to master…pasta and kale…with white wine.

The premise of the recipe was skimmed over while reading through the Funny Love blog.  And from there, I tweaked it to fit my dietary needs.  What emerged was a healthy, delicious, and runner-friendly (non-runner friendly too!) meal this evening that both my roommate and I sat down and devoured while watching Friends on Netflix.  Life…can be good and delicious all at once.

Recipe: Gluten Free Penne with Kale and a White Wine Sauce

Gluten Free Penne with Kale in a White Wine Sauce

Servings: 4-6
Time: Prep 10 minutes; Cook 15 minutes

Ingredients:

  • 8-12 ounces Gluten Free Penne (I used Aldi’s liveGfree brand)
  • 4 cloves garlic, minced
  • Salt
  • Crushed red pepper
  • Olive oil
  • 4 cups kale
  • Parmesan cheese, for serving
  • 1 cup white wine
  • 1 cup pasta water (reserve right before you drain the pasta)

Directions:

Cook the pasta per the package instructions.

While the pasta is cooking, pull out a pan I used the one I was using to make the sauce) and add about an inch or two of water with about a teaspoon of salt.  Place pan on stove and bring water to a boil.

Cut the kale into large strips and remove the stems.

Put the kale into the boiling water for about a minute.  Drain the kale and set it aside.

In the same pan, prepare the sauce.  Add a drizzle of olive oil, the red pepper flakes, and the minced garlic and cook over medium heat, for about 2-3 minutes, until the garlic is soft and golden.  Do not burn the garlic.  It will make everything bitter.
Stir in the wine.  Allow the wine to come up to a boil and reduce for about a minute.  Then, add some of the starchy pasta water, if you’d like a bit more liquid in the dish.  Stir in the drained pasta, the kale, and some Parmesan cheese (as much as you’d like).  Season with salt, more cheese, red pepper, or pasta water as you deem necessary.

Serve.

~*~*~

This turned out to be a light dish, despite having the pasta integrated into the rest of it.  I found it a great way to use of a bottle of white wine from the fridge so that it didn’t go wasted.  And…I love finding new ways to enjoy kale!  Packed with nutrients, light, delicious…yeah…it’s a perfect meal.  And one I might consider the night before a long run…should this hip ever improve enough to get me back out onto the roads.

Recipe: Brussels Sprouts in a Gluten Free White Wine Sauce

So…I’m totally addicted to Brussels sprouts.  You may or may not be aware of this.  The first time I ever cooked them up, I made them in a casserole.  And then…it was all about the roasting.  With olive oil and seasoning…or maple syrup and nuts…the possibilities were endless.

But…I have a lot of wine in my apartment.  A LOT.  And with a fresh bottle of white wine now open and in the fridge…I am coming up with clever ways of using it that doesn’t involve drinking it night after night after night.  Not that there is anything wrong with that…but the medication I’m on for my hip sort of doesn’t mix well with alcohol.  So…yeah…

With Brussels sprouts in my bin this past week and wine in the fridge, I went on a small hunt for recipe ideas.  Because I was just going to roast them up…but that didn’t use any wine…

What I found was a recipe from Taste of Home, which I modified slightly to fit the ingredients I had on hand and to fit my dietary needs.  And what emerged…was a nice twist on Brussels sprouts.

Recipe: Brussels Sprouts in a Gluten Free White Wine Sauce

Brussels Sprouts in a Gluten Free White Wine Sauce

Servings: 4-6
Time: Prep 20 minutes; Bake 25 minutes

Ingredients:

  • 1 pound fresh Brussels sprouts
  • 1/4 cup Earth Balance vegan buttery sticks, cubed
  • 1/4 cup gluten-free all-purpose flour (I used Cup4Cup)
  • 1/2 teaspoon salt
  • 1/4 teaspoon pepper
  • 1 cup non-dairy milk (I used unsweetened cashew milk)
  • 2/3 cup white wine
  • 1 cup white onion, chopped
  • 2 tablespoons raw whole almonds
  • 1 tablespoons sliced almonds

Directions:

Place Brussels sprouts and a small amount of water in a microwave-safe dish. Cover and microwave on high for 2 minutes. Stir; microwave 1-2 minutes longer or until partially cooked. Let stand 5 minutes; drain and set aside.

In a large saucepan, melt butter. Stir in the flour, salt and pepper until smooth. Combine cream and wine. Gradually whisk into flour mixture. Bring to a boil. Cook and stir for 1-2 minutes or until thickened and bubbly. Stir in the onions, chopped almonds, and reserved Brussels sprouts.

Transfer to a greased 1-1/2 quart baking dish. Sprinkle with sliced almonds. Bake, uncovered, at 400°F for 20-25 minutes or until bubbly and Brussels sprouts are tender.  Season with salt and pepper.

~*~*~

This was definitely a change from the oven roasted version, but it was good to step outside the box and do a little cooking with wine.  And it was full of flavor and cooked up really well.  Everything went together.  I added a few red pepper flakes to my own bowl just to take it up a notch.

If you’re a Brussels sprouts fan…Try this!!

Product Review: Van’s Gluten Free Rotini and Red Sauce

Van's Gluten Free Rotini & Red Sauce
Van’s Gluten Free Rotini & Red Sauce

 Product: Van’s Gluten Free Rotini and Red Sauce – $3.99+

It’s been one of those weeks.  Seriously.  I’m recovering (slowly) from my awful, awful, painful Boston Marathon.  To top it all off, my produce bin didn’t arrive as scheduled on Friday.  So, all weekend I was left scrambling with ideas as to what to make for dinner and how little grocery shopping I could get away with in trying to manage exactly that.  The answer…I still had to hit up the produce at the grocery store, and my CSA bin was redelivered to me on Monday evening.  But for that weekend…I was not in a good spot.

Thankfully, I have a pantry full of things that have been just dying for me to pick them off the shelf and try.  And when push comes to shove, Saturday was going to be all about some pasta.  I have a few gluten-free pastas (just the noodles and then some dishes like this) in my pantry for just such occasions…because pasta is easy and a very common go-to for me. Because I LOVE pasta.

I listed off some options to the roomie, and ultimately Cathy made the final say.  “Let’s try that last Van’s thing.”

And so it came to pass that “the last Van’s thing” was going to make its way from pantry shelf to full-on meal in my kitchen.  Moving on up!

You see, awhile back I had picked up three boxes of the Van’s Gluten Free Whole Grain Pasta Sides, which I had discovered at Walmart, of all places, way ahead of anywhere else in the area carrying them.  I snagged one of each flavor and happily stocked my pantry with them.  I have already had the Creamy Herb and Garlic Pasta and the Ultimate Cheddar Penne as well.  So…this time it was Rotini & Red Sauce’s turn to shine.

Van’s Gluten Free choices have never disappointed me.  Not once.  Not ever.  They are my waffle of choice, above all others, even the new Gluten-Free Eggo’s.  That’s a huge thing!!  But Van’s puts a lot of love and care into their packaged foods.  And Van’s does believe that nutritious is delicious and that’s why they make their gluten-free pastas with whole grain brown rice, delivering more than a full serving of nutrient dense whole grains.  You can always add in some vegetables or chicken (if you eat meat…which I don’t…) in order to bulk up the pasta sides and make these more of an entrée.  But as my roommate and I take something that serves three and split it between the two of us…it’s the perfect amount in the end.

Cooking up the Van’s Gluten Free Rotini and Red Sauce takes all but 10 minutes.  Seriously.  Just boil 6 cups of water in a medium saucepan.  Add the pasta and allow it to return to a boil.  Let it cook for 7-8 minutes.  The noodles will become al dente.  Do not overcook.  Gluten-free noodles are an awful thing overcooked.  Drain the noodles and give them a rinse.  Then, add the marinara sauce to the saucepan, heating on low.  Stir often.  Put the pasta back into the pan with the marinara and heat through.  Enjoy.

I served this up with a gluten-free dinner roll that I baked up a few weeks ago.  It made a perfect, perfect, perfect dinner.  The rotini (which is actually red) cooked up really perfectly.  It wasn’t mushy and didn’t crumble apart when I stabbed at it with my fork.  The pasta sauce was rich and flavorful.  I sort of wish there was a little more sauce when all was said and done, but there was the perfect amount to lightly coat the noodles and serve them up.  This was a filling entree, and would serve at least 4 people as a side dish to a bigger main dish.  I enjoyed this one, but it was my least favorite of the three pasta sides that Van’s created.  Not that it wasn’t good.  It was. But it was something I easily could have made with things I have at home in the same amount of time.  It was nothing special.  But it was quite tasty.  If more sauce had been present, I would have used my dinner roll to mop it up.  But…the sauce was just enough…no extra.  Still…a solid, delicious pasta dish.

Van’s is very proud of the ingredients they put into their products.  Seriously.  They state this on the box.  And the ingredients that go into Van’s Gluten Free Rotini & Red Sauce are simple.  These ingredients include gluten free penne pasta (brown rice flour, red lentil flour, beet powder, tomato powder), marinara sauce (tomatoes, water, tomato paste, olive oil, onions, sugar, basil, garlic, salt, citric acid, and black pepper).  It is gluten-free, kosher, contains no artificial colors or flavors, has a full serving of whole grains, is egg-free, and is dairy-free.

As far as nutrition goes, a serving of Van’s Gluten Free Rotini & Red Sauce is about 1 cup prepared.  This box contains about 2.5 servings.  This will dish up 250 calories, 3.5 grams of fat, 160 mg sodium, 52 grams of carbohydrates, 4 grams fiber, 3 grams sugar, and 12 grams of protein.  This side dish is cholesterol free.

So, while this was a simple and basic meal, it was easy to make and served up a fantastic dish for my roommate and I to share.  Of the three, however, this would probably be the one I wouldn’t pick up again.  Not that it wasn’t good…it just wasn’t as memorable as the others.

Van's Gluten Free Rotini & Red Sauce (prepared)
Van’s Gluten Free Rotini & Red Sauce (prepared)

Product Review: Tastefully Simple Gluten Free Pizza Crust & Sauce Mix

Tastefully Simple Gluten Free Pizza Crust & Sauce Mix

Product Review: Tastefully Simple Gluten Free Pizza Crust & Sauce Mix – $10.99

I know some pretty amazing people.  I really do.  One of such people is a friend of mine from high school.  Awhile back, she contacted me and said that Tastefully Simple was releasing some gluten-free products that she would love for me to try.  My friend, Rebecca Fifield, just happens to be a Tastefully Simple Consultant.  So, she sent them to my.  And then Tastefully Simple released more products…and I bought them and some of the ones that had originally just been sent to me.  And I loved every one of them that had tried.

I think what I love most about what Tastefully Simple is doing with their gluten-free mixes is that they are making it so easy to make bread or pizza or cake cookies or pancakes.  They take all that fancy flour mixing and make it so you have it in one easy place, and only need to add 2 ingredients to it.  I love it.  LOVE it.

And now, thanks to both Rebecca and my own trial-by-fire with the gluten-free products that Tastefully Simple offers (they’ve added cookies and pancakes since I last looked!)…I’m obsessed.  Because, as much as I love baking and cooking and being in my teeny-tiny kitchen…I love simplicity too.  Because baking can be stressful…gluten-free baking can be catastrophic if anything is off.

That’s the glory of Tastefully Simple.  They take that guess work off.

So, with me heading out of town on Friday evening, the main goal this week is to use up all the fresh produce that would otherwise go bad in my absence.  So, with fresh basil and some tomatoes and onions lurking about, I remembered that I had a Tastefully Simple Gluten Free Pizza Crust & Sauce Mix in my pantry.  So…pizza it would be.  AND…it would last for three days between my roommate and I.  Added bonus.  No more cooking the rest of the week.  YAY!

Tastefully Simple Gluten Free Pizza Crust & Sauce Mix (prepared)

Preparing the Tastefully Simple Gluten Free Pizza Crust & Sauce Mix is super easy!!  For real.  That’s why there is the word “simple” in the brand.  HA!  To prepare the crust, simply combine the crust mix with 1 cup of water and 2 tablespoons of olive oil.  The dough will be sticky.  Cover it losely with plastic wrap and let it stand for 10 minutes at room temperature.  Using lightly oiled hands to prevent sticking, spread the dough out on a pizza stone or a 12-inch greased pizza pan.  Bake it for 10 minutes in a 400°F oven.

While it’s baking…mix up the sauce.  It’s a breeze.  Simply combine the sauce mix with the remaining 1 tablespoon of olive oil and tomato sauce.  Spread it over the warm crust you have now baked for 10 minutes.  Add your favorite toppings (in my case…tomato, onion, basil and Daiya vegan mozzarella cheese shreds) and place back in the oven to cook for another 17-20 minutes, until the crust is golden brown.  Slice into 6 pieces and devour.

Tastefully Simple Gluten-Free Pizza Crust & Sauce (baked)

The quality, however, always comes in the taste test.  And they totally nailed it.  The dough wasn’t too sticky when I went to press it out on the pizza stone.  And, it cooked up to this amazing crispy, golden brown.  The sauce and toppings didn’t make it soggy.  It held up to slicing and being moved onto plates.  And I loved the flavor.  It had this amazing crusty quality that just made it work.  It was the perfect base for my toppings of choice.  And it was one of my favorite crusts I have made at home.  It was easy, and it didn’t take too long to bake up either.  Perfect way to enjoy my dinner tonight.  Tastefully Simple is not only making gluten-free delicious, but easy too!

So, let’s take a look at what Tastefully Simple puts into their Gluten Free Pizza Crust & Sauce Mix, shall we?  This pizza crust mix is made from rice flour, tapioca flour, sugar, baker’s yeast, potato starch, cassava flour, salt, less than 2% hydrogenated palm kernel oil, soy lecithin, baking powder and, xanthan gum.  The sauce mix is made from maltodextrin, dehydrated garlic, garlic powder, salt, dehydrated onion, spices, roasted dehydrated garlic, sugar, Romano cheese, less than 2% of natural flavors, toasted sesame oil, citric acid, whey, cheddar cheese, hydrolyzed soy protein, disodium phosphate, and silicon dioxide (anticaking).

As far as the nutritional information for the Tastefully Simple Gluten Free Pizza Crust & Sauce Mix goes, this isn’t bad for pizza.  Really.  A serving size is 1/6 of the package.  This serving will dish up 200 calories, 1.5 grams of fat, no cholesterol, 810 mg sodium (it’s a little high, yes), 43 grams carbohydrates, 3 grams sugar, 1 gram fiber, and 4 grams of protein.

If you love pizza and want that “from scratch” appeal with a golden, crispy crunch, without it being the frozen cracker-crusts that the gluten-free community are otherwise delegated to having…then give Tastefully Simple’s Gluten Free Pizza Crust & Sauce Mix a try.  Hop on over to my friend, Rebecca Fifield‘s, page and place an order.  Not only will you be amazed with how easy this is to make, the taste, texture, and everything else will win you over.  I promise you that.

A slice of gluten-free pizza made with Tastefully Simple Gluten Free Pizza Crust & Sauce Mix
A slice of pizza made with Tastefully Simple Gluten Free Pizza Crust & Sauce Mix