Product Review: The Pure Pantry Gluten-Free Organic Old Fashioned Pancake and Baking Mix (with bonus recipe & coupon code)

Product: The Pure Pantry Gluten-Free Organic Old Fashioned Pancake and Baking Mix – $7.29+

A couple weeks ago, I was fortunate enough to be sent a free package of The Pure Pantry‘s Gluten-Free Organic Old Fashioned Pancake and Baking Mix.  I was ecstatic…for quite a few reasons.  For the first thing…most gluten-free baking mixes that I have tried…haven’t lived up to expectations.  Secondly, the pancakes on the package looked heavenly…so, I could only imagine the awesomeness that was enclosed inside.

Included with the mix were two recipes.  I had this perfect vision in my head the moment I saw one for The Pure Pantry’s Gluten-Free/Dairy-Free Cornbread (or Muffins).  You see…I love chili, soup, and stew.  I LOVE…LOVE…LOVE these things…and it’s officially autumn.  It’s fall.  It’s soup season.  It’s time to break into my vegetable crisper and my pantry and whip up some warm, comforting goodness on the stovetop.

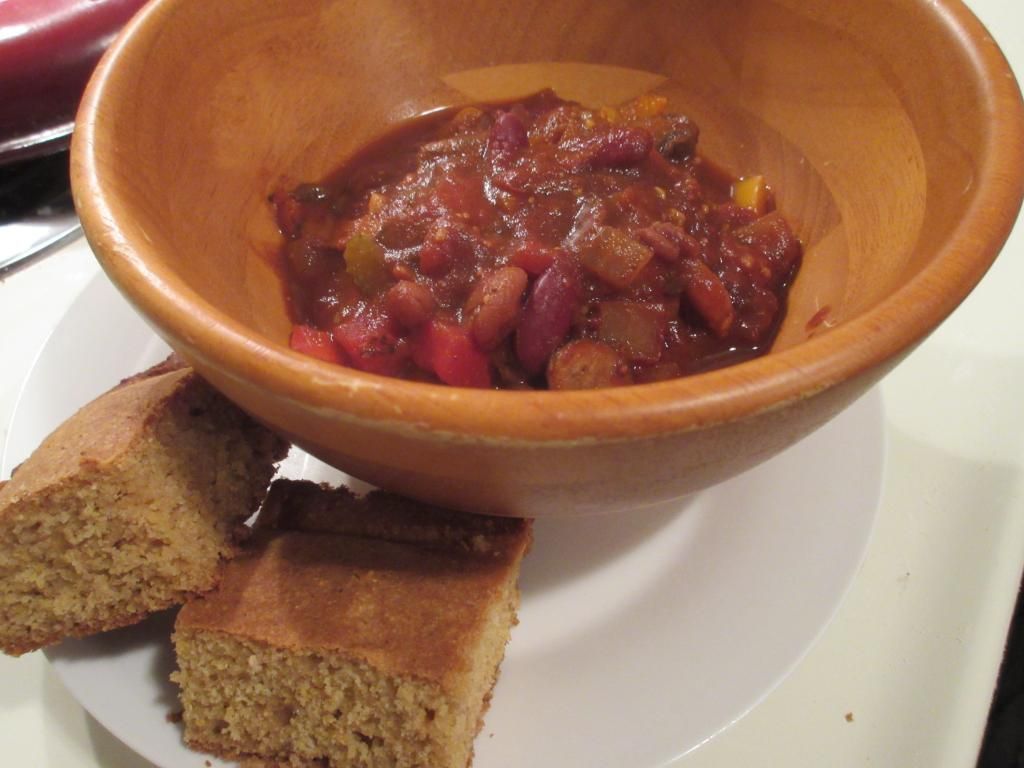
Tonight…that’s just what I did.  And I pulled out my package of The Pure Pantry’s Gluten-Free Organic Old Fashioned Pancake and Baking Mix because the perfect accompaniment to any chili (and I made a fantastic Garden Chili with LOTS of veggies!)…is cornbread, of course!!

This was not my first foray into gluten-free cornbread.  I’ve made at least a dozen different versions of it.  None of which I have liked.  Seriously.  None.  They just never seemed to hit that perfect cornbread mark!  Always a disappointment.  If my roommate was game, she’d offer to use the failed versions for some snacks at work…but that was rare.  Yeah…my cornbread record since going gluten-free has not been stellar.

So, you can only imagine my anticipation today when, after a long day of fitness, festivals, and…yes…food…I wanted to cook up a light chili and give this cornbread recipe a whirl.  What could go wrong?  I’d either be amazed…or disappointed once again.

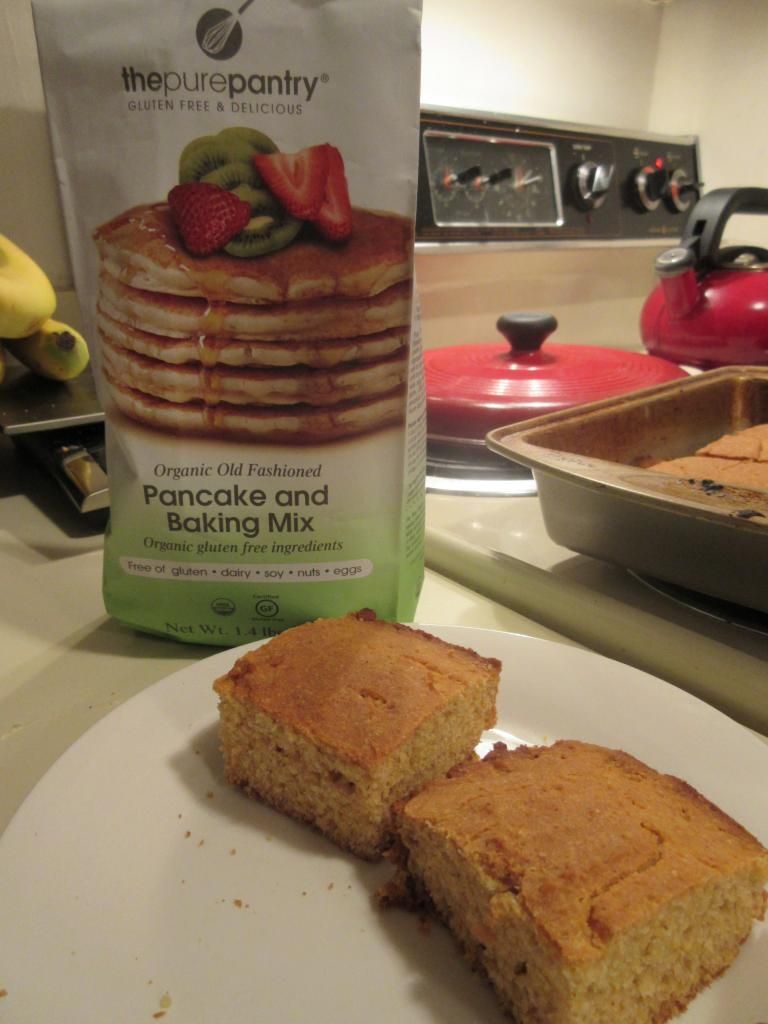
The recipe was very easy and everything needed was in my pantry or fridge already.  Don’t you love it when that happens?  Combining the mix with corn meal, baking powder, salt, and some liquid ingredients, this epic dough that felt light and airy emerged.  I poured it into a greased baking pan and threw it in the oven for about 22 minutes.

What emerged was sheer cornbread perfection.  It looked like cornbread.  It smelled like cornbread.  Once the chili was done simmering away on the stove…I would find out if it tasted like cornbread.  About 20 minutes later…dinner was served.

The first difference between the cornbread made with The Pure Pantry’s Gluten-Free Organic Old Fashioned Pancake and Baking Mix was that it didn’t feel heavy or dense…even as it came out of the oven.  I can tell when I bake whether a recipe is going to be good by how heavy the pan feels as I lift it out of that oven.  This didn’t feel heavy at all.  It was this gorgeous golden color on top. It cooled briefly before I got out a knife and sliced it into 16 squares.  Cutting it was a dream.  I could tell that it was going to be a perfect texture due to how easily the knife cut through it.  Like butter!  It glided right through…no fighting with heavy, gummy insides on this bread.  I might have perfection here!  Each bowl of chili was served with two squares of the cornbread.

The verdict?!

BEST GLUTEN FREE CORNBREAD EVER!!  And, as I stated above, I’ve made so much gluten-free cornbread that I didn’t like or I felt just came out wrong.  There was absolutely nothing wrong with this recipe.  It was hearty and delicious and so easy to prepare.  I loved not just the texture, but how light, but substantial it felt.  I loved the flavor…which…for me…was perfect.  It wasn’t sweet cornbread…which is just how I like it.  Sugar in cornbread is cake.  This didn’t taste like cake.  This tasted like cornbread.  It had that gritty, corn flavor.  Honestly…made my night.

I am going to definitely try the sweet recipe that was sent along with this baking mix as well…so stay tuned for that!!  But for now, please enjoy this recipe from The Pure Pantry:

Recipe: The Pure Pantry’s Gluten-Free and Dairy-Free Cornbread (or Muffins)

The Pure Pantry Gluten-Free Organic Old Fashioned Pancake and Baking Mix (with Gluten-Free and Dairy-Free Cornbread)

Servings: 6
Time: Prep 10 minutes; Bake 20 minutes

Ingredients:

  • 1 cup The Pure Pantry Gluten Free All Purpose Baking Mix
  • 1 cup organic yellow corn meal
  • 1/4 cup agave nectar
  • 1 teaspoon aluminum free baking powder1/2 teaspoon salt
  • 1 cup milk (almond milk or rice milk may be substituted) (I used unsweetened almond milk)
  • 1/3 cup vegetable shortening, butter, or coconut oil – melted
  • 1 large egg, slightly beaten (or egg replacer)

Directions:

Preheat the oven to 400°F.

Grease or butter an 8-inch square baking pan.

Combine dry ingredients in a medium bowl.

Combine milk, oil, agave, and egg in a small bowl; mix well.

Add the milk mixture to flour mixture; stir until just blended.

Pour into prepared pan and bake for 20-22 minutes.  For muffins, spoon batter into greased muffin cups, fill 2/3 full and bake 15-18 minutes.

This recipe may be doubled and baked as above in a 13×9 inch baking pan.

~*~*~

The Pure Pantry has so many mixes to offer.  And they were kind enough to share a coupon code with me to give to all of you, my dear readers.  If you are interested in trying their products, skip over to http://www.thepurepantry.com and take a look at their shop.  You can get $1.00 off your purchase of any two (2) gluten-free products from The Pure Pantry simply by entering PLU 35147 as you are checking out!  Trust me…these products are totally worth it.  I have never been so satisfied with a mix than I was with this one.  The Pure Pantry might actually be selling gluten-free baking perfection.

But…don’t just take my word for it.  Get over to their site…order some of their products and see how life changing your gluten-free foods can be.  Simple.  Delicious.  And…amazing and delicious.

The Pure Pantry is pure gluten-free delicious goodness!

Recipe: Garden Chili

I have a lot of vegetables in my crisper drawer.  Like…a lot.  A whole lot.  Because…I get a CSA bin loaded up each Friday and sometimes I get through them, and other times…I don’t.  Well, last week with all the birthday insanity…I barely got through them.  It wasn’t without trying.  I just…had so much going on and a few dinners had to be really quick and simple and…not cooked from my fresh and delicious vegetables.  Hey…I did make an amazing salad though with a whole lot of them.

But, I digress.

With a trip coming up next week, I am determined to use up much of what is now in my crisper drawer.  I also had a new gluten-free and dairy-free recipe for cornbread that I really, really, really wanted to get working on…so…I thought…

CHILI!!

Now, I have a TON of recipes for vegetarian chili…but I wanted one that I could use simply what I had in my kitchen.  And, it just so happened to exist in my Happy Herbivore Light & Lean cookbook.  Only thing I needed was…beans!  Simple enough, I was grocery shopping today anyway.  So…clocking in at 153 calories and 1 gram of fat, I give you…

Recipe: The Happy Herbivore’s Garden Chili

The Happy Herbivore's Garden Chili
The Happy Herbivore’s Garden Chili

Servings: 2-3 (but I made 6 servings out of it)
Time: Prep 15 minutes; Cook 25 minutes

Ingredients:

  • 2 cups vegetable broth, divided
  • 1 onion, diced
  • 4 garlic cloves, minced
  • 1 green bell pepper, seeded and diced
  • 1 (15 ounce) can diced tomatoes (undrained) (I used fire-roasted low sodium diced tomatoes)
  • 1 cup sliced mushrooms
  • 2 celery stalks, sliced
  • 2 carrots, peeled and diced
  • 1/4 cup tomato paste2 tablespoons chili powder
  • 2 tablespoon Vegan Worcestershire Sauce (I used gluten-free liquid smoke instead!)
    1/2 teaspoon ground cumin
  • 1 tablespoon yellow mustard
  • 1 (15 ounce) can pinto or kidney beans, drained and rinsed (I used organic chili beans)

Directions:

Line a large pot with a thin layer of broth, and sauté onion and garlic over high heat until onion is translucent, about a minute.

Add the bell pepper, tomatoes with juice, mushrooms, celery, carrots, tomato paste, remaining broth, spices, and condiments.  Stir, cover, and bring to a boil.  Once boiling, reduce to low and simmer until the vegetables are fork-tender, about 10 minutes.  Add water or tomato sauce to make it more chili-like if necessary.  Add beans and serve.

~*~*~

Okay…confession…I totally missed the part where it said to cover the pot.  HAHA!  No wonder it took a little bit of time to get those vegetables fork-tender.  My total bad!  But, it still worked.  And what emerged was a fantastic spicy (but not too spicy…because the roomie didn’t even comment that her sinuses were running!) chili that celebrates vegetables.  Most vegetarian chilies seem to put so much emphasis on beans that this was, indeed, a nice change.  And serving this up with a couple slices of gluten-free and dairy-free cornbread made for one great, perfect fall meal.

It’s soup/chili season, folks!  Let’s get cooking!

Recipe: Grilled Eggplant with Gluten Free Couscous and Greek Yogurt Dressing

Sometimes…it’s fun to ignore those magical CSA bin vegetables and go off the beaten path.  Besides, while I love having fresh and local produce delivered to my door, I also love the fun and buzz of the local’s farmer’s market.  And that’s exactly what my roommate and I did this week.  While we have some great bin ingredients, there was an amazing recipe in the October 2014 issue of Vegetarian Times…and the only ingredient I currently had in the home was the couscous.

Don’t panic.  This is gluten-free couscous that came in my Cuisine Cube this month.  I was pretty stoked about that and really wanted to use it right away.  So, that same day as I was flipping through the Vegetarian Times magazine (that had also just arrived)…one dish stood out, as it utilized couscous.  When Cathy read the magazine after me, she also spotted it.  So, that Saturday morning, we went out to a large farmer’s market in Louisville and picked up the necessary ingredients to make this dish.

I prepped most of it last night, so today, the only thing I needed to do to complete the dish was slice and grill the eggplant.  Simple…

Recipe: Grilled Eggplant with Gluten Free Couscous and Greek Yogurt Dressing

Grilled Eggplant with Gluten Free Couscous and Greek Yogurt Dressing

Servings: 4
Time: Prep 30 minutes; Cook 10 minutes

Ingredients for salad:

  • 2/3 cup couscous (I used a gluten-free brand)
  • 1 cup pomegranate seeds, divided
  • 2 Persian cucumbers, diced (1 cup)
  • 1/4 cup sliced green onion
  • 2 tablespoons chopped mint leaves
  • 1 tablespoon olive oil
  • 2 tsp white wine vinegar

Ingredients for dressing:

  • 7 ounces low-fat plain Greek yogurt (or dairy-free yogurt)
  • 1/2 cup chopped Persian cucumber
  • 1/4 cup mint leaves
  • 1 green onion, chopped
  • 1 tablespoon white wine vinegar
  • 1 clove garlic

Ingredients for eggplant:

  • 4 teaspoons olive oil
  • 1 teaspoon finely chopped fresh mint
  • 2 small Italian eggplants, each but on the bias into 6 slices

Directions:

To make the salad: Bring 1 cup of water to a boil in a small saucepan.  Stir in couscous.  Cover pan, remove from heat, and let stand for 5 minutes.  Transfer to bowl and cool for 10 minutes.

Stir 3/4 cup pomegranate seeds and remaining ingredients into couscous, and season with salt and pepper, if desired.

Chill for 1 hour, or overnight.

To make the dressing: Purée all ingredients in a blender until smooth.

To make eggplant: Preheat grill or grill pan over medium-high heat.  Whisk together oil and mint in a small bowl.  Brush eggplant slices with mint oil and season with salt and pepper, if desired.  Grill slices 4 minutes per side, or until tender and nicely grill-marked.

Divide salad among plates.  Top each serving with 3 eggplant slices, 1 tablespoon of remaining pomegranate seeds, and 2 tablespoons of the dressing.

Serve any remaining dressing on the side.

~*~*~

I made only one minor change.  Instead of making the mint oil, I instead added a hit of cayenne pepper, cumin, and garlic powder to the olive oil instead, then brushed that over each slice of eggplant and grilled it.  It worked out perfectly.  And the mint dressing is so light and fresh that it really just brings everything together on the plate.  I highly recommend this hot and cold salad.  It’s simple and easy and beyond delicious for sure!  I can’t wait to make it again.

Product Review: Molina di Nicoli Gluten Free Couscous

Molino di Nicoli Gluten Free Couscous

Product: Molina di Nicoli Gluten Free Couscous – $3.00+

There was a time…back before I was diagnosed as a Celiac…when I used to make numerous dishes with a grain known as couscous.  But, as couscous is made from the semolina of hard wheat…so any couscous dish I started to ignore or substitute quinoa.  It worked…but it wasn’t the same.

You cannot imagine my excitement when I opened up this month’s Cuisine Cube and found a box of Molino di Nicoli Gluten Free Couscous.  I was beyond thrilled.  Seriously, I might have done a happy dance in my office.  Okay…I did do a happy dance.  And with that being said, I was already making plans in my head to recreate some of my favorite couscous dishes with this little box.  My roommate immediately said, “BREAKFAST COUSCOUS!”  Which, is definitely going to happen.  But…it just so happened that I ended up making a salad first with this product.

It was this month’s issue of Vegetarian Times, highlighting hot and cold salads.  And the one that really, really caught her attention was one of Grilled Eggplant with Couscous and Greek Yogurt Dressing.  We looked over the ingredients and they all seemed within reason to pick up at the local farmer’s market (as none of the ingredients were in the CSA bin this week), so I made a pact…if we could find the ingredients, I would cook up the dish.  Because now…I could absolutely use couscous in a dish that asked for it.

The shopping was a success and last night, I found myself prepping most of the ingredients for our dinner tonight.  I cooked up the couscous, seeded the pomegranate, diced the cucumbers, chopped the green onion, and chopped the mint leaves.  I blended together the yogurt dressing ingredients, after a quick run to the store for the actual yogurt itself.  It was the one ingredient we forgot about.  HA!  Not bad.

Molino di Nicoli Gluten Free Couscous (cooked)

I have to say…the couscous is easy enough to cook.  I actually didn’t follow the ingredients on the box.  I went off the instructions in Vegetarian Times for the cooking of the whole-wheat couscous they used in the original recipe.  So, instead of 2/3 cup of couscous with 2/3 cup of boiling water, I used the 2/3 cup of couscous and 1 cup of boiling water, letting it cook for 5 minutes.  Usually the said amount of boiling water and the same ratio of couscous would sit for 2 minutes, then the box says to add oil or butter and cook for 3 more minutes over a slow flame.  The way I did it worked just as well, and when the 5 minutes was up, I emptied the pan of couscous into a bowl to cool for 10 minutes.  Then I added the pomegranate seeds and the remaining ingredients, seasoning with olive oil and white wine vinegar.  I let it chill overnight in the fridge.

After work today, my roomie and I returned home and I set out to grill the eggplant and piece the dish together.  That’s what I did.  I plated the couscous salad, then topped it with the grilled eggplant, gave a drizzle of the Greek yogurt dressing and topped it off with a few more pomegranate seeds.  It looked amazing.  And it tasted just as good!

Now, my roommate said her least favorite part of the dish was the couscous, but to me, it was one of the highlights.  Maybe it was because I haven’t had it in a long time.  But I did nothing special to season this couscous, as I used to hit up the regular couscous with cayenne while it steamed.  I left this one plain, as I was adding enough flavors via the fresh ingredients and the oil and vinegar…and a touch of salt to season.  I thought the texture was clearly different.  This was a lighter, smoother, not as gritty couscous, but it was the perfect ingredient for this dish.  In fact, I can’t wait to try it in my “Breakfast Couscous” later on this week.

The grains of the Molino di Nicoli Gluten Free Couscous were finer and smoother than regular couscous.  However, this is not to say that it was mush.  Anything but that.  In fact, the grains were still very noticeable on the palate and tongue.  I found that it really blended well with all the fresh vegetables and ingredients that were placed on top of it.  It was perfection…quinoa wouldn’t have been the same.  The couscous was perfect.  And it tasted brilliant.

I was beyond impressed!

So, I bet you’re wondering what a gluten-free couscous is made from.  Simple.  One ingredient is all that is listed on Molino di Nicoli’s Web site – corn flour.  Yes, the Molino di Nicoli Gluten Free Couscous is simply corn flour.  That explains the different texture from regular couscous…but ultimately still delicious.  It felt more like grits than couscous…but…it will do.  Different…but close enough in my eyes.

As far as nutrition goes…well…let me see if I can figure this out.  A serving size of Molino di Nicoli Gluten Free Couscous is 50 grams, which is about 1/4 of a cup.  This serving will provide you with 177 calories and 0.5 grams of fat.  You will be consuming 0.002 mg sodium (yes…that is the actual measurement) and 0.3 grams of sugar.  A serving provides you with 1.3 grams of fiber and 3.8 grams of protein.  It’s not too filling, but you won’t fell starved an hour later either.  Molino di Nicoli Gluten Free Couscous is gluten-free and cholesterol free.

I will be savoring this couscous for as long as I can, as I have a few more dishes I want to make with it.  But tonight’s meal was a success.  It was the perfect base for the grilled eggplant and the light and lively dressing that brought everything together.  Beyond happy.  It’s not exactly couscous, but when you’re gluten-free…this is close enough.  Close enough…and really, really good!

Thank you, once again, Cuisine Cube.  Because of you…I’m one happy couscous eating girl again!

Grilled Eggplant with Greek Yogurt Dressing over a Gluten Free Couscous Salad using Molino di Nicoli Gluten Free Couscous


Recipe: Gluten Free Avocado Bruschetta with Green Sauce

Ah, Martha Stewart.  I have to hand it to you!  You always come through for me in a pinch.  Always.

You see, I’m running short on time and have quite a few things left from my CSA bin delivery.  Yes.  I know.  I don’t even eat out that often anymore.  Once a week…generally on the weekend…and it’s usually always at Annie May’s Sweet Café on Saturday morning.

But…with my bin ingredients needing some attention, I noted this morning that my avocado was now ripe.  Not just ripe…but at that perfect creamy ripeness.  So…I scrapped my original plan to make Maple Roasted Brussels Sprouts and instead thought about what I could do with the ingredients I have in my fridge and pantry…that I could use avocado with.

I puzzled it out for much of the day…until I found this recipe.  It’s one of Martha Stewart’s.  And yes…it is sheer perfection.  The only thing I did differently was I used kale in my sauce instead of parsley…because I have plenty of kale to use!  HA!  Oh, and I used slices of gluten-free sandwich bread instead of the crispy French bread that you would normally use to make bruschetta.

Trust me…you’ll eat this up as fast as Cathy and I did tonight!

Recipe: Gluten Free Avocado Bruschetta with Green Sauce

Gluten Free Avocado Bruschetta with Green Sauce

Servings: 4
Time: Prep 10 minutes; Bake 10 minutes

Ingredients:

  • 2 ripe Hass avocados, pitted and peeled
  • 1 tablespoon freshly squeezed lemon juice
  • 8 slices gluten-free sandwich bread, toasted
  • 1 small clove garlic, peeled
  • 6 leaves of kale, trimmed
  • 3/4 cup packed basil leaves
  • 5 tablespoons plus 2 teaspoons extra-virgin olive oil
  • 1-1/2 teaspoons red-wine vinegar
  • Salt and freshly ground pepper


Directions:

Place the garlic in a food processor, and pulse.

Add the kale, basil, 5 tablespoons olive oil, vinegar, and salt and pepper to taste; puree.

Set the sauce aside.

Cut the avocados into 1/2-inch chunks.  Toss with the lemon juice and remaining 2 teaspoons olive oil.

Spread a scant tablespoon of the green sauce on each slice of bread.

Arrange the avocado chunks on the bread, sprinkle with a pinch of ground pepper.

Serve immediately.

~*~*~

This dinner was so simple and yet…so fantastic all at once.  It really wasn’t hard to make at all.  When toasting the bread is what takes up most of your time, you’re doing it right.  Seriously…this was a flavor haven of sheer recipe awesomeness.  The avocado was smooth, creamy, and soft.  The sauce had this great flavor to it…without being overly oily.  Think of it as a sort of kale and basil pesto.  What that ended up doing was really bringing this amazing earthy and light flavor to the dish itself.

One bite…and you’ll be hooked.  I added a sprinkle of red chili flakes to mine…because a little hit of heat is an amazing thing.  I sort of want to make it all over again.  YUM!


Recipe: Gluten Free Pumpkin Bread Pudding

It’s no secret…to anyone…that I love pumpkin.  And as we head out of summer and into fall, we have reached the “pumpkin flavored everything” time of year.  YAY!  But, I have to say, I never let pumpkin season go away in my house.  Not at all.  In fact, I stock up on pumpkin because I will use it in so many things.  As it was, I got a little overzealous this past year with my purchasing of Libby’s Pure Pumpkin…so, my pantry has cans of it.  I figured it was time to come up with ways to use it up.  Last weekend, I made my Gluten-Free Pumpkin Waffles.  This morning…yes…during the work week…I baked up a Gluten Free Pumpkin Bread Pudding.  I love bread puddings…and this one was no exception.  Even better…it is so easy to make.

I spotted the original recipe when Schär Gluten Free posted a link to a blog that had utilized their Gluten Free Classic White Rolls in a bread pudding.  Made with pumpkin.

They had my full and undivided attention.

So…this morning…I decided to bake up the recipe that Mama Me Gluten Free originally posted and Schär linked to on their social media site.  I made a few changes in the preparation for convenience sake…but in the end…it was just as amazing as the recipe promised.

Gluten Free Pumpkin Bread Pudding

Gluten Free Pumpkin Bread Pudding


Servings: 8
Time: Prep 10 minutes; Bake 50 minutes

Ingredients:

  • 15 ounces pureed pumpkin (fresh or canned)
  • 1 1/2 cups milk (I used unsweetened almond milk)
  • 2 large eggs
  • 1/2 cup dark brown sugar
  • 1/4 cup organic pure cane sugar
  • 1/2 tsp. kosher salt
  • 1 tsp. pure vanilla extract
  • 1/2 tsp. ground cinnamon
  • Few small dashes of ground ginger
  • Few small dashes of ground cloves
  • Couple of small dashes of ground nutmeg
  • Package of Schar Classic White Rolls (or any gluten-free bread that is similar in consistency), cubed into 1 to 1-1/2- inch pieces (I let mine sit out overnight to dry out)
  • 1/2 cup chopped pecans
  • Cinnamon and sugar to sprinkle on top (optional…but delicious)


Directions:

Preheat oven to 350°F.

Grease a 2-quart baking dish.

Place bread in a large bowl and set aside.

In another bowl, mix together pumpkin, milk, eggs, sugars, salt, vanilla paste or extract, cinnamon, ginger, cloves and nutmeg.

Pour over bread and gently stir until all is covered.  Let this sit for about 15 minutes.

Pour the mixture into the baking dish and spread it out with the back of a spoon or a spatula so that it is evenly spread throughout the dish.

Sprinkle pecans over the top, and shake cinnamon and sugar lightly over it all if desired.

Bake for 45-50 minutes.

ENJOY!

~*~*~

A slice of Gluten Free Pumpkin Bread Pudding with Maple Syrup

Oh…oh yes!!  This bread pudding is one of the best (and easiest) I have made to date.  I served up a wedge of the Pumpkin Bread Pudding with a delicious drizzle of warm maple syrup.  If heaven was on a breakfast plate…that would be it.  The flavors are amazing.  There is the right hint of spice and sweetness to really elevate the savory aspect of the pumpkin.  It’s rich.  It’s decadent.  And the pecans sprinkled with the cinnamon and sugar on top truly lend a great hit of sweetness as well as texture.  I am totally going to make this again!  But lucky for me, I still have 3 more days worth for eating it.

If you are a pumpkin freak like me…believe me…you’ll want to bake this one up!

Recipe: Gluten Free Lemon Bread Pudding

It’s become a sort of tradition whenever Weekend at Jenn’s happens…Sunday morning means creating one of our, now legendary, breakfast treats to feast on.  No more eating out…no more eating day old goodies from the local gluten-free bakery (although, I’m okay with that…just sayin’.)  We usually plan it out the week of the visit…and I sprung this one on her sort of as an afterthought a day or two before my drive up that way.  She, thankfully, had everything but the bread…which I had in my freezer, leftover from our last bread pudding adventure.  Seriously, if you ever want a sturdy bread…order the Katz Gluten Free Braided Challah loaf…the big one…and you will have at least 6 uses out of it.  I know I got my money’s worth, that’s for sure.

Anyway…I don’t know why…but I was feeling lemon this week.  And it just so happens that my two partners in crime, Jenn and Cathy, are both lovers of lemon and lemon flavored things as well.  This recipe was going to be a match made in heaven.  Jenn and I took a recipe, originally posted by Bijouxs, and put our own little touches on it to make it easier as well as change it to gluten free.  We also made ours dairy free…because I’m sort of lactose intolerant and every little bit helps!

This bread pudding smelled SO amazing as it was baking up on Saturday morning.  It does take an hour to do.  And Jenn and I prepped the dish the night before and let everything soak up and sit in the fridge until we were getting ready for breakfast.  I recommend doing this.  The original recipe called for homemade lemon curd.  We weren’t feeling that.  Jenn had a 12 ounce jar…so we just used every bit of that jar in our version of this dish.  Just make sure that the lemon curd is gluten-free (not all of them are!).

And now…you can make it yourself and see what I mean!

Recipe: Lemon Bread Pudding

Gluten Free Lemon Bread Pudding

Servings: 6-8

Ingredients:

  • 1 French bread baguette, cut into 1 inch slices (I used Katz Gluten Free Braided Challah (of [delicious] DOOM!))
  • 1 12 ounce jar of lemon curd
  • 2 cups cold whole milk (I used coconut milk)
  • 1/2 cup granulated sugar
  • 4 eggs, cold
  • 3-4 lemons, juiced (around 1/3 cup juice)
  • zest of 2 lemons (about 2 tablespoons)
  • pinch of kosher salt


Directions:

Place the bread slices cut sides down in a lightly buttered 10 x 8 inch oval ovenproof baking dish.  Fit the bread slices together in a single layer to completely cover the bottom of the pan.

Spread the top of the bread slices with all of the lemon curd.

Whisk together the milk, sugar, eggs, lemon juice, lemon zest and pinch of salt, mixing well and pour over the bread.

Cover and refrigerate for at least 3 hours (or overnight like we did!), to allow the bread to absorb the milk mixture. Remove from the refrigerator at least 30 minutes prior to baking.

Preheat the over to 325° F.

Cover the bread pudding with foil and bake on top of a sheet pan for 30 minutes.

Remove cover and bake for an additional 30 minutes until puffy and golden brown.

Dust with confectioner’s sugar and serve warm with whipped cream or vanilla ice cream if desired.

~*~*~

OMG…amazing.  Bright, zesty, tangy…it was a citrus flavored treat all rolled into one amazing little bread pudding.  This makes a day brightening breakfast or a light, palate cleansing dessert.  No matter how you slice it, all of us were digging into this delicious treat.   I brought some home and reheated it for breakfast this morning.  This reheats beautifully.  Seriously.  Nothing got soggy or gross in the fridge and it didn’t get destroyed when nuked in the microwave for about 2 and a half minutes.  Still amazing.  Still tangy.  Still…OH so good!

Recipe: Broccoli Masala

Ever since I started going to my favorite (and Louisville’s most popular) Indian restaurant, one of the best dishes I have ever eaten has been their Broccoli Masala.  No joke.  It is amazing.  It has so much depth of flavor.  I always get mine done up spicy…because I love some heat with my food.

I’ve done a baked version of a Broccoli Masala before and even blogged on it…but I wanted to see if I could find a better recipe to use.  And, lo and behold, I found one that would incorporate items that I already had in my apartment.  I had broccoli from my last CSA bin, before having to take a couple weeks off as I was out of town.  I had onion.  I had cherry tomatoes.  And so…this recipe from Spicy Treats just seemed ideal.  I made up my mind to make it…so after I got home from work,  I got busy chopping up veggies and seaming some rice on the stove top.

The rest…was just a matter of cooking.  It was so easy and Cathy even preferred it to the baked one I made previously.  It’s still not Shalimar’s (that would be my favorite Indian restaurant)…but it is, so far, the next best thing!

Recipe: Broccoli Masala

Broccoli Masala
Broccoli Masala

Servings: 2
Time: Prep 20 minutes; Cook 15 minutes

Ingredients:

  • 1 medium sized crown of broccoli, chopped into small florets
  • 1 big onion, sliced
  • 1 tomato, chopped (I just sliced grape tomatoes in half)
  • 2 cloves garlic, crushed
  • 1/4 teaspoon turmeric powder
  • 1/2-1 teaspoon chili powder
  • 1/2 teaspoon cumin
  • 1 teaspoon curry powder
  • salt to taste
  • cilantro, finely chopped (optional)
  • 2-3 teaspoons coconut oil
  • 1/4 teaspoon fennel seeds


Directions:

Wash Broccoli crown, drain and chop into small florets.  Chop the onion , tomato, and crush the garlic and keep ready.

Heat oil in a pan.

Add fennel seeds and when they splutter, add garlic and saute it.

Add onions and saute for 1-2 minutes or until it turn light golden brown.

Add tomato and saute until soft and mushy.

Add turmeric powder, chilli powder, cumin powder, and curry powder.  Stir fry well.

Add broccoli florets.  Season with enough salt and then add a dash of water.  Stir fry for a minute.

Cover and cook for 2-3 minutes, or until the florets turn soft and tender.  Do not over cook.  The broccoli should retain that bright green color.

If you are using it, add the cilantro and stir fry for a moment.

Serve over steamed jasmine rice.

~*~*~

My roomate really dove into this dish, loving the further depth of flavor that the addition of the tomatoes and the onions made.  In addition, the coconut oil made the perfect oil in which to cook the vegetables.  They cooked up to perfection, and I hit the seasoning just right for my roommate (she is not one who likes spicy foods…I do).  So, that was a win.  If you prefer a spicier meal, add more chili powder.  This delicious and nutritious meal is a great and fun way to enjoy Indian food in the comfort of your home.  Simple to make…and delicious too.

And now I’m craving…

Recipe: Gluten-Free Charred Corn Tacos (with Homemade Taco Seasoning)

So…I was back from some time away and without my CSA bin for yet another week.  I still had a couple of produce items from the week prior in my fridge.  Nothing that would have gone bad while I was out of town for the weekend…but…you know…just some things I hadn’t gotten to just yet.  One of these items were 2 ears of corn.  I had previously grilled up the other 2 ears of corn that were in the bin…and I really, really wanted to try something different this time around.

So, I went on a little bit of a hunt…and somehow discovered the amazing recipe for Charred Corn Tacos (as well as homemade (so it can be gluten-free) taco seasoning) from Joy the Baker.  I was elated.  Because I love tacos and because it was definitely a different and unique way to consume said corn…and do something different with your average tacos.  The best part?  This recipe was super easy and I just needed to swing by the grocery store for a couple of items that I didn’t have due to not getting my produce bin.

If you love tacos…I highly recommend these.  If you are a carnivore…I swear, you won’t even miss the meat!

Recipe: Gluten-Free Charred Corn Tacos (with Homemade Taco Seasoning)

Gluten-Free Charred Corn Tacos (with homemade Taco Seasoning)
Gluten-Free Charred Corn Tacos (with Homemade Taco Seasoning)

Servings: 2
Time: Prep 25 minutes; Cook 15 minutes

Ingredients for Taco Seasoning:

  • 2 teaspoons chili powder
  • 1 teaspoon ground cumin
  • 1 teaspoon paprika
  • 1 teaspoon dried oregano
  • 1 teaspoon garlic powder
  • 1 teaspoon onion powder
  • 1/2 teaspoon coriander
  • 1/2 teaspoon salt
  • 1/2 teaspoon crushed red pepper flakes


Directions for Taco Seasoning:

Toss together.  Store in a jar.  Apply liberally to most everything.


Ingredients for Gluten-Free Charred Corn Tacos:

  • 2 ears of fresh corn, kernels cut from the cob
  • a handful of chopped scallions
  • a handful of sliced cherry tomatoes
  • a seeded fresh Serrano pepper, chopped
  • a liberal amount of homemade taco seasoning
  • 4 corn tortillas
  • 1 ripe sliced avocado
  • 1 tablespoon olive oil


Directions for Gluten-Free Charred Corn Tacos:

Heat a few tablespoons of olive oil in a large skillet over medium-high heat.

Add the corn and allow to char for several minutes.  Stir infrequently to allow the corn to really char.

Remove from the heat and stir in scallions, cherry tomatoes, jalapeno, and taco seasoning to taste.

Warm up the tortillas.

Spoon the charred corn into the tortillas.  Top with avocado.

DEVOUR!

~*~*~

My roommate declared this one of her favorite taco dishes that I have ever prepared.  And, a couple years back we did what we called a “Tour de Taco” where I did different flavors and versions of tacos throughout the entire week.  To hear that sort of exclamation really made my day.  The char on the corn really does make all the difference, so be sure you start to get that blackened color on the kernels.  These aren’t too spicy…and the seasoning is perfect.  Honestly, it just brought this wash of flavor to the entire dish.  Top off however you like.  I added kale to mine for a bit of a leafy green.  It was awesome.  My roomie had me whip up some vegan Sriracha sour cream and I topped mine with hot sauce.  However you like it…it’s yours for the making.

Recipe: Roasted Garlic, Cheddar and Chive Biscuits

This spring, my roommate and I decided to take on a new challenge.  This challenge was…we were going to see if we could…possibly…grow our own herbs.  We actually picked up a little kit from a local store that gave us five different herbs to grow.  Sadly, the cilantro and the parsley didn’t quite survive the first wave of heat and humidity, despite our best efforts.  This left us with chives, basil and oregano.  So far…they’ve been doing well.  The break in the hot summer weather has worked in favor for those three herbs, at least.

Well, the chives were getting a bit crazy and I was informed by the roomie that we needed to use them.  And I know how she loves biscuits.  Does she ever love biscuits…

So I promised her that I would make her some biscuits that included chives in some way, shape or form.   I also know that she loves cheese and she loves garlic.  I found a base recipe for some flaky biscuits on a blog called Whole and Heavenly Oven…and then made my own adjustments to make it work within my own diet restrictions.  I will note that I didn’t roast my own garlic.  I had a jar of roasted garlic in my fridge, so I used about 2 tablespoons of the garlic instead of roasting a head of garlic myself.  But, roasting garlic is easy and I’ll include those instructions from the original recipe in case you don’t have the jar of roasted minced garlic like I did.

Recipe: Gluten-Free Roasted Garlic, Cheddar and Chive Biscuits

Gluten-Free Roasted Garlic, Cheddar and Chive Biscuits

Servings: 20
Time: Prep 50 minutes; Bake 15 minutes

Ingredients:

  • 1 small head of garlic, top cut off*
  • 1/2 teaspoon olive oil*
  • 4-1/2 cups flour (I used Better Batter Gluten-Free All Purpose)
  • 4 teaspoons coconut sugar
  • 2 tablespoons baking powder
  • 2 teaspoons baking soda
  • 2 teaspoons salt
  • 1-1/4 cups cold butter, cubed (Earth Balance is a great non-dairy option)
  • 1 cup shredded cheddar cheese (Diaya is great for a non-dairy option)
  • 2 tablespoons fresh chives, chopped
  • 2 cups buttermilk (I used unsweetened almond milk)*NOTE: If you are using the jarred minced roasted garlic, you don’t need these ingredients.

Instructions:

If you are roasting your own garlic, preheat the oven to 400°F.  Place garlic in a small baking dish and drizzle with olive oil.  Cover with foil and bake for 35-40 minutes, or until garlic is soft.  Cool slightly then finely chop.  Set aside.

In a large bowl, combine flour, sugar, baking powder, baking soda, and salt.

Using a pastry cutter, or your fingers, work in cold butter, shredded cheese, chives, and chopped roasted garlic until crumbly.

Pour buttermilk over all and gently stir until a shaggy clump of dough forms.

Turn dough onto a floured surface and gently knead until dough is smooth.

Pat dough into a 3/4 in circle.  Using a biscuit cutter, cut out biscuit shapes and place on parchment paper-lined baking sheets.  Keep doing this until all the dough is used up.

Bake biscuits at 400°F for 15-18 minutes, or until lightly golden.  Cool on wire cooling racks.

Store biscuits in an airtight container at room temperature up to 3 days.

~*~*~

Much to my delight (and I admit…surprise), what emerged were these golden, flaky, amazing biscuits.  My roommate had one hot from the oven and she raved about the flavors.  These will be part of our breakfast lineup this week for certain.  I already scrambled up eggs and placed between a sliced biscuit with some greens for breakfast this morning.  HUGE win on the breakfast front.  I will definitely be making these again!