I have been a reader of Vegetarian Times since before I went full-on vegetarian. No joke. And after I took the step toward eating a plant-based diet, I became a subscriber. It’s one of the magazines I just can’t live without each month. Well, back in the April/May 2015 issue, they had an amazing recipe that involved polenta and corn, and black beans, and some other easy to find, or already have on-hand, items. And I had it in my head to make it.
This happens every month when I get my magazine subscriptions. But this time, it was different. Instead of just saying I would one day make that recipe. This time I did.
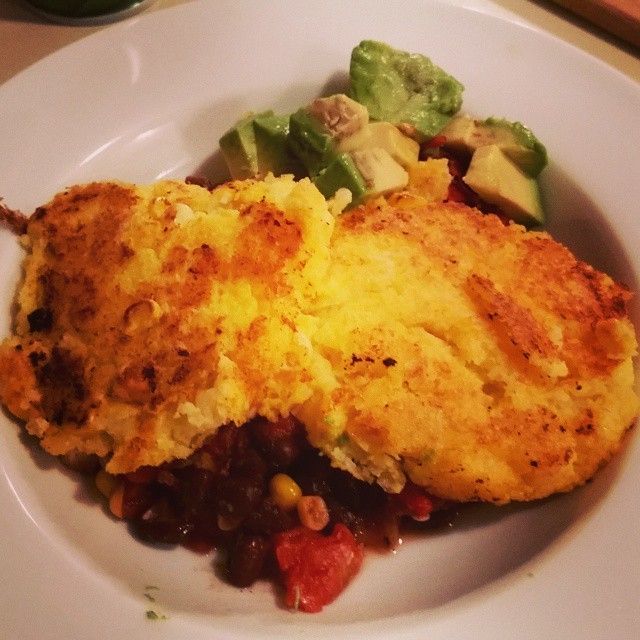
The recipe is for Double Corn Cakes with Black Beans…and the flavors, textures and just presentation are all fabulous. It’s a healthy and plenty filling meal. Having a hard time with your protein? Make this and you’ll be getting 19 grams in one serving. YES!
2 (15-oz) cans no-salt-added black beans, rinsed and drained
1 (15-oz) can diced tomatoes
1-½ cups fresh or thawed frozen corn kernels, divided
1 tablespoon lime juice
1 (18-oz) tube pre-cooked polenta
1 large egg, lightly beaten
Directions:
Heat oil in large skillet over medium-high heat.
Add onion, garlic, jalapeño, and cumin, and sauté 5 minutes.
Stir in beans, tomatoes, 1 cup corn, and lime juice; season with salt and pepper, if desired.
Cook 5 minutes, or until heated through. Transfer mixture to covered container, and keep warm.
Wipe out skillet.
Meanwhile, crumble polenta into microwave-safe bowl, and mash with fork until nearly smooth. Add remaining 1/2 cup corn kernels. Microwave 1 minute to soften polenta. Stir, then add beaten egg, and fold into polenta mixture until smooth.
Coat skillet with cooking spray, and heat over medium-high heat. Shape polenta into 8 1/3-cup cakes, gently flattening with palm. Cook corn cakes in two batches in skillet 5 minutes per side, or until golden brown.
Serve corn cakes over black bean mixture.
~*~*~
There is something amazing about transforming corn kernels and polenta into savory fritters. I served mine with a side of sliced avocado, but salsa would be a great touch as well. These fritters have this nice crispy outside and soft inside. Fantastic flavor. Healthy. Delicious!! I need to really make more recipes from my magazine subscriptions in the future!
We all know that two of my favorite things in life is ice cream and chocolate. Well, unfortunately, real ice cream and I don’t get along, so I’ve taken to exploring other avenues, such as frozen desserts made out of coconut milk, almond milk, or even sorbets. Even better…I have an ice cream maker and often do a lot of experimenting on my own. Sometimes it works brilliantly. Other times…not so much.
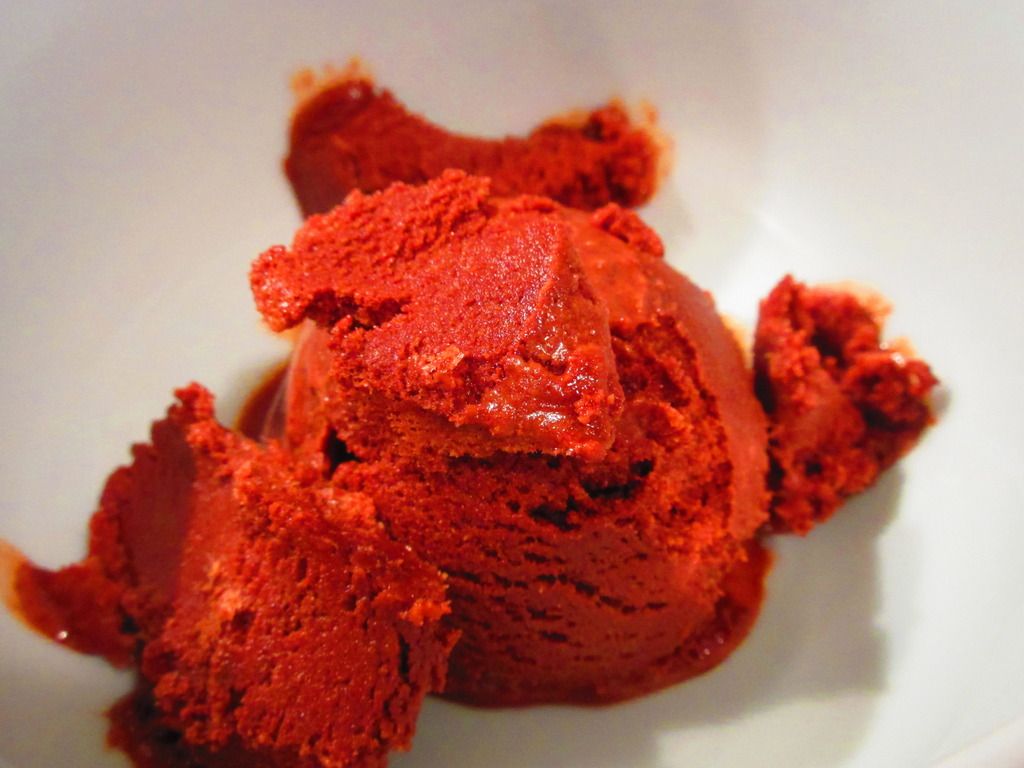
But…HELLO PINTEREST! While browsing through my Pinterest one afternoon, I ran across a recipe from King Arthur Flour for none other than a dark chocolate sorbet. WOO! I had every intention of making this sooner rather than later, so I went home that night and started chilling the bowl for the ice cream maker. I prepped the actual recipe and let it chill overnight in the fridge.
My roomie and I were having her mom over for dinner the following night, so that morning, I went ahead and made the ice cream up to freezer. It was brilliant…
2 teaspoons espresso powder (optional, but it really does enhance the chocolate flavor)
1/2 cup semisweet or bittersweet chocolate chips
2 1/4 cups water
1 teaspoon vanilla extract
2 tablespoons Peppermint Mocha Kahlua, regular Kahlua, or vodka, (optional, but it keeps the sorbet from freezing solid)
Directions:
Combine the sugar, cocoa, salt, espresso powder, chocolate chips, and water in a saucepan set over medium heat.
Bring the mixture to a boil and cook, stirring frequently, until the chips and sugar are dissolved.
Remove from the heat, and stir in the vanilla and Kahlua or vodka. Transfer the mixture to a heatproof bowl, and refrigerate until thoroughly chilled; overnight is best.
Freeze the mixture in your ice cream maker, according to the manufacturer’s instructions. It’ll remain quite soft; freeze for several hours before serving, to firm up.
~*~*~
This was a rich, decadent treat. The Peppermint Mocha Kahlua was the perfect touch. Not only did it lend an amazing flavor to the recipe, but it honestly does help prevent the ice cream from becoming hard as a rock. LOVE. This was one of my favorite treats I’ve made in my ice cream maker.
This might surprise you if you are unfamiliar with Carolina Gold Rice and/or Chef Sean Brock (owner of Husk in Charleston, SC and Nashville, TN)…but this isn’t really ice cream. Not at all. It’s a rice dish.
*SHOCK! GASP! DISBELIEF!*
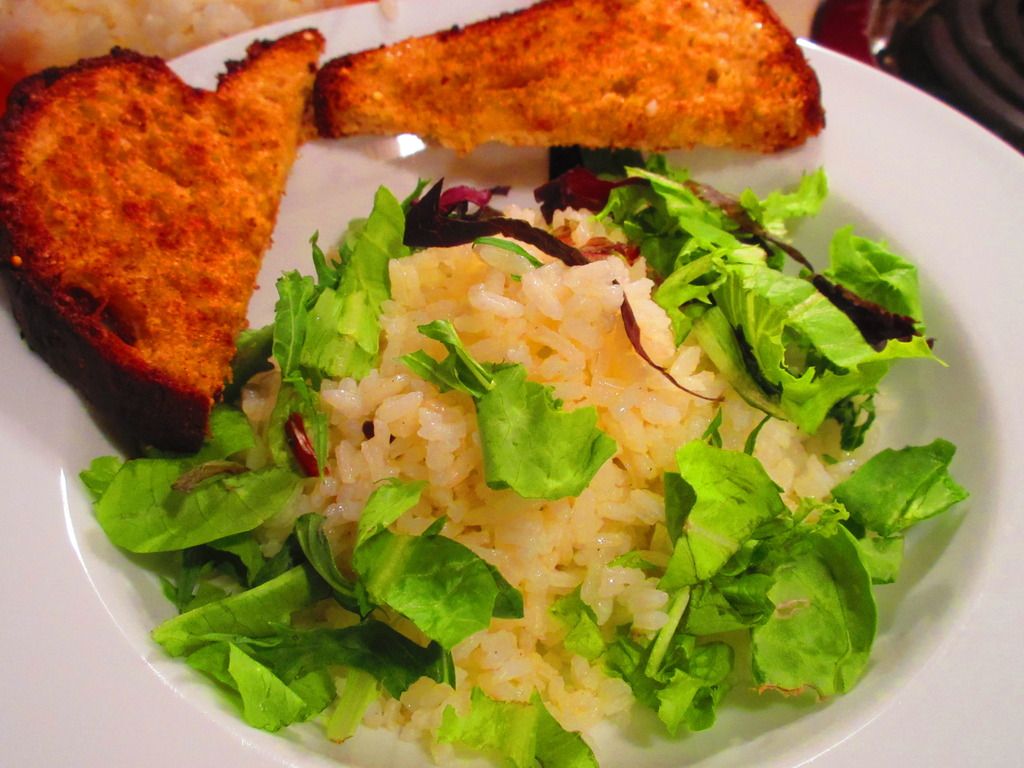
But ever since I watched Sean Brock make this dish on Mind of a Chef, and really go in depth into how amazing Carolina Gold Rice really is…I not only wanted to try the rice, but I wanted to make this recipe as well. Back in January, I went to Charleston, SC to run the Charleston Marathon, and while I was there, I hit up the market and purchased (for a hefty price…but worth it!) a sack of Carolina Gold Rice. The actual phrase “ice cream” in this particular recipe refers more to the preparation, which involves a boil-and-strain initial cooking of the rice, and then the process of oven drying it to give it a better texture. each grain is a distinct bit of food…no clumping. As the rice dries and the butter is added, the rice simply becomes the star. And that’s why it makes a simple, but perfect meal all on its own.
Since I had a bit of time yesterday, and since I wasn’t screamingly hungry, I went ahead and decided to use some of the field greens I got in my CSA bin as the topper for this dish and prepare it for dinner, using some of the Carolina Gold Rice I brought back from Charleston, SC. It takes a little bit of time and patience, but the end result…is amazing, simple, and delicious. A little elegant touch of the South right in your own home. Trust me, you’ll rethink the way you prepare rice in the future.
Recipe: Charleston Ice Cream
Charleston Ice Cream
Servings: 4
Time: Prep 5 minutes; Cook 45 minutes
Ingredients:
6 cups water
1 teaspoon salt
¼ teaspoon white pepper
1 bay leaf
1 cup Carolina gold rice
4 tablespoons unsalted butter, diced
Baby lettuces (or some julienned greens) (for serving)
Directions:
Preheat the oven to 300°F.
In a heavy stockpot, bring the water, salt, pepper, and bay leaf to a boil over medium-high heat. Reduce heat to medium, add the rice, stir once, and bring to a simmer. Simmer gently, uncovered, stirring occasionally, until the rice is al dente, about 15 minutes. Drain the rice.
Spread the rice onto a sheet tray.
Dry the rice in the oven, mixing occasionally. After 10 minutes, spread the butter evenly over the rice. Continue stirring every few minutes. The rice should be dry in about 15 minutes, and the grains should separate.
Serve by plating the Rice in a bowl and garnishing with the baby lettuces.
~*~*~
This recipe is super easy and really simple to prepare. I was most concerned about the flavor being bland, but I promise, it’s not. The simple addition of salt and white pepper to cook the rice in, not to mention the bay leaf, brings in a huge amount of flavor. And don’t skip the greens. They are refreshing and add a great texture and flavor to the finished dish. It’s an unconventional way of cooking rice, yes. But, damn…it’s amazing!
I am definitely hooked on Charleston Ice Cream. And…will want to keep Carolina Gold Rice in my pantry forever from now on. If you don’t have Carolina Gold Rice, any long grain rice will substitute for it. But, if at all possible, order some in, get your hands on some, and try it. You’ll be amazed.
I’m getting back into the swing of using up everything that comes in my CSA bin before the next one arrives. Sometimes, it’s hard…but this past week, I have literally used up every bit of produce that came to me last Friday in my green bin of happiness. Ah, I love Friday because it is BIN DAY!
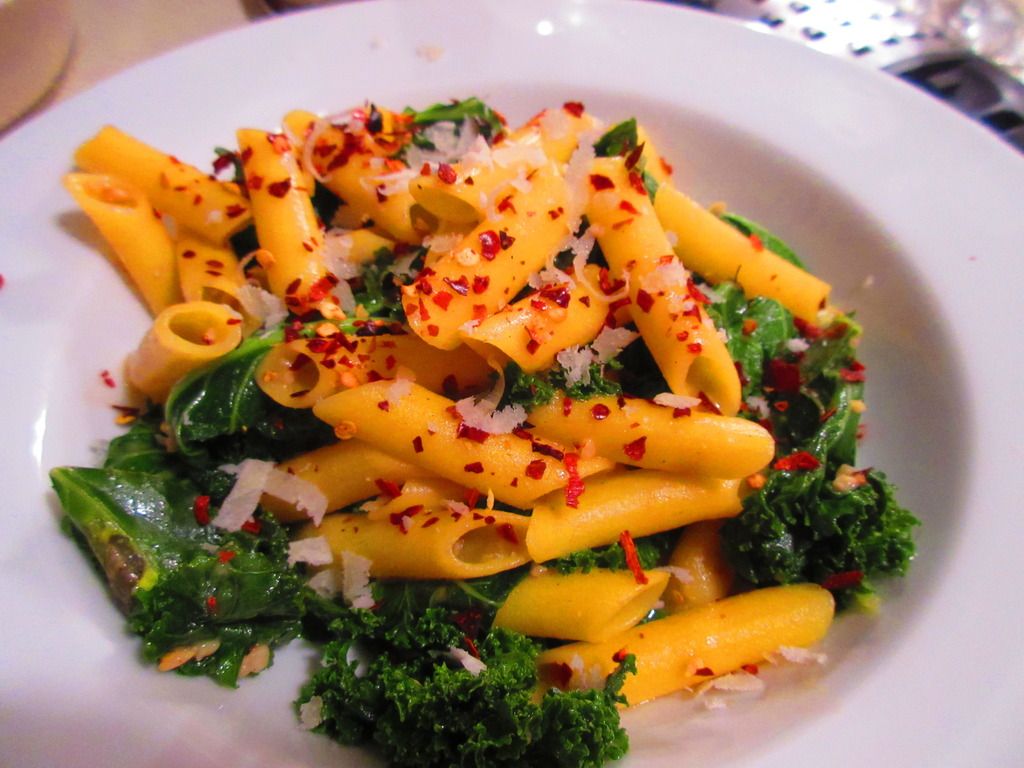
So, after using up the cucumber (I made a childhood favorite…cucumbers in vinegar), zucchini, squash, blueberries, apples, green beans, broccoli, watermelon, and onion, all that remained was the kale. And, I do love cooking with kale. Usually I make kale chips or use it in a breakfast egg scramble of sorts. But I wanted to get a little more creative than that this time around. So…with just enough white wine remaining in the bottle in the fridge, I set out to master…pasta and kale…with white wine.
The premise of the recipe was skimmed over while reading through the Funny Love blog. And from there, I tweaked it to fit my dietary needs. What emerged was a healthy, delicious, and runner-friendly (non-runner friendly too!) meal this evening that both my roommate and I sat down and devoured while watching Friends on Netflix. Life…can be good and delicious all at once.
Recipe: Gluten Free Penne with Kale and a White Wine Sauce
8-12 ounces Gluten Free Penne (I used Aldi’s liveGfree brand)
4 cloves garlic, minced
Salt
Crushed red pepper
Olive oil
4 cups kale
Parmesan cheese, for serving
1 cup white wine
1 cup pasta water (reserve right before you drain the pasta)
Directions:
Cook the pasta per the package instructions.
While the pasta is cooking, pull out a pan I used the one I was using to make the sauce) and add about an inch or two of water with about a teaspoon of salt. Place pan on stove and bring water to a boil.
Cut the kale into large strips and remove the stems.
Put the kale into the boiling water for about a minute. Drain the kale and set it aside.
In the same pan, prepare the sauce. Add a drizzle of olive oil, the red pepper flakes, and the minced garlic and cook over medium heat, for about 2-3 minutes, until the garlic is soft and golden. Do not burn the garlic. It will make everything bitter.
Stir in the wine. Allow the wine to come up to a boil and reduce for about a minute. Then, add some of the starchy pasta water, if you’d like a bit more liquid in the dish. Stir in the drained pasta, the kale, and some Parmesan cheese (as much as you’d like). Season with salt, more cheese, red pepper, or pasta water as you deem necessary.
Serve.
~*~*~
This turned out to be a light dish, despite having the pasta integrated into the rest of it. I found it a great way to use of a bottle of white wine from the fridge so that it didn’t go wasted. And…I love finding new ways to enjoy kale! Packed with nutrients, light, delicious…yeah…it’s a perfect meal. And one I might consider the night before a long run…should this hip ever improve enough to get me back out onto the roads.
So…I’m totally addicted to Brussels sprouts. You may or may not be aware of this. The first time I ever cooked them up, I made them in a casserole. And then…it was all about the roasting. With olive oil and seasoning…or maple syrup and nuts…the possibilities were endless.
But…I have a lot of wine in my apartment. A LOT. And with a fresh bottle of white wine now open and in the fridge…I am coming up with clever ways of using it that doesn’t involve drinking it night after night after night. Not that there is anything wrong with that…but the medication I’m on for my hip sort of doesn’t mix well with alcohol. So…yeah…
With Brussels sprouts in my bin this past week and wine in the fridge, I went on a small hunt for recipe ideas. Because I was just going to roast them up…but that didn’t use any wine…
What I found was a recipe from Taste of Home, which I modified slightly to fit the ingredients I had on hand and to fit my dietary needs. And what emerged…was a nice twist on Brussels sprouts.
Recipe: Brussels Sprouts in a Gluten Free White Wine Sauce
Brussels Sprouts in a Gluten Free White Wine Sauce
1/4 cup gluten-free all-purpose flour (I used Cup4Cup)
1/2 teaspoon salt
1/4 teaspoon pepper
1 cup non-dairy milk (I used unsweetened cashew milk)
2/3 cup white wine
1 cup white onion, chopped
2 tablespoons raw whole almonds
1 tablespoons sliced almonds
Directions:
Place Brussels sprouts and a small amount of water in a microwave-safe dish. Cover and microwave on high for 2 minutes. Stir; microwave 1-2 minutes longer or until partially cooked. Let stand 5 minutes; drain and set aside.
In a large saucepan, melt butter. Stir in the flour, salt and pepper until smooth. Combine cream and wine. Gradually whisk into flour mixture. Bring to a boil. Cook and stir for 1-2 minutes or until thickened and bubbly. Stir in the onions, chopped almonds, and reserved Brussels sprouts.
Transfer to a greased 1-1/2 quart baking dish. Sprinkle with sliced almonds. Bake, uncovered, at 400°F for 20-25 minutes or until bubbly and Brussels sprouts are tender. Season with salt and pepper.
~*~*~
This was definitely a change from the oven roasted version, but it was good to step outside the box and do a little cooking with wine. And it was full of flavor and cooked up really well. Everything went together. I added a few red pepper flakes to my own bowl just to take it up a notch.
Back when I first went gluten-free, the receptionist at my office was on this diet kick. And she brought in these muffins that were made with only two ingredients: spice cake and a can of pumpkin. That’s it. I didn’t get to try them, despite her asking me to at least take a bite…because I didn’t want to feel ill the rest of the day, or perhaps the week. Everyone else who tried them though loved them.
That was over three years ago. And despite there being at least one gluten-free spice cake mix out on the market (made by Namaste Foods)…I hadn’t really gotten around to purchasing the mix and then giving a gluten-free version of those muffins a try.
And then…this past fall as I was strolling down the back aisle of my Whole Foods Market…I saw a display of gluten free fall baking items, all by Pamela’s Products. They were the new Gluten Free Pumpkin Bread Mix and the new Gluten Free Spice Cake Mix. I had just recently gotten a gluten-free pumpkin bread mix from a different company, but the spice cake mix…that made me happy. I turned to my roommate and asked if we could break the budget for this…because I had two ingredient muffins I wanted to make with it. She agreed. YAY! Home came the cake mix.
However, with the busy, hectic holidays…my time for baking things for me (I baked a lot of gluten-free goodies for family/friends/special businesses) and the muffins got pushed to the back burner. As a lot of my great ideas at the time…when I am purchasing something often do. Sadness. But sadness no more…because I needed some easy breakfast food this week…mostly because I’m attempting to get back into a workout routine, despite my injury, and have some early morning sessions at the gym planned out. The easier something is to make afterwards, the better!
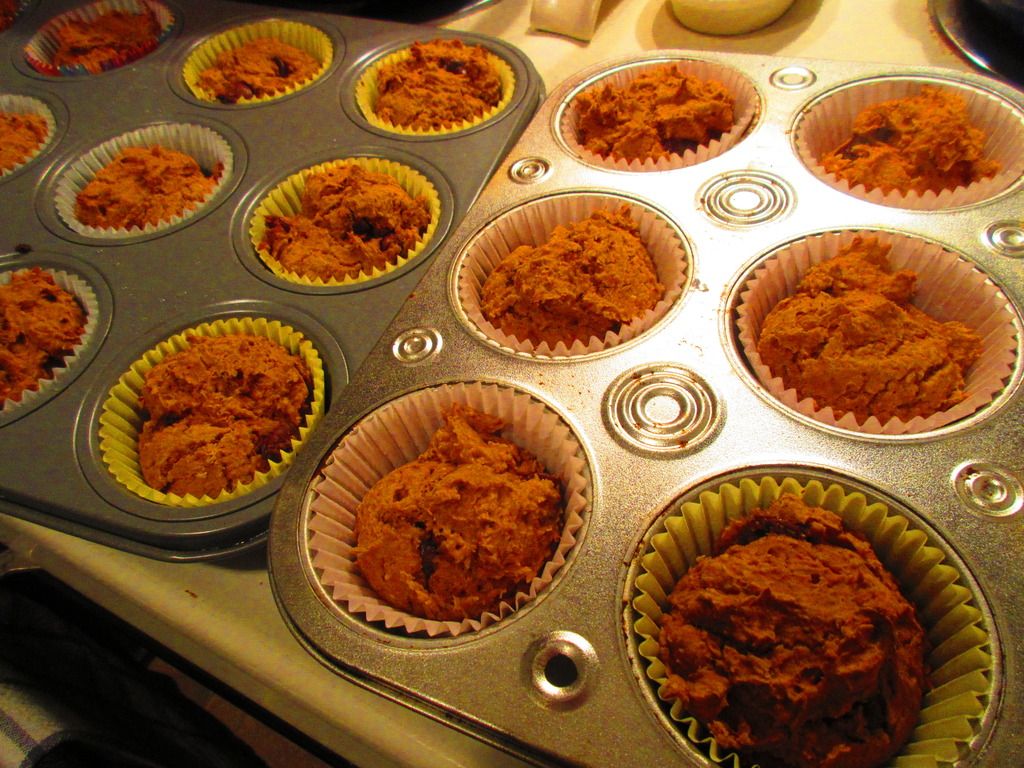
So, today, I got out a can of pumpkin (I keep cans of pumpkin on hand like they are going out of style!) from my pantry and snagged the bag of Pamela’s Products Gluten Free Spice Cake Mix from the baking shelf. It was time to make those muffins as planned.
So, into a bowl went the cake mix and the can of pumpkin. I beat it all together with an electric mixer and then folded in 1/2 cup of semi-sweet chocolate chips. So…I made mine with three ingredients. I wasn’t sure how a gluten-free cake mix would take to this recipe (a lot of times you should follow instructions on the package exactly or face epic, massive, culinary fail!), and who doesn’t like a touch of sweet chocolate with their breakfast, right? RIGHT! I filled 18 muffin cups with the mix and popped it into a 350°F oven, allowing them to bake for around 24 minutes. I removed them and let them cool before placing them in a container to keep for the upcoming week.
BUT…I can’t bake something and not try it, right? If it was an epic fail…well…I didn’t want to find out tomorrow morning when there was nothing to do about it.
My worry was for naught. I should have known. Pamela’s Products has always been delicious, no matter if I’m using her flour blends, or product mixes, or feasting on cookies, figgies, or granola bars. I have never met a Pamela’s Products product that I didn’t fall in love with or enjoy. And that continues to hold true.
The Pamela’s Products Gluten Free Spice Cake Mix has this delicious fall spice flavor to it. A hint of cinnamon, nutmeg, allspice, cloves, ginger and cardamom bring out that amazing taste of one of my favorite seasons! Nothing like a taste of fall at the height of spring, right? Maybe I was trying to forget that we were in the high 70s already this morning when I set out to make these. The pumpkin added this great flavor and moistness as well. And who doesn’t love a little touch of chocolate when all is said and done, right? Because the addition of the chocolate chips made these a sweet enough treat, without all the guilt. The muffins didn’t puff up, but that’s gluten-free mixes for you. They did bake up gorgeously though…with a golden brown top and a moist, cake-y middle. Loved it at the first bite and will truly enjoy devouring a couple of these each morning this week. Super easy to make…and super delicious in the finished product.
So, let’s discuss the ingredients that go into Pamela’s Products Gluten Free Spice Cake Mix, shall we? This mix is made from evaporated cane sugar, tapioca starch, white rice flour, potato starch, brown cane sugar, inulin, grainless & aluminum-free baking powder, rice bran, sea salt, cinnamon, gluten-free flavor, nutmeg, allspice, xanthan gum, cloves, ginger, cardamom, and black pepper. This mix is certified gluten-free, non-dairy, and kosher.
Let’s discuss the nutrition information of Pamela’s Products Gluten Free Spice Cake Mix, shall we? This mix makes 12 servings (I made 18 muffins though!), so it’s 1/12th of the dry mix or 1/12th of the finished cake that you bake. In this serving, you will be consuming 150 calories and less than 1 gram of fat. This mix will provide you with 340 mg sodium, 36 grams carbohydrates, 15 grams of sugar, 2 grams of fiber and 1 gram of protein. Not bad for a cake mix, right? Normally, this mix is prepared using eggs, butter and milk, so your nutrition facts will change when it’s mixed with baking ingredients.
For those interested, the nutrition information for the Gluten Free Pumpkin Spice Muffins that I made with this mix is that 1 muffin will give you 141 calories, 2 grams of fat, 228 mg sodium, 30 grams carbohydrates, 14 grams sugar, 2 grams of fiber and 1 gram of protein. Only three ingredients. Easy to bake. And…YUMMY!
I hope that the fall isn’t the only time I can find the Pamela’s Products Gluten Free Spice Cake Mix. I haven’t looked recently at my natural foods stores…but if they have another package of it, I’ll be more than happy to pick it up and bake up another batch of these muffins. Or, maybe next time, I’ll bake up the actual cake itself. As always, Pamela’s Products impresses me beyond all expectations. And this is why this is a big-name gluten-free brand I trust.
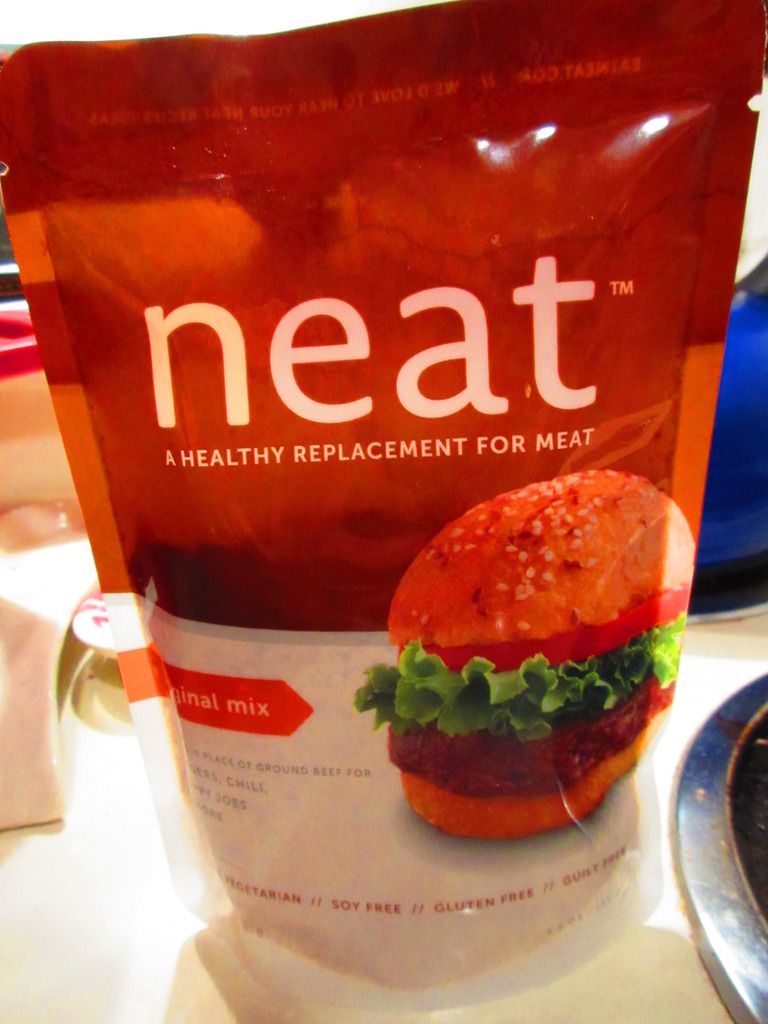
Neat – A Healthy Alternative For Meat Original Mix
Product: Neat – A Healthy Replacement For Meat Original Mix + Recipe Bonus – $4.99+
I am so excited. And the reason why is simple. I have found the meat replacement, Neat, at a few of my local stores. My Kroger, my Meijer, and even a few of my natural food stores now carry these little pouches of meat replacement goodness. Now, mind you, I’m not one who often will replace meat in a dish. I usually will use something like tofu or mushrooms instead, but there are some recipes (from my childhood, especially!) that just call for using an actual meat replacement. I have a few go-to brands that are gluten-free as well as either vegetarian or vegan. But ever since I received a pouch of the Mexican Mix from Neat in my Cuisine Cube back in October, I was hooked. I just had nowhere in this area to purchase it on my own.
Until now.
Up until yesterday, my pantry held the Italian Mix and the Original Mix. I’m using a few things up in my pantry (I have a bit of an overstock, HA!), so I decided I would go ahead and bake up some of the Moon Rabbit Foods pie crusts that I had from another Cuisine Cube. I could freeze two of them, and then give using the third one a shot in an old family favorite, which I would adjust to make gluten-free, dairy-free, and vegetarian.
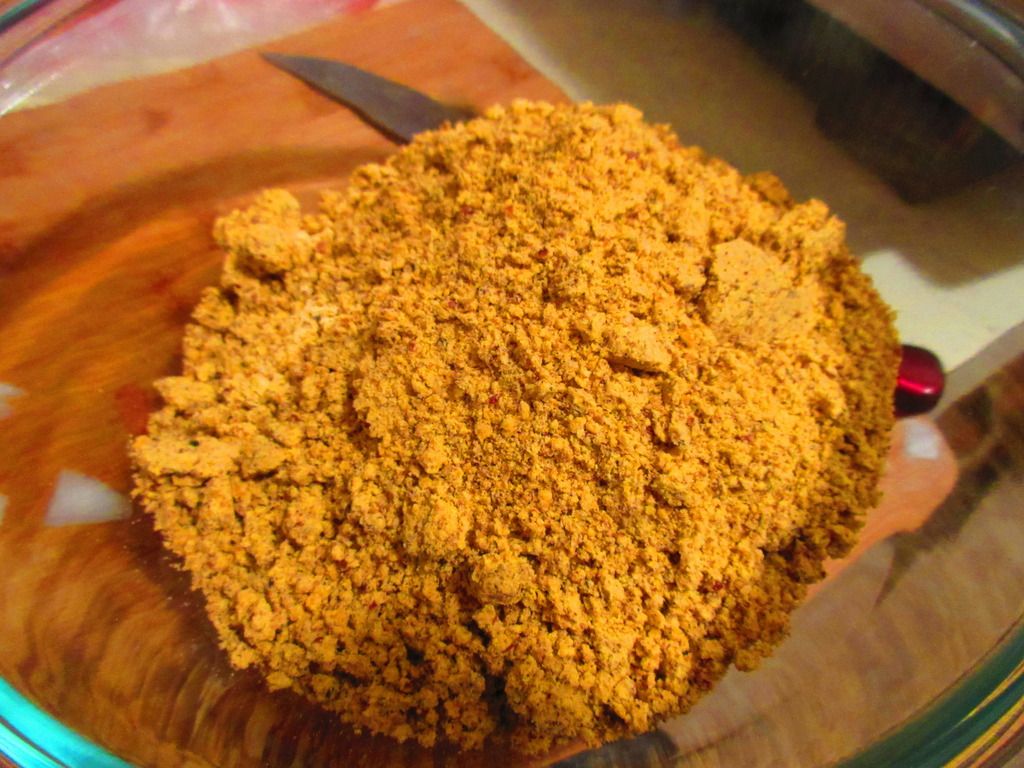
Neat – A Healthy Replacement For Meat Original Mix (before adding eggs/egg replacer and water)
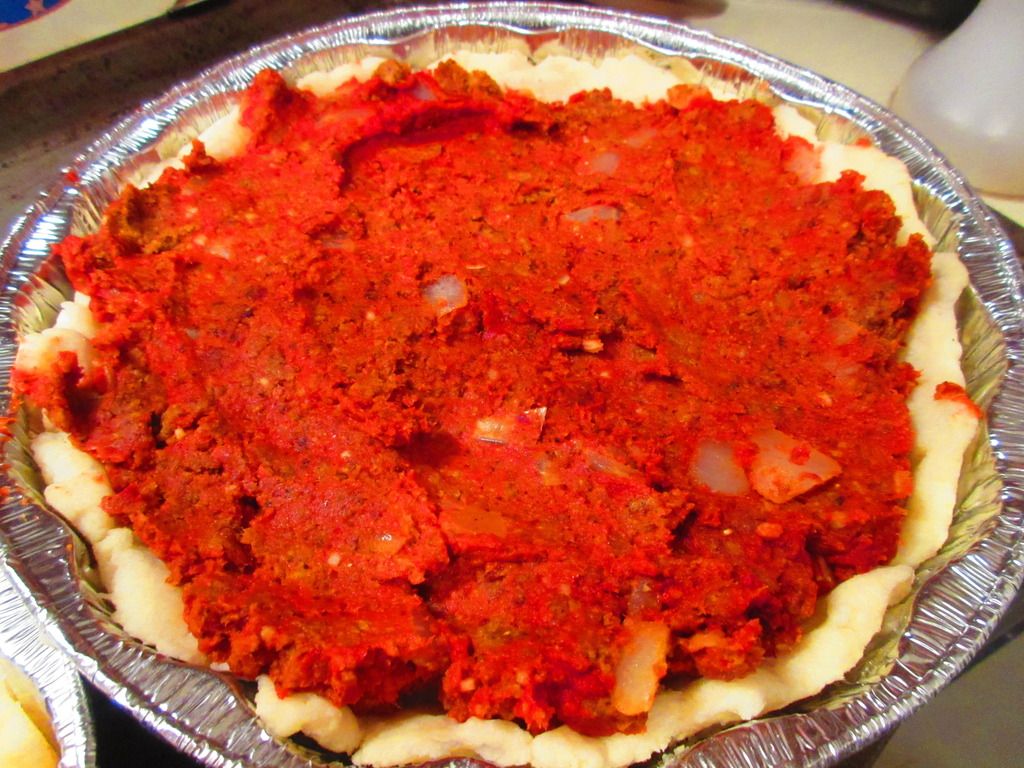
With a pie crust baked up…it was time to make the filling. As I was using my mom’s recipe, I began to brown the sweet onion while I mixed up the ingredients for the Neat Original Mix. This is really easy. Simply empty the Neat mix into a bowl, add two eggs (or egg substitute) and 2 tablespoons of water. Mix well. Once the onions had began to soften, I added the neat mixture and cooked it on medium heat for about 7-10 minutes, chopping at it as one would with regular ground beef. It looked and smelled perfect. I added the tomato paste, cooked it a few moments longer and then put it all in the pie crust. On went the topping of Daiya cheese and…into the oven it went.
Before I talk more about the original mix, let me tell you a bit about Neat. Neat is a meat replacement that is derived from nuts and other non-GMO natural ingredients. It is a product that was created by a mother of two children who decided that they were going to become vegetarians. At first she would puree beans into sauces to help her girls get the protein they wanted, but after awhile, everyone got tired of it. And that was when she got into the kitchen, experimented, and created what is now marketed at Neat. Neat comes in this shelf-stable pouch in a powdered form. All you do to prepare it is pour the pouch into a bowl, add two eggs (or a vegan egg replacer), plus two tablespoons of water. Then, you just cook it in a skillet, as you would ground beef, for about 7-9 minutes. It’s really easy…and really delicious too.
Neat – A Healthy Alternative For Meat Original Mix (prepared) cooked with onion and tomato paste
So, a vegetarian and gluten-free Cheeseburger Pie…that was what this was used for. When I sliced through the pie crust and the filling, I was just anticipating the crumbling and falling apart. But Neat surprised me. Much like my mom’s recipe (which used real meat as I wasn’t a vegetarian at that point), this all stuck together and made for a perfect slice. The Neat seemed to be the meat replacement I was looking for. And it was the perfect choice for this recipe for sure. I dished up two slices of the Gluten-Free and Vegetarian Cheeseburger Pie and handed one to my roommate and settled in with mine. My roommate took the first bite and said that it tasted dead-up like a cheeseburger. That’s good. She’s not a vegetarian, nor is she dairy-free or gluten-free like me. But this impressed her. It impressed her a lot. The most disappointing aspect of the dish was the pie crust and that was a whole unrelated product, and it still worked out well in the end.
The Neat Original Mix is fantastic. I mean, it is so close to the real thing. As I said, I don’t often do meat replacements, but sometimes when revisiting old recipes I grew up with, it is necessary. I don’t think any other replacement for beef will come close to what Neat does for these dishes. This is the second time I have used a Neat product and both times I have been beyond impressed. The taste and texture are phenomenal. Even meat eaters won’t realize they aren’t really eating meat. That’s the wonder and the glory of this product. Anyone can have it (unless they have a nut allergy) and enjoy it. It was, for the second time, love at first bite. And it was wonderful to be able to adapt an old family favorite to fit my dietary needs.
A slice of Cheeseburger Pie (gluten-free, dairy free, and vegetarian) made with Neat – A Healthy Alternative For Meat Original Mix
Let’s now take a look at what goes into the Neat Original Mix. This product is made up of pecans, garbanzo beans, gluten free whole grain oats, organic whole grain gluten free cornmeal, garlic, onion, sea salt and spices. Simple. Delicious. Clean eating! It is gluten-free, non-GMO, and kosher.
As for nutrition, the Neat Original Mix is a powerhouse. A serving is 40 grams and there are 4 servings per pouch. One serving will provide 190 calories and 15 grams of fat. You will also be getting 232 mg sodium, 11 grams carbohydrates, 2 grams of sugar, 4 grams fiber, and 4 grams of protein. It is filling, so it makes a fantastic substitute for meat. But there is that added bonus of protein from the nuts that are blended into the mix.
It really did make a great addition and the perfect substitute for actual ground beef in the following recipe…
Gluten-Free, Dairy-Free, and Vegetarian Cheeseburger Pie
Gluten-Free, Dairy-Free, Vegetarian Cheeseburger Pie
Servings: 8
Prep: 10 minutes; Cook 30 minutes
Ingredients:
1 package Neat – A Healthy Replacement For Meat Original Mix
2 organic cage-free eggs
2 tablespoons water
1/4 cup chopped onion
1 (6 oz) can tomato paste
1 gluten-free pie crust (either made from scratch or bought at the store)
2 cups Daiya Mozzarella Cheese Shreds
Directions:
Preheat oven to 375°F.
Pour the Neat – A Healthy Replacement For Meat Original Mix into a medium bowl. Add two eggs (or egg replacer if vegan) and 2 tablespoons of water. Mix well.
In a non-stick skillet over medium heat, brown the Next Mexican Mix and onion. Cook until vegetables begin to soften and the Neat can be chopped into a meat texture. Add the tomato paste and stir well. Allow it to heat through for a few minutes to marry the flavors together.
Pour the mixture into the prepared pie crust and top with 2 cups of Daiya cheese shreds. Bake in the oven for 20-25 minutes, until cheese is melted and pie crust is browned (with any luck). Slice and serve.
~*~*~
I have fallen head-over-heels for Neat. It is, without a doubt, the healthiest replacement of meat out on the market. I am thrilled that it is more available in my area. In fact, with so many places carrying it, I’m guaranteed to be able to pick it up at one place or another when I need it for a dish.
Neat…you are by far my best find and my favorite substitute in old family recipes. Nothing else can do what you do! So much love.
It was Easter Sunday and I woke up early. I haven’t been sleeping well due to bouts of chronic pain in my back and hip. So, I got out of bed and came out to the living room to do my stretches assigned to me by my physical therapist. It was as I started doing these that I thought to myself:
“Self…what are we having for breakfast this beautiful Easter morning?”
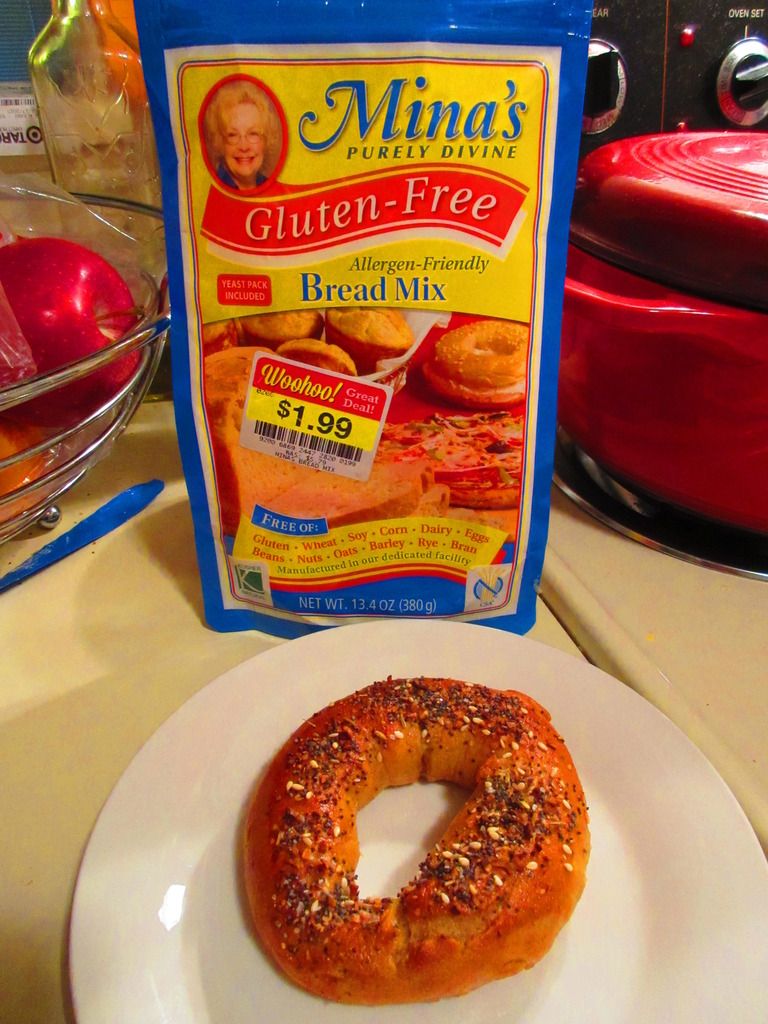
Since I am currently in a state of no running at all…I had plenty of time to come up with something. And for some strange reason, I recalled having two bags of Mina’s Purely Divine Gluten Free Bread Mix in my pantry. I bought these and a chocolate cake mix (which I have used already and didn’t review because I never tried the finish product…I made it for someone else…so now I have to purchase another bag) on Manager’s Special at my local grocery store…for $1.99. How fantastic is that?
I knew very little about the Mina’s Purely Divine products when I bought them, just that I had seen them featured in ads in my gluten-free magazines. That was the only familiarity I had with them. So, with the recollection and the realization that I had two pouches of the Gluten-Free Allergen-Friendly Bread Mix in my pantry…I thought…
Bagels.
Because when I already fail at baking up gluten-free bread more often than I succeed…why not bake bagels. Because that is SO much easier! *SARCASM*
That being said…I had it in my head now to make them. It was going to either end well…or be a complete and epic fail. It wouldn’t be my first. So, while the roomie was still slumbering in her room…I went into the kitchen and plucked one of the bags of Mina’s Purely Divine Gluten Free Bread Mix off the shelf and set out to work.
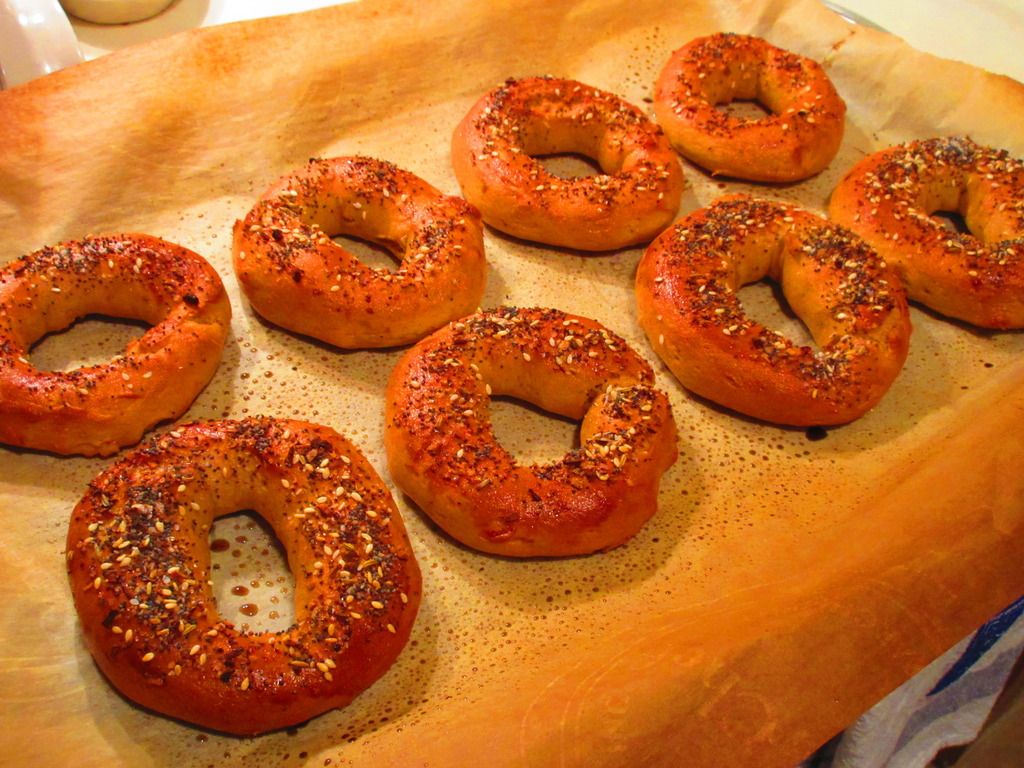
Long story short…for my first time making bagels (and gluten-free bagels at that!)…this worked wonderfully. They didn’t rise as much as I had hoped they would, but they did rise some in the 30 minutes I gave them to just sit. I think next time I’m going to try the oven on warm thing that a friend suggested and see if it makes any sort of distance. They held up to boiling in the water and even the actual baking. Totally impressed. But the real challenge was going to be in the taste.
By the time the bagels were in the oven and baking (given a little bit of egg wash over the top and a sprinkling of the “everything spice” that I picked up in Charleston, SC, the roomie had emerged and was ready for some brekkies. I told her that breakfast was currently in the oven…and I would have it ready once the timer went off. It was already starting to smell amazing, so when she asked what it was, I actually told her.
Bagels.
She looked really surprised. “You made bagels?!” You see…she has suffered through more than one epic gluten-free homemade bread loaf fail…so I wasn’t insulted at all. I nodded and as I pulled them out of the oven, called her over to take a look. They were perfectly golden on the outside. Fresh and hot out of the oven, I didn’t want to slice into them so just put some vegan cream cheese in a bowl and said we’d dip (kind of how I used to eat soft pretzels). So, onto some plates the bagels went while the rest cooled on the pan. I handed a plate and bowl of the cream cheese over to her and went to get my own. She started her cry of “hot, hot, hot!” as she broke it open and steam from the fresh bagels swirled up from the little breakfast goodie. She took a bite and said, “It tastes like a bagel!”
Now, she’s had Everything Bagels from some of the top-flight bakeries in New York City…and she seemed quite content to dive into my first attempt at ever making bagels. Trust me…she’s quite the critic and if she doesn’t like something…she’ll say so. But she thought the texture and the flavor were spot on. And after I got settled to try it for myself…I totally agreed. As a New Yorker, bagels were a way of life growing up. I still love them, but am often relegated to getting the frozen versions from Udi’s (as they are the only gluten-free bagels outside of Jennifer’s Way in NYC that have come close to tasting like the real thing!)…which is fine in a pinch. But these…these were mine. And they wouldn’t have been possible without Mina’s Purely Divine Gluten Free Bread Mix, for sure.
Truth…I can’t wait to make these again with the other batch. Maybe get a bit more rise out of them so that middle gets all fluffy and amazing. Cathy said these were very reminiscent of the ones we ate at Jennifer’s Way back in March, which I took as a high compliment as my first bite of one of Jennifer’s Way bagels made me cry. Good tears. This mix worked beautifully and made amazing bagels. Talk about taking a risk and having it pay off in the end.
Let’s discuss the ingredients in Mina’s Purely Divine Gluten Free Bread Mix. This mix is made up of organic rice flour, potato starch, organic cassava starch, organic sorghum flour, arrowroot starch, rice flour, teff flour, sea salt, yeast, xanthan gum, and guar gum.
As far as nutrition goes, the Mina’s Purely Divine Gluten Free Bread Mix contains about 13 servings, with each serving being about 1/4 cup. A serving will provide 100 calories, 0 grams of fat, 0 mg cholesterol, 50 mg sodium, 23 grams carbohydrates, 4 grams of sugar, 1 gram fiber, and 1 gram protein. That’s really good for a bread mix. I am very impressed.
If you have access to Mina’s Purely Divine Gluten Free Bread Mix…and feel like taking on a challenge, go ahead…whip up your own homemade gluten-free bagels!! You’ll be very impressed with the results.
Recipe: Gluten Free Everything Bagels
Gluten Free Everything Bagels made with Mina’s Purely Divine Gluten Free Bread Mix
Servings: 6-12 (I made 8 good-sized bagels!)
Time: Prep 1 hour; Bake 18-20 minutes
Add to mixer bowl, 1 cup warm water, 1 tsp of sugar and the yeast. Whisk and let rest for 10 minutes.
Add to yeast mixture: 1 cup of bread mix, the rest of the sugar, the oil, the molasses, and mix well.
Add last 1-2/3 cups of bread mix. Mix on medium high for 5 minutes.
Scrape out on a lightly oiled surface. Form dough into a log. Cut into 6 large or 12 small pieces. (I went for the middle and did 8 perfect size pieces). Roll each piece with lightly oiled hands into a 6″ rope. Shape in a circle, crimping edges.
Arrange bagels on parchment paper. Cover with oiled plastic wrap. Let rise in warm draft free area for 30 minutes. Dough will be tender at this point after the initial rise.
Preheat oven to 450 degrees F.
Bring 3 quarts of water to a slow boil. Gently using oiled hands, or spatula, drop each bagel, one at a time, into the water. Boil in small batches, do not crowd. Simmer for 30 seconds on each side, flip over once. Drain on rack for 5 minutes.
Brush with whisked egg white (optional) and sprinkle the toppings on at this point, if using.
Bake on a lightly greased cookie sheet for 20 to 25 minutes for large bagels and 15 minutes for small bagels. (It took mine 18 minutes…so if you do 8…go with that!)
Cool on rack.
DEVOUR!
~*~*~
I was so impressed with the way Mina’s Purely Divine Gluten Free Bread Mix baked up perfect, delicious bagels. And with this being my first time ever attempting such a culinary feat…well…it just made me want to improve on it.
That being said…WOW!! Total and complete WOW!! Find Mina’s Purely Divine Gluten Free Bread Mix and, seriously, give this recipe a try. I am dying to do it all over again! Maybe even improve on it some. We shall see!
Mina’s Purely Divine is purely amazing, purely awesome, and…yes…purely divine! Just WOW!
I am a stranger in a not so strange land. Seriously. Because for the past three three years that I’ve had to be gluten-free…I’ve followed, discussed, and even met the infamous Jules Shepard, AKA: Jules Gluten Free, AKA: gfJules. And, despite all of that…it has taken me up until now to actually try one of her products! Hard to believe, right? Truth of the matter is…no store in my area currently carries any of the Jules line. I hope that changes.
So…it was due to my November 2014 Cuisine Cube (aka: the Thanksgiving Cube) that my Jules drought finally came to an end. Thank you, Cuisine Cube. Because, honestly, I was beginning to wonder if I was ever going to be able to give this an easy try, without it involving some online ordering and shipping and…yeah. So, yes, Jules brand is not new to me…but it is. Confused yet? Don’t be.
Jules Shepard is one of the biggest advocates and leaders that I know in the gluten-free community. She was diagnosed with Celiac back in 1999 and embarked upon her new diet. As a former attorney who was unwilling to accept the dry, gritty, vacuous foods that the gluten-free community was limited to. Two years later, Shepard perfected an all-purpose flour blend that allowed her to continue her passion for baking. Soon, people were begging for her to sell it commercially…which she did. She introduced this flour blend back in 2008, with her former company, Jules Gluten Free, and now exclusively through her new company – gfJules. Not only is she an entrepreneur, but Shepard has written three highly regarded books and attends various speaking engagements at gluten-free consumer, business, and trade gatherings. She is the mother of two children, hosts a weekly radio show, pens one of the gluten-free community’s most active blog, organizes an annual Gluten Free Cookie Swap, and personally monitors all forms of her social media network. She’s doing it all…but not letting her high standards slip in the slightest.
So…here I was, three years after having discovered Jules via Facebook and Twitter, having met her in person last year at a Gluten Free Expo in Indianapolis, Indiana, and having spent forever longing to try her flour and mixes…it finally happened. Thanksgiving. A time for giving thanks and eating comforting and hearty foods. Like…cornbread. And that is what Cuisine Cube sent me!
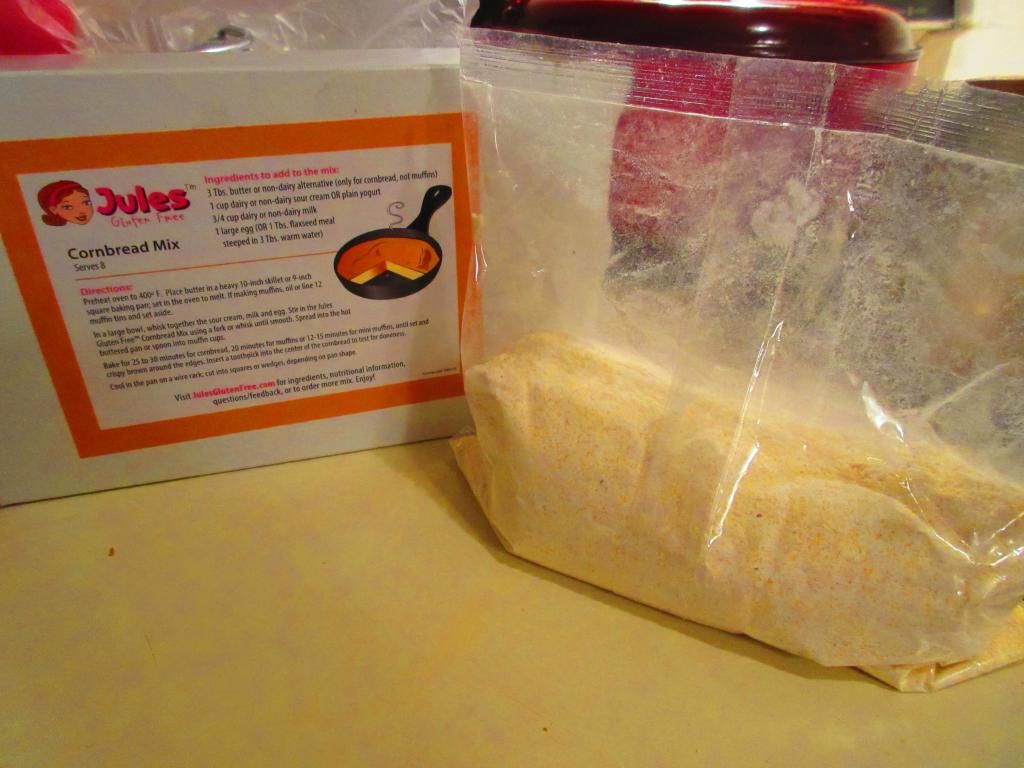
gfJules Cornbread Mix (mixed)
The gfJules Gluten Free Cornbread Mix is a gluten free cornbread mix that “will put a smile on anyone’s face.” Or, so I was told by the Web site. As cornbread is one of Jules’ favorite sides, she took extra care when she crated this mix, making it so authentic, some restaurants even serve it and don’t promote it as being gluten-free. It’s really easy to prepare and make too. Simply whisk together sour cream, milk and an egg. Stir in the mix using a fork or whisk until smooth. Spread into a hot buttered pan (or into muffin cups) and bake for 25-30 minutes. The cornbread is done when the edges are crispy and brown and a toothpick inserted in the center comes out clean. That is…if you bake it according to the instructions on the box.
By now, you should know…that’s not what I do.
Before I get to the recipe I used this amazing product in, let’s discuss it, shall we?
I loved how a light and airy this batter was once I had it all mixed together. It just whisked up beautifully and perfectly. I had a good feeling that this wasn’t going to bake up heavy and dense like most gluten-free cornbread…and I was right. The cornbread turned a perfect golden in the oven, the edges browning perfectly. And it had this amazing crust that gave it some great texture. And the inside was light and soft and moist and…so good. It ranks up in my top gluten-free cornbreads I have made and tried. I am blown away by just how delicious and perfect this bread was. Now I want to try more of her mixes…and will have to skip over to her Web site and make it happen. This was one of the best parts of this entire dish.
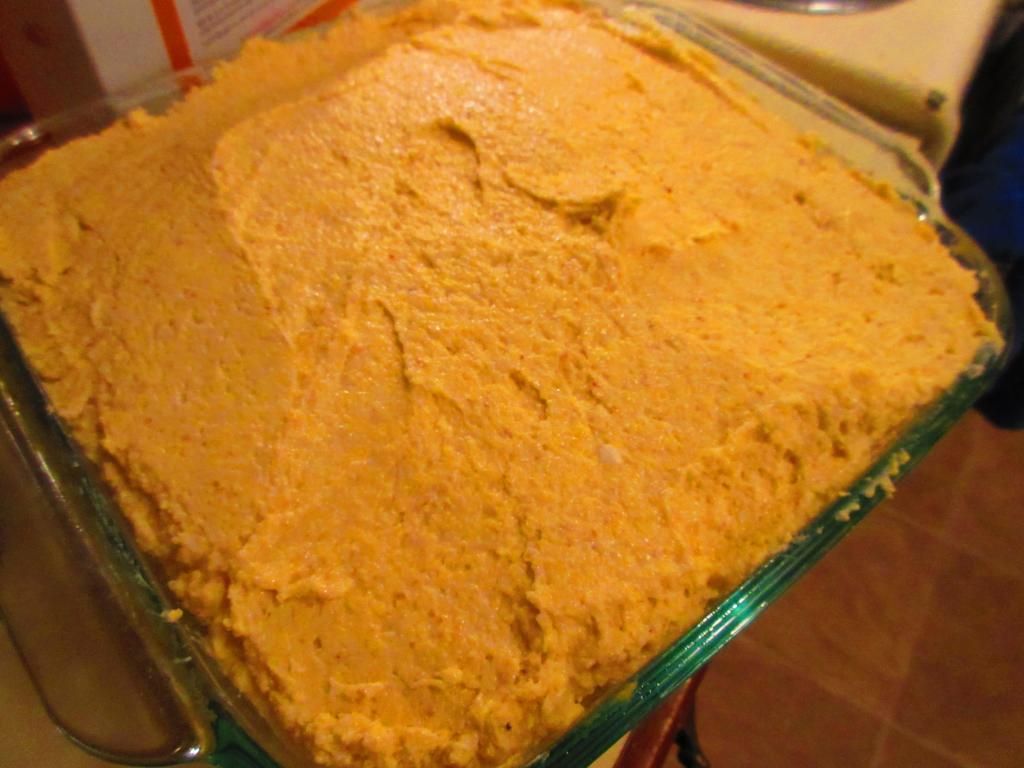
gfJules Cornbread Mix (prepared, not baked)
The gfJules Cornbread Mix is made from the following ingredients: yellow cornmeal, modified tapioca starch, cane sugar, potato starch, cornstarch white rice flour, corn flour, baking powder, flaxseed meal, xanthan gum, baking soda, salt, tocopherols (vitamin E). It is made in a certified facility free of gluten, wheat, dairy – all of the Top 8 food allergens. All her ingredients in the cornbread mix are also non-GMO. Love it.
The gfJules Cornbread Mix makes 8 servings per box. In each serving, you will be provided with 160 calories and 1 gram of fat. This serving will give you 490 mg sodium and 5 grams of sugar, which is really good for cornbread, if you ask me! And, finally, you will be taking in 2 grams of fiber and 2 grams of protein.
And now…how about the recipe that featured the always amazing gfJules Cornbread Mix? I won’t keep you waiting any longer, I promise…
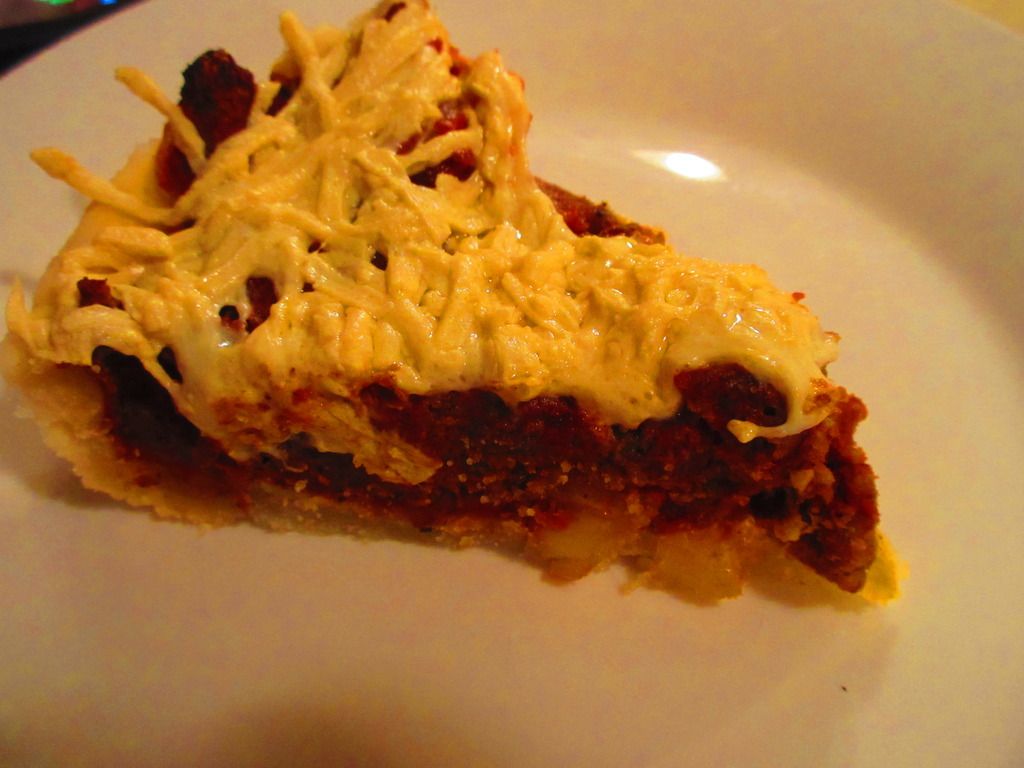
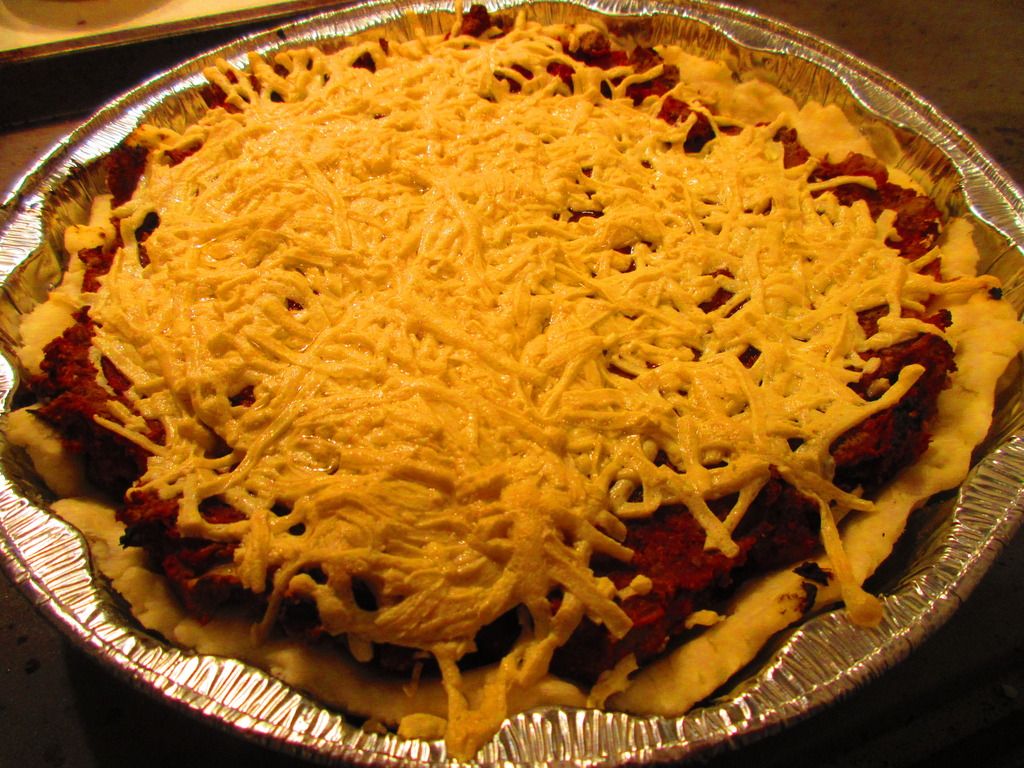
Recipe: Gluten Free and Vegan Cheddar Chili Cornbread Pasta Bake
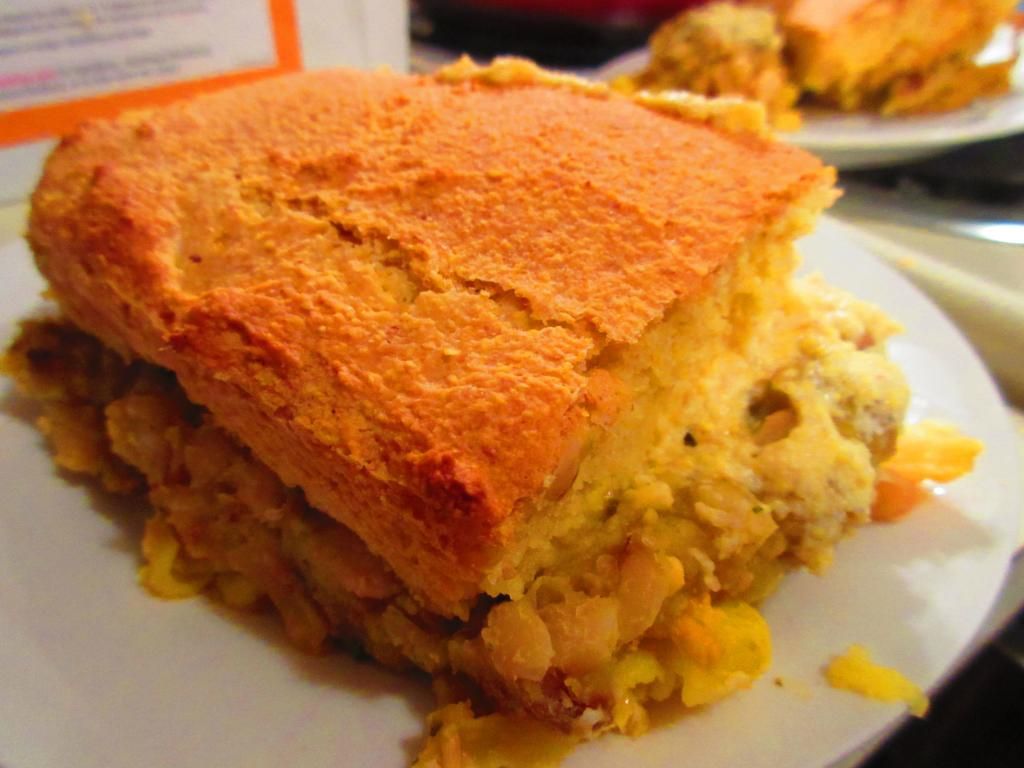
gf Jules Cornbread (prepared) on top of the Gluten Free and Dairy Free Cheddar Chili Cornbread Pasta Bake
Servings: 6
Time: Prep 4 hours; Cook 30 minutes
Ingredients:
1-1/2 cups uncooked gluten-free elbow noodles (I used Meijer Gluten Free Corn Pasta Elbow Noodles)
3/4 cup Daiya Cheddar Style Shreds (if you do dairy…freshly shredded cheddar works!)
2 1/2 – 3 cups of leftover chili (I used Mary Ann’s Beans Gluten Free White Chili)
1 batch of your favorite cornbread (I used gfJules Cornbread)
Directions:
Preheat oven to 425° F.
Bring the water to a boil and prepare the pasta according to the directions on the package, taking about 1-2 minutes off of the cooking time, as the noodles are going into the oven.
While the noodles are cooking, mix up a batch of your favorite cornbread (just the batter…do not cook it!) and get the cheese prepared.
Drain the pasta when it’s ready.
In an 8 x 8 inch baking dish, spray non-stick cooking spray. Add the pasta to the botom of the dish. Then top it with a layer of cheese. Then add the chili. Top with the cornbread batter, spreading it evenly over the top with a spoon. It’s okay if it doesn’t reach the edges.
Bake for 30-35 minutes, or until the cornbread is golden on top and cooked all the way through. You can use a spoon to lift up the cornbread layer to make sure that it is completely cooked. Cooking times may vary with the cornbread mixture you use, but keep an eye on it and check it. The cooking time might increase due to the “wet” layers that are underneath the layer.
Serve immediately.
~*~*~
I don’t think a better upper crust could have existed. No doubt about it. gfJules lives up to the high pedestal that I have regarded it on since I first discovered Jules Gluten Free three years ago. So happy that, because of Cuisine Cube, I finally got to try one of her amazing products. It was everything I thought it would be. Maybe even more. Count me one happy cornbread loving girl!
And, if you have yet to give gfJules a try, or Cuisine Cube for that matter…head over to the Cuisine Cube page and sign up for at least a month. If you aren’t impressed (but, trust me, you will be), you can opt out after that. With plans starting as low as $29.99/month for each cube, you get the convenience and amazing pleasure of having box of gluten-free goodies arrive each month, featuring lesser-known and smaller gluten-free artisan products. I have been amazed, wowed, and completely blown away at times by the items I have had the opportunity to find out about and try thanks to Cuisine Cube. We aren’t talking sample sizes either…you get a full size product, as you would purchase it in the store. So…what are you waiting for? Go sign up!
And, gfJules…I loved meeting you this past year…and I have really enjoyed finally getting to try one of your outstanding and top-of-the-line gluten-free products. I hope more people hop over to your site and order. Now that I have tried it…there’s no stopping me now!
Product: Mary Ann’s Beans Gluten Free White Chili Mix – $8.00
It’s the New Year. Time to make resolutions and then, over the course of a month…break them. Right? Yes. Right. It’s the way it works every year. You vow to stop eating chocolate…to go to the gym…to eat more vegetables and less potato chips. You promise to get into a habit…make it a routine. But then…by MLK Day…you’re already off the wagon.
And you know what? That’s okay. We’re in the midst of winter here. Cold temperatures and lack of sunlight have a funny way of killing off any bit of motivation out there. We’re human. It happens. But, it’s also okay to enjoy the little things in life and to be less strict with yourself. Resolutions can be broken…but they can be picked right back up on where we left off. That’s the best part.
Being that it is January…and the New Year has come and gone…and the weather outside is frightful(ly cold)…I’m a lover of all things comforting when it comes to food. Tis the season for those hearty meals that make you just want to curl up with a good book in front of the fireplace and dig in while losing yourself. Ah…it’s a wonderful thing. And, when it comes to winter comfort foods…nothing is better than soups, stews, chili, and pasta, right? Of course!! Those are classic comfort foods if you ask me.
Well, in the January Happy New Year 2015 Cuisine Cube, we were served up a few products that were good for you…but also a guilty pleasure and comfort. That’s the wonderful thing about Cuisine Cube…you just never know what to expect from one box to the next. One cube guarantees a product that is good for a breakfast, lunch, snack, dinner and dessert. And sometimes, like in the case of January, you get a bonus item. In this case…another snack. YAY!
I know, if you’re reading this blog regularly, you are familiar with the service that Cuisine Cube offers…but just in case you are a newbie…first of all…welcome. Secondly…hop on over to Cuisine Cube’s Web site and take a look at this fantastic service. This small group of foodies put together a completely gluten-free box of goodness each month with 5-6 products from small, lesser-known artisan producers…some local…some not-quite-so-local. I’ve discovered so many amazing products after I signed up for this service back in May. And…you get a cube delivered right to your door each month…starting at $29.99. So, yeah…I encourage you to check them out. Have a little surprise each month and enjoy a few products you might never have tried or known about before. It doesn’t get much better than that.
With that said, the January Cube was packed with a lot of healthy foods. Seriously. The dessert was dark chocolate covered rice cakes. Yes, there will be blog on those soon…stay tuned. Even the most comforting of foods inside…is healthy-ish! And I’m okay with this. But…I’m also dealing with a bit of the winter blues…so when I saw the unassuming cloth pouch of Mary Ann’s Beans Gluten Free White Chili Mix…my brain immediately turned to comfort food. And with that, I set out to do more than just make the chili and eat it. You know, reinventing a product is something I love to do.
First, let me talk a little bit about Mary Ann’s Beans. Chili can be comfort food, but Mary Ann’s Beans is making it a part of a healthy lifestyle. All of the soup and dip mixes are nutritious and low in sodium. They have options for vegetarians, gluten-free, and offer all seasoning mixes that are made with no salt, no sugar, and no MSG. In other words…it’s good for you. And these soups tastes great too.
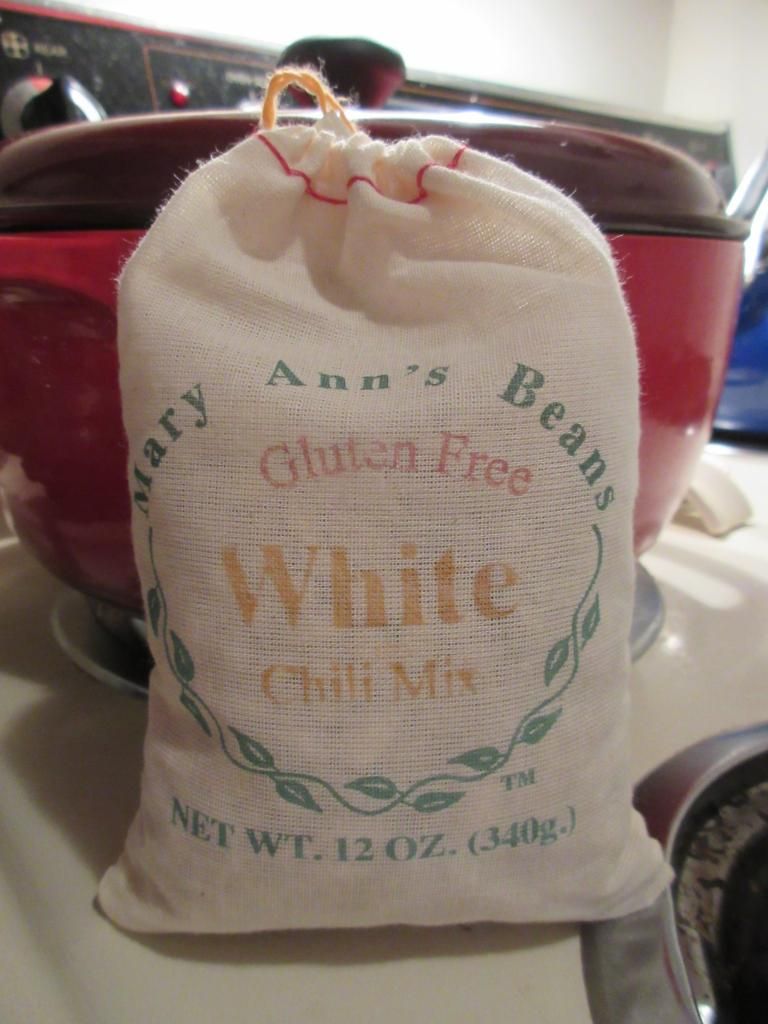
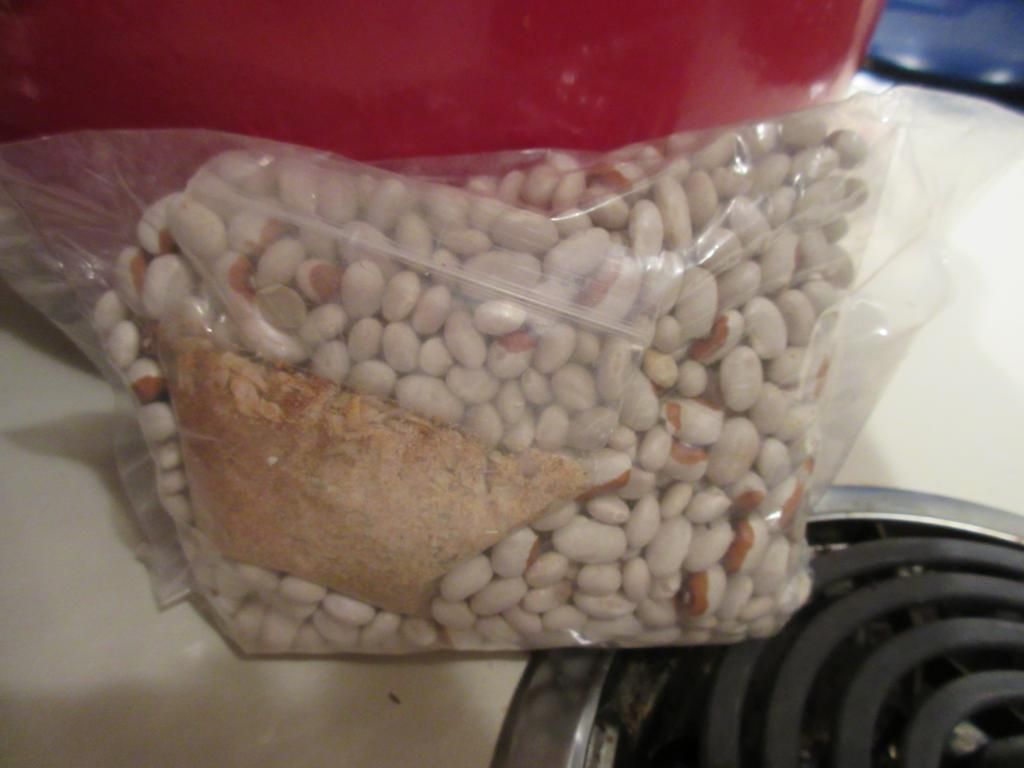
Mary Ann’s Beans Gluten Free White Chili Mix (dried beans and seasoning packet)
Make Mary Ann’s Beans part of your heart healthy lifestyle with our delicious and nutritious low sodium soup mixes. With flavors to please every palate, and options including vegetarian and gluten-free, your whole family will love our soups. Our all natural soup, dip and seasonings mixes are hand made with no salt, no sugar, and NO MSG. Mary Ann’s Beans most famous mix is the Gluten Free White Chili Mix that was in the January Cuisine Cube. And, honestly, I can see why!! These mixes do take some time to make, but, trust me…it’s well worth it.
Mary’s Ann’s Beans Gluten Free White Chili Mix (beans soaked)
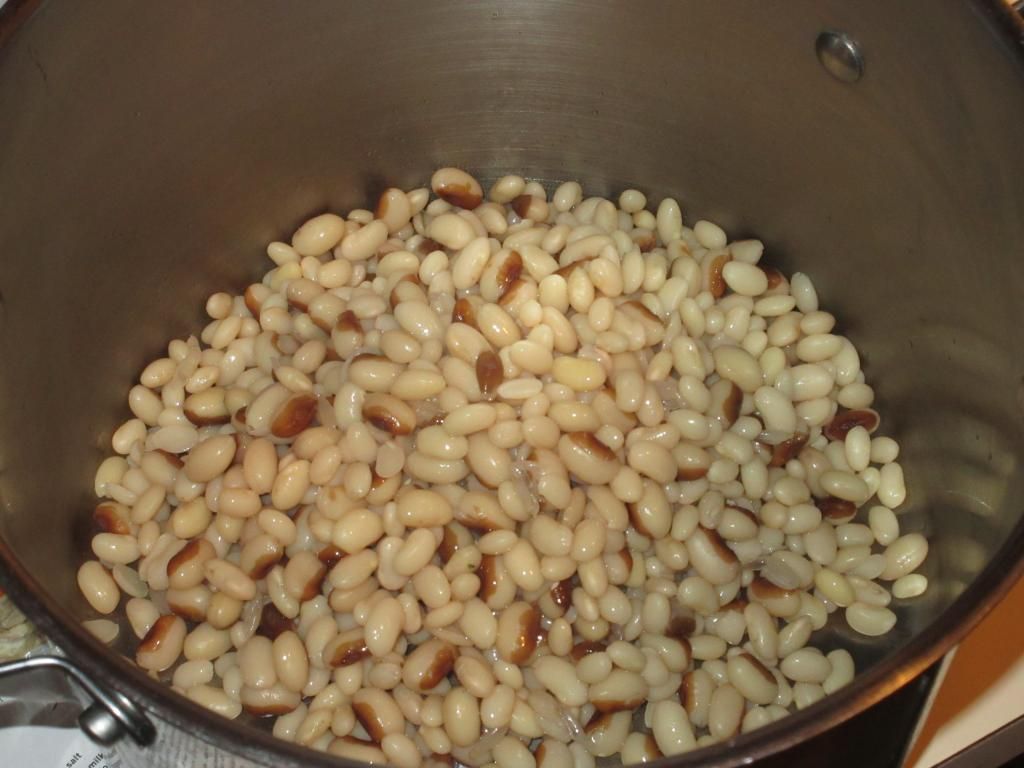
Last night, I soaked the packet of dried white beans in water. I drained them and rinsed them. And then…set out to cook them. The instructions included on this chili mix package give two ways to cook it…in a slow cooker for 6-8 hours or…on the stove top for 3-4 hours. I went with the stove top method. And making this chili is super easy. The actual instructions do call for chicken, as it is a white chili. But, as a vegetarian, I just left it out and kept it strictly the beans and the can of chopped green chilies. I used Vegetarian No-Chicken Broth as well, instead of chicken broth. Cooking it is time consuming, but it yields amazing results. With the stove top method, you simply combine the white chili beans, 6 cups of broth (vegetable, non-chicken, chicken…), a 4 ounce can of chopped green chilies, 1-1/2 – 2 cups of boneless cooked chicken (if you are using…if you are a vegetarian like me…it’s fine to leave it out!), and the contents of the spice packet that is included, into a large pot and bring it to a boil. Reduce the heat, cover, and allow it to simmer for 3-4 hours, or until tender. I let mine go for about 3-1/2 hours and it was perfect. Add a bit of salt at the end voila…your chili is ready to eat.
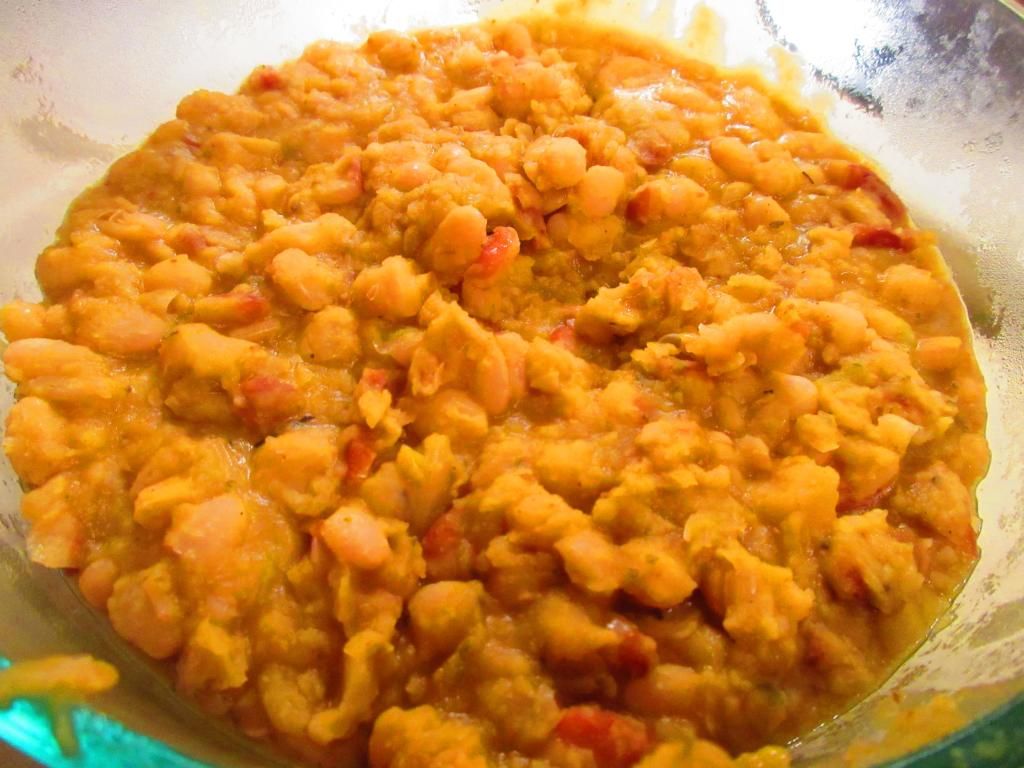
What emerges is this hearty and thick chili that has this light, and slightly spicy taste to it. White chili is amazing, even without the chicken, and it makes for a beautiful and eye-catching addition to any potluck or chili cook-off. But I was not just going to cook up this fantastic product and just eat it straight. You know better than that. I did, however, take a few spoonfuls to see how it was. And, let me tell you, Mary Ann’s Beans is doing comforting winter food right. The flavor is familiar…the texture is hearty and rich…and the spice is a mild heat. If you like hotter (I do), you can put in jalapenos instead of chilies, but my roommate isn’t a lover of spice, so I kept it mild. At the end of cooking, I added some salt and a hit of berbere seasoning…and it made pure chili perfection. If you love chili…you will love this.
Mary Ann’s Beans Gluten Free White Chili Mix (prepared)
Let’s talk ingredients, shall we? Mary Ann’s Beans White Chili Mix is made from great northern beans, navy and yellow eyed beans, dried onions, garlic and spices. As stated before, these are gluten-free, contain no salt, no sugar, and no MSG. This mix is also cholesterol free.
One pouch of Mary Ann’s Beans Gluten Free White Chili Mix contains about 6 servings. One serving will give you 190 calories and 1 gram of fat. A full serving will also dish up only 10 mg sodium and 1 gram of sugar. As for being filling…it’s chili…it will be filling. You get 13 grams of fiber and 12 grams of protein in each serving. I do love hearty, nutritious, comfort food. And this is all of that rolled into one.
But wait…there’s more!! I created an amazing (vegan and gluten-free) ultimate comfort food dish using the prepared Mary Ann’s Gluten Free White Chili Mix. Trust me, your winter blues will disappear while you dive into this dish.
Recipe: Gluten Free and Vegan Cheddar Chili Cornbread Pasta Bake
Gluten Free and Vegan Cheddar Chili Cornbread Pasta Bake
Servings: 6
Time: Prep 4 hours; Cook 30 minutes
Ingredients:
1-1/2 cups uncooked gluten-free elbow noodles (I used Meijer Gluten Free Corn Pasta Elbow Noodles)
3/4 cup Daiya Cheddar Style Shreds (if you do dairy…freshly shredded cheddar works!)
2 1/2 – 3 cups of leftover chili (I used Mary Ann’s Beans Gluten Free White Chili)
1 batch of your favorite cornbread (I used gfJules Cornbread Mix)
Directions:
Preheat oven to 425° F.
Bring the water to a boil and prepare the pasta according to the directions on the package, taking about 1-2 minutes off of the cooking time, as the noodles are going into the oven.
While the noodles are cooking, mix up a batch of your favorite cornbread (just the batter…do not cook it!) and get the cheese prepared.
Drain the pasta when it’s ready.
In an 8 x 8 inch baking dish, spray non-stick cooking spray. Add the pasta to the bottom of the dish. Then top it with a layer of cheese. Then add the chili. Top with the cornbread batter, spreading it evenly over the top with a spoon. It’s okay if it doesn’t reach the edges.
Bake for 30-35 minutes, or until the cornbread is golden on top and cooked all the way through. You can use a spoon to lift up the cornbread layer to make sure that it is completely cooked. Cooking times may vary with the cornbread mixture you use, but keep an eye on it and check it. The cooking time might increase due to the “wet” layers that are underneath the layer.
Serve immediately.
~*~*~
Oh. My. Gluten. Free. Comfort. Food. Gods. No…really. If you love a hearty winter meal, this is the way to go. I loved the rich flavors that the Mary Ann’s Beans White Chili brought to the dish. It was the centerpiece…the middle layer…the glue. And it was an absolutely amazing addition to this entire dish. When winter has you hiding under the blankets longing for something warm and wonderful to eat…this will definitely fulfill that desire. Either that…or a big, steaming bowl of just the chili on its own. However you serve it up…flavorful, creamy, and just…so good!
It was thanks to the amazing products that Mary Ann’s Beans put out and Cuisine Cube sent me that I was able to piece together this hearty, and amazing dinner. For the record, the gfJules Cornbread Mix (review to follow) is also a product I received from Cuisine Cube in November. So, as you can see…it is definitely a service worth trying out. Seriously, your inner foodie will thank you for it.