It’s winter time…and you know what that means? It means my CSA bin is throwing Brussels sprouts at me again. As you will recall, the first time Brussels sprouts turned up in my bin…I was at a loss. Not only had I never eaten them…but I had no idea how to cook them. I finally cooked them up in a Creamy Brussels Sprouts Bake which my roommate and I did enjoy.
But we weren’t blown away by it.
This time, when I pulled out the Brussels sprouts, I was determined to find a different way to cook them. So, in the end I went with the most basic, rustic, perfect way…simply roasting them in the oven. And it only takes 4 ingredients to make this happen.
Cut off the brown ends of the Brussels sprouts and pull off any yellow outer leaves.
Mix them in a bowl with the olive oil, salt and pepper.
Pour them on a sheet pan and roast for 35 to 40 minutes, until crisp on the outside and tender on the inside. Shake the pan from time to time to brown the sprouts evenly. Serve immediately.
~*~*~
It doesn’t get much easier than that. Honestly. And they smelled so good while they were cooking. When I dished them up to eat with dinner, my roommate took the first bite and said that they reminded her of when I made kale chips.
NICE!
You know what? She was right. This is definitely my favorite way to eat Brussels sprouts. Nothing fancy. Just letting the vegetable shine. Who would have thought something this basic, this simplistic could win my taste buds over.
Now I know exactly what to do next time Brussels sprouts turn up in my bin.
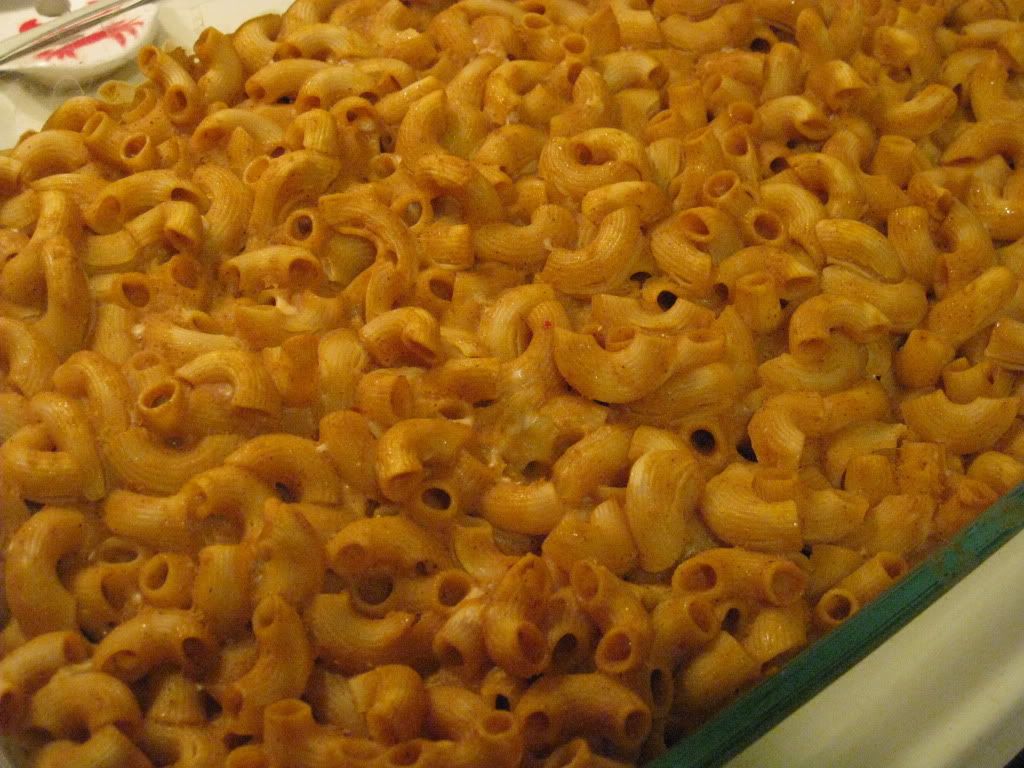
Awhile back, I did a gluten-free version of a recipe that came from The Brokeass Gourmet that intrigued me. It was a Brown Butter Pumpkin Mac and Cheese. And it was delicious.
It is definitely the time of year for pumpkin flavored things, so when the office potluck luncheon rolled around this week, I decided I would make the Brown Butter Pumpkin Mac & Cheese. And then, after pondering for a bit, I decided to do things a little differently. For one thing, it was going to be vegan, as we do have a vegan in the office and I wanted him to be able to eat it too. Secondly…I was going to do a different recipe that put a little more emphasis on the pumpkin portion of the entree.
So, after some searching I found a recipe that originally came from The Inventive Vegetarian and modified it to fit the ingredients I have (vegan & gluten-free). The end result…was better than I dreamed.
Recipe: Gluten-Free and Vegan Pumpkin Mac and “Cheese”
1 box elbow macaroni (I used BiAglut Gluten-Free Maccheroncini)
2 cups almond milk (I used unsweetened)
2 tablespoons olive oil
2 tablespoons all-purpose flour (I used Arrowhead Mills Gluten-Free All-Purpose Flour)
2 cups Daiya Cheddar Style Shreds (I prefer the Daiya wedges, so I just shredded an entire Daiya Cheddar Wedge)
1 can pumpkin puree
1 teaspoon soy sauce*
1/2 teaspoon cinnamon
1/4 teaspoon cloves
1/4 teaspoon allspice
1/8 – 1/4 teaspoon cayenne pepper (or more if you like heat)
Salt and pepper to taste
Directions:
Preheat oven to 375 degrees F.
Heat the almond milk in a small saucepan, but don’t boil it.
In a medium pot, heat the oil over medium heat and sprinkle in the flour. Whisk for about 2 minutes to create a smooth roux. The mixture should darken slightly during this time.
Still whisking, add the hot almond milk slowly and cook for a minute or two more, until the mixture has thickened. A good way to check is to dip a spoon into the mixture, then run your finger over the back of the spoon. If the mixture does not run into the streak made by your finger, it’s thick and good to go.
Add in the pumpkin puree and stir until smooth. Keep it on the heat for just a minute or two, until the puree is warmed through.
Take the almond milk mixture off the heat and stir in the vegan cheese, soy sauce, and spices. Partially cover and let the mixture sit as the cheese melts.
While waiting for the cheese to melt, bring a pot of water to a boil and cook your macaroni. Cook it just shy of al dente (subtract a minute or two from the al dente cooking time on the box). Drain the noodles when they’re done.
Once the cheese has fully melted (it will take a little longer with this stuff than with real cheese), taste and adjust any of the spices, as well as salt and pepper, to your liking. The whole mixture should now have a nice, velvety texture to it. Add the cooked macaroni (and the onions if you’re adding them) and stir well. Pour the whole mixture into a 9×13 baking dish, or a deeper casserole dish.
Bake for 40 to 50 minutes, or until the sauce is bubbly.
Enjoy!
~*~*~
The difference between this pumpkin mac and cheese and the previous one is the pumpkin flavor is definitely more pronounced in this one. I think that has to do with the seasonings used more than anything. It was creamy and delicious and those who ventured to try it at the office luncheon all said it was really good.
*Now, I do want to note that if you are using real cheese and not making this a vegan recipe…do not add the soy sauce. The soy sauce is basically used as a seasoning for the extra umami that soy cheese needs. Real cheese…you’re good to go without it.
Very impressed with this recipe. If you love pumpkin and mac & cheese…give this one a try.
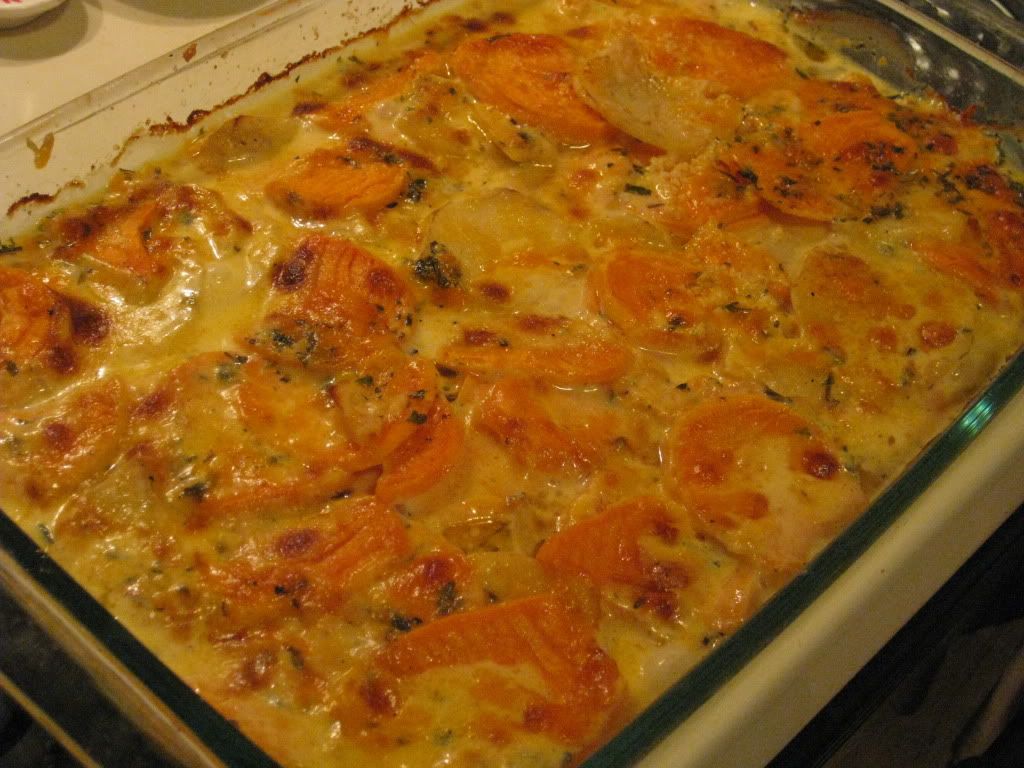
As I mentioned, my CSA bin was exploding this past week with treats to help make any Thanksgiving feast complete. Honestly…everything in there would go in a Thanksgiving meal. And if I was making a Thanksgiving meal…that would be ideal. As it was, being the token vegetarian among my roommate’s family, I am always asked to supply a vegetable dish. And as I had green beans in my bin…I went with that. Although, I honestly could have provided a healthy and fresh side item (forget canned yams and cranberry sauce…I could have made it from scratch with fresh and local ingredients), I stuck with what I was told to bring and let them open up canned yams and cranberry sauce. That’s their tradition.
But I’m a firm believer in fresh is best and therefore now had a plethora of Thanksgiving fruits and vegetables to play around with. As a result…I found a recipe that utilized Yukon Gold potatoes and sweet potatoes, and decided that I could alter it to accommodate my ready supply of fresh Russet potatoes and fresh yams that came in my bin. It even used some of the fresh, local herbs that I received as well.
WINNING!
So, last night…I cooked up this amazing gratin…and it emerged smelling fantastic and bubbling with goodness. At first bite…I knew I made a good choice. The original recipe was printed in a 2008 edition of Bon Appétit magazine. I adapted it to fit my ingredients. All of which…I had on hand and begging to be used.
Break out that mandolin slicer and bake up potatoes in a fresh, tasty new way.
Recipe: Scalloped Russet Potato and Yam Gratin with Fresh Herbs
Scalloped Russet Potato and Yam Gratin with Fresh Herbs
1-1/2 pounds medium red-skinned sweet potatoes (yams)
2 cups heavy whipping cream (I used 1 cup heavy whipping cream and 1 cup unsweetened almond milk)
1/4 cup (1/2 stick) butter (I used Smart Balance)
2 garlic cloves, minced
1 tablespoon minced fresh Italian parsley
1 tablespoon minced fresh rosemary
1 tablespoon minced fresh sage
1 tablespoon minced fresh thyme
1-1/2 teaspoons fine sea salt
3/4 teaspoon freshly ground black pepper (I used 1/4 teaspoon black pepper and 1/2 teaspoon ground red pepper)
1-1/4 cups (packed) coarsely grated Gruyére cheese (about 5 ounces) (I used Extra Sharp Cheddar Cheese)
Directions:
Fill large bowl with cold water.
Working with one Russet potato at a time, peel, then cut into 1/8-inch-thick rounds and place in bowl with water. Repeat with sweet potatoes.
Combine cream, butter, and garlic in medium saucepan; bring to simmer. Remove from heat.
Mix all herbs in small bowl.
Mix sea salt and black pepper in another small bowl.
Butter a 13x9x2-inch glass baking dish.
Drain potatoes, then pat dry with kitchen towels. Transfer half of potatoes to prepared baking dish. Use hands to distribute and spread evenly.
Sprinkle with half of salt-pepper mixture, then half of herb mixture. Sprinkle with half of cheese.
Repeat with remaining potatoes, salt-pepper mixture, herb mixture, and cheese.
Pour cream mixture over gratin, pressing lightly to submerge potato mixture as much as possible.
Preheat oven to 400°F. Cover gratin tightly with foil. Bake 30 minutes. Uncover; bake until top of gratin is golden and most of liquid is absorbed, about 25 minutes longer. Let stand 10 minutes.
Serve.
~*~*~
Cheesy, potato goodness…that’s what this was. I mean…full of amazing flavor. The yams were the actual star, though. The flavor they brought to this gratin was out-of-this-world delicious. I loved the use of the fresh herbs as they complimented every ingredient that went into this dish. This would make a fantastic entree or even a delicious side dish at Thanksgiving (or just for a get-together of family dinner). The hardest part was getting that potato sliced on the mandolin. But, once that part was done, the rest was super-simple and easy.
Love potatoes and cheese? Trust me…you’ll love this!
Leave it to my CSA bin to throw me the Thanksgiving curve ball. Seriously. Everything in my bin this past week (which delivered the day before Thanksgiving) fit, somehow, into a Thanksgiving meal. I had carrots, potatoes, yams, celery, apples, onions, green beans, fresh herbs, local lettuce…you get the picture. The one item, however, that I was most unfamiliar with…was the fresh cranberries I received.
Cranberries?!
My initial thought was to go ahead and make my own cranberry sauce to take to Thanksgiving with my roommate’s family. I could do something with the potatoes and yams as well. However…potatoes had been planned a long time ago, yams are always canned (*gag*) and the cranberry sauce is always out of a can as well (YUCK!). Needless to say…I had a lot of Thanksgiving items and very little Thanksgiving to contribute. I was in charge of the vegetable, and made up a fantastic green bean recipe that I posted last week. So…lots to play around with at home.
Now…cranberries…cranberries…hmmm…
I called in the big guns…and did a Google search for some recipes that would involve cranberries…be vegetarian…and not be too complicated. I had it down to two options…but my roommate made the choice in the end.
The winning recipe comes from Ina Garten, The Barefoot Contessa herself, and I only tweaked it slightly to make it gluten-free. Aside from that…the recipe stands.
12 ounces fresh cranberries, rinsed and picked over for stems
1 Granny Smith apple, peeled, cored, and diced
1/2 cup light brown sugar, lightly packed
1 tablespoon grated orange zest (2 oranges)
1/4 cup freshly squeezed orange juice
1-1/8 teaspoons ground cinnamon, divided
2 extra-large eggs, at room temperature
1 cup plus 1 tablespoon granulated sugar
1/4 pound (1 stick) unsalted butter, melted and slightly cooled (I used Smart Balance)
1 teaspoon pure vanilla extract
1/4 cup sour cream (I used Tofutti Better Than Sour Cream)
1 cup all-purpose flour (I used Arrowhead Mills Gluten-Free All-Purpose Flour)
1/4 teaspoon kosher salt
Directions:
Preheat the oven to 325 degrees F.
Combine the cranberries, apple, brown sugar, orange zest, orange juice, and 1 teaspoon of the cinnamon in a medium bowl. Set aside.
In the bowl of an electric mixer fitted with the paddle attachment, beat the eggs on medium-high speed for 2 minutes. With the mixer on medium, add 1 cup of the granulated sugar, the butter, vanilla, and sour cream and beat just until combined. On low speed, slowly add the flour and salt.
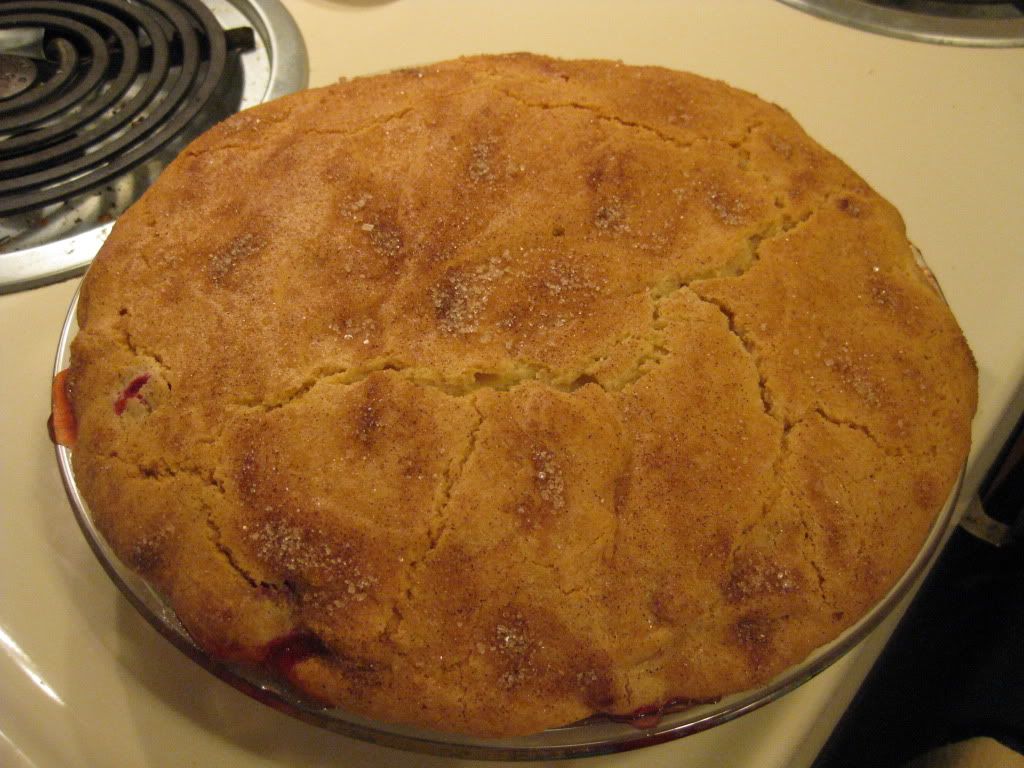
Pour the fruit mixture evenly into a 10-inch glass pie plate.
Pour the batter over the fruit, covering it completely.
Combine the remaining 1 tablespoon of granulated sugar and 1/8 teaspoon of cinnamon and sprinkle it over the batter.
Bake for 55 to 60 minutes, until a toothpick inserted in the middle of the cake comes out clean and the fruit is bubbling around the edges.
Serve warm or at room temperature.
A slice of the Gluten-Free Cranberry and Apple Cake
~*~*~
So…how was the end result? I couldn’t be happier with it. Cranberries and apples are a perfect pairing, and when you hit it with the acidity of the orange, you really get a great balance of flavors. But the absolute star of this dessert is the crust…that cake-y bit on top. It’s sweet, soft in the middle, but golden and crusty on the outside. The cinnamon and sugar on top just makes it pop.
It’s really a combination of a pie, a cake, and a crumble…but, wow…is it ever good.
If I am ever handed cranberries in my CSA bin again, I now have a fantastic, delicious, and worthy recipe to turn to.
And my “I don’t really like cranberries” roommate fell in love with this at first bite. So…even if you are unsure about the cranberries, I encourage you to try it. Honestly…it all comes together brilliantly in the end.
Another recipe adaption gluten-free baking success!
It happens without fail…every time. When I am attending a big get-together and asked to supply a dish…it’s a vegetable. I can count on it. I can place money on that bet and win every time. Perhaps, in this group of people, it’s because I’m the only vegetarian…so it just makes sense. Regardless…sometimes getting a bit creative with a vegetable can be a task. Anyone can bring those steam-in-the-bag veggies and just give them a quick nuke in the microwave…but that’s not my style. Not anymore.
So, it came as no surprise to me on Thanksgiving that I was asked to supply the vegetable dish for the meal with my roomie’s family. At first, I thought of doing my famous confetti corn dish, but I had received 24 ounces of green beans in my CSA bin (along with a plethora of Thanksgiving veggies and fruits…that I probably could have cooked all the side dishes had I been allowed), so I changed my mind. But…how to dress up green beans and make them…interesting?
Well, for that I turned my attention to a Top Chef. No joke. I found a recipe on the Internet from Stephanie Izard (Season 4 winner of Top Chef, and the first female winner). The recipe was for her restaurants green beans, known as Girl and the Goat Magic Beans. It sounded…really good. And I only had to make a few minor adjustments to make it fit into my diet. Like…I didn’t use fish sauce, I just used more tamari sauce instead. That sort of thing.
The recipe was super-easy to prep for and really easy to prepare. Better yet…it was enjoyed by all at the table. These really are magic beans. Delicious green beans everyone will love. And the recipe…is below.
Girl and the Goat Magic Beans (Green Beans) – adapted from Stephanie Izard’s recipe
5 ounces fish sauce (I replaced with San-J Gluten-Free Low Sodium Tamari Sauce)
2.5 ounces soy sauce (I used San-J Gluten-Free Low Sodium Tamari Sauce)
1 tablespoon Dijon mustard
3/4 teaspoon Sriracha
3 cloves garlic
1 cup mayonnaise (I use Trader Joe’s Reduced Fat Vegan Mayonnaise)
cashews (I used walnuts…but your favorite nut will do…or leave out if you have a nut allergy)
Directions:
Make the green bean dressing (yields 2 cups):
Combine lemon juice, fish sauce, soy, Dijon and sriracha. Transfer to blender, add garlic and emulsify with oil.
Make the aioli:
In a bowl, combine 1/3 cup of the green bean dressing (above) with 1 cup mayonnaise. Whisk together. Set aside.
Make the green beans:
Wash and trim the stems off the green beans.
In a large frying pan, heat a small amount of oil. Add the green beans and some sliced shallots for flavor.
Add enough vinaigrette to coat the green beans. Cover and allow to steam.
Add a handful or two of cashews (or nut of your choice) for flavor. Season with salt.
Transfer to a serving dish and drizzle with aioli.
Serve hot.
~*~*~
Stephanie Izard has said that her restaurant gets compliments for its vegetable dishes all the time. That being said…there is a reason for that. These were some of the best green beans I have ever eaten. The dressing and aioli really stepped up the flavor. And, the addition of the walnuts added a necessary texture to them. I would make these again in a heartbeat. Normally not a huge fan of green beans, these were fantastic.
There is a reason Stephanie won Top Chef all those years ago. With recipes like this…she’s winning over fans of her food even now. Even little home chef’s like me.
Want to dress up your green beans differently, I highly encourage you to give this recipe a shot. I wasn’t disappointed. My roomie’s family wasn’t disappointed. I promise…you won’t be either.
There comes a time during those weeks I’m preparing to go out of town for the weekend that I realize I still have a whole heap of fresh produce from my CSA bin that I need to use or lose. And I am not one that likes to see good food go to waste. Such is the reason for my brilliant creation that I totally made up on the fly yesterday.
Keep in mind…this would have been a lot easier had I planned it ahead of time…prepped some of the items beforehand. But…I never have these brilliant moments of brilliance until I am already away from my kitchen. Naturally.
So, what is an allergic chef to do when her crisper drawer is still heaped full with veggies? Make something up. And what emerged was a fantastic little casserole, packed with veggies, sprinkled with a little cheese, and ultimately…nutritiously delicious.
2/3 cup black beans (mine had actually gone bad…so I substituted with Trader Joe’s Gluten-Free Vegan Chorizo)
1 cup shredded mozzarella cheese
1/4 cup shredded Parmesan cheese
2 tablespoons butter (I used Smart Balance)
2 tablespoons flour (I used Arrowhead Mills Gluten-Free All-Purpose Flour)
1 cup milk (I used unsweetened almond milk)
Salt and pepper (to taste)
Directions:
Preheat oven to 375 degrees F.
Cut the spaghetti squash in half and remove the seeds. Place on a baking sheet. Bake in the oven for 40 minutes, or until tender enough to pierce with a fork. Remove from the oven and allow to cool slightly. When squash is cool enough to handle, scoop out insides, separating the strands with a fork.
Meanwhile, in a pan, heat olive oil and add chopped shallots and white button mushrooms and saute until shallots are soft and mushrooms begin to brown. Add the broccoli florets. Season with salt and red pepper flakes. Saute until broccoli begins to soften. Add black beans (or vegan chorizo) and heat through. Remove veggies from heat.
While the vegetables are cooking, melt butter in saucepan over low heat. Blend in flour, salt and pepper. Cook, stirring until mixture is smooth and bubbly. Stir in the milk. Heat to boiling, stirring constantly. Boil and stir for 1 minute.
Set the saucepan aside and gently scrape the tines of a kitchen fork around the edge of the spaghetti squash to shred the pulp into strands.
Place half of the strands of spaghetti squash into a 2 quart baking dish. Add half of the sauteed vegetables and half of the mozzarella and Parmesan cheese. Repeat the layers. Pour the sauce over the top and mix well.
Place the baking dish in the oven for 20-25 minutes. Remove from oven and serve.
~*~*~
I wasn’t exactly sure how this was going to turn out. Honestly. I was just in one of those modes where I’ll grab a bunch of ingredients, toss stuff together, somehow incorporate it into a dish, and just hope for the best when it’s done cooking. My roommate loved this…so this may be added to the list of things I can make with a spaghetti squash. I have a feeling I’ll be seeing quite a few this winter from my CSA.
Go ahead and give this recipe a try. See what you think. I know I’m excited to be dining on the leftovers tonight. Really, really good. Sometimes just making something up really works out.
So, this past weekend, my roomie purchased a new cookbook for me. I actually told her not to get it. As, at full price, it was rather expensive. But she insisted that it was necessary because the holidays happen every time you turn around. And not just the fall/winter holidays. All the little ones in between too. After a quick flip through of the book, I finally relented my stance and let her get it for me.
The book is Gluten-Free and Vegan Holidays: Celebrating the Year with Simple, Satisfying Recipes and Menus by Jennifer Katzinger, who also authored Flying Apron’s Gluten-Free & Vegan Baking Book. So, if there is any authority in this area…this would be the person to turn to. And the recipes really did sound amazing. Everything was something I was willing to try.
Now, the first recipe I chose to do out of this cookbook is considered a side dish. But I eat side dishes for meals all the time. The original recipe calls for new potatoes, but I had 24 ounces of fingerling potatoes in my fridge from my CSA bin, along with baby carrots. It would work. The only ingredient for this recipe that I didn’t have on hand was fresh rosemary, but my grocery store happens to have that. And so, last night, I set out to prepare this recipe for dinner. And yeah…I wasn’t disappointed at all.
Recipe: Rosemary Roasted Carrots and Fingerling Potatoes
1 pound new red potatoes (I used organic fingerling potatoes), halved
1/2 pound carrots, peeled and cut diagonally into 1/2-inch pieces
1/4 cup canola oil
3 tablespoons minced fresh rosemary
4 cloves garlic, minced1 teaspoon sea salt
1/2 teaspoon freshly ground pepper
Directions:
Preheat the oven to 400 degrees F.
Combine all the ingredients in a large bowl and toss well to coat the potatoes and carrots with the seasonings and oil.
Pour the contents of the bowl onto a large baking sheet and roast the vegetables for about 50 minutes, or until the exteriors are crisp and the interiors can be easily pierced with a fork. (Halfway through cooking, using tongs or a spatula, turn the potatoes and carrots so that they brown evenly). Transfer to a serving bowl and season to taste with additional salt and pepper.
~*~*~
First of all…this smells amazing while it is baking up. Honestly. It really gave the apartment an amazing aroma. The vegetables really do crisp up nicely on the outside, leaving the inside nice and soft. Perfect. And wow…packed with flavor. This is a super simple, but super tasty dish. Honestly. I thought about bringing this to Thanksgiving, but mashed potatoes are always abundant there…so I don’t want to repeat the potato. Looking for a new way to enjoy potatoes and carrots…give this recipe a try.
Okay…I lived in Birmingham, Alabama for six years…and never once ate collard greens! Never. Not once. Why? I don’t know. Perhaps it was the ill-fated attempt my mom had cooking okra that turned me away from those “southern” vegetables. I can’t say for sure. But I never felt the need to try them, nor the desire.
But, much like with the Brussels sprouts, along came my CSA bin and inside…collard greens.
Now, my roommate happened to scoop up a recipe card for a Collard Green Hash while we were out at the grocery store, but the problem was, it was going to take an hour and fifteen minutes (not including prep time) to throw that together. And I was hungry and not wanting to deal with it. So, instead, I had one of my “I’m just going to make this up” moments and created my very own recipe using a leafy green vegetable that I had never tasted nor cooked with before.
And surprisingly…it worked!
Recipe: Oven Roasted Potatoes, Peppers, and Collard Greens in a Vegan Cream Sauce
Potato, Sweet Peppers, and Collard Greens in a Vegan Ancho Chile Cream Sauce
2 small Russet potatoes, cubed
6 mini sweet peppers, chopped
5 collard green leaves, stalks trimmed and cut into strips
olive oil
salt
red pepper flakes
garlic powder
3 tablespoons sour cream (I used Tofutti Better Than Sour Cream)
1/4 teaspoon Ancho chile powder
dash of lime juice
Directions:
Preheat oven to 425 degrees.
Spray a baking sheet with cooking spray and set aside.
Wash the potatoes and pat them dry. Slice the potatoes into cubes and place in a zip lock bag. Drizzle with a bit of olive oil and season with salt, red pepper flakes, and garlic powder. Seal the bag and shake to coat the potatoes.
Next slice the sweet peppers away from the seeds. Chop them and add them to the bag with the potatoes. Give another shake. Then pour the peppers and potatoes out onto the baking sheet that has been sprayed with cooking spray to prevent sticking.
Pour the potatoes out onto a baking sheet and spread them out over the surface. Place the baking sheet in the oven for 15 minutes.
While the potatoes and peppers begin to roast, wash the collard greens and cut away the stems. Slice the collard greens in half, then into strips. Place in another zip lock bag and drizzle with a little olive oil. Season with a little red pepper flakes and garlic powder. Seal the bag and shake to coat the greens. Set aside.
In a bowl, place 3 tablespoons of sour cream (I used a vegan sour cream) and add 1/4 teaspoon of Ancho chile powder. Stir until combined. Add a small dash of lime juice and stir. Set aside.
After 15 minutes, remove the potatoes and peppers and give them a stir. Spread the strips of collard greens over the potatoes and peppers and place in the oven for another 15 minutes.
Remove from the oven and transfer the mix of potatoes, peppers and greens to the bowl with the cream sauce in it. Stir to coat.
Serve.
~*~*~
I was actually surprised with how much I enjoyed this side. I probably could have eaten it as my meal and been completely content with it. But I had a veggie burger calling my name. I’m actually excited to be making this again tomorrow night with my dinner, I loved it so much. If you have never tried collard greens before, or if you are looking for a new way to enjoy them…I recommend this recipe. Not just because I made it up…but because it is actually quite yummy!
Sometimes a recipe just catches your attention. That’s exactly what happened to me one day when I was at my local library. On the shelf holding the new books there was one called Simply…Gluten-Free Quick Meals by Carol Kicinski. I picked it up and flipped through it, and immediately some recipes began catching my attention. So, I checked it out.
It just so happened that one of the recipes in there was for a vegetable curry (Curry in a Hurry). I had everything required for the recipe except the can of coconut milk, the butternut squash, a potato, and the frozen peas. But those were affordable enough to add to that week’s grocery list, so I went ahead and made plans to have this recipe for dinner this week.
And last night…I made it up and I was so happy with the results. This is a hearty, delicious, vegan curry that anyone can enjoy. You can adjust it to your level of spiciness (I kept mine mid-range, as my roomie is a heat wimp and I love it spicy). It’s full of flavor and will fill you up without filling out out with calories.
4 cups butternut squash, peeled, seeded, and cubed (I bought mine pre-cut!)
1 large Idaho potato, peeled and cubed
1 medium yellow or white onion, thinly sliced (I used shallots)
1 cauliflower head, cut into florets
2 to 4 tablespoons gluten-free mild or hot Indian curry paste (I used Thai Kitchen)
14.5 ounce can unsweetened coconut milk, shaken well (I used light coconut milk)
15 ounce can chickpeas, rinsed and drained
1 cup frozen peas
Directions:
Heat the oil in a large, deep skillet or Dutch oven with a lid over medium-high heat.
Add the butternut squash and potato cubes and sauté just until they start to brown a little, 3 to 4 minutes.
Add the onion, cauliflower, and curry paste, starting with a little and continuing to add until you reach the desired heat level. Cook, stirring constantly for 1 to 2 minutes, or until the paste is combined and the onion is just starting to soften.
Add the coconut milk and stir to combine. Cover the pot, lower the heat, and simmer for 15 minutes, or until the vegetables are tender.
Add the chickpeas and frozen peas to heat through, 1 to 2 minutes.
Serve.
~*~*~
I served my curry over steamed jasmine rice. It was so delicious. With it being fall and the winter months approaching, this made for a nice, warm, hearty meal that is packed with fresh ingredients and lots of nutritional value. It’s a fantastic and different way to use those winter vegetables that are in season and everywhere at the grocery store right now.
And this is really easy to prepare. I definitely recommend buying the squash pre-cut, as it takes out a lot of the hassle. No shame in it, my friends. Trust me! If anything…I would just recommend a little pinch of salt. Other than that…this made for a delicious, filling dinner under 300 calories per serving. And I loved every bite of it. I also can’t wait to make it again!
You know…sometimes I get into a breakfast rut. I know…that might be hard to believe…but it happens. I’ll get on a pancake kick, or an egg kick (I get on the egg kick a lot because it is SO easy and versatile), and that’s what I do. For awhile. And then…eventually, I find something else to entertain me.
But…I had an ingenious stroke of breakfast inspiration the other night. And I warned my roommate that when she woke up, I would have an experiment ready for us to try at breakfast. She looked a little concerned. But agreed she would brave whatever it was that I created. And if it was crap, I told her that I’d be happy to whip something else up for us.
Thankfully, however, my little experiment turned into a delicious breakfast treat. One I would totally make again. Just not every day. Given that it is mostly chocolate…it’s good for a nice, sweet morning eat every now and again.
Recipe: Gluten-Free S’mores Hot Cereal
Gluten-Free S’mores Hot Cereal
Servings: 2
Time: Prep 5 minutes; Cook 10 minutes
Ingredients:
1/2 cup hot cereal (I used Bob’s Red Mill Gluten-Free Mighty Tasty Hot Cereal)
1-1/2 cups + 2 tablespoons water
1/4 teaspoon salt
3 tablespoons unsweetened cocoa powder (divided)
1/2 teaspoon vanilla
1 teaspoon zero calorie sweetener (I used Truvia)
2 dark chocolate mini candy bars, chopped (I used Nestle Special Dark)
1 tablespoon white chocolate morsels
2 gluten-free graham crackers, crumbled (I used Kinnikinnick S’moreables)
2 tablespoons Marshmallow Fluff
Directions:
Bring water and salt to a boil. Stir in 1/2 cup cereal and 1 tablespoon unsweetened cocoa powder. Immediately turn heat to very low, continuing to stir until cereal and water are blended. Cover and cook for 10 minutes, stirring occasionally.
Remove from heat and add the vanilla, 2 tablespoons cocoa, and and sweetener to taste.
Split between two bowls.
Over the top, sprinkle each with chopped dark chocolate, white chocolate morsels, and crumbled gluten-free graham crackers. Place a dollop of Marshmallow Fluff on each serving. Toast with kitchen torch or just serve.
Enjoy!
~*~*~
The best part about this breakfast was just how much it really tasted like S’mores. If you aren’t a fan of dark chocolate, feel free to use milk chocolate. Or just use chocolate chips instead. The possibilities are endless…and yield a delicious treat for breakfast. The chocolate melts into the hot cereal and it’s just…yum! Really, really yum! Forget the campfire at night, now you can have S’mores for breakfast. Trust me…you’ll want to make this one again!


")


")

