Product Review: Road’s End Organics Gluten-Free and Dairy Free Penne & Chreese

Road's End Organics Gluten-Free and Dairy Free Penne & Chreeze
Road’s End Organics Gluten-Free and Dairy Free Penne & Chreese

Product: Road’s End Organics Gluten-Free and Dairy Free Penne & Chreese – $3.49+

For the past two weeks…I have been without my CSA bin.  It has been…tough.  I have been trying to make a point, however, to attempt to use up products/items from my fridge, freezer, and pantry.

Fast forward to Friday night.  It was the first full day back in town for me after having flown in the day before after visiting my family for Christmas.  Without fresh produce readily available, and a tight, tight budget due to the holidays…it was time to make due with what was in the apartment.  No big deal…there is plenty to choose from.

And it just so happened I remembered picking up a box of Road’s End Organics Gluten-Free and Diary Free Penne & Chreese (yes…chreese!) when I spotted it on a super closeout at my local grocery store.  For fear that I might never try it otherwise or never have the opportunity due to possibly not being able to find it anywhere else…I panicked and purchase one box.  Just one.  Just to have on hand.

I am so glad I did that, because after a stressful day of travel, a long night, an early morning, a full day at the office, and a lot on my mind…an easy dinner was just what I needed.  And this…just sounded good.

If it wasn’t…I had a backup plan.  Don’t laugh.  I often do this when I try new products.

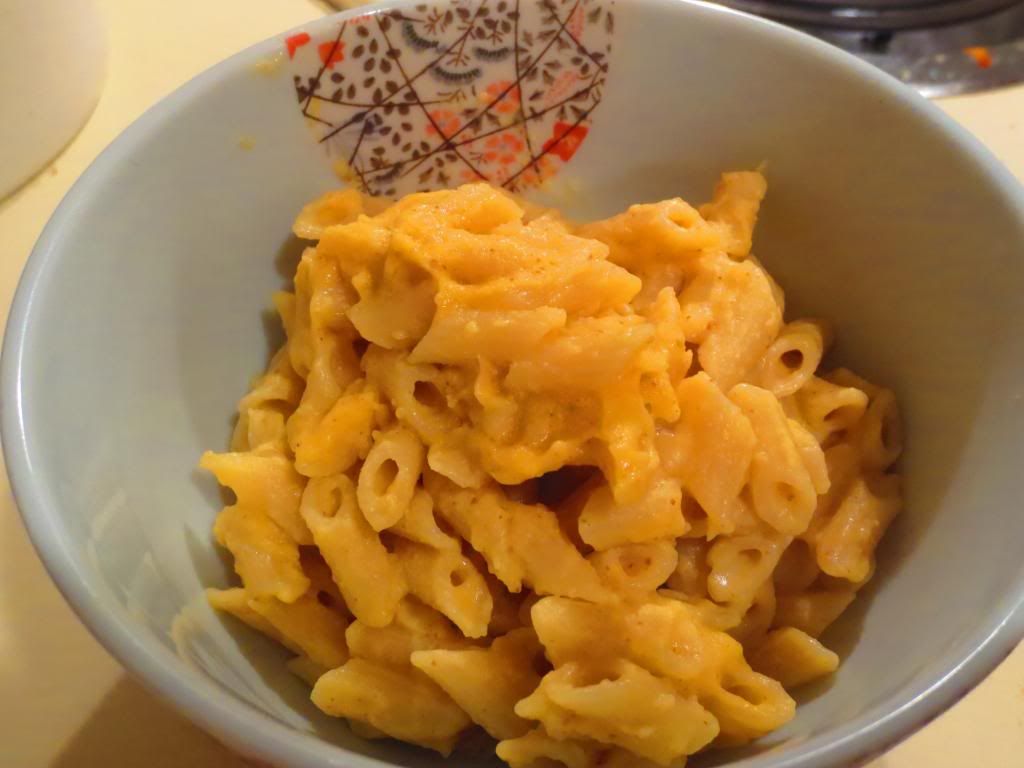
Anyway…nothing could be more stress-free than this!  I came home from work and got a pot of water boiling on the stove.  As soon as it had come to a boil, I poured in the noodles and allowed them to cook for about 10-12 minutes.  I didn’t want to overcook them, because, let’s face it…pasta, especially brown rice pasta…gets really gummy when it’s overcooked.  I wanted that perfect al dente.  I managed it too.  I drained the noodles just as they reached that perfect state, then…in the same sauce pan…poured in 1/2 cup of almond milk and the powdered chreese packet which came in the box.  I stirred them together until they combined and had no clumps.  Then, back onto medium heat, and the pasta was added back in.  I gave it a stir, and let it cook for another couple of minutes, to thicken the chreeze mixture as it blended with the noodles.  Done.

I poured half into a bowl for my roomie and saved the other half for me.  Time to dig in.

I was actually a little worried about not liking this one.  But…this is definitely one of my favorite boxed gluten-free mac and cheese.  Don’t laugh.  It’s true.  What did I love about it?  Aside from noodles that were normal size, and not teensy-tiny, it cooked up perfectly.  The dairy-free cheese (chreeze) mixture thickened up beautifully after the noodles were put back in.  And the flavor was remarkable.  I loved how the cheese sauce clung to the noodles.  I love how my noodles weren’t left swimming in sauce, as most gluten-free boxed mac and cheeses do.  I loved the thick, rich flavor of the chreese.  It had a great balance of flavor…the creamy richness of an Alfredo with the flavor of cheddar.  So good.  It was major mac and chreeze love.

I love saying chreese!

Anyway…the nitty-gritty basics.

Road’s End Organics Gluten-Free and Dairy Free Penne & Chreese contains a gluten-free rice penne.  As for the gluten-free Chreese (vegan cheese), that is a blend of organic brown rice flour, organic tapioca starch, enriched nutritional yeast, organic green lentil flour, salt, organic garlic powder, organic yellow mustard seed, organic onion powder, and annatto powder.  The ingredient list is all recognizable…no chemicals, no weird preservatives.  Just awesome gluten-free goodness.

Nutritionally speaking, Road’s End Organics Gluten-Free and Dairy Free Penne & Chreese contains 2 servings per box.  A serving contains 320 calories and 3.5 grams of fat.  That’s not bad for a mac and cheese.  And you get a lot.  This pasta is cholesterol free, contains only 350 mg sodium, and has less than 1 gram of sugar.  Awesome!  In addition, a serving provides 6 grams of fiber and 9 grams of protein.  See what I mean?  You will feel full…and you’re only eating a cup.  That’s the serving size!  Awesome!

I was pleasantly surprised with how much I enjoyed chowing down on this fantastic boxed macaroni and “cheese.”  They vegan cheese that is used in place of real cheese doesn’t taste fake at all.  I loved the flavor.  And it is easy on my tummy…as I am lactose intolerant and cheese can really be an issue at times.  So…YAY!!  I would definitely recommend this to everyone.  Even cheese lovers, like my roommate, will eat it.  She loved the richness and the texture.  And, yeah…it doesn’t lack in flavor.  SO damn good!

Find it.  Try it.  Love it.

Road's End Organics Gluten-Free and Dairy Free Penne & Chreese
Road’s End Organics Gluten-Free and Dairy Free Penne & Chreese

Product Review: Nature’s Path Gluten-Free Pumpkin Spice Waffles

Nature's Path Gluten-Free Pumpkin Spice Waffles
Nature’s Path Gluten-Free Pumpkin Spice Waffles

Product: Nature’s Path Gluten-Free Pumpkin Spice Waffles – $4.99+

FINALLY!

Just…FINALLY!

As much as I love gluten-free waffles made from scratch…these days it seems impossible to find the time to actually make them.  Trust me…it is an undertaking and a half.  Seriously!  And, my favorite homemade gluten-free waffles to prepare are…pumpkin!  Yep…pumpkin.  Delicious.  Tasty.  And we all know how much I love pumpkin flavored things.  Just…YUM!!

These days, however, I just am never home long enough to actually work through the recipe and get the pumpkin waffles made from scratch.  So…waffles have been off the menu.  Because, regular waffles can be a task and a half to make as well.  So…it’s been pancakes, Greek yogurt parfaits with fruit and gluten-free granola, cereal, and things with roasted potatoes…or just gluten-free bagels.  No waffles.  Not for a very long time.

But that changed.  That changed the moment I stepped into the freezer section of my local Whole Foods and spotted…one of the most wonderful things I have ever encountered in that aisle.  Gluten-Free Pumpkin Spice Waffles.  YES!  GLUTEN-FREE PUMPKIN SPICE WAFFLES!!  Shout it from the rooftop friends.  I did another happy dance of joy in the aisle.  I should really stop doing that…but I just get so excited!

This box of frozen waffles is made by Nature’s Path.  I tried one other variety of their gluten-free waffles a year or two ago…but don’t remember too much about them.  Other than that Van’s gluten-free versions blew them out of the water.  For real!

But…let bygones be bygones…and…Van’s doesn’t make pumpkin spice waffles…so…HA!  These were in my basket and at the register before my roomie or I could talk ourselves out of the purchase.  The deed was done.

And with me taking an early morning spin class a couple mornings a week…these are the perfect thing to throw in the oven to toast while I shower off before work.  And that’s exactly what I did on Friday.  Friday was already crazy.  I had just gotten back in town from my Christmas trip to see my family.  My luggage had gone missing and was returned late that night.  I was worn out…but really wanted to get a little activity in before settling back into my routine for one day.  Spinning did that.  And I just happen to get home right as my roomie is waking up.  So, I put these waffles in the oven and went to shower.  They were done just as I finished off dressing.  I warmed up some of my agave maple syrup to pour over them and…just like that…brekkies was served.

Oh…these definitely made an impression on me.  The pumpkin spice flavor is there…but not overpowering.  There is pumpkin and then there is PUMPKIN.  I love pumpkin flavors…but I want to taste the other spices too.  In this case…cinnamon and nutmeg.  Perfect compliments.  The waffles toasted up beautifully…their orange color turning a deep golden as they reached the perfect level of toastiness.  This gave them this great crunch on the outside, but that soft, steamy center that make every waffle perfect.  Oh…it was bliss.  Bliss in a pumpkin-y waffle-y form.  These made my hectic morning easy…and super delicious.  I hope these aren’t a seasonal thing because I really want to stock up!

Nature’s Path Gluten-Free Pumpkin Spice Waffles are made from water, organic pumpkin puree, organic brown rice flour, organic potato starch, organic yellow corn flour, organic soy oil, organic tapioca starch, organic cane sugar, organic potato flour, baking powder, organic flax seeds, organic soy lecithin, organic pear and/or grape juice concentrate, organic quinoa, organic amaranth, organic spices, and sea salt.  Whew.  It seems like a lot of ingredients, but I recognize every single one of them.  That’s something.  And I love how a majority of the ingredients are also organic.

So, let’s talk nutrition.  A serving of Nature’s Path Gluten-Free Pumpkin Spice Waffles is 2 waffles.  This pair of pumpkin waffle yumminess will serve you up 210 calories and 7 grams of fat.  These waffles contain no cholesterol, have only 385 mg sodium, and 6 grams of sugar.  Not too bad.  They also have 2 grams of fiber and 2 grams of protein…so not too filling…but I wasn’t starving all morning either.  Definitely a healthier choice for breakfast if you have to do the “from-the-freezer” grab on a busy morning.  Seriously…worth it.

These waffles are amazing.  I love the pumpkin flavor.  I loved the texture and taste.  The crunch with the warm, soft center.  Oh yeah.  Perfect for those busy mornings…and always good drizzled with syrup.  Makes these winter mornings cozy and warm.  Let me tell you…I think I’m in love with a new gluten-free waffle.

Delish!

Nature's Path Gluten-Free Pumpkin Spice Waffles (toasted)
Nature’s Path Gluten-Free Pumpkin Spice Waffles (toasted)

Product Review: Udi’s Gluten-Free Margherita Pizza

Udi's Gluten-Free Margherita Pizza
Udi’s Gluten-Free Margherita Pizza

Product: Udi’s Gluten-Free Margherita Pizza – $7.99+

Love is pizza.

For real, yo!

No…honestly…one of my favorite things in life is a delicious slice of pizza.  You get the right crust, the right sauce, and the right toppings…and you create a meal of perfection.

I was elated when I heard that Udi’s Gluten-Free was introducing gluten-free frozen pizzas to their already epic and delicious line-up of products.  I already am a huge fan of their readily available gluten-free pizza crusts…so…take that and top it, box it up, and it’s one more way to make life a little easier on you.  Udi’s has four different flavors of gluten-free pizzas: Three Cheese, Margherita, Spinach & Feta, and Uncured Pepperoni.  I can eat three of the four, as I am a vegetarian.  Although I may pick up the pepperoni version for my roommate to give a taste sometime.

Since this was my first foray with the Udi’s Gluten-Free frozen pizzas, I opted for one that wasn’t just cheese…and chose the Margherita Pizza.  I mean…you can’t go wrong with tomatoes, mozzarella cheese, and basil.  Anyone who has eaten a caprese salad can tell you that!  I felt good about my decision, and gifted my freezer with one box for starters.  It took a couple of weeks to find the perfect evening for a pizza, but as the holidays were approaching and the CSA bins were cancelled due to neither my roommate or I being around…we had to make use of whatever is in our freezer, fridge and pantry.  So, after going to the gym one evening (yes…instead of first thing in the morning…blame the Trans-Siberian Orchestra), it was necessary to do something simple for dinner.  What better than a frozen pizza, right?

Udi's Gluten-Free Margherita Pizza (frozen)
Udi’s Gluten-Free Margherita Pizza (frozen)

RIGHT!

I was quite excited as I pulled this box out of my freezer and began to preheat my oven to 400°F.  I opened up the pizza and peeled away the plastic.  Once the oven was heated, I popped the pizza in and let it cook for about 15 minutes.When I removed it from the oven, the crust was crisp and golden, the cheese melted, and it smelled beyond fantastic.

Now, I’ve been underwhelmed by previous frozen (and restaurant) gluten-free pizzas.  But I trust Udi’s Gluten-Free…because their gluten-free pizza crust is THE BOMB!!  Honestly.  If you don’t want to make your own gluten-free crust…reach for one of these.  It’s the only one I can find in this area in every grocery store.

So, how did this pizza stack up?  I have no words beyond OMG…MMMMMMMMMMMMMM!!

And if that doesn’t sum it up, let me say this…this is one stellar pizza.  The crust crisped up beautifully…not one part of it was soggy or limp in the middle.  It was perfect.  The cheese melted and spread out across the tomato sauce.  The Italian spices gave it really good flavor.  The dollops of mozzarella cheese really helped make this pizza.  So packed with flavor.  And, honestly, better than most restaurant pizzas (my local gluten-free bakery, Annie May’s Sweet Café still makes my absolute favorite pizza crust).  Flaky, golden, crunchy, and a perfect mix with the toppings.  It was perfection!

This frozen pizza is made from an Udi’s Gluten-Free Pizza Crust (water, brown rice flour, rice starch, potato starch, olive oil, dried cane syrup, tapioca starch, yeast, salt, xanthan gum, calcium sulfate (for freshness)), a tomato sauce (made simply from tomato paste, water, sugar, salt, olive oil, canola oil, granulated garlic, spices, citric acid), low moisture mozzarella cheese, mozzarella cheese, tomato, parmesan cheese, basil and spices.  For the most part…all ingredients that are natural and recognizable.

Nutritionally speaking, a serving of Udi’s Gluten-Free Margherita Pizza is 1/2 of the pizza.  This half will provide you with 300 calories and 11 grams of fat.  Most of that fat is from the cheese that comes on the pizza.  This pizza only has 320 mg of sodium and 3 grams of sugar.  It has 25 grams of cholesterol.  It also has 2 grams of fiber and 9 grams of protein.  So, yes…it is filling.  Even with the thin crust.  Trust me.

I love, love, LOVE, Udi’s Gluten-Free.  The products the company puts out is amazing and always delicious.  The taste, texture, and flavors all matter and they really focus on that when they introduce an item to the market.  The frozen pizzas are a very welcome addition.  And I highly recommend this vegetarian option…because I was beyond impressed with Udi’s Gluten-Free Margherita Pizza.

Pick one up from your grocer’s freezer section and see for yourself.

Udi's Gluten-Free Margherita Pizza (baked)
Udi’s Gluten-Free Margherita Pizza (baked)

Product Review: Garden Lites Veggie Chili & Cornbread Melt

Garden Lites Veggie Chili & Cornbread Melt

Product: Garden Lites Veggie Chili & Cornbread Melt – $3.49+

It was getting so close to Christmas and the nights after work were hectic and frantic.  Lots to do…so little time to actually do it in.  And that’s when you need something quick, simple, and still nutritious.  It’s not always feasible to cook up a meal after a long day at the office or being on the go.  Thankfully, there is this great company called Garden Lites, and they make fantastic vegetarian and gluten-free dishes.

Some of my favorites happen to be their amazing soufflés.

There was something really intriguing and different about this soufflé, however.  It was one of their newer flavors, which had actually been out for awhile, but was only now turning up in my local natural food stores.  I had to purchase it (along with the previously mentioned Southwestern Soufflé) and try it out for myself.  I’ve loved most of the Garden Lites soufflés that I’ve eaten previously.  And with one that included chili and cornbread…well…this was awesomesauce waiting to happen.

Garden Lites Veggie Chili & Cornbread Melt (cooked)

Sure enough…I popped open the package, tossed the wrapped tray into the microwave for about 3 minutes.  Then, I removed the plastic wrap and gave another microwave session for 2 minutes…and viola…dinner was served.  My roommate and I were going to split this little dish, so I served it up with some hand-cut, homemade sweet potato fries…which I baked in the oven.

How was this little dish?  Well, all I can say is that Garden Lites really, really outdid themselves with this one.  The base is a cornbread soufflé, which is light, not dense, and really delicious.  Sitting on top of that is this healthy helping of veggie chili, which is packed with veggies and beans.  And then, on top…some cheese.  Just like the good, old-fashioned classic…but with a healthy twist.  The cheese is just an added touch that doesn’t overwhelm the dish at all.  The star is that cornbread base.  Light and airy…and a perfect match for that chili top.  So good.

So…now we get down to the science of this dish…mainly the ingredients and nutrition.  What I love about these soufflés is that they are so good…and good for you.  The Garden Lites Veggie Chili & Cornbread Melt contains diced tomatoes, fire roasted corn, pasteurized egg whites, black beans, onion, low fat milk, crushed tomatoes, zucchini, broccoli, evaporated cane juice, brown rice flower, red pepper, green pepper, corn starch, corn meal, cheddar cheese, baking powder, canola oil, lemon juice, sea salt, garlic, ancho pepper, cumin, chili powder, chipotle pepper, a blend of locust bean gum, guar gum, and xanthan gum, annatto extract (for color), and black pepper.  It sounds like a lot of ingredients, I know, but they are all ingredients I recognize by name…and not one single chemical.  Loving it.  It is gluten-free and nut-free.

As for nutrition, the Garden Lites Veggie Chili &  Cornbread Melt contains 200 calories for the entire soufflé.  Loving it.  The entire soufflé will also serve you up 4.5 grams of fat.  This one has 10 grams of cholesterol, 650 mg sodium, and 10 grams of sugar.  Finally, you will be devouring 4 grams of fiber and 9 grams of protein.  You will not feel hungry after eating this.  Trust me.

Once again Garden Lites and served up a nutritious, easy-to-prepare, delicious little treat that goes from the freezer to the microwave.  It’s perfect for these cold nights.  And it’s so fast to prepare, and still so delicious.  This is, by far, my favorite one I have eaten so far.  A little bit of comfort food without the guilt.

This is food love…and it will love you back.

Half of a Garden Lites Veggie Chili & Cornbread Melt

Product Review: Garden Lites Southwestern Souffle

Garden Lites Southwestern Soufflé

Product: Garden Lites Southwestern Soufflé – $3.49+

Awhile back, I stumbled upon Garden Lites products.  And I mean…this was a good while back.  Back when really all they were offering were their soufflés.  Well…their product line-up has expanded.  And yes…they even added some different soufflé flavors.

This isn’t something new.  This actually happened quite a bit ago.  I just never could find the new flavors.  And when I finally did…they sat in my freezer.  I just sort of got on this cooking thing and never turned back.  I love cooking up something fresh.

But with the holidays in full swing…sometimes it’s too hectic after a long day to start something from scratch.  That’s why I was so thankful to have a couple of Garden Lites soufflés kicking around in my freezer.

Forreals!

With being out of town the past couple of weekends, the CSA bin has been on hold.  So, no fresh fruits and vegetables delivered to my door.  Not until after Christmas when things aren’t as crazy and I’m traveling less.  So, after a long day at the office and not much energy to spare the other night…I came home and my roommate and I decided to split a Garden Lites soufflé and enjoy that with some baked, hand-cut shoe-string fries.  Always baked…never fried in my home.  Just as my mom always did it.  That’s how I was raised, peeps!

Anyway…we had two choices for the soufflé, so I just grabbed the one on top.  The choice: Garden Lites Southwestern Soufflé.

It sounded amazing, combining seasonings with vegetables like tomatoes, broccoli, zucchini, black beans, corn, red pepper, green pepper, and even brown rice!  Once my potatoes were cut into shoestrings (yes…I do that by hand!), I got them in the oven and then had to wait in order to start the main dish.

Garden Lites Southwestern Soufflé (cooked)

Garden Lites soufflés are so easy to cook up.  As the potatoes were finishing up, I popped the Southwestern Soufflé into the microwave and gave it a little burst of heat for 3-1/2 minutes.  I left it to stand for about a minute before removing the plastic wrapper and then microwaving it again for another full minute.

That’s it.  SO easy!

I’ll be honest…I thought it made the apartment smell like Taco Bell…and it has been ages since I’ve even set foot in a Taco Bell.  So…that was interesting.  I sliced the fluffy soufflé in half and dinner was served.

Tasty!!  That’s the best way to describe this soufflé.  I loved the fluffiness the egg whites bring to the actual product.  The veggies and spices are evenly incorporated and chopped so they aren’t awkward.  In fact, bite-for-bite, I loved the variety of flavors and textures.  It was a perfect bite…and it even tasted like a taco.  Go figure.  My roommate loved it too.

So, ingredient wise, the Garden Lites Southwestern Soufflé contains pasteurized egg whites, onion, crushed tomatoes, broccoli, zucchini, black beans, corn, brown rice, red pepper, green pepper, corn starch, evaporated cane juice, canola oil, lemon juice, sea salt, garlic, chipotle pepper, chili powder, ancho pepper, and cumin.  All real ingredients…all real food.  Nothing fake or processed here.  This dish is gluten-free, dairy-free, soy-free and nut-free.  Love it.

As for nutrition…the Southwestern Soufflé is actually a really healthy choice.  The entire soufflé is the serving and that one item is only 180 calories and contains only 2.5 grams of fat.  This soufflé also will serve you up 4 grams of sugar and 650 mg of sodium.  The sodium does seem a bit high…but it is a prepackaged food.  Not only that, the Southwestern Soufflé provides 4 grams of filling fiber and 9 grams of amazing protein.  So good.  And good for you!

I loved the Southwestern flair that this souffle carried with it.  Loved every bit of it.  And every bite for that matter.  Looking to add a little spice to your menu on a hectic day?  Keep Garden Lites in your freezer and you’ll have an easy meal in less than 5 minutes.  And…you’ll love every bite of it.  I know I sure did!  I’ve always loved Mexican and Southwest flavors…so this souffle was made for me.  And I devoured it in kind.

Half of a Garden Lites Southwestern Soufflé

Recipe: Oven Baked Broccoli Masala

This one time I went to an Indian restaurant…and got the Broccoli Masala.  It was something that I hadn’t seen on any other Indian restaurant menu in the area.  It intrigued me.  I took one bite and declared it the best thing I have ever eaten…which may or may not be true.  HA!

But, it was really, really damn good.

And during these cold winter months, I see a ton…and I mean a ton of broccoli.  For real.  Like…every week.  Last year my freezer was filled with broccoli.  But not this year.  Not this time.  I’ve gotten more than a little creative with the use of broccoli in the past few months.  And I’m proud of that.

But, instead of turning to a pizza crust…or some other culinary magic skill…this time…I attempted to recreate that dish for that local Indian restaurant.  Because, yes…I was craving and didn’t want to drive into Louisville.

With the guidance of the blog Spicy Treats, I did an oven-baked version of this meal, adding it to caramelized shallots (which caramelized down to this beautiful sweet jam) and some Indian-spiced basmati rice.  The results…while not the same as the restaurant…were a very close alternative.  And I was quite happy with it.  I may or may not have hoovered this meal down in record time.

Recipe: Oven Baked Broccoli Masala

Oven Baked Broccoli Masala


Servings: 2
Time: Prep 10 minutes; Cook 20 minutes

Ingredients:

  • 2 medium-sized crowns of broccoli
    1-2 teaspoons olive oil
    salt (to taste)
    1 teaspoon chili powder
    1/4 teaspoon cumin powder
    1/4 teaspoon garam masala
    Pinch turmeric powder
    Squeeze of lime juice
    2 teaspoons finely chopped parsley/cilantro (optional)

Directions:

Preheat the oven to 350° F.

Wash and cut broccoli in to small florets.  Drain well and keep ready.

In a large bowl, add broccoli and salt and toss well.  Then add the other spice powders and lime juice and toss everything well.  Finally, add the olive oil and stir well, making sure everything is covered with the spices and oil.

Sprinkle cilantro over the top and mix everything well.

Line a baking tray with aluminum foil and grease it with a few drops of olive oil.  Spread the prepared broccoli florets on the baking sheet and bake it for 15-20 minutes, stirring after 10 minutes.

ENJOY!!

~*~*~

As I said above, I served mine with caramelized thinly sliced shallots (almost made a shallot chutney) and some Indian-spiced basmati rice.  The meal was amazing and the flavors were really good.  Nothing overpowered.  And it was still mild (because my roomie is a heat wimp), yet had just a little spice to keep each bite interesting.  While it is nothing like the dish I have every time I go to my favorite Indian restaurant…it was close enough and simply delicious.

Taste for yourself!

Product Review: Katz Gluten Free All Purpose Dough

Katz Gluten Free All Purpose Dough

Product: Katz Gluten Free All Purpose Dough – $4.99

Dear Katz Gluten Free:

I love you.  I love you more and more with each product that I try.  From your breads to your pies to your amazing donuts, you continue to keep me coming back, order after order, no matter the cost.  You are that good.  And I love you that much.

But…you really outdid yourself with the ready-to-use Gluten-Free All Purpose Dough.

Because of you…I could have a calzone for dinner again.

Because of you…I can make my own delicious pies…without the hassle of making my own crust.

Because of you…the gluten-free community continues to get quality food products.  Ones that I will continue to purchase…not just for myself but others.

Add the All Purpose Dough to my list.

Yes…I love you.

All my gluten-free love,
Me

Ease!  That’s the best part of this product.  It not only is peace of mind, but it’s so simple.  Thaw out dough.  Use.  No hassles.  No wondering if your own gluten-free concoction will cook up right.  This worked.  And it worked beautifully.

I’ve been wanting calzones for a long while now.  For real.  And with a plethora of vegetables that needed to be used up before the next CSA bin arrived, well, I figured I’d see how the dough would hold up to a little of my craving and baking magic.  I had this thought in my head that involved this dough, some squash, some crimini mushrooms, and some shallots.  I sauteed them up in a pan and added some marinara sauce as well.  All I needed now was the casing for the calzone.

Enter Katz Gluten Free All Purpose Dough.  I removed it from my freezer two days before.  The evening I was making the calzones, I cut out two very small pieces of dough, as it says it serves 8 and a serving size is only 2 ounces.  So…this was going to be a challenge.  But, I was up for it.  Using a rolling pin, I attempted to shape the dough into a large circle that wouldn’t break open when I added the filling and moved it to the baking sheet.  The first couple times, the dough was rolled too thin, so I knew these would be relatively small calzones.  I didn’t care.  I rolled out two very asymmetrical circles and piled in the filling on one half.  I carefully folded over the other half and did my best to crimp the small serving shut.  Sure, I could have used more dough, but I am so careful about serving sizes.  I stick to them.  I think next time I’ll throw caution in the wind and just add a little more.  But…I wanted to do it my way this time.  Into the oven the dough went…and when about 20 minutes passed, I opened up the oven and it was this gorgeous golden brown and the filling was sizzling (and peaking out of some holes in my dough).  Everything was ready.  Dinner was served.  And gluten-free calzones were on the menu.

Oh. Hell. Yes.

One bite…and I was hooked.  At first, it sort of reminded me of the crust of a potpie.  Golden and flaky and it sort of had that same texture and flavor.  But when you got a piece with the filling in it…magic.  Simple food magic.  The crust didn’t get soggy and held up to the marinara/vegetable mixture that I stuffed (and I mean literally stuffed) inside.  It was gluten-free and vegetarian food magic.  And it was made possible and easy because I took a chance with a new Katz product.  So easy.  So delicious.  I can’t wait to use it in other ways.

Katz Gluten Free Web site says the crust is perfect for pies, turnovers, knishes, or any other pasty imaginable.  It’s the go-to solution.  It’s what I (and other gluten-free foodies) need in their lives!  FOR REAL!

Katz Gluten Free All Purpose Dough is made from their own blend of gluten-free flour (which includes tapioca flour, white rice flour, sorghum flour, and corn flour), palm oil, water, eggs, sugar, salt, and xanthan gum.  Not a bad list of ingredients at all.  And that flour blend is pure magic.  Pure gluten-free food magic.

As for nutrition…there is a reason I stuck to the serving size.  A serving size is 2 ounces.  This serving (which is a small rectangle of the dough), will provide you with 260 calories and 18 grams of fat.  See why I wanted to stick to the serving size?  This serving also will give you 55 mg sodium and 2 grams of sugar.  Sadly, this dough does serve up about 9 grams of saturated fat and 35 mg cholesterol in each serving.  Another good reason to stick to the meager 2 ounce recommendation.  This dough also will give you 1 gram of fiber and 1 gram of protein.  So do not expect this dough to fill you up and leave you feeling full.  It won’t work that way.  But…that being said…it toasted up beautifully in calzone form on my pizza stone and made one delicious meal for me and my roommate.  We have 3 more servings each of this dough to use and I intend to see how many various ways I can use it.  I might attempt perogies next.

Yes, my dearest Katz Gluten Free…I do love you and your products.  You just make my life happy, full, and delicious again.  This All Purpose Dough will be something I’ll definitely consider using more of in the future. Simple.  And delicious.

Who could ask for anything more?

A gluten-free and vegetarian calzone made with Katz Gluten Free All Purpose Dough

Product Review: Vegenaise Tartar Sauce

Vegenaise Tartar Sauce

Product: Vegenaise Tartar Sauce – $4.49+

Ah…tartar sauce.

I have a love-hate relationship with this condiment.

For one thing, when I used to eat fish, I normally would drown it in ketchup.  Mmmm…ketchup.

But every now and again, I’d give the tartar sauce a try.  And I never really liked it.  Sometimes…I was pleasantly surprised and then lulled into this sense of false hope…and I would try it somewhere else and it would be gross and just…not to my taste.

Then, when I had to go dairy-free…I totally ditched this sauce all together.

But, when I was reviewing some items from Sophie’s Kitchen (vegan sea food, FTW!), my friend Kari mentioned the crab cakes with the tartar sauce from Vegenaise.  Vegan. Tartar. Sauce.

Okay…I was intrigued.  I knew two local grocery stores carried the vegan crab cakes from Sophie’s Kitchen…and I knew Whole Foods had the Tartar Sauce from Vegenaise.  So…I set out a spot in the budget to purchase and then consume both.

My roomie was on board and so…we hit up Whole Foods and purchased both items.  Dinner was going to be interesting.  I just prayed it all was good.

So…a little while ago, I pulled the vegan crab cakes out of the freezer and said that dinner would be those…with a healthy helping of homemade kale chips.  And I would serve the cakes over bibb lettuce from my bin.  Originally I was going to place them between gluten-free buns…but I was out of those.  So…this was my compromise.  I heated the crab cakes as instructed on the box, and while that was working, I got the vegetables working and finally…the sauce.

My roommate has the same sort of love-hate relationship with tartar sauce as well.  She is not gluten-free nor vegetarian, but since I am the cook in the apartment, that’s what she eats.  She is a huge aficionado for fish and chips when we go out to eat, however…and she has made a habit to at least try the house tartar sauce.  Sometimes she raves…sometimes she picks up the ketchup and goes to town.  But we thought we would give Vegenaise a fair shake.  So, into a little dish, I spooned out a serving of the Vegenaise Tartar Sauce.  The crab cakes finished, I plated everything…and it was time to dig in.

I was a little worried about flavor, but I trusted my friend Kari.  She raved.  She and I like a lot of the same flavors and foods…so…I was worried, but I had high hopes.  I know now to always trust Kari…because the Vegenaise Tartar Sauce was some of the best sauce I have tasted in my life.  Not just tartar sauce either…spanning ALL THE SAUCES! Filled with a tangy, delicious flavor, it was the perfect compliment to the vegan crab cakes and the greens I served them on.  OMG…so freakin’ good!  It was love at first taste and I took the opportunity to pile it onto my vegan crab cakes until it was gone.  Now I keep thinking of other vegan sea food dishes where I could utilize this sauce.  It is SO good.

Veganaise Tartar Sauce is made from a base of Vegenaise (vegan mayonnaise), sweet relish, yellow onion puree, white wine vinegar, vegan Worcestershire sauce, black pepper, and xanthan gum.  Not bad when it comes to ingredients, right?  My thoughts exactly.  And nothing is weird…it’s all ingredients I have heard of and trust.  Vegenaise is also vegan, gluten-free, dairy-free, non-GMO, and soy-free.  Loving it!

Nutritionally speaking, on serving is 2 tablespoons.  This serving will serve you up a side of 120 calories and 13 grams of fat.  It seems high, but it is a vegan mayonnaise-based sauce, right?  And regular mayonnaise would be the same way.  So, it’s really not too bad for what it is.  This small serving also gives you 125 mg sodium and 2 grams of sugar.  That’s awesome.  This is also trans-fat free and cholesterol free.  In addition, this sauce has no fiber in it, but you do get 2 grams of protein.  So, yeah…it’s not totally healthy, but it isn’t bad for you either.

And did I mention how freakin’ good it is?  Seriously.  In love with a sauce.  It’s my new favorite.  YUMMY!!

A serving of Vegenaise Tartar Sauce

Product Review: Sophie’s Kitchen Vegan Crab Cakes

Sophie's Kitchen Vegan Crab Cakes
Sophie’s Kitchen Vegan Crab Cakes

Product: Sophie’s Kitchen Vegan Crab Cakes – $5.99+

I’m probably not the best judge when it comes to comparing sea food products with vegan interpretations of them.  Honestly.  Now, growing up and before I became a vegetarian, I ate seafood.  Mostly shrimp.  Mostly fried, popcorn, scampi or creole.  I was not a huge fan of other fish…but I would eat them.  And, to say the least, I made a delicious lemon-crusted oven baked tilapia back in the day.

For real.

But…never, ever did I eat a crab cake before I became a vegetarian and then had to go gluten-free.  So, judging these by comparison isn’t going to happen.

Here’s what I can do though.  I can go off of flavor, texture, and overall taste.  And that was how I approached this product.

The product of which I speak is the Gluten-Free and Vegan Crab Cakes from Sophie’s Kitchen.  Now, I’m no stranger to Sophie’s Kitchen, having already tried the Gluten-Free and Vegan Fish Filets, Gluten-Free and Vegan Scallops, and the Gluten-Free and Vegan Breaded Shrimp.  While I was blown away by the shrimp, I felt the scallops were good, and the fish filets were…eh…okay.

So…crab cakes.  A new challenge for the allergic/intolerant foodie in me.

Sophie's Kitchen Vegan Crab Cakes (frozen)
Sophie’s Kitchen Vegan Crab Cakes (frozen)

What I love about Sophie’s Kitchen products is how easy they are to make.  The crab cakes could either be baked in the oven, or fried in a skillet on the stove.  I’m a health-nut, so I try not to fry things often.  I chose to bake them in the oven, which takes about 15 minutes to do.  Not too bad at all.  They don’t get golden cooking this way, the way the image looks on the box, but I didn’t mind the pale look to them.  Remember…never had a crab cake back when I even could.  I kept it simple when serving these.  I had thought about doing a crab cake sandwich, but didn’t thaw out my gluten-free buns from my local allergen-free bakery.  So, instead, I made some homemade kale chips and served the crab cakes over fresh bibb lettuce from my CSA bin.  I served a side of Veganaise Tartar Sauce with each cake and…dinner was served in less than 20 minutes.  Love that.

But how did it taste?

This is one of my favorite products from Sophie’s Kitchen that I have had the opportunity to try.  OH. MY. GLUTEN. FREE. VEGAN. GOD.  Seriously…packed with awesome flavor.  The texture was great…like lump crab…so that was kinda cool  And the blend of ingredients that Sophie’s Kitchen uses to give their faux seafood that fishy flavor worked SO well with these.  They are a close second in my favorite gluten-free and vegan things.  The first is the breaded shrimp from Sophie’s Kitchen.  These are fantastic.  They don’t taste fake of bad at all.  I loved every bite.  Thankfully, my roommate and I made a big dinner out of these…each of us having 2 of the crab cakes instead of the serving size of just one.

Speaking of which…it’s that time in the blog where I bring up the ingredients and nutrition for the products I try.  Let’s start with the ingredients.  Sophie’s Kitchen Vegan (and Gluten-Free) Crab Cakes are made up of water, pea protein, potato starch, canola oil, seaweed powder, rice flakes (from brown rice), konjac powder, rice vinegar (from brown rice), organic agave nectar, sea salt, celery powder, black pepper, bay leaf, nutmeg, ginger, paprika, dry mustard, cloves, calcium hydroxide.  So close to being clean eating…but that calcium hydroxide there at the end sort of killed that.

That being said…it is still a rather healthy choice and one I’d love to buy and indulge in again.  In fact, Sophie’s Kitchen Vegan Crab Cakes are soy-free, gluten-free, 100% vegan and plant based, contain no preservatives, colors or MSG, and have no artificial anything!!  Nice.

Speaking of indulging…a serving size of Sophie’s Kitchen Vegan Crab Cakes is 1 cake.  This serving will provide you with 120 calories and 6 grams of fat.  That’s not bad for a crab cake!!  The Vegan Crab Cakes contain only 170 mg sodium and less than 1 gram of sugar.  Gotta love that!  And, one crab cake also provides you with 2 grams of fiber and 3 grams of protein.  Not too shabby.

I am falling more and more in love with the products that Sophie’s Kitchen is bringing to the gluten-free and vegan world.  And I love that someone, like me, with food allergies, can safely indulge in a product that is vegan as well.  So often this is not the case, so it’s so nice when a company goes the extra mile.  And that’s why I continue to purchase and eat products by Sophie’s Kitchen.

And now…I must hit up my Whole Foods for more of these amazing crab cakes.  It’s happening!

Sophie's Kitchen Vegan Crab Cakes (baked), served over local bibb lettuce with homemade kale chips
Sophie’s Kitchen Vegan Crab Cakes (baked), served over local bibb lettuce with homemade kale chips

Recipe: Gluten-Free Thin Mint Cookies

The cookie monster strikes again!

But this time…for a good reason!

You see, one of the people I run with…a lot…had a birthday.  And he also recently ran yet another marathon, making 11 for this year, I believe.  Well, birthdays and marathons are things to be celebrated.

Originally, I was going to make a Boston Cream Pie to bring to the run group…but I just couldn’t figure out a way to make it dairy-free with the custard inside.  Well, I could…but it wasn’t going to be easy and time was a little tight.  So, I changed my mind at the very last minute, while standing in my kitchen, and instead threw together a version of the Girl Scout favorite (which I haven’t been able to indulge in since my diagnosis three years ago!).  Guess what?  They were a hit.

The recipe came together with a little help from Gluten-Free On A Shoestring.  So, check out the recipe and give it a go.  They brought back so many happy memories and made a lot of people happy that night.

Recipe: Gluten-Free Thin Mint Cookies

Gluten-Free Thin Mint Cookies

Servings: 30 larger cookies (I made 65 small cookies)
Time: Prep 15 minutes; Bake 7 minutes

Ingredients:

COOKIES

  • 5 tablespoons unsalted butter (I used Earth Balance)
  • 4 ounces semi-sweet chocolate, chopped (I used Enjoy Life morsels)
  • ¼ teaspoon pure vanilla extract
  • ½ teaspoon pure peppermint extract
  • ¾ cup high-quality all-purpose gluten-free flour (I used Better Batter)
  • ¼ teaspoon xanthan gum (omit if your blend already contains it)
  • ½ cup unsweetened natural cocoa powder
  • ¼ teaspoon baking soda
  • ½ teaspoon kosher salt

GLAZE

  • ½ pound dark chocolate, chopped
  • pure peppermint extract, to taste

Directions:

Preheat your oven to 300° F.  Line rimmed baking sheets with unbleached parchment paper, and set them aside.

In a medium-size microwave-safe bowl, place the butter and all of the semi-sweet chocolate except for 3 to 4 1-1/2-inch-size chunks.

Microwave at 70% power for 45 seconds at a time, stirring in between, until melted and smooth.  Add the reserved chunks of chocolate, and stir until the chocolate has begun to thicken a bit and the chunks have melted.

Add the vanilla extract and peppermint extract, and stir to combine.  Set the chocolate aside.

In a large bowl, place the flour, xanthan gum (if using), cocoa powder, baking soda, salt and sugar, and whisk to combine well.  Add the chocolate mixture, and mix until the dough comes together and is well-integrated.  Press the cookie dough into a disk.

Place the dough between two sheets of unbleached parchment paper, and roll it out until it is about 1/4 inch thick (any thinner and the cookies are more likely to burn in the oven, and they will crack when you try to coat them in chocolate).  Cut out rounds that are about 1-1/2 inches in diameter, and place them, 1 inch apart, on the prepared baking sheets.

Place the baking sheet in the center of the preheated oven and bake, rotating once, for 7 minutes.

Remove from the oven, and allow the cookies to cool completely on the baking sheet.

Once the cookies are cool, make the glaze.

Place all of the dark chocolate except for 3 to 4 1-1/2 inch-size chunks in a medium-size, microwave-safe bowl.

Microwave at 70% power for 45 seconds at a time, stirring in between, until melted and smooth.  Add the reserved chunks of chocolate and the peppermint extract, and stir until the chocolate has begun to thicken a bit and the chunks have melted.

Place the cookies, one at a time, in the glaze.  Press down on the cookie with the tines of a fork, then flip it gently in the chocolate.  Pull the cookie out of the chocolate by slipping the fork under it and bobbing the cookie on the surface of the chocolate a few times before pulling it along the edge of the bowl and carefully placing it on a clean sheet of parchment paper.  Allow the chocolate to set at room temperature.

Serve and enjoy!

~*~*~

While it has been ages since I have last been able to eat a Thin Mint Cookie (or 12 in one sitting)…these reminded me SO much of the cookies I grew up devouring.  I loved them enough to have as much trouble stopping myself from eating them as I did the real things.  So, from this one-time Girl Scout to all of you Celiacs and gluten-intolerant people out there…don’t give up hope.  You can now make your own Girl Scout favorite in the comfort of your own kitchen.

They’re probably less expensive too.  *WINK*