It all began at Expo West…which I always dream about attending but know that it is highly unlikely. The best part about Expo West is that all the companies who are in attendance usually announce and promote their new products that are set to hit stores throughout the coming year. I try to follow my Twitter feed closely while Expo West is happening, just waiting for one of the gluten-free companies or a gluten-free blogger who is there to post what they are releasing or what they have seen at the booths of certain gluten-free companies.
So, when I saw not only freezer meals but also gluten-free burritos pop up from Udi’s Gluten Free…you better believe I perked up and took interest. Of course, it took until now for me to find the burritos in my area…but it happened yesterday. I made a random stop off at my local Meijer and discovered these little delights hidden in the freezer section. I scanned the boxes…seeing so many of them to choose from, but most of them with meat. And then…I spotted the two versions that did not include meat.
YAY!!
One was a breakfast burrito and the other one for lunch/dinner. My roommate spotted the Udi’s Gluten Free Chicken Apple Sausage Breakfast Burrito, so it was decided that today, after we went swimming, we’d come home and have breakfast burritos for breakfast before running some errands and whatever else needed to be done. So, I grabbed the vegetarian version – the Udi’s Gluten Free Spicy Southwest Veggie Breakfast Burrito, and we checked out.
And I was excited. My laps in the pool couldn’t end soon enough. And when they did…I changed…I drove home…and I was totally ready to eat. For real.
Preparing the Udi’s Gluten Free Breakfast Burritos is super easy. Remove from the freezer, and take out of the wrapper. Wrap the small (it is small) burrito in a moist paper towel and microwave for 1 minute and 35 seconds on high. My microwave is old…so I did it for 2 minutes to ensure they were warm all the way through. Allow the burrito to sit for 1 minute before removing it from the paper towel and devouring.
My roommate had hers done first. And as I threw mine, wrapped in a paper towel, into the microwave, I asked her what she thought. She said that the tortilla was nothing special but the filling was phenomenal. So, that was good. YAY! Made me feel good about mine as it cooked through. When mine finished up, I allowed it to sit, and then, for blogging photo purposes, I cut mine in half. It was still a little frosty on the inside, so I tossed it, now unwrapped, back into the microwave for an additional 30 seconds. That worked. Time to eat.
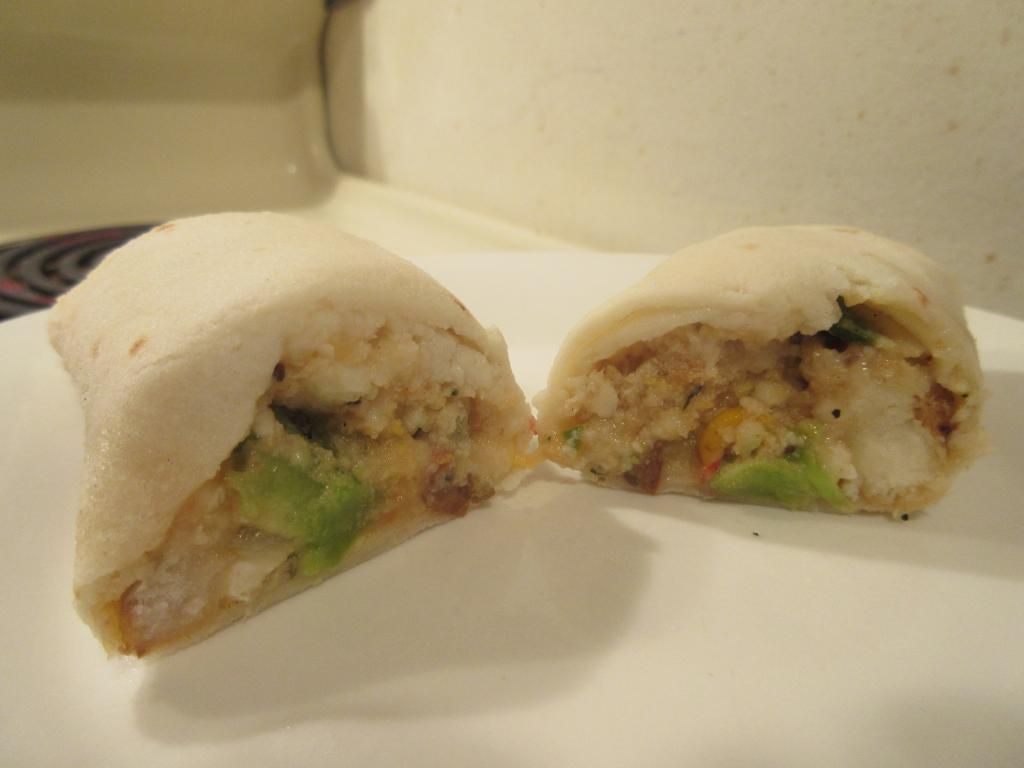
I sliced into my burrito, having not had a burrito in ages. Seriously. Ages. Years. Since I have been a Celiac. So…I was just…dying to try it. I took my first bite and was…slightly underwhelmed. It wasn’t bad at all. It just…didn’t have much flavor to it. It felt like it was lacking seasoning or something. A dash of something just to elevate the flavors. But…it wasn’t bad. I could taste all of the vegetables that were inside, and loved the various textures that they brought to my palate. But, I actually think the tortilla was my favorite part of mine. If I had thought about it while eating, I would have put some hot sauce on the burrito…but it didn’t even occur to me. Weird, because I always put hot sauce on breakfast things that involve veggies and potatoes and eggs. I guess I was focusing on eating it…seeing what I liked and what I didn’t. The tortilla was soft and delicious. The inside was stuffed, for sure, with all the egg whites, vegetables, potatoes, and even some cheese. It was a good breakfast, for sure. Filling and ultimately good…but I just thought a little dash of something…cayenne or salt or something…might just make it great. And…I found this more mild than spicy for sure. No spice at all. Hence…add your own hot sauce. For real.
So…let’s talk ingredients, shall we? The Udi’s Gluten Free Spicy Southwest Veggie Breakfast Burrito is best examined in two parts. The filling of the burrito is made up from cooked egg whites, roasted potatoes, cheese sauce, heavy cream, butter, water, potato flour, onions, rice starch, parmesan cheese, tomatoes in juice, poblanos, corn, cheddar cheese, jalapenos, tomatoes, bell peppers, onions, garlic, corn starch, lime juice, salt and spices. The tortilla is made from water, tapioca starch, modified food starch, sweet rice flour, powdered cellulose, tapioca syrup, palm oil, egg whites, pea protein, tapioca maltodextrin, cane sugar syrup, glycerine, gum, cellulose gum, cultured corn syrup solids, citric acid, lactic acid, salt, enzymes, fumaric acid. Whew…it’s a laudnry list of ingredients…and not all of them sound like real food, right? So…yeah…there are some chemical-ish sounding things in there…but a majority of the ingredients are real food.
As for the nutritional information, a serving is 1 burrito. This burrito will provide you with 200 calories and 5 grams of fat. Not bad for a breakfast burrito, right? You will also be consuming 5 mg cholesterol, 400 mg sodium, and 4 grams of sugar. Finally, you will be eating 5 grams of fiber and 8 grams of protein. Like I said…filling!
So, the filling wasn’t much to scream about, but the tortilla was delicious and cooked up to perfection, without getting dry and hard in the corners or anything. Love that. Would I purchase this product again…maybe…if I needed something easy and fast. But next time, I’ll have my own hot sauce ready. Don’t believe for a moment that these flavors bring any sort of spicy heat…but that is really my only complaint. A little more flavor will bring this to breakfast perfection!
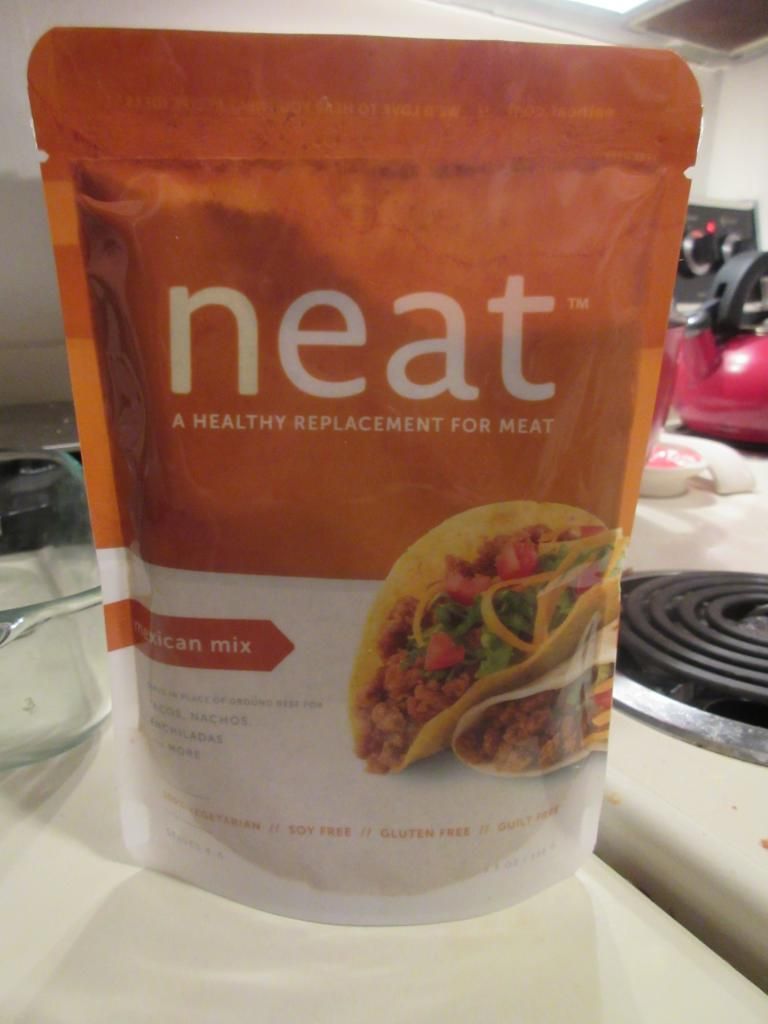
Product: Neat – A Healthy Replacement For Meat Mexican Mix – $4.99+
For the last few issues, I’ve noticed that my Delight Gluten Free magazine has had ads for this vegan meat replacement called Neat. I was beyond intrigued and immediately went on the hunt in my local natural food stores. Sadly, but not surprisingly, no one in my area carried this product. At least not yet. I said I’d get online and see if I could order it, but, naturally, I forgot to do that. Story of my life.
I can’t help it. I have too much to think sometimes and these mental notes and reminders get lost in the shuffle.
But then…it was as if they felt the need to answer my unspoken prayer…my favorite monthly delivery arrived. Cuisine Cube’s October cube arrived in the mail and I immediately tore into it, wondering what sort of surprises awaited inside. And if you haven’t looked into ordering a Cuisine Cube yet…get over to their Web site and try it out. Seriously, this is one of the best investments I have ever made. Receiving gluten-free items from smaller and lesser known companies each month has become a treat I look forward to every month. So…if you have made a mental note to check them out, and it’s gotten lost in the shuffle…click on the link above and check it out. For real.
Now back to your regularly scheduled blog…
So, October’s Cuisine Cube arrived and one of the items inside was…you guessed it…because I’m blogging about it…Neat – A Replacement For Meat! The version included in the box was the Mexican Mix. Neat, for the record, also has an Original Mix (for burgers/chili), an Italian Mix (for “meatballs” and lasagna), and also a Breakfast Mix (for quiches and breakfast sandwiches). Let me tell you…I did this happy little dance of joy and might have squeaked a bit when I pulled that pouch out of the cube. Seriously…after reading about it and looking for it…I finally had it in my clutches!
As a gluten-free vegetarian, vegan/vegetarian meat substitutes are hard to come by. Most vegan/vegetarian meat substiutes have some sort of vital wheat gluten in them. And a lot of companies refuse to go the gluten-free route because it would “jeopardize the integrity of the product.” BOOOO!! So, up until recently, I’d just season up some tofu and work with that. But…it’s not the same.
So, what exactly is Neat? Neat is a meat replacement that is derived from nuts and other non-GMO natural ingredients. It is a product that was created by a mother of two children who decided that they were going to become vegetarians. At first she would puree beans into sauces to help her girls get the protein they wanted, but after awhile, everyone got tired of it. And that was when she got into the kitchen, experimented, and created what is now marketed at Neat.
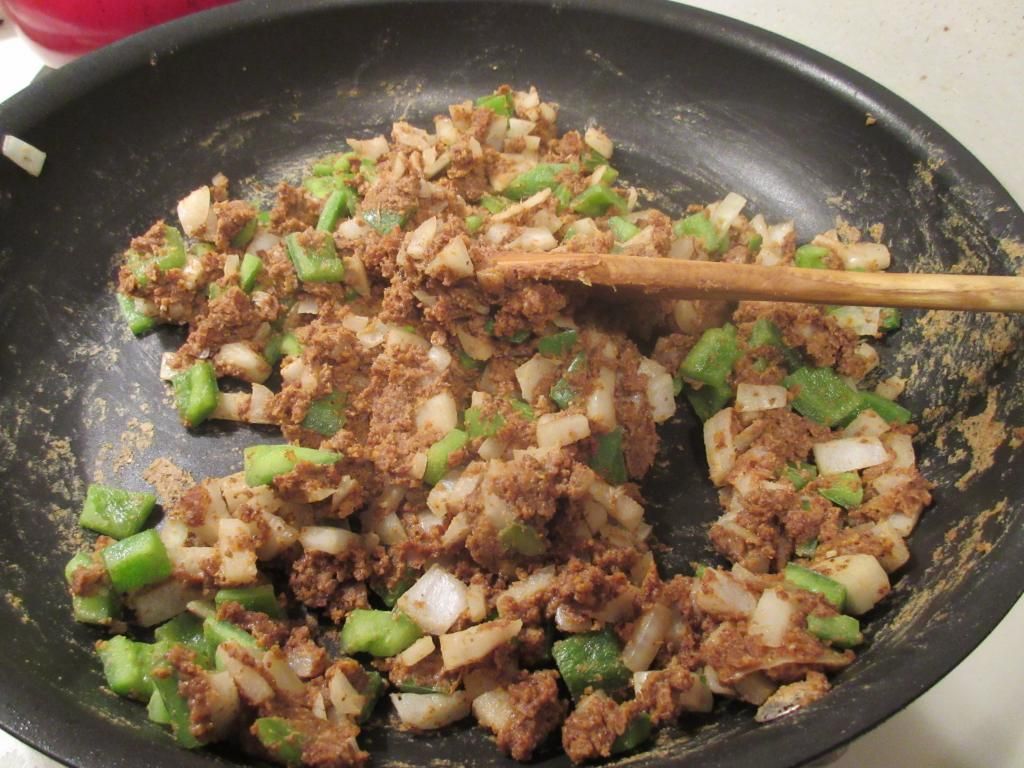
Neat – A Healthy Replacement For Meat Mexican Mix (in a skillet with chopped onion and chopped green pepper)
Neat comes in this shelf-stable pouch in a powdered form. All you do to prepare it is pour the pouch into a bowl, add two eggs (or a vegan egg replacer), plus two tablespoons of water. Stir all the ingredients together and throw it into a skillet over medium heat, just as you would ground beef, for about seven minutes. To make it into crumbles, as it cooks, stir and chop it up, and what you end up with is this perfect texture of meat crumbles that is not just completely vegan/vegetarian…but also gluten-free!
Now…gluten-free and vegetarian tacos are sort of something I’m famous for. I have gotten really creative with how to prepare tacos (Tour De Taco happens often at my apartment) to make them not just gluten-free, but also meat free. And a meat replacement hasn’t been used in a long time. So, while I had a pouch of the Mexican Mix from Neat, I decided to bring back an old favorite of mine as a kid, back when I ate meat and would basically beg my mom to make this for dinner.
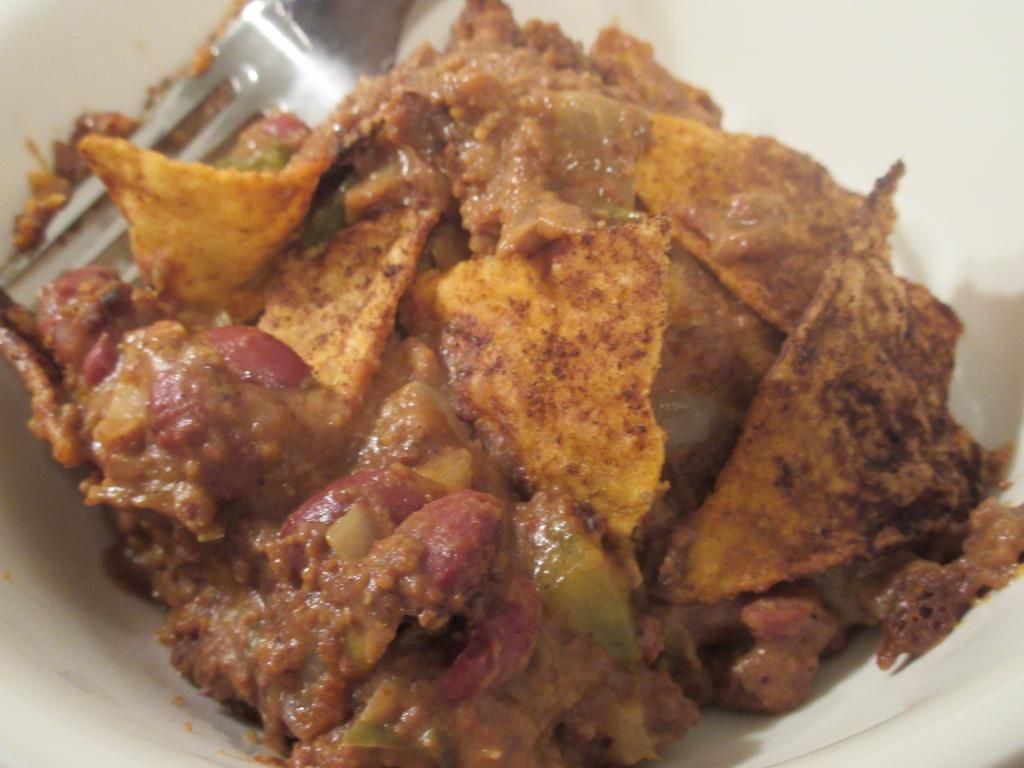
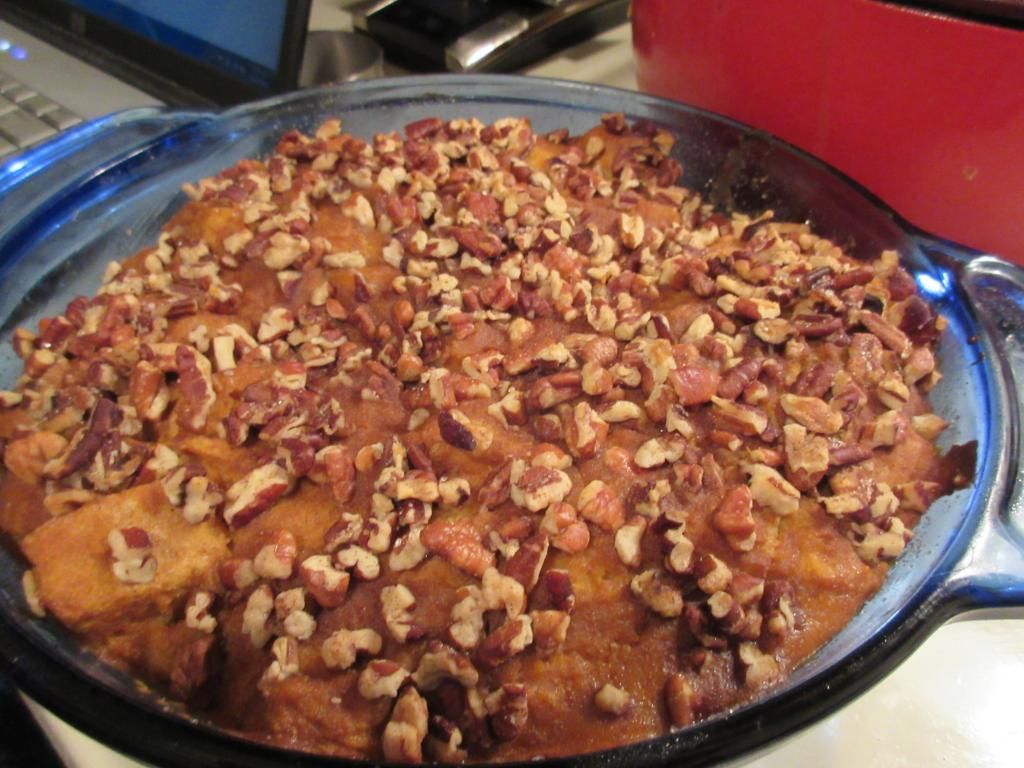
What I did was cook up my mom’s famous Enchilada Hotdish. Normally this is made with ground beef, but this meant I could use the Neat Mexican Mix for a different purpose. Tacos…been there, done that. Enchilada Hotdish…haven’t had that in AGES!! So, that’s what I did. I picked up a gluten-free and vegetarian can of chili and I got a roll of Teese Vegan Nacho Cheese…and the rest was vegetables and seasonings I already had at home. Perfect.
So, tonight…I pulled out the Cuisine Cube treat of Neat – A Healthy Replacement For Meat Mexican Mix and set out to prepare it. I chopped up the vegetables that were needed and then retrieved the can of chili and the vegan nacho cheese (which I substituted for the cheddar cheese soup) and had them ready with my seasoning. First things first…preparing Neat.
Super easy. I poured the powdered contents of the package into a medium mixing bowl. Then, per the instructions, I added two eggs and the water and mixed it up. It created this…sludge of sorts…but I trusted it and went with it. I had a non-stick skillet on the stove and put the Neat into it to start browning. The vegetables were also added so they could start to get soft before I added the rest of the ingredients. With everything in the pan, and heated through, I began to assemble the hotdish itself. This meant putting the “meat” mixture into the casserole dish, then layering it with tortilla chips, then repeating it. Into the oven it went to bake and about 30 minutes later…viola!! I was enjoying a version of my mom’s Enchilada Hotdish.
So…how was it?
It is not an exaggeration when I say I want to marry Neat. For real. WOW! I was SO impressed, not only with the flavor, but how great the texture it. Here is a company that is getting ti right. Going into the pan to cook, it didn’t look appetizing or promising, but it all came together. And it was the perfect meat substitute for the beef that would have been normally used in this recipe. I am thrilled with this product and think I’ll be placing an order to try ALL the Neat products. And, I also might straight-out make tacos next time. But, I figured I should really put this product to the test. Trust the hype…it’s amazing.
Also…tested it out straight from the pan on the tortilla chips and…oh…yum. Makes a great dip too! HA!
Gluten-Free and Vegetarian Enchilada Hotdish (made with Neat – A Healthy Replacement For Meat Mexican Mix)
Let’s first delve into the nitty-gritty ingredients and nutrition of Neat – A Healthy Replacement For Meat Mexican Mix. The Mexican Mix version of Neat is made from pecans, garbanzo beans, organic whole grain gluten free cornmeal, sea salt, and spices. So, where this is meat-free and dairy-free, and also gluten-free…it is NOT nut-free. So, if you have a nut allergy…this product is not for you.
As for nutrition, a serving of Neat Mexican Mix is 40 grams and each pouch contains 4 servings. This serving will give you 21o calories and 15 grams of fat (healthy fat as it is coming from beans and nuts). A serving will provide you with 333 mg sodium and 2 grams of sugar. And, trust me, the 5 grams of fiber and 5 grams of protein will leave you feeling full…whether you’re making a hotdish or having taco night.
But…there is more!
I’ve decided, since it worked out so well, that I would share the recipe I used this product in. This is a family recipe of my mom’s and it is SO delicious!! If you are not a vegetarian, you can use 1 pound of lean ground beef…and if you can handle dairy, please use your cheddar cheese soup (as long as it is gluten-free!)…but this is how I prepared the dish tonight…with great success!!
1 package Neat – A Healthy Replacement For Meat Mexican Mix
2 organic cage-free eggs
2 tablespoons water
1 cup chopped onion
1 cup chopped green pepper
1 tablespoon chili powder
1 package Teese Vegan Nacho Cheese Sauce
1 can vegetarian chili (I used Amy’s Organic Light in Sodium Medium Chili)
1/2 can water
Directions:
Preheat the oven to 350° F.
Pour the Neat – A Healthy Replacement For Meat Mexican Mix into a medium bowl. Add two eggs (or egg replacer if vegan) and 2 tablespoons of water. Mix well.
In a non-stick skillet over medium heat, brown the Next Mexican Mix, onion, and green peppers. Cook until vegetables begin to soften and the Neat can be chopped into a meat texture. Add the chili powder, vegan cheese sauce, chili and water to the mix and mix well. Allow it to heat through for a few minutes to marry the flavors together.
In a 9×9 oven-proof dish, place in layers, alternating the meat mixture with 1 package of tortilla or nacho chips.
Bake for 30 minutes.
~*~*~
Thanks to Cuisine Cube and Neat – A Healthy Replacement For Meat, I was not only able to recreate a version of an old family favorite, but it tasted so much like how I remembered it tasting when I was growing up. I couldn’t have been happier tonight as I sat and devoured my dinner. I can’t wait to get my hands on the other Neat products. Talk about having a desired product land in your lap!!
Seriously…seek out this product!! I highly recommend it! The product is so versatile…beyond just a protein base for tacos. Try out the recipe above or use it in one of your own family favorites. You will not be disappointed. I promise!
Tastefully Simple Gluten Free Cinnamon Apple Cake Mix
Product: Tastefully Simple Gluten-Free Cinnamon Apple Cake Mix – $10.99
I want to give another quick shout-out to my friend (all the way back through middle school!), Rebecca Fifield, who not only is just an all-around fantastic person, but is also a consultant for Tastefully Simple. She was kind enough to send me a batch of the original four gluten-free mixes that Tastefully Simple were putting out on the market. I have one more to go, and this one isn’t one of them.
The product I am reviewing today, the Tastefully Simple Gluten-Free Cinnamon Apple Cake Mix, actually is part of their second round of gluten-free mix offerings, which also brought about a Gluten-Free Coconut Lime Cake Mix. Actually, I am just now realizing that Tastefully Simple sneaked out two more mixes while I wasn’t looking…a Gluten-Free Chocolate Chip Cookie Mix and a Gluten-Free Cinnamon Apple Pancake Mix. I think I know what I’ll be ordering soon!
Anyway…when Tastefully Simple first released second round of products (Coconut Lime Cake Mix and the Cinnamon Apple Cake Mix), I was determined to buy at least one of them. I would have purchased both, except I was already planning on buying more of the Gluten-Free Beer Bread Mix. Hey…that stuff is awesome. So after a little back and forth with myself…I finally chose the Gluten-Free Cinnamon Apple Cake Mix for this time around.
And last night…I baked it up.
One of the things that makes Tastefully Simple products so appealing is how…simple…they are to make. Normally, they require the addition of 2-3 items, all of which get stirred together and then popped into the oven to bake. Seriously…that easy. I love something that won’t take up too much of my time in the kitchen. Let’s face it…I may love to cook and bake, but I’m a busy girl and I value my time.
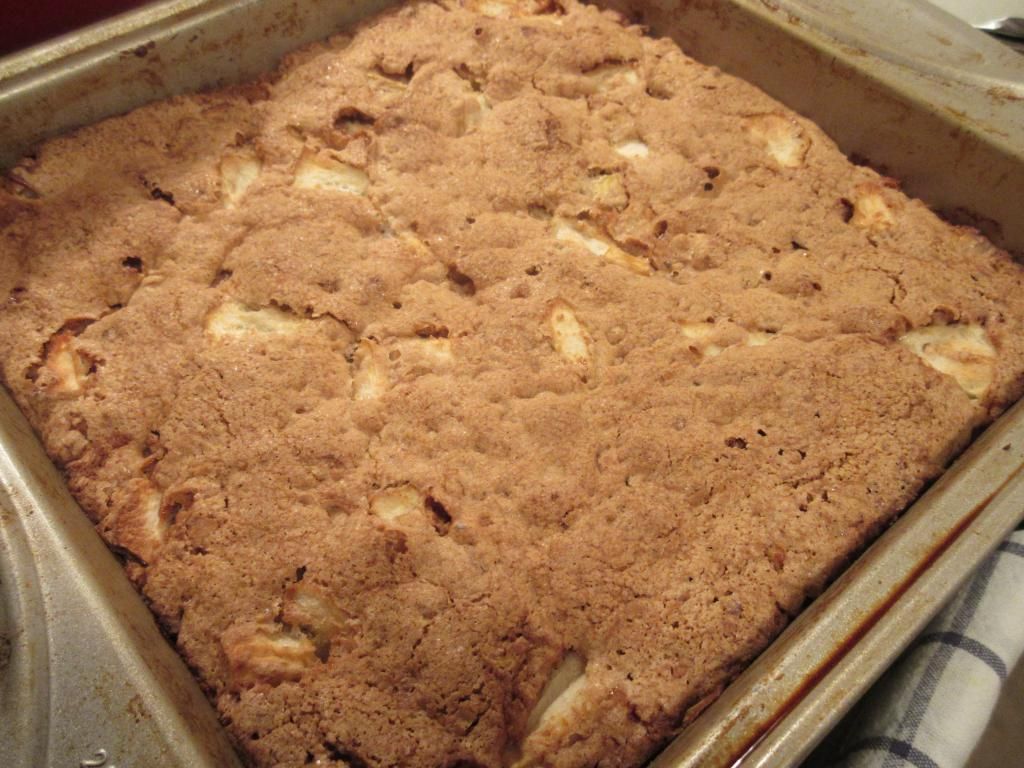
As it was, the Tastefully Simple Gluten Free Cinnamon Apple Cake Mix only requires 2 cups of chopped apples (and, hey, my CSA bin gave me apples this week!), 2 eggs (or egg replacer if you are vegan), and 1 cup of chopped walnuts (which are optional, but I always add nuts!). So, I poured the mix into a mixing bowl, chopped up two large Gala apples, broke two eggs into the bowl, and then added the walnuts. I stirred the contents until everything was combined and no powdery mix remained in the bowl. This took a couple of minutes because the only liquid in the bowl came from the two eggs, and for a moment I didn’t think it was going to come together. I will never doubt again, because it all mixed in beautifully. I poured the batter into a greased baking pan and threw it into the oven to bake. This normally takes about 45-55 minutes. Surprisingly, my old oven perfectly baked the cake in 45 minutes.
Tastefully Simple Gluten-Free Cinnamon Apple Cake Mix (baked and fresh from the oven)
First of all, the Tastefully Simple Gluten Free Cinnamon Apple Cake smells AMAZING as it is baking. We’re in the midst of September, and autumn is coming. This made my entire apartment smell like fall. For real! When it came out of the oven, it took everything in my power to let it cool down before I sliced it up and tried it for myself. I’m not good with self control, but somehow…I managed.
The end result?! One of the most fantastic, moist, and flavorful cakes I have ever had. This is no joke. Not one bit. The apples provide a nice hit of sweetness and texture. The top of the cake gets this nice crust on it, which crumbles as you slice into it. It was a beautiful thing. And the cake itself…aside from being moist, this cake tastes like a flavorful and delicious coffee cake. It has this rich flavor to it, with the cinnamon adding a sweet spice to it that I love and my taste buds crave. I was so surprised with how moist this cake was. I was a bit concerned about it, but I should have known to trust Tastefully Simple. I might be addicted to this cake. Self control is definitely being exercised as I have an entire cake now. It sure does taste like autumn around here.
So, let’s take a look at the ingredients. The Tastefully Simple Gluten Free Cinnamon Apple Cake Mix is made from sugar, rice flour, potato starch, tapioca flour, sodium bicarbonate, sodium acid pyrophosphate, salt, cinnamon, and xanthan gum. It is cholesterol free, gluten free and kosher.
The Tastefully Simple Gluten Free Cinnamon Apple Cake Mix isn’t bad for a cake. Remember though, this is for the mix only, but even after everything is added in, the calories and fat all stay in check. A serving of the mix is 1/4 cup, and the mix itself makes 9 servings. This serving will give you 190 calories. It is fat-free and cholesterol free (until you add the eggs, of course!). The mix has only 260 mg sodium and a whopping 29 grams of sugar. But…it’s cake. It’s going to be sugary! The mix itself has no fiber and only 1 gram of protein.
Not bad at all for nutrition of a cake, that’s for sure. I honestly was so pleasantly surprised by this cake. I think it’s going to become a pantry staple in my apartment. Because…wow…I am beyond impressed.
Now, I know you’re dying to try it! You must be. And you should be. So, head over to Rebecca Fifield‘s page and place an order. I promise…you won’t be disappointed.
A slice of Tastefully Simple Gluten-Free Cinnamon Apple Cake (serving size)
It’s no secret…to anyone…that I love pumpkin. And as we head out of summer and into fall, we have reached the “pumpkin flavored everything” time of year. YAY! But, I have to say, I never let pumpkin season go away in my house. Not at all. In fact, I stock up on pumpkin because I will use it in so many things. As it was, I got a little overzealous this past year with my purchasing of Libby’s Pure Pumpkin…so, my pantry has cans of it. I figured it was time to come up with ways to use it up. Last weekend, I made my Gluten-Free Pumpkin Waffles. This morning…yes…during the work week…I baked up a Gluten Free Pumpkin Bread Pudding. I love bread puddings…and this one was no exception. Even better…it is so easy to make.
I spotted the original recipe when Schär Gluten Free posted a link to a blog that had utilized their Gluten Free Classic White Rolls in a bread pudding. Made with pumpkin.
They had my full and undivided attention.
So…this morning…I decided to bake up the recipe that Mama Me Gluten Free originally posted and Schär linked to on their social media site. I made a few changes in the preparation for convenience sake…but in the end…it was just as amazing as the recipe promised.
Package of Schar Classic White Rolls (or any gluten-free bread that is similar in consistency), cubed into 1 to 1-1/2- inch pieces (I let mine sit out overnight to dry out)
1/2 cup chopped pecans
Cinnamon and sugar to sprinkle on top (optional…but delicious)
Directions:
Preheat oven to 350°F.
Grease a 2-quart baking dish.
Place bread in a large bowl and set aside.
In another bowl, mix together pumpkin, milk, eggs, sugars, salt, vanilla paste or extract, cinnamon, ginger, cloves and nutmeg.
Pour over bread and gently stir until all is covered. Let this sit for about 15 minutes.
Pour the mixture into the baking dish and spread it out with the back of a spoon or a spatula so that it is evenly spread throughout the dish.
Sprinkle pecans over the top, and shake cinnamon and sugar lightly over it all if desired.
Bake for 45-50 minutes.
ENJOY!
~*~*~
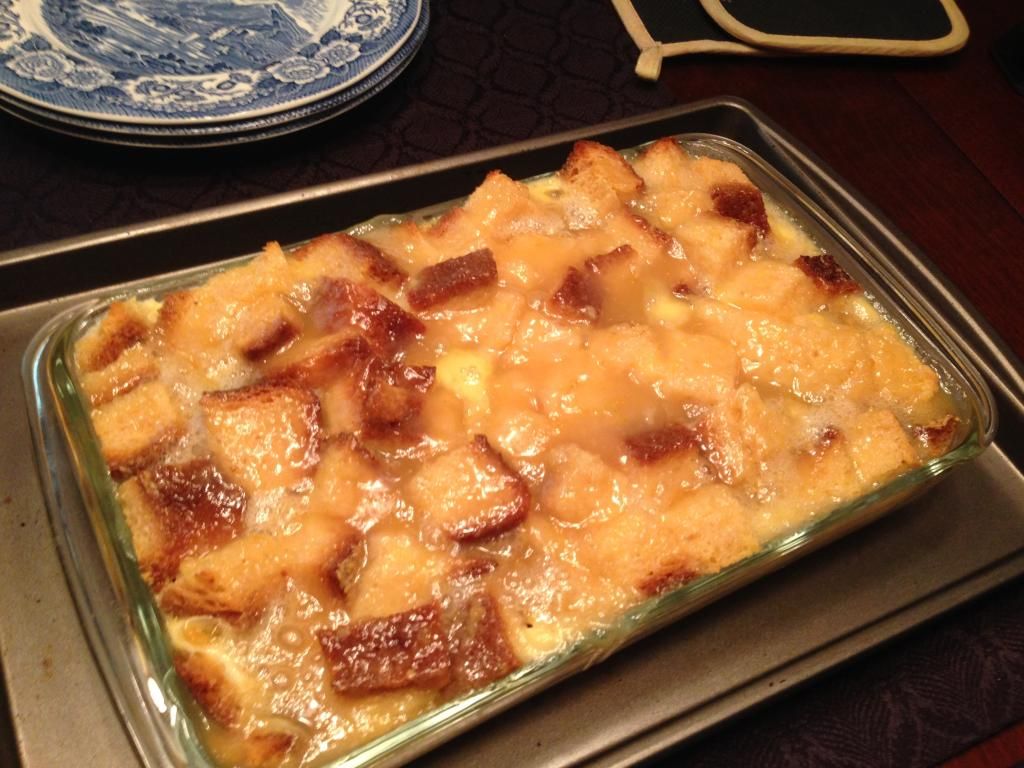
A slice of Gluten Free Pumpkin Bread Pudding with Maple Syrup
Oh…oh yes!! This bread pudding is one of the best (and easiest) I have made to date. I served up a wedge of the Pumpkin Bread Pudding with a delicious drizzle of warm maple syrup. If heaven was on a breakfast plate…that would be it. The flavors are amazing. There is the right hint of spice and sweetness to really elevate the savory aspect of the pumpkin. It’s rich. It’s decadent. And the pecans sprinkled with the cinnamon and sugar on top truly lend a great hit of sweetness as well as texture. I am totally going to make this again! But lucky for me, I still have 3 more days worth for eating it.
If you are a pumpkin freak like me…believe me…you’ll want to bake this one up!
Product: Breads From Anna Gluten Free Banana Bread Mix – $7.49+
I don’t remember where I first heard about Breads From Anna bread mixes…but I discovered it one day at work. I remember messaging my friend, Jenn, on Twitter because the store locator showed that her local natural foods store, The Raisin Rack, carried these mixes. She said that the next time she made it over there, she’d check.
Well, it just so happened that the next time she was over there…I happened to be with her. And my roommate happened to be in a generous mood as far as the food budget, because she handed me a basket and told me to fill it up!
I did. And, lo and behold, in one of the aisles with a bunch of gluten-free baking mixes…I found Breads From Anna bread mixes. Lots and lots of them. The hard part was finally choosing which one to try first. While I love pumpkin bread…in the end I went with the Gluten Free Banana Bread Mix.
Normally I make my own bread, but I have never, ever had a gluten-free banana bread come out right. I figured it was time to call in some help in the form of a mix. When in doubt…try the experts. How did I know that Anna would be an expert? I didn’t. But I had heard things. Good things. And as a celiac and type 1 diabetic, she wanted to make bread that tastes like bread (not cardboard), and as a trained chef, she was able to put her skills to the test and created safe, allergen-free products that would have superb flavor, texture, and taste. When her non-celiac brother first tried her bread…he said it tasted like bread. That was all she needed. Breads From Anna grew from there.
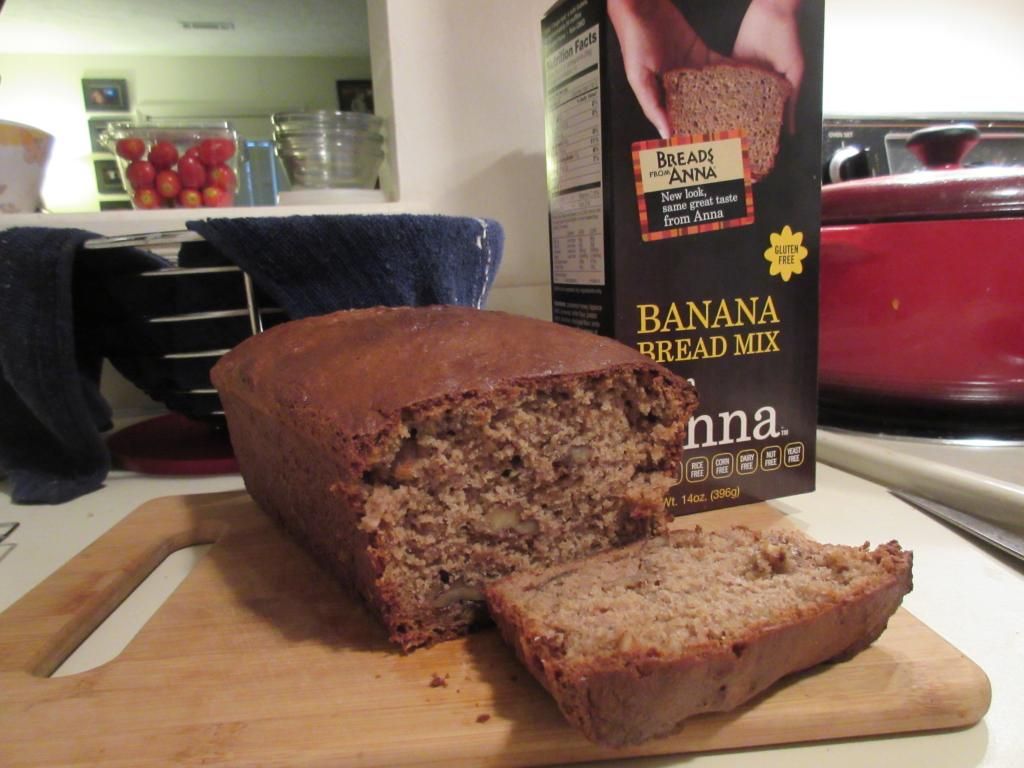
Regardless of what I heard and the creator’s promise on the side of the box…with me…it just has to be baked and tested. Making the batter was easy. After preheating the oven and greasing one bread loaf pan, I mixed together the eggs, the oil, and the 3 bananas, which I had pureed in the food processor. In went the bread mix, and once that was well blended, I went ahead and folded in the optional chopped nuts. Because banana bread plays nicely with nuts. Into the loaf pan and then into the oven for one hour.
Yes. One hour. One hour of sheer torture because after about 20 minutes, you get that amazing banana bread smell wafting out of the kitchen. I was literally doing my hand weight routine and trying really heard not to drool. The aroma was beyond enticing. I peaked into the oven about halfway through and the loaf had risen and puffed up gorgeously and was turning this fantastic golden color. I wasn’t sure it needed the remaining 30 minutes, but kept it in the oven regardless…hoping for the best this time around. When the timer went off, I pulled it from the oven and set it on a cooling rack to now cool in the pan for an hour.
Sweet torture!
But…well worth the wait. After an hour…to the exact moment, I made my way back into the kitchen, grabbed a knife, and you better believe I carved a slice out of it. My roommate, who is non-celiac and a bread connoisseur, was my ultimate test. I handed her a slice of the still warm gluten-free banana bread and waited for her to take a bite. She absolutely loved it. My turn.
Moist. Light. Definitely delivering on the flavor, the texture, and the overall feel of banana bread. This bread isn’t heavy and dense. It isn’t overly banana. It’s moist, but without being wet. It’s perfection. Honest to goodness bread goodness. I wish I could claim I made this from scratch. This loaf of bread puffed up to this gorgeous loaf with a nice golden outer crust. Inside, you get this fantastic banana and walnut flavor. And this loaf does bake up big. Like…better than any other bread I have made, whether from scratch or from a mix. Never before has it turned out like this one did. I’m hooked. I want to buy all the Breads From Anna Mixes and just get into that kitchen and test them all out.
Totally worth it.
So, down to the science of things. The Breads From Anna Gluten Free Banana Bread Mix is made from powdered honey, tapioca starch, arrowroot, millet four, potato starch, chia flour, chickpea flour, pinto bean flour, navy bean flour, cream of tartar, baking soda, xanthan gum, and sea salt. This bread mix is gluten-free, yeast-free, corn-free, dairy-free, soy-free, nut-free and rice-free. For a bread that is yeast free…it sure did rise up beautifully. This mix is also kosher parve and non-GMO.
Nutritionally speaking, the Breads From Anna Gluten Free Banana Bread Mix contains 14 servings. One serving of the mix on its own is 80 calories. The mix is fat free and cholesterol free. Just the dry ingredients alone, you will be taking in 270 mg sodium and 9 grams of sugar. In addition, you will be consuming 2 grams of fiber and 1 gram of protein.
I. AM. IN. LOVE.
With a bread mix. Thank you, Anna Sobaski…for creating this fantastic mix to make gluten-free baking, which is an art and science all itself, easy for someone like me. This bread is one of the best I have ever cooked up in my kitchen. I am happily, happily noshing away on this delicious loaf. And with all the flavor, texture and taste of “real” banana bread…no one would have a clue that they were eating gluten-free.
It’s become a sort of tradition whenever Weekend at Jenn’s happens…Sunday morning means creating one of our, now legendary, breakfast treats to feast on. No more eating out…no more eating day old goodies from the local gluten-free bakery (although, I’m okay with that…just sayin’.) We usually plan it out the week of the visit…and I sprung this one on her sort of as an afterthought a day or two before my drive up that way. She, thankfully, had everything but the bread…which I had in my freezer, leftover from our last bread pudding adventure. Seriously, if you ever want a sturdy bread…order the Katz Gluten Free Braided Challah loaf…the big one…and you will have at least 6 uses out of it. I know I got my money’s worth, that’s for sure.
Anyway…I don’t know why…but I was feeling lemon this week. And it just so happens that my two partners in crime, Jenn and Cathy, are both lovers of lemon and lemon flavored things as well. This recipe was going to be a match made in heaven. Jenn and I took a recipe, originally posted by Bijouxs, and put our own little touches on it to make it easier as well as change it to gluten free. We also made ours dairy free…because I’m sort of lactose intolerant and every little bit helps!
This bread pudding smelled SO amazing as it was baking up on Saturday morning. It does take an hour to do. And Jenn and I prepped the dish the night before and let everything soak up and sit in the fridge until we were getting ready for breakfast. I recommend doing this. The original recipe called for homemade lemon curd. We weren’t feeling that. Jenn had a 12 ounce jar…so we just used every bit of that jar in our version of this dish. Just make sure that the lemon curd is gluten-free (not all of them are!).
And now…you can make it yourself and see what I mean!
Place the bread slices cut sides down in a lightly buttered 10 x 8 inch oval ovenproof baking dish. Fit the bread slices together in a single layer to completely cover the bottom of the pan.
Spread the top of the bread slices with all of the lemon curd.
Whisk together the milk, sugar, eggs, lemon juice, lemon zest and pinch of salt, mixing well and pour over the bread.
Cover and refrigerate for at least 3 hours (or overnight like we did!), to allow the bread to absorb the milk mixture. Remove from the refrigerator at least 30 minutes prior to baking.
Preheat the over to 325° F.
Cover the bread pudding with foil and bake on top of a sheet pan for 30 minutes.
Remove cover and bake for an additional 30 minutes until puffy and golden brown.
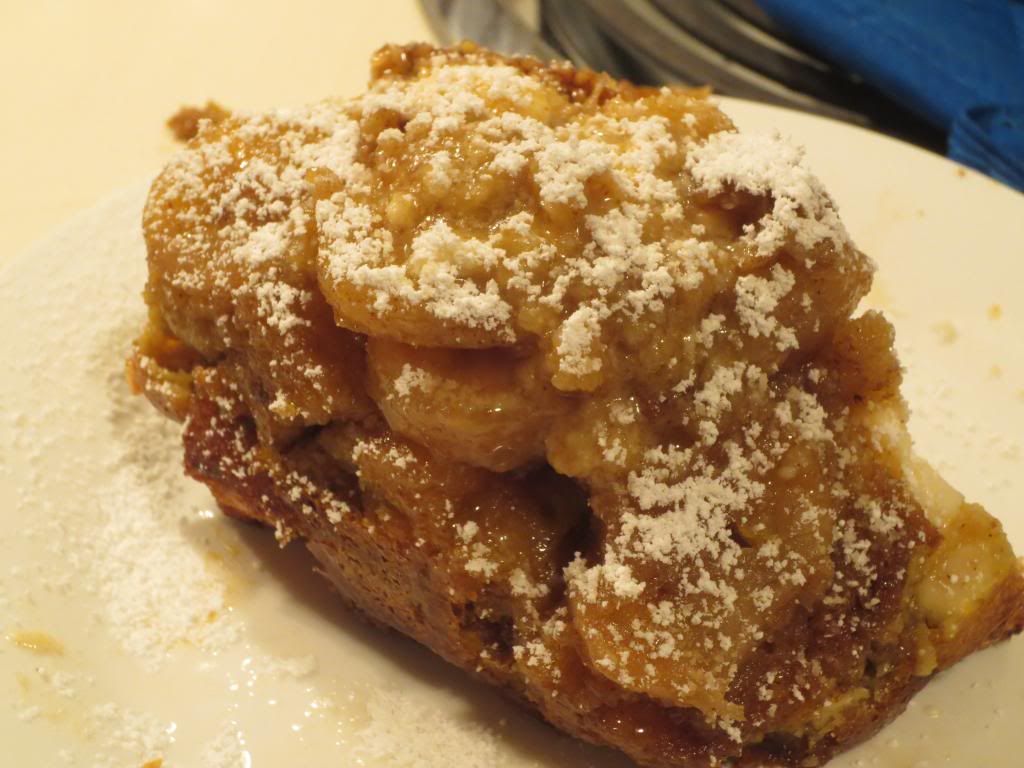
Dust with confectioner’s sugar and serve warm with whipped cream or vanilla ice cream if desired.
~*~*~
OMG…amazing. Bright, zesty, tangy…it was a citrus flavored treat all rolled into one amazing little bread pudding. This makes a day brightening breakfast or a light, palate cleansing dessert. No matter how you slice it, all of us were digging into this delicious treat. I brought some home and reheated it for breakfast this morning. This reheats beautifully. Seriously. Nothing got soggy or gross in the fridge and it didn’t get destroyed when nuked in the microwave for about 2 and a half minutes. Still amazing. Still tangy. Still…OH so good!
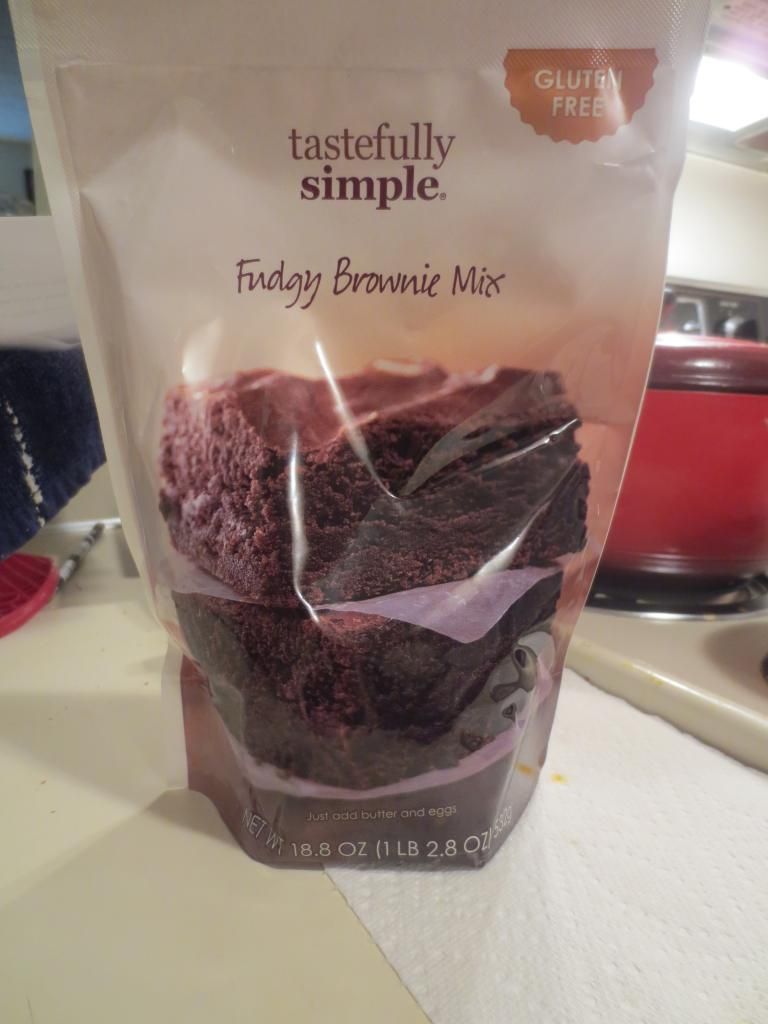
I want to give a quick shout out to my friend, Rebecca Fifield, a Tastefully Simple consultant and friend of mine since middle school. When Tastefully Simple first put out their new gluten-free products, she sent me a box containing said products and asked me to try them out. Sometimes, I get distracted, but I always get around to it. And while I have already reviewed the Tastefully Simple Gluten-Free Gluten-Free Beer Bread Mix and the Tastefully Simple Gluten-Free Vanilla Bean Pound Cake Mix, I had yet to get around to the (honestly) most important one…the Tastefully Simple Gluten-Free Fudgy Brownie Mix.
Why is this one the most important product? It’s not…I just made that up. Why? Because it involves chocolate. And brownies. And second only to cookies…brownies are my next favorite treat in life. Seriously. And while there are plenty of gluten-free options out there for brownie mixes…let’s face it…they aren’t all great.
Well…I don’t know what convinced me that today was a good day to make brownies. It was 97°F outside…I had just returned from Detroit (I was seeing Queen in concert!) and the World Cup Final was about to begin. Of course, brownies seem logical, yes?
Well, the best part about Tastefully Simple is…how simple their products are to make. So, this took me, literally 5 minutes to get ready to go into the oven. Anything that doesn’t require me dragging out my Kitchenaid Mixer and a bunch of different bowls and ingredients is a good thing in my book. And this…required only two additional items to the mix itself – 2 eggs and butter.
That’s it.
Simple.
Tastefully simple.
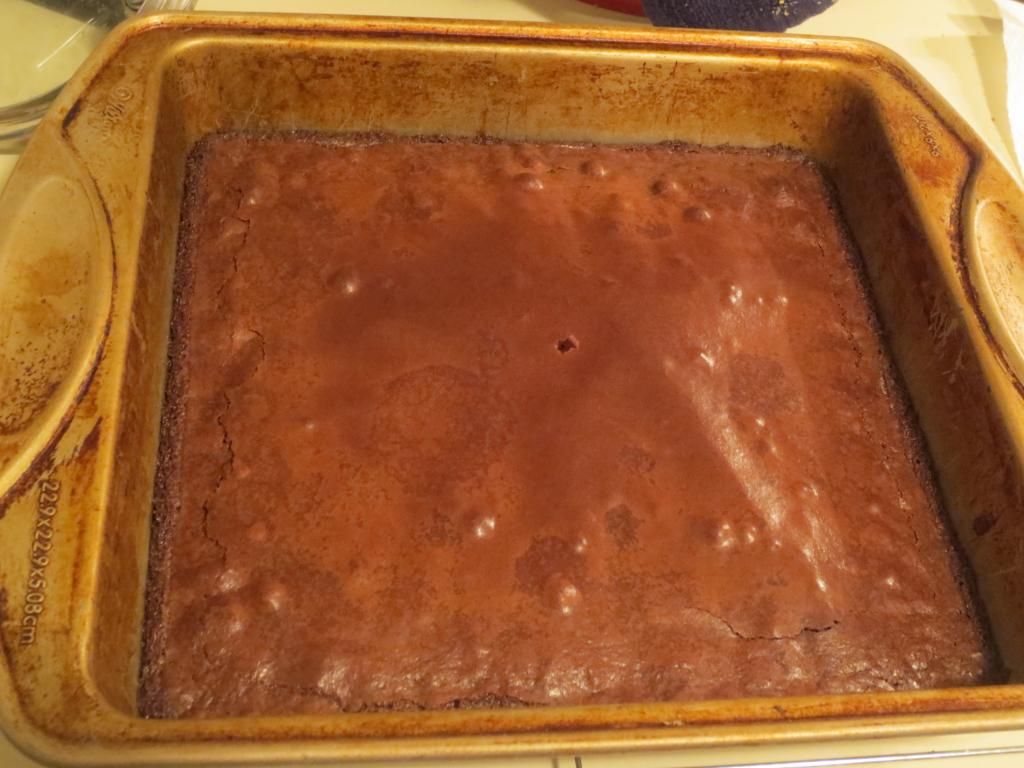
So, here I was, moments away from kickoff and I’m preheating my oven to 350°F and getting out a large bowl. I empty the Tastefully Simple Gluten-Free Fudgy Brownie Mix into a large mixing bowl and crack open 2 eggs. I add the melted 1-1/2 sticks of butter to the bowl, grab a spoon, and simply stir it all together. The thick, chocolate batter then is poured into a greased 8×8 baking pan…and into the oven it went. No World Cup missed. And dessert well on its way to being done in 40 undisturbed minutes.
Tastefully Simple Gluten-Free Fudgy Brownies (baked and fresh from the oven)
Near the end of the first half, my timer beeps and I get up and pull the brownies out of the oven. I had been smelling them all during the match and my mouth was already watering. They looked amazing…a little crisp on the edges, but crumbly and flaky all throughout the center. I inserted a toothpick to see if it came out clean…and it did. The Tastefully Simple Gluten-Free Fudgy Brownie Mix was done baking. I placed the pan on cooling rack and got to work on dinner while they cooled.
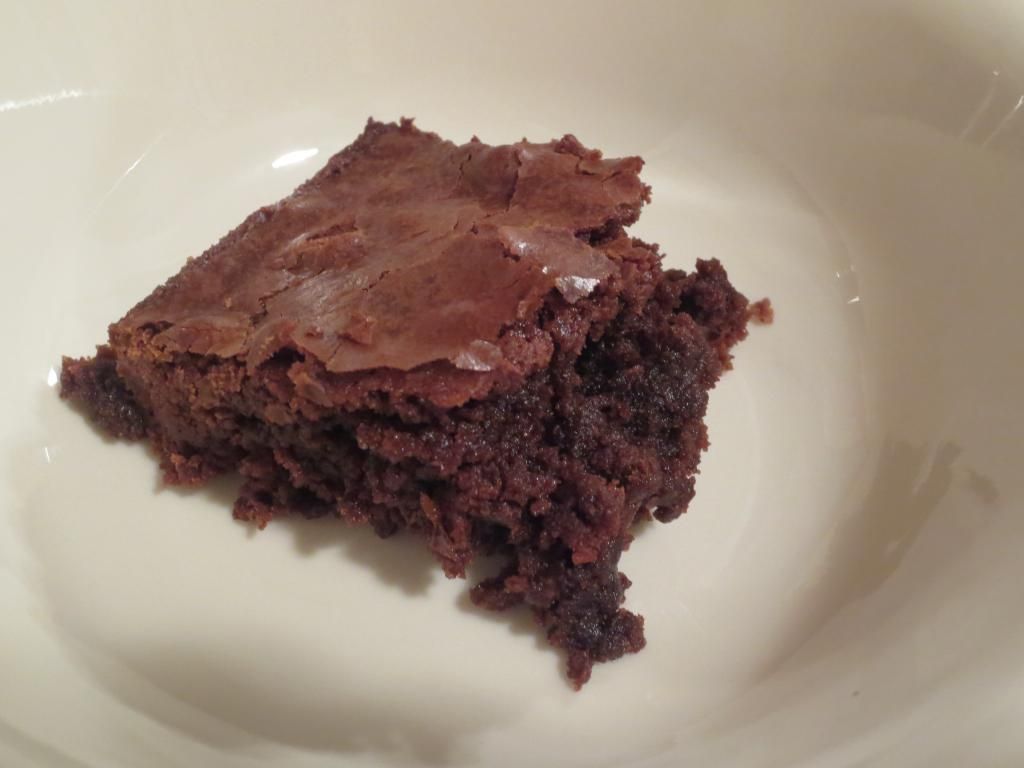
After dinner, it was time to give my dessert a try. I got out a knife and sliced the Tastefully Simple Gluten Free Fudgy Brownies into 16 squres, as the serving is 1/16th of the package. Math is my strong subject. I eased out two squares, one for my roommate and one for myself. As we are coming off of a mega concert high and World Cup excitement, it was time to doctor these up. I got out my gluten-free So Delicious Coconut Milk Cookie Dough Ice Cream and placed a scoop on top of the brownies. Then, topped it off with a drizzle of hot fudge. Gluten-Free Brownie Sundaes done in time for the second half of the final match.
So…here’s the thing…
The Tastefully Simple Gluten-Free Fudgy Brownie Mix bakes up really rich and fudgy brownies. Oh…my…GOD! These were chocolate heaven. I ended up pushing my scoop of ice cream off the top of the brownie so I could simply enjoy it and all it’s moist, chocolate goodness. Seriously. I wasn’t expecting to fall this in love with this dessert, but Tastefully Simple truly nailed it with these. They have a nice, crisp, outer edge…but the rest of the brownie is ooey, gooey, soft, fudgy goodness. From one bite to the next, I was already anticipating the next rich burst of chocolate. I was just…loving each and every bite and had to stop myself from going back to steal another square. I did, however, pick up all the crumbs from the two pieces I dished up and ate those. Hey…nothing this good should go to waste.
I know, you’re thinking that $11.99 is a lot of money to spend on a brownie mix…but when Tastefully Simple does something…they do it right. And with it being so easy to prepare and bake, you’ll never want to go back to any other brownie mix. Phenomenal flavor…sweet, rich, moist and simply tasty.
Let’s look at ingredients, shall we? The Tastefully Simple Gluten-Free Fudgy Brownie Mix is made up of sugar, rice flour, cocoa, potato starch, tapioca flour, and less than 2% of natural flavors, salt, xanthan gum, and silicon dioxide (anticaking). It is gluten-free and can be made vegan by using vegan butter (like Earth Balance) and using an egg substitute.
As for nutrition? Well…they are brownies. So…remember that. A serving of the Tastefully Simple Gluten-Free Fudgy Brownies is 1/16th of the package. So that’s about a 2-inch square, I think. This serving will give you 130 calories and 0.5 grams of fat. It is cholesterol-free. You will be taking in 60 mg sodium and 20 grams of sugar. Yep…it is high in sugar, but it’s also the first ingredient on the pouch and…it is BROWNIES! Dessert. Hello! This mix also provides 1 gram of fiber and 1 gram of protein.
Thank you Rebecca for introducing me to Tastefully Simple and their gluten-free line. I have a few more products to review, but so far, everything I have been able to try has gone above and beyond all expectations. I think the Fudgy Brownie Mix will never leave my pantry. Ever. Simple and delicious. That’s Tastefully Simple. And they make some of the best gluten-free products I have ever been able to easily make and try.
Make sure you head over to Rebecca Fifield‘s Tastefully Simple page and order some for yourself! You will not be disappointed.
I admit it…originally, I was going to take my zucchini and pull out my handy-dandy Cusinart food processor and make some more gluten-free zucchini bread. Why? Because I love my family recipe for zucchini bread (which very successfully bakes up gluten-free from the original not-gluten-free recipe). I was so tempted.
But…I’m going out of town this weekend…and need to use up produce without having too much left just sitting around in the crisper drawer or in the fridge and freezer. So…I hunted down other ideas. And thanks to the magic of Pinterest…I stumbled across a recipe that would not only use up the zucchini in my crisper, but also one of my two sweet potatoes. It was from the blog Averie Cooks and I had everything necessary to make these that night for dinner. I sent the link to my roomie and she mightily approved. I gave her the option of two sweet potato recipes…and she went with this one. And so…dinner was decided…just like that.
Upon returning home from the office on Friday, I set myself to work in the kitchen, cleaning and shredding up a large sweet potato and a large zucchini. And when all was said and done, these baked up to be a soft, but delicious treat for dinner. Honestly, I can’t wait to make it again. The flavors are amazing and they even go well in a skillet and served up like a veggie burger on a bun (that’s what I did with the leftovers!).
2 teaspoons chipotle seasoning (I used ancho chili powder)
1/2 teaspoon salt, or to taste
1/2 teaspoon black pepper, or to taste
2 tablespoons all-purpose flour (I used Trader Joe’s Gluten-Free All-Purpose)
about 3 cups coarsely grated sweet potato (1 medium to large sweet potato, peeled and grated)
about 2 cups coarsely grated zucchini (1 large or 2 small zucchini)
Directions:
Preheat oven to 375°F and line two baking trays with parchment paper. Sp with cooking spray; set aside.
In a large microwave-safe bowl, melt the butter, about 1 minute on high power.
To the melted butter, add the egg and beat with a fork to combine.
Add the chipotle seasoning, salt, pepper, and stir to combine.
Add the flour and stir to combine.
Add the sweet potato, zucchini, and toss to combine.
Mixture will be loose and a bit soggy.
Using a 1/2-cup measure, form fritters by transferring one heaping half-cup of vegetable mixture from mixing bowl directly to baking trays. They will be about 4-inches in diameter.
Bake fritters for 10 minutes at 375°F and if fritters have “leaked” or released any liquids, either from the zucchini releasing water, or the butter-egg mixture, just “push” the liquid back into a fritter using a spatula.
Lower oven temperature to 350°F and bake for about 15 minutes. Carefully flip fritters over (they will be soft and delicate, so be careful to flip them without breaking them) and bake for about 15 more minutes, or until browned. Fritters will be browned but soft upon removal from oven. Allow them to cool and firm up on the baking trays for at least 10 minutes before moving or serving them.
~*~*~
Really, really fantastic flavor!! Honestly. My roommate raved about them. They are still quite soft, but they are delicious and amazing. I fell in love with these at first bite. And so did the roomie. In fact, we were thrilled to come home tonight and eat the two leftover patties as veggie burgers. The night I made these, we each had 2 fritters each (about 100 calories per fritter), and I baked up some gluten-free zucchini fries with the leftover zucchini. One of my favorite dinners to date.
I encourage you to give these fritters a shot. They are definitely worth the time they take to make and eat. Trust me…you’ll love them.
Mmmm. I love a good breakfast. I love doing something different and outside the box. I love breakfast so much that I could (and have) eat it for every meal of the day. Seriously. But when you get a little tired of various ways to do breakfast food, there is always another option out there. And, thankfully, for me, I discovered a great looking recipe via I Heart Eating’s blog, which I adapted to be dairy-free and gluten-free…for an overnight French toast recipe.
Sort of like a breakfast bread pudding.
But with bananas. And vegan cream cheese. And rum.
Yes. RUM!
And that is why, the day after I ran a marathon, I found myself in my kitchen baking up a fantastic breakfast treat. It was Easter morning, and that meant something special needed to start off the day. Aside from a short shakeout run…my only other plans that morning was to bake up this breakfast. I had actually prepared it the night before and all night it was marinating in my fridge…just waiting to be placed in that warm oven.
So, without further adieu…I give you the recipe for Gluten-Free and Dairy-Free Overnight Bananas Foster French Toast Casserole!
Recipe: Gluten-Free and Dairy Free Overnight Bananas Foster French Toast Casserole
Gluten-Free and Dairy-Free Overnight Bananas Foster French Toast Casserole
4 tablespoons butter, melted (I used Earth Balance)
2/3 cup brown sugar
2 tablespoons light corn syrup
1 teaspoon vanilla extract
1/2 teaspoon dark rum
1/2 tsp. ground cinnamon
2 medium ripe (not overripe) bananas, sliced
French Toast
2/3 loaf gluten-free challah bread, cut into cubes (I used Katz Gluten-Free)
4 ounces Toffutti Better Than Cream Cheese
6 large eggs
1 cup unsweetened almond milk
1/4 cup granulated sugar
1/2 teaspoon ground cinnamon
1/4 teaspoon ground nutmeg
1 teaspoon vanilla extract
Pinch of salt
Powdered sugar (for dusting)
Directions:
Make the banana topping by stirring together the melted butter, brown sugar, corn syrup, vanilla extract, dark rum, and cinnamon. To make banana topping, stir together butter, brown sugar, corn syrup, extracts, and cinnamon.Lightly grease a 9×9-9nch baking pan.Pour the butter sauce into the prepared pan.Place banana slices over the sauce.Layer half of the bread cubes over the bananas.Dot the bread cubes with the vegan cream cheese.Cover with the remaining bread cubes.Whisk together eggs, milk, sugar, vanilla extract, cinnamon, nutmeg, and salt in a medium bowl. Be sure to mix it well.Pour the egg mixture over the bread. Smoosh the bread down a little so that the bread can absorb the egg mixture.Cover and refrigerate overnight.In the morning, remove the pan from the refrigerator and leave it out while preheating the oven to 375°F.
Uncover and bake on a rimmed cookie sheet (in case the topping bubbles out…mine didn’t…but you can’t be too careful) for about 30-40 minutes or until the eggs have set.
Allow it to cool in the pan for 5-10 minutes.
Invert to serve and sprinkle with a dusting of powdered sugar.
Enjoy!
~*~*~
While I have made plenty of overnight recipes before, there was definitely something special about this one. The flavor was fantastic. The banana portion, once inverted was rich and creamy, and the bread toasted to perfection, giving a nice play on both taste and texture. I was beyond impressed with the way this turned out. It totally made for the most amazing Easter breakfast I have made yet.
While Indy was in town this past week, we really wanted to treat her to a nice dinner, welcoming her in true foodie style, to the area. It just so happens that while we were at Disneyland last September, she treated everyone to a tasting menu at the Chef’s Counter of Napa Rose…complete with wine pairings. It still ranks up there as one of the most amazing meals I have ever had the opportunity to eat. Disneyland’s chefs work really well around my dietary needs, and my meal was completely gluten-free and vegetarian…complete with the perfect wine to compliment each dish we were served.
Well, this gave us an idea…to treat her to a tasting menu at one of our local restaurant’s chef’s tables. It happens that three local restaurants have a chef’s table. And after a little debate…Cathy and I decided on a new hotspot in town, Rye. Rye is located in the NULU region of Louisville…and it seemed right up our alley. Cathy got in touch with the restaurant, speaking with PR and Events Coordinator, Erin MacDonaold, and made arrangements, explaining my dietary needs and that she and Indy would be up for anything. But they had to stay within the perimeters of my diet for me. The chef and the restaurant had no problem with that, so…it was set. Friday night…we’d be treating Indy to a tasting menu with drink pairings at Rye.
The most difficult part was not telling Indy we were doing this. The only instruction we gave her was to bring something nice to eat dinner out in on Friday night. That was it. That was all she got. And we didn’t even give her the name of the restaurant until we were getting close to it, even though she asked because she wanted to look it up on Yelp. We have our ways. Anyway, once she knew which restaurant, she seemed pretty excited about that. The chef’s counter, however, remained a surprise until we got inside and Cathy let them know our reservation. As we were being walked back to the counter at the kitchen, Indy leaned in and said, “Did I hear chef’s counter.” HAHAHA!! Yes, my dearest foodie friend. Yes…you did!
We were seated at the counter, facing into the kitchen, getting a first-hand view of the chefs at work. I was soaking this in, just watching how they worked together, talked, and even put together each dish. It was heaven to me. I still have a dream of being a chef. Maybe one day it will happen. But this…was a treat and I was enjoying it.
At Rye, that evening, we were assigned to the caring hands of Chef Joe Banet, Bar Manager Doug Petry, and Alyssa, who was around for anything we might need or questions we might have. Let me tell you, this team was amazing. Doug had the drinks out to us just before the food was brought over by Chef Joe. And Alyssa made sure we had everything we needed, from fresh silverware to full glasses of water. It was incredible. And, within a few minutes of looking over our menu that Chef Joe prepared, he came over to introduce himself and explain that he would have our first course up in no time. Our first course…of what would be an 8 course tasting menu.
The only difference between my menu and those of Indy and Cathy was that mine was strictly vegetarian, so I was served a cooked vegetable instead of the protein they received. My drink was different in a few occasions too, better paired with my vegetable than their meat. Other than that…it was time to enjoy some good food and soak up the experience.
Rye’s Radish with Whipped Butter and Black Salt, served with Dolin Blanc, Sugar, Meyer Lemon Bitters
And it was off to a good start. Doug brought out our first drink, a Dolin Blanc with Sugar and Meyer Lemon Bitters. This accompanied our first course, which arrived a moment later…Radish with Whipped Butter. Granted, they had Caviar Butter with their Radish as well as a Potato Roll…but since I’m a gluten-free vegetarian…I received extra garnish on the radish with the whipped butter just beneath it with a hit of black salt. The radish was bitter, as it should be…and it was a bit odd being served with butter…especially since I had no way of really eating the butter. I put some on each bite of radish and it complimented the flavor well enough, the black salt cutting back on the bitterness by adding a little zing to each bite. Still a bit bizarre, but delicious. And that’s what mattered. The pairing with the Dolin Blanc was brilliant. The effervescence and lightness was a great way to start off the meal.
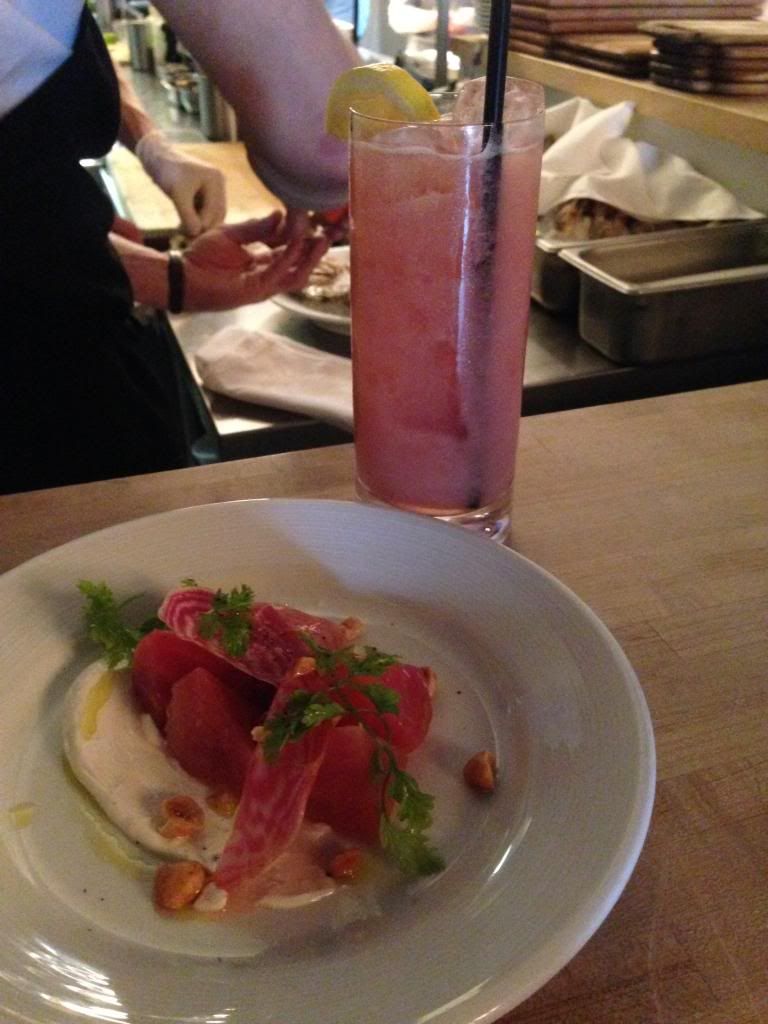
Rye’s Beets with Lavendar-Mango Chutney, Labne, Hazelnut, Chervil, served with a Raspberry Lemonade
Our plates were cleared and things were given time to settle. But, after about 10 minutes our next drink was brought out. It was a Strawberry Lemonade. No alcohol in this one. Just a sweet palate refresher. Not but a moment later, Chef Joe appeared with three identical plates. The second course was Beets with Lavender-Mango Chutney, Labne, Hazelnut and Chervil. THIS…my dear friends, turned out to be my favorite course of the entire meal. Yes…this one. The roasted beets were fresh and fantastic. Perfect, really. And it paired so well with the labne (strained yogurt). The lavender-mango chutney was light and fresh. And topping it with toasted hazelnuts was a stroke of genius, as it gave a hit of texture when it was needed most. The fruitiness of the raspberry lemonade paired and played well with the sweet, yet earthy flavor of the beets. I was in foodie heaven with this one. I could have eaten another plate of that and been a happy girl.
Plates were cleared again and we were once again given time to chat, watch the chefs at work (we were trying to figure out just how many
Rye’s Asparagus with a Smoked Egg, Endive, and Pignoli, served with Chono Sauvignon Blanc
oysters they shuck per night, because there was a lot of shucking over on our end of the counter!), observe some cooking techniques…and watch as the lights flickered and caused problems. The owner came over to apologize for the technical difficulties with the lights over the pass and asked if it was going to bother us as they fixed it because he could move us. We were content where we were, however. (On a completely different line of though, the phrase ‘where we were’ is kind of interesting to type!) Anyway, with that decision made, we were soon greeted by our third drink pairing prior to our entree. Cathy and Indy received a Stillwater Classique beer. This was a change from what was printed on the menu, so it took them by surprise. Since I’m gluten-free, my drink stayed true to the menu that was created, and I was served a glass of Chono Sauvignon Blanc. Cathy tasted her beer and didn’t like it much…but we still had food to pair with it. And Chef Joe appeared soon after, serving up our third course. This course was Asparagus with a Smoked Egg, Endive, and Pignoli (pine nuts). First of all…a smoked egg is the most wonderful thing in the world. It’s smokey and savory and rich and creamy and just made of complete yumminess. Seriously…if I had a smoker I would do this every morning for breakfast. In fact, I asked Chef Joe how to smoke an egg…and now I kind of feel like I need a smoker just to be able to do it. Yes…this was a rich dish. The smoked egg was velvety smooth and paired so well with the bitterness of the endive and the perfectly cooked white and green asparagus. I savored each and every bite. And because it was so rich, the wine pairing was perfect. This course was comfort food to me. For the record, Cathy never did really like the beer.
When plates were cleared, we all gazed down at our menus to see what was up next. This is where dishes started to really get different. Cathy and Indy were about to start getting their proteins. Mine stuck to a tried and true vegetable replacement for said protein. The rest of the dish would mirror each other. And, on some occasions…the drinks would be different.
Rye’s Sweet Potato Soup with Kaffir Lime Leaf, Coconut Milk, Cilantro, served with a Pineapple Shrub
Such was the case for the fourth course of the night. This one was a light serving, which was what we needed after all the richness in the smoked egg and asparagus course. Doug brought over our drink pairings for the upcoming course. Cathy and Indy were given another beer, this time Stiegl Grapefruit Radler. Cathy was pretty certain she’d hate it since she hates grapefruit, but this turned out to be one of her favorite drinks of the night. Go figure. As for me, Doug paired mine with a Pineapple Blush, which he described in great detail and all I remember about it is that it had vinegar in it. That just seemed strange. But I gave it a sip prior to the dish coming up and it actually had a refreshing taste. The vinegar worked. Chef Joe brought over soup bowls for us. My soup was Sweet Potato in a broth made from Coconut Milk and flavored with Kaffir Lime Leaf and Cilantro. The broth was the same for Cathy and Indy, but they had Crab and Clam in their soup, not sweet potato. I loved how light this course was, and how refreshing. I am a sucker for soups as it is, and this one was perfection. Seriously. The broth was creamy without being filling. The sweet potatoes were soft and delicate and perfect. The seasoning was spot on. And who doesn’t love an amazing soup? Fantastic. And the drinks paired perfectly. I enjoyed sipping my Pineapple Blush between tastes of my soup. Delish.
Our bowls were taken away and we watched as more food was prepared, put up at the pass, looked over by the expediter, and then sent out to
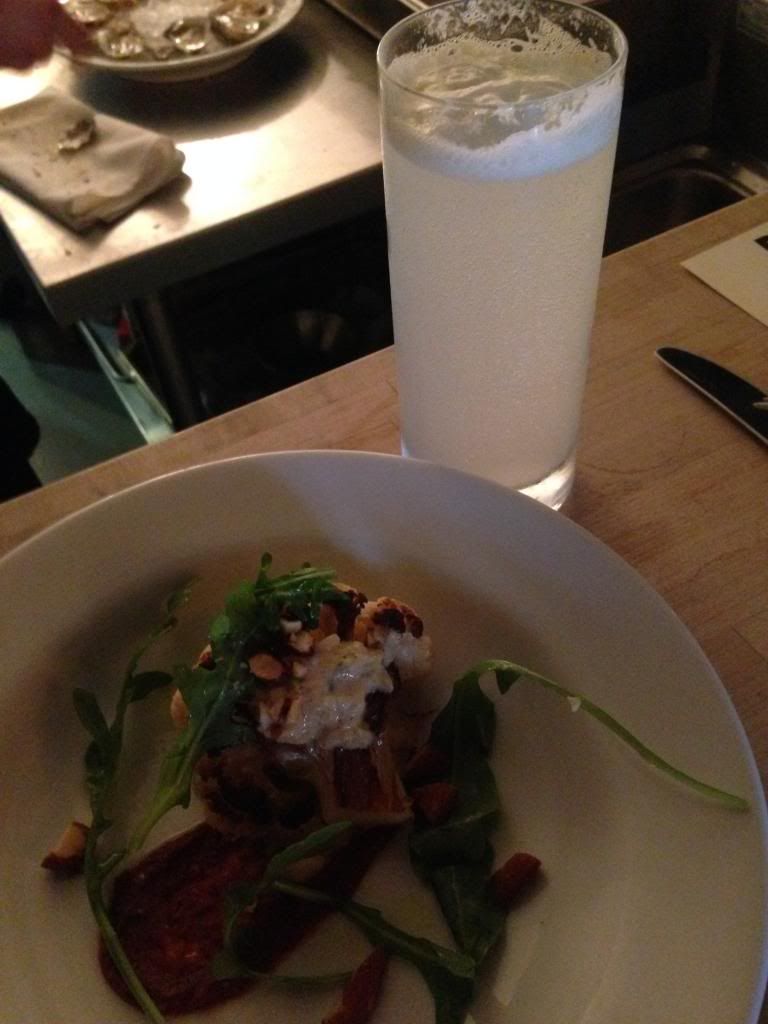
Rye’s Cauliflower with Harissa, Almond, Arugula, Cucumber, served with a Gin, with Lemon, Sugar, Cucumber Sea Foam
tables. It was so awesome watching the kitchen work while we ate. Doug returned with three glasses of identical drinks. We were each served one and he explained that we were about to taste a Gin that was done up with Lemon, Sugar and topped off with a Cucumber Sea Foam. I figured this one would be interesting because I’m not a big fan of gin…at all…but the cucumber sea foam sounded A-MAZ-ING! I took a sip, and while it did taste a little gin-y…the cucumber sea foam gave it this refreshing taste. I actually found myself liking this one. And, on cue, Chef Joe came over with our course. The fifth course of the night, for me, was a fantastically grilled Cauliflower with Harissa, Almond, Arugula and Cucumber. Ah…a match to that cucumber sea foam. Cathy and Indy were served Monkfish instead of the cauliflower. First of all, the harissa was amazing. This chili pepper paste was a nice play against the refreshing cucumber and the warm cauliflower. In fact, I was trying to get a little harissa in each bite because I loved how it worked with everything on the plate. The almonds added a nice hit of texture. Yeah…this one was so good. Now I want harissa in my kitchen to use on my own cauliflower when I cook it. Cathy fell in love with the monkfish, but Indy wasn’t as sold on it.
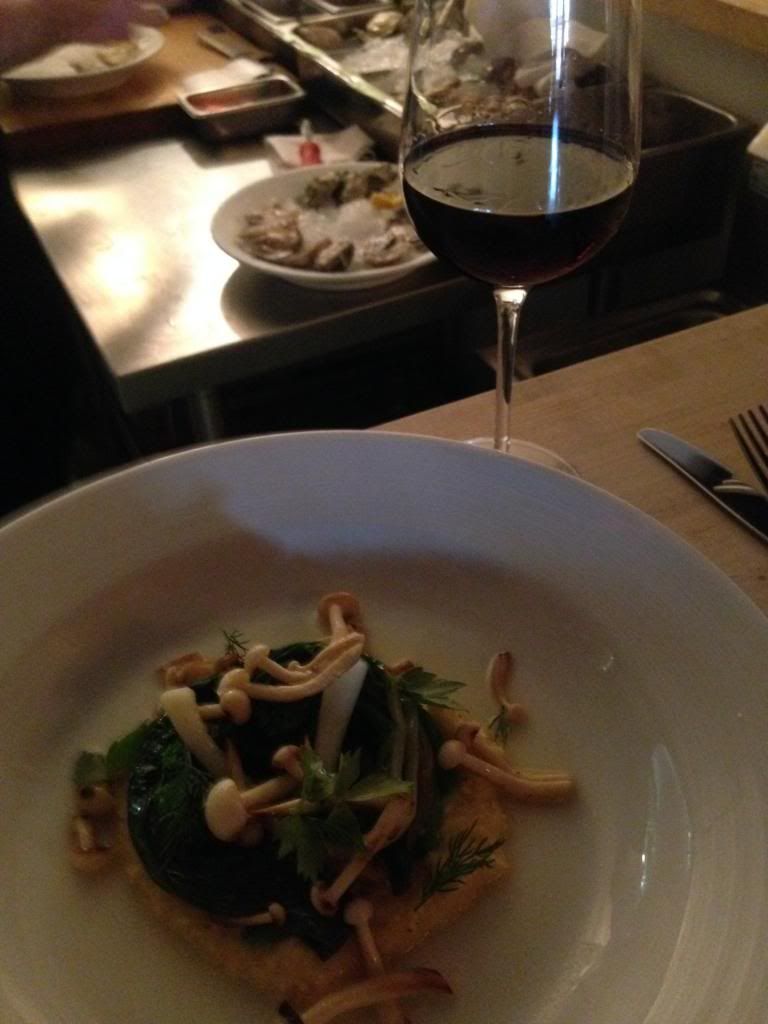
Rye’s Broccoli Rabe with Ramps, Hon-Shemeji Mushroom, Yellow Grits, Lovange, served with Leese-Fitch Zinfandel
Another plate clearing and more time to let things settle. We were starting to get full, but we were over the halfway point. And thankfully these were small plates. This time, our food beat the drink to our counter. So, Chef Joe went ahead and described our sixth course to us. For me, I was given Broccoli Rabe with Ramps, Hon-Shemeji Mushrooms, Yellow Grits, and Lovange. Cathy and Indy were served Rabbit with their ramps, mushrooms, grits and lovange. We waited for a moment and a minute later, Doug was at our sides giving us each a glass of Leese-Fitch Zinfandel. We now felt ready to dig in. I sipped the wine first, finding that bitterness that I often find with red wine. But it was good. And when I took a bite of the broccoli rabe with the ramps (onions) and the earthy mushroom…it was a perfect pairing. My favorite part, however, was the grits. And as I lived in Alabama for six years and never liked grits, this totally surprised me. I couldn’t say enough good things about these grits. This was a fantastic course and we all polished it off. Indy much preferred the rabbit over the monkfish, saying that the cuter your food is, the better it tastes. Veggies must be really cute, because my food was really good.
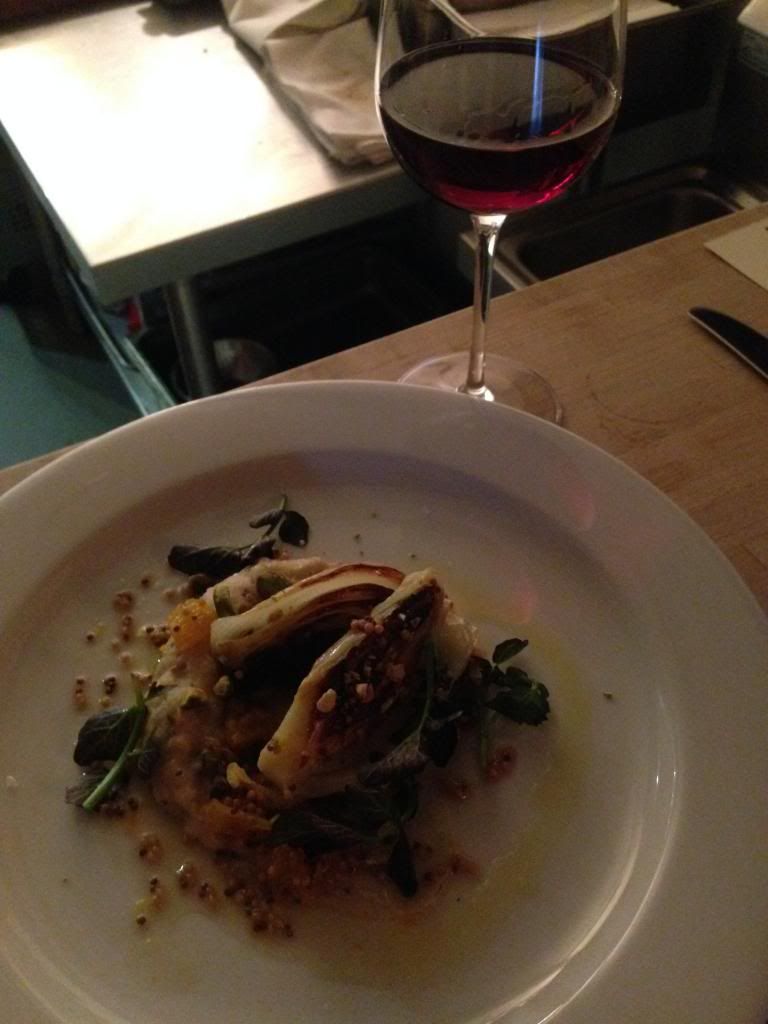
Rye’s Fennel with Parsnip, Black Garlic, Red Watercress, Pistachio, Orange-Mustard Jus, served with Angeline Reserve Pinot Noir
And so…our plates were cleared once more and we waited, talking about how the impending food wall was approaching. But we didn’t care. The food was some of the most amazing I had in a long time. This was definitely a treat. Doug appeared at our sides with a glass of Angeline Reserve Pinot Noir and talked about how it would pair well with our next course. Chef Joe arrived with our plates. I was given Fennel with Parsnip, Black Garlic, Red Watercress, Pistachio, and an Orange-Mustard Jus. Cathy and Indy had Duck instead of the fennel. Wow. I loved how the Fennel was grilled and cooked down to perfection. The parsnip puree was perfect. It wasn’t gritty at all. The black garlic paired well with everything, seasoning it perfectly. I loved how the pistachio gave it some texture. And, surprisingly, the orange-mustard jus was delicious and just amped up the flavor of the dish. Cathy and Indy definitely seemed happy with the duck. And when we were done eating, we were all eying the menu. One course to go…and it was dessert. I always have room for dessert.
Rye’s Lemon Curd with Macadamia Brittle, Pink Peppercorn Meringue, served with Gerard Bertrand Cremant de Limoux
Gone were our dishes and Cathy was really, really looking forward to our dessert. Why? It was lemon. And we are both huge fans of anything lemon. Seriously. Even better, the chef changed the way it was made so we could all have the same dish and it could be kept gluten-free. This made me a happy, happy girl. Doug appeared with our final drink pairing of the night. This was a Gerard Bertrand Cremant de Limoux. I love dessert wines. LOVE. If I could drink dessert wine all the time, I would totally do it. Pure perfection. This was light and crisp and just…delicious. I had to remind myself to save some for the dessert. Chef Joe brought out the most amazing looking dessert of all time. Seriously. It was Lemon Curd with Macadamia Brittle and a Pink Peppercorn Meringue. First of all…salty and sweet. Second of all…LEMON!! This was a fantastic and light dessert. And I wanted to devour it quickly because it was so delicious…but I managed to keep my sweet tooth under control and really savor each bite. The lemon flavor was spot on. Not too much. Just right. And the pink peppercorn meringue was fantastic. Light. Fluffy. Topped with the macadamia brittle that just tied everything together and gave it a crunch, which was needed in an otherwise soft dessert. This was love in dessert form. Lemon-y, nutty, meringue-y love. And I had to make sure I got a bit of everything in each bite.
Rye really, really outdid themselves. Not only were we treated well from the start, but the food they served up was beyond anything I could have imagined. They were more than happy to work with and around my food allergies and dietary needs. Sitting at the chef’s counter was an amazing treat that was worth every bit of money we poured into that meal. This was more than a dinner out with my foodie friends…this was a foodie experience.
If you haven’t checked out Rye yet…you should. Their menu sounds amazing and they are very good with dietary restrictions. Their kitchen is clean and kept that way. Their staff is knowledgeable. And I can’t wait to go back again and try some food off their standard menu.