Twas the night of my Monday fun run…and instead of doing my usual go-to meals…a Tasty Bite Indian meal or a grilled cheese sandwich…I went off the beaten path. I decided…pasta would be good. Mmmm…pasta.
I love pasta, and being gluten-free sometimes means I don’t get as good pasta as I used to be able to eat. Rice pasta gets mushy and gummy. Corn pasta is fine…but doesn’t always go with what I’m making.
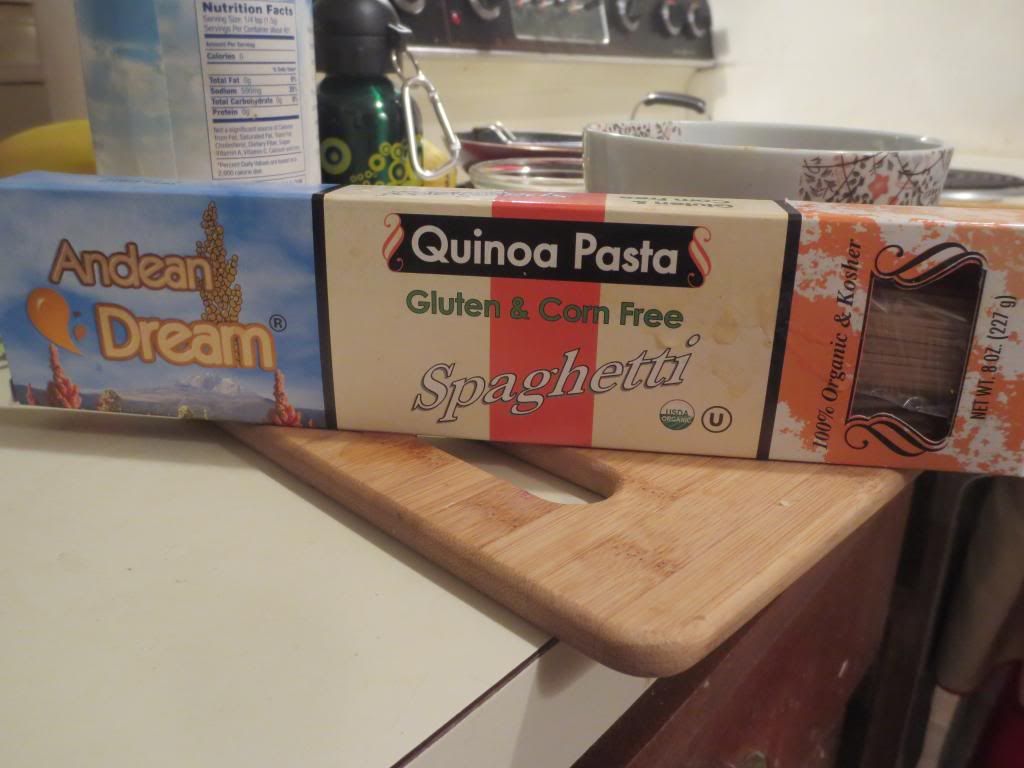
And then…Andean Dream created the solution to my problem. Quinoa pasta. Yes…pasta made from quinoa. I figured…why not give it a try? So, I purchased a box of the spaghetti and took it home with me. I have an overabundance of gluten-free pasta…because I love pasta…like…love, love, love…devour…mmmmm…good…carbs…pasta…kind of love…so this one sat in my pantry until it was it’s turn.
Well, on Monday…for some reason…I decided it would be pasta night. Even though it was a hectic, busy, rushed night. Traffic going to Louisville is bad. I mean…BAD…every Monday and it’s only gotten worse with some of the construction going on…lane closures on the bridge…etc. Why I thought pasta might be a good idea, who knows? Things work out better in my head. Timing works out better in my head. But…that’s how life goes.
Live. Learn. Eat pasta anyway.
I made it home from work and immediately turned on the pot of water I left on the stove all day. It was covered, so I hoped that would bring the water up to a boil faster. I opened up the Andean Dream Quinoa Spaghetti and pulled out 4 ounces…or two servings. The box says that it serves 4, so this was half of the box. But you know me…I weighed it out.
The color and texture of the dried noodles remind me a lot of when I ate spelt pasta. That was a good sign. I loved my spelt pasta…until I could no longer eat it. While waiting on the water to boil, I did busy work…like get changed, put together lunch and snack for the following day, and chop up some grape tomatoes and get them sauteing in a pan with some olive oil. The water did boil and in went the Quinoa Spaghetti. The box said it would take about 13-15 minutes to cook, so I let it go…stirring occasionally…and hoped that it wasn’t one of those pastas that really took about 20-25 to reach that perfect al dente. It wasn’t. It took all but 13 minutes. I swear to the quinoa gods (which must exist for this to be a reality!).
Time to plate up. I had my tomatoes in a pan, so I drained the pasta, threw it in the pan with the tomatoes, added my chopped fresh basil, and just gave it a toss, warming it all up all the way through, coating everything in the remnants of the olive oil and red wine vinegar. Viola. Dinner was served. And…appropriately devoured…with a little slice of the gluten-free pull-apart bread I made and baked up over the weekend when my sister was in town.
So…how did the pasta stack up in flavor?
I only want to buy quinoa pasta from now on. It is fantastic. It didn’t get gummy or mushy. It held up through the additional cooking with the tomatoes and basil…in the sauce. It didn’t crumble or fall apart. It was so good. The texture reminded me not just of spelt pasta, but when I could eat whole wheat pasta. It just…was wow. Wonderful. Not chewy, not mushy, not disappointing at all. I was thrilled to cook it up again and have it perform equally as well on the second go-round.
Yes…Andean Dream has converted me. Quinoa pasta…FOREVER!
A serving size of Andean Dream Quinoa Spaghetti is 2 ounces, which dishes up a delightfully tasty 207 calories. Which is about right for a pasta. Just slightly under most other pastas out there. The Quinoa spaghetti has only 1 gram of fat. In addition to all that, not only is this pasta wheat-free and corn-free, but it is also sodium-free. That’s right!! A serving also provides you with a meager 3 grams of sugar and fiber. But, due to this pasta being made from quinoa and rice flour…a serving contains 6 grams of protein. Love that quinoa!!
Looking for a change or just want to step away from the strictly rice and corn based gluten-free pasta out on the market? I highly recommend Andean Dream pasta noodles. The spaghetti worked perfectly with my dinner and I can’t wait to try the other pastas that Andean Dream makes. So happy with this…and wish I had dug it out sooner!!
Gluten-Free Caprese Pasta made with Andean Dream Quinoa Spaghetti
A couple weeks ago…I tried O’Doughs Gluten-Free Original Flavor Bagel Thins and was just…wowed by them. Sure, this bagel-lover enjoys that soft, chewy inside of a bagel as much as the next one…but sometimes, even with gluten-free bagels, it can be a bit much. So, the fact that gluten-free bagel thins existed made me very, very happy.
And my local grocery store just started to carry these little gluten-free gems in their freezer section. You do not know happy until you’ve seen me settle in at breakfast with a fantastic bagel with a schmear of some variety of cream cheese (often vegan). I was raised in New York…the bagel capital of the universe. No exaggeration. New Yorkers love a good bagel.
And when I had to go gluten-free…I feared that the bagel would be out of my life forever. I tried a few varieties out on the market and hated them. I fell in love with Udi’s…but they can be really filling at times. Sometimes…you just want something light…but bagel-y. Yes…that’s a word…now. And thanks to O’Doughs…this has become a reality.
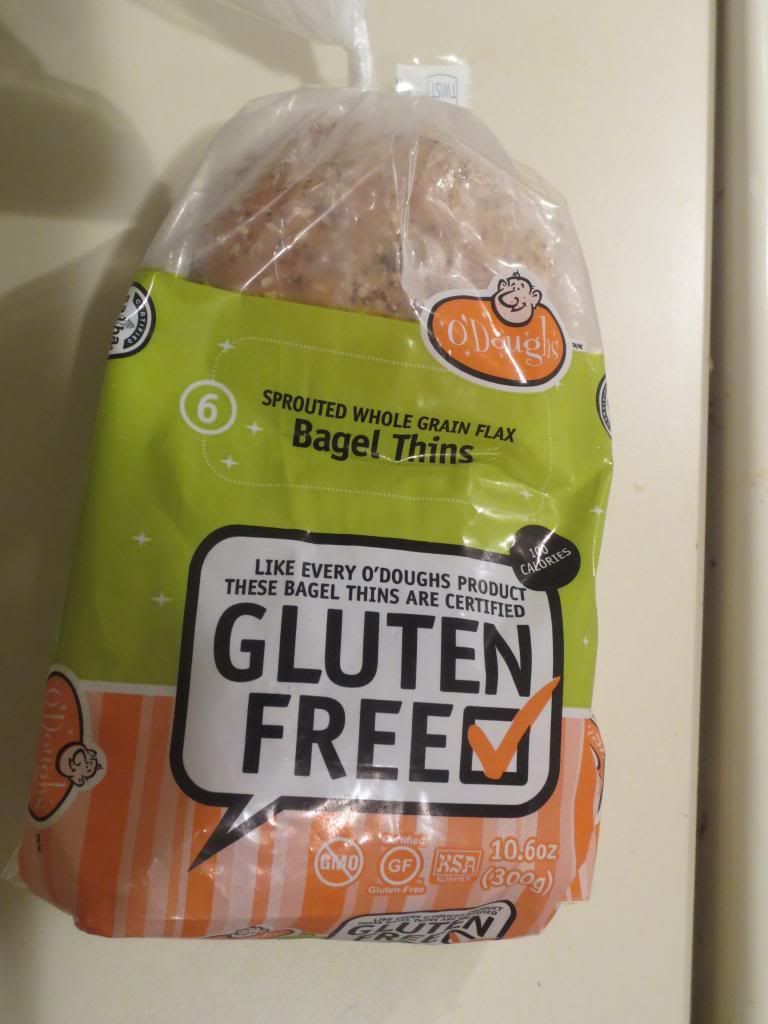
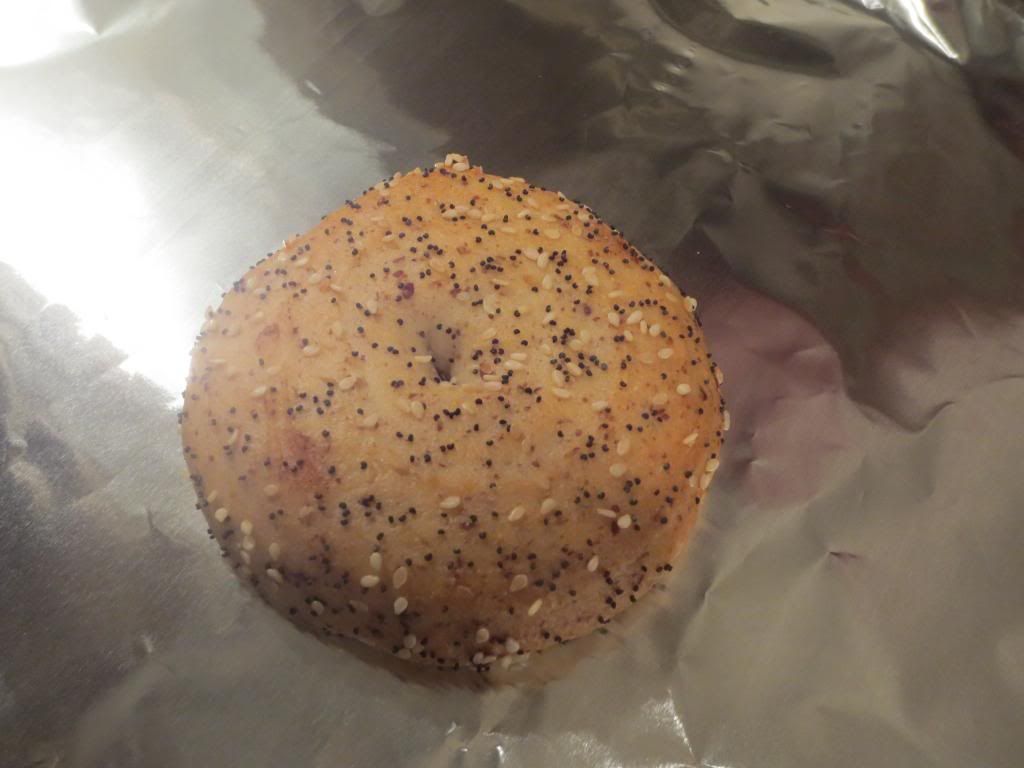
O’Doughs Gluten-Free Sprouted Whole Grain Flax Bagel Thins are these thin little slabs of bagel, which I actually had to slice in half this time. The original were pre-sliced. I don’t know if this was a fluke or what…but…I managed. Without destroying them in the process too, I might add. God love a good serrated knife. WOOHOO! Anyway, these bagel thins are made up of filtered water, potato starch, tapioca starch, chickpea flour, sprouted flax flour, soya flour, rice flour, evaporated cane juice, cellulose gum, glycerine, sunflower oil, yeast, salt, xanthan gum, cinnamon, algal oil, baking powder, baking soda, sesame seeds, and poppy seeds.
I am wagering a guess that this is really their attempt at an Anything Bagel…which is a definite New York staple.
So…after giving them a toast…and a schmear of a pumpkin spice cream cheese…how did they work out?
Deliciously wonderful. This variety of O’Doughs Gluten-Free Bagel Thins actually have this fantastic rustic and nutty flavor to them. The top of the bagels themselves have this amazing sprinkling of seeds (sesame and poppy). I loved that, as they toasted up with the bagels themselves and really penetrated the dough of the bagel thins…giving them amazing flavor and texture. And…you won’t overfill your stomach with these thin little bagels of awesomeness. Not only does O’Doughs provide these amazing Sprouted Whole Grain Flax Bagel Thins free of trans-fat and eggs, they are also non-GMO, kosher, and a healthy and delicious source of fiber.
Now comes the point in the blog where I talk about the nutritional value of the product I ate. Well, the O’Doughs Gluten-Free Sprouted Whole Grain Flax Bagel Thins are made with all-natural ingredients and no preservatives. A serving is 1 bagel thin, which gives you 100 calories and 1.5 grams of at. One of these tasty gluten-free bagel thins provide 300 mg of sodium and 2 grams of sugar. Not too bad at all. And you will also be consuming 2 grams of fiber and 2 grams of protein.
As I stated in the blog about the Original Flavor Bagel Thins by O’Doughs…if you spot these…snatch up a bag of them and give them a try. They are some of the best bagels I have ever tasted. All that bagel flavor…not too filling…not too fattening. Just right. And with so many varieties of toppings to choose from with bagels…get creative and put your own spin on them. The Gluten-Free Sprouted Whole Grain Flax Bagel Thins are delicious, fantastic, and healthy. Not to mention…just plain awesome.
So…go and buy some and toast up some gluten-free bagel-y goodness today. Or tomorrow morning. But do it!
Quick Indian meals are usually my Monday thing. I mean…I have to get home from work, scarf something down, and get changed and out the door to head to my running group’s Monday meet-up at 6 p.m. Not easy when construction is going on and often traffic is at a stand-still going across the river. It can be frustrating. And when trying to take a little bit of stress out of the day…the best thing to do is have a simple meal prepared.
But this time…this was a Wednesday thing. I had eaten a big lunch on the way back from Chicago the Monday before I had this…so no food was necessary that evening. Not a bite. But…Wednesday marked a big heaping deal of a run. My good friend, Natalie, was completing her pledged 180th straight day of running to raise money for the victims of the Boston Marathon bombing. And she invited the group at the store to run those last miles with her. She chose 4.15 miles, in honor of the date of the bombings, April 15.
So, that evening sort of ran (heh…no pun intended. See what I did there?) like a Monday night. That morning, I cooked up two servings of jasmine rice, let it cool, and tucked it away in the fridge for later. Upon returning home from work…I heated up the rice, pulled out my next packet of Tasty Bite goodness…and got ready to dive in.
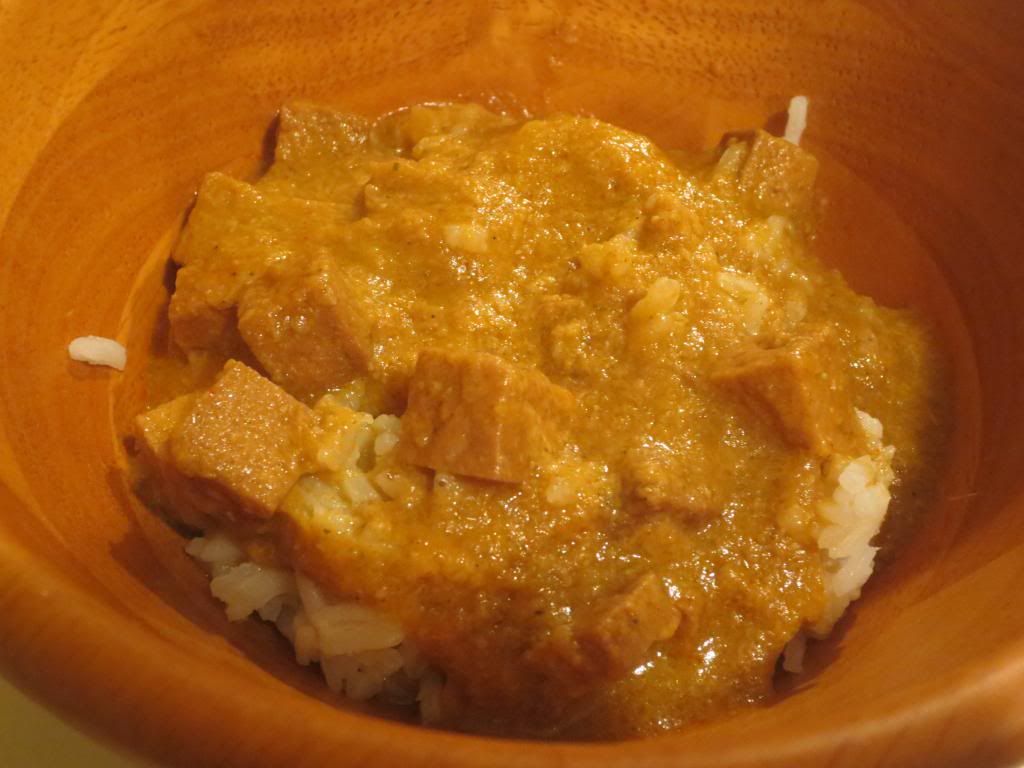
This week…Tasty Bite Paneer Makhani. Paneer, for those of you not familiar with Indian cuisine, is a soft, vegetarian-friendly cheese. It can be firm or soft…depending on how it is made. But it is…delicious. Makhani is a Hindustani word meaning “with butter.” So…this is basically Butter Paneer. Don’t freak out…really it’s these cubes of paneer that are cooked in this fantastic, creamy tomato sauce…spiced just right to give it that Indian flavor. I love the taste of Indian food. So yummy.
So…what happens when said entree comes in a microwavable pouch? What happens when it only takes 90 seconds to heat and eat? Magic. Because Tasty Bite knows what it is doing when it comes to these fun little meals. Honestly. I wasn’t too sold on the thought of a buttery cheese dish…but…they proved me wrong.
The Tasty Bite Paneer Makhani is just what I described above…home-style paneer cheese in a creamy, spiced sauce. This pouch is a delicate balance of natural ingredients that are non-GMO, vegetarian, and gluten-free. Happy dance. In fact, the ingredients in this particular Indian meal include tomatoes, paneer cheese, water, onion, cream, cashew nuts, sunflower oil, ginger, garlic, salt, coriander, chiles, and spices. Sounds delicious, yes? Of course it does. So, after giving my jasmine rice a quick steaming in the microwave to reheat it…this little pouch of goodness was put in and given it’s 90 seconds to warm through.
I poured the contents over two bowls of rice…and dinner was done in 5 minutes total.
So, we all know that this Tasty Bite Paneer Makhani was easy to prepare…but how did it stack up in flavor and taste?
It was good. It was really good. I loved the bit of mild heat from the variety of spices in the sauce itself. The sauce was the perfect thickness…not too runny, but not too thick either. Perfect consistency. I wished I had more of the sauce, honestly. The cheese was…pretty good. I love paneer cheese, but this just seemed a bit rubbery. Probably because it is, after all, in a microwavable pouch. It wasn’t bad…it was still soft…but it wasn’t the star of this dish like it should have been. Major props to the sauce. It saved this one. I’d probably invest in this variety again…but only if nothing else caught my eye. The Paneer Makhani wasn’t about the paneer at all. It was all about that Makhani sauce.
So, let’s talk nutrition. A serving of the Tasty Bite Paneer Makhani is 1/2 of the pouch. This serving dishes up 220 calories and 17 grams of fat. YIKES!! Some of that, however, does come from the cashews…but most of it comes from the paneer. That’s…a hefty dosage of fat, I think. I mean, 150 of those 220 calories come from fat. That’s…not that great. A serving of the Paneer Makhani also will provide you with 440 mg of sodium and 3 grams of sugar. Not bad for a shelf-stable, processed meal, right? Also, you will be getting 1 gram of fiber and a whopping 10 grams of protein. Low fiber, high protein…good for running.
So, while the flavor was there in the Paneer Makhani, the paneer cheese definitely fell flat, but the sauce saved it. I would recommend trying this one, if you are a fan of Indian flavors. And if you love paneer cheese. Just know…fresh cheese that isn’t sealed in a pack and kept on the shelf definitely stands up better when used in Indian cuisine. But when you are an on-the-go kind of person…this definitely works in a pinch. So…not one of my favorites, but not bad either. Tasty Bite hasn’t put out a bad product…this one just didn’t wow me like the others have so far.
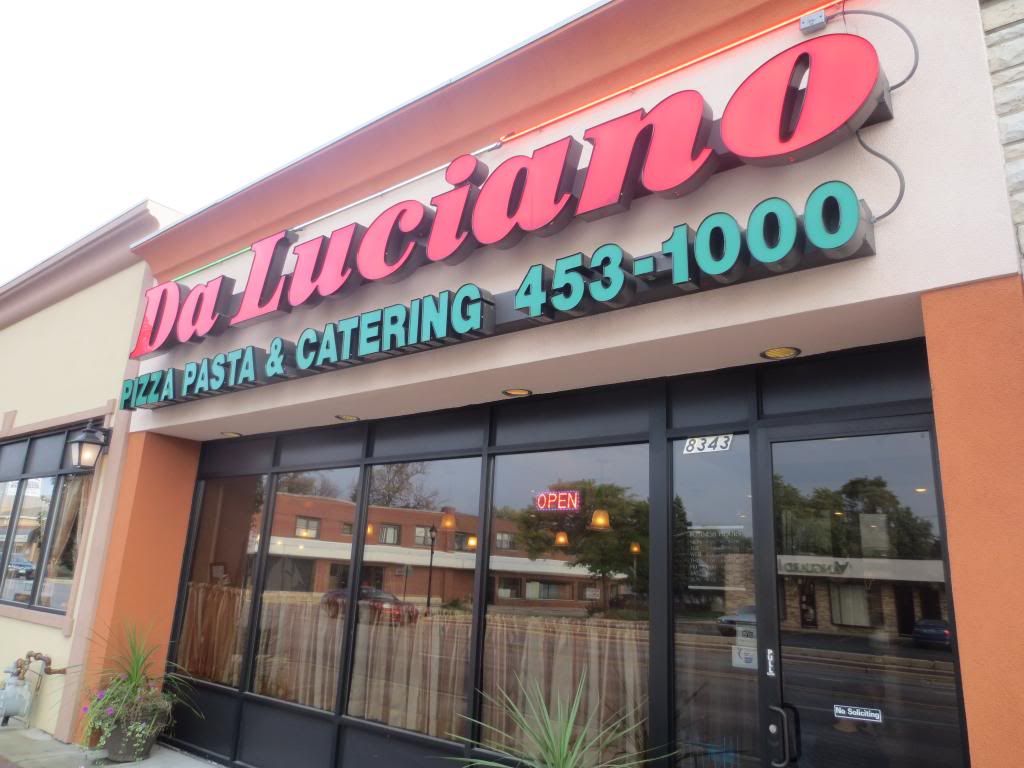
Da Luciano – Pizza, Pasta & Catering, River Grove, Illinois
Restaurant: Da Luciano – Pasta, Pizza& Catering, River Grove, Illinois
This…was an important dining choice to make when I was coming to Chicago, Illinois. I mean…for real. This was a big…heap…deal.
Why?
Because I was in town for the Chicago Marathon. I needed a safe meal…one that would guarantee that I would have no stomach issues…and…being that I was running on Sunday morning…this needed to include gluten-free pizza. It HADto be gluten-free pizza. That is my stipulation when it comes to the night before a big run. If it’s a half marathon or marathon…it has to be gluten-free, vegetarian pizza. It just works for me. Some down pasta…not this girl. This girl indulges in a few epic slices of (hopefully) amazing pizza. Gluten-free pizza isn’t tasteless cardboard, you know. When done right…it is a culinary work of art.
And I’ve eaten good and bad gluten-free pizzas…as they are well documented in this blog.
But there was something special about Da Luciano, which is one of the reasons, despite meaning a car ride outside of downtown Chicago, that I felt I needed to eat there the night before the Chicago Marathon.
What was so special about this place?
They understand Celiac Disease. They totally get me. They totally know how to handle and prepare my food so that I won’t get sick from eating there. And how do I know this? Well, as stated on their Web site, the owners, Luciano and Rosalia, were first introduced to the gluten-free world when four of of their seven children were diagnosed with Celiac Disease. Being an Italian family, bread and pasta were daily staples in their diets. Rosalia set out on a mission to find quality gluten-free bread and pasta for her children, but found that her options were limited. So, she began to experiment with her own recipes, succeeding in making gluten-free bread, pasta, pizza, and desserts that satisfied all of her children. When Da Luciano Pizza, Pasta & Catering opened the following year, they decided to offer their customers a gluten-free menu featuring Rosalia’s amazing recipes. The response from the gluten-free community was huge.
So…as you can see…this place won me over right from the start. And, upon arriving at the restaurant, we were immediately asked if anyone needed a gluten-free menu. I didn’t have to request one. I didn’t have to ask if one even existed. The hostess just flat-out asked. And so, when we were seated, I was given their rather extensive (no one sheet of paper here…but a true menu, my friends!) gluten-free menu to peruse.
So many of the dishes sounded awesome. And part of me wanted to do the gluten-free bruschetta for an appetizer…but we had all decided that dessert was happening…so the appetizer went to the wayside…this time. The gluten-free menu at Da Luciano is about as big as the regular menu. So many of the dishes are offered as a gluten-free option. From the dishes with meat (as I’m a vegetarian, I didn’t look at the extensive seafood, chicken, and veal offerings), but there were many amazing sounding pasta dishes. BUT…I never change up the night before a race…and it was one of their individual gluten-free pizzas for me.
When our waitress returned to the table to take our orders…we were all settled on what we wanted. Heather is not big on carbs, so she went with one of the chicken entrees. Her choice – Chicken Scaloppine ($14.95), which was thinly sliced chicken served in what looked like a tomato and mushroom sauce. Cathy opted for the Rigatoni Porcini ($11.95), which was rigatoni pasta cooked with porcini mushrooms in a light cream sauce. Jenn went with the Gnocchi al Pesto ($11.95), which was delicious looking gnocchi served in a creamy (probably) basil pesto sauce. It looked fantastic.
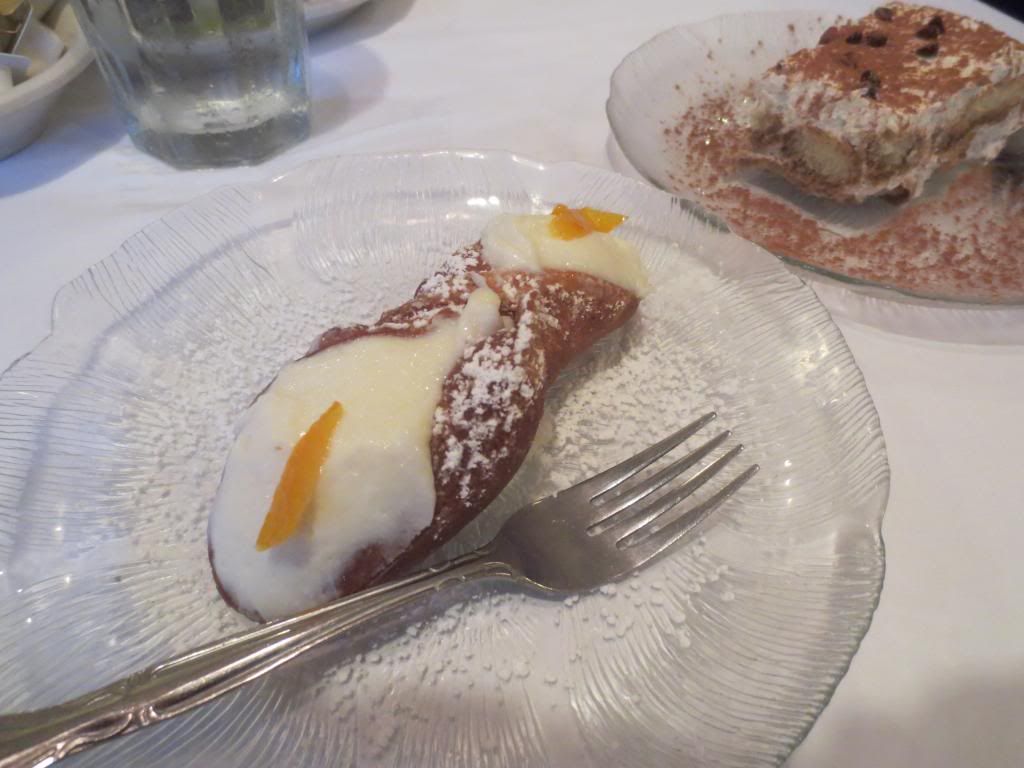
Da Luciano’s Gluten-Free Pizza with Mushrooms, Onions, and Roasted Red Peppers
But for me…I went with the Gluten-Free Pizza ($8.50) topped off with mushrooms, onion, and roasted red pepper ($0.75 each). I couldn’t wait to get a taste of this pizza. And…I wanted to make sure that Heather got a bite as well, because she suffered through the disaster of Pizza Ranch in Minnesota with me…and I wanted her to know good gluten-free pizza was out there. If we had been in Louisville…I’d take her to Annie May’s Sweet Café and split one of those amazing pizzas with her…but when in Chicago…you find a place that works.
We had a little wait, but soon our food was arriving at the table. And it all looked and smelled amazing! I photographed every dish…especially my pizza. And it was time to dig in.
So…
WINNING!! Granted, I still like my local bakery’s crust better…but this definitely is one of the best crusts I’ve had on a gluten-free pizza. Cooked to golden perfection, so it was crispy, without being burnt or overdone. And it still had that nice doughy texture with it as well. The sauce was amazing. The cheese…was more than I would have liked…but…it starts off as a cheese pizza. The other toppings get added. The star of the toppings, however, were the roasted red peppers. OMG…YES! Packed with flavor. Mild…but with that right amount of kick to keep the palate interested. The onions didn’t overpower anything. And the mushrooms were done to perfection. Nothing watery. Nothing disappointing. And, as I cut off pieces for my friends to try, the rest of it was mine. All mine. And yes…I devoured it all. Every slice. I might have licked the plate clean. It was delicious…and I needed to top off the tanks for the marathon the next morning. This was the key.
And, as I mentioned earlier…dessert was going to happen. I had 6 options to choose from on the gluten-free dessert menu. And while they all sounded fantastic, I was down to three choices…the cream puffs, the tiramisu, and the cannoli. It took a lot of pondering, internal debate, and deliberation with myself to pick between them. I rarely have so many options for a dessert…so choosing one was not easy. The cream puffs almost won, but I wasn’t sure how big they were and it came with two on the plate. The tiramisu was SO tempting. I haven’t had tiramisu in a long, long time. I wanted it. But…ultimately…I settled on the Gluten-Free Cannoli ($4.95). Both Jenn and Cathy opted for the regular Cannoli ($3.95) and Heather went with the regular Tiramisu ($3.95).
I was so excited when our desserts emerged from the kitchen and at our table. My cannoli definitely looked different from Cathy & Jenn’s…but it was the color and thickness of the shell. That was the only difference. Heather’s tiramisu looked absolutely amazing. Next time…(and there will be a next time!)…I’ll get the gluten-free tiramisu. It looked fluffy and amazing.
So…how was the gluten-free cannoli? SO SO SO good. SO GOOD!! MMMMMMMM….GOOD! OMG…GOOOOOOOOOD! The cannoli cream was amazing. Sweet, but not overly sweet. Creamy. Amazing. Delicious. It had bits of chocolate chips and fruit. There was a candied orange peel on each end. And the shell…sugary-sweet goodness. The crunch that it had with each bite was satisfying. And it all just blended together. It worked. And I devoured my dessert happily.
With that…I went and purchased a few bags of their gluten-free pasta, available at the register, and we paid our bill. As we were leaving, I overheard the restaurant manager explaining to a customer that the way the manage no cross-contamination is that all the gluten-free dishes are prepared in the kitchen upstairs at the restaurant…and the regular menu items are all done in the kitchen downstairs. Brilliant. And so safe for Celiacs. I loved learning that about Da Luciano’s. It’s nice to know I had nothing to worry about when eating there…which is good because the last thing you want before running 26.2 miles is tummy troubles.
We had to head back downtown…after dropping Heather off at a train station to head back to her hotel. We had plans for when she would arrive at The Hilton Chicago to meet up with us before the the marathon the following morning. We were all satisfied and happy with the meal we ate at Da Luciano. I will be back the next time I find myself in Chicago…which I hope is soon.
Speaking of which…the gluten-free pizza worked its magic as always…I had a fantastic marathon. Thank you, Da Luciano…for giving me my pre-race carbs in my favorite form. I can’t wait to come back and try more of your amazing menu.
So, if you find yourself in the Chicago area, make a point to head to River Grove and eat at the fantastic Da Luciano – Pasta, Pizza & Catering. It’s worth the short drive because the food is simply that amazing.
I know what you’re thinking. You’re thinking…”Squash…again?” Heck yeah. It’s the time of the year where my CSA bin is inundated with squash. It’s unstoppable. You can’t stop it. You just have to embrace it, find new ways to eat it, and then enjoy the fruits of your labor.
In this case…that’s exactly what I did.
This is the second time my CSA bin has thrown delicata squash my direction. I copped out last time and chopped it, steamed it, then threw it on a broccoli crust pizza. But this time…I really wanted to experience the delicata squash. So, I went hunting on Pinterest (because…hello!) and happened across a recipe originally posted on the blog Peanut Butter & Peppers, which focuses on health, fitness, and good food. As delicata squash was not something that came up a lot on Pinterest…and I had the squash and goat cheese…I figured I could at least wrangle up a pomegranate (or 2…because I love pomegranate) and give this recipe a try.
Tonight…was that night. And below…is said recipe.
Recipe: Baked Delicata Squash with Pomegranate and Goat Cheese
Baked Delicata Squash with Pomegranate and Goat Cheese
1/8 tsp cayenne pepper (optional, but highly recommended)
2 tbsp. pomegranate arils
1/2 oz goat cheese
Directions:
Preheat oven to 375 degrees
Line a baking sheet with aluminum foil, spray with cooking spray.
Wash delicata squash, cut off the ends.
Slice squash in 1/2″ pieces. With a spoon take the seeds out.
Place the squash in a bowl and toss with olive oil, cinnamon, salt, and cayenne pepper.
Place squash on the prepared baking sheet.
Bake for 10 minutes, flip the squash and bake for another 10 – 12 minutes or until fork tender and skin slightly blistering.
Place squash on a plate and top with pomegranate arils and goat cheese.
~*~*~
This dish is a flavor explosion. You have the sweet creaminess of the roasted winter squash. Then you have the sweet tang of the pomegranate arils. And then that savory, rich flavor of the goat cheese. The cinnamon and cayenne pepper give it this nice warmth (not heat, but warmth)…with just the right amount of sweetness. It all balances out and comes together right on the plate.
As I was eating, the only fault I could find was that there wasn’t more of it. This is a fantastic dish…and very nutritious too. Clean eating, once again, for the win!!
I’m sure any winter squash would be a good stand in, but the delicata squash made for a beautiful, and more importantly, delicious plate.
If I am out of town or at the gym, that is my preferred station. I might be a gluten-free vegetarian, but I love food. And I love to learn about food. And, even more, I love to learn new ways to cook food. Lucky for me HULU airs a few Food Network shows, and one evening my roommate and I tuned into an episode of The Barefoot Contessa. I know, a lot of people don’t like Ina that much, but sometimes the things she does with food is awesome. And on this particular episode…she was making risotto. The difference was, she was not going to stand over a pan on a stove, stirring and stirring and stirring as the rice worked its way to the perfect texture.
Nope. She was going to bake it.
BAKED RISOTTO!! Who would have thought that would work?
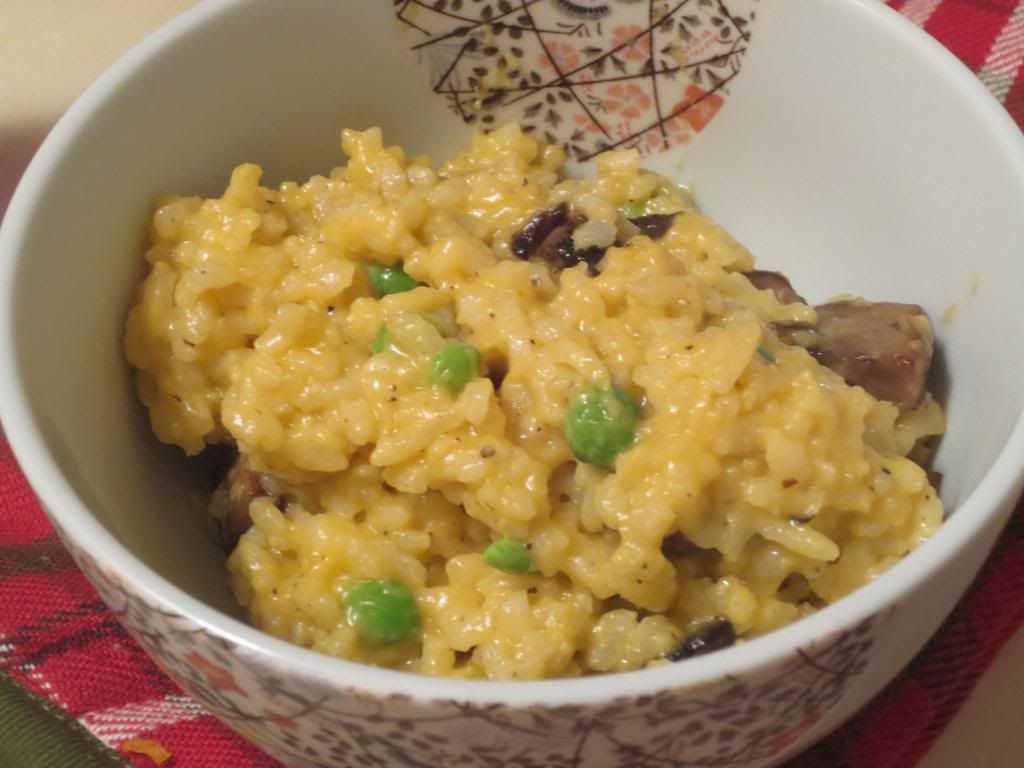
I changed up the original recipe to be vegetarian and make use of what I had in the kitchen, which meant I even (God forbid) took out the use of the white wine. I didn’t have any on hand. I include some sauteed fresh portobello mushrooms as well.
Recipe: Baked Parmesan Risotto with Peas and Portobello Mushrooms
Baked Parmesan Risotto with Peas and Portobello Mushrooms
Place the rice and 4 cups of the vegetable broth in a Dutch oven.
Cover and bake for 45 minutes, until most of the liquid is absorbed and the rice is al dente.
While it bakes, clean and chop your portobello mushrooms (if using). Place a pan over medium heat and add olive oil. When the olive oil is heated, add the portobello mushrooms and a dash of salt and saute until the mushrooms are lightly browned on each side. Remove from the heat and set aside.
Remove the risotto from the oven, add the remaining cup of vegetable broth, the Parmesan, butter, salt, and pepper.
Stir vigorously for 2 to 3 minutes, until the rice is thick and creamy. Add the peas and mushrooms and stir until heated through.
Serve hot.
~*~*~
I couldn’t believe how beautifully this actually worked out. Honestly. It was amazing. The rice was fluffy and soft. The risotto itself had that thick risotto feel to it. The cheese melted beautifully and really helped give it that added bit of creaminess. I didn’t even miss the wine. And by sauteing up the mushrooms, I gave the risotto a little meatiness. The seasoning was good, but if you are using a good Parmesan cheese, I recommend maybe cutting back slightly on the salt that is added.
My roomie loved this dish and was so happy we had leftovers. I even took a serving in to a co-worker because I had mentioned I was making it for dinner, and he had been having a rough week. When I saw him later that day, he said it was SO good. It made me happy.
So, if you love risotto but don’t want to slave over a hot stove to make it…give this recipe for baked risotto a try. I think you’ll be more than pleased with the results. As for me…I think I will forever bake my risotto in the future. So much easier and much better results.
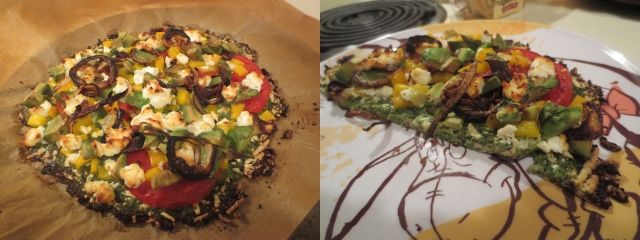
Yes…you read that title right. This is a pizza crust…made out of broccoli. Hey…I’m doing this whole clean eating thing, and while I love a real (gluten-free) pizza crust as much as anyone else, sometimes you just want to think outside the pizza box and try something new. And since it’s getting to the point where I always have broccoli in my CSA bin…well…instead of doing a typical cauliflower crust (if you can call that typical)…I decided to give it a go with one of my favorite veggies…broccoli.
It’s a little bit of work, but it’s a beautiful and nutritious alternative to standard pizza crust. I make mine with vegan cheese do to lactose intolerance, but regular cheese works just as well. Don’t mock it until you try it:
1 cup grated mozzarella cheese (I use Daiya mozzarella shreds)
1/2 teaspoon dried basil
1/2 teaspoon dried oregano
1/2 teaspoon salt
1/4 teaspoon pepper
1 teaspoon nutritional yeast (optional…but I highly recommend it)
1 large egg
Directions:
Preheat the oven to 450°F and line a baking sheet with parchment paper.
Chop the broccoli into florets (try to remove the stems) and place them in the large bowl of a food processor. Pulse for about 30 seconds, just until all of the florets have been cut down into very fine crumbs. You should have about 3 cups of crumbs.
Transfer to a microwave safe bowl, cover, and microwave on high for 4 minutes. Remove and let cool slightly.
Transfer to a clean tea towel (not paper towels because they will shred). Wrap the broccoli bits up tightly in the towel and wring all the water out over the sink. There is actually quite a bit of water in the broccoli, so keep wringing to get out as much water as you can. This will help keep the crust from crumbling.
Combine dried broccoli with the cheese, basil, oregano, salt, pepper, nutritional yeast, and egg. Use your hands (that’s it…get a little dirty) to mix everything together.
Transfer the mixture to the prepared baking sheet and form into a 10-inch thin circle. Bake in preheated oven for 10-11 minutes.
Once crust has precooked, remove from the oven and top with whatever toppings you like. For this particular pizza, I topped mine off with slices of fresh red tomato, caramelized onion, chopped yellow pepper, chopped avocado and topped it off with goat cheese.
Return to oven and bake for another 15-20 minutes.
Remove from oven and serve.
~*~*~
As you can imagine, this crust doesn’t keep very well so you’ll want to eat the entire thing that day. So either share with a friend of come to dinner hungry. Cheese, herbs and fresh veggies made up my entire pizza and it was super delicious. You won’t even miss the actual crust. Honestly! This has become one of the meals my roommate begs me to make. It’s a good thing we get lots of broccoli.
They are one of my favorite go-to comfort foods. Seriously. And so easy to make too. Put anything inside with the cheese of your liking and you have yourself a gourmet sandwich good for breakfast, lunch, and yes…even dinner.
Cheese and I don’t always get along though. But that is where vegan and lactose-free cheeses come into play. Granted, most of the time, these cheese alternatives lack in the stretchy, ooey-gooey nature of cheeses. But, over time, it is something you do get used to. Not saying I don’t miss it…but…you work with what you are given.
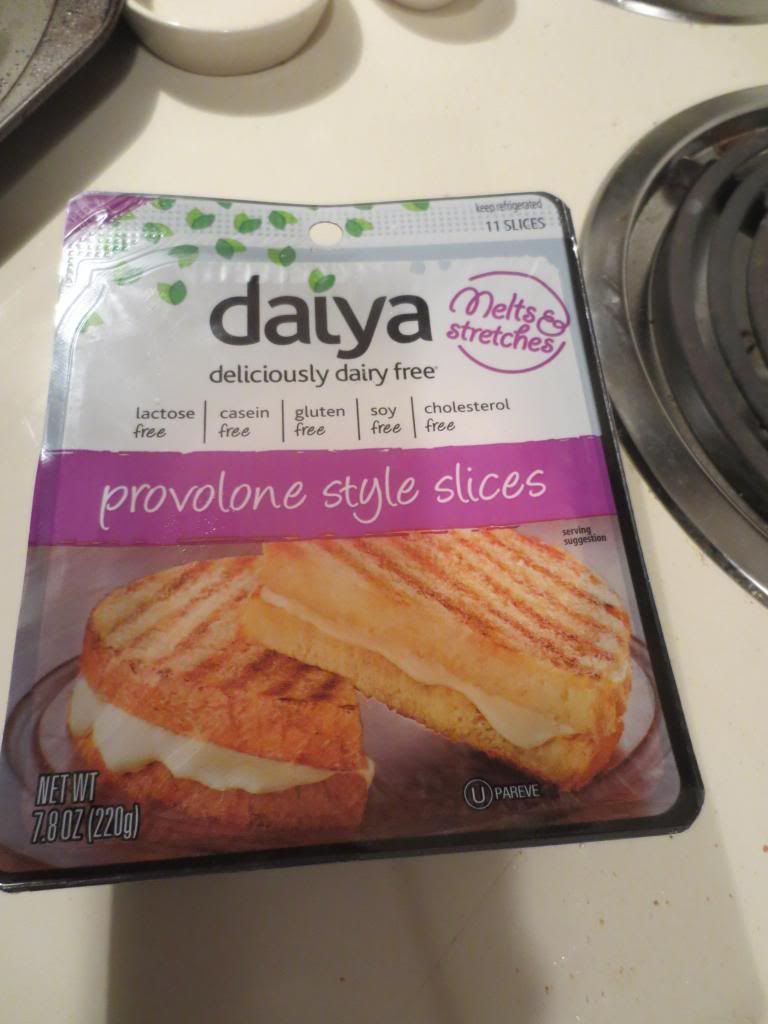
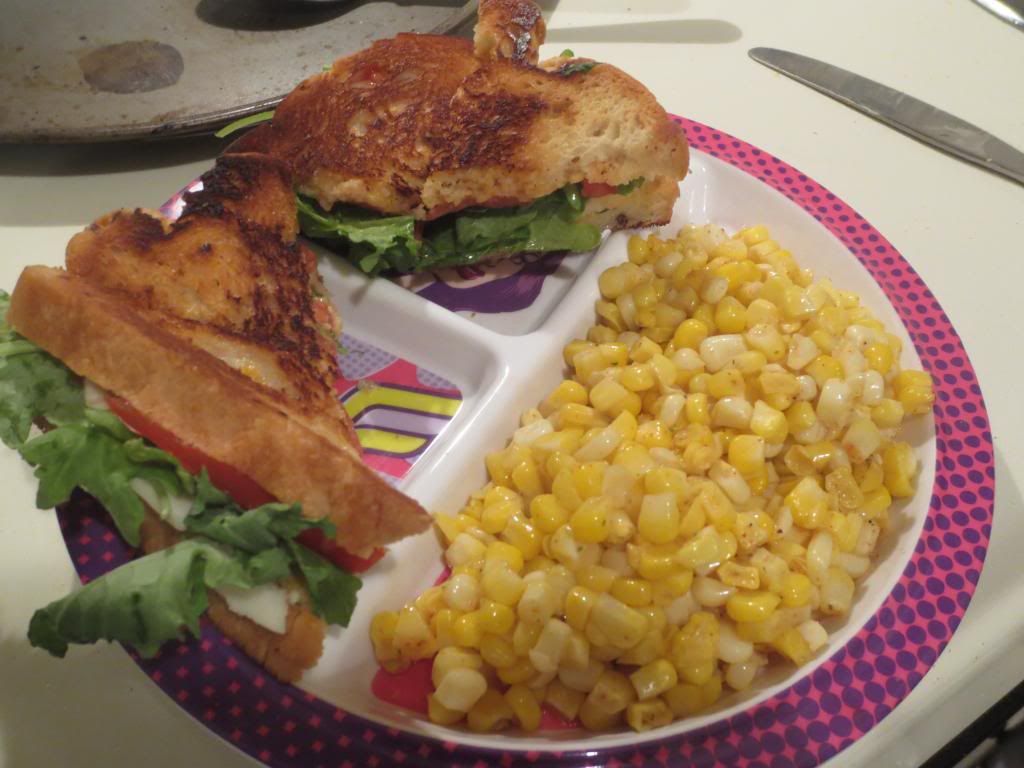
That being said, not too long ago, Daiya introduced their slices of vegan cheese, perfect for sandwiches. I mean…perfect. Now, it took awhile for these to hit the market around here, but I spotted them at Whole Foods. And, while I had wanted to start with the cheddar flavor, they were out of that one, so I grabbed the Daiya Deliciously Dairy Free Provolone Style Slices to have on my grilled cheese sandwich I intended to make for dinner on…my birthday. Yes…my birthday. This also means you can tell I am about a month behind on my blogging. Trips and a busy training schedule do that. But I’m catching up…kinda.
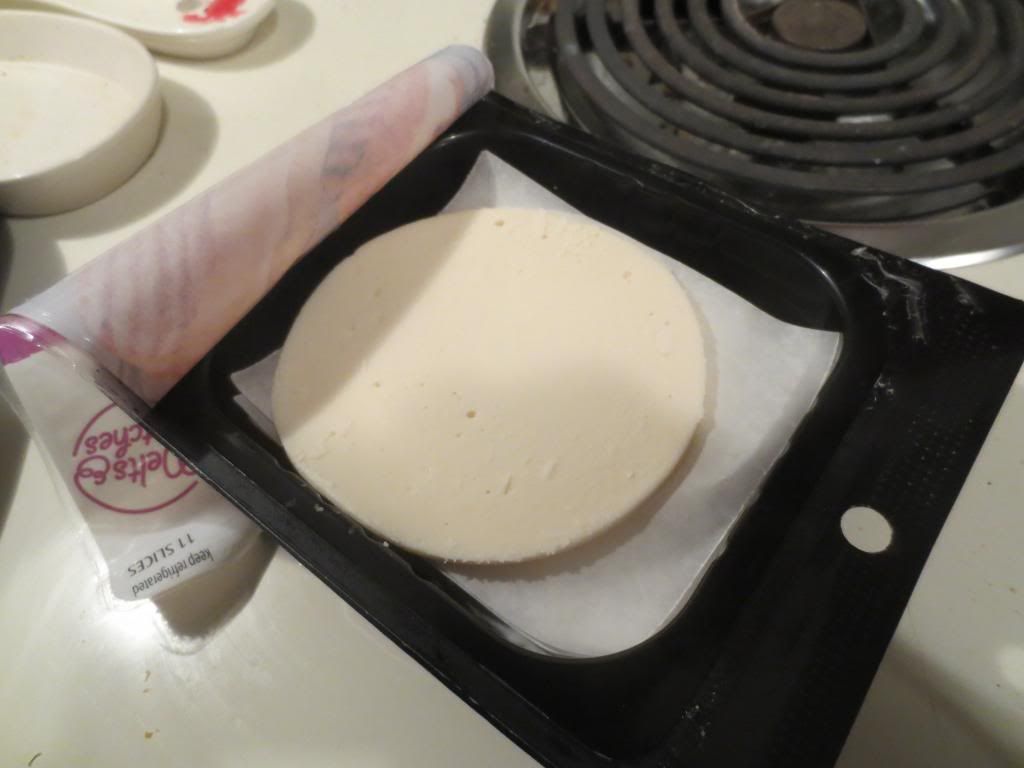
First of all, I love that these slices come in a resealable package. YES!! No need to dig out a storage bag to ziplock around the container. Nicely done, Daiya. I also love the promise that these slices will stretch and melt like real cheese. And that they taste like real cheese. It was enticing…and I really wanted to try them. So, on my birthday, with no money in the budget to go out and plenty of food in the pantry, fridge and freezer to use, I did up a gourmet grilled cheese sammie (complete with spinach, tomato, and yes…Diaya Provolone Style Slices) with a heaping side of steamed corn from my CSA bin. Hey…no one said that the birthday dinner had to be fancy. And, I have gotten amazing reviews of my grilled cheese sandwiches. I have finally mastered the art of making them without burning one side. The key…I don’t distract myself with too much else in the kitchen while making them.
While I won’t go as far as to say that the Diaya Provolone Style Slices melted and stretched like real cheese (not even close!), the taste had that nice sweetness that provolone provides. I was so incredibly happy with the way it flavored the sandwich itself. A little buttery golden crust on the outside of my gluten-free bread, some sweet cheese, and healthy vegetables sandwiched in between…gourmet grilled cheese it was. The flavor of the cheese itself once again has that distinctive Daiya cheese flavor. It doesn’t taste plastic-y like some vegan cheese, but it does have that distinctiveness to it that if you take a bite, you know at once you are eating Daiya cheese. And I love Daiya. I wish it had really melted and stretched as the packaging promises, but in the end, all I can ask for is a safe and delicious cheese alternative. And that’s exactly what these slices are.
Daiya Deliciously Dairy Free Provolone Style Slices are made up of filtered water, tapioca starch, palm fruit oil, expeller pressed non-GMO canola and/or safflower oil, coconut oil, pea protein isolate, natural vegan flavors, vegetable glycerine, brown rice syrup, sea salt, xanthan gum, lactic acid (for flavor) carrageenan (NOOOOO!!!!), titanium dioxide (naturally occurring mineral), and vegan enzyme. So…again…not a huge chemistry experiment, but not all-natural either. Then again, it’s vegan cheese…how natural can it be?
Nutritionally speaking, a serving of Daiya Deliciously Dairy Free Provolone Style Slices is one slice of cheese. This one slice will serve you up 70 calories and 5 grams of fat. Each slice is also cholesterol-free, sugar-free, and contains only 85 mg of sodium. One slice does not provide any fiber to your diet and only 1 gram of protein.
These are definitely not a bad option for the lactose intolerant or those who are vegan and gluten-free. These Provolone Style Slices are lactose-free, gluten-free, casein-free, and soy free. They do make a great alternative to cheese if you find your system unable to handle the real stuff, as mine sometimes does. Diaya is one of my favorite companies to turn to for allergen-free vegan cheese alternatives. And I appreciate all the effort they put forth to make sure their products remain top-of-the-line. It’s why I continue to return to their variety of cheese-y good products time and time again. Another win, Diaya!
A gluten-free and dairy-free gourmet grilled cheese made with Daiya Provolone Style Slices!
In the previous blog, I reviewed some bagel thins which were made of awesome and happiness. Like butterflies and unicorns.
Well, I also mentioned vegan cream cheese. My usual go-to vegan cream cheese is Tofutti. Which I LOVE so much. It’s just really, really tasty. But, you see, my favorite vegan cheese company, Daiya, had just released some vegan cream cheese of their own…and yes…I really wanted to try it.
It was just a matter of finding it, in stock, here in my area.
It took a little while…but I finally stumbled across it at my local grocery store. The last place I expected to find it…but there it was in all it’s dairy-free glory. So, you bet your bagel-loving butt that I snatched up a container of it. With bagel thins in my freezer…I needed some cream cheese, yes? Of course. Justifying the grocery budget here!
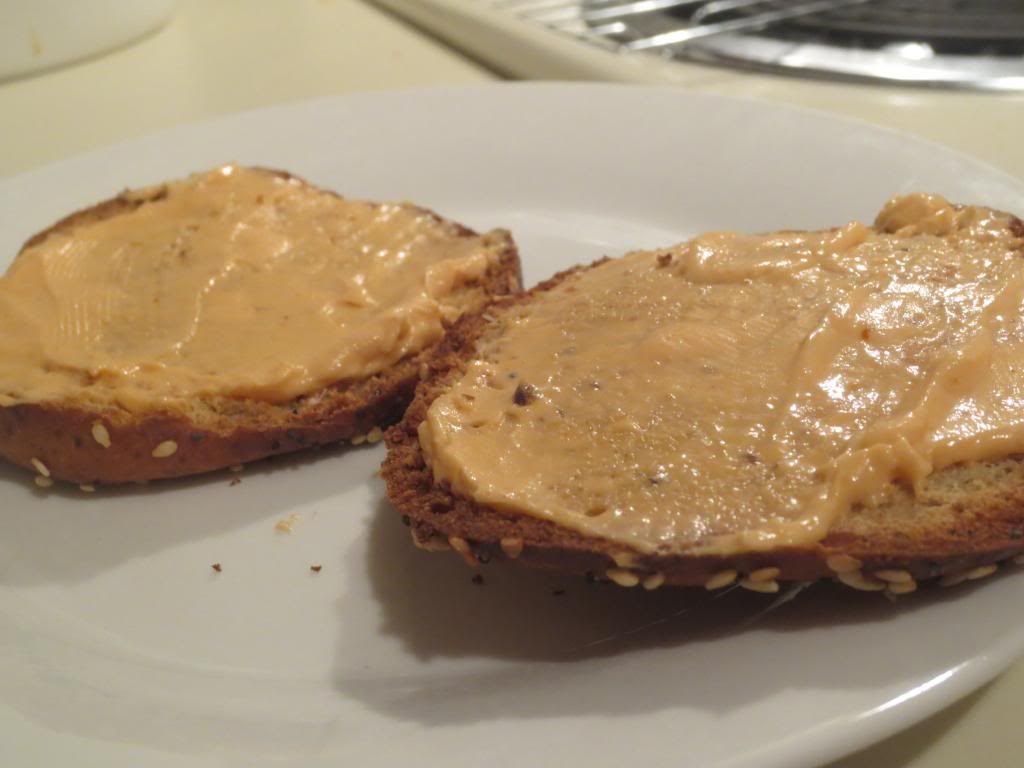
Anyway…having tried two other vegan cream cheese options and loving them…Daiya had a lot to live up to. But…Daiya is a brand that I love and trust, so I wasn’t worried. Not one bit. And when those bagel thins came out of the oven that morning…I was ready to give each half a nice, healthy schmear.
Which…is exactly what happened.
Compared to the other vegan cream cheese spreads I have used, Daiya was definitely not as creamy or as spreadable as the rest. It was a bit clumpy when I dished out a serving to put on each half of the bagel thin. That being said, it did spread out just fine, especially on the toasty top of each bagel, even melting down like regular cream cheese does. And the taste? Well…it tastes like Daiya. That’s about all I can say. Daiya has this distinct flavor to it. But it is the absolute best vegan cheese out there and I found myself enjoying the taste of this the more I ate. Honestly. At first, I wasn’t too sure about it…but then as I kept eating, I liked it…then loved it.
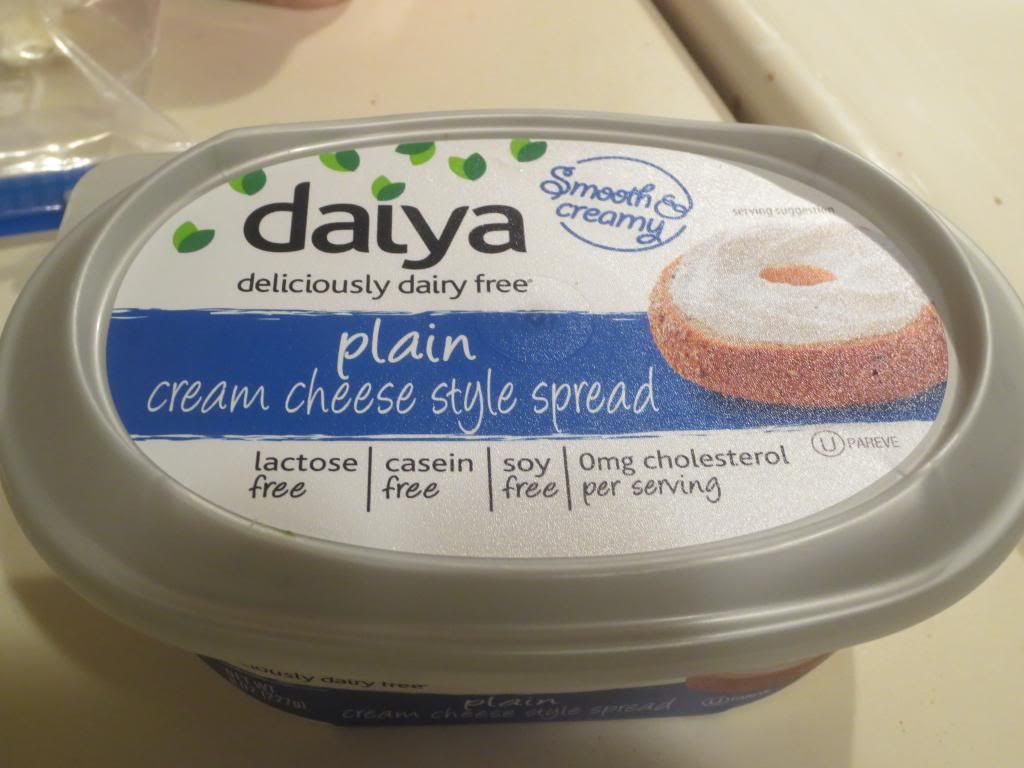
So, let’s talk about Daiya Deliciously Dairy Free Plain Cream Cheese Style Spread, yes? Yes. As with all Daiya products, the Plain Cream Cheese Style Spread is casein free, lactose free, and soy free. It is made up of filtered water, coconut oil, non-GMO expeller pressed canola and/or safflower oil, potato starch, pea protein isolate, sea salt, vegetable glycerin, xanthan gum, lactic acid (for flavor) agave syrup, natural vegan flavors, titanium dioxide (a naturally occurring mineral), vegan enzyme, and cultured sugar. So, it’s not a complete chemistry experiment when it comes to ingredients. Although not everything is all natural either. But, you have to make exceptions sometimes, right?
Nutritionally speaking, Daiya Deliciously Dairy Free Plain Cream Cheese Style Spread is doled out in servings of 2 tablespoons. These two tablespoons contain 90 calories and 7 grams of fat. That’s not too bad. Each serving contains no cholesterol and a scant 190 mg of sodium. A serving of this spread does not contain any fiber and only 1 gram of protein.
So, as it stands, Tofutti Better Than Cream Cheese is a better option, however…it does contain soy. If you are sensitive to soy or limiting your consumption of soy, than Diaya is the way to go. The cream cheese works great on bagels and I hope to dish up a delicious cheese cake with it in the very near future. Maybe for Thanksgiving since I am playing host for the first time. We’ll see.
Give it a try…see what you think!
Daiya Deliciously Dairy Free Plain Cream Cheese Style Spread over O’Doughs Gluten Free Original Flavor Bagel Thins
Product: O’Doughs Gluten-Free Original Flavor Bagel Thins – $3.99+
I am a bagel zombie.
Mmmmm…bagel…bagel…mmmmm….nom nom nom.
Seriously. I’m a New York girl and I grew up enjoying the carby awesomeness of bagels. Give it a schmear of cream cheese and happiness could be found in each bite. As I got older…my love for bagels continued…but I started to watch the waistline. Bagel thins came out. And I fell in love with the thin, crispy goodness that these offered. All the taste of bagels without all the bread. Nice.
And then…Celiac.
I sampled so many gluten-free bagels at first, having given up even finding something close to a bagel. Most of the ones I tried were shaped like donuts, not bagels. Small, bready, and just all wrong texture-wise. And then…Udi’s came out with bagels that rocked my world. Seriously…amazing.
And then…while out grocery shopping one day at our local Earth Fare, I spotted O’Doughs Gluten-Free Bagel Thins. I did a double-take. I backed up, snatched them from the cooler, and tossed them into my shopping cart. No questions asked…these were coming home with me. I was so thrilled with this discovery without even having tried them yet. I had a great company for bagels…now maybe it was time to let the bagel thins shine.
I hadn’t had anything from O’Doughs yet. So, this was going to be the first product I sampled from this company. I stored these in my freezer for over week while I was out of town, but then…then it was time to have these for breakfast…because I came back into town with little groceries in my fridge and freezer and was trying to make do with what I did have on hand.
O’Doughs Gluten-Free Original Flavor Bagel Thins
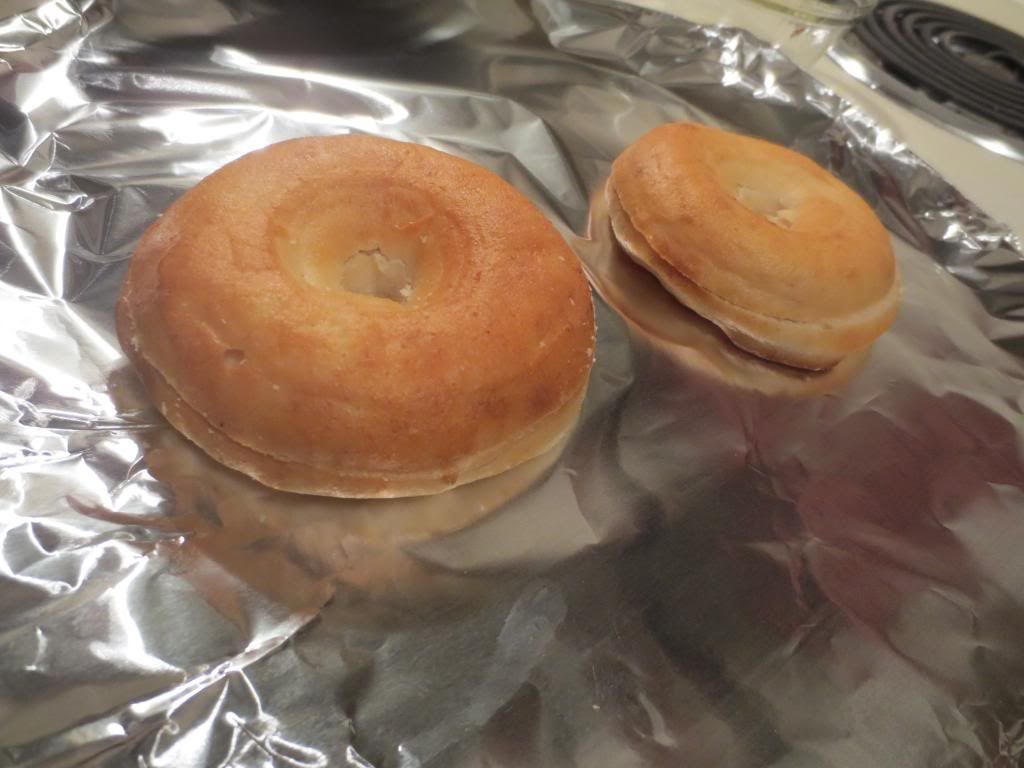
That morning, I turned on my oven and put two bagel thins on the pan and let them toast up gently in the oven. You could totally do this in a toaster, but I got rid of mine when I was diagnosed with Celiac, wanting to eliminate any potential for cross-contamination. Now that my roommate eats only gluten-free bread too (for my sake!) I could totally get a new toaster now. I just have nowhere in my kitchen for one at the moment.
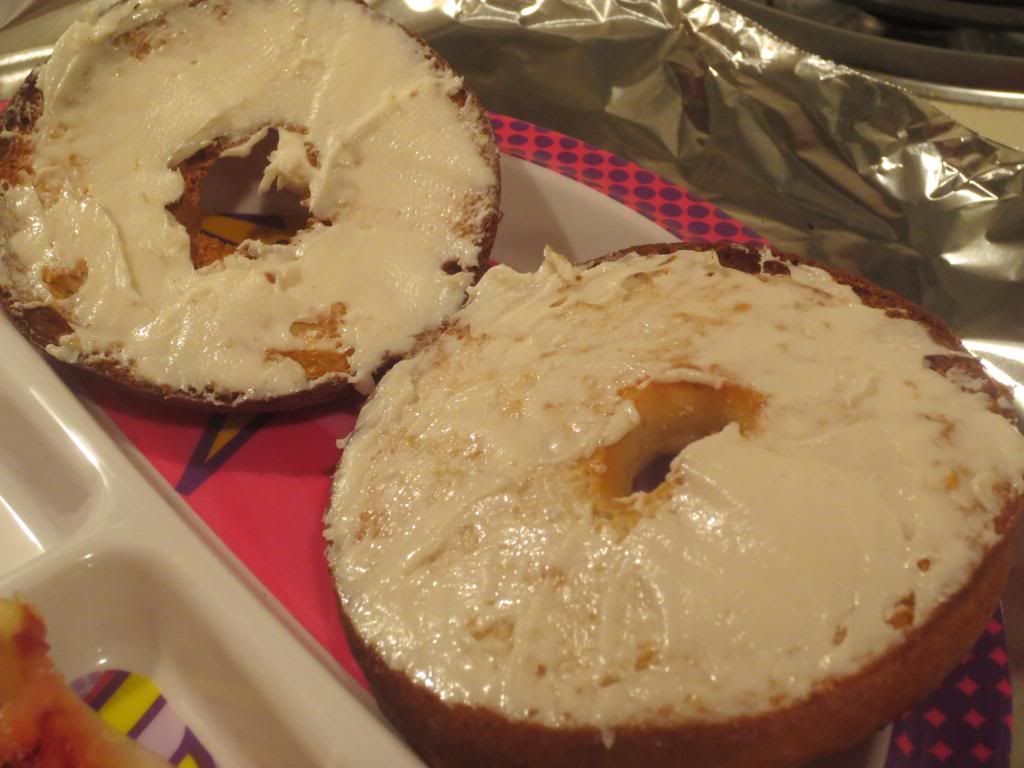
Anyway, these bagel thins toasted up beautifully in the oven. Because these are bagel thins…not bagels…I kept a close eye on them to keep them from burning. After removing the golden toasty bagel thins from the oven, I gave each half a schmear of gluten-free and vegan cream cheese. Served them up with some fruit that morning and VIOLA…breakfast was served.
One bite and I knew O’Doughs got these bagel thins right. I was amazed. The Original Flavour variety tastes just like a regular bagel. The outside gets that nice crispness to it, and the thin innards toast to a beautiful golden color and still maintain a bit of that chewy texture you want with a bagel. What this means is that the thin texture provides a base for any topping you want to top it with. Nothing takes away from anything else. The toppings compliment the bagel and vice versa!
So, now that you know they are amazing…let’s talk shop.
These bagel thins are composed of filtered water, soya flour, tapioca starch, chickpea flour, whole grain rice flour, cellulose fiber, glycerine, yeast, sunflower oil, salt, organic evaporated cane juice, xanthan gum, baking powder, and baking soda.
Not too bad as far as ingredients go. Not exactly clean eating…but…better than some other options out there, yes? Yes!
Nutritionally speaking, a serving is one bagel thin. And one bagel thin only contains 100 calories and 1.5 grams of fat. Consuming one bagel thin also means you will be taking in 300 mg sodium and 1 gram of sugar. These bagel thins contain no cholesterol, no trans-fat, no eggs, are non-GMO, and are kosher. One bagel thin also gives you 2 grams of fiber and 2 grams of protein.
And yeah…they are really amazing. O’Doughs makes three varieties of bagel thins. Original, Sprouted Whole Grain Flax, and Apple Cranberry. I finally have found the Sprouted Whole Grain Flax at my local grocery store…but have yet to find the Apple Cranberry out in the wild.
But, if you should spot O’Doughs Gluten-Free Original Flavor Bagel Thins…grab them. Toast them. Top them. And enjoy them. Trust me…you’d never guess it was gluten-free. They taste like the regular thing. Perhaps even better. I am in love.
O’Doughs Gluten-Free Original Flavor Bagel Thins with Daiya Vegan Cream Cheese