Product Review: Glutino Gluten Free Corn Bread Stuffing + Recipe Bonus

Glutino Gluten Free Corn Bread Stuffing

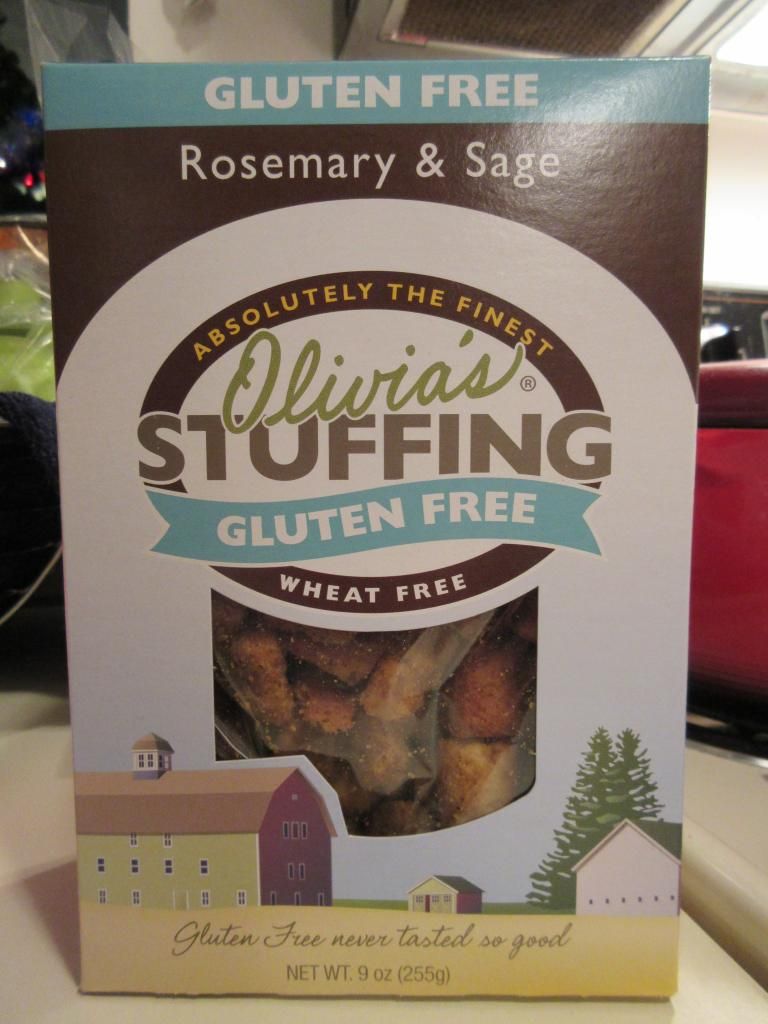
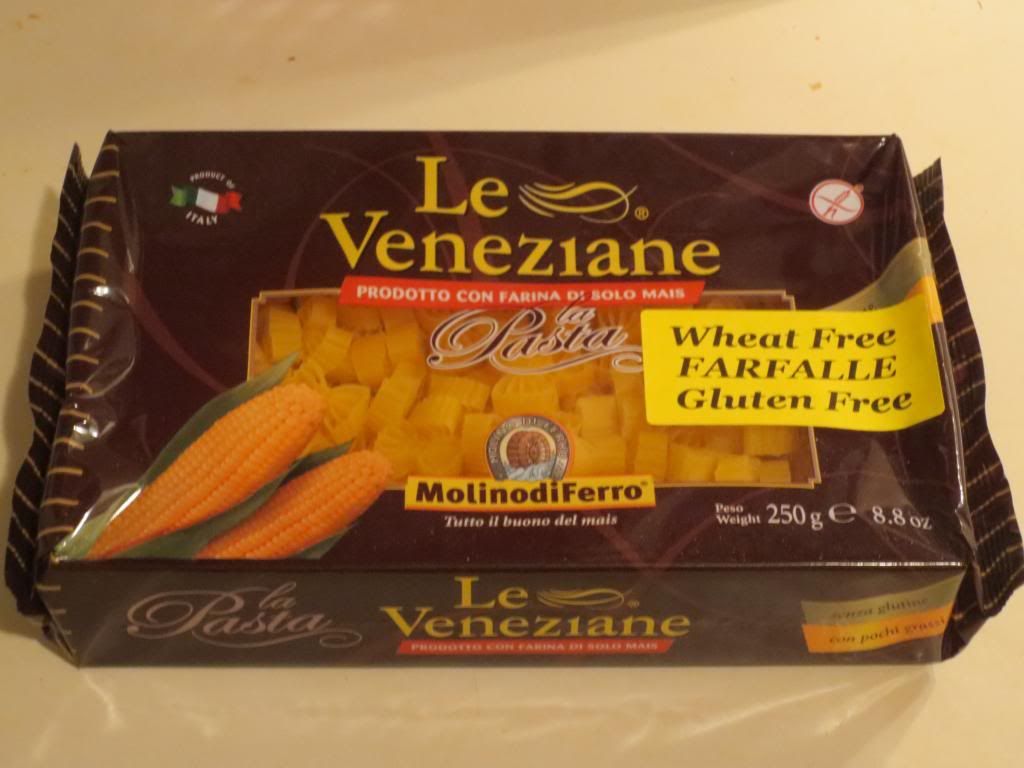
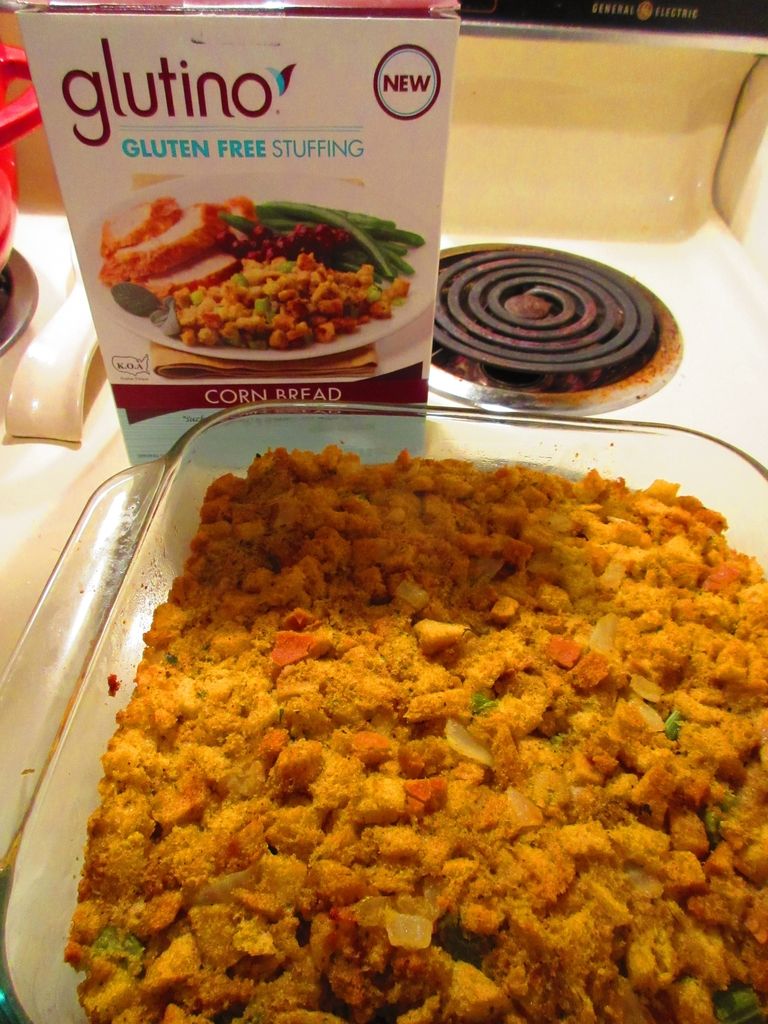
Product: Glutino Gluten Free Corn Bread Stuffing – $5.99+

Who says stuffing is just for Thanksgiving?  Where is that written?  Growing up, I was one of the only people in my family who wanted to have stuffing.  My dad wasn’t a fan, so my mom never made it.  Everything I needed to know about stuffing, I tasted at my friend’s homes.  It was a rare occasion that my mom would make it…and as we never had turkey on Thanksgiving, but enjoyed a delicious shrimp creole instead…well…this was more of a Christmas thing.

When I went gluten-free…stuffing was off the menu regardless…unless I made it myself.  In fact, one of the first gluten-free recipes I posted was a Gluten Free Hazelnut Sage Stuffing, which I made with Rudi’s Gluten Free Bread.  That was back in 2011…and I’ve made that recipe quite a few times since then.  It’s delicious and easy and amazing.

But sometimes, you just don’t want to do all the work yourself.  These days, my free time is less and less.  I’m recovering from a torn hip labrum, getting back to running, doing all my stretches for physical therapy and trying to maintain only a slight bit of pain when I move, and everything else like work, preparing meals/snacks for work, and maintaining my training/workout schedule.  It just isn’t always feasible to pull out a recipe and whip something up.

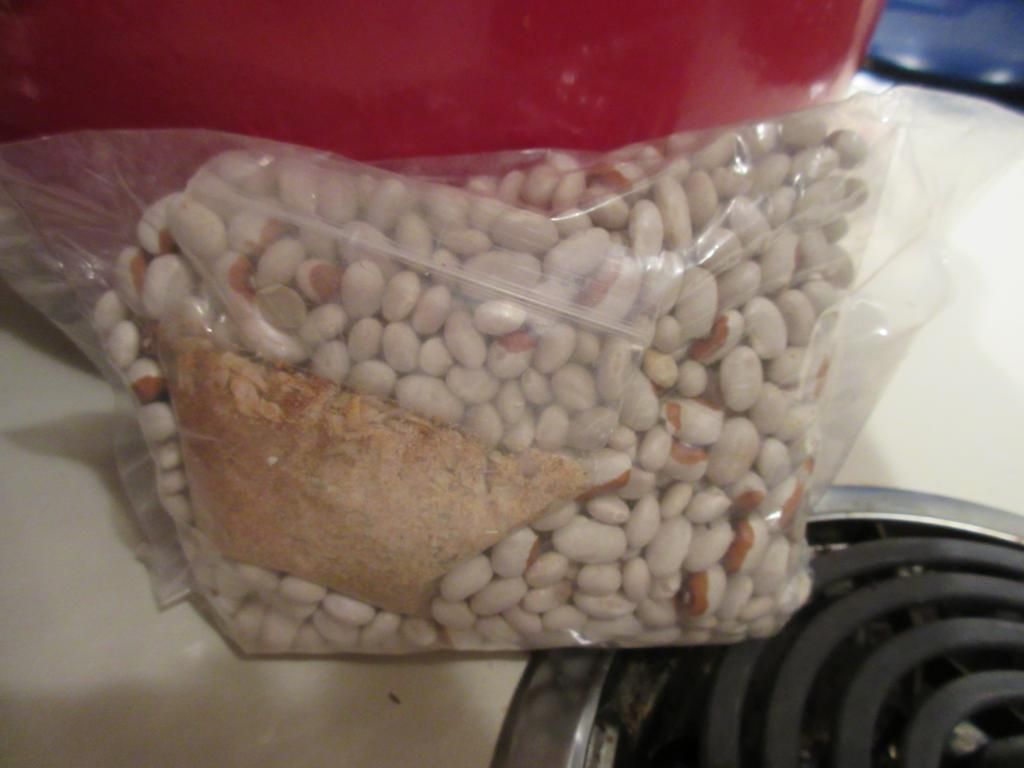
Well, two weeks ago, I was in Columbus, Ohio, visiting my friend Jenn.  And as I was packing up to head home, she handed me a box of Glutino’s Gluten Free Corn Bread Stuffing.  As it was due to expire within the month, I decided I would make this for lunches this week for both the roomie and myself.  And, that Sunday evening, I did just that…

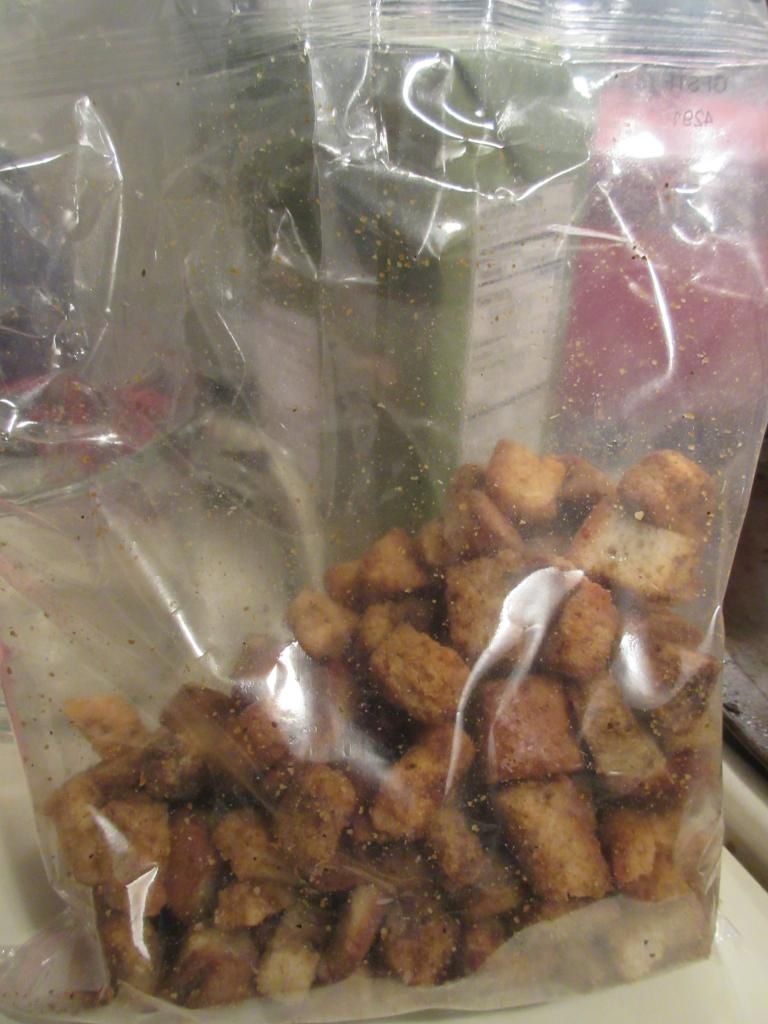
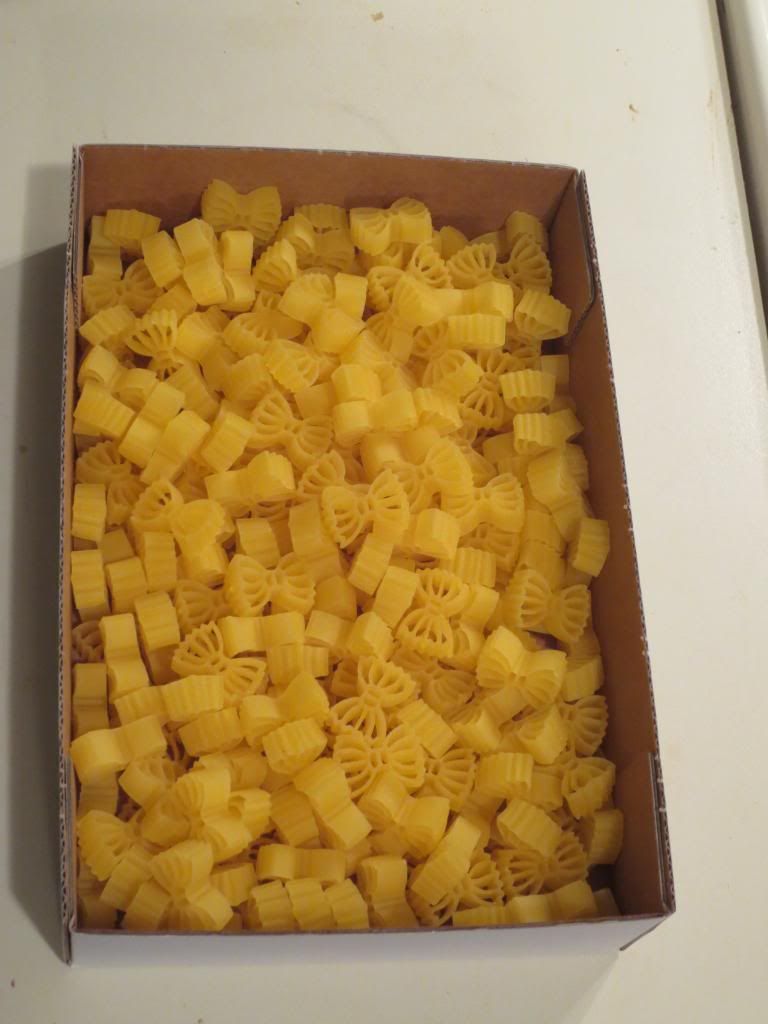
I had everything else needed to make the recipe that was supplied on the box in my fridge, ironically enough.  I guess I just know what’s good to have on hand, HAHA!  Actually, it was just luck that I didn’t have to pick up anything else to make this.  All I needed was butter (I used Earth Balance), eggs, vegetable broth, celery, and onion.  That was it.  I followed the instructions on the box, pulling open the silver package that contained the corn bread stuffing portion of the product, loving the little, crispy, yellow corn bread croutons that spilled out and into the bowl with the rest of the ingredients.  Giving it a good stir, it was prepared and ready to cook.

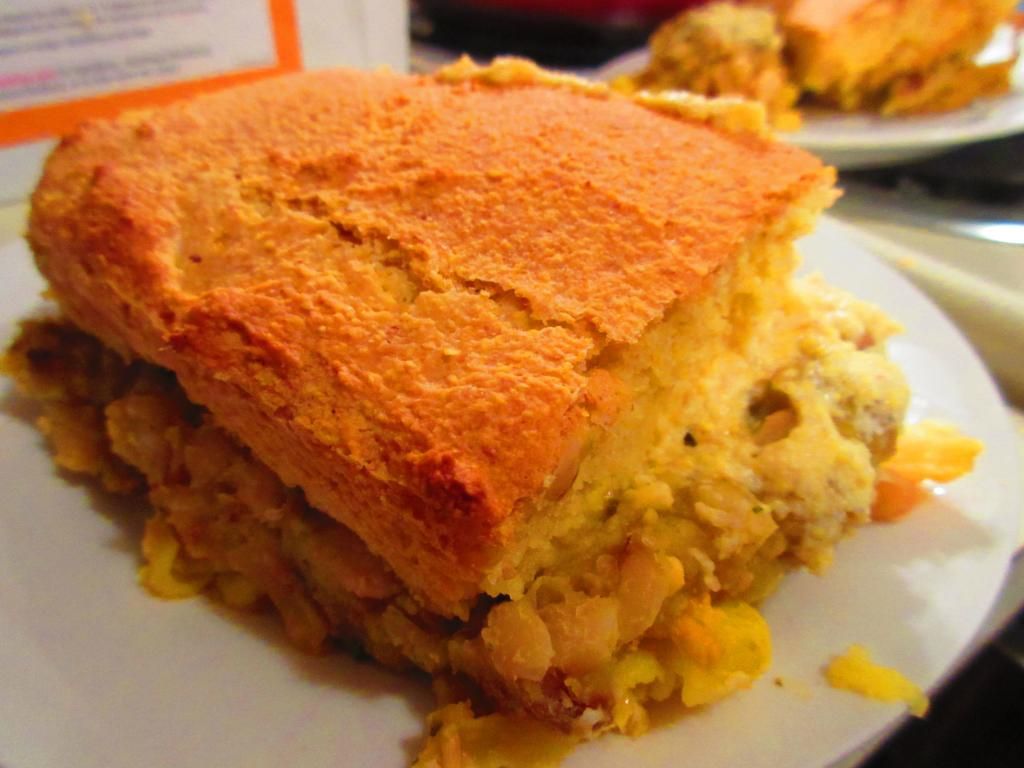
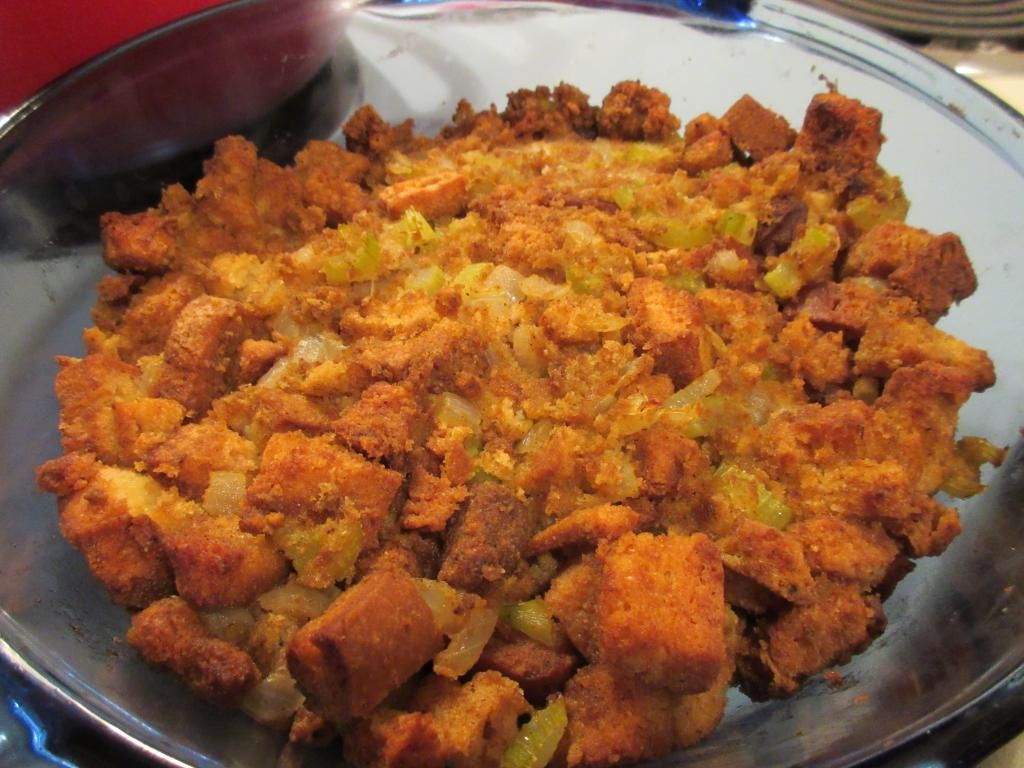
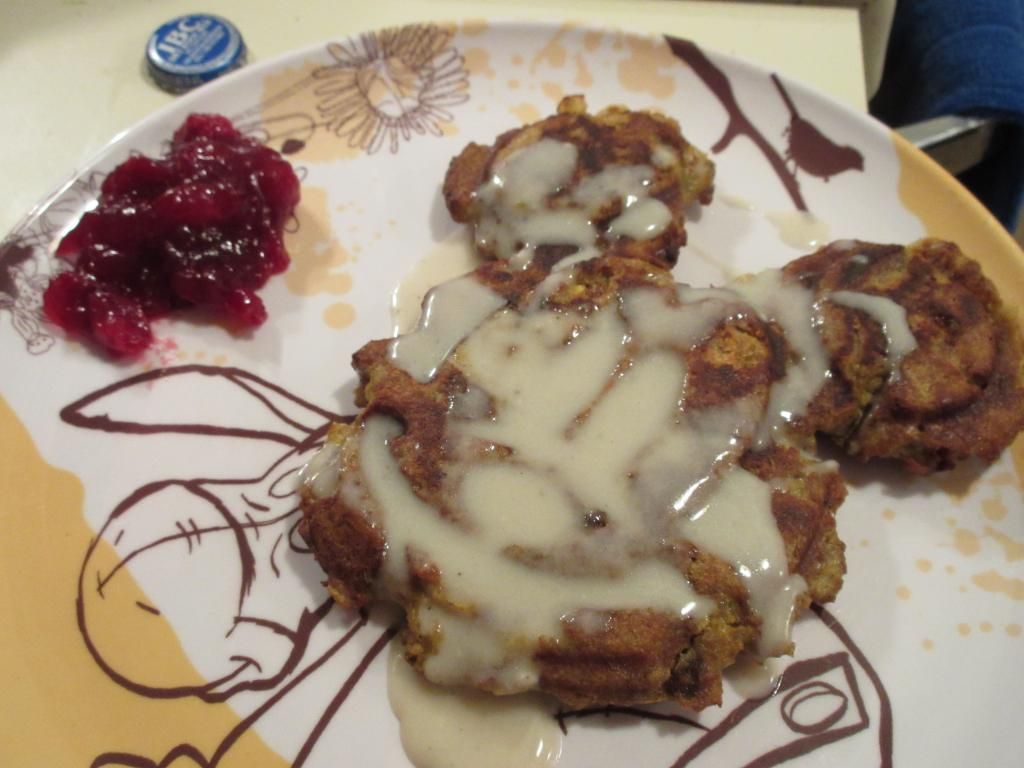
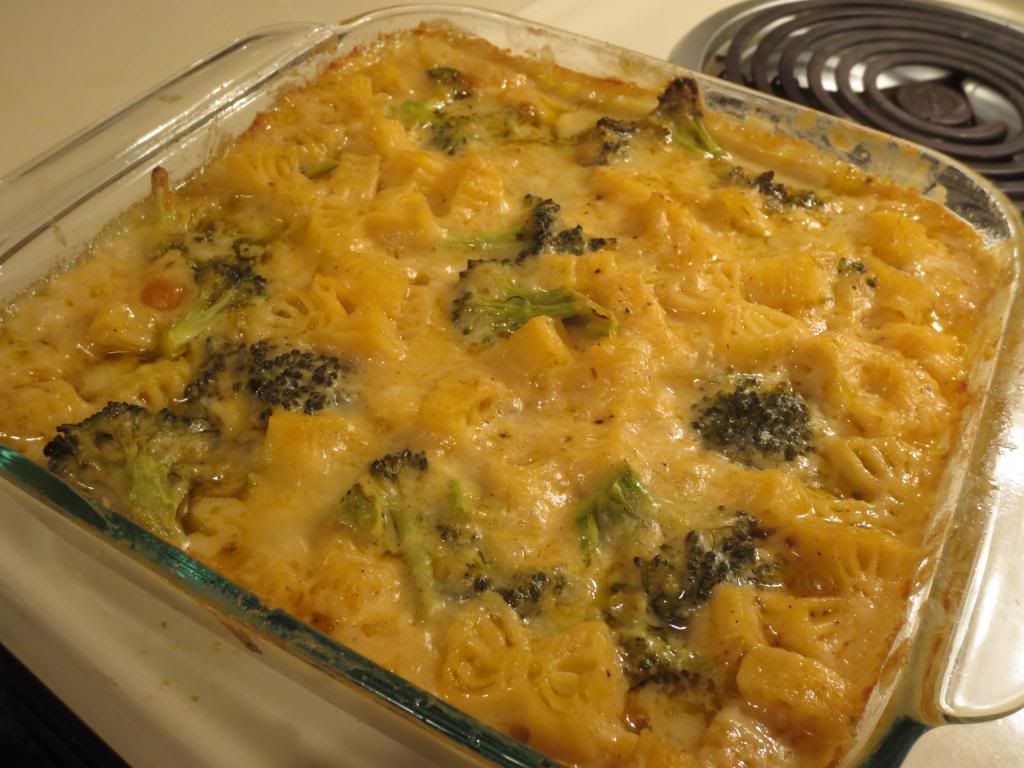
This stuffing smells amazing as it cooks.  I think I was drooling a little every time I walked by the oven.  I mean, SO good.  And when it was finally done, I pulled the dish from the oven, loving how golden the top had become during the cooking process.  I dished it out into 6 Pyrex dishes, tasting a little at the end…and…oh yeah…this was going to be good.

I was wrong, though.  This stuffing wasn’t good.  It was FANTASTIC!!!  Seriously, it was love at first taste.  And I was really, really anticipating lunch for the three days that my roomie and I had this in our refrigerator.  Seriously…I was sad when we devoured the last servings of it.  The cornbread croutons soak in all that amazing flavor from the eggs, sauteed veggies, and the vegetable broth.  It doesn’t get mushy though.  Not at all.  As it bakes, all that flavor bakes inside, making this rich, savory, and addictive stuffing that it’s hard to stop eating.  And that top layer gets this nice golden brown, which brings that bit of crunchy texture when you dig into it.  My mouth waters just thinking about it again.  In fact, I want to see if any of my natural food stores have this on hand.  I’m sort of concerned it’s a seasonal product…but I have every intention of stocking up!

So, let’s take a look at what all goes into a box of the Glutino Gluten Free Corn Bread Stuffing, shall we?  This product is made up of corn starch, tapioca starch, vegetable oil (contains one or more of the following: sunflower oil, canola oil, safflower oil), seasoning (salt, yeast extract, sugar, maltodextrin, dextrose, spices, onion powder, garlic powder, dehydrated parsley, expeller pressed canola oil, spice extractive, silicon dioxide), sugar, egg whites, salt, guar gum, glucono-delta-lactone, yeast, pectin, sodium bicarbonate, sodium alginate, modified cellulose, iron, niacin, tricalcium phosphate, pyridoxine hydrochloride, thiamine mononitrate, and riboflavin.

The Glutino Gluten Free Corn Bread Stuffing mix isn’t a nutritional bomb either.  So, it’s not clean eating for sure…but the nutritional facts aren’t so bad.  A serving size of this product is 1/2 cup prepared and there are 8 servings per box.  This serving will provide you with 120 calories, 4.5 grams fat, 0 grams saturated fat, 0 grams trans fat, 0 mg cholesterol, 470 mg cholesterol, 20 grams carbohydrates, less than 1 gram fiber, 1 gram sugars, and less than 1 gram protein.  The lack of fiber and protein would make you believe that it wouldn’t fill you up if eating it as a meal instead of a side, but that wasn’t the case at all for me.  I found it filling and amazing.

So…if you want to make this too, here is the recipe I used, which is straight off the back of the box itself:

Recipe: Glutino Gluten Free Corn Bread Stuffing

Servings: 6
Time: Prep 10 minutes; Cook 35 minutes

Ingredients:


  • 2 Tbsp of unsalted butter (I used Earth Balance)
  • 2 large eggs
  • 1-1/2 cups of vegetable broth
  • 1 cup diced onion
  • 1 cup diced celery
  • l box Glutino Gluten Free Corn Bread Stuffing

Directions:

Preheat oven to 350° F.

Lightly grease one 8×8 baking pan.

In a heated skillet add the 2 Tbsp of unsalted butter and sautée onions and celery until translucent. Let the vegetables cool.

In a mixing bowl empty package of stuffing mix.  Add cooled sautéed onions and celery, eggs, and vegetable broth. Let stand one minute.

Stir until all the liquid has been absorbed.

Place in greased baking pan and pack down.

Cover with foil, bake for approximately 25 minutes. Uncover and finish cooking for an additional 8 minutes or until it reaches an internal temperature of 165° F.

~*~*~

This was one of the first corn bread stuffings I have had.  And it brought back all those happy memories of the Stove Top Stuffing days of my childhood.  I was beyond impressed.  So, if you’re a glutton for stuffing, I highly recommend picking up a box of Glutino’s Gluten Free Corn Bread Stuffing.  Even your gluten-eating friends would never guess this was gluten-free.  It is that delicious!!  ENJOY!


Product Review: Kite Hill Ricotta

Kite Hill Ricotta
Kite Hill Ricotta

Product: Kite Hill Ricotta – $9.99+

Color me charmed.  For real.  A couple of weeks ago, I took a chance and tried a new product I discovered (exclusively) at my local Whole Foods.  In fact, all of the products from this particular brand are only available at Whole Foods…currently.  They are a little pricey, but as I’ve been discovering…they are totally worth it.

Kite Hill was started due to a vision for a plant-based food that would have all the qualities we love in the best artisan dairy cheeses.  Using simple ingredients and using traditional methods, Kite Hill has created artisan cheeses, yogurts, and cream cheeses that can all be incorporated into entrées and desserts.  Created by a dedicated team with deep culinary, cheese-making, and scientific expertise, including Tal Ronnen, Monte Casino, Jean Prevot, Pat Brown, and Matthew Sade, Kite Hill has stepped up to the challenge  to create a non-dairy cheese that met their high standards for quality.  So often, vegan cheese tastes fake or plastic-like.  After years of recipe testing and countless trials and errors to develop the perfect nut milk, cultures, and enzymes needed to create a worthy product, Kite Hill emerged on the market place.

Kite Hill Ricotta
Kite Hill Ricotta

You will recall that I have already given a raving review for the Kite Hill Plain Cream Cheese Style Spread.  Well, I had pasta on my mind this past week.  Really.  And I had gluten free lasagna noodles in my pantry.  And ramekin dishes in my cupboard.  See where this is headed?  Yep…individual mini lasagnas…all made possible by the introduction of Kite Hill’s Ricotta – which is completely soy free, vegan, gluten free and dairy free.

Let me tell you, I was beyond blown away by this product.  It surprised me.  It really, really did.  The Kite Hill Ricotta is light and fluffy right off the bat.  It looked just like real ricotta…the stuff I am incapable of consuming anymore.  Damn lactose intolerance.  But let me say this, if Kite Hill continues to produce their version of ricotta cheese, then I will never miss it again.  I know that tofu can be substituted in pasta dishes for ricotta…as can Tofutti’s Better Than Ricotta…and I have actually used both in successful recipes.  But…it wasn’t the same.  The texture was different.  The flavor was different.

Not with Kite Hill.  My roommate and I both tried some of the Kite Hill Ricotta on its own before I blended it with some herbs for the actual meal.  Oh.  My.  God.  I probably could have eaten the entire tub on my own, with just a spoon.  There is that much amazing flavor in this cheese.  The texture is light, but with a bit of heft to it.  So, it mimics that of real ricotta.  Oh…this was already looking good for my mini lasagnas.  I just had to keep myself from eating all the cheese out of the container and to use it, instead, in the actual recipe.

No easy task.

But I did end up blending it with my herbs and some Daiya Mozzerella Shreds to complete the cheesy filling of the lasagna, which would also include sautéed onion and kale with some garlic.  YUMMY!!  The noodles were cooked, cooled, and put into the dishes.  The ricotta & cheese filling was added, and layered with the vegetables…and of course an amazing sauce from Rao to top it all off.  Into the oven for 40 minutes and…viola…we’re in business!  The mini-lasagnas came out of the oven bubbling hot with cheese and sauce and a whole lot of goodness.  I eased them out of the ramekins and dinner was served.

Oh. My. God.  This was the best ricotta cheese substitute I have tried yet.  Not only was this flavorful, mimicing both ricotta and/or mascarpone cheese, but it didn’t make the dish heavy at all.  The ricotta has a slight tanginess to it, making it a nice addition not just to pastas, but also to desserts.  This product is ridiculously tasty.  I want to make ricotta pancakes now.  And I think I might just do that…maybe tomorrow.  We’ll see.  I have some left over to do just that.  And I have all these fresh local blueberries to use as well.  Oh yes…I sense an epic gluten-free and dairy free pancake breakfast.  It’s the best ricotta substitute I have ever stumbled upon.  It’s made from almond milk, so if you have a nut allergy, it’s not for you, but it’s nice to have a soy-free alternative.

So, now let’s talk about the ingredients.  Nothing beats real, wholesome ingredients.  What’s even better, the Kite Hill Ricotta only has 5 ingredients in it.  Yep.  Just five!  These include: almond milk (water, almonds), salt, enzyme, tartaric acid, and cultures.  This product, as mentioned before, is gluten-free, soy free, dairy free and vegan.  It also contains no cholesterol, no saturated fat, and no trans fats!

And with that in mind, this is the best time to discuss Kite Hill Roctta nutritional facts, yes?  A serving of the Kite Hill Ricotta is 1 ounce (28 grams…or about 2 tablespoons).  This serving will provide you with 70 calories, 6 grams of fat, 0 grams saturated fat, 0 grams trans fat, 0 mg cholesterol, 90 mg sodium, 2 grams carbohydrates, 0 grams dietary fiber, 0 grams sugars, and 3 grams of protein.  Are you loving it?  I’m loving it!

Seriously, you won’t find anything better than Kite Hill Ricotta.  It’s so versatile.  Pastas, pizza toppings, desserts, or even in hot chocolate, this will do it all.  And the taste, oh my God, the taste is fantastic.  I am hooked.  I’ll pay the price to have a good tasting, good quality product.  And Kite Hill totally makes it worth it.  If you live near a Whole Foods, I encourage you and highly recommend that you check out the Kite Hill lineup of vegan artisan cheese.

Mini Vegan Kale Lasagna (made with Kite Hill Ricotta)

Recipe: Brussels Sprouts in a Gluten Free White Wine Sauce

So…I’m totally addicted to Brussels sprouts.  You may or may not be aware of this.  The first time I ever cooked them up, I made them in a casserole.  And then…it was all about the roasting.  With olive oil and seasoning…or maple syrup and nuts…the possibilities were endless.

But…I have a lot of wine in my apartment.  A LOT.  And with a fresh bottle of white wine now open and in the fridge…I am coming up with clever ways of using it that doesn’t involve drinking it night after night after night.  Not that there is anything wrong with that…but the medication I’m on for my hip sort of doesn’t mix well with alcohol.  So…yeah…

With Brussels sprouts in my bin this past week and wine in the fridge, I went on a small hunt for recipe ideas.  Because I was just going to roast them up…but that didn’t use any wine…

What I found was a recipe from Taste of Home, which I modified slightly to fit the ingredients I had on hand and to fit my dietary needs.  And what emerged…was a nice twist on Brussels sprouts.

Recipe: Brussels Sprouts in a Gluten Free White Wine Sauce

Brussels Sprouts in a Gluten Free White Wine Sauce

Servings: 4-6
Time: Prep 20 minutes; Bake 25 minutes

Ingredients:

  • 1 pound fresh Brussels sprouts
  • 1/4 cup Earth Balance vegan buttery sticks, cubed
  • 1/4 cup gluten-free all-purpose flour (I used Cup4Cup)
  • 1/2 teaspoon salt
  • 1/4 teaspoon pepper
  • 1 cup non-dairy milk (I used unsweetened cashew milk)
  • 2/3 cup white wine
  • 1 cup white onion, chopped
  • 2 tablespoons raw whole almonds
  • 1 tablespoons sliced almonds

Directions:

Place Brussels sprouts and a small amount of water in a microwave-safe dish. Cover and microwave on high for 2 minutes. Stir; microwave 1-2 minutes longer or until partially cooked. Let stand 5 minutes; drain and set aside.

In a large saucepan, melt butter. Stir in the flour, salt and pepper until smooth. Combine cream and wine. Gradually whisk into flour mixture. Bring to a boil. Cook and stir for 1-2 minutes or until thickened and bubbly. Stir in the onions, chopped almonds, and reserved Brussels sprouts.

Transfer to a greased 1-1/2 quart baking dish. Sprinkle with sliced almonds. Bake, uncovered, at 400°F for 20-25 minutes or until bubbly and Brussels sprouts are tender.  Season with salt and pepper.

~*~*~

This was definitely a change from the oven roasted version, but it was good to step outside the box and do a little cooking with wine.  And it was full of flavor and cooked up really well.  Everything went together.  I added a few red pepper flakes to my own bowl just to take it up a notch.

If you’re a Brussels sprouts fan…Try this!!

Product Review: Mary Ann’s Beans Gluten Free White Chili Mix + Recipe Bonus

Mary Ann's Beans Gluten Free White Chili Mix
Mary Ann’s Beans Gluten Free White Chili Mix

Product: Mary Ann’s Beans Gluten Free White Chili Mix – $8.00

It’s the New Year.  Time to make resolutions and then, over the course of a month…break them.  Right?  Yes.  Right.  It’s the way it works every year.  You vow to stop eating chocolate…to go to the gym…to eat more vegetables and less potato chips.  You promise to get into a habit…make it a routine.  But then…by MLK Day…you’re already off the wagon.

And you know what?  That’s okay.  We’re in the midst of winter here.  Cold temperatures and lack of sunlight have a funny way of killing off any bit of motivation out there.  We’re human.  It happens.  But, it’s also okay to enjoy the little things in life and to be less strict with yourself.  Resolutions can be broken…but they can be picked right back up on where we left off.  That’s the best part.

Being that it is January…and the New Year has come and gone…and the weather outside is frightful(ly cold)…I’m a lover of all things comforting when it comes to food.  Tis the season for those hearty meals that make you just want to curl up with a good book in front of the fireplace and dig in while losing yourself.  Ah…it’s a wonderful thing.  And, when it comes to winter comfort foods…nothing is better than soups, stews, chili, and pasta, right?  Of course!!  Those are classic comfort foods if you ask me.

Well, in the January Happy New Year 2015 Cuisine Cube, we were served up a few products that were good for you…but also a guilty pleasure and comfort.  That’s the wonderful thing about Cuisine Cube…you just never know what to expect from one box to the next.  One cube guarantees a product that is good for a breakfast, lunch, snack, dinner and dessert.  And sometimes, like in the case of January, you get a bonus item.  In this case…another snack.  YAY!

I know, if you’re reading this blog regularly, you are familiar with the service that Cuisine Cube offers…but just in case you are a newbie…first of all…welcome.  Secondly…hop on over to Cuisine Cube’s Web site and take a look at this fantastic service.  This small group of foodies put together a completely gluten-free box of goodness each month with 5-6 products from small, lesser-known artisan producers…some local…some not-quite-so-local.  I’ve discovered so many amazing products after I signed up for this service back in May.  And…you get a cube delivered right to your door each month…starting at $29.99.  So, yeah…I encourage you to check them out.  Have a little surprise each month and enjoy a few products you might never have tried or known about before.  It doesn’t get much better than that.

With that said, the January Cube was packed with a lot of healthy foods.  Seriously.  The dessert was dark chocolate covered rice cakes.  Yes, there will be blog on those soon…stay tuned.  Even the most comforting of foods inside…is healthy-ish!  And I’m okay with this.  But…I’m also dealing with a bit of the winter blues…so when I saw the unassuming cloth pouch of Mary Ann’s Beans Gluten Free White Chili Mix…my brain immediately turned to comfort food.  And with that, I set out to do more than just make the chili and eat it.  You know, reinventing a product is something I love to do.

First, let me talk a little bit about Mary Ann’s Beans.  Chili can be comfort food, but Mary Ann’s Beans is making it a part of a healthy lifestyle.  All of the soup and dip mixes are nutritious and low in sodium.  They have options for vegetarians, gluten-free, and offer all seasoning mixes that are made with no salt, no sugar, and no MSG.  In other words…it’s good for you.  And these soups tastes great too.

Mary Ann's Beans Gluten Free White Chili Mix (dried beans and seasoning packet)
Mary Ann’s Beans Gluten Free White Chili Mix (dried beans and seasoning packet)

Make Mary Ann’s Beans part of your heart healthy lifestyle with our delicious and nutritious low sodium soup mixes. With flavors to please every palate, and options including vegetarian and gluten-free, your whole family will love our soups. Our all natural soup, dip and seasonings mixes are hand made with no salt, no sugar, and NO MSG.  Mary Ann’s Beans most famous mix is the Gluten Free White Chili Mix that was in the January Cuisine Cube.  And, honestly, I can see why!!  These mixes do take some time to make, but, trust me…it’s well worth it.

Mary's Ann's Beans Gluten Free White Chili Mix (beans soaked)
Mary’s Ann’s Beans Gluten Free White Chili Mix (beans soaked)

Last night, I soaked the packet of dried white beans in water.  I drained them and rinsed them.  And then…set out to cook them.  The instructions included on this chili mix package give two ways to cook it…in a slow cooker for 6-8 hours or…on the stove top for 3-4 hours.  I went with the stove top method.  And making this chili is super easy.  The actual instructions do call for chicken, as it is a white chili.  But, as a vegetarian, I just left it out and kept it strictly the beans and the can of chopped green chilies.  I used Vegetarian No-Chicken Broth as well, instead of chicken broth.  Cooking it is time consuming, but it yields amazing results.  With the stove top method, you simply combine the white chili beans, 6 cups of broth (vegetable, non-chicken, chicken…), a 4 ounce can of chopped green chilies, 1-1/2 – 2 cups of boneless cooked chicken (if you are using…if you are a vegetarian like me…it’s fine to leave it out!), and the contents of the spice packet that is included, into a large pot and bring it to a boil.  Reduce the heat, cover, and allow it to simmer for 3-4 hours, or until tender.  I let mine go for about 3-1/2 hours and it was perfect.  Add a bit of salt at the end voila…your chili is ready to eat.

What emerges is this hearty and thick chili that has this light, and slightly spicy taste to it.  White chili is amazing, even without the chicken, and it makes for a beautiful and eye-catching addition to any potluck or chili cook-off.  But I was not just going to cook up this fantastic product and just eat it straight.  You know better than that.  I did, however, take a few spoonfuls to see how it was.  And, let me tell you, Mary Ann’s Beans is doing comforting winter food right.  The flavor is familiar…the texture is hearty and rich…and the spice is a mild heat.  If you like hotter (I do), you can put in jalapenos instead of chilies, but my roommate isn’t a lover of spice, so I kept it mild.  At the end of cooking, I added some salt and a hit of berbere seasoning…and it made pure chili perfection.  If you love chili…you will love this.

Mary Ann's Beans White Chili Mix (prepared)
Mary Ann’s Beans Gluten Free White Chili Mix (prepared)

Let’s talk ingredients, shall we?  Mary Ann’s Beans White Chili Mix is made from great northern beans, navy and yellow eyed beans, dried onions, garlic and spices.  As stated before, these are gluten-free, contain no salt, no sugar, and no MSG.  This mix is also cholesterol free.

One pouch of Mary Ann’s Beans Gluten Free White Chili Mix contains about 6 servings.  One serving will give you 190 calories and 1 gram of fat.  A full serving will also dish up only 10 mg sodium and 1 gram of sugar.  As for being filling…it’s chili…it will be filling.  You get 13 grams of fiber and 12 grams of protein in each serving.  I do love hearty, nutritious, comfort food.  And this is all of that rolled into one.

But wait…there’s more!!  I created an amazing (vegan and gluten-free) ultimate comfort food dish using the prepared Mary Ann’s Gluten Free White Chili Mix.  Trust me, your winter blues will disappear while you dive into this dish.

Recipe: Gluten Free and Vegan Cheddar Chili Cornbread Pasta Bake

Gluten Free and Vegan Cheddar Chili Cornbread Pasta
Gluten Free and Vegan Cheddar Chili Cornbread Pasta Bake

Servings: 6
Time: Prep 4 hours; Cook 30 minutes

Ingredients:


  • 1-1/2 cups uncooked gluten-free elbow noodles (I used Meijer Gluten Free Corn Pasta Elbow Noodles)
  • 3/4 cup Daiya Cheddar Style Shreds (if you do dairy…freshly shredded cheddar works!)
  • 2 1/2 – 3 cups of leftover chili (I used Mary Ann’s Beans Gluten Free White Chili)
  • 1 batch of your favorite cornbread (I used gfJules Cornbread Mix)


Directions:

Preheat oven to 425° F.

Bring  the water to a boil and prepare the pasta according to the directions on the package, taking about 1-2 minutes off of the cooking time, as the noodles are going into the oven.

While the noodles are cooking, mix up a batch of your favorite cornbread (just the batter…do not cook it!) and get the cheese prepared.

Drain the pasta when it’s ready.

In an 8 x 8 inch baking dish, spray non-stick cooking spray.  Add the pasta to the bottom of the dish.  Then top it with a layer of cheese.  Then add the chili.  Top with the cornbread batter, spreading it evenly over the top with a spoon.  It’s okay if it doesn’t reach the edges.

Bake for 30-35 minutes, or until the cornbread is golden on top and cooked all the way through.  You can use a spoon to lift up the cornbread layer to make sure that it is completely cooked.  Cooking times may vary with the cornbread mixture you use, but keep an eye on it and check it.  The cooking time might increase due to the “wet” layers that are underneath the layer.

Serve immediately.

~*~*~

Oh. My. Gluten. Free. Comfort. Food. Gods.  No…really.  If you love a hearty winter meal, this is the way to go.  I loved the rich flavors that the Mary Ann’s Beans White Chili brought to the dish.  It was the centerpiece…the middle layer…the glue.  And it was an absolutely amazing addition to this entire dish.  When winter has you hiding under the blankets longing for something warm and wonderful to eat…this will definitely fulfill that desire.  Either that…or a big, steaming bowl of just the chili on its own.  However you serve it up…flavorful, creamy, and just…so good!

It was thanks to the amazing products that Mary Ann’s Beans put out and Cuisine Cube sent me that I was able to piece together this hearty, and amazing dinner.  For the record, the gfJules Cornbread Mix (review to follow) is also a product I received from Cuisine Cube in November.  So, as you can see…it is definitely a service worth trying out.  Seriously, your inner foodie will thank you for it.

Product Review: Olivia’s Gluten Free Rosemary & Sage Stuffing + Recipe Bonus

Olivia's Gluten Free Rosemary & Sage Stuffing
Olivia’s Gluten Free Rosemary & Sage Stuffing

Product: Olivia’s Gluten Free Rosemary & Sage Stuffing – $6.50+

There are a lot of Thanksgiving foods that, as a gluten-free vegetarian, I no longer indulge in at the dinner table.  That being said, my Thanksgiving meal usually consists of a scoop of vegetables, some plain potatoes, and usually a fruit of some sort…or whatever I brought with me for the occasion.

This year for my contribution to the Thanksgiving meal, I brought desserts.  YAY!  I also, however, brought gluten-free stuffing.  From my local gluten-free bakery.  I actually pre-ordered it prior to receiving my November 2014 Cuisine Cube.  But…this just gave me the opportunity to have stuffing…all over again.

And this is a good thing.  Because I absolutely LOVE stuffing!  I never ate it much as a kid, because, prior to going vegetarian, my family’s go-to Thanksgiving meal was shrimp creole, not turkey, but sometimes, on Christmas, my mom would cook up a turkey and I would request stuffing.  And…it was usually Stove Top.  But, to me, it was amazing!

So, stuffing was one of my guilty pleasures that I rarely indulged in, but would devour every time I had the chance.

When my Cuisine Cube happened to have a box of a gluten-free stuffing in it, I might…might…have done a happy dance of joy with a few bounces and jumps and squeals of happiness.  This isn’t uncommon each month when I open up my Cuisine Cube…but we are talking GLUTEN FREE STUFFING!!  Did I make that clear yet?

Olivia's Gluten Free Rosemary & Sage Stuffing
Olivia’s Gluten Free Rosemary & Sage Stuffing

So, since I had my local allergen-free bakery make me some gluten-free stuffing for the big meal on Thursday, I got to have some fun and get a little creative with my box of Olivia’s Gluten Free Rosemary & Sage Stuffing.  But, this still meant that I needed to cook it up properly.  And this stuffing is really easy to make!  I cut up some onion and celery per the instructions on the box, cooked it in my vegan butter, and then added some vegetable broth.  I transfered the liquid into a large mixing bowl and added in the Olivia’s Gluten Free Rosemary & Sage Stuffing mix.  I gave it a stir and let it sit for about 8-10 minutes, until the cubes were moist and the liquid was completely absorbed.  After that, I put the mix into a baking dish and baked it for 30-40 minutes per the instructions on the box until it was beautifully golden and ready to eat.

I won’t lie…I had a small serving of it then.  I had to.  The smell as it was baking was phenomenal.  Really.  I was practically salivating the entire half hour it was cooking.  So, yeah…I wanted to try it so I could tell you, my readers, how it was before I had some fun with it.

It was amazing.  No joke.  Freakin’ fantastic.  The chunks of bread got to that perfect golden crispness, while the vegetables and the absorbed liquid kept it moist and delicious.  The level of flavors was spot on.  Definitely perfect on its own.  I didn’t even need to add any additional salt and pepper.  Olivia’s Gluten Free Rosemary & Sage Stuffing was better than any stuffing I have ever eaten in my life.  Way better.  That goes for the boxed stuff as well as the stuff made from scratch.  This was an total win.  I wish I had made it up for dinner at my roommate’s family’s home.  Perhaps next year.  They wouldn’t even begin to guess that it was gluten-free…except for I’d be eating it, so they would know!

Olivia's Gluten Free Rosemary & Sage Stuffing (prepared)
Olivia’s Gluten Free Rosemary & Sage Stuffing (prepared)

I am so in love with this stuffing.  My only complaint was there was only one box of it.  Good thing I can order more through Cuisine Cube and Olivia’s Gluten Free Web site.  Trust me…this will be happening!

Let’s talk about the ingredients in Olivia’s Gluten Free Rosemary & Sage Stuffing.  This stuffing is made from gluten-free bread, certified non-GMO canola oil, granulated onion and garlic, rosemary, sage, thyme, celery seed, sea salt and pepper.  It is cholesterol free, gluten-free and made in a dedicated gluten free facility.

As far as nutritional information goes, Olivia’s Gluten Free Rosemary & Sage Stuffing makes about 9 servings per container.  If you use it traditionally.  A serving size is 3/4 cup prepared.  This serving will provide you with 110 calories and 4 grams of fat.  You will also be taking in 200 mg sodium and 1 gram of sugar.  In addition, you will be consuming only 1 gram of fiber and 1 gram of protein.  On its own, this stuffing won’t make you feel stuffed, but you will love every single bite of it.  Trust me.

But…as I mentioned earlier…I had some fun with this stuffing.

Why eat it straight up when you can do something a little outside the box, right?  Well, on Black Friday, I picked up a new waffle maker (shaped like Mickey Mouse!) and I really wanted to test it out.  I’m like a child…I get something new and I want to try it out right away.  So, on Saturday night, I took the stuffing that I cooked up out of the fridge and put it into a big mixing bowl.  It was time to use the “leftovers” in a new way.  Prepare yourself…

Recipe: Gluten Free Leftover Stuffing Waffles

Gluten Free Leftover Stuffing Waffle (shaped like Mickey Mouse)

Servings: 4 large waffles
Time: Prep 5 minutes; Cook 10 minutes

Ingredients:

  • 4 cups crumbled leftover gluten free stuffing
  • 2 large eggs
  • 1/4 cup vegetable broth (or chicken broth if you’re not vegetarian)


Directions:

Preheat the waffle maker and grease it with cooking spray.

Gluten Free Leftover Stuffing Waffle with Vegan Homemade Vegan White Gravy and Cranberry Chutney

In a large bowl, stir together the leftover stuffing and eggs.  Add 1/4 cup of vegetable broth and mix until well combined.  Continue adding broth as needed until the mixture is well-moistened.

Scoop the stuffing mixture into the prepared waffle maker, spreading it evenly.  (The stuffing will not spread or expand like regular waffle batter as it bakes, so arrange it in an even, thin layer).   Close the lid and let the waffle bake until golden brown and the egg is cooked throughout.  Stuffing waffles take longer to cook than regular waffles, as the egg must be completely cooked throughout.  Don’t be afraid to let the waffle bake until it’s golden brown and crispy!

Transfer the waffle to a serving plate then repeat the filling and baking process with the remaining stuffing.

Serve.

~*~*~

I know what you’re wondering…you are pondering what I served these waffles with.  Simple.  I prepared a gluten-free white gravy and took some fresh cranberries from my CSA bin and made a cranberry chutney.  I poured a bit of the warm gravy over the waffle with a side of the cranberry relish and…BAM…dinner was served.

It tasted amazing.  Mine, being in a Mickey Mouse waffle maker, was shaped like Mickey Mouse…but it came to this perfect golden crispiness on the outside.  It paired great with gravy, making it a savory dinner.  And the cranberry chutney tied it all together.  A great way to use up some of those holiday leftovers for sure!

TRUST ME!

Thanks to Cuisine Cube for including a box of Oliva’s amazing Gluten-Free Rosemary & Sage Stuffing in my box for Thanksgiving.  I am forever thankful!

Recipe: Gluten-Free Overnight Bananas Foaster French Toast Casserole

Mmmm.  I love a good breakfast.  I love doing something different and outside the box.  I love breakfast so much that I could (and have) eat it for every meal of the day.  Seriously.  But when you get a little tired of various ways to do breakfast food, there is always another option out there.  And, thankfully, for me, I discovered a great looking recipe via I Heart Eating’s blog, which I adapted to be dairy-free and gluten-free…for an overnight French toast recipe.

Sort of like a breakfast bread pudding.

But with bananas.  And vegan cream cheese.  And rum.

Yes.  RUM!

And that is why, the day after I ran a marathon, I found myself in my kitchen baking up a fantastic breakfast treat.  It was Easter morning, and that meant something special needed to start off the day.  Aside from a short shakeout run…my only other plans that morning was to bake up this breakfast.  I had actually prepared it the night before and all night it was marinating in my fridge…just waiting to be placed in that warm oven.

So, without further adieu…I give you the recipe for Gluten-Free and Dairy-Free Overnight Bananas Foster French Toast Casserole!

Recipe: Gluten-Free and Dairy Free Overnight Bananas Foster French Toast Casserole

Gluten-Free and Dairy-Free Overnight Bananas Foster French Toast Casserole

Servings: 6-8
Time: Prep 20 minutes; Bake 50 minutes

Ingredients:

Banana Topping

4 tablespoons butter, melted (I used Earth Balance)
2/3 cup brown sugar
2 tablespoons light corn syrup
1 teaspoon vanilla extract
1/2 teaspoon dark rum
1/2 tsp. ground cinnamon
2 medium ripe (not overripe) bananas, sliced
French Toast

2/3 loaf gluten-free challah bread, cut into cubes (I used Katz Gluten-Free)
4 ounces Toffutti Better Than Cream Cheese
6 large eggs
1 cup unsweetened almond milk
1/4 cup granulated sugar
1/2 teaspoon ground cinnamon
1/4 teaspoon ground nutmeg
1 teaspoon vanilla extract
Pinch of salt
Powdered sugar (for dusting)


Directions:

Make the banana topping by stirring together the melted butter, brown sugar, corn syrup, vanilla extract, dark rum, and cinnamon.  To make banana topping, stir together butter, brown sugar, corn syrup, extracts, and cinnamon.Lightly grease a 9×9-9nch baking pan.Pour the butter sauce into the prepared pan.Place banana slices over the sauce.Layer half of the bread cubes over the bananas.Dot the bread cubes with the vegan cream cheese.Cover with the remaining bread cubes.Whisk together eggs, milk, sugar, vanilla extract, cinnamon, nutmeg, and salt in a medium bowl.  Be sure to mix it well.Pour the egg mixture over the bread.  Smoosh the bread down a little so that the bread can absorb the egg mixture.Cover and refrigerate overnight.In the morning, remove the pan from the refrigerator and leave it out while preheating the oven to 375°F.

Uncover and bake on a rimmed cookie sheet (in case the topping bubbles out…mine didn’t…but you can’t be too careful) for about 30-40 minutes or until the eggs have set.

Allow it to cool in the pan for 5-10 minutes.

Invert to serve and sprinkle with a dusting of powdered sugar.

Enjoy!

~*~*~

While I have made plenty of overnight recipes before, there was definitely something special about this one.  The flavor was fantastic.  The banana portion, once inverted was rich and creamy, and the bread toasted to perfection, giving a nice play on both taste and texture.  I was beyond impressed with the way this turned out.  It totally made for the most amazing Easter breakfast I have made yet.

Delicious.

Come on…you know you want to make it too!


Product Review: Annie May’s Sweet Café Gluten-Free Macaroni and Cheese

Annie May's Sweet Café Gluten-Free Macaroni and Cheese
Annie May’s Sweet Café Gluten-Free Macaroni and Cheese

Product: Annie May’s Sweet Café Gluten-Free Macaroni and Cheese – $8.00

The weather is getting colder.  In fact, tomorrow, here, it isn’t even supposed to crack 0°F.  No joke.  That’s not common around here, not as of late anyway…but that is so freakin’ cold.  And that makes me an unhappy girl.  Trust me.  I. HATE. COLD. WEATHER.

But with the cold weather comes those warm, hearty meals that fill you up and leave you feeling nice and cozy from the inside out.  This includes a vast array of foods, but for me…it’s soups and casseroles…

…and macaroni and cheese.

Yes.  Simple.  Straightforward.  Macaroni and Cheese.

But no ordinary macaroni and cheese will do.  I do eat the kinds out of the box…but they are just for those quick meals I need to eat before rushing off somewhere in my hectic and busy schedule I keep.  But on these days where I’m hibernating…or simply have some time on my hands…I will always choose a good old-fashioned homemade macaroni and cheese.

Here’s the thing though…I make a damn, damn, damn good gluten-free macaroni and cheese.  My roommate will ask for it every now and again and beg and plead for me to make it.  And, naturally, I will.  It’s my mom’s recipe, which I have tweaked only slightly to fit into my dietary restrictions and to spice it up some.  I love my homemade mac and cheese and I do love making it.  But shredding the cheese and making the white sauce…it all takes a lot of time.  Even if I have it…I sometimes can think of 100 other things I need to be doing.

Lucky me!  Yes…once again…lucky me.  Lucky me for having Annie May’s Sweet Café practically in my own backyard.  Sure, this little bakery offers cupcakes and brownies and cookies and cakes and…all those other delictible naughty treats.  But…sometimes…you get take-n-bake specials.  I have previously blogged on Annie May’s Take-N-Bake Cinnamon Rolls and have tried (but obviously forgot to blog about…and will remedy that immediately) the Take-N-Bake Crescent Rolls.  The take-n-bake options at Annie May’s Sweet Café make all those foods you crave that much easier to make yourself.

And she recently added Gluten-Free Macaroni and Cheese to that list.

Pardon me while I do the happiest little dance of joy.

Of course…I had to try it.  I absolutely had to.  I mean…I was heading home soon after dining there on Saturday morning for breakfast so…it only seemed logical, despite not really being in the budget, to give it a go.  I was getting breakfast treats to go for Sunday…why not add dinner to the mix too.  Just make Sunday (a busy day with everything needing to be done before Monday strikes) that much easier to slog through.

I was beyond excited the day I pulled this out of my refrigerator, preheating my oven to 375°F, per the instructions on the container.  It looked so amazing and that was before I even popped it in the oven to bake.  Go figure.  Once the oven heated, I removed the plastic wrap and set the tray inside for about 20 minutes…the gluten-free breadcrumbs on top were golden and the cheese around the edge was bubbling.  Oh yeah…done.  And it looked and smelled so good.

Once again, Annie May’s Sweet Café really delivers.  One bite and I looked over at my roommate, who was also enjoying half of this tray, and I said, “I think this is better than mine!  And I make really good mac and cheese!”  What makes it so amazing?  Hell if I know.  I don’t know what magic Annie May’s puts into their products, but this macaroni and cheese baked up creamy and cheesy, with that nice toasted crunch from the breadcrumbs.  It was fantastic.  So comforting to the soul, spirit, and body.  I had wished I had bought them out of the trays they had.  And I intended to do that this past weekend…but they only had  one tray left by the time I got there so…I luckily snagged it before anyone else could.  I think it might have been a near thing.  Anyway…creamy, dreamy goodness in one simple dish.

I mean, right on the label, Annie May’s lays it all out as far as the ingredients: Brown rice flour, water, whole milk, cheddar cheese, and butter.

This is, in no way, a light meal.  It’s hearty, it’s warm, it’s filling…but it makes you feel good as you eat it.  And in the end, the food you eat should make you feel good.

I can’t say enough good things about Annie May’s Sweet Café in Louisville, Kentucky.  They keep expanding their menu…which is soon to include bagels (and I can’t WAIT for that to happen)…and I have enjoyed being able to try these new additions as they are placed in the case.  Yes…we, the food-allergic and even the non-food-allergic of Louisville, Kentucky have one really sweet place on Frankfort Avenue…which I make a point to visit often.  It’s that good.  The people are amazing.  The food continues to get better and better.

No one would even guess it was gluten-free.

Comfort yourself on these cold winter nights with a little bit of gluten-free comfort food.  Go to Annie May’s…and get the macaroni and cheese.  You can thank me later.

And trust me…you will.

Annie May's Sweet Café Gluten-Free Macaroni and Cheese (baked)
Annie May’s Sweet Café Gluten-Free Macaroni and Cheese (baked)

Going Beyond Meat for vegan and gluten-free not-chicken options with Southwest Style Chicken-Free Strips

Beyond Meat Southwest Style Chicken-Free Strips

Product: Beyond Meat Southwest Style Chicken-Free Strips – $4.99+

Something happy happened to me the other day when I was in Whole Foods.  Something that I had been hoping for for a very long time.

I discovered…gluten-free vegan “chicken.”  Normally…any vegan/vegetarian protein has some sort of ingredient that contains gluten, normally used for texture purposes.  Sure, it can be left out, however, that is what the leading brands will tell you…it is for texture.  So, for these past two years, save for the Health Is Wealth Gluten-Free Vegan Not Chicken Nuggets, my not chicken food habits have been non-existent.  And…to top it off, my grocery store no longer carries the Health Is Wealth Gluten-Free Vegan Not Chicken Nuggets because they were told they were discontinued.  I think I cried…no…I did cry when I was told that.

But then Whole Foods saved the day.

The brand…Beyond Meat.  Their objective is simple – to become the market leader in the development and introduction of new plant protein products, specifically focusing on perfectly replacing animal protein with plant protein.  And to be able to pull this off cost effectively…not just for the company, but the consumer.

Beyond Meat was founded by Ethan Brown, who learned all about animal-based agriculture at his father’s dairy operation in Western Maryland.  As he grew up, he developed a career in the clean energy sector and contemplated whether the world would continue to raise and eat animals in such staggering numbers if a plant-based replication of the meat existed.  So, he began searching for a way to do just that.  Along the way he met Fu-hung Hsieh and Harold Huff at the University of Missouri, and after several years of collaboration, Beyond Meat was born with the sole purpose of driving innovation and progress on meat-free plates around the world.

Enter my little happy dance of joy…because not only is Beyond Meat’s products vegan…but they are also gluten-free.  And they come in three varieties: Lightly Seasoned, Grilled, and Southwest Style.

I grabbed the two kinds they had.  And I already had a dish in mind.  I was going to make my mom’s famous Mexican Chicken Casserole…but do it with the vegan chicken product and vegan cheese.  These strips were actually perfect.  And with the fact that it was a Mexican sort of dish, the Southwest Style Chicken-Free Strips would be ideal.  The Grilled was the other version…and those got tucked into the freezer for the time being.

So…how does this stack up?

Beyond Meat Southwest Style Chicken-Free Strips

For a gluten-free and vegan meat alternative…this is actually quite palatable.  The texture reminded me of the Quorn variety I ate before having to go gluten-free.  And the flavor was just as good…maybe more on the Morningstar level for taste…but that’s not bad.  In fact, I could actually, despite it being in a casserole, taste the not-chicken strips.  And what I loved about the Southwest Style variety was that little kiss of lime flavor you got with each bite.  It was a really nice surprise and a great addition of flavor to the entire dish.  These chicken strips didn’t turn to mush when they were cooked in the casserole.  In fact, they remained in full strips as real chicken would.  I was very impressed.  Both with the taste and the texture.  This is definitely a substitute I would do again.

Nutritionally speaking, the Beyond Meat Southwest Style Chicken-Free Strips have 4 servings per container.  Each serving dishes up only 130 calories and 3.5 grams of fat.  That is awesome!!  A serving also contains only 370 mg of sodium and no sugar.  That’s always nice to see.  And, you will also receive 2 grams of fiber and a whopping 20 grams of protein.  Yes…20 grams of protein in each serving.  How amazing is that?!

So…what are these not-chicken strips made out of?  Well…the basics are water, soy protein isolate, pea protein isolate, amaranth, vegan chicken flavor, expeller-pressed canola oil, soy fiber, carrot fiber, and they contain 0.5% or less of: white vinegar, salt, lime juice concentrate, garlic, black pepper, chili powder, onion, sugar, cumin, coriander seed, sodium alginate, dipotassium phosphate, titanium dioxide (color), calcium sulfate, oregano, paprika, red and green pepper powder, cayenne pepper.  If anything looks confusing to you, the website for Beyond Meat lays out what each unfamiliar ingredient may be.  It takes any guess work out of it.  And you’ll be happy to know…those couple of chemical sounding ingredients aren’t chemicals but things that appear naturally in nature.  Yep.  I learned something too.

If you are looking to cut back on meat, or perhaps are vegetarian or vegan, Beyond Meat is a fantastic choice.  While there is a literal sea of vegan/vegetarian meat alternatives out there, very few of them on the market are gluten-free.  Beyond Meat finally brings the protein back to the gluten-free vegan/vegetarian plate.  And for that, I am forever grateful.

With how much I enjoyed the Southwest Style Chicken-Free Strips, I am totally anticipating giving the Grilled ones a try too.  These were just what I needed!

Mexican
Mexican “Chicken” Casserole using Beyond Meat Southwest Style Chicken-Free Strips

A delicious change of pace with Le Veneziane Corn Meal Farfalle Pasta

La Veneziane Gluten-Free Corn Meal Farfalle

Product: La Veneziane Gluten-Free Corn Meal Farfalle – $4.39+

Mmmm…pasta.  I love, love, love, love, love pasta!!  But, being gluten-free…you have to find the perfect pasta in order to truly enjoy any pasta dish you might have had prior to needing to go gluten-free.  That’s how it was with me.  And while I like brown rice pasta well enough, I find that on the reheat, it gets mushy and falls apart.  And sometimes, on the initial cooking, it gets mushy and falls apart.  This can be really, really aggravating.

But, pasta lovers…do not fear.  There is a plethora of gluten-free pastas out on the market these days…and all of them are different, cook different, hold up differently, reheat differently…so you do have your options.  And, being the pasta-fiend that I am…I am slowly making my way through the ever-growing varieties that are offered.

Normally, I probably never would have stumbled across Le Veneziane.  But, I was in Milwaukee, Wisconsin for a race and there is this amazing little store called The Gluten-Free Trading Company.  Everything in there is…naturally…gluten-free.  And I went there…twice…in the short time I was in town.  It called to me.  Imagine grocery shopping without having to read every label.  The guesswork was done for you.  It was all gluten-free.  It was all safe.  YAY!

La Veneziane Gluten-Free Corn Meal Farfalle noodles

I tried to be selective in the items I chose to purchase there, opting for brands and products I had never seen or heard of before.  In the back, they had shelves of gluten-free pastas.  And one of the ones that caught my eye was Le Veneziane.  This pasta is made with Italian first choice cornmeal.  So, it’s more of a corn-based pasta than a rice-based pasta.  In the past, I have preferred corn pasta over rice for a gluten-free option, mainly because it holds together better, doesn’t get mushy, and the texture is just preferred.

I chose the La Veneziane Farfalle because it was ‘bow-tie’ pasta.  And I hadn’t had a gluten-free farfalle yet.  Not only that, these little “bow-ties” weren’t filled in…rather the shapes were more intricate and delicate.  I had to try it.

Last night, I decided to modify my mom’s famous recipe for macaroni and cheese and make it with gluten-free pasta (as I normally do) and add some fresh veggies from my CSA bin.  Why not?  Of course, the most important part was choosing a good pasta.  And, after digging through my pantry, I opted for the La Veneziane Corn Meal Gluten-Free Farfalle.  I figured it would not only make an interesting mac and cheese, but hopefully a delicious one too.  I wanted a corn pasta for this because with the added broccoli and, of course, the cheese, it could be quite heavy and I needed my pasta noodles to hold up.

Le Veneziane is produced by Molino di Ferro.  It is their gluten-free pasta line and offers up light and easy-to-digest corn pasta options.  These pastas have a very low fat content, making them ideal for those who are attempting to stay healthy, but still enjoy Mediterranean cuisine.  Yes…a balance can be found.

La Veneziane Gluten-Free Farfalle does cook up very light.  The noodles were amazingly light, yet sturdy.  The survived the initial boiling, to just under al dente.  Then, they were dumped into my casserole dish, mixed with fresh vegetables, spices, and my gluten-free white sauce.  And then, on top of all of that…they were baked for 45 minutes.  And they held their shape and were sheer perfection in the end.  I am very picky about how my noodles hold up, especially in classic dishes, and La Venezian Gluten-Free Farfalle, despite looking delicate, held its shape.

A serving of homemade gluten-free macaroni and cheese (and veggies) made with La Veneziane Gluten-Free Corn Meal Farfalle

Texture-wise, this pasta is awesome.  As I said, it cooked and baked to a perfect consistency.  At al dente, it had the right amount of bite to it.  And, despite being made from corn meal, this pasta doesn’t add any sort of corn flavor to your dish.  You would assume regular noodles were being used.  That’s another thing…no one would even guess that these noodles were gluten-free.  They held up, didn’t become mushy, and just complimented the rest of the ingredients in the macaroni and cheese itself.  For that, I am thankful.  I grew up eating this dish quite often.  Nothing beats my mom’s homemade macaroni and cheese.  And I love being able to enjoy it with a pasta that is worthy of it.

La Veneziane Gluten-Free Farfalle Pasta will serve up 200 calories per serving, which is about 56 grams dried pasta.  The container has 4.5 servings in it.  There is only 0.5 grams of fat in a serving (LOVE THAT!).  No sodium, no cholesterol.  And a nice helping of 4 grams of protein in a serving.  Love that.  It’s a healthier choice for a pasta and one that I wish I could find easier.

The pasta cooks rather quickly, about 8 to 10 minutes in boiling water.  And it really is sheer perfection.  It’s a low-fat, high quality pasta that I would love to find around here and incorporate into more dishes.  So impressed by it and how well it held up to everything I put it through in order to make this dish.  Delicious and dependable.  That’s what La Veneziane serves up with their corn meal pasta.

I hope to find this somewhere around here…or maybe head back to Milwaukee in the near future and pick up more of this brand.  I was so impressed.

Homemade Gluten-Free Macaroni and Cheese (with veggies) made with La Veneziane Gluten-Free Corn Meal Farfalle

Tinkyáda Brown Rice Grand Shells didn’t crumble under heat…surprisingly…

Tinkyáda Brown Rice Grand Shells

Product: Tinkyáda Brown Rice Grand Shells – $3.39+

You know…I do have to give major props to Tinkyáda as a whole when it comes to gluten-free pasta options that are out on the market today.  They definitely have the best variety when it comes to options.  Normally the grocery store will have your basic fusilli, penne, spaghetti…but Tinkyáda actually has a couple of different options out there.  For that, I am beyond appreciative.

One such option that is difficult to find, but worth the search or possibly the Internet order…is Tinkyáda’s Brown Rice Grand Shells.

In other words…a gluten-free option for anyone who has been craving stuffed shells.

Like I had been.

For…like…ever!

And on a whim one day while out at the grocery store, I spotted some Tofutti Better Than Ricotta Cheese in the vegan/vegetarian refrigerated section and bought it.  Why?  I have no idea.  I wanted to try it.  Tofutti makes the best vegan sour cream and a really great vegan cream cheese…so why not give the vegan ricotta cheese a try, yes?

I’m a chef in my own mind…the answer to that is always…a resounding, “YES!”

So, I purchased it.  And took it home.  I popped it into my refrigerator.

And then…it just…sat.

But it donned on me this past weekend while out grocery shopping…that I had purchased a box of Tinkyáda Brown Rice Grand Shells this past summer while in Milwaukee, Wisconsin for a race.  I stopped by the Gluten-Free Trading Company and made a point to purchase a box of those.  Why?  Because my friend Jenn and I ended up ordering some on the Internet awhile back and we still haven’t used them.  So…I now got to be the guinea pig.

After a long, hectic day at the office, I got home and immediately put a pot of water on the stove to bring to a boil.  I retrieved this pasta from the pantry and popped it open to take a look.  If you, like me, were expecting “normal” sized jumbo shells…like the “real” stuff you can buy at the store if you can eat the regular stuff…you will be disappointed.  I sort of was.

Tinkyáda Brown Rice Grand Shells (cooked)

These Grand Shells…are definitely much smaller than the average shell you would use to make stuffed shells.  So, I did feel my heart drop a little upon opening up the box.  I checked the serving size…and it said that the box held 4 servings.  So I counted out the shells and found I had 28 of them.  Awesome.  I always allow for pasta rippage and general carnage when using larger noodles.  You might recall my unfortunate incident with the Tinkyáda Lasagna Noodles…and how they stuck together and then promptly fell apart into pieces, making my lasagna…a little interesting to put together.  So…I dumped the entire box into the boiling water and cooked it for about 18 minutes, just so that it was al dente.

While the noodles cooked, I said a prayer to the gluten-free pasta gods for a little luck when it came to the shells.  Maybe, just maybe enough of them would be useable.  If not…I’d have to get really creative with my stuffed shell meal.  So, with the shells boiling away, I set to prepping my filling for the shells.

I totally made this up.  All I knew was that I wanted to use the Tofutti Better Than Ricotta Cheese.  So, I scooped out a cup of it and put it in a bowl.  From there…it needed to be seasoned.  So I grabbed some dried herbs from my spice rack and just started eyeballing things.  In went the parsley, sage, thyme, basil, and oregano.  Then, a little garlic salt, some crushed red pepper flakes, a touch of cayenne pepper, and a little garlic powder.  I mixed it all together.  Then, I grabbed the green onions I had from my CSA bin and chopped those up, both parts…the white and the green, and threw them into a pan to sautee in a little olive oil.  Out of the fridge came the vegan and gluten-free chorizo that I got at Trader Joes.  I added it to the pan after the onions had softened and just allowed it to heat through.  Finally, I threw in some minced garlic, let that heat for about 30 seconds until it was fragrant…then took it off the heat.  I let it sit for a few minutes, then emptied that into my ricotta cheese mixture and folded it all together.

At that point, my shells were just about ready.  I set up the colander to drain them, and picked up the large pot of noodles.  Holding my breath, I poured the contents into the colander, expecting torn bits of these grand shells to tumble out.  But, for the most part, the shells were completely intact.  Color me impressed!  I gave the shells a rinse in cold water and then shook them carefully out to get most of the water out.  I brought them over to my work station and prepped my casserole dish with some tomato sauce and a sprinkling of Daiya mozzarella shreds.

Tinkyáda Brown Rice Grand Shells (stuffed)

Then…the exciting part.  Stuffing the shells.

I handled each shell carefully at first, afraid that one single wrong move would cause the shell to tear or fall apart.  Let’s face it…rice noodles have this reputation of getting mushy.  And they have that reputation because…it happens.  One tablespoon of filling went into each of the “grand” shells, because that gave them the perfect stuffed appearance.  As these shells don’t fold over like normal shells, I laid them in the pan face up, instead of down, because I didn’t want my stuffing to fall out into the pan.  The entire point of having stuffed shells is that they are…stuffed.  Only a few shells didn’t make the cut.  And the rest I had leftover were tossed only because I ran out of stuffing.  It happens.  Next time…more stuffing.

So now, the shells had survived boiling, draining, rinsing, and stuffing.  And they were still holding their form.  Still impressed.  So, I took the remainder of my tomato sauce and poured it over top the shells.  A sprinkling of Daiya mozzarella shreds went over the top.  Then, into the oven at 350°F for about 30 minutes it went.

And I managed to squeeze in some time with my yoga mat while it baked away.  I uncovered the dish for the last 5 minutes of baking and hoped for the best.

Out of the oven they came and I took a moment to marvel at how amazing the pasta still looked.  The big test now was how they would hold up as I transferred them from the casserole dish to the plate.

The Tinkyáda Brown Rice Grand Shells passed with flying colors.  I scooped up each shell in the cradle of a spoon and carefully deposited a serving on a plate.  They didn’t fall apart at all.  I was SO impressed.  Now it came down to taste.

My roommate and I settled in with our dinner and she took the first bite.  She raved about the filling.  And then said that the noodles were actually really good.  She loved how they were like regular ones in that you slice into them, and they squish down and the filling fills up the fork.  I couldn’t agree more.  Some of the shells were still a little too al dente…but the sauce and filling helped with that.  Of course, the true test will come tonight when I reheat the shells and see if they still hold up as well after spending the night in the fridge.

As far as brown rice pasta goes, Tinkyáda is one of my go-to brands.  I haven’t met a noodle I didn’t like from them.  Honestly.  The box of Tinkyáda Brown Rice Grand Shells has 4 servings in it.  That’s actually a lot of shells…so you can probably squeeze out more to be honest.  Even if they are smaller than the average pasta shell.  A serving as 210 calories, which is right there with regular shells, so that’s a plus.  The serving has only 2 grams of fat and 43 grams of carbohydrates for all you gluten-free athletes out there.  Oh…and 4 grams of protein as well.  Loving that.  What’s even better is that the ingredients couldn’t be more basic: stone-ground brown rice, rice bran and water.  Yep…I love ingredients that I recognize and can tell you exactly what they are.  Love that this has nothing questionable in it.

So, all-in-all…a great showing for Tinkyáda when it comes to these “jumbo” (I use the term loosely) shells.  I won’t complain.  They did the job.  And, as far as I have seen, Tinkyáda is currently the only gluten-free pasta company that offers something remotely close to the jumbo pasta shells out on the market.  So, there is definitely a niche there and one that I am happy they filled.

Much love, Tinkyáda…and appreciation.  Because my stuffed shell craving has been satisfied.  Now…if only my local stores would start carrying these in their inventory…

Gluten-Free and Vegan Stuffed Shells made with Tinkyáda Brown Rice Grand Shells