Restaurant Review: Via Napoli Ristorante e Pizzeria – Epcot – Disney World

Via Napoli - Italy Pavilion - Epcot
Via Napoli – Epcot – Disney World

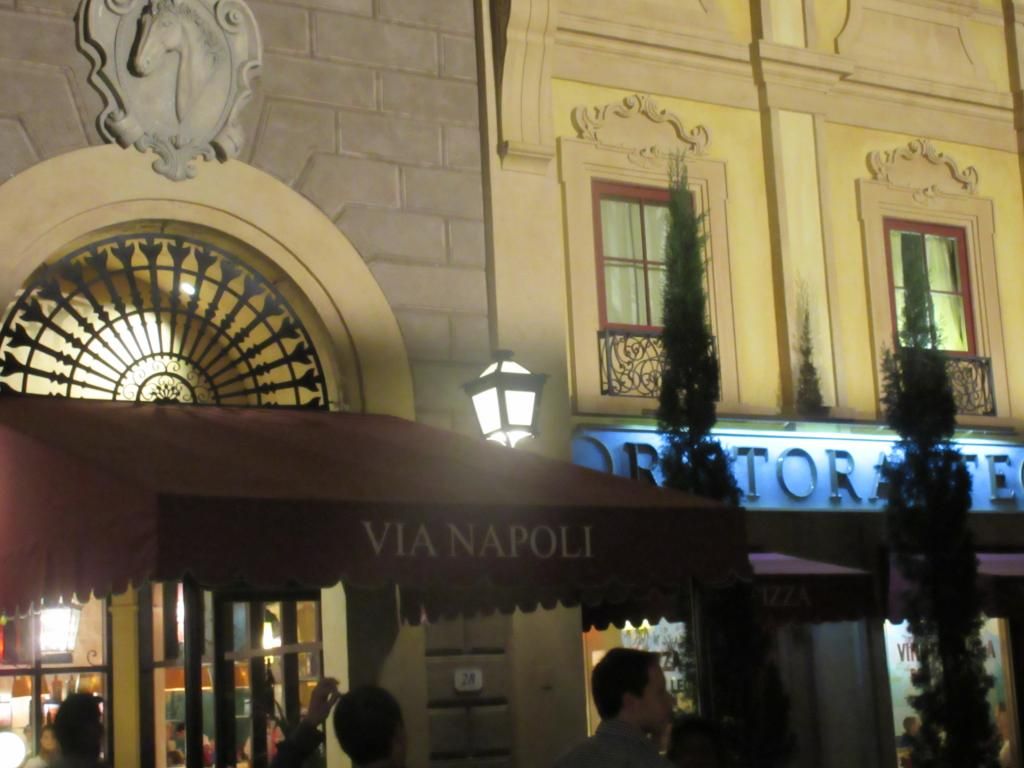
Restaurant: Via Napoli Ristorante e Pizzeria – Epcot – Disney World

It was Epcot Day!  YAY!  I love Epcot Day.  I don’t know why…because so much of it features the World Showcase…which during the Food & Wine Festival…features foods from all over the world.  Even the regular pavilions that are standard in the showcase don’t offer much for a gluten-free vegetarian.  But I still love Epcot Day.

Since we were in Epcot, on our final night, we wanted to go somewhere in the park for dinner.  It took a little bit of back and forth, but we finally decided on Via Napoli Ristorante e Pizzeria.  It had gluten-free pasta on the menu, so we were good.  Something I could eat.  Which, definitely was important on Epcot Day…as our morning actually started at the Magic Kingdom…where we at Dole Whip for breakfast.  Pictures were taken for proof.  I am not ashamed.

But…let’s fast forward.

The entire day was spent doing a few rides and exploring the World Showcase.  My friend, Jenn, was having a difficult time on the last day.  Her feet…her poor feet…had blisters in places I didn’t know one could get blisters.  It was a slower moving day, but I was fine with that.  Take in the showcase.  Stop and watch the new Lumberjack Show.  I miss Off Kilter though…I’m not going to lie.  Cathy snagged a lunch in Morocco (she had to have her lamb shawarma!), while Jenn and I toddled over to Brazil for the (naturally gluten-free) Pao de Queijo (Brazilian Cheese Bread).  I later had one of my protein bars and half of a clementine (Jenn had the other half) because dinner reservations weren’t until 7:45 p.m.  Late.

But, we made use of our time…checking out different things along the way, resting when Jenn needed to get off her feet, exploring the different countries, and shopping.  Of course.  We got in line for the Gran Fiesta Tour Starring The Three Caballeros at the Mexican Pavilion…and that sort of ate up (see what I did there?) the rest of the evening down time before food.  It was a bit of a stroll back to Italy in Epcot…but Jenn was a trooper…and she got there.

I went up to the hostess desk in the very crowded lobby and let her know we were there for our reservation.  She asked me some questions, it was hard to hear her over the din of the lobby.  But we got it worked out.  And, of course, my food allergy thing.  So, there was a short wait…but after about 5 or so minutes, the lobby was emptying and we were up next.  The really nice hostess took us all the way to the back for a table with a bench and two chairs.  Cathy and I sidled up on the bench.  Jenn took the chair this time.

We. Were. Starving.

I perused the menu and noted that, yes, gluten-free pasta was the only option for me.  The downside…none of the listed pasta dishes on the menu were vegetarian.  Yikes.  As I was just starting to look at the menu, the customer liaison came over to speak to me about my food allergy.  He noted the gluten-free and pointed out that they do not have gluten-free pizza but any of the pasta can be done gluten-free.  And then he was off.

Which left our poor waiter to be the one who would have to seriously help me out.  Not that he minded.  And as I am the tricky one…I ordered first.  And my first statement was…

“Well, I am a gluten-free vegetarian…so…”

He came over to my side of the table to look at the pasta dishes.  “Gluten-free…it’s easy,” he said.  “The vegetarian…”  He looked at all the pasta options again and finally said, “I tell you what…we will have the chef prepare some mushrooms and vegetables with our marinara sauce.”

Works for me.  Order in.

Jenn opted for the Lasagne Verde, which is a white lasagna that is stuffed with spinach, parmesan, ricotta, and a besciamella sauce ($22.00).  Cathy went for her go-to when we first go to an Italian restaurant…the Spaghetti e Polpettine, which contained hand-crafted veal meatballs in a tomato sauce ($21.00).  I have to say, I usually giggle a little when Jenn orders something with cooked spinach or vegetables in it…because most of those veggies get tossed to the side of the plate.  But…she is Italian…and she knows her Italian food.

We waited for a bit…no gluten-free rolls or any bread at all at the table.  We watched a woman at the table next to us devour an entire pizza on her own, while her dining companions watched her.  And as she was taking her last few bites, their food arrived.  It was weird.  We couldn’t figure out if they were just there to watch her eat (like some crazy Disney World food challenge or something)…but…who knows.  She then got to watch all of them eat so…turn around is fair play…or something?

But, soon our attention turned to our own food as our dishes arrived and were delivered before us.

Pasta with Veggies and Marinara
Pasta with Veggies in Red Sauce

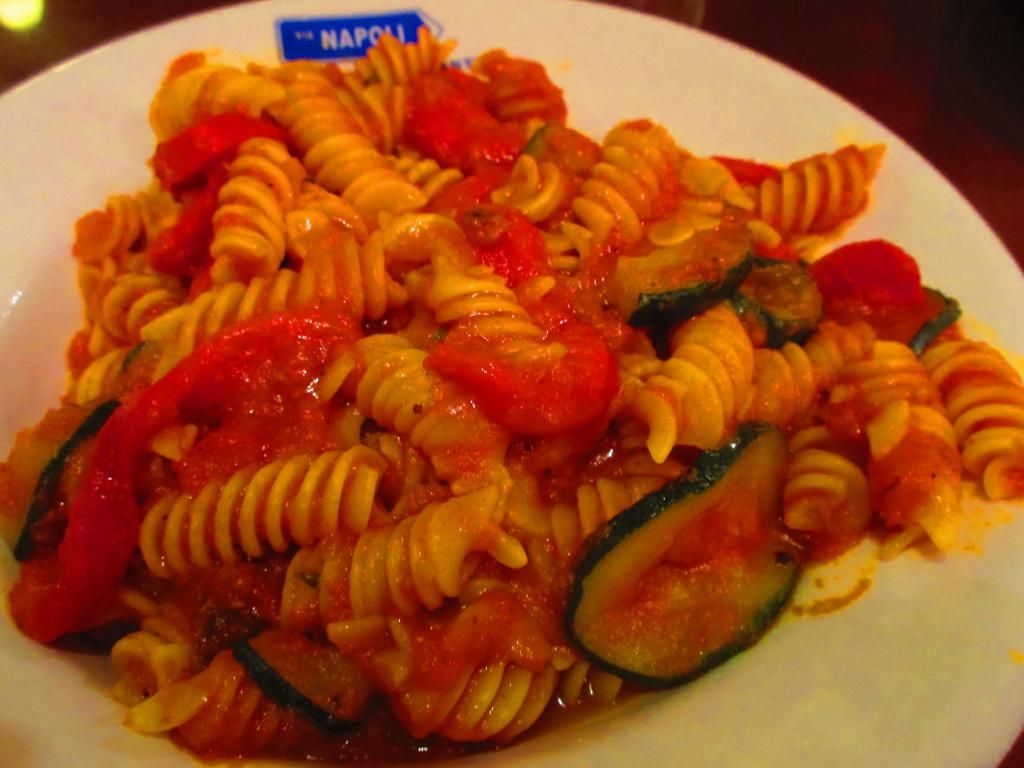
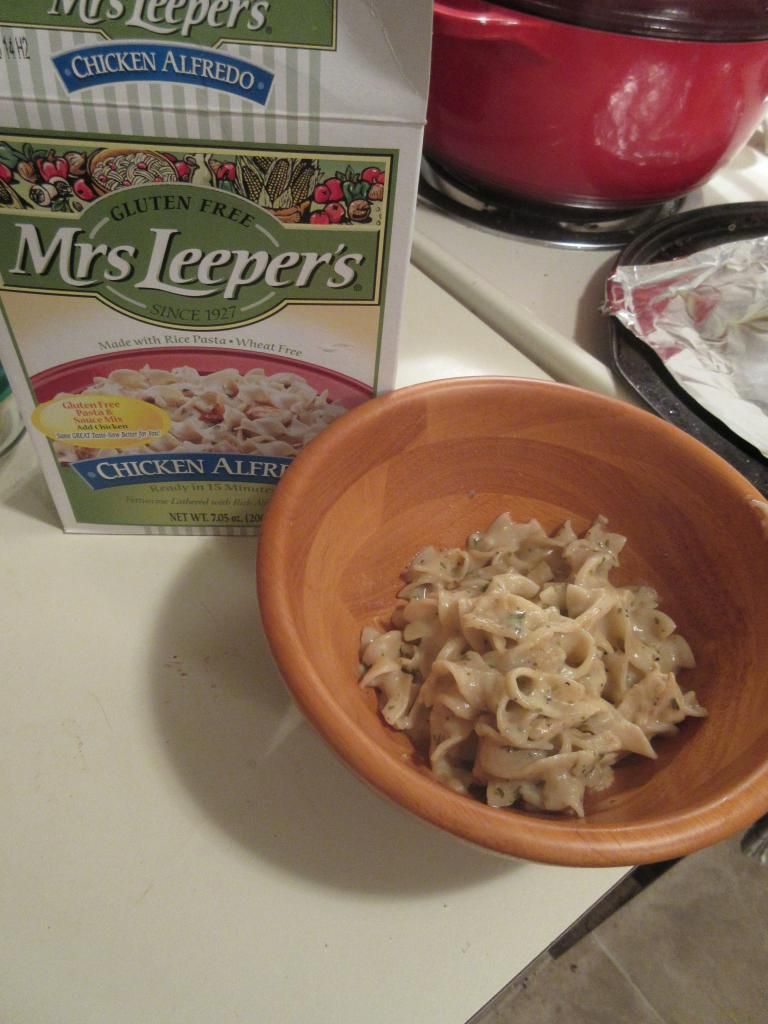
I have to say, my bowl of pasta was beautiful.  A good helping of marinara sauce (which would have been awesome with a gluten-free bread product of some type!) with a variety of vegetables cooked in.  I spotted zucchini, tomatoes, peppers and mushrooms immediately.  And the gluten-free pasta was fusilli…so twisty and perfect for capturing delicious sauce.  I will call this dish…”Pasta for the strange gluten-free vegetarian at the table in the back.”  Or…more simply…Pasta and Veggies in Red Sauce ($22.00).

Now, this is the second Italian restaurant I have visited at Disney World.  Normally we just head over to Hollywood Studios and enjoy our food (complete with gluten-free dinner rolls and gluten-free dessert!) at Mama Melrose’s.  But since were were in Epcot…we figured it would be easier to eat there than park hop.

I sort of wish we park hopped…

It’s not that Via Napoli was bad.  It wasn’t.  The food was actually quite good.  It was just…average though.  The pasta in my dish was actually cooked to perfection.  A lot of gluten-free pastas, especially when crafted from rice flours, tend to get gummy and fall apart.  These were a perfect al dente and held up to the marinara and the vegetables.  But…there was a lot of pasta in that dish and I ended up picking out the veggies at the end and leaving the noodles alone.  I ate about 3/4 of the dish…and that was it.  I was done.  The marinara had a lot of flavor to it.  And the vegetables were a nice touch and I appreciate the chef at Via Napoli for doing that to accommodate my dietary needs.  I just…had better.  Elsewhere.

Jenn enjoyed her lasagna…after she picked out most of the spinach.  And Cathy made sure to eat all of her meatballs.  They were much smaller than what she normally gets in a spaghetti and meatball dish, so she appreciated that too.  But she too had to soldier on and leave some of her pasta noodles behind.

No dessert here for us…we had plans.  Cathy wanted her chocolate cannoli from one of the gelato carts in the World Showcase, and I headed to France to get some Salted Caramel Gelato from an ice cream shop there.  Yummy!

So, as it stands, Via Napoli put out good food.  I can’t think of anywhere at Disney where I have had bad food.  It’s just…Mama Melrose’s had more options for me…and a bit more to offer.  So next time…I think I’ll return to Mama Melrose’s.  But, thank you, Via Napoli, for the fine cuisine.  A little taste of Italy never goes wrong with me.

Product Review: Mrs. Leeper’s Gluten Free Chicken Alfredo

Mrs. Leeper's Gluten Free Chicken Alfredo
Mrs. Leeper’s Gluten Free Chicken Alfredo

Product: Mrs. Leeper’s Gluten Free Chicken Alfredo – $5.99+

Awhile back, while on Manager’s Special, I picked up a box of Cheeseburger Mac made by Mrs. Leeper’s.  I know what you’re already thinking…

Vegetarian…cheeseburger…and chicken?

Well…yes.

Because when I made the Mrs. Leeper’s Cheeseburger Mac, I used Trader Joe’s Soy Chorizo (also gluten-free!) as the meat instead of the ground beef called for in the recipe.  It worked out beautifully.  So, while at my local grocery store a few weeks ago, some of the other Mrs. Leeper’s boxed meals were on closeout.  To me…this means that they are about to go away…and never return.  So…my roommate said that I should go ahead and choose one for us to try, since we both liked the last one that we had.

After looking them over for a few moments, I decided to go with the Gluten Free Chicken Alfredo.  For two reasons.  Reason number one: YUM!  Reason number two: I had the Beyond Meat “Chicken” Strips in the freezer that were just begging for some vehicle to carry it to the dinner table.  That came in the form of this exact box.  And this weekend was the perfect time to dish it up.

For one thing…BRRRR.  For another…I’m having a bad life right now and comfort food just sounds…comforting.  So, last night, I pulled one of the containers of the Beyond Meet Grilled Strips out of the freezer to thaw in the fridge.  This box came out of the pantry and sat in a place of honor on my counter top.  It would be dinner the following night.  TONIGHT!  I was thinking about cooking it up pretty much all day.

When it was just after 5 p.m., I finally got off the computer (I was blogging!) and went into the kitchen.  I pulled out my big skillet and set it on high-ish heat.  Out of the fridge came the chicken strips.  I opened them up and sliced them into bite-size pieces.  That didn’t take too long.  Then, into the hot skillet they went.  I gave them a stir, letting them warm up a bit.  Then, I opened up the box of Mrs. Leeper’s Chicken Alfredo and removed the sauce mix packet.  I measured out the 2 cups of hot water the box called for, as well as the 3/4 cup of milk.  As this meal actually has milk products in it, not wanting to risk discomfort of my tummy, I used my Silk Unsweetened Almond Milk instead.  Both of these were added to the skillet and then the powder mix inside the sauce packet.  I stirred it all together and brought it up to a boil.  Once there…in went the noodles.  I gave it another stir, reduced the heat, and covered it.  My homemade gluten-free dinner rolls went into the oven and I went to work on folding the first load of laundry, stopping every now and again to give it a stir.  It took about 11 minutes to cook completely and get the noodles to their perfect al dente.  I turned off the heat and let it sit for a few minutes before I was ready to dish it up.

It looked and smelled amazing.  But, then again, how can you go wrong when you have fake chicken and perfectly cooked rice pasta swimming in a creamy sauce?  Oh, I was anticipating dinner already.  I dished it up, two bowls for tonight and two bowls for another time.  I snagged the dinner rolls from the oven…and served it up with a helping of this week’s Dr. Who.  Because, dinner is always better when shared with The Doctor.

Anyway, I digress…

Let me just start by saying…WOW!!  Just…WOW!!  This actually tasted like the butter and cream-laden alfredos that I would devour at Italian restaurants all the time.  Hey, I was young and I didn’t know what calories were.  I just knew what I liked.  And that creamy, rich, delicious sauce over the cooked chicken with the pasta was…honestly…so comforting.  Like I said…comfort food.  So, this…this took me back.  It was that good.  The sauce was amazing.  Perfectly seasoned.  Light.  Yes…light.  Let’s hear it for unsweetened almond milk.  And the pasta…it was perfect.  While this can be served without a protein, the Beyond Meat Grilled Chicken Strips were a perfect substitute.  They really absorbed the sauce and paired well with the soft, velvety noodles.  This was heaven in a bowl.  And I might have attempted to savor it, but, in reality, just scarfed it down.  I’m glad there is another bowl waiting for me in the fridge.  That will be later this week for sure.

So, now that I’ve gone on and on about how great the Mrs. Leeper’s Gluten Free Chicken Alfredo is…let’s talk about what is inside it.  Now, I am lactose intolerant, and I know people with dairy allergies…this does contain milk products.  Just be aware.  The ingredients are brown rice pasta, and the alfredo seasoning: whey, corn starch, salt, sour cream, Romano cheese, nonfat dry milk, Parmesan cheese, garlic powder, spices, lactic acid, malodextrin, citric acid, buttermilk solids, natural cheese flavor, less than 2% soybean oil and silicon dioxcide to prevent caking.

Now, let’s talk nutrition.  Generally speaking, you get 5 servings out of this…but I made 4 slightly bigger servings with mine to keep it even.  A serving, however, is 1 cup prepared.  In this serving, you will be taking in 250 calories and 1.5 grams of fat.  You will also be consuming 5 mg cholesterol, 480 mg sodium, and 5 grams of sugar.  Finally, you will be taking in 1 gram of fiber and 4 grams of protein.  All of this, however, does go up if you use real chicken and/or fake chicken or tofu.  This is just for the pasta and sauce itself.

For the second time, I have been pleasantly surprised by Mrs. Leeper’s Gluten Free products.  First the Cheeseburger Mac took my kitchen by storm, and now…I just want to keep eating more of the Mrs. Leeper’s Gluten Free Chicken Alfredo.  It really was amazing.  Great flavors, great textures, and a great dinner overall.  I couldn’t have asked for a better dinner tonight.  Comfort from comfort food…achieved.  Thanks again, Mrs. Leeper’s.

Product Review: The Pure Pantry Gluten-Free Organic Old Fashioned Pancake and Baking Mix (with bonus recipe & coupon code)

Product: The Pure Pantry Gluten-Free Organic Old Fashioned Pancake and Baking Mix – $7.29+

A couple weeks ago, I was fortunate enough to be sent a free package of The Pure Pantry‘s Gluten-Free Organic Old Fashioned Pancake and Baking Mix.  I was ecstatic…for quite a few reasons.  For the first thing…most gluten-free baking mixes that I have tried…haven’t lived up to expectations.  Secondly, the pancakes on the package looked heavenly…so, I could only imagine the awesomeness that was enclosed inside.

Included with the mix were two recipes.  I had this perfect vision in my head the moment I saw one for The Pure Pantry’s Gluten-Free/Dairy-Free Cornbread (or Muffins).  You see…I love chili, soup, and stew.  I LOVE…LOVE…LOVE these things…and it’s officially autumn.  It’s fall.  It’s soup season.  It’s time to break into my vegetable crisper and my pantry and whip up some warm, comforting goodness on the stovetop.

Tonight…that’s just what I did.  And I pulled out my package of The Pure Pantry’s Gluten-Free Organic Old Fashioned Pancake and Baking Mix because the perfect accompaniment to any chili (and I made a fantastic Garden Chili with LOTS of veggies!)…is cornbread, of course!!

This was not my first foray into gluten-free cornbread.  I’ve made at least a dozen different versions of it.  None of which I have liked.  Seriously.  None.  They just never seemed to hit that perfect cornbread mark!  Always a disappointment.  If my roommate was game, she’d offer to use the failed versions for some snacks at work…but that was rare.  Yeah…my cornbread record since going gluten-free has not been stellar.

So, you can only imagine my anticipation today when, after a long day of fitness, festivals, and…yes…food…I wanted to cook up a light chili and give this cornbread recipe a whirl.  What could go wrong?  I’d either be amazed…or disappointed once again.

The recipe was very easy and everything needed was in my pantry or fridge already.  Don’t you love it when that happens?  Combining the mix with corn meal, baking powder, salt, and some liquid ingredients, this epic dough that felt light and airy emerged.  I poured it into a greased baking pan and threw it in the oven for about 22 minutes.

What emerged was sheer cornbread perfection.  It looked like cornbread.  It smelled like cornbread.  Once the chili was done simmering away on the stove…I would find out if it tasted like cornbread.  About 20 minutes later…dinner was served.

The first difference between the cornbread made with The Pure Pantry’s Gluten-Free Organic Old Fashioned Pancake and Baking Mix was that it didn’t feel heavy or dense…even as it came out of the oven.  I can tell when I bake whether a recipe is going to be good by how heavy the pan feels as I lift it out of that oven.  This didn’t feel heavy at all.  It was this gorgeous golden color on top. It cooled briefly before I got out a knife and sliced it into 16 squares.  Cutting it was a dream.  I could tell that it was going to be a perfect texture due to how easily the knife cut through it.  Like butter!  It glided right through…no fighting with heavy, gummy insides on this bread.  I might have perfection here!  Each bowl of chili was served with two squares of the cornbread.

The verdict?!

BEST GLUTEN FREE CORNBREAD EVER!!  And, as I stated above, I’ve made so much gluten-free cornbread that I didn’t like or I felt just came out wrong.  There was absolutely nothing wrong with this recipe.  It was hearty and delicious and so easy to prepare.  I loved not just the texture, but how light, but substantial it felt.  I loved the flavor…which…for me…was perfect.  It wasn’t sweet cornbread…which is just how I like it.  Sugar in cornbread is cake.  This didn’t taste like cake.  This tasted like cornbread.  It had that gritty, corn flavor.  Honestly…made my night.

I am going to definitely try the sweet recipe that was sent along with this baking mix as well…so stay tuned for that!!  But for now, please enjoy this recipe from The Pure Pantry:

Recipe: The Pure Pantry’s Gluten-Free and Dairy-Free Cornbread (or Muffins)

The Pure Pantry Gluten-Free Organic Old Fashioned Pancake and Baking Mix (with Gluten-Free and Dairy-Free Cornbread)

Servings: 6
Time: Prep 10 minutes; Bake 20 minutes

Ingredients:

  • 1 cup The Pure Pantry Gluten Free All Purpose Baking Mix
  • 1 cup organic yellow corn meal
  • 1/4 cup agave nectar
  • 1 teaspoon aluminum free baking powder1/2 teaspoon salt
  • 1 cup milk (almond milk or rice milk may be substituted) (I used unsweetened almond milk)
  • 1/3 cup vegetable shortening, butter, or coconut oil – melted
  • 1 large egg, slightly beaten (or egg replacer)

Directions:

Preheat the oven to 400°F.

Grease or butter an 8-inch square baking pan.

Combine dry ingredients in a medium bowl.

Combine milk, oil, agave, and egg in a small bowl; mix well.

Add the milk mixture to flour mixture; stir until just blended.

Pour into prepared pan and bake for 20-22 minutes.  For muffins, spoon batter into greased muffin cups, fill 2/3 full and bake 15-18 minutes.

This recipe may be doubled and baked as above in a 13×9 inch baking pan.

~*~*~

The Pure Pantry has so many mixes to offer.  And they were kind enough to share a coupon code with me to give to all of you, my dear readers.  If you are interested in trying their products, skip over to http://www.thepurepantry.com and take a look at their shop.  You can get $1.00 off your purchase of any two (2) gluten-free products from The Pure Pantry simply by entering PLU 35147 as you are checking out!  Trust me…these products are totally worth it.  I have never been so satisfied with a mix than I was with this one.  The Pure Pantry might actually be selling gluten-free baking perfection.

But…don’t just take my word for it.  Get over to their site…order some of their products and see how life changing your gluten-free foods can be.  Simple.  Delicious.  And…amazing and delicious.

The Pure Pantry is pure gluten-free delicious goodness!

Recipe: Garden Chili

I have a lot of vegetables in my crisper drawer.  Like…a lot.  A whole lot.  Because…I get a CSA bin loaded up each Friday and sometimes I get through them, and other times…I don’t.  Well, last week with all the birthday insanity…I barely got through them.  It wasn’t without trying.  I just…had so much going on and a few dinners had to be really quick and simple and…not cooked from my fresh and delicious vegetables.  Hey…I did make an amazing salad though with a whole lot of them.

But, I digress.

With a trip coming up next week, I am determined to use up much of what is now in my crisper drawer.  I also had a new gluten-free and dairy-free recipe for cornbread that I really, really, really wanted to get working on…so…I thought…

CHILI!!

Now, I have a TON of recipes for vegetarian chili…but I wanted one that I could use simply what I had in my kitchen.  And, it just so happened to exist in my Happy Herbivore Light & Lean cookbook.  Only thing I needed was…beans!  Simple enough, I was grocery shopping today anyway.  So…clocking in at 153 calories and 1 gram of fat, I give you…

Recipe: The Happy Herbivore’s Garden Chili

The Happy Herbivore's Garden Chili
The Happy Herbivore’s Garden Chili

Servings: 2-3 (but I made 6 servings out of it)
Time: Prep 15 minutes; Cook 25 minutes

Ingredients:

  • 2 cups vegetable broth, divided
  • 1 onion, diced
  • 4 garlic cloves, minced
  • 1 green bell pepper, seeded and diced
  • 1 (15 ounce) can diced tomatoes (undrained) (I used fire-roasted low sodium diced tomatoes)
  • 1 cup sliced mushrooms
  • 2 celery stalks, sliced
  • 2 carrots, peeled and diced
  • 1/4 cup tomato paste2 tablespoons chili powder
  • 2 tablespoon Vegan Worcestershire Sauce (I used gluten-free liquid smoke instead!)
    1/2 teaspoon ground cumin
  • 1 tablespoon yellow mustard
  • 1 (15 ounce) can pinto or kidney beans, drained and rinsed (I used organic chili beans)

Directions:

Line a large pot with a thin layer of broth, and sauté onion and garlic over high heat until onion is translucent, about a minute.

Add the bell pepper, tomatoes with juice, mushrooms, celery, carrots, tomato paste, remaining broth, spices, and condiments.  Stir, cover, and bring to a boil.  Once boiling, reduce to low and simmer until the vegetables are fork-tender, about 10 minutes.  Add water or tomato sauce to make it more chili-like if necessary.  Add beans and serve.

~*~*~

Okay…confession…I totally missed the part where it said to cover the pot.  HAHA!  No wonder it took a little bit of time to get those vegetables fork-tender.  My total bad!  But, it still worked.  And what emerged was a fantastic spicy (but not too spicy…because the roomie didn’t even comment that her sinuses were running!) chili that celebrates vegetables.  Most vegetarian chilies seem to put so much emphasis on beans that this was, indeed, a nice change.  And serving this up with a couple slices of gluten-free and dairy-free cornbread made for one great, perfect fall meal.

It’s soup/chili season, folks!  Let’s get cooking!

Product Review: Tonya’s Gluten Free Kitchen Original Soft Pretzel Bites

Tonya's Gluten Free Kitchen Original Soft Pretzel Bites
Tonya’s Gluten Free Kitchen Original Soft Pretzel Bites

Product: Tonya’s Gluten Free Kitchen Original Soft Pretzel Bites – $9.99+

There was a time in my life, when I worked retail at the mall, that at least one of my meals consisted of a soft pretzel from Auntie Anne’s Pretzels.  Because, really, there is nothing quite like feasting on a soft pretzel with that delicious buttery and salty flavor.  Mmmm…

Don’t make me crave…

Or, actually…go ahead.

Because, with a little help from The Raisin Rack in Columbus, Ohio, I was introduced to the most amazing and fantastic convenience gluten-free soft pretzels ever.  Now, they aren’t my local bakery’s soft pretzels (which they offer only in July and September…on Wednesdays only), which are freakin’ fantastic.  But for something that I can dig out of my freezer and feast on whenever I want…well…these are where it is at, my friends!  Just…trust me!

On one of my many trips to Columbus, Ohio, and one of my many stops at The Raisin Rack, I have snatched up some items that I can’t find anywhere else around where I live (and I shop at 5-6 different stores each week).  I often crave soft pretzels (especially when Annie May’s Sweet Café in Louisville, KY, isn’t doing Soft Pretzel Wednesday), as is bound to happen each time I go to a shopping mall and have to walk by Auntie Anne’s Pretzels.  Because…they flood the mall with their delicious smelling pretzels…and I can’t have them.  Not one.  Not even a sample.  It’s sheer torture.  TORTURE!

But…now I know…there can be pretzels whenever I want.  When those weird cravings hit.

Because of Tonya’s Gluten Free Kitchen!

Tonya’s Gluten Free Kitchen was created when Tonya and her daughter were diagnosed with celiac disease.  Tonya began searching for gluten-free bakery foods that tasted up to par with their gluten equivalents.  After many disappointments and a lot of frustration, she set out to create her own recipes.  She started simply by baking in her home kitchen for friends and family and even fellow Celiacs in Central Pennsylvania.  Soon, they expanded to selling to local grocery and health food stores.  Then they outgrew the home kitchen in 2010 and opened up a gluten-free bakery in Newmanstown, Pennsylvania.  Tonya and her company believe that quality and taste do not need to be sacrificed in order to make something gluten-free.  They take great care, using a dedicated gluten-free facility to make their products, to ensure that everything they churn out is of the highest standards.

I can get on board with that.

So, after a day of grocery shopping and walking around the farmer’s market and shopping malls, I wasn’t really feeling standing around in the kitchen and cooking something for dinner.  So, I opened up the freezer and decided that what this day called for was…soft pretzels.  And, yes, I happened to have a box of Tonya’s Gluten Free Kitchen Original Soft Pretzel Bites in my freezer.  I opened up the package and laid out the bites on a baking sheet to cook up.  I patted each bite down with water and gave them a light sprinkle of the enclosed pretzel salt.  Then, they were placed in a  pre-heated oven to allow to cook.  These can be done in the microwave, but to get crustier pretzels, the oven is the way to go.  And I like that initial crispy outside with the doughy and soft middle.  As my oven never heats right, the normal 5-7 minutes these would cook was actually 9-10 minutes for me.  I left them in for 9 minutes.  And when I removed them from the oven…they looked like pretzel perfection…and smelled like the buttery good aroma that comes from Auntie Anne’s.

My mouth was watering.

I split the entire box with my roommate (this was dinner…not a snack) and served them with some vegan cream cheese for dipping.  Because, seriously, soft pretzels and cream cheese are a match made in heaven.  Delicious heaven.

I served up my roommate’s plate first.  And as I was just getting back to the kitchen, she had already taken a bite and said, “OH MY GOD!”  I wasn’t sure if this was a good thing, so I had to ask.  She told me to take a bite and look at the center.  I did just as she said.

OH MY GOD!

Seriously…OH MY GOD!

The Tonya’s Gluten Free Kitchen Original Soft Pretzel Bites are JUST like the Auntie Anne’s Pretzels I ate almost every day I worked in retail.  Holy goodness.  The pretzels themselves are rich and buttery on the outside and soft and chewy on the inside.  The inner part of the pretzel are a thick white middle…nothing that looks dense or heavy or packed with bubbles of air.  They were perfection.  Soft…gorgeous centers surrounded by the golden crust with the dash of salt on the top.  Yeah…these were fantastic.  These were light and buttery and amazing.  AMAZING!!  These made me happy on so many different levels.

So, let’s talk ingredients.  At Tonya’s Gluten Free Kitchen, they believe in using all-natural ingredients.  And these amazing Original Soft Pretzel Bites are made from rice flour, cornstarch, tapioca flour, milk, sugar, butter, eggs, potato flour, baking soda, xanthan gum, yeast, and salt.  They are all-natural, gluten-free and wheat-free.

As far as nutrition goes…well…they aren’t bad.  Not at all.  A serving of Tonya’s Gluten Free Kitchen Original Soft Pretzel Bites is 5 of the little pretzel nubs.  Now…I ate half the box and I feel no shame.  HA!  A serving contains 220 calories and 8 grams of fat.  One serving would also provide 35 mg cholesterol, 230 mg sodium, and 7 grams of sugar.  Also, you will be consuming 1 gram of fiber and 2 grams of protein.

The Tonya’s Gluten Free Kitchen Soft Pretzel Bites are something that I intend to keep in my kitchen freezer forever.  For LIFE.  They are that good.  They are so worth keeping on hand for those nights where you just want something that doesn’t resemble the food you eat all week.  Maybe you want snack food for dinner.  Maybe you’re having a party and need some finger food.  These are the perfect treat and the perfect item to keep on hand.  Even gluten eaters couldn’t tell these were gluten-free.  SO GOOD!

Soft pretzels…whenever I want them…that taste great…that are just as good as the “real” thing?

Tonya’s Gluten Free Kitchen delivers with these Original Soft Pretzel Bites.  Oh yes…it doesn’t get better than this!

Product Review: Glutino Gluten Free Original English Muffins

Glutino Gluten Free Original English Muffins

Product: Glutino Gluten Free Original English Muffins – $5.29+

Some mornings, it’s easy to decide what to make for breakfast.  Other mornings, I have way too much going on to make something great and elaborate.  These are the mornings that the gluten-free toast and gluten-free bagels usually rear their heads.  And yes, I am certainly aware of the “good carbs vs. bad carbs” argument when it comes to breakfast foods and how you start your day.  But…with a strict budget and, honestly, the need for something quick that doesn’t take a lot of time some mornings…I have to do what fits into my mornings.

I don’t feel guilty about it.  An egg scramble isn’t hard, but to not overcook the eggs, it can take awhile.  Where as something like a gluten-free bagel or a couple slices of gluten-free toast can toast up while I take a quick shower, having just returned home from my early morning spin class or from doing laps in the pool.  Regardless…some mornings, it’s what has to be done.

So, this morning, despite having some gluten-free bagels in my freezer, I reached for something that I had been wanting to try for a very long time.

And if you read the subject of this post, you already know that I’m talking about Glutino’s Gluten Free Original English Muffins.

After my local Whole Foods stopped carrying the LivWell brand of English Muffins that I fell in love with…and since Katz Gluten Free requires an online order…it was nice to be able to duck into one of my local grocery stores/natural food stores and pick these up out of the freezer section.  I did a bit of a double-take, I admit, when I first purchased them, as they are a bit of a yellow-orange color in the packaging.  Odd.  But, it didn’t deter me from buying them.  Nope.  So, purchase made, they found their way to my freezer, I found myself out of town and using up other products that needed using…until this morning.

After that morning spin class I previously mentioned, I drove home, turned on the oven and put the two Glutino Gluten Free Original English Muffins onto a baking sheet.  I had left them in a Ziploc bag to thaw while I was gone.  I handed my roommate her bowl of cereal, put the English Muffins into the oven and went to take a quick shower.  They could cook without me needing to babysit them.  I was all about that for sure!  Makes for an easy breakfast that can be done while I am doing something else.  I love to be able to multitask.

So, after I was dressed and ready for work, I made my way back out to the kitchen, where the Glutino Gluten Free Original English Muffins were still happily toasting away.  I pulled down some plates and got out the Earth Balance spread and some blueberry jam (made from real fruit only!).  I checked on the English muffins and they were almost to that perfect golden toasty color.  So, I got out the butter knife and then grabbed the hot pad holder to remove them from the oven.  They looked perfect.  I slathered each half of the Glutino Original English Muffins with Earth Balance spread and then…topped that with the most perfect schmear of blueberry jam.  It looked heavenly and I was already anticipating my very first bite.

I picked up my plate and settled in for breakfast.  I lifted the English muffin and took my very first bite.

I was anticipating something that was heavy and dense and just…not what an English muffin should be.  But I was wrong.  I was definitely wrong.  The Glutino Gluten Free Original English Muffins actually were quite light.  The toasted areas had this nice crispiness to them, but the inner layer was soft and light.  I loved that it wasn’t dense.  I loved that it felt like I was eating a normal English muffin.  In fact, the powdery cornmeal dusted on top helped add to that illusion too.  I was loving every bite.  And it paired so well with the classic toppings of butter and jam.  It was pure breakfast perfection.  And now that they were toasted, that strange color didn’t look so scary anymore.  I happily noshed away on my entire English muffin, wanting to savor, but not wanting it to get cold either.  I found the perfect balance, enjoying every bite and commenting on just how surprised I was by the taste and texture.  These were, for sure, a winner!

The Glutino Gluten Free Original English Muffins are made from water, corn starch, tapioca starch, skim milk powder, corn flour, egg whites, can sugar, canola oil, salt, cellulose gum, yeast, baking powder, gluconon-delta-lactone, pectin, sodium bicarbonate, sodium alginate, modified cellulose, corn meal, iron, nacin, tracalcium phosphate, pyridoxine hydrochloride, thiamine mononitrate, and riboflavin.  Yes…I am aware of how chemically some of those ingredients sound.  And that word modified is a bit of a bother.  It’s sad…because, if you’re like me and actually care about that sort of thing…it sort of lessens my excitement for these breakfast treats.

A serving of the Glutino Gluten Free Original English Muffins is one English muffin.  This one English muffin will provide your body with 170 calories and 1.5 grams of fat.  I think that’s freakin’ fantastic.  A serving also provides 440 mg sodium and 7 grams of sugar.  Not bad for a bready breakfast item.  These English muffins are also cholesterol free.  And, finally, this serving will give you less than 1 gram of filling fiber and only 4 grams of protein.  So, this is why I paired it with a bowl of cereal…because otherwise, I’d be starving within an hour.  It will not leave you feeling full for very long, that’s for sure.

Regardless, I am a huge fan of the Glutino Gluten Free Original English Muffins.  Great flavor, great taste, great texture…which means I’ll treat myself to them every now and again.  Because, on some mornings, sometimes the only thing you want is an English muffin.  And when, normally, due to Celiac or gluten intolerance, this isn’t something that can happen on a regular basis…this is a nice treat indeed.  I highly recommend these English muffins.  In fact, I even think people who can eat Thomas’ English Muffins would appreciate these as well.  There…I said it.

Put it to the test.  For me…no need.  I’m in love.  I’m in love all over again with breakfast.  Thank you, once more, for another fantastic product, Glutino.  Thank you.

Product Review: BeeFree Gluten Free Lemon Loaf

BeeFree Gluten Free Lemon Loaf

Product: BeeFree Gluten Free Lemon Loaf – $3.00

It was two weekends ago that I was walking around the Indiana State Fairgrounds at the Living Without Gluten Free Food Allergy Fest.  I had such a great time going up to the various booths, some from big name and well-known gluten-free companies and corporations.  And then…some of the booths belonged to local businesses…bakeries and sauce makers and the like.  It was an amazing variety and a great time.  I had a blast talking to the various vendors, from local and nationally acclaimed businesses and finding out more about their products and/or company.

One booth that I dropped by was BeeFree Gluten Free Bakery, based out of Noblesville, Indiana.  The bakery is owned and operated by Jennifer Wiese, the mother of four teenage boys, the eldest of which is on the autism spectrum.  She attended an autism conference a few years ago where she learned about the benefits of a gluten-free and casein free diet in helping to alleviate some of the behavioral issues associated with autism.  With a limited amount of good gluten-free and casein free food in Nobelsville, and an 8-year-old with limited patience for being asked to give up some of his favorite foods, Weise decided to get creative.  With the assistance of her mother, they eventually were able to put together a winning combination of rice, tapioca, coconut, and potato flours, with corn starch, as a base for her baking.

In the end, the diet had positive effects on her son.  And Weise wanted her son to be able to eat at social events, often meaning she had to bake a cake or pizza to be offered alongside the glutinous one that everyone else was eating.  When people started complimenting Weise on how good her creations were, she began to get asked to bake for their parties.

With the demand there, Weise decided that starting a business was the next step.  So, in 2010, BeeFree Gluten Free Bakery opened.  Weise rented out kitchen space in a restaurant after hours and would start baking.  After a year, she realized she couldn’t keep up with her orders and grow the business like she wanted to, so she rented a bakery and started producing her baked creations on a larger scale.  This meant she could do her baking in the morning while the equipment was freshly sanitized and there wasn’t any wheat flour wafting around the air.

Today, Weise’s entire family has gone gluten-free.  Now that Weise has more time freed up for working on business, she is interested in getting BeeFree Gluten Free Bakery carried more widely across the region and expanding her line.  She recently even developed a cereal for people on the Paleo Diet, which tends to avoid grains, legumes, dairy products, salt, refined sugar and processed oils.

So…here the bakery was, participating in a huge gluten-free expo.  As I strolled up to the table, they were offering samples of their Warrior Mix (which is a cereal).  But, for sale, I noticed one lonely loaf on the table…and it caught my attention for one reason – it was LEMON!

I love, love, LOVE lemon flavored things.  And so does my roommate.  Which, I immediately pointed the loaf out to Cathy and she nodded her head.  I spoke to the guy behind the counter and said that I’d love to take the Lemon Loaf off their hands.  He picked it up and informed me it was the last one they had.  WOOT!  Good timing.  Cathy passed over the $3.00 they were asking and we walked away with something lemon and delicious looking.

Upon returning home from our day in Indianapolis, Cathy and I sorted out our stash of free goodies and the items we bought, including ones that needed to be refrigerated.  The BeeFree Gluten Free Lemon Loaf went into the refrigerator.  I had every intention of busting into it before today…but we were working hard on polishing off the banana bread I had prepared from the mix I reviewed a couple of weeks ago. And then…we were heading out of town, and taking my own gluten-free zucchini bread loaves with me to my parents home.  So…with all of that finally gone…this morning’s after-gym breakfast had to be simple…and I had nothing.  NOTHING.  Until I recalled…the BeeFree Gluten Free Lemon Loaf.  Breakfast…was served.

That morning, before we left for the gym, I pulled out the Lemon Loaf and opened it up.  The serving size was 1/4 of the loaf, so I cut it in half, then cut that half in half…so that my roommate and I each had a serving.  I immediately noted the gorgeous lemon yellow color of the loaf.  However, I was a bit uncertain about the white layer of thick icing on the top.  I’m not big on frosting or icing…and the sheer amount of it was a bit…overwhelming.  But…I placed the slices into a container and we were off to face the cardio machines.

After going to the gym this morning, we hiked over to the office and I removed the two slices (or half of the loaf) from the cooler I bring on gym mornings.  I placed each slice on a plate and gave it a small warming (about 15 seconds) in the microwave before handing off one slice to Cathy and settling in at my desk with the other.

I cut through the top part, getting the huge chunk of icing with a little bit of the loaf.  I took a taste…and aside from the sweetness of the lemon-flavored icing…the loaf itself was moist, rich, sweet, sour, and just plain…delicious!  Yes…delicious.  I ended up breaking the icing away and cutting it up so that I could get smaller bits of it with each bite instead of having it just sitting on top.  Because…there was a lot of it.  By breaking it up like that, it definitely gave the loaf more depth as I got a bit of icing with a bit of bread with each bite.  Otherwise, I’d just get the icing and it was far too sugary sweet for a breakfast.  More like a dessert.  Maybe that’s what this was meant for.  Dessert for breakfast…it happens.  But…with the volume of icing, it was best eaten this way.  Trust me.

I was rather impressed with the texture, taste, density, and flavor that came in the BeeFree Gluten Free Lemon Loaf.  It was light, and airy, not dense and heavy.  Like I said, my only complaint is that the ratio of loaf to icing was…way off, in my opinion.  It was a little overwhelming with that thick layer of icing on top, but I made it work.  Truth is, the loaf would have been just as delicious even without the icing.  And probably would make it feel like less of a dessert too. But, to each their own, and this is truly just a personal preference.

The BeeFree Gluten Free Lemon Loaf is made from sugar, organic enriched rice milk, corn oil, eggs, white rice flour, tapioca flour, corn starch, organic lemon juice, organic lemon peel, coconut flour, potato flour, xanthan gum, baking powder, and sea salt.

As for nutrition, a serving of the the BeeFree Gluten Free Lemon Loaf is 1/4 of the loaf.  In this serving, you will be consuming 250 calories and 11 grams of fat.  You will also be consuming 125 mg sodium and 22 grams of sugar.  And finally, you will be taking in 1 gram of fiber and 2 grams of protein.  It isn’t filling…but it is one sweet treat in the morning.

I love supporting a local business, so I was excited to tear into my BeeFree Gluten Free Lemon Loaf this morning.  Fantastic flavor and just the right amount of lemon.  For my own tastes, I find the amount of icing a bit of overkill, but it does add great flavor to the loaf.  I was one happy lemon lover this morning.  And this loaf gets another eating on Thursday.  Already anticipating.

Recipe: Gluten Free Avocado Bruschetta with Green Sauce

Ah, Martha Stewart.  I have to hand it to you!  You always come through for me in a pinch.  Always.

You see, I’m running short on time and have quite a few things left from my CSA bin delivery.  Yes.  I know.  I don’t even eat out that often anymore.  Once a week…generally on the weekend…and it’s usually always at Annie May’s Sweet Café on Saturday morning.

But…with my bin ingredients needing some attention, I noted this morning that my avocado was now ripe.  Not just ripe…but at that perfect creamy ripeness.  So…I scrapped my original plan to make Maple Roasted Brussels Sprouts and instead thought about what I could do with the ingredients I have in my fridge and pantry…that I could use avocado with.

I puzzled it out for much of the day…until I found this recipe.  It’s one of Martha Stewart’s.  And yes…it is sheer perfection.  The only thing I did differently was I used kale in my sauce instead of parsley…because I have plenty of kale to use!  HA!  Oh, and I used slices of gluten-free sandwich bread instead of the crispy French bread that you would normally use to make bruschetta.

Trust me…you’ll eat this up as fast as Cathy and I did tonight!

Recipe: Gluten Free Avocado Bruschetta with Green Sauce

Gluten Free Avocado Bruschetta with Green Sauce

Servings: 4
Time: Prep 10 minutes; Bake 10 minutes

Ingredients:

  • 2 ripe Hass avocados, pitted and peeled
  • 1 tablespoon freshly squeezed lemon juice
  • 8 slices gluten-free sandwich bread, toasted
  • 1 small clove garlic, peeled
  • 6 leaves of kale, trimmed
  • 3/4 cup packed basil leaves
  • 5 tablespoons plus 2 teaspoons extra-virgin olive oil
  • 1-1/2 teaspoons red-wine vinegar
  • Salt and freshly ground pepper


Directions:

Place the garlic in a food processor, and pulse.

Add the kale, basil, 5 tablespoons olive oil, vinegar, and salt and pepper to taste; puree.

Set the sauce aside.

Cut the avocados into 1/2-inch chunks.  Toss with the lemon juice and remaining 2 teaspoons olive oil.

Spread a scant tablespoon of the green sauce on each slice of bread.

Arrange the avocado chunks on the bread, sprinkle with a pinch of ground pepper.

Serve immediately.

~*~*~

This dinner was so simple and yet…so fantastic all at once.  It really wasn’t hard to make at all.  When toasting the bread is what takes up most of your time, you’re doing it right.  Seriously…this was a flavor haven of sheer recipe awesomeness.  The avocado was smooth, creamy, and soft.  The sauce had this great flavor to it…without being overly oily.  Think of it as a sort of kale and basil pesto.  What that ended up doing was really bringing this amazing earthy and light flavor to the dish itself.

One bite…and you’ll be hooked.  I added a sprinkle of red chili flakes to mine…because a little hit of heat is an amazing thing.  I sort of want to make it all over again.  YUM!


Recipe: Gluten Free Pumpkin Bread Pudding

It’s no secret…to anyone…that I love pumpkin.  And as we head out of summer and into fall, we have reached the “pumpkin flavored everything” time of year.  YAY!  But, I have to say, I never let pumpkin season go away in my house.  Not at all.  In fact, I stock up on pumpkin because I will use it in so many things.  As it was, I got a little overzealous this past year with my purchasing of Libby’s Pure Pumpkin…so, my pantry has cans of it.  I figured it was time to come up with ways to use it up.  Last weekend, I made my Gluten-Free Pumpkin Waffles.  This morning…yes…during the work week…I baked up a Gluten Free Pumpkin Bread Pudding.  I love bread puddings…and this one was no exception.  Even better…it is so easy to make.

I spotted the original recipe when Schär Gluten Free posted a link to a blog that had utilized their Gluten Free Classic White Rolls in a bread pudding.  Made with pumpkin.

They had my full and undivided attention.

So…this morning…I decided to bake up the recipe that Mama Me Gluten Free originally posted and Schär linked to on their social media site.  I made a few changes in the preparation for convenience sake…but in the end…it was just as amazing as the recipe promised.

Gluten Free Pumpkin Bread Pudding

Gluten Free Pumpkin Bread Pudding


Servings: 8
Time: Prep 10 minutes; Bake 50 minutes

Ingredients:

  • 15 ounces pureed pumpkin (fresh or canned)
  • 1 1/2 cups milk (I used unsweetened almond milk)
  • 2 large eggs
  • 1/2 cup dark brown sugar
  • 1/4 cup organic pure cane sugar
  • 1/2 tsp. kosher salt
  • 1 tsp. pure vanilla extract
  • 1/2 tsp. ground cinnamon
  • Few small dashes of ground ginger
  • Few small dashes of ground cloves
  • Couple of small dashes of ground nutmeg
  • Package of Schar Classic White Rolls (or any gluten-free bread that is similar in consistency), cubed into 1 to 1-1/2- inch pieces (I let mine sit out overnight to dry out)
  • 1/2 cup chopped pecans
  • Cinnamon and sugar to sprinkle on top (optional…but delicious)


Directions:

Preheat oven to 350°F.

Grease a 2-quart baking dish.

Place bread in a large bowl and set aside.

In another bowl, mix together pumpkin, milk, eggs, sugars, salt, vanilla paste or extract, cinnamon, ginger, cloves and nutmeg.

Pour over bread and gently stir until all is covered.  Let this sit for about 15 minutes.

Pour the mixture into the baking dish and spread it out with the back of a spoon or a spatula so that it is evenly spread throughout the dish.

Sprinkle pecans over the top, and shake cinnamon and sugar lightly over it all if desired.

Bake for 45-50 minutes.

ENJOY!

~*~*~

A slice of Gluten Free Pumpkin Bread Pudding with Maple Syrup

Oh…oh yes!!  This bread pudding is one of the best (and easiest) I have made to date.  I served up a wedge of the Pumpkin Bread Pudding with a delicious drizzle of warm maple syrup.  If heaven was on a breakfast plate…that would be it.  The flavors are amazing.  There is the right hint of spice and sweetness to really elevate the savory aspect of the pumpkin.  It’s rich.  It’s decadent.  And the pecans sprinkled with the cinnamon and sugar on top truly lend a great hit of sweetness as well as texture.  I am totally going to make this again!  But lucky for me, I still have 3 more days worth for eating it.

If you are a pumpkin freak like me…believe me…you’ll want to bake this one up!

Product Review: Schär Gluten Free Multigrain Bread

Schär Gluten Free Multigrain Bread

Product: Schär Gluten Free Multigrain Bread – $4.99+

For all those different gluten-free bread needs, I often turn Schär.  Not only has Schär put out a variety of bread products on the market, they make sure that the products that they do put out are up to their high standards.  This is why when I need sandwich rolls or ciabatta or even baguettes…I head to the gluten-free bread section and pull one of these products off the shelf.  Yes.  Not frozen.  I get so tired of having to thaw out my bread…but without preservatives and the like, gluten-free products don’t keep for long if they aren’t refrigerated.

Schär specializes in the development and production of foods for people with special dietary needs, with a goal of becoming a leader in that field.  They have very much established themselves as a leader in the gluten-free foods out on the market.  They are certainly one brand that I never hesitate to purchase, even if I’ve never tried the product.  And since Schär guarantees the highest safety standards in the manufacturing of their products, you can rest assured that you won’t have any contamination from their products.  They aim to produce quality and delicious products that ensure the consumer a balanced nutrition and quality of life through their restrictive diet.

In the past, I have often used Schär Gluten Free Baguettes, Ciabatta Rolls, Sandwich Rolls, Cinnamon Raisin Bagels, Table Crackers, and even some of their sweets, like their Chocolate Hazelnut Bars.

So, when my roomie and I spotted a loaf of the Schär Gluten Free Multigrain Bread at Wal-Mart on sale, we couldn’t pass up that deal.  So…we purchased it.  And I was already coming up with ideas for sandwiches and the like.  I was excited to try it.  Honestly.  I had my usual brand (Rudi’s Gluten-Free Multigrain Bread) already open, so I didn’t immediately break into my loaf from Schär.  Until last night.

You see, last night the Series 8 premier of Doctor Who was playing at my local movie theater.  I wanted to keep dinner light and easy so we could get out the door and get to the theater in time.  So, I opted to make one of my vegan gluten-free grilled cheese sandwiches.  Yummy.  I try to enhance the sandwich by adding items to it.  No time to get really creative, so I sliced up the rest of a tomato and added it to the sandwiches.  I spread Earth Balance onto the slices of bread, put the cheese and tomato on and placed it in the skillet to toast.

The first thing I noticed about the Schär Gluten Free Multigrain Bread was that the slices are very small.  If you are familiar with Udi’s Gluten-Free Bread…then think about slices about that size.  I’ve grown used to this when I branch away from my standard bread…so…I won’t hold it against Schär.  It toasted up nicely on my skillet and the vegan cheese melted as well as vegan cheese can melt.  Once each side was toasted, I served up one sandwich to my roommate and one for myself.

Gluten-Free and Vegan Grilled Cheese Sandwich using Schär Gluten Free Multigrain Bread

She took the first bite and I asked her what she thought of the Schär Gluten Free Multigrain Bread.  She said it was “pretty good.”  I think she did actually like it, but prefers our usual Rudi’s brand when it comes to sandwich bread.  And…I agree.  However, that’s not saying that the Schär Gluten Free Multigrain Bread isn’t good.  It is.  In fact, one aspect of it that I did quite enjoy was the wholesome flavor that came with each bite.  It almost reminded me of wheat bread, back when I could eat it.  I don’t think my sandwich was the best vehicle to test this bread out on, however.

So, tonight…I gave it another test run.  And this time, I used it as a base for a Gluten Free Avocado Bruschetta with a Green Sauce (which I made from kale, fresh basil, olive oil, red wine vinegar, and some salt and pepper).  Oh…oh…this was a game changer.  I toasted the bread, dry, in the oven for about 10 minutes.  It came out a gorgeous golden color…not burned or charred on any of the edges.  Perfect.  I put the Green Sauce on the bread then topped it off with the chopped avocado.  My first bite…and…oh…oh yes!  YES!!  This was brilliant.  This was what that bread was made for.  And it turned out the smaller size was perfect for the amount of topping and chopped avocado that I had.  Each bite had every flavor and the savoriness of the bread just elevated this dish even higher.

It was the more complex dish that truly won me over with the Schär Gluten Free Multigrain Bread.

So, let’s talk ingredients, shall we?  A loaf of Schär Gluten Free Multigrain Bread is made from water, corn starch, rice flour, rice starch, soy flakes, potato starch, buckwheat flour, soy bran, rice syrup, soy protein, palm oil, psyllium seed husk (vegetable fiber), millet flakes, yeast, beet sugar syrup, sugar, hydroxypropyl methylcellulose (emulsifier), apple extract, salt, calcium citrate, citric acid, tartaric acid, folic acid. This loaf of bread is gluten-free, wheat free, lactose free, dairy free and egg free.  It is also cholesterol free.

As far as nutrition goes, a serving of Schär Gluten Free Multigrain Bread is 1 slice of bread.  One slice of bread provides you with 80 calories and 1 gram of fat.  In addition, you will be consuming 125 mg sodium and less than 1 gram of sugar.  Love those stats.  Finally, you will be taking in 1 gram of fiber and 2 grams of protein.  The bread won’t leave you feeling full…but it won’t make you feel like you hardly ate either.

So, while it wasn’t exactly love at first bite with Schär Gluten Free Multigrain Bread, I came around.  It just took a second tasting to really value the texture, flavor, and overall feel of this bread.  Yes, the slices are small, and yes…it can be tough without some toasting or warming…but in the end…a definite quality product I would be proud to purchase again!

Gluten Free Avocado Bruschetta with Green Sauce using Schär Gluten Free Multigrain Bread