Product Review: Grandpa’s Gourmet Gluten Free Citrus Herb Chicken Encrusting

Grandpa's Gourmet Gluten Free Citrus Herb Chicken Encrusting
Grandpa’s Gourmet Gluten Free Citrus Herb Chicken Encrusting

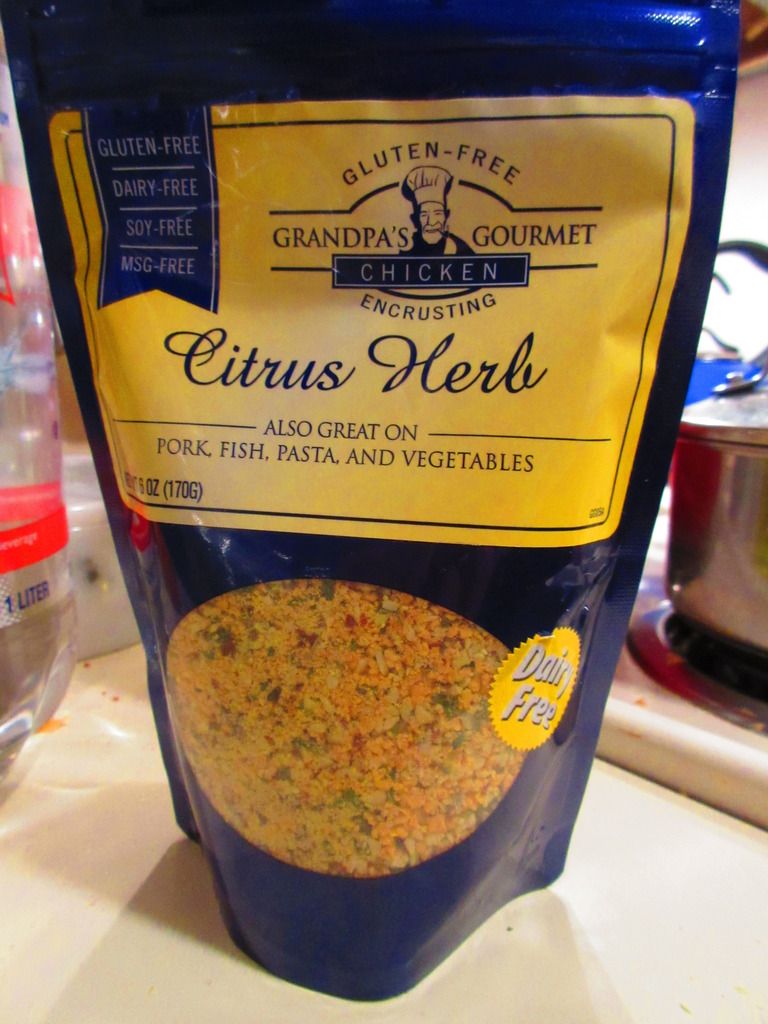
Product: Grandpa’s Gourmet Gluten Free Citrus Herb Chicken Encrusting – $5.00+

Okay…I know what you’re thinking.  You’re thinking…what is the gluten-free vegetarian doing with a breadcrumb coating that is meant for making fried chicken?

Well…it all starts with Cuisine Cube.

I signed up for Cuisine Cube back in May 2014…and for a year have been receiving a monthly subscription box of full-size products from artisan and smaller gluten-free companies.  I love it.  You can subscribe for as little as $29.99/month.  While you might be uncertain about the quality of the service, let me tell you…you will receive products you may never have heard of and are definitely not readily available stores.  You will receive 5-6 products (full-size) each month, each one representing a time when you’d eat: breakfast, lunch, dinner, snack, dessert.  And…sometimes…a bonus!  For me, some some products get used faster than others…and some sort of linger in my pantry until I can figure out something to do with them.

That was the case when, in my July 2014 Cuisine Cube, I received a 6 ounce package of Grandpa’s Gourmet Gluten Free Citrus Herb Chicken Encrusting.  Upon first opening the box, I thought…”I’m a vegetarian…what am I going to do with this?”  But, as most of you are well aware, I do love to coat some of my fresh vegetables in different breading (some made out of re-purposed items, and some…from actual gluten-free breadcrumbs) and bake them up in the oven to serve for dinner.  And, after almost a year of procrastinating on this product, I thought it was time to move the last of the 2014 products out.

That honor…went to Grandpa’s Gourmet Gluten Free Citrus Herb Chicken Encrusting.  Grandpa’s Gourmet was founded by a couple – he is a Celiac and she can’t have sugar, making meal planning quite a task.  One night, while she was preparing her grandfather’s old recipe for oven fried chicken, her husband gave into the craving and devoured all the fried chicken he could get his hands on.  He, of course, braced for the inevitable reaction – which never came.  Could it be…they had stumbled upon a recipe that would mean – “One Meal for Everyone!”?

Grandpa’s Gourmet calls their line of products “Encrustings” because they are breading taken to the next level.  Typical store-bought breading (or breadcrumbs) you get are genetically modified, unnatural wheat-based products that contain high amounts of sodium, sugar and preservatives.  Even most gluten-free breadings are loaded with fat because they are nut based or have a gritty texture as they are rice based.  But that’s what sets Grandpa’s Gourmet Gluten Free Encrustings apart.  Not only are their products all natural and healthy…but they taste great.  These encrustings have a non-GMO corn base, instead of rice or potato, giving it a fantastic texture.  They are sweetened with natural fruit juice…no artificial flavorings here.  And then, they fold in their own custom blend of spices and seasonings that smell amazing as they cook.

Roasted Broccoli over a Wild Rice Blend using Grandpa's Gourmet Gluten Free Citrus Herb Chicken Encrusting
Roasted Broccoli over a Wild Rice Blend using Grandpa’s Gourmet Gluten Free Citrus Herb Chicken Encrusting

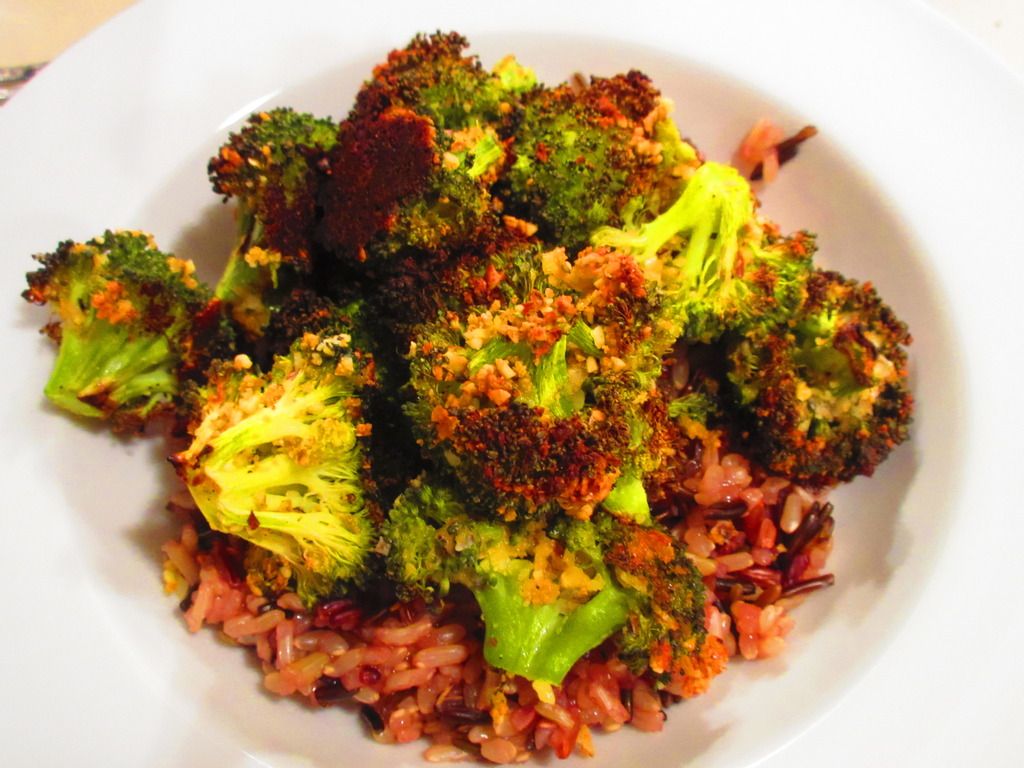
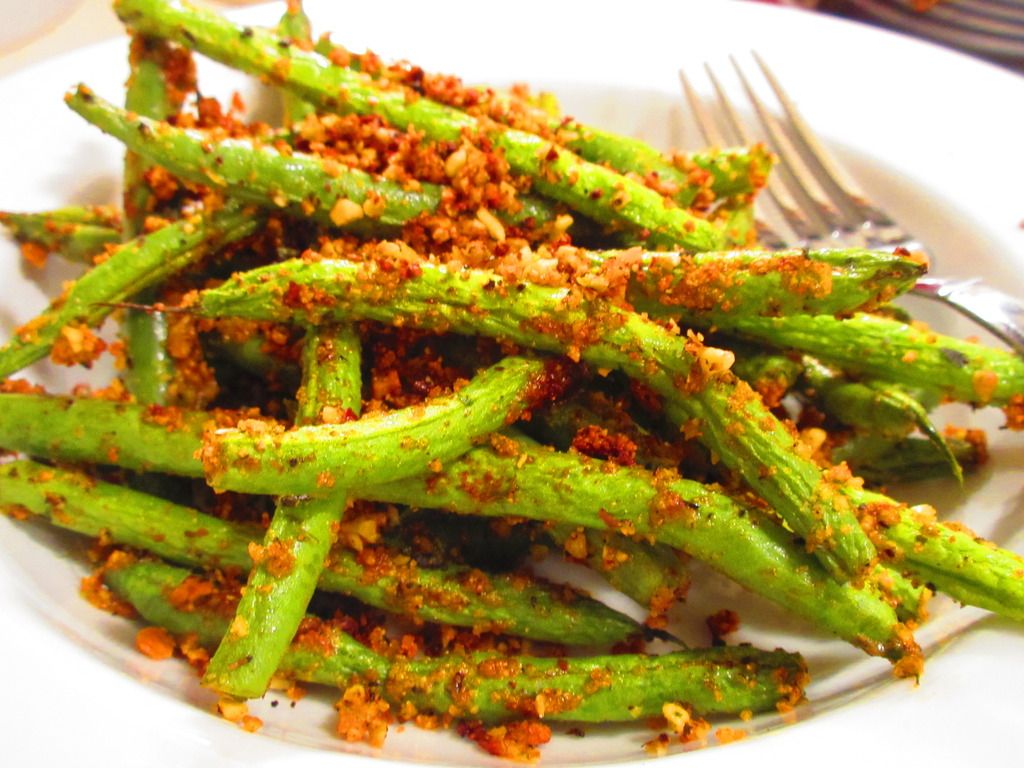
I don’t eat chicken…nor do I cook meat…but I do a lot with vegetables.  Had I thought about it before, the Grandpa’s Gourmet even suggests putting it on vegetables on the front of their pouch.  It says, “Also great on: pork, fish, pasta, and vegetables.”  VEGETABLES!  DUH!  So, last night and tonight, it was all about the Grandpa’s Gourmet Gluten Free Citrus Herb Chicken Encrusting.

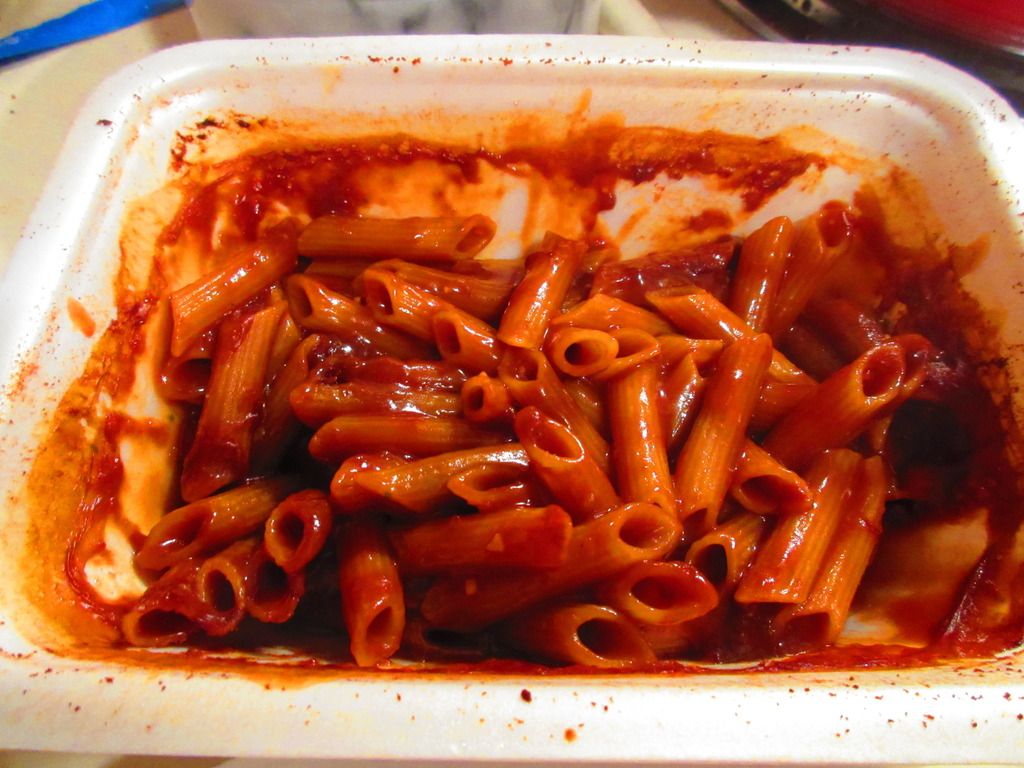
Last night, I roasted up some broccoli that I coated with some olive oil and the encrusting mix.  I did the same tonight with green beans, which I toasted up in the oven to get them nice and crispy and good.  Let me tell you, Grandpa’s Gourmet Gluten Free Citrus Herb Chicken Encrusting is phenomenal.  While I liked it well enough on the oven roasted broccoli, it really shined tonight when I put it on the green beans and toasted those up for dinner.  WOW.  This breading is anything but bland.  In fact, it is a fantastic seasoning that would work well even in scrambled eggs.  Honestly…I am beyond impressed with this amazing product.  And to think, I never would have thought about this product otherwise.  It is versatile and amazing.

Let’s take a look at the ingredients that go into a pouch of Grandpas Gourmet Gluten Free Citrus Herb Chicken Encrusting.  This breading is made from organic corn meal (organic corn meal, organic grape and/or pear juice concentrate, sea salt), cashews, almonds, spices, salt, and orange peel.  This encrusting is gluten free, dairy free, soy free, MSG free, and non-GMO.

As far as nutrition goes, I am totally impressed with how this all adds up.  A serving of Grandpa’s Gourmet Gluten Free Citrus Herb Chicken Encrusting is 1/4 cup.  There are about 6 servings per container.  One serving will provide 120 calories and 6 grams of fat.  This serving will also dish up 0 mg cholesterol, 220 mg sodium, 14 grams carbohydrates, 2 grams sugars, 2 grams fiber, and 3 grams of protein.

Honestly, I never would have given Grandpa’s Gourmet Gluten Free Citrus Herb Chicken Encrusting a second glance, but thanks to Cuisine Cube, I now have a product I can actively seek out (and order) and indulge in and include in so many dishes.  This is one versatile breading…so even if you’re like me and don’t eat meat…you can still enjoy this product.  I am definitely in love.  Enough that I even ate the breading that flaked off my green beans tonight.  A nice salty-sweet treat at the end of a meal.  Definitely a new favorite.

Crispy Green Beans made with Grandpa's Gourmet Gluten Free Citrus Herb Chicken Encrusting
Crispy Green Beans made with Grandpa’s Gourmet Gluten Free Citrus Herb Chicken Encrusting

Product Review: Van’s Gluten Free Rotini and Red Sauce

Van's Gluten Free Rotini & Red Sauce
Van’s Gluten Free Rotini & Red Sauce

 Product: Van’s Gluten Free Rotini and Red Sauce – $3.99+

It’s been one of those weeks.  Seriously.  I’m recovering (slowly) from my awful, awful, painful Boston Marathon.  To top it all off, my produce bin didn’t arrive as scheduled on Friday.  So, all weekend I was left scrambling with ideas as to what to make for dinner and how little grocery shopping I could get away with in trying to manage exactly that.  The answer…I still had to hit up the produce at the grocery store, and my CSA bin was redelivered to me on Monday evening.  But for that weekend…I was not in a good spot.

Thankfully, I have a pantry full of things that have been just dying for me to pick them off the shelf and try.  And when push comes to shove, Saturday was going to be all about some pasta.  I have a few gluten-free pastas (just the noodles and then some dishes like this) in my pantry for just such occasions…because pasta is easy and a very common go-to for me. Because I LOVE pasta.

I listed off some options to the roomie, and ultimately Cathy made the final say.  “Let’s try that last Van’s thing.”

And so it came to pass that “the last Van’s thing” was going to make its way from pantry shelf to full-on meal in my kitchen.  Moving on up!

You see, awhile back I had picked up three boxes of the Van’s Gluten Free Whole Grain Pasta Sides, which I had discovered at Walmart, of all places, way ahead of anywhere else in the area carrying them.  I snagged one of each flavor and happily stocked my pantry with them.  I have already had the Creamy Herb and Garlic Pasta and the Ultimate Cheddar Penne as well.  So…this time it was Rotini & Red Sauce’s turn to shine.

Van’s Gluten Free choices have never disappointed me.  Not once.  Not ever.  They are my waffle of choice, above all others, even the new Gluten-Free Eggo’s.  That’s a huge thing!!  But Van’s puts a lot of love and care into their packaged foods.  And Van’s does believe that nutritious is delicious and that’s why they make their gluten-free pastas with whole grain brown rice, delivering more than a full serving of nutrient dense whole grains.  You can always add in some vegetables or chicken (if you eat meat…which I don’t…) in order to bulk up the pasta sides and make these more of an entrée.  But as my roommate and I take something that serves three and split it between the two of us…it’s the perfect amount in the end.

Cooking up the Van’s Gluten Free Rotini and Red Sauce takes all but 10 minutes.  Seriously.  Just boil 6 cups of water in a medium saucepan.  Add the pasta and allow it to return to a boil.  Let it cook for 7-8 minutes.  The noodles will become al dente.  Do not overcook.  Gluten-free noodles are an awful thing overcooked.  Drain the noodles and give them a rinse.  Then, add the marinara sauce to the saucepan, heating on low.  Stir often.  Put the pasta back into the pan with the marinara and heat through.  Enjoy.

I served this up with a gluten-free dinner roll that I baked up a few weeks ago.  It made a perfect, perfect, perfect dinner.  The rotini (which is actually red) cooked up really perfectly.  It wasn’t mushy and didn’t crumble apart when I stabbed at it with my fork.  The pasta sauce was rich and flavorful.  I sort of wish there was a little more sauce when all was said and done, but there was the perfect amount to lightly coat the noodles and serve them up.  This was a filling entree, and would serve at least 4 people as a side dish to a bigger main dish.  I enjoyed this one, but it was my least favorite of the three pasta sides that Van’s created.  Not that it wasn’t good.  It was. But it was something I easily could have made with things I have at home in the same amount of time.  It was nothing special.  But it was quite tasty.  If more sauce had been present, I would have used my dinner roll to mop it up.  But…the sauce was just enough…no extra.  Still…a solid, delicious pasta dish.

Van’s is very proud of the ingredients they put into their products.  Seriously.  They state this on the box.  And the ingredients that go into Van’s Gluten Free Rotini & Red Sauce are simple.  These ingredients include gluten free penne pasta (brown rice flour, red lentil flour, beet powder, tomato powder), marinara sauce (tomatoes, water, tomato paste, olive oil, onions, sugar, basil, garlic, salt, citric acid, and black pepper).  It is gluten-free, kosher, contains no artificial colors or flavors, has a full serving of whole grains, is egg-free, and is dairy-free.

As far as nutrition goes, a serving of Van’s Gluten Free Rotini & Red Sauce is about 1 cup prepared.  This box contains about 2.5 servings.  This will dish up 250 calories, 3.5 grams of fat, 160 mg sodium, 52 grams of carbohydrates, 4 grams fiber, 3 grams sugar, and 12 grams of protein.  This side dish is cholesterol free.

So, while this was a simple and basic meal, it was easy to make and served up a fantastic dish for my roommate and I to share.  Of the three, however, this would probably be the one I wouldn’t pick up again.  Not that it wasn’t good…it just wasn’t as memorable as the others.

Van's Gluten Free Rotini & Red Sauce (prepared)
Van’s Gluten Free Rotini & Red Sauce (prepared)

Product Review: Beyond Meat Beastly Sliders

Beyond Meat Beastly Sliders

Product: Beyond Meat Beastly Sliders – $5.99+

Beyond Meat had me with their vegan and gluten free chicken strips from the very start.  I remember first spying those products in my local Whole Foods and immediately latching on to all three varieties and tossing them in the freezer.  Since then, they have not only improved on the vegan not-chicken strips…but they have since added to their non-meat repertoire.  Beyond Meat has introduced vegan chicken poppers, vegan chicken tenders, beyond beef crumbles, beyond beef meatballs, and beast burgers and beastly sliders.

I have yet to find the poppers and tenders and meatballs anywhere in my area, but I have stumbled across the two varieties of Beyond Beef Crumbles and…more recently…discovered the Beyond Meat Beast Burger and Beyond Meat Beastly Sliders.  Now, it’s not every day I stumble across a vegan/vegetarian slider that I can eat.  In fact, the only other sliders I’ve seen are made by Gardein, but they aren’t gluten-free.  So…the instant I spotted these at my Whole Foods, I knew there was no escaping the tight budget.  I’d squeeze it in and give them a try.

Due to my fresh produce and my lack of any sort of gluten-free slider buns…I ignored these in my freezer for a little while.  But after hobbling through The Boston Marathon, and not having a produce bin delivered on time…this past weekend, I needed to do something for dinner.  I searched my freezer, and have a few options remaining in there.  The one that caught my attention was the Beyond Meat Beastly Sliders.

Well…why not?  I was going grocery shopping that morning, so I could pick up some Udi’s Gluten Free Whole Grain Dinner Rolls to use as slider buns…I figured.  In my head, that was the plan.  I think I forgot that the Udi’s Gluten Free Dinner Rolls were a little longer than a standard roll…so when I had everything out to start cooking…I realized I was going to have to slice the dinner rolls in half and then slice them open to make a close proximity of a slider bun.

Dear Gluten Free bread makers….slider buns…create them.  I will buy them.  For reals!

So while my dinner rolls/slider buns of sorts were toasting in the oven, I got out a saute pan and gave it a splash of olive oil, allowing it to heat up on medium-high heat.  Then, into the pan all six of the slider patties went.  I was impressed upon opening the package of Beyond Meat Beastly Sliders.  The sliders have the appearance of real burgers.  So, it’s not a vegetarian patty that looks nothing like a burger masquerading as a burger.   These actually look like burgers.  I was impressed.  They were so easy to cook up too. Simply add the sliders to a touch of oil in a skillet and cook until lightly brown on both sides.  It takes about 5-7 minutes.  Then…it’s time to eat.

The dinner rolls weren’t a perfect fit for these hearty slider patties, but they worked.  So, that’s what matters.  I sliced each roll down to “slider” size and then loaded on the burger with a hit of ketchup and…BAM…vegetarian sliders for dinner.  It was really that easy.  I served these with a side of Zapp’s Voodoo Chips, which if you haven’t tried those…DO IT!

I haven’t eaten any sort of meat in over four years.  That being said, back when I was big into burgers…you know…Hard Rock Café knew my burger order…these rank right up there with the real thing.  Seriously.  They have this great meaty texture…and they were hearty and held up.  So often, vegetarian and vegan burger substitutes crumble and fall apart.  This is especially true with vegan/vegetarian patties that are also gluten-free.  It’s one of my pet peeves.  This did not happen with the Beyond Meat Beastly Sliders.  My roommate had just had sliders on our way to Boston a week before, and she said these were better than the real thing.  WOW!  I won’t lie…the texture, the flavor…it was awesome.  They were juicy and filling.  Oh yeah…they are Beastly Sliders for a reason…I was full from my serving of 3 of them.  I loved the smokey flavor that these patties had, sort of lending it to the “I taste like beef, but I’m not” flavor.  I’m sort of in love with these.  It is just eerie how much these resembled real beef patties in appearance and in taste.  It sort of freaked me out.  In a good way.  These will definitely find their way back into my freezer.  I might have to experiment with making my own slider buns, but these were truly fantastic.  I was beyond impressed.

Beyond Meat set out to replicate the taste and texture of beef burgers and to prove that there is a better, more sustainable, plant-based way to satisfy any burger craving.  In addition, they prove that there is a healthier, plant-based, sustainable way to make a burger without the need to kill animals.  We just needed a better burger…and these sliders are definitely proof that vegan burgers can run with the real thing.

Let’s discuss ingredients in the Beyond Meat Beastly Sliders, shall we? These sliders are made from water, pea protein isolate, essential fatty acid oil blend (DHA algal oil, flaxseed oil, sunflower oil, canola oil, and palm oil), methycellulose, carrageenan, calcium sulfate, yeast extract, maltodextrin, potassium bicarbonate, potassium chloride, tapioca starch, caramel color, sorbitol, beyond nutrient blend (vegetable nutrient extract blend (spinach, broccoli, carrot, tomato, beet, shiitake mushroom), sea buckthorn juice powder, beet juice powder, hydrilla powder, horsetail herb powder, moringa leaf powder, mesquite powder, fulvic minerals, pomegranate seed powder), natural flavoring, spices, salt, l-cysteine hydrochloride, onion powder, sugar, onion extract, paprika extract and garlic extract. Lots of stuff I don’t recognize.  I admit.  And a lot of ingredients at that.  I know.  But…WOW.  The Beyond Meat Beastly Sliders are gluten-free, soy-free, cholesterol-free, and non-GMO.  They are also contain antioxidants, iron, calcium, vitamins B6, B12, D, potassium, as well as DHA and ALA omega-3’s.

So, let’s talk the nutritional value for a moment, yes?  A serving of the Beyond Meat Beastly Sliders is 3 sliders.  You get 6 in a box.  This serving of three patties will provide you with 260 calories, 16 grams of fat, 480 mg sodium, 720 mg potassium, 7 grams carbohydrates, 0 grams sugars (YAY!), 4 grams of fiber, and 23 (YES…23) grams of protein.  No wonder you feel full after eating these.  WOW!

While I don’t make faux meat products a standard in my home, it is fun to try out products every now and again.  The past four years I’ve had many vegetarian/vegan burger patties.  In the past three years, I’ve consumed quite a few brands that are also gluten-free.  By a long shot, Beyond Meat has provided the best burger patty to date.  To think…plant power all the way.  Totally in love with the nutritional aspect, the flavor, the taste…everything.  Now when I want sliders…I can have sliders.  So much love.

Beyond Meat Beastly Sliders (prepared)

Product Review: Nuttzo Original Crunchy Seven Nut & Seed Butter

Nuttzo Original Crunchy Seven Nut & Seed Butter

Product: Nuttzo Original Crunchy Seven Nut & Seed Butter – $12.99+

When it comes to food, nothing completes me more than any sort of nut butter.  Peanut butter, almond butter, cashew butter, sunflower seed butter (technically, not a nut butter…but close enough!), etc.  I love them.  Give me any flavor (add in honey, chocolate, coconut) too.  I love it.  It is, perhaps, my ultimate comfort and snack food.  When I’m stressed out, I just want a spoon and the nearest container of peanut butter.  No joke.

For awhile now, I’ve noticed and heard of a brand of nut butter that contains seven different nuts and seeds.  Needless to say, I knew a few people who swore by this stuff.  Loved this stuff.  And…as chance would have it…I found this stuff at my local Whole Foods Market.

Problem…it was between $12.99 – $17.99 a jar.  And, as much as I love nut butters…even I couldn’t justify spending that much on a simple (seven variety) peanut butter.  As much as it intrigued me.

Until…it went on sale.  Granted, the original crunchy is in the lower end ($12.99) regular price, but it was on sale for $9.99 one day I was in Whole Foods.  I still have money on a gift card I received for Christmas (best gift ever!), so I figured…why not?  I wouldn’t find it any cheaper.  I made my purchase and never felt one iota of remorse.  YAY!  Expensive peanut butter.  Now I’m living large.

So what is it about Nuttzo?  Nuttzo is a gourmet nut and seed butter that, each variety, contains seven different nuts and seeds.  It is billed as the healthiest and most unique super-butter on the planet.  They have three different flavors…available in the crunchy and smooth varieties: original, power fuel with chia, and Peruvian dark chocolate.  Said to be, perhaps, the next big next big thing in nut butter.  They are easy to spot too…standing upside down on the shelf.  Why upside down?  Because they are a little “nuttzo.”  Heh.  Actually, it’s because all the oils that naturally separate in natural peanut butters will now be at the bottom of the jar and not the top.  Open it without the mess.  YAY!  All of the Nuttzo flavors and products are 100% organic, contain no added sugars or oils, are high in healthy fats and protein, contain flax in every flavor for your daily Omega 3 ALA’s, are gluten-free certified, non-GMO certified, and kosher certified.

I love it already.  Good to know there are ways for a gluten-free. dairy-free, vegetarian to get those important Omega 3’s.

So, while the price had me doubting my purchase…on Sunday, I needed a light lunch (as I had made an epic breakfast and would be making an epic dinner!), so my roommate suggested open face peanut butter sandwiches.  I said, “Should we try the expensive peanut butter?”  She said that it had to happen sometime.  So…down from the top shelf of the pantry my jar of Nuttzo Original Crunchy Seven Nut & Seed Butter came.  I flipped the jar over, opened it up, looked inside and the chunky, nutty and seedy goodness, and gave it a swirl.  I doled up spoonfuls for my roomie and I to “sample” while I put a schmear of it on two pieces of gluten-free toast.

My roomie thought the honey I was going to drizzle on top would make it better.  Me…I was quite happy with all the different things going on in the Nuttzo.  I love smooth peanut butter, but chunky peanut butter…that’s another level.  And this…this is the supreme being…the god of all crunchy and chunky nut butters.  You actually have, swimming in this smooth sea of nutty goodness, chunks of cashews and peanuts and the other nuts (which I will get to), not to mention flax seeds and sunflower seeds, just adding to the texture.  Happy day.  I loved it straight off the spoon.  I loved it spread across a toasted slice of gluten-free bread.  I loved it driizzled with honey.  The only thing I don’t love about it is the steep price tag.  But with all those expensive nuts and seeds inside…I can see why that’s the case.  It just means that if I decide to splurge on nut butter…it will happen only once or twice a year.  This stuff is fantastic…but it is pricey.  Like…I could buy 13 individual cups of Greek yogurt for the price of one jar of this nut butter.  Is it worth it…yeah.  I think it is.  I mean, what’s not to love about something that excites your palate and is smooth and chunky and gritty and rich and tasty and just everything you want from a nut butter all in one?  Absolute nothing.  Except Nuttzo.

Granted…I have a great Vitamix now.  I can probably make this myself for a lot less…but sometimes…convenience wins out.

Let’s talk about ingredients, shall we?  With nut butters you usually have 1 to 2 ingredients.  Well, if you buy organic and natural, like I do.  This is that…but loaded with nuts and seeds.  In fact, the Nuttzo Original Crunchy Seven Nut & Seed Butter is made up of organic peanuts, organic cashews, organic almonds, organic flax  seeds, organic brazil nuts, organic hazelnuts, organic sunflower seeds, sea salt.  LOTS of flavorful nuts and seeds…all that give it this fantastic flavor, sweetness, and texture.  All without adding unnecessary things like sugar.  LOVE!!

As far as nutrition information goes, this is one very super-nutritious, high protein, amazing nut butter.  One serving, of the Nuttzo Original Crunchy Seven Nut & Seed Butter is 2 tablespoons.  This serving will provide you with 180 calories, 16 grams (healthy) fat, 70 mg sodium, 7 grams carbohydrates, 1 gram sugar, 3 grams fiber, and 7 grams of protein.  Like I said…powerhouse.  This nut butter, for someone with my dietary restrictions, is definitely worth the cost.  Heck, it’s worth it’s weight in gold!!

Love comes in so many different forms.  When you’re an athlete with food allergies, sometimes love is as simple as a jar of expensive nut butter called Nuttzo.  I might be “Nuttzo” for being willing to pay for said nut and seed butter, but this gives me so many nutrients in just a serving that I think it’s worth it.  Bought it on a whim, scoffed a little at the price, loved it when I tried it…now…completely obsessed.  It’s hidden so I just don’t take a spoon and eat the entire jar.  Because, trust me, it would happen.

Product Review: Le Veneziane Micrawable Gluten Free Penne Al Pomodoro E Basilico Pasta Express

Le Veneziane Microwaveable Penne Al Pomodor E Basilico Pasta Express
Le Veneziane Microwaveable Gluten Free Penne Al Pomodor E Basilico Pasta Express

Product: Le Veneziane Microwavable Gluten Free Penne Al Pomodoro E Basilico Pasta Express – $6.99+

Pasta.  We all know that pasta is one of my favorite things in the world.  I grew up begging for spaghetti each week.  I wanted my mom’s spaghetti when my birthday rolled around each year.  Forget dining out.  I wanted my mom’s cooking.  I didn’t care if it was store-bought boxed pasta noodles.  Her sauce made it.  And that’s what I wanted.  Pasta (in all forms) has been one of my favorite dishes to just dive into.  Ultimate comfort food.  Ultimate meal.

Even after the Celiac diagnosis…one of the first things I sought out were pasta alternatives.  There are so many out on the market.  Some good…others not-so-good…and some that rise above and beyond the bar.  Like…even better than true pasta level of amazing.

Back in my September 2014 Cuisine Cube, I was presented with a box of Le Veneziane Microwavable Gluten Free Penne Al Pomodoro E Basilico (Penne with Tomato and Basil) Pasta Express.  And, yes, even the pasta freak in me didn’t immediately make this up.  But…I’ll explain why in a moment.

For now, let me give you a quick run through of what Cuisine Cube is all about.  Cuisine Cube is a monthly subscription service that delivers healthier, lesser-known, smaller artisan bakers/companies gluten free goodies to your door.  Each box contains 5-6 items (breakfast, lunch, dinner, snack, dessert, and a bonus sometimes!) and subscriptions start as low as $29.99.  Go to their site and check them out.  I’ve really enjoyed my year of Cuisine Cube and intend to keep my subscription rolling.  In fact, I might have to go in for the long-term subscription instead of the month-to-month.  I’m that committed.  LOVE.

So…yes…I realize that September is about 7 months ago and that I am just now reviewing a product from that Cube.  BUT…it is the last item from the September 2014 Cuisine Cube.  And that was one very delicious cube for sure!  The Dinner portion of that box was dedicated to a 1-serving microwavable pasta meal made by Le Veneziane.  Now, I have had Le Veneziane products before and have always been impressed, so I was quite happy to see this company included in the box.  I had no idea they made microwavable pasta meals.  The things you learn!

Le Veneziane corn pasta is actually a very great choice for people trying to stay healthy and for people who follow the Mediterranean Diet.  Why?  It has a very low fat content.  How about that?  Le Veneziane is now one of the most modern companies using high-quality corn and producing amazing gluten-free pasta, polenta, sauces, and cookies.  They put out a high quality product because they believe in using the highest quality ingredients from flour and corn.  It is milled properly and kept in the right conditions to make sure that nothing, including being 100% gluten free, is compromised.  Love that integrity and devotion.

So, last night after a very busy day that included breakfast at my favorite gluten-free bakery and lunch of gluten-free crepes from my favorite food truck at a festival…I wanted something light for dinner.  This was ideal because my roommate and I could split it and it would be the perfect amount.  To accompany it, I made some homemade gluten-free dinner rolls (even though I was so tempted just to grab some out of the freezer section).  So, while the rolls were cooling, I went ahead and opened up the Le Veneziane Microwavable Gluten Free Penne Al Pomodoro E Basilico Pasta Express.  Inside was a microwaveable dish that I peeled the top off of and a measuring cone so that I could get exactly 300 ml of water as directed by the instructions.  The corn pasta in the container was perfect.  It had this deep red-brown powder inside too.  And when I added the water and mixed it well, everything got this muddy brown color.  I hoped for the best and popped it in the microwave for 10 minutes.

Le Veneziane Micrwavable Gluten Free Penne Al Pomodoro E Basilico Pasta Express (cooked)

When 10 minutes elapsed, I pulled the tray out of the microwave, a little put off by the brownish color of the sauce.  But, I gave it a stir and then dished up half to my roommate and half for me, giving us each a dinner roll to have with it.  When I handed her the bowl she said, “That’s an interesting color sauce.”  HAHA!!  Everyone was thinking it; she just said it aloud.

Well, despite the rich brown color of the sauce, the Le Veneziane Microwaveable Gluten Free Penne Al Pomodoro E Basilico Pasta Express was actually very delicious.  I shouldn’t have doubted it.  The sauce was thick and rich with a tomato flavor that was peppered with the right hit of basil.  It was really quite delicious.  The pasta, despite being nuked in a microwave, were cooked to that perfect al dente.  The homemade rolls made the perfect side item for this meal.  And even eating just half of the dish itself was more than enough.  Very filling.  But very, very good.  I don’t know where to find more of the microwave meals from Le Veneziane, but I will keep my eyes open for them now.  It’s nice to have a delicious and healthy meal in 10 minutes sometimes.

So, let’s talk about ingredients, shall we?  The Le Veneziane Microwaveable Gluten Free Penne Al Pomodoro E Basilico Pasta Express pasta is made from corn flour, emulsifier, and the sauce is made from tomato, cream, salt, melted cheese powder, onion, garlic, basil, and sugar.  This is 100% gluten-free.

As for the nutrition information, the Le Veneziane Microwaveable Gluten Free Penne Al Pomodoro E Basilico Pasta Express portion is 1 pack.  In this serving, you will be taking in 350 calories and 7 grams of fat, 10 mg cholesterol, 820 mg sodium (um…yikes!), 64 grams carbohydrates, 4 grams fiber, 3 grams sugar, and 8 grams of protein.  See what I mean…it’s filling.  And delicious.

I want to thank Cuisine Cube for letting me try a new product from Le Veneziane that I didn’t even know existed.  I’ll be on the watch now for more microwavable pasta meals by this great Italian company.

Half of a serving of Le Veneziane Gluten Free Microwaveable Penne Al Pomodoro E Basilico Pasta Express with a homemade gluten-free dinner roll

Product Review: Mina’s Purely Divine Gluten Free Bread Mix + Recipe Bonus

Mina's Purely Divine Gluten Free Bread Mix
Mina’s Purely Divine Gluten Free Bread Mix

Product: Mina’s Purely Divine Gluten Free Bread Mix – $5.79+

It was Easter Sunday and I woke up early.  I haven’t been sleeping well due to bouts of chronic pain in my back and hip.  So, I got out of bed and came out to the living room to do my stretches assigned to me by my physical therapist.  It was as I started doing these that I thought to myself:

“Self…what are we having for breakfast this beautiful Easter morning?”

Since I am currently in a state of no running at all…I had plenty of time to come up with something.  And for some strange reason, I recalled having two bags of Mina’s Purely Divine Gluten Free Bread Mix in my pantry.  I bought these and a chocolate cake mix (which I have used already and didn’t review because I never tried the finish product…I made it for someone else…so now I have to purchase another bag) on Manager’s Special at my local grocery store…for $1.99.  How fantastic is that?

I knew very little about the Mina’s Purely Divine products when I bought them, just that I had seen them featured in ads in my gluten-free magazines.  That was the only familiarity I had with them.  So, with the recollection and the realization that I had two pouches of the Gluten-Free Allergen-Friendly Bread Mix in my pantry…I thought…

Bagels.

Because when I already fail at baking up gluten-free bread more often than I succeed…why not bake bagels.  Because that is SO much easier! *SARCASM*

That being said…I had it in my head now to make them.  It was going to either end well…or be a complete and epic fail.  It wouldn’t be my first.  So, while the roomie was still slumbering in her room…I went into the kitchen and plucked one of the bags of Mina’s Purely Divine Gluten Free Bread Mix off the shelf and set out to work.

Long story short…for my first time making bagels (and gluten-free bagels at that!)…this worked wonderfully.  They didn’t rise as much as I had hoped they would, but they did rise some in the 30 minutes I gave them to just sit.  I think next time I’m going to try the oven on warm thing that a friend suggested and see if it makes any sort of distance.  They held up to boiling in the water and even the actual baking.  Totally impressed.  But the real challenge was going to be in the taste.

By the time the bagels were in the oven and baking (given a little bit of egg wash over the top and a sprinkling of the “everything spice” that I picked up in Charleston, SC, the roomie had emerged and was ready for some brekkies.  I told her that breakfast was currently in the oven…and I would have it ready once the timer went off.  It was already starting to smell amazing, so when she asked what it was, I actually told her.

Bagels.

She looked really surprised.  “You made bagels?!”  You see…she has suffered through more than one epic gluten-free homemade bread loaf fail…so I wasn’t insulted at all.  I nodded and as I pulled them out of the oven, called her over to take a look.  They were perfectly golden on the outside.  Fresh and hot out of the oven, I didn’t want to slice into them so just put some vegan cream cheese in a bowl and said we’d dip (kind of how I used to eat soft pretzels).  So, onto some plates the bagels went while the rest cooled on the pan.  I handed a plate and bowl of the cream cheese over to her and went to get my own.  She started her cry of “hot, hot, hot!” as she broke it open and steam from the fresh bagels swirled up from the little breakfast goodie.  She took a bite and said, “It tastes like a bagel!”

Now, she’s had Everything Bagels from some of the top-flight bakeries in New York City…and she seemed quite content to dive into my first attempt at ever making bagels.  Trust me…she’s quite the critic and if she doesn’t like something…she’ll say so.  But she thought the texture and the flavor were spot on.  And after I got settled to try it for myself…I totally agreed.  As a New Yorker, bagels were a way of life growing up.  I still love them, but am often relegated to getting the frozen versions from Udi’s (as they are the only gluten-free bagels outside of Jennifer’s Way in NYC that have come close to tasting like the real thing!)…which is fine in a pinch.  But these…these were mine.  And they wouldn’t have been possible without Mina’s Purely Divine Gluten Free Bread Mix, for sure.

Truth…I can’t wait to make these again with the other batch.  Maybe get a bit more rise out of them so that middle gets all fluffy and amazing.  Cathy said these were very reminiscent of the ones we ate at Jennifer’s Way back in March, which I took as a high compliment as my first bite of one of Jennifer’s Way bagels made me cry.  Good tears.  This mix worked beautifully and made amazing bagels.  Talk about taking a risk and having it pay off in the end.

Let’s discuss the ingredients in Mina’s Purely Divine Gluten Free Bread Mix.  This mix is made up of organic rice flour, potato starch, organic cassava starch, organic sorghum flour, arrowroot starch, rice flour, teff flour, sea salt, yeast, xanthan gum, and guar gum.

As far as nutrition goes, the Mina’s Purely Divine Gluten Free Bread Mix contains about 13 servings, with each serving being about 1/4 cup.  A serving will provide 100 calories, 0 grams of fat, 0 mg cholesterol, 50 mg sodium, 23 grams carbohydrates, 4 grams of sugar, 1 gram fiber, and 1 gram protein.  That’s really good for a bread mix.  I am very impressed.

If you have access to Mina’s Purely Divine Gluten Free Bread Mix…and feel like taking on a challenge, go ahead…whip up your own homemade gluten-free bagels!!  You’ll be very impressed with the results.

Recipe: Gluten Free Everything Bagels

Gluten Free Everything Bagels made with Mina's Purely Divine Gluten Free Bread Mix
Gluten Free Everything Bagels made with Mina’s Purely Divine Gluten Free Bread Mix

Servings: 6-12 (I made 8 good-sized bagels!)
Time: Prep 1 hour; Bake 18-20 minutes

Ingredients:

  • 1 package, approx. 2⅔ cups Mina’s Purely Divine Gluten Free Bread Mix
  • 1 cup warm water
  • 2¼ tsp yeast (included)
  • 1 tsp + 1 Tbsp sugar, divided
  • 2 tsp vegetable oil
  • 2 Tbsp molasses
  • 3 quarts water
  • 1 egg white, whisked (optional)
  • sesame or poppy seeds for toppings (optional)

Directions:

Add to mixer bowl, 1 cup warm water, 1 tsp of sugar and the yeast. Whisk and let rest for 10 minutes.

Add to yeast mixture: 1 cup of bread mix, the rest of the sugar, the oil, the molasses, and mix well.

Add last 1-2/3 cups of bread mix. Mix on medium high for 5 minutes.

Scrape out on a lightly oiled surface. Form dough into a log. Cut into 6 large or 12 small pieces. (I went for the middle and did 8 perfect size pieces). Roll each piece with lightly oiled hands into a 6″ rope. Shape in a circle, crimping edges.

Arrange bagels on parchment paper. Cover with oiled plastic wrap. Let rise in warm draft free area for 30 minutes. Dough will be tender at this point after the initial rise.

Preheat oven to 450 degrees F.

Bring 3 quarts of water to a slow boil. Gently using oiled hands, or spatula, drop each bagel, one at a time, into the water. Boil in small batches, do not crowd. Simmer for 30 seconds on each side, flip over once. Drain on rack for 5 minutes.

Brush with whisked egg white (optional) and sprinkle the toppings on at this point, if using.

Bake on a lightly greased cookie sheet for 20 to 25 minutes for large bagels and 15 minutes for small bagels. (It took mine 18 minutes…so if you do 8…go with that!)

Cool on rack.

DEVOUR!

~*~*~

I was so impressed with the way Mina’s Purely Divine Gluten Free Bread Mix baked up perfect, delicious bagels. And with this being my first time ever attempting such a culinary feat…well…it just made me want to improve on it.

That being said…WOW!!  Total and complete WOW!!  Find Mina’s Purely Divine Gluten Free Bread Mix and, seriously, give this recipe a try.  I am dying to do it all over again!  Maybe even improve on it some.  We shall see!

Mina’s Purely Divine is purely amazing, purely awesome, and…yes…purely divine!  Just WOW!

Product Review: Glutenfreeda Gluten Free Roasted Garlic Artisan Flatbread and Pizza Crust

Glutenfreeda Gluten Free Roasted Garlic Artisan Flatbread and Pizza Crust

Product: Glutenfreeda Gluten Free Roasted Garlic Artisan Flatbread and Pizza Crust – $6.99+

If nothing else, this blog post is to remind you about how much I love pizza.  Pizza is the ultimate food to me.  Seriously.  It satisfies every food craving I really have.  Except maybe chocolate.  But I’ve been cutting way back on that, except for an every-now-and-again 1 ounce dark chocolate treat.

But I digress.

Back to the pizza.  Anyway, I have a myriad of gluten free pizza crust mixes that have worked and not worked in the past.  I’ve tried just about every gluten-free pizza shell out there.  If gluten free pizza is on the menu at a restaurant…you better believe that’s what I’m ordering.  Pizza…is perfection to me.  Food perfection.

It’s my go-to pre-race (half marathon or over) meal, which somehow equals out to the perfect amount of fats, carbs, and protein for me to perform at the top of my game.  Trust me, I’ve tested this numerous, countless times.

So, imagine my glee when I was on a miniature shopping spree at The Raisin Rack in Columbus, Ohio, and came across the Glutenfreeda Gluten Free Artisan Flatbread and Pizza Crusts in their freezer section.  I was beyond elated.  Seriously.  They come in four flavors, so I knew I was going to take one home with me, it was a matter of narrowing it down to which one.  The Glutenfreeda Gluten Free Artisan Flatbread and Pizza Crusts come in Sun-Dried Tomato & Herbs, Roasted Garlic, Original, and Parmesan and Asiago.

I love garlic…so I went right for the Roasted Garlic flavor.

Now, I had no intention of letting these linger in my freezer for as long as they did.  I swear to you.  However, that being said, they did.  I just had fresh produce and other, older products to work through first.  That being said, yesterday was a good day.  I guess the Gluten Free Pizza Bites I ate after the soccer match on Saturday got my tastebuds craving more, because both my roommate and I were really wanting pizza.

But I can’t just make any pizza, you know.  I had some fresh produce that needed to be used, so I thought…Brussels sprouts on a pizza.  That could rule.  But what to pair it with?  Vegan and gluten-free bacon.  Perfect.  What else?  Bar-b-que sauce, of course!  Add a bit of sauteed onion and it would definitely be a nice change of pace for a pizza.  After all, who does Brussels sprouts on a pizza?

I DO!

Glutenfreeda Gluten Free Roasted Garlic Artisan Flatbread and Pizza Crust

And thanks to having the Glutenfreeda Gluten Free Roasted Garlic Artisan Flatbread and Pizza Crust in my freezer…I could indulge in my pizza craving without hassle or going to my grocer’s freezer section for a pre-made one.  This one…this one would be all mine.

Super easy.  I preheated the oven with the pizza stone and took the frozen flatbread out of the freezer, defrosting it a little in the microwave.  Once the oven and stone were heated, I placed two flatbreads onto the stone and then topped it with some local barbeque sauce, some sauteed onions and Brussels sprouts, the vegan and gluten-free bacon, and then a bit of vegan cheese.  Into the oven it went for about 10-12 minutes, to allow the cheese to melt and the flatbread/pizza crust to get that perfect crispness on it (I hoped).

Well…it worked.  This was, perhaps, the most durable pizza crust that I can buy in a freezer section at the grocery store that I have ever had.  Most gluten-free pizzas are thin and fall apart if loaded up with toppings.  But because this is also a flatbread, Glutenfreeda has given it some more heft than most gluten-free crusts out on the market.  And, even though it was flavored, it didn’t overpower any of the toppings that went on it.  The crust toasted up beautifully and sliced into perfect triangles.  If using it as a sandwich bread…I’ve heard it can be a little thick for that, but it was perfect for the pizza.  And I’m totally looking forward to baking up another round of these tomorrow for dinner.  I have more Brussels sprouts, after all.  Glutenfreeda really impressed me with their Gluten Free Roasted Garlic Artisan Flatbread and Pizza Crust.

Let’s talk ingredients.  The Glutenfreeda Gluten Free Roasted Garlic Artisan Flatbread and Pizza Crust is made from water, brown rice flour, tapioca starch, potato starch, expeller pressed canola oil (non-GMO), psyllium powder, egg whites, evaporated cane sugar, yeast, teff flour, seasoning (natural roasted garlic flavor, dehydrated garlic, hydrolyzed soy protein, spices, and salt) flax seed, salt, cultured dextrose, xanthan gum, and citric acid.  It is wheat-free, cholesterol free, non-GMO, dairy-free, gluten-free, and contains no trans fats.

As for nutrition…a serving size is 1/2 of the flat bread.  I was using this as my meal, so I ate the entire flatbread.  As did my roomie.  However, if you stick to the serving size, you will be consuming 110 calories and 3 grams of fat.  You will be taking in 380 mg sodium and 0 grams of sugar.  Yes…no sugar.  LOVE.  In addition, you will be consuming 18 grams of carbohydrates, 3 grams of fiber, and 4 grams of protein.  This does make for a filling meal…but one that won’t break the calorie bank either as long as you are smart with your toppings.

I think, when I can’t pick up a pizza crust from my local gluten-free bakery, I need to find a local store that carries these.  Because I was beyond impressed with how it cooked, held up, and tasted.  Forget everything you think you know about frozen gluten-free pizza crusts.  Pick up a package (there are 4 flatbreads per package) of Glutenfreeda Gluten Free Artisan Flatbread and Pizza Crust (in any flavor…but Roasted Garlic is YUMMY!) and see for yourself.  It is amazing.  You’ll see!

Gluten-Free Brussels Sprout and (Vegan) Bacon Pizza on Glutenfreeda Gluten Free Roasted Garlic Artisan Flatbread and Pizza Crust

Product Review: Sophie’s Kitchen Breaded Vegan Coconut Shrimp

Sophie's Kitchen Breaded Vegan Coconut Shrimp
Sophie’s Kitchen Breaded Vegan Coconut Shrimp

Product: Sophie’s Kitchen Breaded Vegan Coconut Shrimp – $5.99+

Dear Sophie’s Kitchen:

I love you.  I love everything about you.  I love everything you develop and offer to the vegan and gluten free community.  Your products have gone from wowing me to astounding me.  Sometimes I go into something thinking that it will end up horribly wrong, but then…everything about it just seems right.

That was how I felt about the Sophie’s Kitchen Breaded Vegan Coconut Shrimp.

For the record, back when I used to eat seafood (and other meats)…shrimp was my favorite thing in life.  However, that being said, I never developed a taste for coconut shrimp.  I don’t know why…but that was the case.  It disgusted me.  So, why, then, was I ever tempted to even purchase a vegan version of a seafood I didn’t like?  I have no clue.  No answer.  Nothing except that I get really excited when I see new products from a beloved and trusted company, and that is the case with Sophie’s Kitchen.  I have loved everything from the Fish Filets to the Crab Cakes to the Calamari to the Shrimp and Prawns.  Love.  Just lots of vegan seafood love.  I went into it nervous and a little bit concerned and found out that sometimes, the vegan version from Sophie’s Kitchen is even better than I remember the original and actual seafood version being.

Talk about amazing, right?

So that…my dearest readers…has to be why I picked up a box of the Sophie’s Kitchen Breaded Vegan Coconut Shrimp.  I got new product happy.  I couldn’t help it.  It was in my freezer for awhile…just begging to be made.  And with a little determination to clear out items that I’ve been hoarding in my freezer/pantry/fridge…I made sure that this box of vegan seafood got used this weekend.  Enter…Sunday night.

My roommate was craving shrimp po’boys.  She told me so.  And she reminded me of the box of vegan coconut shrimp in the freezer.  I told her that I was a little bit nervous about those as I never liked coconut shrimp to begin with…but she insisted.  Po’boys.  Besides…one more item out of the freezer.  So, Saturday night, I pulled the shrimp out of the freezer and placed it in the fridge to thaw.  I finished up grocery shopping (and discovered my local store stopped carrying the gluten-free sandwich rolls…so I had to purchase gluten-free hotdog buns…which are SO not the same!) and came home to a fun afternoon of hanging out with my downstairs neighbors, eating gluten-free lemon chiffon birthday cake (I made it…as my roomie requested it for her birthday and that happened while we were in New York City), cleaning up the apartment, getting laundry done, and taking a nice walk in the beautiful weather.  We were both ready for dinner soon after 5 p.m.  And Sophie’s Kitchen makes it a breeze.

While my makeshift sandwich rolls (aka: hotdog buns) toasted in the oven, I prepared a sweet chili aoili to put on top of the sandwich itself.  I sliced up some grape tomatoes and washed a mixture of various super greens (kale, spinach, arugula).  Then, as the hotdog buns were finishing up in the oven, I put a spoonful of coconut oil into a hot pan and gave a quick pan fry to 12 of the Sophie’s Kitchen Breaded Vegan Coconut Shrimp.  I mean, coconut oil just seemed logical to me.  I allowed them to cook on one side for about 3 minutes, then flipped them over to find them a perfect golden brown on the side that had cooked through.  So, I did the same on that side, then removed them to a paper towel and began to assemble the po’boys.  A little Veganaise…the greens, the tomatoes, the vegan shrimp, then the aoili to top it all off.  It all came together so well…even if the bread was a bit of a challenge.

Okay…so I ate a bit of the shrimp on its own first.  Why?  Because I needed to taste it without my drizzle of aoili on it.  Guess what?  My tastebuds lit up.  And I was amazed with how much I loved this flavor.  Honestly…the texture was meaty and perfect…with the crispiness of the breading on the outside and the soft vegan shrimp on the inside.  There was this nice sweet kick in the breading that I absolutely adored.  And sort of wished I was eating these outside of the actual sandwich itself.  Both my roommate and I saved a shrimp to eat alone.  Sophie’s Kitchen definitely did it once more and let me know that I can, in fact, love coconut shrimp.  Either tastes change or, more likely, they just do it better than the real thing.  But, I devoured this faster than any other product I’ve tried from Sophie’s Kitchen.  Big, big love!!

So…what exactly is vegan seafood made from?  Well, the Sophie’s Kitchen Breaded Vegan Coconut Shrimp is made from water, konjac powder, pea protein, potato starch, coconut powder, rice flakes (from brown rice), canola oil, paprikia, fenugreek, organic agave nectar, sea salt, turmeric, white pepper, alginate (from seaweed), and calcium hydroxide.  Is it clean eating…nope.  Not even close.  But…it’s not too bad as processed, frozen products go.  Not at all.  These are soy-free, vegan (100% plant based), non-GMO, gluten-free, contain no artificial preservatives, no artificial colors, no MSG, they are free of trans fats, and they are cholesterol free.  These also contain no added sugar.  Nothing about them is artificial.  Nothing.

So, let’s talk nutrition.  A serving of Sophie’s Kitchen Breaded Vegan Coconut Shrimp is 4 pieces of shrimp.  This serving will provide you with 130 calories and 10 grams of fat.  This serving also gives you 150 mg sodium and 1 gram of sugar.  A serving will give you 12 grams of carbohydrates, 3 grams of fiber, and less than one gram of protein.  You’ll feel full, but mostly due to what you pair it with.  In this case…I made it into a sandwich…and that definitely gives it a dinner heft that kept me full until the next morning.

Once again, blown away by how much I am loving the products that come from Sophie’s Kitchen.  Seriously, if you turned vegan, vegetarian, or are gluten-free and want some breaded “seafood”…I encourage you to seek out Sophie’s Kitchen and try it.  Take it from me…you’ll fall in love with the products.  If Sophie’s Kitchen can make me fall in love with coconut shrimp…imagine what it can do for you.

I’m so glad to be dining on this once more tonight.  Beyond YUM!

Sophie's Kitchen Gluten Free Coconut Shrimp in a Gluten Free Vegan Coconut Shrimp Po'Boy
Sophie’s Kitchen Gluten Free Coconut Shrimp in a Gluten Free Vegan Coconut Shrimp Po’Boy

Product Review: gfJules Cornbread Mix + Recipe Bonus

gfJules Gluten Free Cornbread Mix

Product: gfJules Cornbread Mix – $6.26+

I am a stranger in a not so strange land.  Seriously.  Because for the past three three years that I’ve had to be gluten-free…I’ve followed, discussed, and even met the infamous Jules Shepard, AKA: Jules Gluten Free, AKA: gfJules.  And, despite all of that…it has taken me up until now to actually try one of her products!  Hard to believe, right?  Truth of the matter is…no store in my area currently carries any of the Jules line.  I hope that changes.

So…it was due to my November 2014 Cuisine Cube (aka: the Thanksgiving Cube) that my Jules drought finally came to an end.  Thank you, Cuisine Cube.  Because, honestly, I was beginning to wonder if I was ever going to be able to give this an easy try, without it involving some online ordering and shipping and…yeah.  So, yes, Jules brand is not new to me…but it is.  Confused yet?  Don’t be.

Jules Shepard is one of the biggest advocates and leaders that I know in the gluten-free community.  She was diagnosed with Celiac back in 1999 and embarked upon her new diet.  As a former attorney who was unwilling to accept the dry, gritty, vacuous foods that the gluten-free community was limited to.  Two years later, Shepard perfected an all-purpose flour blend that allowed her to continue her passion for baking.  Soon, people were begging for her to sell it commercially…which she did.  She introduced this flour blend back in 2008, with her former company, Jules Gluten Free, and now exclusively through her new company – gfJules.  Not only is she an entrepreneur, but Shepard has written three highly regarded books and attends various speaking engagements at gluten-free consumer, business, and trade gatherings.  She is the mother of two children, hosts a weekly radio show, pens one of the gluten-free community’s most active blog, organizes an annual Gluten Free Cookie Swap, and personally monitors all forms of her social media network.  She’s doing it all…but not letting her high standards slip in the slightest.

So…here I was, three years after having discovered Jules via Facebook and Twitter, having met her in person last year at a Gluten Free Expo in Indianapolis, Indiana, and having spent forever longing to try her flour and mixes…it finally happened.  Thanksgiving.  A time for giving thanks and eating comforting and hearty foods.  Like…cornbread.  And that is what Cuisine Cube sent me!

gfJules Cornbread Mix (prepared)
gfJules Cornbread Mix (mixed)

The gfJules Gluten Free Cornbread Mix is a gluten free cornbread mix that “will put a smile on anyone’s face.”  Or, so I was told by the Web site.  As cornbread is one of Jules’ favorite sides, she took extra care when she crated this mix, making it so authentic, some restaurants even serve it and don’t promote it as being gluten-free.  It’s really easy to prepare and make too.  Simply whisk together sour cream, milk and an egg.  Stir in the mix using a fork or whisk until smooth. Spread into a hot buttered pan (or into muffin cups) and bake for 25-30 minutes.  The cornbread is done when the edges are crispy and brown and a toothpick inserted in the center comes out clean.  That is…if you bake it according to the instructions on the box.

By now, you should know…that’s not what I do.

Before I get to the recipe I used this amazing product in, let’s discuss it, shall we?

I loved how a light and airy this batter was once I had it all mixed together.  It just whisked up beautifully and perfectly.  I had a good feeling that this wasn’t going to bake up heavy and dense like most gluten-free cornbread…and I was right.  The cornbread turned a perfect golden in the oven, the edges browning perfectly.  And it had this amazing crust that gave it some great texture.  And the inside was light and soft and moist and…so good.  It ranks up in my top gluten-free cornbreads I have made and tried.  I am blown away by just how delicious and perfect this bread was.  Now I want to try more of her mixes…and will have to skip over to her Web site and make it happen. This was one of the best parts of this entire dish.

gfJules Cornbread Mix (prepared, not baked)

The gfJules Cornbread Mix is made from the following ingredients: yellow cornmeal, modified tapioca starch, cane sugar, potato starch, cornstarch white rice flour, corn flour, baking powder, flaxseed meal, xanthan gum, baking soda, salt, tocopherols (vitamin E).  It is made in a certified facility free of gluten, wheat, dairy – all of the Top 8 food allergens.  All her ingredients in the cornbread mix are also non-GMO.  Love it.

The gfJules Cornbread Mix makes 8 servings per box.  In each serving, you will be provided with 160 calories and 1 gram of fat.  This serving will give you 490 mg sodium and  5 grams of sugar, which is really good for cornbread, if you ask me!  And, finally, you will be taking in 2 grams of fiber and 2 grams of protein.

And now…how about the recipe that featured the always amazing gfJules Cornbread Mix?  I won’t keep you waiting any longer, I promise…

Recipe: Gluten Free and Vegan Cheddar Chili Cornbread Pasta Bake

gf Jules Cornbread (prepared) on top of the Gluten Free and Dairy Free Cheddar Chili Cornbread Pasta Bake

Servings: 6
Time: Prep 4 hours; Cook 30 minutes

Ingredients:


  • 1-1/2 cups uncooked gluten-free elbow noodles (I used Meijer Gluten Free Corn Pasta Elbow Noodles)
  • 3/4 cup Daiya Cheddar Style Shreds (if you do dairy…freshly shredded cheddar works!)
  • 2 1/2 – 3 cups of leftover chili (I used Mary Ann’s Beans Gluten Free White Chili)
  • 1 batch of your favorite cornbread (I used gfJules Cornbread)


Directions:

Preheat oven to 425° F.

Bring  the water to a boil and prepare the pasta according to the directions on the package, taking about 1-2 minutes off of the cooking time, as the noodles are going into the oven.

While the noodles are cooking, mix up a batch of your favorite cornbread (just the batter…do not cook it!) and get the cheese prepared.

Drain the pasta when it’s ready.

In an 8 x 8 inch baking dish, spray non-stick cooking spray.  Add the pasta to the botom of the dish.  Then top it with a layer of cheese.  Then add the chili.  Top with the cornbread batter, spreading it evenly over the top with a spoon.  It’s okay if it doesn’t reach the edges.

Bake for 30-35 minutes, or until the cornbread is golden on top and cooked all the way through.  You can use a spoon to lift up the cornbread layer to make sure that it is completely cooked.  Cooking times may vary with the cornbread mixture you use, but keep an eye on it and check it.  The cooking time might increase due to the “wet” layers that are underneath the layer.

Serve immediately.

~*~*~

I don’t think a better upper crust could have existed.  No doubt about it.  gfJules lives up to the high pedestal that I have regarded it on since I first discovered Jules Gluten Free three years ago.  So happy that, because of Cuisine Cube, I finally got to try one of her amazing products.  It was everything I thought it would be.  Maybe even more.  Count me one happy cornbread loving girl!

And, if you have yet to give gfJules a try, or Cuisine Cube for that matter…head over to the Cuisine Cube page and sign up for at least a month.  If you aren’t impressed (but, trust me, you will be), you can opt out after that.  With plans starting as low as $29.99/month for each cube, you get the convenience and amazing pleasure of having box of gluten-free goodies arrive each month, featuring lesser-known and smaller gluten-free artisan products.  I have been amazed, wowed, and completely blown away at times by the items I have had the opportunity to find out about and try thanks to Cuisine Cube.  We aren’t talking sample sizes either…you get a full size product, as you would purchase it in the store.  So…what are you waiting for?  Go sign up!

And, gfJules…I loved meeting you this past year…and I have really enjoyed finally getting to try one of your outstanding and top-of-the-line gluten-free products.  I hope more people hop over to your site and order.  Now that I have tried it…there’s no stopping me now!


Product Review: Mary Ann’s Beans Gluten Free White Chili Mix + Recipe Bonus

Mary Ann's Beans Gluten Free White Chili Mix
Mary Ann’s Beans Gluten Free White Chili Mix

Product: Mary Ann’s Beans Gluten Free White Chili Mix – $8.00

It’s the New Year.  Time to make resolutions and then, over the course of a month…break them.  Right?  Yes.  Right.  It’s the way it works every year.  You vow to stop eating chocolate…to go to the gym…to eat more vegetables and less potato chips.  You promise to get into a habit…make it a routine.  But then…by MLK Day…you’re already off the wagon.

And you know what?  That’s okay.  We’re in the midst of winter here.  Cold temperatures and lack of sunlight have a funny way of killing off any bit of motivation out there.  We’re human.  It happens.  But, it’s also okay to enjoy the little things in life and to be less strict with yourself.  Resolutions can be broken…but they can be picked right back up on where we left off.  That’s the best part.

Being that it is January…and the New Year has come and gone…and the weather outside is frightful(ly cold)…I’m a lover of all things comforting when it comes to food.  Tis the season for those hearty meals that make you just want to curl up with a good book in front of the fireplace and dig in while losing yourself.  Ah…it’s a wonderful thing.  And, when it comes to winter comfort foods…nothing is better than soups, stews, chili, and pasta, right?  Of course!!  Those are classic comfort foods if you ask me.

Well, in the January Happy New Year 2015 Cuisine Cube, we were served up a few products that were good for you…but also a guilty pleasure and comfort.  That’s the wonderful thing about Cuisine Cube…you just never know what to expect from one box to the next.  One cube guarantees a product that is good for a breakfast, lunch, snack, dinner and dessert.  And sometimes, like in the case of January, you get a bonus item.  In this case…another snack.  YAY!

I know, if you’re reading this blog regularly, you are familiar with the service that Cuisine Cube offers…but just in case you are a newbie…first of all…welcome.  Secondly…hop on over to Cuisine Cube’s Web site and take a look at this fantastic service.  This small group of foodies put together a completely gluten-free box of goodness each month with 5-6 products from small, lesser-known artisan producers…some local…some not-quite-so-local.  I’ve discovered so many amazing products after I signed up for this service back in May.  And…you get a cube delivered right to your door each month…starting at $29.99.  So, yeah…I encourage you to check them out.  Have a little surprise each month and enjoy a few products you might never have tried or known about before.  It doesn’t get much better than that.

With that said, the January Cube was packed with a lot of healthy foods.  Seriously.  The dessert was dark chocolate covered rice cakes.  Yes, there will be blog on those soon…stay tuned.  Even the most comforting of foods inside…is healthy-ish!  And I’m okay with this.  But…I’m also dealing with a bit of the winter blues…so when I saw the unassuming cloth pouch of Mary Ann’s Beans Gluten Free White Chili Mix…my brain immediately turned to comfort food.  And with that, I set out to do more than just make the chili and eat it.  You know, reinventing a product is something I love to do.

First, let me talk a little bit about Mary Ann’s Beans.  Chili can be comfort food, but Mary Ann’s Beans is making it a part of a healthy lifestyle.  All of the soup and dip mixes are nutritious and low in sodium.  They have options for vegetarians, gluten-free, and offer all seasoning mixes that are made with no salt, no sugar, and no MSG.  In other words…it’s good for you.  And these soups tastes great too.

Mary Ann's Beans Gluten Free White Chili Mix (dried beans and seasoning packet)
Mary Ann’s Beans Gluten Free White Chili Mix (dried beans and seasoning packet)

Make Mary Ann’s Beans part of your heart healthy lifestyle with our delicious and nutritious low sodium soup mixes. With flavors to please every palate, and options including vegetarian and gluten-free, your whole family will love our soups. Our all natural soup, dip and seasonings mixes are hand made with no salt, no sugar, and NO MSG.  Mary Ann’s Beans most famous mix is the Gluten Free White Chili Mix that was in the January Cuisine Cube.  And, honestly, I can see why!!  These mixes do take some time to make, but, trust me…it’s well worth it.

Mary's Ann's Beans Gluten Free White Chili Mix (beans soaked)
Mary’s Ann’s Beans Gluten Free White Chili Mix (beans soaked)

Last night, I soaked the packet of dried white beans in water.  I drained them and rinsed them.  And then…set out to cook them.  The instructions included on this chili mix package give two ways to cook it…in a slow cooker for 6-8 hours or…on the stove top for 3-4 hours.  I went with the stove top method.  And making this chili is super easy.  The actual instructions do call for chicken, as it is a white chili.  But, as a vegetarian, I just left it out and kept it strictly the beans and the can of chopped green chilies.  I used Vegetarian No-Chicken Broth as well, instead of chicken broth.  Cooking it is time consuming, but it yields amazing results.  With the stove top method, you simply combine the white chili beans, 6 cups of broth (vegetable, non-chicken, chicken…), a 4 ounce can of chopped green chilies, 1-1/2 – 2 cups of boneless cooked chicken (if you are using…if you are a vegetarian like me…it’s fine to leave it out!), and the contents of the spice packet that is included, into a large pot and bring it to a boil.  Reduce the heat, cover, and allow it to simmer for 3-4 hours, or until tender.  I let mine go for about 3-1/2 hours and it was perfect.  Add a bit of salt at the end voila…your chili is ready to eat.

What emerges is this hearty and thick chili that has this light, and slightly spicy taste to it.  White chili is amazing, even without the chicken, and it makes for a beautiful and eye-catching addition to any potluck or chili cook-off.  But I was not just going to cook up this fantastic product and just eat it straight.  You know better than that.  I did, however, take a few spoonfuls to see how it was.  And, let me tell you, Mary Ann’s Beans is doing comforting winter food right.  The flavor is familiar…the texture is hearty and rich…and the spice is a mild heat.  If you like hotter (I do), you can put in jalapenos instead of chilies, but my roommate isn’t a lover of spice, so I kept it mild.  At the end of cooking, I added some salt and a hit of berbere seasoning…and it made pure chili perfection.  If you love chili…you will love this.

Mary Ann's Beans White Chili Mix (prepared)
Mary Ann’s Beans Gluten Free White Chili Mix (prepared)

Let’s talk ingredients, shall we?  Mary Ann’s Beans White Chili Mix is made from great northern beans, navy and yellow eyed beans, dried onions, garlic and spices.  As stated before, these are gluten-free, contain no salt, no sugar, and no MSG.  This mix is also cholesterol free.

One pouch of Mary Ann’s Beans Gluten Free White Chili Mix contains about 6 servings.  One serving will give you 190 calories and 1 gram of fat.  A full serving will also dish up only 10 mg sodium and 1 gram of sugar.  As for being filling…it’s chili…it will be filling.  You get 13 grams of fiber and 12 grams of protein in each serving.  I do love hearty, nutritious, comfort food.  And this is all of that rolled into one.

But wait…there’s more!!  I created an amazing (vegan and gluten-free) ultimate comfort food dish using the prepared Mary Ann’s Gluten Free White Chili Mix.  Trust me, your winter blues will disappear while you dive into this dish.

Recipe: Gluten Free and Vegan Cheddar Chili Cornbread Pasta Bake

Gluten Free and Vegan Cheddar Chili Cornbread Pasta
Gluten Free and Vegan Cheddar Chili Cornbread Pasta Bake

Servings: 6
Time: Prep 4 hours; Cook 30 minutes

Ingredients:


  • 1-1/2 cups uncooked gluten-free elbow noodles (I used Meijer Gluten Free Corn Pasta Elbow Noodles)
  • 3/4 cup Daiya Cheddar Style Shreds (if you do dairy…freshly shredded cheddar works!)
  • 2 1/2 – 3 cups of leftover chili (I used Mary Ann’s Beans Gluten Free White Chili)
  • 1 batch of your favorite cornbread (I used gfJules Cornbread Mix)


Directions:

Preheat oven to 425° F.

Bring  the water to a boil and prepare the pasta according to the directions on the package, taking about 1-2 minutes off of the cooking time, as the noodles are going into the oven.

While the noodles are cooking, mix up a batch of your favorite cornbread (just the batter…do not cook it!) and get the cheese prepared.

Drain the pasta when it’s ready.

In an 8 x 8 inch baking dish, spray non-stick cooking spray.  Add the pasta to the bottom of the dish.  Then top it with a layer of cheese.  Then add the chili.  Top with the cornbread batter, spreading it evenly over the top with a spoon.  It’s okay if it doesn’t reach the edges.

Bake for 30-35 minutes, or until the cornbread is golden on top and cooked all the way through.  You can use a spoon to lift up the cornbread layer to make sure that it is completely cooked.  Cooking times may vary with the cornbread mixture you use, but keep an eye on it and check it.  The cooking time might increase due to the “wet” layers that are underneath the layer.

Serve immediately.

~*~*~

Oh. My. Gluten. Free. Comfort. Food. Gods.  No…really.  If you love a hearty winter meal, this is the way to go.  I loved the rich flavors that the Mary Ann’s Beans White Chili brought to the dish.  It was the centerpiece…the middle layer…the glue.  And it was an absolutely amazing addition to this entire dish.  When winter has you hiding under the blankets longing for something warm and wonderful to eat…this will definitely fulfill that desire.  Either that…or a big, steaming bowl of just the chili on its own.  However you serve it up…flavorful, creamy, and just…so good!

It was thanks to the amazing products that Mary Ann’s Beans put out and Cuisine Cube sent me that I was able to piece together this hearty, and amazing dinner.  For the record, the gfJules Cornbread Mix (review to follow) is also a product I received from Cuisine Cube in November.  So, as you can see…it is definitely a service worth trying out.  Seriously, your inner foodie will thank you for it.